
Client Support Documentation
October 3, 2019
1
.
Contents
Welcome to GymMaster Software 8
GymMaster Contact Information 8
Dashboard 12
Staff Access Rights . . . . . . . . . . . . . . . . . . . . . . . . . . . . . . . . . 12
User Administration . . . . . . . . . . . . . . . . . . . . . . . . . . . . . . . . . 12
Dashboard . . . . . . . . . . . . . . . . . . . . . . . . . . . . . . . . . . . . . . 12
Reports . . . . . . . . . . . . . . . . . . . . . . . . . . . . . . . . . . . . . . . . 12
Schedule . . . . . . . . . . . . . . . . . . . . . . . . . . . . . . . . . . . . . . . 13
Class Management . . . . . . . . . . . . . . . . . . . . . . . . . . . . . . . . . . 13
Add Class Attendees . . . . . . . . . . . . . . . . . . . . . . . . . . . . . . . . 13
Class Communication . . . . . . . . . . . . . . . . . . . . . . . . . . . . . . . . 13
Edit or Cancel Class . . . . . . . . . . . . . . . . . . . . . . . . . . . . . . . . . 13
Print Class Enrollment . . . . . . . . . . . . . . . . . . . . . . . . . . . . . . . 13
Building a Dashboard . . . . . . . . . . . . . . . . . . . . . . . . . . . . . . . . 14
Report Data . . . . . . . . . . . . . . . . . . . . . . . . . . . . . . . . . . . . . 14
Club Details 16
Club Details . . . . . . . . . . . . . . . . . . . . . . . . . . . . . . . . . . . . . 16
Logos and Branding . . . . . . . . . . . . . . . . . . . . . . . . . . . . . . . . . 16
Email Template . . . . . . . . . . . . . . . . . . . . . . . . . . . . . . . . . . . 16
Language, Time Zone, Formats . . . . . . . . . . . . . . . . . . . . . . . . . . . 16
Till Float . . . . . . . . . . . . . . . . . . . . . . . . . . . . . . . . . . . . . . . 16
Member Portal Redirect . . . . . . . . . . . . . . . . . . . . . . . . . . . . . . 16
Billing Provider Set Up . . . . . . . . . . . . . . . . . . . . . . . . . . . . . . . 16
Key Tag Sounds . . . . . . . . . . . . . . . . . . . . . . . . . . . . . . . . . . . 16
Maintenance Fee . . . . . . . . . . . . . . . . . . . . . . . . . . . . . . . . . . . 16
Staff Attendance 19
Staff Key Tags . . . . . . . . . . . . . . . . . . . . . . . . . . . . . . . . . . . . 19
Facility Hours and Access . . . . . . . . . . . . . . . . . . . . . . . . . . . . . . 19
Staff Check In / Out . . . . . . . . . . . . . . . . . . . . . . . . . . . . . . . . 19
Door, Resource Staff Availability . . . . . . . . . . . . . . . . . . . . . . . . . . 19
Timesheets . . . . . . . . . . . . . . . . . . . . . . . . . . . . . . . . . . . . . . 19
Timesheets . . . . . . . . . . . . . . . . . . . . . . . . . . . . . . . . . . . . . . 19
Staff Absence . . . . . . . . . . . . . . . . . . . . . . . . . . . . . . . . . . . . . 19
Adjustments . . . . . . . . . . . . . . . . . . . . . . . . . . . . . . . . . . . . . 19
Wages/Pay . . . . . . . . . . . . . . . . . . . . . . . . . . . . . . . . . . . . . . 19
Membership Settings 22
View Memberships . . . . . . . . . . . . . . . . . . . . . . . . . . . . . . . . . . 22
Add Memberships . . . . . . . . . . . . . . . . . . . . . . . . . . . . . . . . . . 22
Edit Memberships . . . . . . . . . . . . . . . . . . . . . . . . . . . . . . . . . . 22
Print Memberships . . . . . . . . . . . . . . . . . . . . . . . . . . . . . . . . . 22
View Division List . . . . . . . . . . . . . . . . . . . . . . . . . . . . . . . . . . 22
Membership Payment . . . . . . . . . . . . . . . . . . . . . . . . . . . . . . . . 22
Membership Lengths . . . . . . . . . . . . . . . . . . . . . . . . . . . . . . . . 22
2

Client Support Documentation GymMaster
Membership Age Restrictions . . . . . . . . . . . . . . . . . . . . . . . . . . . . 22
Membership Cancellation Fee . . . . . . . . . . . . . . . . . . . . . . . . . . . . 22
Membership Lengths . . . . . . . . . . . . . . . . . . . . . . . . . . . . . . . . 22
Discontinue Membership . . . . . . . . . . . . . . . . . . . . . . . . . . . . . . 22
Members 23
Add a Member . . . . . . . . . . . . . . . . . . . . . . . . . . . . . . . . . . . . 23
Add a Prospect . . . . . . . . . . . . . . . . . . . . . . . . . . . . . . . . . . . 23
Add Member Photo . . . . . . . . . . . . . . . . . . . . . . . . . . . . . . . . . 23
Purchase Key Tags . . . . . . . . . . . . . . . . . . . . . . . . . . . . . . . . . 23
Assign Key Tags . . . . . . . . . . . . . . . . . . . . . . . . . . . . . . . . . . . 23
Add SMS and Email Contact Function . . . . . . . . . . . . . . . . . . . . . . 23
Add Emergency Contact . . . . . . . . . . . . . . . . . . . . . . . . . . . . . . 23
Add Member Notes . . . . . . . . . . . . . . . . . . . . . . . . . . . . . . . . . 23
Member Overview Panel 24
Add a Member’s Photo . . . . . . . . . . . . . . . . . . . . . . . . . . . . . . . 24
Manual Check In . . . . . . . . . . . . . . . . . . . . . . . . . . . . . . . . . . . 24
View Visit History . . . . . . . . . . . . . . . . . . . . . . . . . . . . . . . . . . 24
Make a Booking . . . . . . . . . . . . . . . . . . . . . . . . . . . . . . . . . . . 24
Process a Point of Sale Purchase . . . . . . . . . . . . . . . . . . . . . . . . . . 24
Account Summary . . . . . . . . . . . . . . . . . . . . . . . . . . . . . . . . . . 24
Membership Summary . . . . . . . . . . . . . . . . . . . . . . . . . . . . . . . 24
Shared Member Accounts . . . . . . . . . . . . . . . . . . . . . . . . . . . . . . 24
Add Staff Members 25
Add a Staff Member . . . . . . . . . . . . . . . . . . . . . . . . . . . . . . . . . 25
Find a Member 26
Find a Member . . . . . . . . . . . . . . . . . . . . . . . . . . . . . . . . . . . 26
Find an Expired Member . . . . . . . . . . . . . . . . . . . . . . . . . . . . . . 26
Find a Cancelled Member . . . . . . . . . . . . . . . . . . . . . . . . . . . . . . 26
Find Recent Visitors . . . . . . . . . . . . . . . . . . . . . . . . . . . . . . . . . 26
Find a Prospect . . . . . . . . . . . . . . . . . . . . . . . . . . . . . . . . . . . 26
All Members . . . . . . . . . . . . . . . . . . . . . . . . . . . . . . . . . . . . . 26
Member Search Filters 27
Search Alphabetically . . . . . . . . . . . . . . . . . . . . . . . . . . . . . . . . 27
Search by Name . . . . . . . . . . . . . . . . . . . . . . . . . . . . . . . . . . . 27
Search by Join Date . . . . . . . . . . . . . . . . . . . . . . . . . . . . . . . . . 27
Search by Most Recent Update . . . . . . . . . . . . . . . . . . . . . . . . . . . 27
Search Filters . . . . . . . . . . . . . . . . . . . . . . . . . . . . . . . . . . . . 27
Member Details 28
Members vs Memberships . . . . . . . . . . . . . . . . . . . . . . . . . . . . . . 28
Membership Details . . . . . . . . . . . . . . . . . . . . . . . . . . . . . . . . . 28
Account and Billing History . . . . . . . . . . . . . . . . . . . . . . . . . . . . 28
Member Billing Details . . . . . . . . . . . . . . . . . . . . . . . . . . . . . . . 28
Member Communication History . . . . . . . . . . . . . . . . . . . . . . . . . . 28
View or Add Appointment Bookings . . . . . . . . . . . . . . . . . . . . . . . . 28
View or Add Measurements and Progress . . . . . . . . . . . . . . . . . . . . . 28
View or Add Personal . . . . . . . . . . . . . . . . . . . . . . . . . . . . . . . . 28
Page 3

Client Support Documentation GymMaster
View PT Programs . . . . . . . . . . . . . . . . . . . . . . . . . . . . . . . . . 28
View Training Schedules . . . . . . . . . . . . . . . . . . . . . . . . . . . . . . 28
View Member Questionnaires . . . . . . . . . . . . . . . . . . . . . . . . . . . . 28
Memberships 29
Current Memberships . . . . . . . . . . . . . . . . . . . . . . . . . . . . . . . . 29
Add a Membership . . . . . . . . . . . . . . . . . . . . . . . . . . . . . . . . . 29
Interclub Memberships . . . . . . . . . . . . . . . . . . . . . . . . . . . . . . . 29
Member Benefits . . . . . . . . . . . . . . . . . . . . . . . . . . . . . . . . . . . 29
Shared & Linked Memberships 30
Linked Memberships . . . . . . . . . . . . . . . . . . . . . . . . . . . . . . . . . 30
Shared Memberships . . . . . . . . . . . . . . . . . . . . . . . . . . . . . . . . 30
Gifted Times and Holds 32
Holds vs Gifted Time . . . . . . . . . . . . . . . . . . . . . . . . . . . . . . . . 32
Add a Hold . . . . . . . . . . . . . . . . . . . . . . . . . . . . . . . . . . . . . . 32
Hold Limits . . . . . . . . . . . . . . . . . . . . . . . . . . . . . . . . . . . . . 32
Add Gifted Time . . . . . . . . . . . . . . . . . . . . . . . . . . . . . . . . . . 32
Membership and Member Tag Actions 34
Manual Check In . . . . . . . . . . . . . . . . . . . . . . . . . . . . . . . . . . . 34
View Visit History . . . . . . . . . . . . . . . . . . . . . . . . . . . . . . . . . . 34
Stop At Gate . . . . . . . . . . . . . . . . . . . . . . . . . . . . . . . . . . . . . 34
Issue Additional Tags . . . . . . . . . . . . . . . . . . . . . . . . . . . . . . . . 34
Add Member Photo . . . . . . . . . . . . . . . . . . . . . . . . . . . . . . . . . 34
View Historic Addresses . . . . . . . . . . . . . . . . . . . . . . . . . . . . . . . 34
Update Passwords . . . . . . . . . . . . . . . . . . . . . . . . . . . . . . . . . . 34
View Linked Members . . . . . . . . . . . . . . . . . . . . . . . . . . . . . . . . 34
View Member’s Activity Log . . . . . . . . . . . . . . . . . . . . . . . . . . . . 34
Merge With Another Member . . . . . . . . . . . . . . . . . . . . . . . . . . . 34
Add Signature . . . . . . . . . . . . . . . . . . . . . . . . . . . . . . . . . . . . 34
Review Agreement Status . . . . . . . . . . . . . . . . . . . . . . . . . . . . . . 34
Login to Member Portal . . . . . . . . . . . . . . . . . . . . . . . . . . . . . . 34
View Member’s Billing Report . . . . . . . . . . . . . . . . . . . . . . . . . . . 34
View Member Account Summary . . . . . . . . . . . . . . . . . . . . . . . . . 34
Delete Member . . . . . . . . . . . . . . . . . . . . . . . . . . . . . . . . . . . . 34
Write Off or Zero Account Balance . . . . . . . . . . . . . . . . . . . . . . . . 34
Financial Configuration 35
Payment Methods . . . . . . . . . . . . . . . . . . . . . . . . . . . . . . . . . . 35
Add Payment Methods . . . . . . . . . . . . . . . . . . . . . . . . . . . . . . . 35
Billing Providers . . . . . . . . . . . . . . . . . . . . . . . . . . . . . . . . . . . 35
Tax Rates . . . . . . . . . . . . . . . . . . . . . . . . . . . . . . . . . . . . . . 35
Add Tax Rates . . . . . . . . . . . . . . . . . . . . . . . . . . . . . . . . . . . . 35
Tax Rate Components . . . . . . . . . . . . . . . . . . . . . . . . . . . . . . . . 35
Cash Drawer Values . . . . . . . . . . . . . . . . . . . . . . . . . . . . . . . . . 35
Accounting Lock Period . . . . . . . . . . . . . . . . . . . . . . . . . . . . . . . 35
Accounts 39
Add a Payment . . . . . . . . . . . . . . . . . . . . . . . . . . . . . . . . . . . 39
Prepay Membership . . . . . . . . . . . . . . . . . . . . . . . . . . . . . . . . . 39
Page 4

Client Support Documentation GymMaster
Make an Account Adjustment . . . . . . . . . . . . . . . . . . . . . . . . . . . 39
Refund Payment . . . . . . . . . . . . . . . . . . . . . . . . . . . . . . . . . . . 39
Reverse a Sale . . . . . . . . . . . . . . . . . . . . . . . . . . . . . . . . . . . . 39
Preview Billing . . . . . . . . . . . . . . . . . . . . . . . . . . . . . . . . . . . . 39
View, Print, Email Account Statement . . . . . . . . . . . . . . . . . . . . . . 39
View Account History . . . . . . . . . . . . . . . . . . . . . . . . . . . . . . . . 39
View Outstanding Charges . . . . . . . . . . . . . . . . . . . . . . . . . . . . . 39
Zero Account . . . . . . . . . . . . . . . . . . . . . . . . . . . . . . . . . . . . . 39
Process a Payment . . . . . . . . . . . . . . . . . . . . . . . . . . . . . . . . . . 39
Email Member Invoice . . . . . . . . . . . . . . . . . . . . . . . . . . . . . . . 39
View Payments . . . . . . . . . . . . . . . . . . . . . . . . . . . . . . . . . . . 39
View Billing . . . . . . . . . . . . . . . . . . . . . . . . . . . . . . . . . . . . . 39
Void or Edit Charges . . . . . . . . . . . . . . . . . . . . . . . . . . . . . . . . 39
View Unbalanced and Voided Transactions . . . . . . . . . . . . . . . . . . . . 39
Billing 41
Add Billing Provider . . . . . . . . . . . . . . . . . . . . . . . . . . . . . . . . 41
Add or Edit Payment Method . . . . . . . . . . . . . . . . . . . . . . . . . . . 41
Maintenance Fee . . . . . . . . . . . . . . . . . . . . . . . . . . . . . . . . . . . 41
Maximum Billing Amount . . . . . . . . . . . . . . . . . . . . . . . . . . . . . 41
Deadline for Owing . . . . . . . . . . . . . . . . . . . . . . . . . . . . . . . . . 41
Billing Comments . . . . . . . . . . . . . . . . . . . . . . . . . . . . . . . . . . 41
Set Member as Bad Debtor . . . . . . . . . . . . . . . . . . . . . . . . . . . . . 41
Blacklist Member . . . . . . . . . . . . . . . . . . . . . . . . . . . . . . . . . . 41
Communication 43
View Member’s Communication History . . . . . . . . . . . . . . . . . . . . . . 43
Search Communication History . . . . . . . . . . . . . . . . . . . . . . . . . . . 43
Add Note . . . . . . . . . . . . . . . . . . . . . . . . . . . . . . . . . . . . . . . 43
Add Task . . . . . . . . . . . . . . . . . . . . . . . . . . . . . . . . . . . . . . . 43
Add Call Log . . . . . . . . . . . . . . . . . . . . . . . . . . . . . . . . . . . . . 43
Add File to Member’s Communication History . . . . . . . . . . . . . . . . . . 43
Send Email to Member . . . . . . . . . . . . . . . . . . . . . . . . . . . . . . . 43
Send SMS to Member . . . . . . . . . . . . . . . . . . . . . . . . . . . . . . . . 43
View Member’s Agreements . . . . . . . . . . . . . . . . . . . . . . . . . . . . 43
View, Print, Delete Emails . . . . . . . . . . . . . . . . . . . . . . . . . . . . . 43
Templates 44
Email Templates . . . . . . . . . . . . . . . . . . . . . . . . . . . . . . . . . . . 44
SMS Templates . . . . . . . . . . . . . . . . . . . . . . . . . . . . . . . . . . . 44
Templates Categories . . . . . . . . . . . . . . . . . . . . . . . . . . . . . . . . 44
Template Fields 45
Template Fields . . . . . . . . . . . . . . . . . . . . . . . . . . . . . . . . . . . 45
Using Fields . . . . . . . . . . . . . . . . . . . . . . . . . . . . . . . . . . . . . 45
Forms and Waivers 46
Standard Forms . . . . . . . . . . . . . . . . . . . . . . . . . . . . . . . . . . . 46
Terms and Conditions . . . . . . . . . . . . . . . . . . . . . . . . . . . . . . . . 46
Waivers . . . . . . . . . . . . . . . . . . . . . . . . . . . . . . . . . . . . . . . . 46
Questionnaires . . . . . . . . . . . . . . . . . . . . . . . . . . . . . . . . . . . . 46
Custom Forms . . . . . . . . . . . . . . . . . . . . . . . . . . . . . . . . . . . . 46
Page 5

Client Support Documentation GymMaster
Visitors 47
Pop Up . . . . . . . . . . . . . . . . . . . . . . . . . . . . . . . . . . . . . . . . 47
View Member’s Visit History . . . . . . . . . . . . . . . . . . . . . . . . . . . . 47
View Tailgaters . . . . . . . . . . . . . . . . . . . . . . . . . . . . . . . . . . . 47
View Interclub Visitors . . . . . . . . . . . . . . . . . . . . . . . . . . . . . . . 47
Print Visit Report . . . . . . . . . . . . . . . . . . . . . . . . . . . . . . . . . . 47
Manually Open Door . . . . . . . . . . . . . . . . . . . . . . . . . . . . . . . . 47
Change Door Status . . . . . . . . . . . . . . . . . . . . . . . . . . . . . . . . . 47
Bookings and Schedules 48
Bookings and Schedules . . . . . . . . . . . . . . . . . . . . . . . . . . . . . . . 48
Meetings . . . . . . . . . . . . . . . . . . . . . . . . . . . . . . . . . . . . . . . 48
Add/Manage Resources . . . . . . . . . . . . . . . . . . . . . . . . . . . . . . . 49
Resource Groups . . . . . . . . . . . . . . . . . . . . . . . . . . . . . . . . . . . 50
Classes 51
Classes . . . . . . . . . . . . . . . . . . . . . . . . . . . . . . . . . . . . . . . . 51
Online Bookings . . . . . . . . . . . . . . . . . . . . . . . . . . . . . . . . . . . 51
Restrictions/Limitations . . . . . . . . . . . . . . . . . . . . . . . . . . . . . . 51
Cancellations . . . . . . . . . . . . . . . . . . . . . . . . . . . . . . . . . . . . . 51
Services . . . . . . . . . . . . . . . . . . . . . . . . . . . . . . . . . . . . . . . . 53
Trainer Commissions . . . . . . . . . . . . . . . . . . . . . . . . . . . . . . . . 53
Point of Sale / POS 54
Process Customer Purchase . . . . . . . . . . . . . . . . . . . . . . . . . . . . . 54
Select Payment Type . . . . . . . . . . . . . . . . . . . . . . . . . . . . . . . . 54
Manage Receipts . . . . . . . . . . . . . . . . . . . . . . . . . . . . . . . . . . . 54
Add / Edit / Remove Products . . . . . . . . . . . . . . . . . . . . . . . . . . 54
Process Stock-take . . . . . . . . . . . . . . . . . . . . . . . . . . . . . . . . . . 54
Add Stock Delivery . . . . . . . . . . . . . . . . . . . . . . . . . . . . . . . . . 54
Manage Vouchers . . . . . . . . . . . . . . . . . . . . . . . . . . . . . . . . . . 54
Report and Till 55
Standard Reports . . . . . . . . . . . . . . . . . . . . . . . . . . . . . . . . . . 55
Create New Reports . . . . . . . . . . . . . . . . . . . . . . . . . . . . . . . . . 55
Save Reports . . . . . . . . . . . . . . . . . . . . . . . . . . . . . . . . . . . . . 55
Auto-Run Reports . . . . . . . . . . . . . . . . . . . . . . . . . . . . . . . . . . 55
Export Reports . . . . . . . . . . . . . . . . . . . . . . . . . . . . . . . . . . . 55
Contact Report Members . . . . . . . . . . . . . . . . . . . . . . . . . . . . . . 55
Print Report . . . . . . . . . . . . . . . . . . . . . . . . . . . . . . . . . . . . . 55
Tasks 56
What is a Task . . . . . . . . . . . . . . . . . . . . . . . . . . . . . . . . . . . . 56
Task List . . . . . . . . . . . . . . . . . . . . . . . . . . . . . . . . . . . . . . . 56
Task Triggers and Setup . . . . . . . . . . . . . . . . . . . . . . . . . . . . . . 56
New Tasks . . . . . . . . . . . . . . . . . . . . . . . . . . . . . . . . . . . . . . 56
Assigning Tasks . . . . . . . . . . . . . . . . . . . . . . . . . . . . . . . . . . . 56
Email Pending Tasks . . . . . . . . . . . . . . . . . . . . . . . . . . . . . . . . 56
Refresh Task List . . . . . . . . . . . . . . . . . . . . . . . . . . . . . . . . . . 56
Print Task List . . . . . . . . . . . . . . . . . . . . . . . . . . . . . . . . . . . . 56
Completing Tasks . . . . . . . . . . . . . . . . . . . . . . . . . . . . . . . . . . 56
Follow Up Tasks . . . . . . . . . . . . . . . . . . . . . . . . . . . . . . . . . . . 56
Page 6

Client Support Documentation GymMaster
Stock 57
View Stock on Hand . . . . . . . . . . . . . . . . . . . . . . . . . . . . . . . . . 57
Print Stock Report . . . . . . . . . . . . . . . . . . . . . . . . . . . . . . . . . 57
Do Stock Take . . . . . . . . . . . . . . . . . . . . . . . . . . . . . . . . . . . . 57
Print Stock Take . . . . . . . . . . . . . . . . . . . . . . . . . . . . . . . . . . . 57
Input Stock Delivery . . . . . . . . . . . . . . . . . . . . . . . . . . . . . . . . 57
Member Portal 58
Member Portal Setup . . . . . . . . . . . . . . . . . . . . . . . . . . . . . . . . 58
Member Portal Settings . . . . . . . . . . . . . . . . . . . . . . . . . . . . . . . 58
New Member Enquiries . . . . . . . . . . . . . . . . . . . . . . . . . . . . . . . 58
Member Referrals . . . . . . . . . . . . . . . . . . . . . . . . . . . . . . . . . . 58
Sign Up New Members . . . . . . . . . . . . . . . . . . . . . . . . . . . . . . . 58
Access Control 60
Gatekeeper . . . . . . . . . . . . . . . . . . . . . . . . . . . . . . . . . . . . . . 60
Components . . . . . . . . . . . . . . . . . . . . . . . . . . . . . . . . . . . . . 60
Installation . . . . . . . . . . . . . . . . . . . . . . . . . . . . . . . . . . . . . . 60
Placement . . . . . . . . . . . . . . . . . . . . . . . . . . . . . . . . . . . . . . 60
Trouble Shooting . . . . . . . . . . . . . . . . . . . . . . . . . . . . . . . . . . 60
Door Set Up . . . . . . . . . . . . . . . . . . . . . . . . . . . . . . . . . . . . . 61
Access Control . . . . . . . . . . . . . . . . . . . . . . . . . . . . . . . . . . . . 61
Door Access Summary Report . . . . . . . . . . . . . . . . . . . . . . . . . . . 61
Concessions vs Visits . . . . . . . . . . . . . . . . . . . . . . . . . . . . . . . . 61
Booking Access . . . . . . . . . . . . . . . . . . . . . . . . . . . . . . . . . . . 61
Exclusions / Restrictions . . . . . . . . . . . . . . . . . . . . . . . . . . . . . . 61
Tailgating Setup . . . . . . . . . . . . . . . . . . . . . . . . . . . . . . . . . . . 61
Status Report . . . . . . . . . . . . . . . . . . . . . . . . . . . . . . . . . . . . 61
Restart / Reboot Gatekeeper . . . . . . . . . . . . . . . . . . . . . . . . . . . . 61
Feedback 63
Page 7

Client Support Documentation GymMaster
Welcome to GymMaster Software
We’re happy to have you join the team! This document is your guide to where you can find
common tasks in the day to day running of your gym or club.
GymMaster Contact Information
Treshna Enterprises Ltd
EPIC Sanctuary
78-106 Manchester Street
Christchurch, New Zealand
Tel Intl: +64 3 668 5727
Tel AUS: +61 1 800 849 001
Tel USA : +1 415 300 1388
Web: www.gymmastersoftware.com
Sales Enquiries - sales@gymmastersoftware.com
Orders - orders@gymmastersoftware.com
Monthly Rental/Accounts - accounts@gymmastersoftware.com
Data Transfers - transfers@gymmastersoftware.com
Xero Integration - xero@gymmastersoftware.com
When emailing support - Incl Screenshots + URL - support@gymmastersoftware.com
Page 8

Client Support Documentation GymMaster
Glossary
Accrued Revenue Accrued revenue is a sale that has been recognized by the seller, but which
has not yet been billed to the customer. ... Accrued revenue is not recorded in cash basis
accounting, since revenue is only recorded when cash is received from customers. (a charge or cost
relating to work done but not yet invoiced) made provision for at the end of a financial period
API API (or application programming interface) is a set of functions and procedures allowing
the creation of applications that access the features or data of an operating system, application,
or other service. In general terms, it is a set of clearly defined methods of communication among
various components
Billing Providers The billing provider is the provider who actually performs the service.
They’re the ones the member pays their membership fees to. They’re the ones who hold the
members card or bank details. With GymMaster integrating with certain billing providers, we
provide the link between the two. GymMaster is effectively the “middle man” and tells the
billing provider who to bill, how much to bill them and when to bill them
Booking Service A booking service is a booking made for one person. A one on one, personal
booking made with a Trainer or instructor. This may be a personal training session, a massage,
or a tanning session
Cancellation A cancellation is when a membership (or booking, or class) has been
cancelled/deleted. If a membership has been cancelled, this may mean the member has gone
elsewhere and/or ended their membership for a particular reason. Cancellations are different to
expirations, as you’re cancelling the membership early (in a sense). An expiring membership is
reaching the end of it’s preset term
Charge/s A Charge is a fee that has been charged to the member’s account. These reasons may
vary from a certain booking they have made, a prorata charge from a hold they have added. Or
it may just be a regular, monthly charge for their membership. All charges to the member, will
then need to be billed. A charge does not mean that member has been billed that amount or
already paid that amount
Class A Class is a booking made for more than one person. Whether it be just a small yoga or
group PT session, or a larger zumba class. If more than one member can book this particular
session, it needs to be created as a class
Debtors Debtors are members that owe you money. They may owe you money for a booking, a
class, or a product they have purchased via the POS. They may have an owing balance on their
regular membership. Any time something is charged to your member, if it takes them below $0,
they are in debt to you
Expiry The expiry date, is the end of the period for which something is valid. If someone’s
membership is due to expire on July 15th, then it will no longer be valid after that date. The
member will not have an active membership unless they renew or purchase a new one
First Payment Date The first payment date is the date you wish to take the first payment of
the membership. This may be some time in the future and not on the day sign up took place.
For example, the member may be signing up to a new. monthly membership on the 2nd, but
their pay day is on the 15th. The first payment date may be scheduled for the 15th so it’s
Page 9

Client Support Documentation GymMaster
convenient for the member going forward
Free Time/ Gifted Time Gifted Time is used when you’re gifting a member a certain free
period of time. This could be two weeks free for a promotion, or a week free for referring a friend,
for example. Gifted time is simply added to the members account. Therefore, during this time,
access to the facility can still be granted
Gatekeeper Gatekeeper is the hardware used to manage access to your facility by providing a
connection between the Member’s tags, and your Gymmaster application.
Hold / Suspension Adding a hold, or freezing an account is often mistaken for adding gifted
time. The main difference being, you’re holding / postponing their membership and access will
not be granted to the facility during this time. This may be due to an operation, an injury or a
holiday for example
KPI or Key Performance Indicators A Key Performance Indicator is a type of performance
measurement. KPIs evaluate the success of an organization or of a particular activity in which it
engages. E.g. Cancellations, New Members, Online sign ups, Classes booked
Members and Memberships A Member is an individual who has, is or will visit your facility
depending on their Membership status. A Membership is a contractual agreement for use of your
facility, and a Member may therefore have multiple Memberships.
Open-Ended If something is Open ended, it has no end date. These would be regular, ongoing
memberships that need to be cancelled by either party if and when needed
Payment/s A payment that the member has paid. Whether it be a payment for their
membership, a payment for a booking, or a payment for a class. All payments, are payments
made to the facility
Prorata/Upfront Fee Prorata (meaning in proportion), is the term used in many legal and
economic contexts. Suppose the monthly membership fee is $40.00. The prorata fee would be a
“part charge” of that $40.00. A lot of facilities do this so every member pays the exact same
amount, regardless of which day they joined. If the person was only a member for 15 out of the
30 days of the month, the prorata fee would be $20.00. If this setting is selected, GymMaster will
work out these calculations for you
Renewal The renewal of something in GymMaster, is effectively repeating it again. If someone’s
“3 month membership” is up for renewal on July 15th, then it will no longer be valid after that
date. The member will not have an active membership unless they renew that membership again
for another 3 months
Resource A resource is a room or area in which services, classes and meetings can be scheduled.
If you hold a few classes at similar times, or there’s a possibility / option for multiple bookings
overlapping, then you’ll need enough resources to cover these bookings. Eg, Studio 1, Studio 2,
Gym Space, Massage Room. Or Court 1, Court 2, Court 3, Court 4 etc. A Trainer or staff
member can also be resource, allowing their time to be booked / managed
Schedule Your schedule is your plan for carrying out a process or procedure, giving lists of
intended events and times. Or to arrange or plan for something to take place at a particular
time. Your schedule can include all activities in all of your rooms (resources) and all of your
Trainers bookings and personal work schedules
Page 10

Client Support Documentation GymMaster
Start Date The start date of a membership is when the member wants to start using that
membership. When it is valid from. This can be different to the joining date. A member may
come in and sign up/ join the facility on the 5th of the month, but not want their membership to
start until the 30th of the month. This would mean if you have your upfront/sign up fees to be
collected on “membership start date”, these will not be due until 30th
Termination The action of terminating something (ending, closing, concluding, finishing,
stopping)
X Report X reports cover everything from the shift opening until when the report is run. An X
report would be run by a staff member ending their shift. Ie 10am - 4pm
Z Report Z reports cover the entire shift from open to close. A Z report would be run by a staff
member at the end of the business day. Ie 5am - 6pm You cannot complete a Z report without
running an X report.
Page 11

Client Support Documentation GymMaster
Dashboard
The Home menu is where you will find your Dashboard and access to Reports and metrics to
assist in the day to day running of your facility.
Individual Dashboard views for different staff can be set via the Settings - User Administration
menu, by first selecting the Staff Member, and then Set Staff Access Rights.
The Staff Access Rights menu allows for many different settings to be managed for individual
Staff Members, using predefined access levels, from the drop-down menu.
Descriptions of each are provided, to assist in choosing the correct access levels, depending on the
Staff Member’s roles and responsibilities, and consist of 4 levels - No Access, Basic, Intermediate,
or Admin - which provides full access to all settings, data and metrics related to your facilities
operation.
Table of Contents
Page 12

Client Support Documentation GymMaster
The Weekly Schedule is displayed at the top of the Dashboard screen. Each day’s Class bookings
can be displayed by selecting the date, or alternatively, the entire schedule can be expanded to
show all Bookings for the next week, using the double arrow icon.
Selecting a Class in the schedule, brings up a class management screen where Casual, New or
current Members can be added to the Class. Previous attendees of the class are also displayed
and their profile can be viewed, or they can be quick added to the Class using the arrow button.
Communication by SMS or Email to the class attendees is available from this screen, and the
Instructor can also be emailed from the right hand menu options.
Table of Contents
Page 13

Client Support Documentation GymMaster
Classes can be Cancelled or Edited from the menu options at the bottom of the screen, and a
Class Enrollment form can also be printed, to allow for classes to be booked in manually.
There are a number of Metrics available to be displayed graphically in the Dashboard
configuration settings, covering various aspects of Billing, Payments, Bookings, Attendance,
Meetings, Cancellations, Prospects, Classes, and Financials, each of which can be selected and
arranged to suit via the Customize Dashboard option, below the last Card or Graph on the right
hand panel.
Where a Metric is linked to a Report, the Card
or Donut will display a link to that Report.
For example, the Current Members card links
through to the Current Members report,
showing a detailed breakdown of all current
members and their associated membership data.
It is important to note that the Current Members report is a
snapshot of all Member statuses (eg Casual, Current and
Non-Members), and it is therefore recommended that it is run for a
single date, rather than a date range. As Cancellations or New
Memberships are generally not actioned instantly, there may be
minor differences in reported figures between Historic, Cancelled,
New, Future and Current Members - all of which have slightly
different definitions for reporting.
Hovering over a value in a Card or Donut will
display additional text describing both the
Metric and the Value selected. In the case of an
Age Group Donut for example, added detail is
displayed relating to the value and category of
the selected item, as well as the Description of
the graph or card. In this case - the age bracket,
count, and the metric being displayed.
Table of Contents
Page 14

Client Support Documentation GymMaster
When viewing a graph, data can be added or excluded by selecting the variable directly on the
graph.
In the example of a Visit History report, a particular door can be excluded from the report by
clicking it to show a strike-through, which then removes it from the data being displayed.
October 3, 2019
Table of Contents
Page 15

Client Support Documentation GymMaster
Club Details
Settings - Club Details holds all information relating to the set up of your Facility, including your
Facility’s Name, Address, and Bank details. Logos, graphics and signatures for branding and
templates can also be added.
An Email Template can be created or edited via
the Club’s Email Template button.
Changing the Template will allow a choice between having a Header or Footer, or both. The
colour scheme of the background can be picked, and images and text can be added to personalise
your Template.
Common Details allows for the setting of Location, Time Zone, Date format and Height, Weight
and Length formats. These settings will be used throughout Gymmaster for calculating and
displaying resource and scheduling allocations, recording measurements, and displaying and
entering dates.
Page 16

Client Support Documentation GymMaster
Additional Details holds your Facility’s Email Address, Phone Number, Website address, Tax
Number, Till Float, Opening Date and Billing Start Date. The default Door ID is also able to be
selected here.
The Online Signup Redirect address is where Members will be taken once they’ve completed an
online sign-up through the Member’s portal. This can be set to a personalised ’Thank You’ page,
or to your Club’s Welcome page for example.
Billing Details is where the information provided to you relating to your Billing Provider is
entered. You can also select to enable Manual Billing, if you do not want to bill your Members
automatically.
The sound effect for key tag access granted or
denied, as well as for a newly created tag, can be
selected via the Notification Sounds setting
dropdown boxes.
Page 17
Client Support Documentation GymMaster
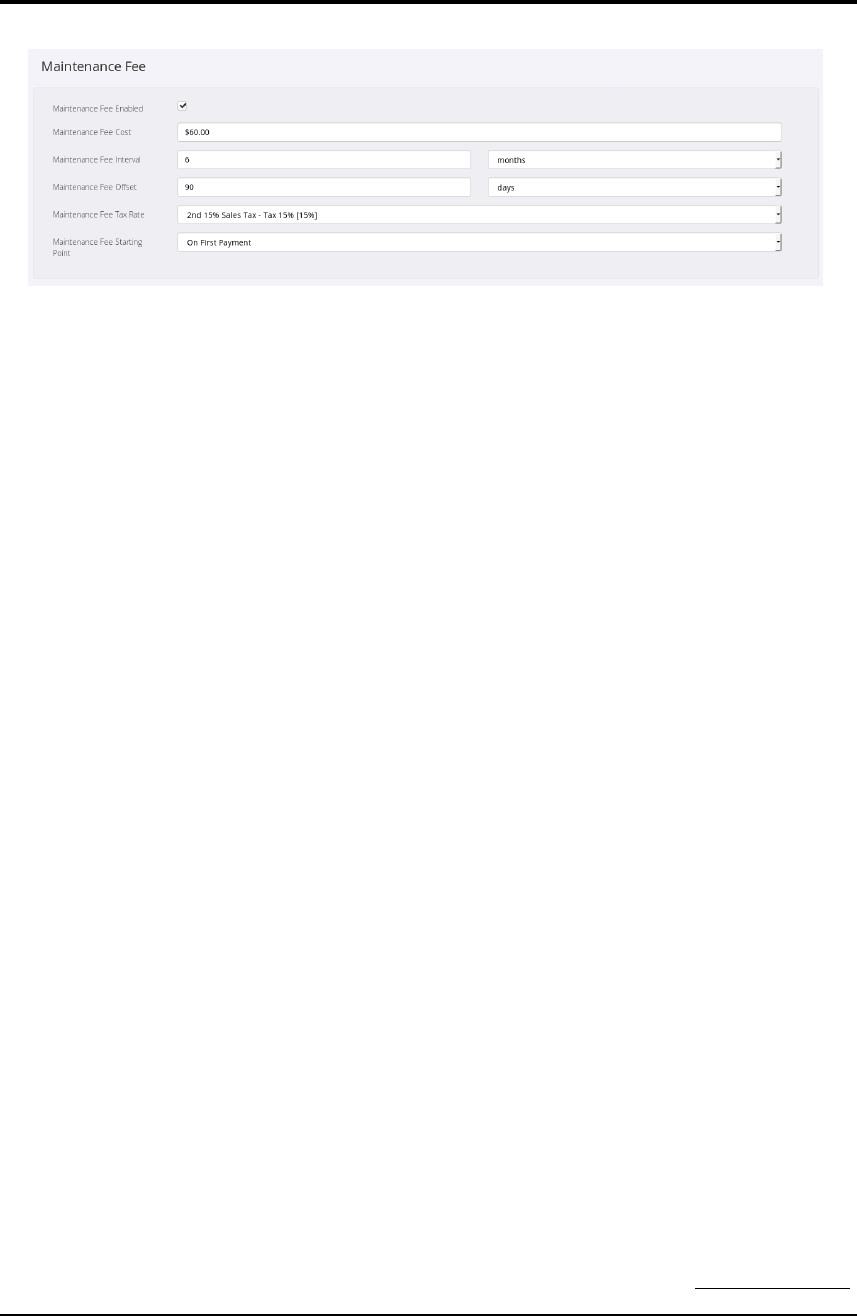
A Maintenance Fee is a regular, one off charge on top of standard Membership fees, that can be
set to be charged at a regular interval via the Interval setting.
The Fee Offset will create a grace period between sign-up and the first time charging of the fee.
This grace period can be further extended via the Maintenance Fee Starting Point setting, which
allows a choice between starting the fee interval at sign-up, or from first payment date.
October 3, 2019
Table of Contents
Page 18

Client Support Documentation GymMaster
Staff Attendance
Staff Keytags are assigned via the Settings - User Administration menu.
Once the Staff member has been selected, their Keytag can be swiped, and once confirmed by a
pop-up, the tag icon (circled), can be clicked to assign that tag (and resulting system generated
Tag number) to the Staff Member.
With the Keytag assigned, the Staff Member is able to Swipe Once to check in, and Swipe
Twice to check out of the Facility.
October 3, 2019
Table of Contents
Page 19

Client Support Documentation GymMaster
Rosters are how Facility, Staff, Resource and Door access, as well as Staff Schedules are managed,
and they can be added via Settings - Roster and Open Hours.
When first adding Rosters, Open and Off-Peak Rosters will be pre-loaded, and are able to be
adjusted to your Facility’s preferred schedule or operating hours.
A Staff Roster will also be added for any Staff Member that is selected as ”Is a Trainer” in the
tick-box under their profile picture via Settings - User Administration, which can then be
modified to suit.
Once your Facility’s operating hours are set up, availability or
access for each Door, Resource or Staff Member can be added and
managed as per the Rosters assigned to each
A Door Roster will set the hours the door may be accessed, whereas the Resource Roster will set
the hours of availability that the Resource can be Booked.
Setting specific Rosters for Staff will make them available for Bookings in the Schedule, and these
available hours can then be modified or managed via Unavailable Time.
Staff attendance within their rostered access times is
recorded on their Timesheet, and based on when they
Clock In or Clock Out via their Account menu dropdown.
October 3, 2019
Table of Contents
Page 20

Client Support Documentation GymMaster
The Timesheet is available from the View Staff
Timesheet button, once the Staff Member is
selected from Settings - User Administration, or
alternatively by the Staff Member themselves,
via their Account menu dropdown.
The Timesheet will display the staff member’s days and hours worked, and any absences can be
recorded there, as well as any manual adjustments that need to be made for early, late or missed
key-tag swipes. Appointment, Classes, and Members Signed Up will also be displayed for each
Staff Member on the Timesheet, providing a summarised overview of staff activity.
The resulting information can then be printed or
exported to a file, and used to assist in
calculating and managing payroll.
October 3, 2019
Table of Contents
Page 21

Client Support Documentation GymMaster
Membership Settings
Available Memberships can be managed and maintained via Settings - Membership Types.
From here, Current or Discontinued Memberships can be viewed or edited, and new Memberships
can be added.
When adding a Membership, the information required is separated into 3 sections, Membership
Details, Payment and Membership Length.
Memberships within a Facility can be grouped into Divisions. This allows for similar
Memberships eg - 3, 6 or 12 Month Memberships, Weights and Workout, or Tanning and Beauty
for example, to be reported on and managed together.
Membership Details allows for configuration
of Memberships, including whether they are
available online via the Portal, whether the
Membership is renewable, and if the
Membership is able to be Shared.
Waivers, Cancellation Terms and general
Terms and Conditions for the Membership
can be attached or created, and any
applicable Age restrictions can be added
also.
Payment method and frequency settings allow for In Person Payments, where the Member will
initiate payments in person, or alternatively, Integrated Billing - where the Member’s account or
credit card is billed directly via the Gymmaster system.
Payment Frequency allows for the setting of the regularity of payment, from a 1-off paid in full
payment, through to an Annual subscription.
A Sign-up and/or Online Cancellation Fee can also be added if required.
Membership Length provides settings for how long the Membership will last, and how it will be
concluded. This can include open-ended contracts, renewal based contracts, or charge per visit
type Memberships.
A Discontinued Membership will not be available to be sold to future Members, but will still
allow access to current Members on that Membership.
October 3, 2019
Table of Contents
Page 22

Client Support Documentation GymMaster
Members
GymMaster makes a distinction between Members and Memberships. A Member can for example
have multiple Memberships, eg a Tanning membership that is managed separately from a
Weights Membership, depending on how your facility is set up, or you might have memberships
with different benefit levels, for example an All Access membership vs a 10 Visit Swim Pass.
Your client could also have memberships in different stages, eg one membership could be Active
while another is on Hold.
The Member Details tab is where you add new members to your club or business, add photos to
their file, purchase or assign key tags, add Email and SMS contact function, document emergency
contacts, and add any other notes that might apply to the member.
You can also choose to designate a new contact as a Prospect, allowing you to identify and
manage potential new members.
October 3, 2019
Table of Contents
Page 23

Client Support Documentation GymMaster
Member Overview Panel
The left hand side of each Member’s individual screen,
details an account overview for that member.
From here you can add or upload a photo, manually check
a member in, view Visit history, make a booking for a
Member, and process a purchase of goods and services.
You will also find a summary of the Member’s account
status, current Memberships and any Linked or Shared
Member accounts. These summary sections also provide a
shortcut to the relevant Member’s details and actions tabs.
A Linked Account allows charges and benefits for the
Linked account to be billed to a Master Account.
This could be useful for example, in cases where a
couple may want to simplify their billing to a single
account.
Details of any Linked Accounts are displayed in a
panel at the bottom left of the Membership screen,
and include the Linked Member’s name, their
relationship to the Master Account holder, and what
charges are being billed to the Master Account.
October 3, 2019
Table of Contents
Page 24

Client Support Documentation GymMaster
Add Staff Members
A new Staff Member is added through the Settings - User
Administration menu, via an invitation sent to their staff
email account.
Once invited and accepted, the staff member will have a
User Profile that can be designated as a Trainer or a Sales
Rep, and can have Staff Access Rights set as outlined in
the Dashboard section.
If the Member is set as a Trainer, they will then be
available as a Resource for Bookings and Schedules etc.
October 3, 2019
Table of Contents
Page 25

Client Support Documentation GymMaster
Find a Member
This section allows you to search within all Members by selecting Everyone, or restrict your
search to Current Members, Expired Members (which also includes Cancelled Members), Recent
Visitors, and Prospects.
Searches can be by First Name, Surname, Email Address, Phone Number, Membership Number,
or any of the other Custom Fields on the Member’s Detail page.
October 3, 2019
Table of Contents
Page 26

Client Support Documentation GymMaster
Member Search Filters
For all of the above search filters, you can further sort members alphabetically by first or last
name, their join date or by most recently updated, by using the drop down filter menu at the top
right by the Search button.
In the main Search box, filters are available at a Club, Division and Membership Type level. You
can further refine your search via the tick boxes, to Members assigned to Staff, Memberships on
Hold, Incomplete Memberships, and by Members currently on premise in your facility.
October 3, 2019
Table of Contents
Page 27

Client Support Documentation GymMaster
Member Details
Once the Member has been added or located, they will have their own Member Details page
where you can access their address, contact numbers, emergency contacts and any custom fields
or lookups that have been added, as well as their Membership details, Account history, Billing
details, and Communication history, found in the 5 tabs at the top of the page.
You can also see Appointment Bookings, Measurements and Progress, PT Programs, Training
Schedules and Member Questionnaires, from the “More” tab
October 3, 2019
Table of Contents
Page 28


Client Support Documentation GymMaster
Shared & Linked Memberships
Linked Memberships allow for a Member to pay for another Member’s benefits. This might be
useful for a family group, where a parent pays for their child’s membership for example, or for a
couple, where one partner pays for both Memberships.
Details of linked Memberships can be found at the bottom
left of the Member panel. The View button will display
all Linked Members, and give the option to add further
Linked Members
Where a Member does not have any linked Memberships,
an Add button will be displayed.
From here an existing Member can be added to the
Primary account, or a new Member can be added to your
facility and attached as the linked account.
When enabled through Settings - Member
Portal, current Members can link new Members
to their Membership via the Online Portal,
enabling a Parent account to add multiple linked
accounts.
Table of Contents
Page 30

Client Support Documentation GymMaster
Shared Memberships allows for two Members to share a Membership equally, where all benefits
of the primary Membership are accessible to the secondary Membership. In practise, this means
that if the primary Membership has a 10 Pass concession benefit for example, then it can be used
equally, or solely by either party for 10 visits total.
The process to create a Shared Membership is the same as a creating a standard Membership
type, with the Benefits and costs added in as per usual, with the addition of the Shared
Membership tickbox selected.
The maximum number of secondary Members on a Shared Membership defaults to one, but can
be adjusted if required. An additional cost per secondary Member can be added at this stage also.
When naming a Shared Membership, choose a name that allows it to be easily recognised and
selected from the Membership list, and that differentiates it from standard (non-shared)
Memberships.
Where a current Membership is to be
shared, the easiest method is to duplicate
the current Membership, then designate it
as Shared and rename it accordingly.
When adding Benefits to a new plan (Shared or otherwise), the All Classes and All Doors Benefits
will be added by default, to allow Members to book sessions, and to enable access to the facility.
Other Benefits can be added manually, or they can be copied from another Membership.
October 3, 2019
Table of Contents
Page 31

Client Support Documentation GymMaster
Gifted Times and Holds
While Gifted Time and Holds can both act as a temporary suspensions on billing, the purpose of
Gifted Time is to allow for unbilled Benefits during the period of Gifted time, whereas a Hold
removes access to Benefits for the duration of the Hold.
In both cases, the duration of the Gifted time or Hold will extend the roll over date of the
current Membership.
When viewing any Suspension, (Gifted Time or Hold), in the Member’s Account detail, the
Suspension will show as a credit to the Member’s account, balancing the debit for the period in
question.
When adding a Hold, you can choose the start
and end dates or the duration, whether to
charge a one-off set-up fee, and whether to
continue regular billing during the Hold period.
As charges may still be accrued during a Hold,
eg POS sales or other scheduled fees relating to
memberships that have not been excluded, these
can be flagged to not be Billed during the Hold
period, in the Hold Settings screen. In this case,
they will carry-over to the next billing date after
the Hold ends.
A Hold can be placed on one, some or all Memberships in cases where a Member has more than
one - eg a Hold on both a Weights and a Tanning membership.
You can also choose whether to Prorata fees during the Hold period. If ticked this will mean the
member will only be charged for the part of the billing period that their membership is still
active. If unticked the member will be charged for the full period in which the Hold started, with
only subsequent periods being held, for the duration of the hold.
If the option, End Hold on Member Return is selected, the Hold can be set to finish once a
member next swipes in. This can be useful in cases of leave due to injury for example, where the
length of the leave period may be at the Member’s discretion.
From the Hold Settings cog, a Hold can also be set to prevent a Member from booking new
classes during the hold period, have any current bookings during the Hold period automatically
cancelled, and any related Benefit generation can be paused as well.
Page 32

Client Support Documentation GymMaster
If required, an annual limit can be set for the quantity (Count), and length of Holds that a
customer can have in a year, with a ”Year” beginning on the member’s joining date. The length
can be designated in either Days, Weeks or Months, and the Count can be any number you
choose. Whichever limit is reached first, (eg 3 Holds in year, or 30 days total in a year), will
result in the system preventing a further Hold being placed
Holds added by Admin accounts do not count towards the Hold Count or Hold Length.
Adding Gifted Time allows you to provide a Member a period of un-billed time to one or all of
their Memberships, entered either as inclusive start/finish dates, or from the pre-populated
duration drop down.
An example of when Gifted Time might be used
could be to reward a customer for a referral by
giving them a week free on their current
membership, or to give free access to a Member
for a new Membership promotion - eg 2 week’s
Gifted Time which then converts into a current
membership at the end of the gifted period.
Note - In the 2nd example, the Member will be
counted as a current Member throughout the
period of Gifted Time.
October 3, 2019
Table of Contents
Page 33

Client Support Documentation GymMaster
Membership and Member Tag Actions
Each membership page also has common ”Membership and Member Tag” actions that can be
found via short-cut links at the bottom of the page.
From here you can do a Manual Check In, view Visit History, Create a Task to stop a Member at
the gate on their next visit, or Issue Additional Tags.
At Member level, you will find further links to the following common tasks including -
* Add a Photo
* View Historic Addresses
* Update a Password
* View Linked Members
* View a Member’s Activity Log
* Merge with Another Member
* Add a Signature
* View Agreement Status
* Login as a Member
* View a Member’s Billing Report
* Delete a Member
* Zero or Write-Off an Account
October 3, 2019
Table of Contents
Page 34

Client Support Documentation GymMaster
Financial Configuration
Payment Methods allow for labelling or tagging of transactions to identify them for accounting or
book keeping purposes.
There are a number of preset Payment Methods that cannot be edited or updated, however it is
possible to add a User Added Method, which will be displayed with a white background.
User added Methods are a description or tag of
how the transaction was processed, and do not
affect the financial or billing aspect of the
transaction itself.
An example of this might be writing a
transaction off as a ”Bad Debtor” when zero-ing
a transaction, or alternatively, identifying a
credit card transaction as ”Visa” for example, to
help identify the transaction when reporting.
Billing Providers are listed in the Financial Configuration settings. All providers listed have an
agreement in place to process billing runs created by GymMaster
While Gymmaster provides the information and facilitates the process of billing, Billing
Providers are responsible for processing all payments between your Member’s and your Facility.
When setting up with a Billing Provider, you
will generally have a choice of options. As your
agreement will be with the provider directly, it
is important that you evaluate their service,
costs and fees to ensure you are satisfied with
the benefits offered.
Once enabled, you will be able to select a Billing Provider from the Billing tab of each Member.
Table of Contents
Page 35

Client Support Documentation GymMaster
Tax Rates settings are located in Settings - Financial Configuration.
The first setting gives a choice between ’Accrual’
and ’Cash’ options for tax.
The difference between the 2 settings is in how your financial KPIs are reported, with ’Cash’
reporting on payments as they are received, and ’Accrual’ reporting on when Sales are actually
made.
Multiple Tax Rates can be Added where required, for example where rates differ between
products and services.
Any single tax rate can also be designated as the Default tax rate, that will then be used for
Divisions, Products Types and Classes.
A Tax Rate can also be built up from multiple component rates, where individual rates can be
Added or Compounded to create an overall rate. These will be combined to a single tax line on
the invoice
Cash Drawer settings provide the currency denominations
that will be available for register and till management.
Each currency value that is required needs to be added,
making them available for processing the Cash Count as
part of Day (X) and End of Shift (Z) Reporting
A Cash Count may not need to be performed for all shifts
or reports, and can be toggled on or off, as part of the
X Report process
Page 36


Client Support Documentation GymMaster
If an Accounting Lock Period is selected, all accounting records prior to the date selected will be
locked. This can be useful for accounting purposes to ensure that records already submitted are
not then updated or modified in any way.
As locked records cannot be modified, voided or adjusted however, it is recommended that checks
are in place to ensure that all records are complete and correct prior to locking.
October 3, 2019
Table of Contents
Page 38

Client Support Documentation GymMaster
Accounts
The Accounts tab allows you to Add a Payment, Prepay a Membership, and make an
Adjustment to an account, either by reversing/refunding a payment, or reversing a sale. (Note
this will apply a credit or debit to the member’s account, but will not refund money to their
bank account.) You can also Preview Future Billing which will show amounts and dates of
scheduled billing, and view, print and email a member’s Account Statement.
Outstanding charges awaiting payment are displayed on the top section of the Accounts screen,
with options to zero the charges, process a payment by matching a deposit, or email an invoice to
the member for the outstanding amount.
A full schedule of a Member’s Account History is displayed on the lower half of the page, which
can be sorted by Membership and then by an Account Overview, Charges Pending and Paid,
Payments made, completed Billing, and Unbalanced and Voided Transactions.
All available transactions can also be filtered by Membership type, and you can choose to include
or exclude future billing via the tickbox below the Member’s name details
Page 39

Client Support Documentation GymMaster
When reviewing the Overview screen, all Charges have a green vertical indicator, with Payments
showing as Blue. Hovering over either a Charge or a Payment will show the related transaction
highlighted in Grey where applicable, allowing for easy visual matching of charges and payments.
Expanding the blue drop-down button reveals options to Bill unpaid Charges, or Void or Edit
current charges. Selecting Bill, will take you to the POS screen to process the selected charge,
whereas Edit will give you the option to change the due date or amount of the Bill, as well as any
notes on the invoice.
October 3, 2019
Table of Contents
Page 40

Client Support Documentation GymMaster
Billing
The Billing tab is where you can select your registered billing provider and enter the Member’s
billing details, (eg credit card or bank account).
Once completed the Member will be deducted automatically, or you can choose to not bill
automatically, or never bill, as per your agreement with the Member.
Once a Provider has been selected and Client Billing Details have been entered, you can choose
whether the specific Member will be included or exempted from a Maintenance Fee, if this option
has first been set up and enabled at both Club level in Settings - Club Detail, and at a Division
level in Membership Types - View Division List
Page 41

Client Support Documentation GymMaster
Other Information allows for management of Members who may not be meeting their billing
obligations, or who may require assistance to manage their Memberships.
The Max Amount To Bill field allows a maximum billing value to be set regardless of what the
member owes or has falling due. This can be useful if a member needs to settle an outstanding or
overdue amount, but cannot cover the total amount in one transaction.
An example of this might be a Member that was $150 in arrears could make an arrangement to
be charged a maximum of $50 a month for the next three months, rather than the full $150 on
their next bill. By setting this Max Amount to Bill, the Member will be charged three amounts
of $50 for the next three Billing runs, excluding any other charges that accrue in this period.
Deadline for Owing, allows a one-off revised deadline to be set before a Member’s debt falls due,
and can be used in conjunction with Max Amount to Bill to create a payment schedule to resolve
their arrears.
Working with the above example, the Deadline for Owing would be entered in three months
ahead, to allow sufficient time for the Member’s agreement to pay. Once the revised deadline is
passed, the standard settings for a Member with arrears will then apply again, such as preventing
entry or similar, as set out in Advanced Config - Door Reader.
Billing Comments allow for internal notes to be made on a Members account. An example might
be notes detailing an agreement made, or other information regarding a Member’s current Billing
status. Notes can also be reported on as additional information per Member.
Marking a Member as a Bad Debtor will display a warning message on the Member’s account
advising the Account is overdue.
October 3, 2019
Table of Contents
Page 42

Client Support Documentation GymMaster
Communication
The Communications tab is the place to view a Member’s communication history. This detail can
be filtered by type via the drop-down menu, or you can search within the Subject or
Sender/Assignee fields.
You can also add a Note, Task or Call Log to a Member’s account, add a file to the Member’s
communication history, send an Email or SMS to a Member, and view their agreements on file.
Email communication can be viewed, printed or deleted from the list of all communications.
The More tab is where you can access the member’s Appointment Bookings, Measurements and
Progress, Personal Training Programs, Training Schedules and Member Questionnaires
October 3, 2019
Table of Contents
Page 43
Client Support Documentation GymMaster
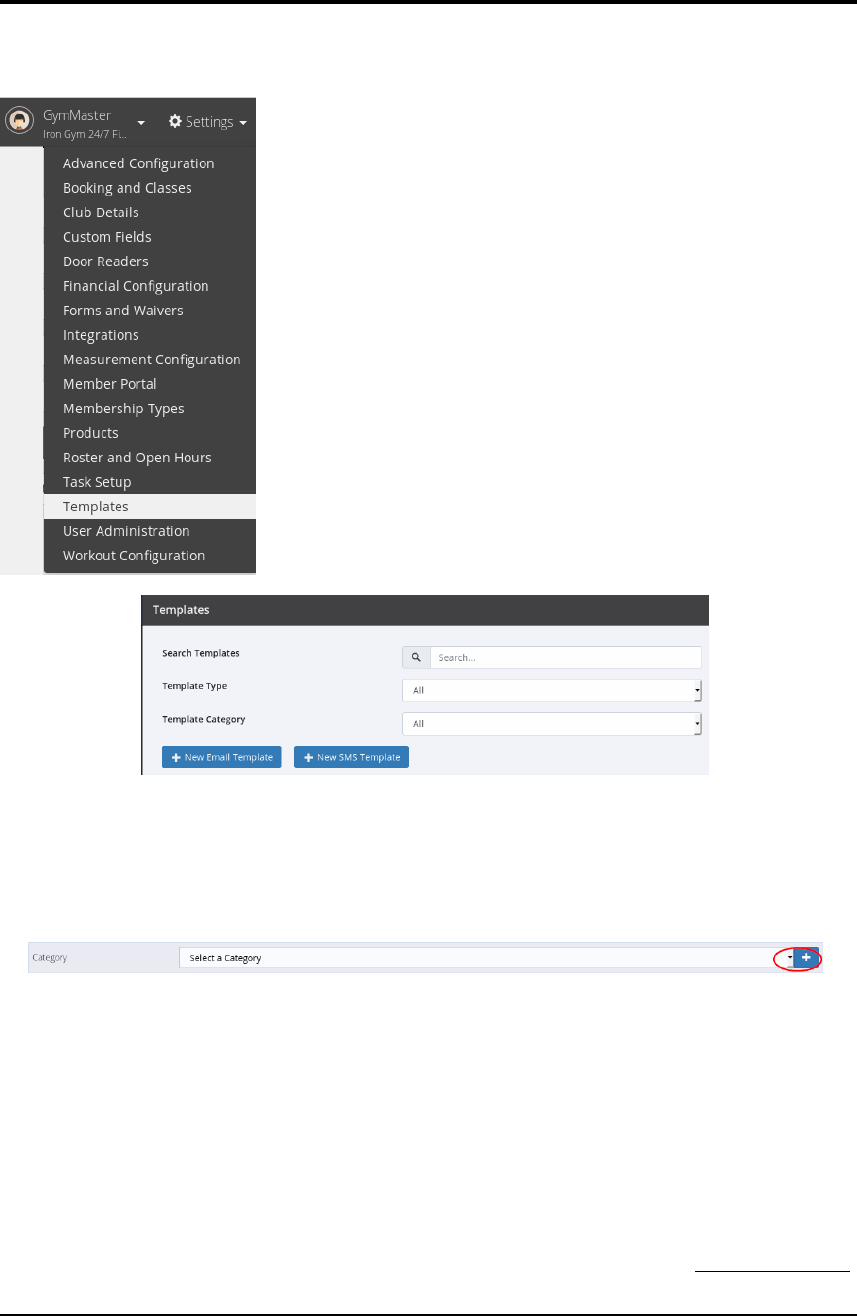
Templates
The Settings - Templates menu is where a selection of
pre-populated email and SMS templates are located,
allowing for fast and targeted communication with your
Members.
From regular newsletters, to Booking confirmations,
through to reminders of outstanding balances, Templates
can be selected, or created and saved, to streamline and
standardise your communication.
By choosing pre-set fields from your customer database,
the templates can include member specific detail, without
having to write a tailored email or SMS every time.
First Name, Last Name, Address, Last Visit Date,
Amount Owing or any Custom fields etc, can all be added
as standard fields that will be populated with the relevant
details once a Template is selected for a certain Member.
Templates can be Categorised to allow for easier sorting, with new Categories able to be added
when a new Template is created, by selecting the Plus symbol and adding the new Category
detail. The new Category will then be available for sorting or selection, once the template is
saved.
Examples of Categories might include
* Staff - allowing each staff member to have their own collection of Templates
* Accounts - grouping all account related communication together
* Task - booking confirmations, welcoming new Members etc
Used well, Templates and Categories can be a powerful tool to enable you to standardise your
communication and develop a consistent voice across your business, when communicating with
your Members.
October 3, 2019
Table of Contents
Page 44

Client Support Documentation GymMaster
Template Fields
Template Fields allows you to add information or details from your Gymmaster system, directly
into your communication with your customers, by inserting any information that needs to change
depending on the Member that is being contacted, with information selected from the system.
The available fields include any of the information from a Member’s profile, such as Date of
Birth, First and Last Name, Age, City - as well as system generated information, such as Start
Date, Last Visit Date, Concessions Remaining etc.
An example of this could be inserting a Member’s first name in a standard Booking Confirmation
email. As the majority of the content of the email doesn’t need to change, it can be saved as a
Template, with just the Member specific detail being inserted by a Field. This means the
Template will always be personalised to a Member, while still allowing it to be saved and re-used
for any other Member as well.
Once selected and inserted into the Template,
the Field will default to having brackets around
it along with a system reference number.
These will be automatically added once the
Field is selected from the Insert Field dropdown
menu.
Fields can be used in Subject lines also, allowing for personalised Email subjects, depending on
the content required. An example is a welcome email template, where the Member name can be
inserted into the template subject line by using a Field.
October 3, 2019
Table of Contents
Page 45

Client Support Documentation GymMaster
Forms and Waivers
The Forms and Waivers section is where you will find standard Terms and Conditions, Waivers
and Questionnaires to suit your facility and client base. Custom Forms and Waivers can also be
created.
When creating a new Questionnaire, there are options for Text, Checkboxes, Dropdowns,
Headings, Dates or Notes, to allow a custom form to be created.
Selecting ’New Agreement’, results in a choice of T&Cs, Waivers, or Cancellation templates, with
the ability to compose your own document in the text editor window.
The option to insert standard fields into the template, allows for documents to be created that
can be used in common situations, by inserting information from the Member’s profile from both
standard fields and as added via Settings - Custom Fields.
The most common usage for Waivers and Agreements is during the sign-up process, as part of
the contractual agreement with your clients, however Questionnaires can also be used to
understand a Member’s goal for example to help tailor Workout or Program, or as a tool to
gather information about your client base.
October 3, 2019
Table of Contents
Page 46

Client Support Documentation GymMaster
Visitors
The Visitors menu is where you can see all visits by a
Member to your facility. These will include Members
swiping in with tags, or any manual check-ins by staff.
You can also view where 2 people enter on one Member’s
tag, where the Tailgating function is set up, as well as any
Interclub visitors, where an arrangement has been made
with another club to share Members/Memberships.
Visits can be filtered by Membership and Door, as well as
Date and Time and a printed report of Member visits is
available from the Print button.
Staff can control the Door Lock Status and manually open
the applicable door from the Edit and Open buttons at
the bottom of the Visit Filter menu
October 3, 2019
Table of Contents
Page 47

Client Support Documentation GymMaster
Bookings and Schedules
The Schedule menu is where you can add and manage Bookings, Meetings, Classes and block out
Available and Unavailable times. In order to use Schedules, you will first need to have Services,
Classes and Resources set up, via Settings - Bookings and Classes
In the Schedule view, you can toggle between Weekly and Daily views, and switch between your
Facilities and Resource calendars.
A Booking is any time set aside in the Schedule for a Resource. By first selecting the Resource,
then the time, the Resource can then be added to a Booking, Meeting or to a Class where
appropriate.
Available or Unavailable time is used to manage Resources on the Member Portal. Available time
will flag that time period as being able to be booked through the Member Portal, with
Unavailable time marking the chosen period as non-bookable. Unavailable time could be used for
a Resource, when a staff member wanted to block out time for maintenance or cleaning of a
Studio for example, or if a new staff member wanted to set non-bookable time to allow for back
office work, or client interaction.
A Meeting can be set for any Resource, by first selecting the Resource, then the time that the
meeting is to be booked. This may be a meeting booked in the Studio Resource for example, or a
meeting booked for a specific Trainer.
In the case where a meeting is with a Trainer in a Resource room for example, 2 meetings would
need to be added, - one for the Trainer and one for the Studio.
From the Add Meeting screen, a note can be added to the meeting, the time can be edited, and
the meeting can be set to repeat at set intervals, until a designated date
Page 48

Client Support Documentation GymMaster
A Resource is a room or area in which Services, Classes and Meetings can be scheduled. By
default, Class bookings are enabled, so this may need to be reviewed depending on the Resource
type, as a Resource can also refer to Equipment that can be booked, eg yoga mats or swimming
goggles etc, meaning Class Bookings would not be relevant, in that instance.
Trainers can also be designated as a Resource, allowing their time to be booked / managed via
the Schedule.
Once a Trainer is selected, the appropriate Service can be added from the Member’s available
benefits, as well as any equipment that may be required for the session.
Table of Contents
Page 49

Client Support Documentation GymMaster
In order to manage Resource Schedules, Resources can be organised into Resource Groups. A
Resource Group is a collection of similar Resources that can be selected for booking under one
Schedule view. For example, a Studio, Pool or Tanning Salon could be grouped together under a
Resource Group called Facilities, or multiple Trainers could be grouped into a Resource Group
called Trainers.
Management of Resources and Resource Groups is handled from the Settings - Bookings and
Classes menu option. From here, new Resources can be added or edited, and Groups can be
managed also.
Adding a Resource Group allows for the Group to be named, have the default Schedule time
increment set, and be assigned to a specific Club. Where appropriate, the Group can also be
assigned a Type, of either Room or Equipment.
Switching between Daily and Weekly views displays Resources by day, or Resource Groups by
week, allowing for simple management of bookings and time.
October 3, 2019
Table of Contents
Page 50
Client Support Documentation GymMaster
Classes
Classes are added from Class Configuration menu, and allow for a default Class Length, a Class
Group or a Seat Allocation to be set.
Seat Allocation is useful when there are limited or reserved resources in the Class, such as spin
bikes for example, or where the members may wish to reserve a certain piece of equipment, or a
position in the room.
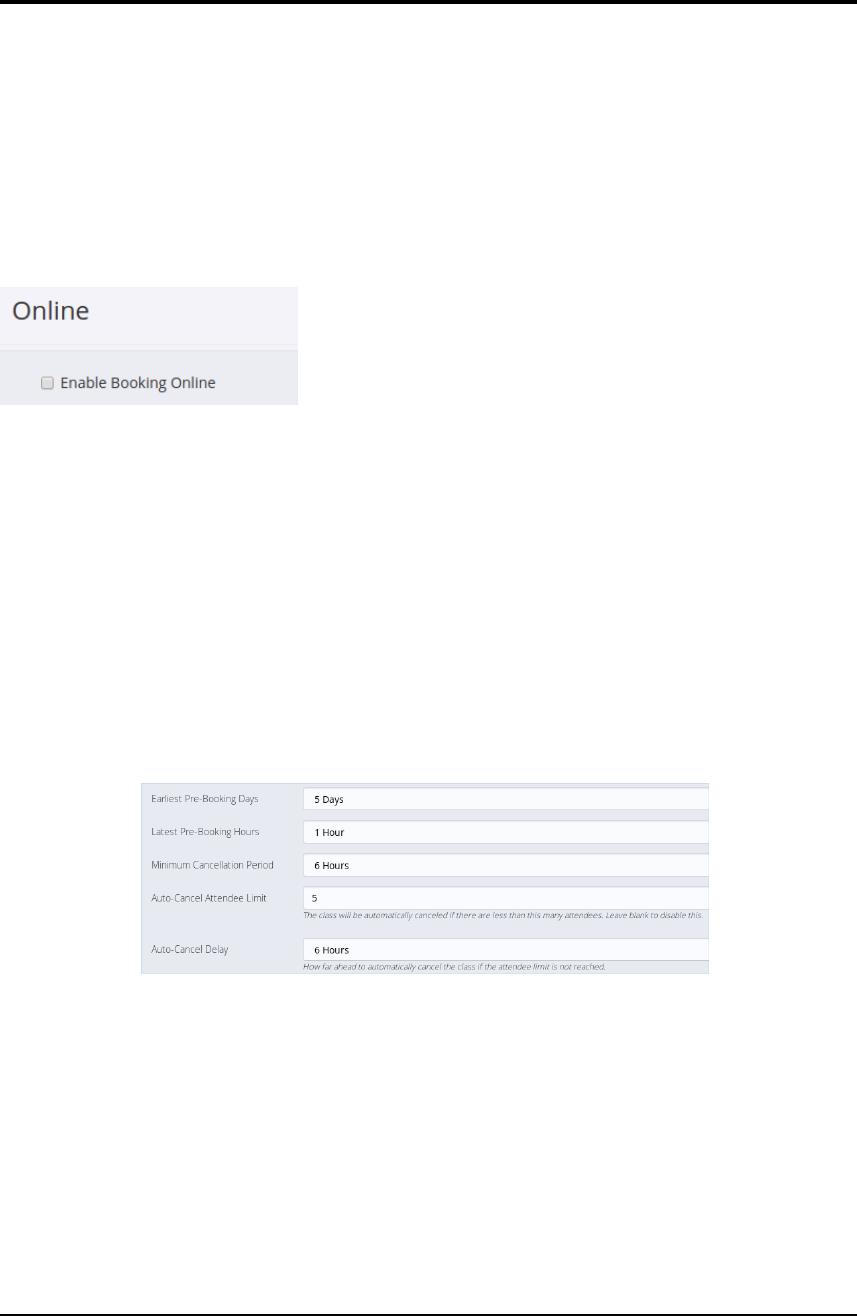
Online Booking can also be enabled from the Add New
Class configuration options, which will enable Members to
book Classes directly from the Member Portal.
Restrictions and Limitations for Classes can also be set from the Add New Class options,
allowing for a maximum number of attendees in a class to be set.
Additional Restrictions provides options for limits on the maximum number of Members on a
Wait List for a class, age limitations where required, for example an Over-60s Class, and settings
relating to Prebooking and Cancellations.
Cancellations can be restricted to only being available up until a certain time period before the
Class in question, with Classes not able to be cancelled once the designated time period is
reached.
There are 2 settings for minimum Cancellations - one for personal bookings, eg PT Sessions, and
the 2nd for Class Bookings.
The Class Booking Cancellation setting is available when adding a new class from ”Add New
Class” or changing a current Class from the ”Edit Selected” pencil icon in the Settings -
Bookings and Classes menu.
Page 51

Client Support Documentation GymMaster
The personal booking Cancellation setting can be located in Setting - Member Portal, under the
Bookings section.
Classes can also be set to automatically cancel if a chosen number of attendees is not reached,
with the delay period for this being adjustable also. This would allow a Class to be set to
automatically cancel if there were less than 10 bookings, 2 days before the Class, for example.
If the Auto-Cancellation setting is selected, it
will also need to be enabled in the Class
Booking Settings menu. Once enabled, specific
Auto-Cancellation settings can be configured for
each Class.
A standard SMS or Email template can be set to notify members of a Class that’s been
auto-cancelled. This can be created or edited in the Settings - Templates menu.
Table of Contents
Page 52

Client Support Documentation GymMaster
In order to make a Booking, a Service must be selected also. An example of this might be a
booking for a Trainer, where the Service being booked is a 30 minute Personal Training Session.
Services are added or managed through the Bookings & Classes menu. This menu also allows for
Services to be managed by using Service groups which enables Services to be restricted to certain
Clubs and Resources, as well as requiring Rooms and/or Equipment to be assigned when making
the booking for the specified Resources in the Service Group.
When configuring Services, the Bookings Settings menu provides a comprehensive list of options
for managing the appearance of the Schedule and actions and communications related to
Bookings
Where a Trainer’s service is being booked, a Commission for the Trainer can be automatically
calculated via the final setting in the Add Service options. This setting allows for a Commission
to be calculated at a flat rate per booking, as a percentage of the cost of the Service being
Booked, or the Commission can be disabled.
The Trainer to receive the Commission can also
be specified, with the option of either the
Trainer booked in the Schedule, or the
Member’s default Trainer as set in the Member’s
Details screen.
This option may apply if the Member’s usual Trainer refers the Member to a Booking or Class by
another Trainer, but still receives the Commission for the referral.
Commissions can be reported via the Trainers Commission report, under Reports & Till
October 3, 2019
Table of Contents
Page 53

Client Support Documentation GymMaster
Point of Sale / POS
Point of Sale is where sales for goods and services are processed.
This can include food, drink, equipment, vouchers, general visits or
any other items that have been previously set-up via Settings -
Products, and are not covered under a member’s contract. The
Products section is also where products are added or removed from
inventory, current products can be edited, stock deliveries are
entered into the inventory, stock-takes can be run, and vouchers can
be administered.
In the POS screen, staff can search for items or scan barcodes if
enabled, to add items to the current transaction. The default
setting is for POS charges to be added to the member’s account,
however Make a Payment allows for POS cash transactions, or
payment by Cheque or Gift Vouchers, or alternatively the Sale can
be made complimentary via the No Payment/Adjustment option.
Under the POS Settings, you can set whether non-current members
can accrue charges, prompt to add any outstanding charges to the
current sale, force staff selection when processing a POS
transaction, choose if receipts are printed by default via a thermal
printer or PDF, toggle Cash Out and General Sale visibility options
for staff or admin, and add a custom title or custom message at the
bottom of your receipts.
Payments can be processed via cash, cheque, vouchers or charged
directly to the member’s account.
October 3, 2019
Table of Contents
Page 54

Client Support Documentation GymMaster
Report and Till
Report & Till provides a number of preloaded reports to
allow you to drill into the data and performance of your
business. Some standard reports are available directly
from the side-bar menu drop-down, including Staff,
Trainer, Debt, Till Take, KPIs and Billing - with the full
list of reports available from the Standard Report menu.
All reports can be customised as required via the Edit
Report button. Once in Edit mode, you can edit the
Report’s Name and Description, Add and Reorder Fields,
and add Filters to the Report.
This will allow you to customise what’s included in the
Report, as well as choose to have it run automatically at a
predetermined interval, and it can also be delivered to a
designated email address once run.
To create a New Report, select Edit Report and then Save New. This will create a copy of the
Report for editing. Once all changes are made, select Save & Close.
Selecting Close will close without saving.
Return to Default on a Standard Report will revert all changes back to default fields
For reports covering a lot of data, you can choose to run
the report in the background, and the system will notify
when the report has run. Reports are run by clicking the
Show Report button.
Once a Report is complete you are able to export the data to a spreadsheet for further analysis,
contact all members included in the report via SMS or email, process a charge to all or some of
the included members, and print the report if required.
October 3, 2019
Table of Contents
Page 55

Client Support Documentation GymMaster
Tasks
The Task section is where you will see calls to action
assigned to your staff, or that will be run automatically,
depending on how they are set up. Common Tasks could
include welcoming new Members, reminders to Members
with outstanding balances, birthday greetings, waitlist
openings or any similar type of scheduled or repetitive
contact action.
Tasks will appear in the Task List based on events or
conditions (Triggers) as set under Settings - Task Setup,
and can be assigned to an individual staff Member, to
teams or to all staff, for follow up. Alternatively, the Task
action can be set to occur automatically in the
background, via email or SMS. The task list can be
filtered by Task, or by the staff member or team (eg
Trainers) the task is assigned to.
New Tasks can be added from the Add New Task button,
selecting from any of the current Tasks loaded through the
Settings option. You can also opt to bulk send any
pending emails, refresh the Task list to update any recent
changes or additions, or print the current list of Tasks.
Tasks assigned to staff can also be emailed to them for
action, or they can work directly from a personal or
facility-wide list, allowing them to check them off once
completed via the Tasks dashboard, adding any applicable
notes or follow up tasks where appropriate.
October 3, 2019
Table of Contents
Page 56

Client Support Documentation GymMaster
Stock
The View Stock menu will allow you to view current stock
on hand by Date, Product Type or Supplier. If you have
multiple facilities or Clubs, you can also filter to show all,
or by facility.
Do Stock Take will process a stock-take for your club/
facility, for the date and time the report is run, and will
show total stock movements and resulting balances based
on the opening inventory at the time, and any stock
movements since then. Each line included in the stocktake
can have a Reason attributed to it where applicable, and
the report can be printed for your records.
Input Stock Delivery is where you add inwards stock
deliveries to your inventory. When keying the inwards
goods into your stock, you can filter by Supplier or
Product Type to simplify the data entry process.
October 3, 2019
Table of Contents
Page 57
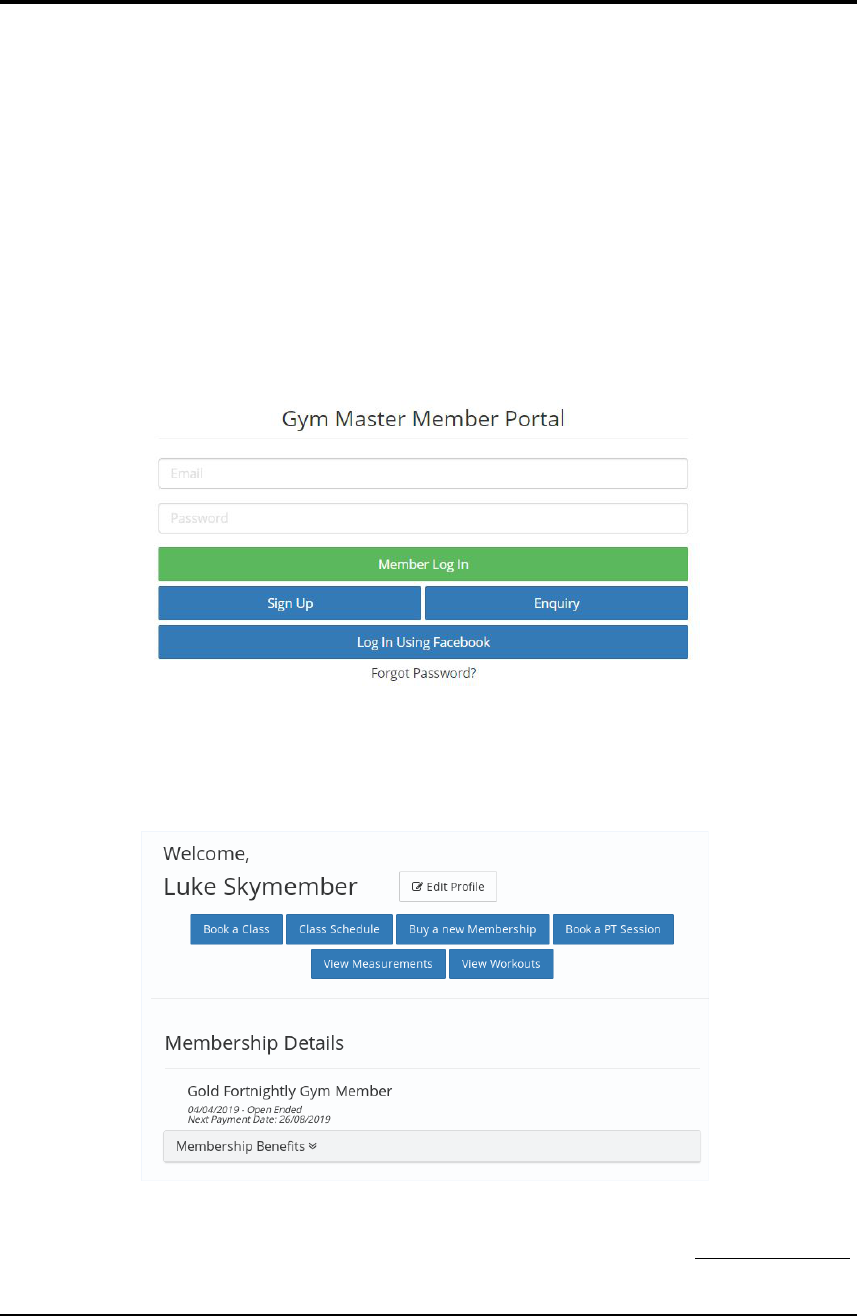
Client Support Documentation GymMaster
Member Portal
The Portal provides easy, instant access to your facility’s Classes and Bookings, allowing
Members to manage their Memberships.
It can be added directly to your facility’s website, and will enable potential new Members to
make an enquiry, or sign up for a Membership.
Current or new members can also refer a friend via the Portal, generating leads for future
Prospects.
If made available in your facility via a kiosk tablet or similar, it can also be a quick and simple
option for Members to book or manage classes while on premise.
Using the Member Log In button, current Members can log in and access their Class Schedule,
Book a Class or Session, review their Visit History, manage Current Bookings, View Payments
and a number of other functions as set up via Settings - Member Portal.
Table of Contents
Page 58


Client Support Documentation GymMaster
Access Control
The Gatekeeper System enables Member access control and management, by linking a Member’s
keytag to the door access Benefits loaded against that Member in your GymMaster software.
This enables your members to self check-in and gain access through the doors at your facility.
The system consists of a central control unit, the Gatekeeper, and depending on your facilities
requirements: door readers, locks, desktop reception readers and connections to your point of sale
register & printer.
It is recommended that Gatekeeper installation is carried out by a qualified electrician or security
installer, following the Installation Instructions. It is important that the instructions are followed
carefully.
When choosing an installation location, ensure the central unit is positioned for easy access to to
the indicator lights on the front panel, allowing for simple trouble-shooting if required.
Should any issues occur with your Gatekeeper access or control system, please follow the
Trouble-Shooting Guide in the first instance.
Table of Contents
Page 60

Client Support Documentation GymMaster
Once a gatekeeper system is set up, the door readers and doors can be be set up, managed,
manually opened or deleted via the Settings - Door Reader menu.
The Door Readers menu provides an at-a-glance look at all of the readers in your GymMaster
system. From here you can see the door names, the status of each of your doors, the Gatekeeper
location and status, and open a kiosk check-in mode for self check-in via Key Tag swipe, or via
the QR code reader in the Mobile App.
When editing the readers, each is associated to a certain Facility as well as a particular
Gatekeeper at that Facility. Be sure to choose a name that will help you to identify which reader
a Member has swiped, as this detail will be reflected in your Visitors list. The status of the door
can also be changed from Open (unlocked) to Locked, or set to Active, making it responsive to
key tags being presented to gain access.
As a Member may have a Concession pass as opposed to
an ongoing membership, the reader can be set to prioritise
counting Concessions on their Membership over Visits, or
alternatively to not count Visits at all, in cases where the
reader is not set up on a main entry door, eg a shower
facility or similar, where internal access control is required.
Where a door reader is set to control access to a Resource or room, it can be set to automatically
book a Member into the session being run in the room at that time, or alternatively, deny access
to a room or Resource if the Member does not have a Booking.
Controlled doors can further be restricted by being designated as a Restricted Door, thereby
excluding the door from Members with ”All Doors” access. This may be useful for Staff Only
access, for example. Any door can also be assigned as Female Access Only, where required.
The final options allow a toggle for displaying the door information in the Last Visits report,
designating the door as an Exit Door, and setting the door up as a Tailgating door, where the
Page 61

Client Support Documentation GymMaster
Tailgating service is enabled.
A current summary of your Gatekeeper status is located at the bottom of Door Control page,
with the option to Restart the software or to Reboot the hardware, located in the menu option
just above.
October 3, 2019
Table of Contents
Page 62

Client Support Documentation GymMaster
Feedback
We are committed to our client’s success, and welcome all feedback.
If there’s anything you need extra assistance with, or would like added to this guide, please get in
touch via the Contact Information at the start of the guide, - we’d love to hear from you.
The Team at Gymmaster
October 3, 2019
Table of Contents
Page 63
