
This document contains proprietary information that is protected by copyright and other intellectual
property laws. No part of this document may be reproduced, translated, or modified without the
prior written consent of QAD Inc. The information contained in this document is subject to change
without notice.
QAD Inc. provides this material as is and makes no warranty of any kind, expressed or implied,
including, but not limited to, the implied warranties of merchantability and fitness for a particular
purpose. QAD Inc. shall not be liable for errors contained herein or for incidental or consequential
damages (including lost profits) in connection with the furnishing, performance, or use of this
material whether based on warranty, contract, or other legal theory.
QAD and MFG/PRO are registered trademarks of QAD Inc. The QAD logo is a trademark of QAD
Inc.
Designations used by other companies to distinguish their products are often claimed as
trademarks. In this document, the product names appear in initial capital or all capital letters.
Contact the appropriate companies for more information regarding trademarks and registration.
Copyright © 2012 by QAD Inc.
EDIeCommerce_UG_v2012EE_1.pdf/mat/mat
QAD Inc.
100 Innovation Place
Santa Barbara, California 93108
Phone (805) 566-6000
http://www.qad.com
Contents
Change Summary . . . . . . . . . . . . . . . . . . . . . . . . . . . . . . . . . . . . . . . . . .vii
Chapter 1 EDI eCommerce Overview . . . . . . . . . . . . . . . . . . . . . . . . .1
Introduction to EDI eCommerce . . . . . . . . . . . . . . . . . . . . . . . . . . . . . . . . . . . . . . 2
Elements of EDI eCommerce . . . . . . . . . . . . . . . . . . . . . . . . . . . . . . . . . . . . . . . . 3
Document Repository . . . . . . . . . . . . . . . . . . . . . . . . . . . . . . . . . . . . . . . 3
EDI eCommerce Tool Set . . . . . . . . . . . . . . . . . . . . . . . . . . . . . . . . . . . . 5
Document Types . . . . . . . . . . . . . . . . . . . . . . . . . . . . . . . . . . . . . . . . . . . 5
EDI eCommerce Processing . . . . . . . . . . . . . . . . . . . . . . . . . . . . . . . . . . . . . . . . . 6
Imports . . . . . . . . . . . . . . . . . . . . . . . . . . . . . . . . . . . . . . . . . . . . . . . . . . . 7
Exports . . . . . . . . . . . . . . . . . . . . . . . . . . . . . . . . . . . . . . . . . . . . . . . . . . . 8
Multiple Domains . . . . . . . . . . . . . . . . . . . . . . . . . . . . . . . . . . . . . . . . . . 8
Chapter 2 Setting Up EDI eCommerce . . . . . . . . . . . . . . . . . . . . . . . .9
Introduction to eCommerce Setup . . . . . . . . . . . . . . . . . . . . . . . . . . . . . . . . . . . 11
Setup Overview . . . . . . . . . . . . . . . . . . . . . . . . . . . . . . . . . . . . . . . . . . . . . . . . . . 11
Setting Up Data Directories . . . . . . . . . . . . . . . . . . . . . . . . . . . . . . . . . . . . . . . . 12
Standard Directory Structure Conventions . . . . . . . . . . . . . . . . . . . . . . 13
Using Sequence IDs . . . . . . . . . . . . . . . . . . . . . . . . . . . . . . . . . . . . . . . . . . . . . . 14
Configuring eCommerce Control . . . . . . . . . . . . . . . . . . . . . . . . . . . . . . . . . . . . 15
Defining the EC Subsystem . . . . . . . . . . . . . . . . . . . . . . . . . . . . . . . . . . . . . . . . 18
Defining an Exchange File . . . . . . . . . . . . . . . . . . . . . . . . . . . . . . . . . . . . . . . . . 23
Defining EC Subsystem Cross-References . . . . . . . . . . . . . . . . . . . . . . . . . . . . . 27
EC Subsystem to Exchange File Cross-References . . . . . . . . . . . . . . . . 27
EC Subsystem to Application Cross-References . . . . . . . . . . . . . . . . . . 29
Defining a Specific Implementation . . . . . . . . . . . . . . . . . . . . . . . . . . . . . . . . . . 29
Defining Transformation Maps . . . . . . . . . . . . . . . . . . . . . . . . . . . . . . . . . . . . . . 36
Editing Transformation Events . . . . . . . . . . . . . . . . . . . . . . . . . . . . . . . 42
Creating Document Definitions . . . . . . . . . . . . . . . . . . . . . . . . . . . . . . . . . . . . . 43
Defining Transmission Groups . . . . . . . . . . . . . . . . . . . . . . . . . . . . . . . . . . . . . . 45
Setting Up Trading Partners . . . . . . . . . . . . . . . . . . . . . . . . . . . . . . . . . . . . . . . . 47
Using Other Setup Programs . . . . . . . . . . . . . . . . . . . . . . . . . . . . . . . . . . . . . . . . 53
Defining Trading Partner Parameters . . . . . . . . . . . . . . . . . . . . . . . . . . 53
Defining Data Cross-References . . . . . . . . . . . . . . . . . . . . . . . . . . . . . . 55
Defining HTTP Adapters . . . . . . . . . . . . . . . . . . . . . . . . . . . . . . . . . . . . 56

iv User Guide — QAD EDI eCommerce
Validating Data Values . . . . . . . . . . . . . . . . . . . . . . . . . . . . . . . . . . . . . 57
Creating Application Document Definitions . . . . . . . . . . . . . . . . . . . . . 58
Copying Definitions . . . . . . . . . . . . . . . . . . . . . . . . . . . . . . . . . . . . . . . . 62
Using Transformation Functions . . . . . . . . . . . . . . . . . . . . . . . . . . . . . . 64
Renumbering Transformation Actions . . . . . . . . . . . . . . . . . . . . . . . . . 67
Scheduling Automatic Processing . . . . . . . . . . . . . . . . . . . . . . . . . . . . . 67
Unloading and Loading Trading Partner Library Data . . . . . . . . . . . . . 68
Deleting Trading Partner Setup Data . . . . . . . . . . . . . . . . . . . . . . . . . . . 72
Storing and Retrieving Turnaround Data . . . . . . . . . . . . . . . . . . . . . . . . . . . . . . 72
Storing Inbound Turnaround Data . . . . . . . . . . . . . . . . . . . . . . . . . . . . . 72
Retrieving Turnaround Data for Export . . . . . . . . . . . . . . . . . . . . . . . . . 74
Using eCommerce with Multiple Domains . . . . . . . . . . . . . . . . . . . . . . . . . . . . 75
Multiple-Domain Processing . . . . . . . . . . . . . . . . . . . . . . . . . . . . . . . . . 75
Multiple-Domain Setup . . . . . . . . . . . . . . . . . . . . . . . . . . . . . . . . . . . . . 77
Chapter 3 Using EDI eCommerce . . . . . . . . . . . . . . . . . . . . . . . . . . .81
Introduction to eCommerce Use . . . . . . . . . . . . . . . . . . . . . . . . . . . . . . . . . . . . . 82
Using eCommerce with EMT . . . . . . . . . . . . . . . . . . . . . . . . . . . . . . . . 83
Using eCommerce with Trade Sales . . . . . . . . . . . . . . . . . . . . . . . . . . . 83
Importing Documents . . . . . . . . . . . . . . . . . . . . . . . . . . . . . . . . . . . . . . . . . . . . . 84
Exporting Documents . . . . . . . . . . . . . . . . . . . . . . . . . . . . . . . . . . . . . . . . . . . . . 86
Exporting ASNs . . . . . . . . . . . . . . . . . . . . . . . . . . . . . . . . . . . . . . . . . . . 87
Exporting Consignment Usage Data . . . . . . . . . . . . . . . . . . . . . . . . . . . 89
Exporting Invoices . . . . . . . . . . . . . . . . . . . . . . . . . . . . . . . . . . . . . . . . . 90
Exporting Purchase Orders . . . . . . . . . . . . . . . . . . . . . . . . . . . . . . . . . . 91
Acknowledging Purchase Orders . . . . . . . . . . . . . . . . . . . . . . . . . . . . . . 92
Exporting Supplier Schedules . . . . . . . . . . . . . . . . . . . . . . . . . . . . . . . . 94
Exporting Self-Billing Information . . . . . . . . . . . . . . . . . . . . . . . . . . . . 96
Exporting Cycle Count Data . . . . . . . . . . . . . . . . . . . . . . . . . . . . . . . . . 96
Exporting Packing Lists . . . . . . . . . . . . . . . . . . . . . . . . . . . . . . . . . . . . . 97
Exporting Distribution Order Packing Lists . . . . . . . . . . . . . . . . . . . . . 98
Exporting Price Lists . . . . . . . . . . . . . . . . . . . . . . . . . . . . . . . . . . . . . . . 99
Exporting Warehouse Shipment Advice Documents . . . . . . . . . . . . . 100
Exporting Data Using the Generic Gateway . . . . . . . . . . . . . . . . . . . . 101
Tracking Import/Export Document Status . . . . . . . . . . . . . . . . . . . . . . . . . . . . 102
Correcting Errors . . . . . . . . . . . . . . . . . . . . . . . . . . . . . . . . . . . . . . . . . 104
Reprocessing Documents . . . . . . . . . . . . . . . . . . . . . . . . . . . . . . . . . . . 105
Tracking Exported Documents . . . . . . . . . . . . . . . . . . . . . . . . . . . . . . 105
Maintaining the Document Repository . . . . . . . . . . . . . . . . . . . . . . . . . . . . . . . 108
Exchange Data Repository . . . . . . . . . . . . . . . . . . . . . . . . . . . . . . . . . . 108
Application Document Repository . . . . . . . . . . . . . . . . . . . . . . . . . . . 109
Maintain eCommerce Repository Data Collection . . . . . . . . . . . . . . . 110
Turnaround Data . . . . . . . . . . . . . . . . . . . . . . . . . . . . . . . . . . . . . . . . . 111

Contents v
Identifying Cross-References Between Repository Files . . . . . . . . . . 112
Archiving and Deleting EDI eCommerce Data . . . . . . . . . . . . . . . . . . 113
Chapter 4 EDI eCommerce Error Messages. . . . . . . . . . . . . . . . . .117
Index. . . . . . . . . . . . . . . . . . . . . . . . . . . . . . . . . . . . . . . . . . . . . . . . . . . .137

vi User Guide — QAD EDI eCommerce

Change Summary
The following table summarizes significant differences between this document and previous
versions.
Date/Version Description Reference
September 2012/2012.1 EE Rebranded for QAD 2012.1 EE --
March 2012/2012 EE Changed Trading Partner Library contact to QAD Support Various
Added recommended standard dir
ectory structure page 13
Added reference to new I
nclude Invoiced field page 93
Added reference to new Include Unallocated Lines
field page 98
September 2011/2011.1 EE Rebranded for QAD 2011.1 EE --

viii User Guide — QAD EDI eCommerce
Chapter 1
EDI eCommerce Overview
This chapter describes how EDI eCommerce exchanges business documents with external
electronic commerce
(EC) subsystems.
Introduction to EDI eCommerce 2
Introduction to how EDI eCommerce is an improved method of managing electronic data
interchange (EDI) communications with trading partners.
Elements of EDI eCommerce 3
Describes the document repository; the tool set containing table definitions and transformation
procedures needed to integrate transactions and support table maintenance, import, and export; and
the document import and export process control functions.
EDI eCommerce Processing 6
Describes the processing actions needed to convert between the EDI-oriented exchange file and
the system-oriented business document.

2 User Guide — QAD EDI eCommerce
Introduction to EDI eCommerce
EDI eCommerce is an improved method of managing electronic data interchange (EDI)
communications with trading partners. It is the interface between the system and third-party EDI
communications or translator products called EC subsystems.
EC subsystems send and receive EDI data files c
ontaining documents used by such products as
QAD Sales. This packaged software performs electronic data communications for flat-file transfer.
In the EDI eCommerce context, EC subsystems translate EDI data to and from the QAD
standards-neutral formats (SNFs), which are defined for all inbound and outbound EDI
documents.
Fig. 1.1
EDI eCommerce Overview
Manufacturing
EDI eCommerce
Financials
Sales
Sales
Distribution
EC Subsystem
EDI eCommerce’s table-based logical structure supports all major EDI standards, making the
system compatible with most EC subsystem translation capabilities. Additionally, you can map
inbound or outbound data in extensible markup language (XML) format—an important feature in
making EDI communications interoperable with external systems.
Traditional EDI processing applications
require program changes at the code level to meet the
input and output requirements of external systems. In contrast, eCommerce’s processing logic,
EDI document specifications, and trading partner specifications are stored in database tables.
These tables can be modified through the user interface with a set of maintenance programs.
The import and export processes use gatewa
y programs to move data into and out of the database.
These programs are the same for all combinations of document type and trading partner.
Specifications for trading partners and application document definitions are set up in tables instead
of in the code.
EDI eCommerce also stores the EDI data in tables. This
enhances the system’s ability to
manipulate, analyze, edit, and reprocess EDI documents.
The EDI eCommerce Trading Partner Library includes
a set of file definitions and transformation
mappings between the system and a variety of SNFs. Since these are trading-partner specific, you
can often use them as-is to exchange documents with the trading partners for whom they were
designed. Additionally, implementers can use these mappings as templates, then use eCommerce
maintenance programs to make the maps fit their specific needs.

EDI eCommerce Overview 3
Contact QAD Support for more information.
Note EDI eCommerce supports the EDI requirements of the Enterprise Material Transfer (EMT)
module, which allows you to automatically generate purchase orders from sales orders and
transmit them to lower-level suppliers. Use eCommerce programs to communicate the following
types of EMT-related documents among trading partners:
• Purchase orders
• Purchase order acknowledgments
• Purchase order changes
• Purchase order change acknowledgments
• Advance ship notices (ASNs)
See User Guide: QAD Sales.
Elements of EDI eCommerce
EDI eCommerce consists of several elements.
• A document repository
• A tool set containing table definitions and transformation procedures needed to integrate
transactions and support table maintenance, import, and export
• Document import and export process control functions
Document Repository
EDI eCommerce includes a document repository, a set of tables that store data in transition during
various phases of processing. Types of data included in the repository include:
• Exchange file documents
• Application documents
• Turnaround data
See “EDI eCommerce Processing” on page 6.
Maintenance programs let you change all three types of repository data. However, this should be
done with care since modifying data values in the eCommerce tables can cause data
synchronization problems within the database.
See “Maintaining the Document Repository” on page 108.
Exchange File Repository
This portion of the repository holds data at two stages of processing.
• Inbound data from a standards neutral format (SNF) file before it undergoes transformation
processing and is moved into the application document repository
• Outbound data that has already undergone transformation processing before it is written to an
SNF file and transferred to the EC subsystem

4 User Guide — QAD EDI eCommerce
The system moves documents into and out of the repository as needed. A maintenance program
lets you modify data in the exchange file data repository, if necessary.
See “Exchange Data Repository” on page 108.
Application Data Repository
The application data repository includes data in business-document formats:
• Outbound data that is awaiting transformation processing before it is moved to the exchange
file repository
• Inbound data that has already undergone transformation processing and is waiting to be
transferred into the database
The system moves documents into and out of the repository as needed. A maintenance program
lets you modify data in the application document repository, if necessary.
See “Application Document Repository” on page 109.
Direct Import to Application Repository
To provide flexibility in using the document mapping functions of EDI eCommerce, you can
import source files directly into the application document repository and export them without
having to create business documents.
For example, you can use this feature to:
• Receive an EDI file containing a sales order from an external system.
• Load it into the repository based on an implementation definition.
• Transform it into XML format.
• Post it using an HTTP adapter on a Web server where it is available to a second external
system.
During this process, you never are required to create a sales order in the database.
See “Importing Documents” on page 84.
Turnaround Data
Turnaround data includes some data items being stored from transactions imported from an EC
subsystem. Such data items cannot be mapped into the database as elements of a business
document, but are required for related outbound documents.
Example An inbound supplier schedule includes additional customer data your company does
not ordinarily track in shipping documents. However, the customer requires the same data to be
included on all advance ship notices (ASNs) your company exports for items included on the
schedule.
You can define inbound documents from this customer to map turnaround data during gateway
processing. The system marks this data as turnaround data and stores it, but does not attempt to
map it to the database. The corresponding outbound implementation for this trading partner
indicates that the outbound gateway program should pick up these data items and place them in the
appropriate fields on the ASN exchange file document sent to the EC subsystem.

EDI eCommerce Overview 5
EDI eCommerce provides a tool for modifying stored turnaround data.
See “Turnaround Data” on page 111.
EDI eCommerce Tool Set
The EDI eCommerce tool set includes a set of tables containing trading partner data, exchange file
document definitions, and implementation-specific application document definitions used in the
transformation process. Additionally, a set of menu programs lets you maintain these tables. Other
menu programs are used to set up the system and to run the import and export functions.
Most of the programs are not intended for day-to-day use. Typically, a user requires only import
and export programs, reprocessing programs, and a few reports and browses.
The other programs are used by system implementers to perform initial setup and to add trading
partners and document types during system maintenance.
EDI eCommerce programs are located on the 35 menu.
Document Types
EDI eCommerce allows several types of documents to be exchanged with EC subsystems.
Table 1.1 lists examples of the international standards typically associated with some of the
document types supported by eCommerce. Standards include those defined by the following:
• American National Standards Institute (ANSI) Accredited Standards Committee (ASC) X12
• Electronic Data Interchange for Administration, Commerce, and Transportation (EDIFACT)
• Organization for Data Exchange by Teletransmission in Europe (ODETTE)
• Verband der Automobilindustrie e.V. (VDA)
Note These standards are provided as examples. Because of the flexible, database-centered
design of eCommerce, the SNF-based maps can be tailored to any standard or nonstandard
business document.
Table 1.1
Sample EDI eCommerce Document Types
Document Type Examples of International Standards
Planning and shipping schedules • ANSI X12 830 and 862
• EDIFACT DELFOR and DELJIT
• ODETTE DELINS
• VDA 4905
Purchase orders (including changes and
acknowledgments)
• ANSI X12 850, 860, and 865
• EDIFACT ORDERS and ORDCHG
• ODETTE ORDERR
Invoices • ANSI X12 810
• EDIFACT INVOIC
• ODETTE INVOIC
• VDA 4906
Remittance advices • ANSI X12 820
• EDIFACT REMADV

6 User Guide — QAD EDI eCommerce
Note QAD’s Trading Partner Library is an evolving collection of EDI eCommerce
implementation data prepared to meet the needs of specific companies and document standards.
Contact QAD Support for more information.
EDI eCommerce Processing
During import and export, the system stores data in repository tables based on table-resident
exchange file definitions and trading-partner-specific implementation definitions of business
documents. Then, it uses transformation definitions to determine the processing actions needed to
convert between the EDI-oriented exchange file and the system-oriented business document.
Most eCommerce processing is done at a programmatic level. V
ery little system interface is
required on the part of the day-to-day user.
Menu-level programs let you select documents for
import and export processing, if required.
Depending on how your system is set up, processing might not start from the user interface, as in
the following cases.
• You can use Export/Import Controller (35.17.5) to set up a time-based process that searches
for documents or files and automatically begins processing them. See “Scheduling Automatic
Processing” on page 67.
• The external EC subsystem can use a custom-written program to start inbound eCommerce
processing when files are ready for import.
Three basic steps take place when you import or
export a file with eCommerce: load/unload,
transform, and gateway transfer. Each step moves data into or out of the repository. Figure 1.2
summarizes the process.
Fig. 1.2
Import/Export Process Steps
Load/Unload
Load/Unload
Transform
Transform
Gateway
Transfer
Gateway
Transfer
Exchange
Document
Repository
Exchange
Document
Repository
Application
Document
Repository
Application
Document
Repository
SNF
Files
SNF
Files
Database
Database
Turnaround
Data
Turnaround
Data
As required
Inbound (import)
Outbound (export)
Advance ship notices (ASNs) • ANSI 856
• EDIFACT DESADV
• ODETTE AVIEXP
• VDA 4913
Inventory advices
• ANSI X12 846
• EDIFACT INVRPT
• ODETTE STOACT
Distribution order receipts
• ANSI X12 944
• ODETTE STOACT
Sales order shipments
• ANSI X12 945
• ODETTE STOACT
Document Type Examples of International Standards

EDI eCommerce Overview 7
• Load/Unload
• The inbound process loads EDI data from the EC subsystem SNF files into the exchange
file repository.
• The outbound process unloads data from the exchange file repository into the EC
subsystem SNF files.
• Transform
• The inbound process transforms the documents from the EDI format into business
document format, applying trading partner-specific logic to map fields appropriately.
• The same process is applied in reverse to outbound documents—business documents are
transformed into EDI-oriented formats.
• Gateway transfer
• The inbound process extracts transformed documents from the repository and calls the
appropriate gateway program to update the database.
• The outbound transfer process starts with the selection of a gateway program. Data is then
placed in the document repository.
• The transfer process also stores trading partner-specific turnaround data on inbound
messages. It retrieves stored turnaround data for outbound messages.
The import and export processes run automatically from beginning to
end. If the system detects an
error with a file or document at any time, it generates error messages and continues processing the
rest of the job. Depending on where the error occurs, documents with errors are placed either in an
error file or in the appropriate repository with a field indicating an error status. You can then use
reporting tools to determine why errors occurred, then correct the problems and reprocess the
documents.
See “Correcting Errors” on page 104.
Imports
The way import documents are processed and the way gateways are used to transfer data depends
on the types of files loaded from the EC subsystem. A single menu program provides access to the
documents available for import and allows you to select from a list of eligible files. The system
reads control records in the SNF file to determine the document type, then selects the appropriate
gateway processing program. All further processing is automatic.
You can also use the import function to load files from the
EC subsystem directly into the
application document repository. This feature lets you transform inbound files and export them
again without ever creating business documents in the database.
See “Importing Documents” on page 84.
The import process control flow is shown in Figure 1.3.
Fig. 1.3
Document Import Process
Load
Exchange
SNF File
Load
Exchange
SNF File
Transform
Exchange
Document
Transform
Exchange
Document
Transfer
Using Inbound
Gateways
Transfer
Using Inbound
Gateways
Database
Database
SNF
Files
SNF
Files

8 User Guide — QAD EDI eCommerce
Exports
Document export processing is similar to import processing at the user interface, with one
exception. Instead of a single export program, there is a program for each type of document. This
lets the user enter selection criteria for the specific type of document to be exported.
These programs begin the process of extracting docu
ment data from the database and transforming
it into a format that meets the requirements of the receiving trading partner.
The export process control flow is shown in Figure 1.4.
Fig. 1.4
Document Export Process
Transfer
Using Outbound
Gateways
Transfer
Using Outbound
Gateways
Transform
Document
Transform
Document
Unload
Exchange
SNF File
Unload
Exchange
SNF File
Database
Database
SNF
Files
SNF
Files
See “Exporting Documents” on page 86.
The system can create optional tra
cking records for exported documents. After acknowledgment
messages are imported from the EC subsystem, tracking records are automatically updated with
status information from both the EC subsystem and the trading partner’s application.
See “Tracking Exported Documents” on page 105.
Multiple Domains
You can use a single instance of eCommerce to import and export documents between multiple
domains and the EC subsystem.
“Multiple-Domain Processing” on page 75 describes how the system process
es EDI transactions
in a multi-domain environment.
Chapter 2
Setting Up EDI eCommerce
This chapter discusses the programs used to implement and set up EDI eCommerce.
Introduction to eCommerce Setup 11
Outlines the purpose of the chapter and gives information about the potential complexity of
eCommerce.
Setup Overview 11
Illustrates the setup workflow and details some of the customizable options of eCommerce.
Setting Up Data Directories 12
Details the setup of subdirectories in eCommerce Control and directory structure.
Using Sequence IDs 14
Describes how the system assigns sequence IDs.
Configuring eCommerce Control 15
Outlines how eCommerce Control works and describes the frames associated with it.
Defining the EC Subsystem 18
Details how EC Subsystem Maintenance are used to define data, records, and fields.
Defining an Exchange File 23
Explains exchange files and their uses.
Defining EC Subsystem Cross-References 27
Explains how to set up cross-references and use them to exchange files and information.
Defining a Specific Implementation 29
Defines implementations and explains how they can be used to more accurately accommodate the
user’s needs.
Defining Transformation Maps 36
Explains how transformation maps work and how to set them up with Transformation Definition
Maint.
Creating Document Definitions 43
Describes a menu program that lets you create new exchange file, application, or implementation
definitions from existing definitions, .xml/.xsd files, or Progress code that includes temp-table
definitions.
Defining Transmission Groups 45
Explains how transmission groups work and how to define them using Transmission Group
Maintenance.

10 User Guide — QAD EDI eCommerce
Setting Up Trading Partners 47
Explains how Trading Partner Maintenance is used to identify the document types that are
exchanged with each trading partner and to set up cross-references between trading partner
documents and your system.
Using Other Setup Programs 53
Describes additional programs that support setup and maintenance—defining trading partner
parameters, data cross-references, and HTTP adapters; validating data values; defining application
documents and copying those definitions; using transformation functions; scheduling automatic
processing; and loading and unloading trading partner library data.
Storing and Retrieving Turnaround Data 72
Explains how eCommerce deals with turnaround data and specific storage and retrieval practices.
Using eCommerce with Multiple Domains 75
Describes how to set up multiple domain features and how the system processes transactions.

Setting Up EDI eCommerce 11
Introduction to eCommerce Setup
This chapter is for the system implementers and EDI specialists setting up eCommerce to
exchange data with EC subsystems.
The complexity of setting up and implementing eCommerce depends on your company’s specific
needs. If you usually exchange standard types of EDI documents with your trading partners, then
the QAD-developed transformation mappings will probably meet your needs with a minimum of
customization. However, eCommerce’s powerful implementation tools let you perform setup tasks
of much greater complexity.
This chapter describes all the programs available for implementing eCommerce. Depending on the
complexity of your implementation scenario, you may not need to use all of the programs—or
even most of them.
See Chapter 1 for a description of how eCommerce works.
Setup Overview
The implementation definition is the main element used to customize the transformation of data
exchanged with an external system. Building an implementation definition is a complex task. But
many eCommerce installations will never require this activity. QAD provides a set of templates
with much of the basic content already in place. eCommerce implementers then use eCommerce
programs to copy and modify the template and to perform other required setup tasks.
The setup procedures assume that you have already completed a standard system implementation
and have defined common base data such as items, customers, and sites.
A significant step in the EDI eCommerce implementation process is to define the document
exchange requirements of an external EC subsystem. During setup, you do this in terms of several
elements:
• Control record structures and formats used by the EC subsystem.
• Data structure definitions of the standards neutral format (SNF) exchange files communicated
with the EC subsystem.
• Transformation mappings that describe the actions needed to transform data from one
system’s specifications to the other’s. If these actions require functions not provided with
eCommerce, you can define your own functions. See
“Using Transformation Functions” on
page 64.
Figure 2.1 summarizes a typical setup workflow. The degree to which you use the setup programs
depends on your company’s trading partners and the types of documents you exchange with them.

12 User Guide — QAD EDI eCommerce
Fig. 2.1
Typical Setup Workflow
Set up data directories.
Set up data directories.
Define number sequence IDs
and specify control settings.
Define number sequence IDs
and specify control settings.
Define the EC subsystem and
its control record structure.
Define the EC subsystem and
its control record structure.
Define the records and fields
used in exchange files.
Define the records and fields
used in exchange files.
Copy application definitions
and modify for specific
implementations.
Copy application definitions
and modify for specific
implementations.
Define or modify
transformation mapping
actions.
Define or modify
transformation mapping
actions.
Define transmission groups for
outbound documents.
Define transmission groups for
outbound documents.
Associate exchange file and
application definition records
with EC subsystem.
Associate exchange file and
application definition records
with EC subsystem.
Set up trading partners.
Set up trading partners.
In addition to the initial setup programs, the eCommerce menus provide several other programs
you can use to customize the way your system uses eCommerce. These programs allow you to:
• Copy the QAD-provided exchange file, application document, and implementation definitions
so that you can modify them for your specific needs.
• Build your own application document definitions to be used in designing trading-partner-
specific implementations.
• Custom-define additional definitions and functions used in transformation mapping. You can
copy existing items to use as the basis for new ones.
• Define cross-references to specific data values that can be converted automatically to new
values during processing.
• Define data values that can be validated automatically against specified values during
transformation.
• Set up a polling schedule that enables the system to search automatically for files and begin
processing when it finds them.
See “Using Other Setup Programs” on page 53.
Setting Up Data Directories
Before setting up EDI eCommerce, the system administrator should set up a data directory for
eCommerce data files. Below that directory, there must be several subdirectories for the following
types of data:
• Error files
• Inbound files for import. See “Direct Import to Application Repository” on page 4
• Archive files, which are inbound flat files that have completed processing

Setting Up EDI eCommerce 13
• Function definition files, which include the user-defined functions used for transformation
processing
• Files from an external system that are imported directly into the document repository for
transformation and export to another external system
• Outbound files, which contain exported documents.
All but the outbound directories are specified in eCommerce Control (35.13.24). Outbound
directories are used in Transmission Group Maintenance (35.13.13) to specify where exported
document files should be stored for a trading partner. You can set up a separate outbound directory
for each trading partner.
If your company’s environment includes clients on multiple operating systems, your system
administrator must ensure that these directory definitions do not contain anything that is operating
system-specific.
To set up a dual environment, you still must create a master data directory that includes the other
eCommerce subdirectories. Then change the PROPATH—an environment variable containing the
list of directories searched by Progress—for eCommerce users to include the master directory as
the first item. For the directory definitions in eCommerce Control (35.13.24) and Transmission
Group Maintenance (35.13.13), use only the names of the subdirectories, such as error or archive.
See “Defining Transmission Groups” on page 45.
Standard Directory Structure Conventions
QAD Global Services recommends that you establish the following EDI eCommerce directory
structure on each regional server.
Directory Description
Root Directory
/ediec Server (region) level root +
Global Directories
/ediec/bin Server (region) level shared scripts +
/ediec/dat Server (region) level shared script data +
/ediec/func Server (region) level shared functions
/ediec/log Server (region) level shared script logs +
Domained Directories
/ediec/{domain} Domain level branch +
/ediec/{domain}/arc Base for archived (processed) files +
/ediec/{domain}/arc/in Archived inbound files
/ediec/{domain}/arc/out Archived outbound files +
/ediec/{domain}/arc/scn Archived non-Enterprise Applications files
/ediec/{domain}/arc/trk Archived document tracking files *
/ediec/{domain}/bin
+ = Directory does not correspond to a directory reference within EDI eCommerce
* = Directory corresponds to a directory reference for QAD Global Services document tracking

14 User Guide — QAD EDI eCommerce
If in the future an additional delineation is required on a single server, introduce an environment
level within this structure and adjust the setup accordingly:
/ediec/{environment}/{domain}
Using Sequence IDs
The system uses Number Range Management (NRM) sequences to generate repository document
numbers and other numbers used during processing.
Use EC Number Range Maintenance (35.21.1) to c
reate sequences and define their parameters.
Fig. 2.2
EC Number Range Maintenance (35.21.1)
This program is similar to Number Range Maintenance (36.2.21.1). However, EC Number Range
Maintenance defines sequences that are specific to the eCommerce processing domain.
/ediec/{domain}/dat
/ediec/{domain}/err Files processed with errors
/ediec/{domain}/err/gateway Files processed with gateway specific erro
rs +
/ediec/{domain}/func
/ediec/{domain}/in Unprocessed inbound files
/ediec/{domain}/lib Trading partner library files +
/ediec/{domain}/log
/ediec/{domain}/out Unprocessed outbound files
/ediec/{domain}/pre Unprocessed preprocessor files +
/ediec/{domain}/pre/err Preprocessed files with errors +
/ediec/{domain}/scn Unprocessed non-Enterprise App
lications files
/ediec/{domain}/scn/err Non-Enterprise Applications files
processed with errors
/ediec/{domain}/tmp Temporary files +
/ediec/{domain}/trk Unprocessed document tracking files *
/ediec/{domain}/trk/err Document tracking files processed with errors *
Directory Description
+ =
Directory does not correspond to a directory reference within EDI eCommerce
* = Directory corresponds to a directory reference for QAD Global Services document tracking

Setting Up EDI eCommerce 15
After defining number sequences, assign them as system and application-level defaults in
eCommerce Control. You can change the defaults for trading partners or trading partner
documents using Trading Partner Maintenance (35.13.7). When assigning a new sequence number,
the system looks for a sequence definition in the following order:
1 Trading partner document record
2 Trading partner record
3 Application control record
4 Control record
The system maintains a history of numbers generated
that can be displayed using EC Sequence
Number History Report. When this history is no longer needed online, remove it using EC
Sequence Delete/Archive.
See Use
r Guide: QAD System Administration for information on setting up sequence IDs.
Configuring eCommerce Control
Use eCommerce Control (35.13.24) to set default values for eCommerce processing. This program
is also available on the eCommerce Utilities menu (35.17).
The program includes three frames:
• Use the initial frame to set domain-level control values, such as directories used during
document import and export.
• The second frame sets default values for error handling, as well as the default sequence IDs
used to generate repository document numbers.
• The third optional frame lets you set application-specific values that apply only to such
functions as Financials, EMT, and so on.
Fig. 2.3
eCommerce Control (35.13.24), Initial Frame
Default Subsystem. Enter the name of the EC subsystem to be used when documents being
processed do not identify the originating subsystem. This subsystem must be defined in EC
Subsystem Definition Maint (35.13.1) before you can enter it in this field.

16 User Guide — QAD EDI eCommerce
Input Directory (Import). Enter the directory where the EC subsystem places files for import.
When you run Document Import (35.1) with Direction set to Outbound, the system uses this as
the source directory for selecting files.
Note Destination directories for exported files are specified in the Destination field in
Transmission Group Maintenance (35.13.13).
Note The system prompts you to create directories if they do not already exist.
Archive Directory (Import). Enter the directory where the system places the original SNF files
when processing begins.
Error Directory (Import). Enter the directory where files from the Input Directory that fail
during load or unload are stored. Reporting and reprocessing functions use this directory for
input.
Input Directory (Export). Enter the directory where the system looks for files to load directly
into the document repository and process for export without creating business documents.
When you run Document Import with Direction set to Outbound, the system uses this as the
source directory for selecting files.
Archive Directory (Export). Specify the directory where files from the Input Directory are
moved after export processing.
Error Directory (Export). Enter the directory where files from the Import Directory that fail
during export processing are stored. Reporting and reprocessing functions use this directory
for input.
Function Directory. Enter the directory where the user-defined functions used during
transformation processing are stored. See
“Using Transformation Functions” on page 64.
Process Log Directory. Specify the default directory where the system creates log files when it
is processing documents. If the directory does not exist, the system attempts to create it.
You can leave this field blank. If you enter a value, it defaults to the same field for new records
in EC Subsystem Definition Maintenance (35.13.1).
Process log files can be used for two purposes:
• As a record of what took place during a processing session, including warning and error
messages.
• As source information for system-generated e-mail messages. When processing errors
occur, the system automatically notifies the user by adding the process log file to an e-mail
message, provided that e-mail system and address information is defined in User
Maintenance. Additionally, it sends status information from the log to other e-mail
addresses specified for individual location cross-reference records in Trading Partner
Maintenance (35.13.7).
Unless it is blank, the subsystem definition value overrides the eCommerce Control value. If
both are blank, logging is disabled, and process control functions do not create permanent log
files. Instead, the system creates temporary log files in the user’s startup directory. After
sending process status e-mail messages, the system deletes the temporary logs.
Three fields set values for output reports produced when processing is initiated from outside the
EDI eCommerce user interface. For example, some Financials applications can be used to process
bank transactions directly from a related menu item.

Setting Up EDI eCommerce 17
Print Fail/Pass/Both. Specify the level of information included in the output report.
Failed (default): Only files that failed to load are
included in the report.
Passed: Only files that loaded succ
essfully are included.
Both: All processed files are included.
Print Details. Set this field to Yes to include detailed error and warning messages in the output
report.
When it is No, the report includes only a summa
ry of process events.
Report Output. Enter the output device or file name the system uses to display the report.
If you leave this field blank and click Next, the
system sets it to the file name eComOut.
Note When you use an EDI eCommerce menu program to select documents for import or export,
these fields have no effect. You can set the corresponding values directly in the user interface.
Fig. 2.4
eCommerce Control, Transaction Control Frame
Suppress Warnings. Enter Yes to prevent the system from generating status messages that
result from warning conditions during transformation or gateway processing.
When this field is No (the defa
ult), the system always generates warnings in the status
message table.
This field defaults to new records in T
rading Partner Maintenance. You can override it at the
trading partner, trading partner document, and trading partner location cross-reference level.
Stop on Error. Enter Yes to have the system stop processing a document during transformation
when the first error is encountered. The system skips the rest of the document and moves to the
next sequence number.
When this field is No (the default), processing
continues regardless of the number of errors
that occur.
This field defaults to new records in T
rading Partner Maintenance. You can override it at the
trading partner, trading partner document, and trading partner location cross-reference level.
Suppress Session Report. Enter Yes to prevent the system from generating a session report
following document load or unload.
When this field is No (the default), the system
always generates session reports.
This field defaults to new records in T
rading Partner Maintenance. You can override it at the
trading partner, trading partner document, and trading partner location cross-reference level.

18 User Guide — QAD EDI eCommerce
Send E-mail on Error Only. Enter Yes to have the system send e-mail only when the document
does not process successfully. Otherwise, e-mail is sent regardless of document status.
This field defaults to new trading partner location cross-referen
ce records defined in Trading
Partner Maintenance. You can override the control program value as needed.
E-mail Address. Enter the e-mail address of the person who receives a message when an error
occurs during an import or export session.
Note This is not related to the Send E-mail on Error Only field.
These must be complete email addresses
; for example, [email protected].
Use Email Definition Maintenance to set up your
system to manage automated email
messages.
Source Code Page. Optionally, specify the default code page used to create files imported to
your system. During import processing, the system converts the data to the system code page.
This field is not validated. Be sure that the value
you enter is included in the Progress file
DLC/convmap.cp. Otherwise, the conversion program returns an error.
If you enter a value, it defa
ults to EC Subsystem Definition Maintenance. You can update it as
needed for individual subsystems.
Counters: Inbound Exchange, Outbound Exchange, Inbound Application, Outbound
Application, Error.
Specify the default sequence IDs used to assign numbers to documents
during processing. You can override these values in Trading Partner Maintenance.
The fields cannot be blank. They must contain
values defined in EC Number Range
Maintenance.
You can use the next frame to override one or
more settings for individual applications.
Fig. 2.5
eCommerce Control, Application Frame
Use this frame to override system-level sequence ID defaults defined in the previous frame for a
specific application. You can save your changes only if you enter a valid sequence ID in one or
more fields. For blank fields, the system continues to use the sequence IDs from the Transaction
Control frame.
See “Using Sequence IDs” on page 14.
Defining the EC Subsystem
Use EC Subsystem Definition Maint (35.13.1) to define the format and content of the control
records exchanged with an EC subsystem. The values you enter must correspond to those used in
the SNF file by the EC subsystem you are defining.

Setting Up EDI eCommerce 19
Create a separate EC Subsystem Definition Maint record for each direction—inbound and
outbound. The combination of subsystem and direction is a unique identifier, so you can use the
same subsystem name for both.
The program consists of three frames. Use the first frame to define basic EC subsystem data.
Fig. 2.6
EC Subsystem Definition Maint (35
.13.1), First Frame
Subsystem. Enter up to 20 characters to identify an EC subsystem that exchanges data with
your system. Use any name that makes the subsystem easy to identify. For example, if you use
the same subsystem for both imports and exports, you might add the suffix “In” or “Out” to the
end of the subsystem name.
Format. Specify whether the fields in the records used by the EC subsystem are fixed or
variable lengths. Enter a question mark (?) to indicate XML format.
Field Delimiter. If you specify variable-length fields for this EC subsystem, enter the ASCII
code for the character the EC subsystem uses to separate fields.
Record Code Length. Enter the number of characters the EC subsystem uses to indicate the
type of record it is sending. This value must be between 1 and 20.
Record Code Position. Enter the number of the character position where the record code
begins.
Enter zero to indicate that the record code is i
n the last position in the document.
Quote Character. Enter the ASCII code for the quote character used by the EC subsystem. If
no quote character is required, enter zero.
File Extension. Enter the three-character file extension that the EC subsystem uses to identify
its inbound files. For outbound files exported by your system, the system appends this
extension to identify the files to the EC subsystem. The name of the file is based on data you
define in Transmission Group Maint.
Additionally, the load function uses this
extension to determine which EC subsystem
definition to use for interpreting control records.
See “Defining Transmission Groups” on page 45.
Remote Host Name. If this EC subsystem runs automated activities on a host computer, enter
the name of that host computer. For example, you might run an e-mail program on this system
to process messages containing exported files.
To specify the program to be run on the remote host, use
the Processing Program field in the
Transmission Group record for the transmission group that accesses this host.

20 User Guide — QAD EDI eCommerce
Logfile Extension. If the computer specified in Remote Host Name creates a log file related to
its processing activities, enter its file extension.
Logfile Directory. If the computer specified in Remote Host Name creates a log file related to
its processing activities, enter the directory that contains the log file.
Process Log Directory. Enter the complete path to the directory where the system creates log
files when processing documents using this subsystem. The system verifies that this is a valid
directory. This defaults from eCommerce Control, if a value is specified.
Process log files can be used for two purposes:
• As a record of what took place during a processing session, including warning and error
messages.
• As source information for system-generated e-mail messages. When processing errors
occur, the system automatically notifies the user by adding the process log file to an e-mail
message, provided that e-mail system and address information is defined in User
Maintenance. Additionally, it sends status information from the log to other e-mail
addresses specified for individual location cross-reference records in Trading Partner
Maintenance.
Unless it is blank, the subsystem definition value overrides the eCommerce Control value. If
both are blank, logging is disabled, and process control functions do not create permanent log
files. Instead, the system creates temporary log files in the user’s startup directory. After
sending process status e-mail messages, the system deletes the temporary logs.
Direction. Specify whether this EC subsystem definition is for inbound or outbound records. In
eCommerce, direction is always relative to your system—inbound for imports and outbound
for exports.
Each EC subsystem must have separate definitions for inbound and outbound records.
Application. Enter a code representing the application to which this subsystem definition
applies. The default is EDI.
Source Code Page. Optionally, specify the code page required by inbound files. This field
defaults from eCommerce Control.
During import processing, the system converts the data to the system code page using the
specified code page.
This field is not validated. Be sure that the value you enter is included in the Progress file
DLC/convmap.cp. Otherwise, the conversion program returns an error.
Parsing Program. For an inbound subsystem definition, optionally specify the Progress
program name of a procedure that runs before the system attempts to load the imported
document.
A primary use of this field is to specify a program that sets default token values in situations
where the inbound document does not provide such values.
Example When you import bank statements for use by QAD Financials, the inbound
document does not provide values required for the control record to set the tokens. Parsing
Program can reference a program that rewrites the incoming document to an SNF file that
provides a record code on each line. When it reads this file, the system can use these record
identifiers to correctly interpret the document so that it loads without errors.
Use the second frame to define the control records for this EC subsystem.

Setting Up EDI eCommerce 21
Fig. 2.7
EC Subsystem Definition Maint, Control Records Frame
Seq. Enter a sequence number identifying the order in which control records are received from
or sent to the EC subsystem.
Record Name. Enter the name of this control record.
Requirement. Specify whether this control record is mandatory or optional for the receiving
system—your system for inbound documents or the EC subsystem for outbound documents.
When mandatory records are not included in a document being processed, the system
generates an error.
Record Code. Enter the alphanumeric code the EC subsystem uses to define this type of
record.
Token. A token is a critical variable used to populate the exchange file master record during
the load process. It provides such information as the trading partner identifier or the document
type. Tokens determine the specific way data is transformed between the EC subsystem and
your system.
If applicable, enter the name of the token associated with
this record. Valid tokens are:
• tp-id (mandatory for transformation processing)
• tp-document-id (mandatory for transformation processing)
• tp-document-nbr
• tp-message-nbr
• tp-func-grp-nbr
• tp-interchange-nbr
• tp-address
• tp-site
• app-table
• app-table-index
• app-table-value
• app-document-id
• app-document-vers
• app-address
• app-site
To assign multiple tokens to one field,
separate them with commas.
The system treats any other values in this f
ield as reference information.
Omit Record. Enter Yes to prevent the system from writing this record to the output file. This
field applies to exported files only.

22 User Guide — QAD EDI eCommerce
Omit Record Code. Enter Yes to prevent the system from writing the record code to the output
file. To prevent the record itself from being added to the file, set Omit Record to Yes.
This field applies to exported files only.
Fields. Enter Yes to display an additional frame that lets you enter or edit the fields contained
in this record.
Use the last frame to define each field included
in the control records for this EC subsystem.
Note This frame displays only when Fields is Yes for the selected record.
Fig. 2.8
EC Subsystem Definition Maint, Control Record Fields Frame
Seq. Enter the numerical sequence in which this field occurs in the record.
Field Name. Enter a descriptive name for this field. See page 21.
Token. If applicable, enter the token that applies to this record.
Req. Specify whether this field is mandatory (Man) or optional (Opt) for the receiving
system—your system for inbound documents or the EC subsystem for outbound documents.
Min. Enter the minimum length of this field. The system validates that data included in the
field is greater than or equal to the minimum required number of characters.
Max. Enter the maximum length of this field.
• If the field lengths are variable and separated by the specified delimiter, the system
validates that the field length is between the Min and Max values.
• If the field lengths are fixed, the system uses this value as the actual length to calculate
where each field starts and ends.
Default Value. Optionally enter a default value for the system to place in this field if no other
value is specified. For example, this field could be used on an outbound transaction when the
receiving EC subsystem requires a value in a field that generally is blank.
Use EC Subsystem Report (35.13.2) to review the structure of the re
cords and fields in an existing
subsystem definition.

Setting Up EDI eCommerce 23
Defining an Exchange File
An exchange file defines the documents communicated between the EC subsystem and your
system. It includes data record structures that match the definition of the SNF communicated with
the EC subsystem.
Note You can use this program to modify an exchange file definition you have created yourself
or one based on a copy of a QAD-developed template definition. However, the system does not
allow you to modify a QAD-developed definition. If you attempt to do so, the program acts as an
inquiry and shows the data in display-only mode. Use Exchange Definition Copy (35.15.1) to copy
a definition before modifying it. See “Copying Exchange File Definitions” on page 62.
Use Exchange Definition Maintenance (35.15.6) to define the layout and content of the exchange
file
documents. You can define records and fields in records.
Important You must create a different exchange file definition for each type of document.
Note It is also possible to create an exchange file definition based on an existing document
definition, as well as an external .xml or .xsd file, or on Progress source code that defines a
temporary table. See “Creating Document Definitions” on page 43.
The program consists of three standard frames. Optionally
, when the exchange definition is used
for mapping outbound documents to extensible markup language (XML) format, additional frames
display.
Use the first frame to identify an exchange file definition by
a unique combination of name,
version, and direction. You can delete a definition by choosing Delete when the cursor is the
Description field. However, if the system finds an existing transformation map or EC subsystem
cross-reference record that references this definition, it displays an error message. You must delete
the transformation map in Transformation Definition Maintenance or the cross-reference in EC
Subsystem/Exchange Maintenance before deleting the exchange file definition.
Note You cannot delete QAD-provided exchange definitions.
Fig. 2.9
Exchange Definition Maintenance (35.15.6), First Frame
Name. Enter a name for the exchange file definition.
Version. Enter a version number. You can use the same name for more than one definition,
then use a different version number to differentiate among multiple definitions with the same
name.
Additionally, you can use Direction—inbound or
outbound—to distinguish between multiple
definitions with the same name.
Direction. Enter the direction of the file transfer that will use this exchange file definition.
Specify the direction relative to your system. Documents imported into your system are
inbound, while those exported from your system are outbound.

24 User Guide — QAD EDI eCommerce
Desc. Optionally enter a text description of this exchange file definition. This description is
for reference only.
Advanced. When this field is Yes, another frame lets you specify information related to XML
translation of data. This field is enabled only for outbound definitions.
Fig. 2.10
Exchange Definition Maintenance, XML Info
rmation Frame
Document Type. Enter the document-level XML identifier for the document to be created
using this definition. The resulting XML document includes this identifier in the first line.
Document Entity. Enter the URL containing the namespace definition that controls the XML
structure associated with documents created using this definition; for example,
http://www.w3.org/2000/xmlns/.
An XML namespace is a collection of names, identified by a specif
ic uniform reference
locator (URL), which are used in XML documents as element types and attribute names.
System Literal. Specify whether the document type definition (DTD) used to validate the
content of exported XML files is on a public server or within a system domain. Valid values
are:
PUBLIC: The value specified in System Locat
ion is outside the local system domain.
SYSTEM: The specified system location is within the l
ocal system domain.
System Location. Enter the path to the location where the document type definition (DTD)
used to validate the content of XML files is stored.
Use the next frame to define exchange
file records.
Fig. 2.11
Exchange Definition Maintenance, Exchange File Records Frame
Seq. The sequence number of this record. Choose Insert to add a new record. The system
automatically assigns the next number, but you can change this to any number. You should set
up a logical numerical hierarchy for record sequence numbers.

Setting Up EDI eCommerce 25
Important In all cases, the first record in a document added to the repository must be sequence
number 1. Other records can be numbered as you choose. The following examples show valid and
invalid record sequences.
Valid Invalid
1, 2, 3, 4, 5 2, 3, 4, 5
1, 10, 20, 22, 30 10, 20, 22, 30
After you have used an exchange definition in a transformation definition, you cannot change
record sequences in the exchange definition without deleting and reentering the entire
transformation definition.
Record Name. Enter a name for this record. Each record name must be unique in an exchange
file definition.
This record name is used as a va
riable during the transformation process, without the sequence
number.
Requirement. Enter Mandatory to indicate that this record is required during the load or
unload process or Optional to indicate that it is not. When the system cannot find a mandatory
record to load or unload, it generates an error message and does not process the associated
document.
Loop Occurs. Enter the number of times the processing logic should loop through the records
during transformation.
Loop Ends Seq. Enter a defined record sequence number to indicate where the loop ends. For
example, enter a Loop Ends Seq value of 2 on sequence number 2 to indicate that the entire
loop sequence takes place on a single record. Or, enter an end sequence of 4 on sequence
number 3 to indicate a loop that starts at 3 and ends at 4.
To specify a loop structure that includes all records, enter zero or
a number higher than the
last record sequence defined.
Fields. Enter Yes to display an additional frame that lets you enter or edit the fields contained
in this record.
XML, Namespace. Enter Yes to display a pop-up that lets you specify an XML namespace for
this record. This field is enabled only for outbound definitions.
In XML, a namespace is a unique identifier for a collection of
element type and attribute
names. This lets you use identical type and attribute names for multiple purposes based on the
namespace identifier. The value entered here will be prefixed to the field names in this record
followed by a colon.
Use the last frame to edit or enter field information for the se
lected record. Choose Insert to add a
new field.
Note This frame displays only when Fields is Yes for the selected record.

26 User Guide — QAD EDI eCommerce
Fig. 2.12
Exchange Definition Maintenance, Exchange File Field Record Frame
Seq. The sequence number of this field in the record. Choose Insert to add a new field. The
system automatically assigns the next available number. You can modify the number as
needed or navigate to the blank fields at the bottom of the frame and assign numbers.
Note It is recommended that you number the fields sequentially, beginning with 1. When you
do this, a total of 99 fields are available for each record. Although the system accepts non-
sequential numbers, their use is not recommended.
Name. Enter the name of the field. The name must be unique in the record. This field name is
concatenated with the record name and used as a variable during the transformation process,
without the sequence number.
Reqd. Enter Mandatory to indicate that this field is required during the load process or
Optional to indicate that it is not. When the system cannot find mandatory fields to load, it
generates an error message and does not process the associated record.
Type. Enter a code representing the type of data stored in this field. Valid entries are:
• AN: Alphanumeric
• D: Date
• I: Integer
• L: Logical
• R: Real number
Min. Enter the minimum number of characters to be included in this field. The system
validates that required or optional data is greater than or equal to the minimum required value
for the field.
Max. Enter the maximum number of characters to be included in this field.
• If the field lengths are variable and separated by the delimiter specified in EC Subsystem
Definition Maint, the system validates that the field length is between the Min and Max
values.
• If the field lengths are fixed, the system uses this value to calculate where each field starts
and ends.
Token. A token is a critical variable used to populate the exchange file master record during
the load process. It provides such information as the trading partner identifier or the document
type. Tokens determine the specific way data is transformed between your system and the EC
subsystem.
If applicable, enter the name of t
he token associated with this field. Valid values are the same
as those used when you define the EC subsystem.
At least tp-id and tp-document-id must be defined.
See page 21.

Setting Up EDI eCommerce 27
Adv. Enter Yes to display another frame that lets you specify field-level information related to
outbound XML translation of data. This field is enabled only for outbound definitions.
Fig. 2.13
Exchange Definition Maintenance, Field XML Information
XML Tag. Optionally enter an alternate XML tag name associated with this field. If you do not
enter a value, the system uses the field name as the tag.
XML Tag Type. Indicate the type of the specified XML tag. Valid values are Attribute and
Element. The default is Element.
Namespace. Optionally enter the XML namespace associated with this field.
In XML, a namespace is a unique identifier for a collection of
element type and attribute
names. This lets you use identical type and attribute names for multiple purposes based on the
namespace identifier. The value entered here will be prefixed to the field name followed by a
colon.
Defining EC Subsystem Cross-References
Depending on whether you are importing documents that will be added to the database or bringing
them in from an external source for transformation and export in a new format, use one of the
following methods to set up cross-reference records between eCommerce and an EC subsystem:
• When you load records into the exchange repository, then through transformation, into the
document repository, and through a gateway into the database, set up cross-reference records
using EC Subsystem/Exchange Maintenance (35.13.3).
• When you load records directly into the document repository, you can transform files for
export without ever creating business documents in the database. Set up cross-reference
records for this type of processing using EC Subsystem/Application Maintenance (35.13.5).
See “EDI eCommerce Processing” on page 6.
EC Subsystem to Exchange File Cross-References
Use EC Subsystem/Exchange Maint (35.13.3) to correlate the structure of the data records in the
SNF file received from the EC subsystem with an exchange file definition.
This lets the system place data properly in
the exchange repository before beginning
transformation processing.
Control records are defined in EC Subsystem
Definition Maint.
See “Defining the EC Subsystem” on page 18.
This program consists of two frames. In the first, you define a unique combinat
ion of EC
subsystem, document type, and exchange file name.

28 User Guide — QAD EDI eCommerce
Fig. 2.14
EC Subsystem/ Exchange Maint (35.13.3), First Frame
Subsystem. Enter the name of an EC subsystem defined in EC Subsystem Definition Maint.
Document. Enter the type of document to be exchanged between your system and this EC
subsystem. For example, 810 could be used to identify an ANSI X12 standard 810 document,
which is used to export an invoice. This is ordinarily the value represented by the tp-doc-id
token. See “Token” on page 22.
Direction. Enter the direction for this document type—inbound or outbound. Documents
imported into your system are inbound, while those exported to an EC subsystem are
outbound.
Trading Partner. Enter an identifier for the trading partner to which this exchange/subsystem
cross-reference applies. Leave blank if it applies to all trading partners.
By setting up trading partner-specific cross-refe
rence records, you can apply different SNF
definitions for different trading partners.
Exchange File Name. Enter the name of the exchange file to be associated with this document
type. If you have set up multiple exchange files with the same file name in Exchange
Definition Maintenance, scroll through the unique name, version, and direction combinations
and select the appropriate one.
Ver. Enter the version of the exchange file to be associated with this document type. Multiple
exchange files can have the same name. Be sure to use the correct version for the specific
exchange file.
Use the next frame to establish a link between the document type and the
record sequences, data
control codes, and data record names in the exchange file.
Fig. 2.15
EC Subsystem/ Exchange Maint, Second Frame
Exchange Sequence. Enter a number to represent the sequence in which this record appears in
the exchange file document.
Data Control Code. Enter the code or XML tag the EC subsystem uses to identify this type of
data record in this document type.
Break Level. Enter the break level associated with this record.

Setting Up EDI eCommerce 29
Break level lets you define documents in which the same record name can be used more than
once. For example, you can use Comment in both the header and in the detail. When the
system processes data during transformation and encounters a duplicate record name, it looks
for the record with a higher Break value than the previous instance.
Omit Record Code. Enter Yes to prevent the system from writing the record code to the output
file. This field applies to exported files only.
Start New Trans. Enter Yes if you want the data in this record to be treated as a separate
transaction line. This lets you process multiple transactions separately even when they are not
separated by control data records.
Exchange Record Name. The system displays the name of the record from the exchange file
definition.
EC Subsystem to Application Cross-References
Use EC Subsystem/Application Maintenance (35.13.5) to cross-reference the EC subsystem
definition to application document definitions. This lets you load files from an external source
directly into the application document repository.
Fig. 2.16
EC Subsystem/ Application Maintenance (35.13.5)
This program is very similar to EC Subsystem/Exchange Maintenance. The major difference is
that you are cross-referencing file structures to the application document repository with this
program, rather than to the exchange repository.
See page 27.
Defining a Specific Implementation
EDI eCommerce includes a number of generalized application document definitions for data. You
cannot directly edit these definitions. Instead, you can copy a definition and tailor it as needed to
accommodate the data exchange needs of a specific trading partner. In eCommerce, this is known
as an implementation.
The system uses three definitions to correlate the specific data structure and
format requirements
of your system and the EC subsystem:
• The implementation definition
• An exchange file definition
• A transformation definition

30 User Guide — QAD EDI eCommerce
Note You can use this program to modify an implementation definition you have created yourself
or one based on a copy of a QAD-developed template definition. However, the system does not
allow you to modify a QAD-developed definition. If you attempt to do so, the program acts as an
inquiry and shows the data in display-only mode. Use Implementation Definition Copy (35.15.3)
to copy a definition before modifying it. See “Copying Implementation Definitions” on page 63.
Use Implementation Definition Maint (35.15.13) to define the data exchange require
ments for a
specific trading-partner implementation. The program includes three primary frames. Optional
frames display under the following circumstances:
• When this implementation is used for mapping data to or from extensible markup language
(XML) format
• When you are defining turnaround data
• When you are setting up fields that can be updated during document export
Note It is also possible to create an implementation definition based on an existing document
definition, as well as an external .xml or .xsd file, or on Progress source code that defines a
temporary table. See “Creating Document Definitions” on page 43.
In the first frame, you name the implementation and specify
an associated
application document definition.
Fig. 2.17
Implementation Definition Maint (35.15.13), First Frame
Implementation Name. Enter an alphanumeric name for this implementation.
Version. Enter a version number for this implementation. You can use the same name for more
than one implementation, then use a different version number to distinguish between them.
Application Name. Enter the name of a document definition to be copied to create this
implementation definition. This can be one you created or one supplied by QAD.
Version. Enter the version number of the document definition you are using as a template for
this implementation document.
Direction. Enter the direction relative to your system—inbound or outbound—of the document
definition you are using as a template for this implementation definition.
Multiple document definitions
can have the same name and version number and be
distinguished only by direction. Be sure to use the right version.
Desc. Optionally enter a text description of this implementation. This description is for
reference only.
Advanced. When this field is Yes, another frame lets you specify information related to XML
translation of data. This is identical to the frame that displays when you set Advanced to Yes
in Exchange Definition Maintenance (35.15.6). See Figure 2.10 on page 24.

Setting Up EDI eCommerce 31
Print Gateway Error Data. Enter Yes to print the data from the repository for each field
defined in Implementation Definition Maintenance where Display is set to Yes.
Note More must be set to Yes to access the Display field.
When a gateway error occurs, this feature lets yo
u view the data that may have caused the
failure.
Use the next frame to edit an existing record structure
or add new records. To add or modify fields
in a record, set Fields to Yes for that record line and choose Go.
Fig. 2.18
Implementation Definition Maint, Implementation File Records Frame
Seq. The sequence number of this record. Choose Insert to add a new record. The system
automatically assigns the next number. You can modify sequence numbers as needed. Choose
Go to modify an existing record.
Important In all cases, the first record in a document added to the repository must be sequence
number 1. Other records can be numbered as you choose. The following table shows examples of
valid and invalid record sequences.
Valid Invalid
1, 2, 3, 4, 5 2, 3, 4, 5
1, 10, 20, 22, 30 10, 20, 22, 30
After you have used an implementation definition in a transformation definition, you cannot
change record sequences in the implementation definition without deleting and reentering the
entire transformation definition.
Record Name. Enter a name for this record. Each record name must be unique in an
implementation definition.
The transformation process uses this as the first part of the rec
ord variable, independent of the
sequence number.
Note Naming conventions apply to the record names used in application document
definitions and implementation definitions. When you create new definitions, you must use
these names. Table 2.1 lists the naming conventions.
Table 2.1
Record Naming Conventions
Document Type Record Name Description
Sales Order HDR Header
HDR-EXT Header Extended
HDR-CMT Header Comment
DET Detail
DET-EXT Detail Extended

32 User Guide — QAD EDI eCommerce
Requirement. Enter Mandatory to indicate that this record is required during the load or
unload process or Optional to indicate that it is not. If the system cannot load or unload
mandatory records, it generates an error message and does not process the associated
document.
Loop Occurs. Enter the number of times the processing logic should loop through the records
during loading or unloading.
Loop Ends Seq. Enter a defined record sequence number to indicate where the loop ends. For
example, enter a Loop Ends Seq value of 2 on sequence number 2 to indicate that the entire
loop sequence takes place on a single record. Or, enter an end sequence of 4 on sequence
number 3 to indicate a loop that starts at 3 and ends at 4.
To specify a loop structure that includes all records, enter zero or a number higher than the
last record sequence defined.
Gen. Enter Yes if this record applies generically to one or more database tables within the
application. The Table field is then enabled so you can enter table names.
DET-CMT Detail Comments
DET-SOB SO Configuration Bill
Customer Schedule HDR Header
HDR-EXT Header Extended
DET Detail
DET-EXT Detail Extended
ATH Authorizations
Invoice HDR Header
HDR-EXT Header Extended
HDR-CMT Header Comment
DET Detail
DET-EXT Detail Extended
DET-CMT Detail Comments
ADDR Address
ASN HDR Header
HDR-EXT Header Extended
CTR-TARE-SUMM Container Tare Summary
TARE-HDR Tare Header
TARE-DET Tare Detail
CTR-TARE Container Tare
CTR-PRIM Container Primary
CTR-ITEM Container Item
ITM Item
ITM-EXT Item Extended
ITM-AUTH Item Authorizations
Document Type Record Name Description

Setting Up EDI eCommerce 33
Table. Enter the schema names of the tables this record applies to. Separate multiple table
names with commas. You cannot leave this field blank when Generic is Yes. The system
validates your entries and displays a warning if the tables do not exist.
Fields. Enter Yes to display an additional frame that lets you enter or edit the fields contained
in this record.
XML. Enter Yes to display the XML Tag and Namespace fields. Those fields do not display
when XML is No.
XML Tag. Optionally enter the XML tag associated with this record. When the field is blank,
the system uses the record name as the XML tag when transforming documents to XML
format.
Namespace. Optionally enter the XML namespace associated with this implementation
record.
In XML, a namespace is a unique identifier for a collection of
element type and attribute
names. This lets you use identical type and attribute names for multiple purposes based on the
namespace identifier.
In the next frame, you can edit the f
ields copied from the application document definition or add
new fields.
Fig. 2.19
Implementation Definition Maint, Implementation File Field Record Frame
Seq. The sequence number of this field in the record. Choose Insert to add a new field. The
system automatically assigns the next number. You can modify the number as needed or
navigate to the blank fields at the bottom of the frame and assign numbers.
Note It is recommended that you number the fields sequentially, beginning with 1. Provided
you do this, a total of 99 fields are available for each record. Although the system will accept
non-sequential numbers, their use is not recommended.
Select a line and choose Go to edit an existing
field record.
Field Name. Enter or modify the name of the field. This value is used with the record name,
formatted as
recordname.fieldname, during transformation.
Requirement. Enter Mandatory to indicate that this field is required during the load or unload
process or Optional to indicate that it is not. If the system cannot find mandatory fields while
loading records, it generates an error message and does not process the associated record.
Type. Enter the type of data stored in this field. Valid entries are:
• AN: Alphanumeric
• D: Date
• I: Integer

34 User Guide — QAD EDI eCommerce
• L: Logical
• R: Real number
Min. Enter the minimum length of this field. The system validates that required or optional
data is greater than or equal to the minimum required value for the field.
Max. Enter the maximum length of this field.
• If the field lengths are variable and separated by the delimiter specified in EC Subsystem
Definition Maint, the system validates that the field length is between the Min and Max
values.
• If the field lengths are fixed, the system uses this value to calculate where each field starts
and ends.
Source/Destination. Enter the type of variable associated with this field. Valid choices
include:
• G: Gateway. This variable type is used by the gateway during the transfer process.
• T: Turnaround. This variable type represents imported data that is stored in the turnaround
data table, indexed, and later associated with an exported document.
• D: Data entry. The operator adds this data during processing. This function is not currently
implemented.
Gateway Variable. Enter the name of the variable associated with this field. The gateway
program uses this variable to move data into the application. The default variable is copied
from the associated application document definition.
More. Leave this field set to No to skip the next frame. Enter Yes to display another frame that
you can use to define field data used in additional applications of the implementation
definition.
The next optional frame applies to implementation definitions
used for the following purposes:
• Outbound ASNs and invoices, when you want to be able to update data on the outbound
document before exporting it to your trading partner
• Imported documents, when you want to define custom fields that display on the report
generated during import
• XML documents, when you want to specify an XML tag type and tag for a field
Fig. 2.20
Implementation Definition Maint, Field Update Frame

Setting Up EDI eCommerce 35
The following fields in this frame are currently implemented:
Default. Enter the value to be included in the field when Display is No. When that is the case,
the system does not prompt for a value during processing.
Edit Mask/Default. When you want to display custom fields on the report generated during
import, use this field to specify the field length and label to display, separated by a slash (/).
For example, if you enter 4/Max, the report displays the output defined in this implementation
record in a four-character field, with a label of Max.
Note Set Display to Yes for these values to have an effect.
Field Help. Enter text to be displayed at the bottom of the data entry screen when the cursor is
in this field during editing. For example, you can describe the type of data or values that
should be entered.
Validate. Enter Yes to activate the validation process for all documents using this
implementation definition. The applies to both inbound and outbound documents. When set to
Yes, the value of the field associated with this option is compared against the values defined in
Data Validation Maintenance. If the value is not found, a transformation error occurs. See
“Validating Data Values” on page 57.
Field Prompt Conditions. This field is not currently used.
Display. This field is used under the following circumstances:
• When you are defining fields to be included in custom reports that are printed for inbound
documents created based on this implementation definition. When you define a field
length and column label for a custom report in the Edit Mask/Default Value field, you
must set Display to Yes for the field to be included in the report.
• When Print Gateway Error Data is set to Yes in the initial frame. You must set Display to
Yes so that field data displays when errors occur.
• When the implementation is for an exported document such as an invoice or ASN and you
want the system to display a prompt to update a value during export. You must set this
field to Yes for the data entered in the Edit Mask/Default Value field to display when the
document is exported.
Edit. Enter Yes to have this field display for editing when you specify Update or Both in the
Update/Export/Both field of Shipment ASN Export (35.4.1) or Invoice Export (35.4.3). See
“Exporting Documents” on page 86.
Disp on Child Frame. This is used during the export update process. When set to Yes, this
functions like the Display option but instead displays field on a child frame, retaining the
information previously displayed.
XML Tag. Optionally enter an XML tag name associated with this field. If you do not enter a
value, the system uses the field name as the tag.
XML Tag Type. Indicate the type of the specified XML tag. Valid values are Attribute and
Element. The default is Element.
Namespace. Optionally enter the XML namespace associated with this field.
In XML, a namespace is a unique identifier for a collection of element type and attribute
names. This lets you use identical type and attribute names for multiple purposes based on the
namespace identifier.

36 User Guide — QAD EDI eCommerce
Display Prior To. When this implementation creates XML documents, specify the sequence
number of the record before which you want to insert the value of this field. Use the up and
down arrow keys to scroll through available record sequence numbers; the system displays the
names of the associated records.
If Src/Dst is T, indicating a turnaround variable,
another frame displays. Use it on inbound
definitions to enter the table and field with which the turnaround data for this implementation
should be associated. On implementations for outbound documents, enter the name of the function
used to retrieve the turnaround data and attach it to the exported document.
See “Storing and Retrieving Turnaround Data” on page 72.
Fig. 2.21
Turnaround Data Location, Inbound
Frame varies based on
document direction.
See “Turnaround Data” on page 111.
Table Name and Index Name. On implementation definitions for imported documents, enter
the name of the database table and field with which this turnaround data value is associated.
Note Turnaround data is not actually stored in the specified table. Instead, it is stored in a set
of turnaround repository tables that use the table and field names as part of the index.
Fig. 2.22
Turnaround Data Retrieval, Outbound
Retrieval Function. On implementation definitions for exported documents, enter the name of
the function defined in eCommerce Function Maintenance (35.15.21) used to retrieve the
turnaround data from the database and add it to the outbound document. When you enter a
valid function, the system displays the parameters from the function definition for update. See
“Using Transformation Functions” on page 64.
Note The QAD function GetTadData is provided for turnaround data retrieval.
Defining Transformation Maps
The system uses a transformation map in combination with an exchange file definition and an
implementation file definition to exchange data between your system and an external EC
subsystem. The resulting output meets the specific data structure and format requirements of both
systems.
Note You can use this program to modify a transformation definition you have created yourself
or one based on a copy of a QAD-developed definition. However, the system does not allow you to
modify a QAD-developed definition. If you attempt to do so, the program acts as an inquiry and
shows the data in display-only mode. Use Transformation Definition Copy (35.17.1) to copy a
definition before modifying it. See “Copying Transformation Definitions” on page 64.
Use Transformation Definition Maint (35.15.17
) to define a transformation map.
This program consists of several frames. Use
the first frame to:

Setting Up EDI eCommerce 37
• Name the transformation definition.
• Identify the combination of an existing exchange file definition, application document
definition, and specific implementation that uses this transformation map.
• Set up two fields for testing the transformation map. The Can Run and Debug Level options
can be especially valuable when you are testing a new implementation for a new trading
partner or document.
Fig. 2.23
Transformation Definition Maint (35.15.17), First Frame
Transformation. Enter a name for this transformation definition.
Direction. Specify the direction—inbound or outbound—of the documents to be transformed
using this definition. Documents imported into your system are inbound, while those exported
from your system are outbound.
Two transformation definitions can have the same
name and be distinguished only by
direction.
Exchange File Name, Version. Enter the name and version of the exchange file definition used
in this transformation.
Note Multiple exchange file, application document, and implementation definitions can use
the same name. Make sure to specify the correct version numbers.
Application, Version. Enter the name and version of the document definition used in this
transformation. This can be a QAD-supplied definition or one you created.
Implementation Name, Version. Enter the name and version of the implementation definition
used in this transformation.
Can Run. Set to Yes to make this transformation map completely operational.
During testing, you can set this field to No. Th
e system then runs the entire transformation
process, but backs the data out of the repository instead of storing it. You can identify
transformation mapping problems and correct them before changing the field to Yes, letting
the data be saved in the data repository.
Debug Level. Specify a value between 0 and 9 to indicate the level of detail reported in the
activity file created when this transformation is run. Lower levels provide less detail. For
example, you can set this to 9 during testing to get a complete record of what happens during
transformation processing.
Warning Leaving this field set to a high value can produce very large files and can lead to disk
space problems.
The system names these activity files
using the convention MMDDYYYY.DBG, where MMDDYYYY
is the date the transformation map is used. A new file is created when the first session is run
each day. A record of each transformation operation that occurs during that day is appended to
this file.

38 User Guide — QAD EDI eCommerce
Many to Many. Set to Yes to combine multiple input documents and treat them as one
document. This lets the system back out multiple files or create a single output from several
inputs.
If No, the system always maps one input document to
one or many output documents,
depending on how many times the transformation definition indicates a new header should be
written.
Before displaying the second frame, the system crea
tes variables from the exchange file and the
implementation associated with this transformation definition. Only these and user-defined
variables can be used during transformation, along with the following automatically assigned
variables.
• tp-id • map-name
• tp-document-id • map-exf-vers
• tp-message-nbr • map-imp-name
• tp-func-grp-nbr • map-imp-vers
• tp-interchange-nbr • map-mfg-name
• tp-document-nbr • map-mfg-vers
• tp-doc-dir • map-exf-name
• tp-site • map-many-to-many
• tp-address • map-debug-level
• tp-token-val-list • map-can-run
• mfg/pro-site • current-exf-seq
• mfg/pro-address • current-mfg-seq
• conditional-rec-flushed
The trading partner variables correspond to
tokens. The system uses MFG/PRO-SITE and
MFG/PRO-ADDRESS to determine the customer address and the site code automatically, based
on the cross-reference defined in Trading Partner Maintenance (35.13.7). You can also assign
these values as an event that takes place during transformation. Other variables contain
information associated with the transformation definition.
See “Token” on page 22.
The second frame displays the events and actions as
sociated with the current transformation
definition records. The records are always related to the direction of the document. For example,
an inbound document always displays exchange file record names.
Choose Insert to define a new event. To delete the current selec
tion, choose Delete, then confirm
the deletion when prompted.
Note The system provides a set of editing tools that let you modify existing records without
deleting them.

Setting Up EDI eCommerce 39
Fig. 2.24
Transformation Definition Maint, Transformation File Records Frame
In the Event Qualifiers frame, begin identifying a new event by specifying a combination of event
qualifier, event, record name, and action sequence.
Fig. 2.25
Transformation Definition Maint, Event Qualifiers Frame
Ev Qual. Enter an event qualifier or use Next/Previous to scroll through the list and choose Go
to select a value.
Note The current version of eCommerce uses only the Each option.
Event. Enter the type of event or use Next/Previous to scroll through the list and choose Go to
select a value. Valid values are:
• Loop-Entry
• Record-Entry
• Field-Entry
• Loop-Exit
• Record-Exit
• Field-Exit
Record Name. Enter the name of the record to be acted upon during this event.
You can also use Next/Previous to scroll through the
list and choose Go to select a value.
Because the record name is associated with the direction of the document, Next/Previous
displays only the records that can be used as input to the transformation. For example, on an
outbound document, only implementation record names are available.
Action Seq. Enter a number to represent the sequence in which this event occurs.
Note When setting up event qualifiers, consider using increments of 10 so you can later insert
intermediate sequence numbers. If necessary, you can use editing options to resequence
events, as described in “Editing Transformation Events” on page 42. Alternatively, use the
Transformation Renumber Utility (35.17.3) to update all the event sequence numbers
automa
tically and to leave space between numbers in which to insert new events. See
“Renumbering Transformation Actions” on page 67.

40 User Guide — QAD EDI eCommerce
After you enter a value in Action Sequence and choose Go, a final frame displays for you to enter
the type of action associated with this event—for example, equating two values or reading a record
into memory. You also specify a qualifier for the source, the target, or both, depending on the type
of action.
Note The target is always the element being acted upon. For example, if you are equating two
values, you are instructing the system to make the target equal to the source.
Fig. 2.26
Transformation Definition Maint, Event Actions Frame
Type. Specify the type of action to be performed or use Next/Previous to scroll through the list
of action types and choose Go to select one. Valid action types are:
• Equate: Set the target equal to the source.
• Read: Read the target record fields into memory. This can be used only with an input
record.
• Clear: Remove the target record fields from memory.
• Write: Write the target record to the database. You can only write an output record. You
must write a header record before another record can be written. Write can be used
optionally with the QAD-provided check-hash function, which determines the header for
which the detail will be written.
• New: Logical placeholder documenting the initialization of new outbound records.
• Loop: Loop through the records already read into memory.
• EndLoop: End a loop. Does not require a source or target.
• If: Conditional logic based on the source and source qualifier. The If statement must return
a value of True or Yes. It allows the use of Else and Endif and does not require a source or
target.
• Endif: End of an If statement. Endif does not require a source or target.
• Else: Logical branch between If and Endif statements. Else does not require a source or
target.
• Repeat: Repeats a section of transformation event actions a specified number of times.
• EndRepeat: Ends the section of transformation event actions being repeated by the
previous Repeat action.
Qual Target. Select the form of data to be specified as the target for this event. Valid values for
the Target field are determined by this setting.
Enter the qualifier for the target or
use Next/Previous to scroll through the list of qualifiers and
choose Go to select one. Valid values are:
• I: Input data
• O: Output data
• V: Variable

Setting Up EDI eCommerce 41
Target. Enter the inbound record or field, outbound record or field, or variable that is the target
of the action specified in Type.
Enter the name of the target or use
Next/Previous to scroll through the list of available targets
and choose Go to select one.
Qual Source. Select the form of data to be specified as the source for this event. Valid values
for the Source field are determined by this setting.
• I: Input data
• O: Output data
• V: Variable
• C: Constant
• F: Function
• S: Sort (only allowed for Loop event type)
If you specify a function and enter its name in So
urce, another frame lets you modify it as
needed for this specific instance. Some functions are provided with eCommerce. However,
you can also define your own functions with eCommerce Function Maintenance (35.15.21).
Use eCommerce Function Copy (35.17.2) to copy an existing function before modifying it as
required.
See “Using Transformation Functions” on page 64.
Source. Enter the inbound record or field, outbound record or field, variable, constant, or
function that is the source of the action specified in Type. If you enter the name of a function,
another frame displays. Use it to modify the qualifiers and parameters as needed for this
specific instance.
Fig. 2.27
Transformation Definition Maint, Function Frame
Qual. Enter a code indicating the structure of the data passed in this parameter. Valid values
for the Parameter field are determined by this setting.
Enter the qualifier for the parameter
or use Next/Previous to scroll through a list of qualifiers
and choose Go to select one. Valid values include:
• I: Input data
• O: Output data
• V: Variable
• C: Constant

42 User Guide — QAD EDI eCommerce
Parameter. Enter the name of the input, output, or variable. You can use Next/Previous to
scroll through a list of available parameters and choose Go to select one. The contents of the
list are determined by the Qual value.
If Qual is C, you must enter a constant. If you enter a va
lue not already defined, the system
prompts you to define the data type as one of the following:
• AN: Alphanumeric
• D: Date
• I: Integer
• L: Logical
• R: Real number
Editing Transformation Events
Transformation Definition Maintenance includes editing options that let you—among other
actions—modify current event records without deleting and re-entering them. These options are
available in both QAD .NET UI and character user interface when focus is on a record in the
Transformation File Records frame.
• In QAD .NET UI, choose an option from the Actions menu.
• In the character UI, use the appropriate keyboard shortcut:
• Edit Current Record: Esc-e
• Delete Block: Esc-d
• Create Gap: Esc-g
• Renumber: Esc-r
• Copy Block: Esc-c
Fig. 2.28
Transformation Definition Maintenance Editing Options in .NET UI
Same options are
available as
keyboard Escape
shortcuts in the
character UI.

Setting Up EDI eCommerce 43
Edit Current Record
Use this option to update a transformation map event. You can change the event type, qualifier,
target, source, and sequence. If the event action calls a function, you can reset the parameter values
or change to a different function.
Delete Block
The system displays a selection range for the current record. The defaults cover all the action event
sequence numbers for the record. Leave the fields as-is to delete all the events for the record, or
modify them to delete just the range of events you want to remove.
Create Gap
The system prompts you to specify the length of the gap in sequence numbers to be created after
the selected event. For example, if focus is on event action sequence 60 and you set the Create Gap
Of field to 100, the system adds 100 to all the subsequent events in the current record. So, if the
next sequence numbers were 70, 80, 90, the system would set the sequence numbers for the record
to 60, 170, 180, 190, and so on.
Renumber
The system prompts you for an Interval—the new starting sequence number for each record in the
transformation map, as well as the increment between event sequences. The system disregards the
current sequences and begins each record with the specified value. For example, if you set Interval
to 5, the system renumbers the events in each record as 5, 10, 15, 25, 35, and so on. You can
perform this same function using Transformation Number Utility (35.17.3).
Copy Block
Use this function to copy a specified range of event actions to the current transformation map or
any other map in the system.
The system prompts you for the range of sequence numbers you want to copy. The default range is
from the current event through the last one in the record. You then specify the destination of the
copied events. The defaults represent the current record and transformation map. Use the arrow
keys to scroll through valid destinations.
The new events start with the specified Destination Sequence; the system maintains the increments
between the source events when assigning new sequence numbers. For example, if you copy
sequence numbers 10, 15, 20 and specify a Destination Sequence of 21, the new events would be
numbered 21, 26, 31—maintaining the original increment of 5 between events.
Creating Document Definitions
You can create exchange file, application, and implementation document definitions by loading
them from trading partner library files, entering them manually, or copying them from an existing
definition of the same type.

44 User Guide — QAD EDI eCommerce
An additional menu program—Create eCommerce Doc Definitions (35.15.4)—offers more ways
to create these document definitions. You can create a definition from:
• A different type of document definition
• A temp-table definition in Progress syntax from either Progress source code (.p or .i file) or a
.txt file
• An XML document (.xml file)
• An XSD document (.xsd file)
Fig. 2.29
Create eCommerce Document Definition (35.15.4)
Source Type. Select the type of source you want to use for creating the new document
definition. Valid values are:
Exchange File Definition
Application Definition
Implementation Definition
Temp Table Definition (*.i, *.p, *.txt)
XML Document (*.xml)
XSD Document (*.xsd)
Input File. Enter the name of the file that contains the source file for the new definition. You
can only access this field when the source type is a temp table, .xml document, or .xsd
document. Leave blank to display a navigation screen for selecting files.
Source Name. Select the source document that the new document will be copied from. You
can only access this field when the source type is an exchange file, application, or
implementation definition. Use the arrow keys to scroll through available documents of the
selected source type. The system displays information about each document.
Create Document Type. Select one or more document types to be created. You must select at
least one type.
Destination Name, Version, Direction. Specify a name, version, and direction (inbound,
outbound) for the new document definitions.

Setting Up EDI eCommerce 45
Special Considerations for Creating Definitions from Files
Although creating a new document definition based on an existing exchange, application, or
implementation definition does not have any particular limitations, some special considerations
apply when you create a new definition from temp tables or .xml/.xsd files.
Fields Defined in Temp Tables
When you use temp table definitions as the source, all fields required for the definition must be
included within the “define” statement itself. Additional fields defined in a referenced include file
will not be part of the resulting document definition.
Example The following temp table definition would create the record tt_doc_status with
only the fields
tt_doc_seq and tt_gtwy_pgm. Any fields defined in ednrmfdf.i would not be
part of the new document definition.
define temp-table tt_doc_status no-undo
field tt_doc_seq like edmfs_mfd_seq
field tt_gtwy_pgm like edmf_gtwy_pgm
{ednrmfdf.i}
index tt_gtwy_idx tt_doc_seq.
Record Fields
• Maximum number of fields. Creating a new definition from a file limits the maximum number
of fields that can be created for each record:
• For Enterprise Edition: 300
• For Standard Edition: 100
If the number of fields in the file exceeds the limit, the system ignores additional fields when
creating the new definition.
• Data type. When creating a definition from an XML file, the system sets the data type for each
field to AN (alphanumeric). For XSD or temp table definition files, the field is assigned the
data type defined in the file, unless the syntax defines the field as “like” another field. In that
case, the system uses AN as the data type.
• Order. Although the system creates fields for nodes in an XML file that do not have a value,
the order in which the fields are created is not necessarily the same as the order in which they
appear in the XML document.
Record Loop End Sequence
When creating a new definition from an XSD file or a temp-table definition that contains data
relationship information, the system attempts to determine the loop ending sequence number for a
record. In cases where it cannot, it sets the end sequence to 0 (zero).
For definitions created from XML documents, the loop end sequence number is always set to 0.
Defining Transmission Groups
Transmission groups consolidate multiple trading partners by network location so that outbound
documents can be batched appropriately. For example, you can create a transmission group for all
the trading partners on one value-added network (VAN).

46 User Guide — QAD EDI eCommerce
When you set up trading partners who will receive documents exported from your system, you
assign them to a transmission group. This relationship indicates such information as where the
system should place outbound files for the trading partner.
See “Setting Up Trading Partners” on page 47.
Use Transmission Group Maintenance (35.13.13
) to define transmission groups.
Fig. 2.30
Transmission Group Maintenance (35.13.13)
Transmission Name. Enter a name for the transmission group or use Next/Previous to scroll
through the existing records and choose Go to select one.
Description. Enter a description of the transmission group, such as a company name.
Destination. Enter the directory where exported SNF files associated with this group will be
written. See “Setting Up Data Directories” on page 12.
Processing Script. Optionally enter the file name of a custom script to be run after a group of
documents is created. For example, this could be a script that invokes an e-mail program to
transmit the exported files to the trading partner.
Processing Program. Enter the path name to an executable program file to be run when a file
is exported to this transmission group. For example, this might be an e-mail program that
transmits the file to a trading partner.
To specify a processing program on a dif
ferent computer, use the Remote Host Name field in
the EC Subsystem Definition Maintenance record for the EC subsystem associated with this
transmission group.
HTTP ID. Enter the code representing the set of parameters used to post XML data to a server
for trading partners in this transmission group. If specified, this must be a valid code defined in
HTTP Adapter Maintenance (35.13.19). See “Defining HTTP Adapters” on page 56.
By default, the Progress program
edimhtad.p is used to post this data. If you use a custom-
written processing program for this task, it should be set up to receive the following
parameters:
• INPUT: The table storing parameter values (in matching pairs).
• INPUT: The XML pointer. This can be blank. In the case of edimhtad.p, the program is
using the memory pointer from the XML document that was created in memory.
• INPUT-OUTPUT: The message table used to capture messages and pass messages back to
the calling procedure.

Setting Up EDI eCommerce 47
• OUTPUT: The success flag used to determine if the process was successful.
HTTP Timeout. Enter the number of minutes that the system waits for a response from the
HTTP posting process before displaying a timeout message. Leave the field set to the default
(0) to have the system wait indefinitely.
Subsystem. Enter the EC subsystem associated with this transmission group. This subsystem
must be defined in EC Subsystem Definition Maint.
This field determines the file extension used for the
SNF files sent to trading partners assigned
to this transmission group.
File Name Counter. Specify the sequence ID that is used to assign file names to files exported
to this transmission group. This must be a valid sequence ID defined in EC Number Range
Maintenance.
Capitalize Outbound Data. Enter Yes to convert the data in exported files for this transmission
group into all capital letters.
Target Code Page. Specify the code page required by the receiving application for files sent
to this transmission group. When creating the export file, the system converts the data as
needed to match the specified code page.
This field is not validated. Be sure that the value
you enter is included in the Progress file
DLC/convmap.cp. Otherwise, the conversion program returns an error.
Setting Up Trading Partners
Use Trading Partner Maintenance (35.13.7) to identify the document types that are exchanged with
each trading partner and to set up cross-references between trading partner documents and your
system. You can also cross-reference the trading partner’s site and address codes to the codes used
in your database.
This program consists of multiple frames. In the first frame, specify the
ID the trading partner uses
to identify itself in the control record portion of the SNF files exchanged between the EC
subsystem and your system.
Fig. 2.31
Trading Partner Maintenance (35.13.7), First Frame
TP ID. Enter an alphanumeric identification code for this trading partner. This must be the
same as the code used in the SNF file control record for the tp-id token. See “Token” on
page 22.
Name. Enter an identifier for this trading partner. This is for reference only.
In the second frame, enter control info
rmation used during document processing for this trading
partner. Several of the fields serve as defaults for trading partner documents defined in the
subsequent frame, such as the sequence IDs used to generate document sequence numbers in the
repositories.

48 User Guide — QAD EDI eCommerce
Fig. 2.32
Trading Partner Maintenance, Control Information Frame
Group. Optionally, enter the name of a trading partner group. You can use this group name to
associate multiple trading partners for reporting purposes.
Counters: Inbound Exchange, Outbound Exchange, Inbound Application, Outbound
Application.
Specify the sequence IDs that are used to assign numbers to repository documents
during processing for this trading partner.
These fields are optional. If you enter a value, it
must be a valid sequence ID defined in EC
Number Range Maintenance. See “Using Sequence IDs” on page 14.
Use Primary Reference ID. Enter Yes to have the system use a reference ID number provided
in the document being processed, rather than using a sequence ID defined in EC Number
Range Maintenance to generate an ID number. This field defaults to the Trading Partner
Document Records frame for new records.
When you use this feature, assign the token PRIMAR
Y-REF-ID to a field in the exchange file,
application, and implementation definitions to represent the reference ID.
Note If this field is Yes and the token is not assigned in a required definition, the system uses
the appropriate sequence ID specified in the eCommerce Transaction Control frame of
eCommerce Control to generate a number.
Application. Enter a code representing the application to which this record applies.
The field in the initial frame defaults to EDI. Y
ou can change it as required. That value
defaults to new records created in the Trading Partner Document Records frame; that value in
turn defaults to new TP location cross-reference records.
Suppress Warnings. Enter Yes to prevent the system from generating status messages that
result from warning conditions during transformation or gateway processing.
When this field is No, the system always gene
rates warnings in the status message table.
This field defaults from eCommerce Control. It defaults t
o the Trading Partner Document
Records frame for new document records.
Stop on Error. Enter Yes to have the system stop processing a document during transformation
when the first error is encountered. The system skips the rest of the document and moves to the
next sequence number.
When this field is No, processing continues regardless
of the number of errors that occur.
This field defaults from eCommerce Control. It defaults t
o the Trading Partner Document
Records frame when you set up a new document record.
Suppress Session Report. Enter Yes to prevent the system from generating a session report
following document load or unload.
When this field is No, the system always generates session reports.

Setting Up EDI eCommerce 49
This field defaults from eCommerce Control. It defaults to the Trading Partner Document
Records frame when you set up a new document record.
The Trading Partner Document Records frame displays next. Set up a separate record for each
document type exchanged with this trading partner.
Fig. 2.33
Trading Partner Maintenance, Trading P
artner Document Records Frame
TP Doc ID. Enter the identifier for the document type exchanged with this trading partner. For
example, this might be 810 to indicate an invoice exported in the ANSI X12 810 format. This
must be the same as the code used in the SNF file control record for the tp-document-id token.
See “Token” on page 22.
Dir. Specify whether this record applies to inbound or outbound records. This field lets you
distinguish between two trading partner records with the same document type by making one
inbound and the other outbound.
Document Map. Enter the name of the transformation map to be used in converting the data in
this record for this combination of trading partner, document type, and direction. This
transformation map must be defined in Transformation Definition Maint. See “Defining
Transformation Maps” on page 36.
Transmission Group. Enter the name of the transmission group associated with this trading
partner for this document type. This group must be defined in Transmission Group
Maintenance. The field is mandatory for outbound documents. See “Defining Transmission
Groups” on page 45.
Token List. Optionally enter a comma-separated list of valid tokens for the system to use to
differentiate between multiple trading partner cross-references to the same combination of site
and ship-to address. These values are used to determine the source of imported documents.
When Fields is Yes, you can then associate corres
ponding comma-separated values for each
combination of trading partner site and address.
Enter enough tokens and values to create a unique
combination of trading partner site, trading
partner address, and tokens for each instance where trading partner site and trading partner
address are the same. See “Token” on page 22.
The next frame displays additional
fields for the selected record.
Fig. 2.34
Trading Partner Maintenance, Additional Trading Partner Document Records Frame

50 User Guide — QAD EDI eCommerce
Track. Indicate whether the system should automatically generate tracking records when
exporting documents of this type to this trading partner. The system can then import
acknowledgment and status messages from the EC subsystem and update the tracking records
as required. See
“Tracking Exported Documents” on page 105.
When this field is No, tracking records are not created and imported acknowledgments are
disregarded.
Note Documents are tracked only when the Primary Reference field in the exchange
repository master record contains a value. For example, this can be a purchase order, invoice,
or ASN number.
Acks. Indicate whether the system typically receives acknowledgment messages from the EC
subsystem after the subsystem processes exported documents of this type for this trading
partner.
When Track is set to Yes, the system creates a tracking record each time it exports this type of
document to this trading partner. When Ack to Yes, the system leaves the Ack Status field in
the tracking record blank until importing an acknowledgment message from the EC
subsystem. When Ack is No, the system automatically sets Ack Status to None Expected. The
system can still update the Ack Status field by importing a status message.
Fields. Enter Yes to display an additional frame that lets you enter or edit trading partner
cross-reference information.
Save Repository. Specify whether the system retains data in the document repositories after
processing.
Yes (default): Any records created in the repositories when processing this document are
saved.
No: The system deletes repository records related to this document after processing is
completed.
Document Group. Optionally, enter the name of a trading partner document group. You can
use this group name to associate multiple trading partners for reporting purposes.
Application. Enter a code representing the application to which this record applies.
This field defaults from the initial trading partner data frame. It defaults to the TP Location
Cross-Reference frame when you set up a new cross-reference record.
Exchange, Application Counter. Specify the sequence IDs that are used to assign numbers to
repository documents for this trading partner.
These fields are optional. If you enter a value, it must be a valid sequence ID defined in EC
Number Range Maintenance.
Use Primary Reference ID. Enter Yes to have the system use a reference ID number provided
in the document being processed, rather than using a sequence ID defined in EC Number
Range Maintenance to generate an ID number. This field defaults from the initial trading
partner setup frame.
When you use this feature, assign the token PRIMARY-REF-ID to a field in the exchange file,
application, and implementation definitions to represent the reference ID.
Note If this field is Yes and the token is not assigned in a required definition, the system uses
the appropriate sequence ID specified in the eCommerce Transaction Control frame of
eCommerce Control to generate a number.

Setting Up EDI eCommerce 51
Suppress Warnings. Enter Yes to prevent the system from generating status messages that
result from warning conditions during transformation or gateway processing.
When this field is No, the system always gene
rates warnings in the status message table.
This field defaults from the initial trading partner
data frame. It defaults to the TP Location
Cross-Reference frame when you set up a new cross-reference record.
Stop on Error. Enter Yes to have the system stop processing a document during transformation
when the first error is encountered. The system skips the rest of the document and moves to the
next sequence number.
When this field is No, processing continues regardless
of the number of errors that occur.
This field defaults from the initial trading partner
data frame. It defaults to the TP Location
Cross-Reference frame when you set up a new cross-reference record.
Suppress Session Report. Enter Yes to prevent the system from generating a session report
following document load or unload.
When this field is No, the system always generates session reports.
This field defaults from the initial trading partner
data frame. It defaults to the TP Location
Cross-Reference frame when you set up a new cross-reference record.
The next frame lets you set up cross-references between the
trading partner’s site and address
codes and those used by your system. The system uses these cross-references during the
transformation process to automatically identify such information as the customer’s site and
address. Without the cross-references, you must use Transformation Definition Maintenance
(35.15.17) to assign the MFG/PRO-SITE and MFG/PRO-ADDRESS variables before the output
header record is written. Otherwise, the system generates a transformation error message.
Note This frame displays only when you set Fields to Yes.
The frame acts as a selection list for all the needed combinations for this tradin
g partner. Select an
existing record and choose Go to update it. Choose Insert to add a new record.
Fig. 2.35
Trading Partner Maintenance, TP Location Cross- Reference Frame
TP Site and TP Address Reference. Enter the site and address codes used by the trading
partner. Several different site and address combinations can exist at this level. For example,
one cross-reference may be for the trading partner (sold-to) and the others for the ship-to
addresses.
For inbound documents, the combination of trading
partner site and address provides a cross-
reference to the site and address. For outbound documents, the transformation process
determines the trading partner site and address codes using the following three elements:
• Application document definition name and version
• Implementation name and version
• Site and address codes from your system

52 User Guide — QAD EDI eCommerce
Token List Values. Enter a comma-separated list of values associated with the tokens entered
in Token List in the previous frame. Be sure that there is one-to-one correspondence between
tokens and values.
On imported documents only, the system uses these values
to differentiate between multiple
trading partner cross-references to the same combination of site and address.
Site and MFG Addr. Enter cross-references from the trading partner site and address to the site
and address codes in your system.
Note Site and Address are not validated against master records defined in your system.
Export. Specify whether the system exports this document type to this combination of site and
address for this trading partner.
In an environment where you have mapped more than one trading
partner cross-reference to
the same combination of site and address, this field lets you limit the trading partner addresses
that are selected to receive exported documents. For example, you can send an ASN both to a
ship-to customer and to the central ordering point that placed the order by having a cross-
reference record for each and setting Export to Yes for both.
This field can be updated only when the Direction field for a trading partner document ID is
Out.
The next frame includes additional location cross-re
ference fields.
Fig. 2.36
Trading Partner Maintenance, Additional TP Location Cross- Reference Fields
Transmission Group Override. Set this field to Yes to display an additional frame that lets you
override the document-level transmission group value in the Trading Partner Document
Records frame for a specific trading partner/site reference.
You can use this feature to define different HTTP parameters
for posting XML documents for
specific trading partner locations; this is useful, for example, when you are using QXtend to
communicate documents created by EDI eCommerce.
Email. Enter Yes to display an additional frame that lets you enter one or more e-mail
addresses of individuals who receive process status notifications regarding documents that use
this trading partner location cross-reference.
You also can specify whether the system sends e-mail to the
address only when a processing
error occurs.
These must be complete email addresses
; for example, [email protected].
Use Email Definition Maintenance (36.4.20) to set up
your system to manage automated email
messages.
Suppress Warnings. Enter Yes to prevent the system from generating status messages that
result from warning conditions during transformation or gateway processing.
When this field is No, the system always gene
rates warnings in the status message table.

Setting Up EDI eCommerce 53
This field defaults from the Trading Partner Document Records frame.
Stop on Error. Enter Yes to have the system stop processing a document during transformation
when the first error is encountered. The system skips the rest of the document and moves to the
next sequence number.
When this field is No, processing continues regardless of the number of errors that occur.
This field defaults from the Trading Partner Document Records frame.
Suppress Session Report. Enter Yes to prevent the system from generating a session report
following document load or unload.
When this field is No, the system always generates session reports.
This field defaults from the Trading Partner Document Records frame.
Using Other Setup Programs
Several other programs on the eCommerce menu support initial setup and system maintenance:
• Trading Partner Parameter Maint (35.13.10)
• Data Cross-Reference Maintenance (35.13.16)
• HTTP Adapter Maintenance (35.13.19)
• Data Validation Maintenance (35.13.21)
• Application Definition Maintenance (35.15.10)
• Definition copy programs
• Exchange Definition Copy (35.15.1)
• Application Definition Copy (35.15.2)
• Implementation Definition Copy (35.15.3)
• Transformation Definition Copy (35.17.1)
• eCommerce Function Maintenance (35.15.21)
• eCommerce Function Copy (35.17.2)
• Transformation Renumber Utility (35.17.3)
• Export/Import Controller (35.17.5)
• Document definition unload and load programs
• Trading Partner Library Load (35.17.7)
• Trading Partner Library Unload (35.17.8)
• For managing obsolete trading partner document setup records, Trading Partner Document
Delete (35.17.10)
Defining Trading Partner Parameters
Use Trading Partner Parameter Maint (35.13.10) to assign parameters and values to a variety of
trading-partner-specific processing actions.

54 User Guide — QAD EDI eCommerce
The system creates a parameter record for each unique combination of trading partner address and
site specified in Trading Partner Maintenance (35.13.7). If you delete an address and site
combination in Trading Partner Maintenance, the parameter record for that combination is also
deleted.
System-generated default values for some standard parameters are created at the same time the
record is generated. Several of these are used to specify values required by the import and export
gateway programs. For example:
• Logical fields for a trading partner determine which types of documents you exchange with
that partner.
• Another logical fields specifies whether purchase orders imported from this trading partner
should be entered as confirmed sales orders.
• Character and integer parameters provide the gateway programs with the names and version
numbers of the application document definitions used in processing.
See “Setting Up Trading Partners” on page 47.
Example Logical parameters set default values for the EDI PO, EDI Schedule, and EDI PO Ack
fields in Purchase Order Maintenance (5.7), Customer Scheduled Order Maintenance (7.3.13), and
Sales Order Maintenance (7.1.1), respectively.
Program-specific parameters used by
the programs on the Document Export Menu are included
with the individual program descriptions.
The program consists of five frames. In the
first you select the combination of trading partner
address and site for which you want to define or modify parameters. In the bottom part of the
frame, you can define up to 40 logical parameters. The first frame displays 10 lines. Choose Go to
access 10 more.
See “Exporting Documents” on page 86.
Note The system only displays frames that already include parameters. Frames with no entries
are skipped.
Fig. 2.37
Trading Partner Parameter Maint (35.13.10)
App Addr and App Site. Enter the address and site codes from your system that represent the
trading partner whose parameters are defined in this record.

Setting Up EDI eCommerce 55
The system displays the corresponding trading partner address and site cross-references,
defined in Trading Partner Maintenance, in the TP Addr and TP Site fields.
Logical Param Desc. Enter an alphanumeric description of the logical parameter defined in
Logical Param Value.
Logical Param Value. Enter Yes or No to define the logical value of this parameter.
Continue to choose Go to display input screens where you can enter up to 40 descriptions and
values for the following ty
pes of parameters:
• Character parameters. These consist of up to 40 alphanumeric characters.
• Date parameters. Enter a date in MM/DD/YYYY format. The system validates this entry.
• Integer parameters. These are positive or negative whole numbers of up to 9 digits.
• Decimal parameters. These are positive or negative decimal numbers. The system accepts up
to eight characters to the left of the decimal point and two characters to the right.
Defining Data Cross-References
Use Data Cross-Reference Maintenance (35.13.16) to set up automatic conversions from one
specified value to another in inbound or outbound documents during the transformation process.
You can do this on a variety of broad and specific levels. For example, you can apply the
conversion to all documents from a certain trading partner or only to those from that trading
partner that use a specific document type.
Example You can use this function to perform unit-of-measure conversions between an
incoming trading partner document and the target business document in your system.
Use Data Cross-Reference Browse (35.13.17) or Data Cross-Re
ference Report (35.13.18) to view
existing cross-references.
Fig. 2.38
Data Cross-Reference Maintenance (35.13.16)
Trading Partner Doc ID. Enter the trading partner document to which this conversion applies.
Direction. Enter the direction of the documents to which this conversion applies. Documents
imported into your system are inbound, while those exported to the EC subsystem are
outbound.
Trading Partner ID. Enter a valid ID code of a trading partner defined in Trading Partner
Maintenance (35.13.7). This conversion will apply only to documents involving this trading
partner.

56 User Guide — QAD EDI eCommerce
Document Name and Version. Enter the document definition and version to which this
conversion applies.
Record Seq. Enter the sequence number of the record to be modified during the conversion.
Field Seq. Enter the sequence number of the field to be modified during the conversion.
Initial Value. Enter the target value to be converted, indicating how the field reads before
conversion.
Converted Value. Enter the new value, indicating how the field will read after conversion.
Defining HTTP Adapters
Use HTTP Adapter Maintenance (35.13.19) to define information for the system to use in posting
documents in XML format to a server to make the documents available to an external application
after EDI eCommerce processing.
Associate connection records with trading partne
rs using Transmission Group Maintenance
(35.13.13). While sending records to that transmission group, the system passes the specified
connection information and parameters, along with the XML data itself, to the receiving server
using an HTTP adapter program.
See “Defining Transmission Groups” on page 45.
Fig. 2.39
HTTP Adapter Maintenance (35.13.19)
HTTP ID. Enter an alphanumeric code identifying this HTTP connection record. You
reference this code in Transmission Group Maintenance to associate XML files with the server
that receives them.
Version. Enter the HTTP version number associated with the parameters in this record.
HTTP URL. Enter the URL address on the specified host where the XML data is made
available for the external application.
Content Type. Enter the type of content included in the files that are posted using this
parameter record. Typically this is text/xml.
Character Set. Enter the character set associated with the files that are posted using this
parameter record; for example, utf-8.
Host Name. Enter the host name of the server to which the data is posted.

Setting Up EDI eCommerce 57
Service Name. Enter the port number on the specified host that your system uses for
connecting with it.
Advanced. Enter Yes to display a text input frame. You can use it to enter additional values
other than the default HTTP header information that must be sent along with the protocol
header, such as SOAPAction information.
Fields. Enter Yes to display another frame that lets you enter a set of parameter codes and
associated values or token names that are appended to the specified URL.
Fig. 2.40
HTTP Adapter Maintenance, HTTP Parameters Frame
Sequence. Enter the relative sequence of this parameter. The system appends the parameters
to the URL according to this sequence.
Parameter Code. Enter the literal name of a parameter to append to the specified URL when it
is posted to the HTTP server.
You can associate either of two types of values with this parameter:
• A hard-coded text string in the Parameter Data field.
• A variable value in the Token field. The system extracts the value associated with the
token from the file and adds it to the URL as the value of this parameter.
For example, if Parameter Code is
xxx and Parameter Data is yyy, the system adds xxx=yyy
to the URL.
Parameter Data. Enter a literal text string to be associated with this parameter when it is
appended to the specified URL.
If you enter a value in Token, this field must be left blank.
Token. Enter a token to be associated with this parameter when it is appended to the specified
URL. The system extracts the value associated with this token from the file and adds it to the
URL as the value of this parameter.
If you enter a text string in Parameter Data, this field
must be left blank.
See page 22.
Validating Data Values
Use Data Validation Maintenance (35.13.21) to define values that will automatically be validated
in inbound or outbound documents during the transformation process.
Note Validation only takes place when the specified implementation definition has Validate set
to Yes.
Define the required value down to the field level. If the data ca
nnot be validated against the
specified value during transformation, the system generates an error.
You can set up more than one data validation for sa
me document, record, and field. The system
then performs validation against each of the specified values. If the field’s value does not match
one of those specified, the system generates an error.
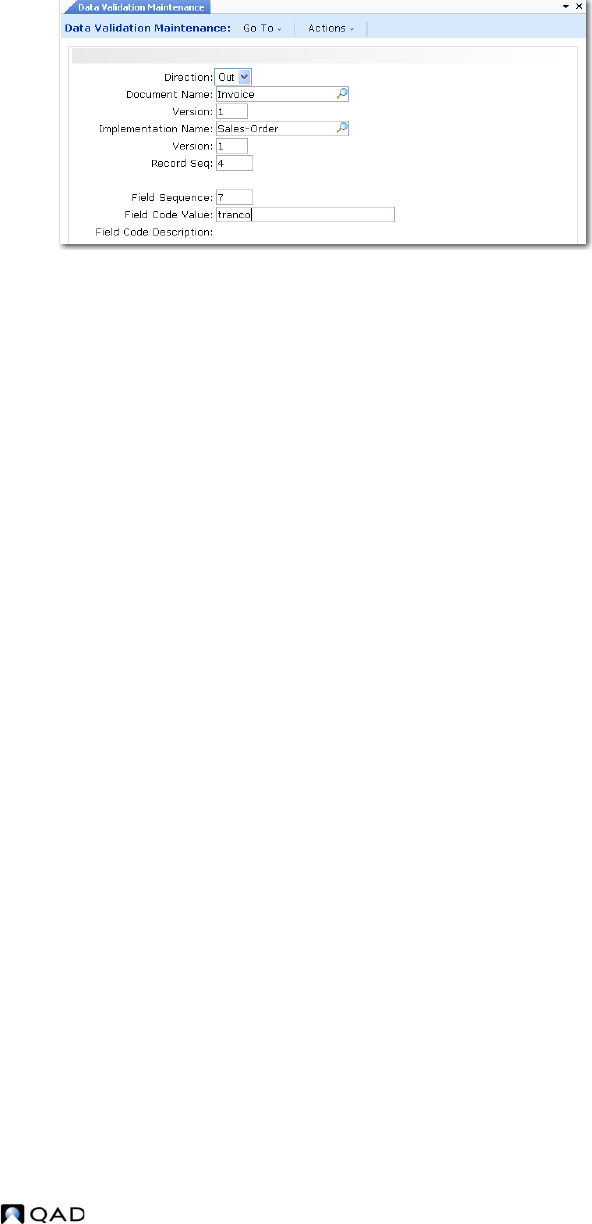
58 User Guide — QAD EDI eCommerce
Because validation records are implementation specific, you can define different validations for
different trading partners.
See “Validate” on page 35.
Fig. 2.41
Data Validation Maintenance (35.13.21)
Direction. Enter the direction of the documents that will have the field value validated.
Documents imported into your system are inbound, while those exported to the EC subsystem
are outbound.
Document Name and Version. Enter the name and version of the document definition that
contains the field to be validated.
Implementation Name and Version. Enter the name and version of the implementation
associated with the document to be validated.
Record Seq. Enter the sequence number of the record containing the field to be validated.
Field Seq. Enter the sequence number of the field containing the value to be validated.
Field Code Value. Enter the value against which the field will be validated.
Field Code Desc. The system displays the description from the field definition.
Use Data Validation Browse (35.13.22) or Data Valid
ation Report (35.13.23) to view existing data
codes.
Creating Application Document Definitions
QAD provides a number of standard definitions for the layout and contents of documents to be
used as templates when you are defining specific implementations.
To set up your own templates, use Application
Definition Maintenance (35.15.10). You can define
formats at both the record and field levels.
Note You can use this program to create new document definitions or to modify any definitions
you have created yourself. However, you cannot modify the QAD-developed document definitions
that were provided with eCommerce. Instead, copy an existing definition with Application
Definition Copy (35.15.2) and then modify the copy.
Create a different definition for each type of document. Use
the first frame to identify a definition
by a unique combination of name, version, and direction. You also specify the gateway programs
used to transfer the data and to produce reports during processing.

Setting Up EDI eCommerce 59
See “Defining a Specific Implementation” on page 29.
See “Copying Application Document Definitions” on page 62.
Note It is also possible to create an implementation definition based on an existing document
definition, as well as an external .xml or .xsd file, or on Progress source code that defines a
temporary table. See “Creating Document Definitions” on page 43.
Fig. 2.42
Application Definition Maintenance (35.15.10)
Cannot be
updated;
displays in
inquiry mode.
Name. Enter a name for the document definition or use the arrow keys to scroll through the list
of existing documents.
Note You cannot modify the QAD-developed template document definitions that were
provided with eCommerce.
Version. Enter a version number. You can use the same name for more than one document
definition, then use a different version number to differentiate among multiple document
definitions with the same name.
Additionally, you can use Direction—inbound or
outbound—to distinguish between multiple
documents with the same name.
Direction. Enter the direction of the file transfer that uses this document definition. Always
specify the direction relative to your system—documents imported into your system are
inbound, while those exported from your system are outbound.
Gateway Program. Enter the name of the Progress gateway program used to transfer this
document. If this definition is based on a QAD-developed definition, the value defaults. If you
are creating your own, this is the name of a custom-developed Progress program.
Gateway Report Program. Enter the name of the Progress program used to generate reports
related to document transfers.
Gtwy Process Priority. Enter the process priority value (0-99999) to set the gateway processing
priority for this document. The default is 0, which is the lowest (normal) processing priority.
This value controls the sequence in which dif
ferent document types are processed at the
gateway level. For example, eCommerce Manager (35.22.13) uses the priority to determine
the sequence in which the business unit processes multiple EMT documents.
DS Program. Optionally, enter the name of the Progress program that is run persistently and
contains the dataset definition and methods.
Procedure. If you enter a value in DS Program, enter the name of the procedure or method that
is run to process the dataset.
Choose Go to define the records and fields that are included in the document.

60 User Guide — QAD EDI eCommerce
Fig. 2.43
Application Definition Maintenance (35.15.10),
Application File Records Frame
Seq. The sequence number of this record. Choose Insert to add a new record. The system
automatically assigns the next number, but you can change it to any number. Organize the
records in a logical numerical hierarchy.
Important In all cases, the first record created must be sequence number 1. For example, you
cannot use a sequence of 10, 20, 30, 40. Instead, use 1, 10, 20, 30, 40.
Record Name. Enter a name for this record. Each record name must be unique in an
application document definition. Record names in application document definitions and
implementation definitions must follow a set of naming conventions.
This record name is used as a record variable by
the transformation process, independent of
the sequence number. See Table 2.1, “Record Naming Conventions,” on page 31.
Requirement. Enter Mandatory to indicate that this record is required during the transfer
process, Optional to indicate that it is not. If the system cannot find mandatory records while
transferring records, it generates an error message and does not process the associated
document.
Loop Occurs. Enter the number of times the processing logic should loop through the records
during transformation.
Loop Ends Seq. Enter a defined record sequence number to indicate where the loop ends. For
example, enter a Loop Ends Seq value of 2 on sequence number 2 to indicate that the entire
loop sequence takes place on a single record. Or, enter an end sequence of 4 on sequence
number 3 to indicate a loop that starts at 3 and ends at 4.
To specify a loop structure that includes all records, enter zero or
a number higher than the
last record sequence defined.
Generic. Enter Yes if this record for generic mapping of one or more database tables within
the application. The Table field is then enabled so you can enter table names.
Table. Enter the schema names of the tables this record applies to. Separate multiple table
names with commas. You cannot leave this field blank when Generic is Yes. The system
validates your entries and displays a warning if the tables do not exist.
Fields. Enter Yes to access an additional frame that lets you display, enter, or edit the fields
contained in this record.
You cannot access the fields for a record if Fields is No.

Setting Up EDI eCommerce 61
Fig. 2.44
Application Definition Maintenance (35.15.10), Application File Field Record Frame
Field Seq. The sequence number of this field in the record. Choose Insert to add a new field.
The system automatically assigns the next available number. You can modify the number as
needed or navigate to the blank fields at the bottom of the frame and assign numbers.
Note It is recommended that you number the fields sequentially, beginning with 1. If you do
this, a total of 100 fields are available for each record. Although the system accepts non-
sequential numbers, their use is not recommended.
Field Name. Enter the name of the field. This must be unique in the record.
Requirement. Enter Mandatory to indicate that this field is required during the load process,
Optional to indicate that it is not. If the system cannot locate mandatory fields, it generates an
error message and does not process the associated record.
Type. Enter the type of data that will be included in this field. Valid entries are:
• AN (Alphanumeric)
• D (Date)
• I (Integer)
• L (Logical)
• R (Real number)
Min. Enter the minimum number of characters required in this field. The system validates that
required or optional data is greater than or equal to the minimum required value for the field.
Max. Enter the maximum number of characters allowed in this field.
• If the field lengths are variable and separated by the delimiter specified in EC Subsystem
Definition Maint, the system validates that the field length is between the Min and Max
values.
• If the field lengths are fixed, the system uses this value to calculate where each field starts
and ends.
Gateway Variable. Enter the name of the gateway variable associated with this field. These
variables determine the specific way data is transformed. If this document definition was
copied from a QAD-provided template, the gateway variable is copied from that file. If not,
the variable must be defined in the program specified in the Gateway Program field.
Default. Optionally enter a default value for this field.

62 User Guide — QAD EDI eCommerce
Copying Definitions
QAD provides a library of trading partner template definitions with eCommerce. You cannot
directly modify these templates with a maintenance program. If you need to change any of the data
in a QAD-provided exchange file definition, application document definition, implementation
definition, or transformation definition, you must first copy the template with one of these
programs:
• Exchange Definition Copy (35.15.1)
• Application Definition Copy (35.15.2)
• Implementation Definition Copy (35.15.3)
• Transformation Definition Copy (35.17.1)
Copying Exchange File Definitions
Use Exchange Definition Copy (35.15.1) to copy an exchange file definition from an existing
definition. Then, use Exchange Definition Maintenance (35.15.6) to modify the copy as needed.
See “Defining an Exchange File” on page 23.
Fig. 2.45
Exchange Definition Copy (35.15.1)
Source Exchange File, Version, and Direction. Specify the exchange file definition you want
to copy. Use the arrow keys to scroll through the list of existing definitions.
Destination Exchange File, Version, and Direction. Specify a unique combination of file name,
version, and direction to identify the new exchange definition.
Note The direction does not have to be the same for the source and destination file. For example,
you can base an outbound definition copy on an inbound source definition.
Copying Application Document Definitions
Use Application Definition Copy (35.15.2) to copy an application document definition from an
existing definition. Then, use Application Definition Maintenance (35.15.10) to modify the copy
as needed.
See page 58.

Setting Up EDI eCommerce 63
Fig. 2.46
Application Definition Copy (35.15.2)
Source Application File, Version, and Direction. Specify the document definition you want to
copy. Use the arrow keys to scroll through the list of existing definitions.
Destination Application File, Version, and Direction. Specify a unique combination of file
name, version, and direction to identify the new document definition.
Note The direction does not have to be the same for the source and destination file. For example,
you can base an outbound definition copy on an inbound source definition.
Copying Implementation Definitions
Use Implementation Definition Copy (35.15.3) to copy an implementation definition from an
existing definition. Then, use Implementation Definition Maint (35.15.13) to modify the copy as
needed.
See “Defining a Specific Implementation” on page 29.
Fig. 2.47
Implementation Definition Copy (35.15.3)
Source Application File, Version, and Direction. Specify the document definition associated
with the implementation definition you want to copy. Use the arrow keys to scroll through the
list of existing definitions.
Source Implementation File and Version. Specify the document definition associated with the
implementation definition you want to copy. Use the arrow keys to scroll through the list of
existing definitions.
Destination Implementation File and Version. Specify a unique combination of file name and
version to identify the new implementation definition.

64 User Guide — QAD EDI eCommerce
Copying Transformation Definitions
Use Transformation Definition Copy (35.17.1) to copy an existing transformation definition to a
new file. Then, use Transformation Definition Maint (35.15.17) to modify the transformation
mapping data in the new definition file as needed.
Use this method to streamline creation of
similar definitions.
See “Defining Transformation Maps” on page 36.
Fig. 2.48
Transformation Definition Copy (35.17.1)
Transformation Direction. Enter the direction of the transformation definition to be copied.
Documents imported into your system are inbound, while those exported from your system are
outbound.
This field determines the records that
will be available for copying in the Source
Transformation field.
Source Transformation. Enter the name of the transformation definition to be copied. You can
also use the arrow keys to scroll through the list of definitions, which will be inbound or
outbound depending on the setting in Transformation Direction.
Destination Transformation. Enter the name of the new transformation definition.
In the remaining fields, enter the n
ames and versions of the exchange file, application, and
implementation definitions to be used with the new transformation definition.
Using Transformation Functions
A transformation function is a Progress procedure that performs a predefined action during the
transformation process. For example, a function can add two values or retrieve the current system
date.
Using QAD-Provided Functions
eCommerce includes a number of functions that can be used for transforming data between an EC
subsystem and your system. They are specified as part of the transformation definition.
Creating User-Defined Functions
Use eCommerce Function Maintenance (35.15.21) to create additional functions, if needed.

Setting Up EDI eCommerce 65
Define the type of return required—alphanumeric, integer, real number, date, or logical—as well
as the names and types of the parameters passed by the function. The program uses your input to
create a Progress program template. After saving the template to disk, use a text editor to open the
file and complete the code.
The system saves user-defined functions in the directory specified in eCommerce Control with the
file name
FunctionName.p.
Fig. 2.49
eCommerce Function Maintenance (35.15.21)
Type Name
Function Name. Enter a unique alphanumeric name for this function. Do not use the name of
any existing QAD-provided or user-defined function.
Important The file name is based on the function name you specify. Use function names that
follow the naming conventions of your operating system.
Description. Optionally describe what this function does.
Return Type. Enter the type of value returned as output when this function is performed. Valid
settings are:
• AN: Alphanumeric
• R: Real number
• I: Integer
• L: Logical
• D: Date
Type. Enter the type of value represented by this variable. Valid settings are the same as for
Return Type.
Name. Enter the name of the variable that will be created inside the program.
Important Do not use Progress keywords or special characters as the variable name. Doing so
will cause the function to fail.

66 User Guide — QAD EDI eCommerce
Viewing Existing Transformation Functions
Two programs display information about existing transformation functions.
• Use eCommerce Function Inquiry (35.15.22) to scroll through summary information on
functions.
• Use eCommerce Function Report (35.15.23) to generate a complete report on a selected range
of functions.
Copying Transformation Functions
Use eCommerce Function Copy (35.17.2) to copy an existing transformation function—either
QAD-provided or user-defined—to a new function name. Then, use eCommerce Function
Maintenance to modify the copy as needed.
The new definition is created in the function directory specified in eCommerce Control.
Use this method to streamline creation of
similar definitions.
You can also use this program to delete existing user
-defined functions. To do this, move the
cursor to the Source Function field in the applicable record and choose Delete. Enter Yes at the
delete confirmation prompt.
Note You cannot delete QAD-supplied functions.
Fig. 2.50
eCommerce Function Copy (35.17.2)
QAD Function. Enter Yes to specify that the function to be copied is one provided as part of
eCommerce. If No, the function is user-defined.
Source Function. Enter the name of the existing function to be copied or deleted. Use the
arrow keys to scroll through the list of available functions, determined by the setting in QAD
Function.
Destination Function. Enter a name for the new function. The system saves the new file in the
function directory specified in eCommerce Control with the file name:
DestinationFunction.p
Important
The file name is based on the function name you specify. Use function names that
follow the naming conventions of your operating system.
Dest. Function Desc. Optionally enter a description for the new function.

Setting Up EDI eCommerce 67
Renumbering Transformation Actions
When you define the transformation process that converts data between EDI formats and business
document formats using Transformation Definition Maint (35.15.17), you use the Action Seq field
to establish the sequence in which the transformation events take place. You cannot edit an event
record—including its sequence—after it has been created. The only way to modify an event is to
delete it and reenter the modified version.
If you need to insert an event between two
existing events and no intermediate sequence number is
available, you can use Transformation Renumber Utility (35.17.3) to reset all the action sequences
in the transformation definition to a higher value.
Example A transformation definition was set up in sequence increments of 5; that is, the first step
was numbered 5, the second 10, and so on. In subsequent changes to the definition, you have
added event sequences 6, 7, 8, and 9. It is now necessary to add another event between sequences
7 and 8. To avoid deleting and reentering events 8, 9, and 10 to assign them higher sequence
numbers, you can use Transformation Renumber Utility to increase the gaps between all the
sequences in the definition.
Fig. 2.51
Transformation Renumber Utility (35.17.3)
Transformation. Enter the name of the transformation definition with action sequences that
you want to reset to different values.
Direction. Specify the direction—inbound or outbound—of the documents that are
transformed using this definition.
Important Make sure to select the appropriate direction. Two transformation definitions can have
the same name and be distinguished only by direction.
Increment. Enter the incremental factor the system should use in renumbering the event action
sequences. This is also the number assigned to the first event. For example, if you enter 5, the
system numbers the first event 5 and subsequent 10, 15, 20, and so on.
Scheduling Automatic Processing
Use Export/Import Controller (35.17.5) to export and import files on a regular schedule.
Based on the frequency and number of hours you specify
, the system searches the database for
confirmed shippers or invoices that have not been exported. When it finds a document,
eCommerce begins processing automatically.
For imports, the system polls the
import directory defined in eCommerce Control.
Logical fields let you set up polling for various combinations of
import and export documents.
When the program is running in the foreground, a summary frame displays processing data.
You can choose to run this process later using the
Batch ID field.
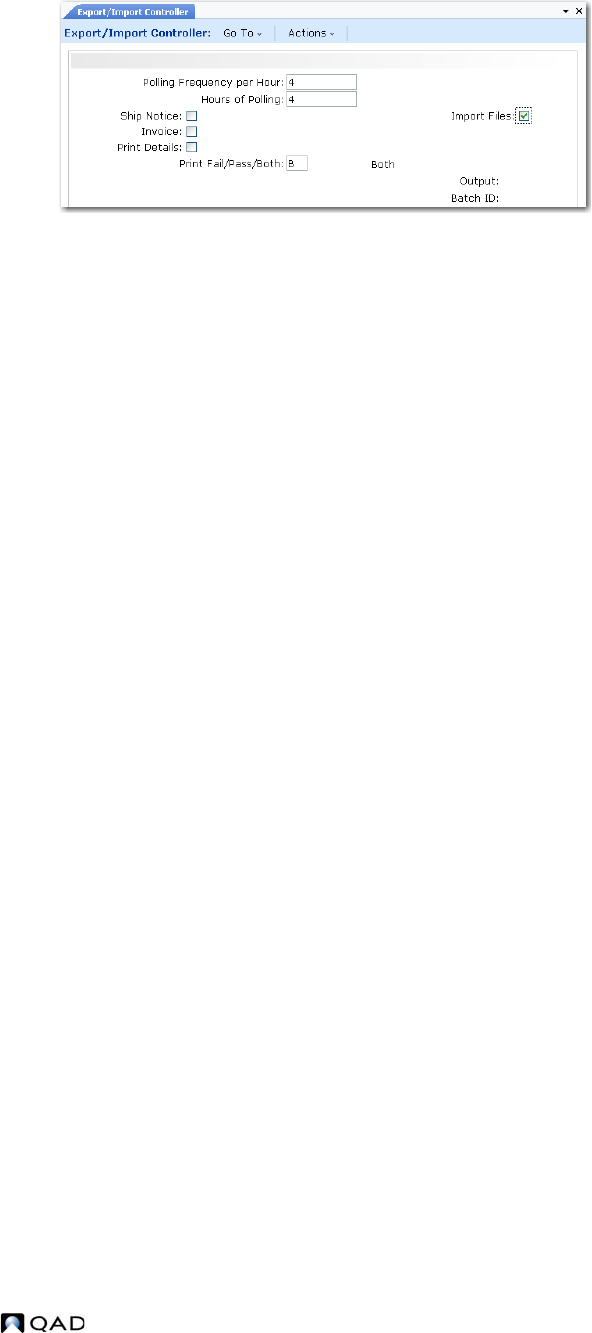
68 User Guide — QAD EDI eCommerce
Fig. 2.52
Export/Import Controller (35.17.5)
Polling Frequency per Hour. Enter the number of times per hour the process should check for
files to import or documents to export.
Hours of Polling. Enter the number of hours the process should check for files to import or
documents to export. If you enter zero, the process keeps checking for available items until
you manually interrupt it.
This is a decimal field. For example, enter 2.50 to indicat
e two and one-half hours of polling.
Ship Notice. Enter Yes to have the system automatically search for and process confirmed
shippers in the database and generate ASNs.
Invoice. Enter Yes to have the system automatically search for and process invoices in the
database.
Import Files. Enter Yes to have the system automatically search for and process files in the
inbound directory specified in eCommerce Control.
Input Directory. Enter the directory path to the location of the files to be processed. This must
be a valid directory.
Initially, the field defaults from eCommerce Control. If you
change it, the system associates
the value you enter with your user ID. Next time you run this program, the field defaults to the
same value you entered previously.
File Mask. Specify one or more patterns, including wildcards (*), for the system to use in
selecting files for processing. For example, if you enter *.EDW, the system selects all files
with an extension of EDW. Separate multiple entries with commas.
Print Details. Enter Yes to include detailed error and warning message information on the
report that is output when this program executes. If you enter No, the report is limited to
higher-level summary information.
Print Failed/Passed/Both. Specify the status of documents to be included in the output report
of this program.
Failed (the default): The report is limited
to documents that failed to process.
Passed: The report is limited to documents that processed correctly.
Both: The report includes all documents regardless of status.
Unloading and Loading Trading Partner Library Data
EDI eCommerce includes tools that let you:

Setting Up EDI eCommerce 69
• Load trading partner library records into your database.
• Create trading partner library files.
Data Load
Use Trading Partner Library Load (35.17.7) to create new trading partner and supporting
document definition data based on the contents of imported source files XML files created using
Trading Partner Document Unload. Each file represents a complete trading partner document.
You can select individual trading partner documents from a list, or load all the documents in a
specified directory at the same time.
Optionally, you also can decide which specific components of the XML files have records created
in the destination domain.
Note This program does not check or enforce data integrity for records you choose not to import.
For example, you can choose to create document definitions but not the associated transformation
definition. This does not cause the import process to generate an error message.
Use the first frame to identify the source directory for imported files, as well as the domain to
which domain-specific types of records will be loaded. To select all documents in the directory,
leave Import set to Select All. If you want to select from a list of documents in the specified
directory, set Import to Select Some to display another frame when you press Go. When you finish
selecting documents, press Go.
Note To select a single file, you also can press the up and down arrow keys with the cursor in the
Import field. The system scrolls through all the documents in the specified directory. When the
document you want to load displays, press Go.
Use the Components field to control which specific types records are created as a result of the
load. When that field is Select All, the system loads all of the records from each selected XML file.
Set the field to Select Some to display a list of available record types. Deselect any types that you
do not want to load.
You can also control whether the source ID (stored in the XML file when it was created using
Trading Partner Library Unload) is used as part of the new record names. If you choose to use it,
you can specify whether it appears as a prefix or as a suffix.
Subsequent frames display several types of information about the document currently being
loaded. You can update many of the fields as needed. Note that navigation may vary depending on
whether you choose not to create some types of records.
1 The system determines if cross-reference records exist for the specified target domain. You are
prompted to create new cross-references if required. If no target domains are available, the
system prompts you to select an existing eCommerce domain as the target.
2 Only when the target domain has not had eCommerce Control initialized, the next frame
displays the fields from that program. You can update default values as needed; an additional
field lets you specify the process log directory that will be associated with the newly created
EC subsystem record.
• If one of the fields includes a directory that does not exist, the system prompts you to
create it. If you respond No, you can still enter the directory path and create it later in the
file system.

70 User Guide — QAD EDI eCommerce
• The system creates a new sequence ID record (ordinarily defined in EC Number Range
Maintenance) called eComNRM. It is assigned to all the sequence ID fields in the
eCommerce Transaction Control frame.
• When you load multiple documents during a single session, this frame displays only when
the first document is loaded. Control settings apply to all the documents in the target
domain.
3 For outbound definitions only, the system next displays Transmission Group Maintenance
fields. If required, you can edit them, or change the Name field to associate a different existing
transmission group with the trading partner. If you update the directory path or subsystem, the
system validates the new values.
4 The system then displays the trading partner ID from the load data and prompts you to change
it before proceeding.
5 The error handling and sequence ID counter fields display from Trading Partner Maintenance.
You can update them as required.
6 The Trading Partner Document Records frame displays. As required, select a record to update
its settings, including error handling and sequence ID counters, as well as TP location cross-
references. You can update a subset of the fields; for example, you can reference a different
address/site combination. You also can enter e-mail addresses to receive status messages
during document processing.
7 The program checks for any existing definitions that match the data being loaded and displays
a list of duplicates, along with an Overwrite setting. If the trading partner definition is a
duplicate, it is listed first, with Overwrite set to Yes. If you change the field to No, the system
cancels the load process for this trading partner.
All other duplicate records have Overwrite set to No. For each one that you change to Yes, the
system displays information about where the existing record is used and prompts you to
rename the new record, overwrite the existing record with the new definition, or keep the
existing one.
8 The system prompts you to apply the update.
9 If the document references user-defined functions, the system compiles the code and saves the
files in the function directory specified in eCommerce Control.
10 If multiple documents are selected for loading, the system repeats the load process for the next
document on the list.
11 After you have completed all the documents, the system lists the files that were loaded. It also
indicates whether any errors occurred. A log file called
filename-import.log is created in
the specified input directory.
Bank Payment Applications
To use this program to support bank payments in the Financials AP and AR modules, you need to
load a bank-specific file for each financial institution with which you want to exchange data. This
creates mapping records that let the system process incoming files correctly, as well as generate
outbound files that meet the requirements of the receiving bank. Additionally, it updates a set of
financial setup tables that define the payment format for each bank.

Setting Up EDI eCommerce 71
Follow these steps to do the basic EDI setup needed for bank payments.
See User Guide: QAD Financials for information.
Note Unless you have experience with EDI eCommerce implementations, you should accept all
other default values.
1 Download the appropriate XML source files from the QAD Support Web site.
2 In Trading Partner Document Load, specify the directory where the source files are stored.
3 If not already defined, set up cross-reference between the target eCommerce processing
domain and the application domain.
4 For documents that the bank sends you, such as AR bank statements, specify the inbound
directory where the system will look for files to process in eCommerce Control.
5 For documents that you will send to the bank, such as AP payment instructions, specify in the
Transmission Group frame the directory where the system will create exported files.
Note The default Transmission Group name matches the Trading Partner ID and also maps to
the bank format name.
Data Unload
Use Trading Partner Library Unload (35.17.8) to create XML files containing document definition
data. You can control which domains, trading partners, and trading partner documents are included
in the exported files. The system creates one XML file for each document.
Note This program does not check or enforce data integrity. For example, you can choose to
export document definitions but not the associated transformation definition.
Use the first frame to select the documents that will be written to XML files. At three levels of
granularity (domain, trading partner, trading partner document), you can either have the system
export all the records, or manually select the records from a list by setting the associated field to
Select Some. On each level, when you choose to select records manually, you can specify filter
criteria to limit the items that are selected by default when the list is displayed.
From the selection list, use the space bar to toggle the Export field between Yes and No in the
character UI. In the QAD .NET UI, use the check box to select records. When you finish selecting
records at each level, press Go or click Next to move to the next selection field.
You also can specify which prefix the system adds to the exported XML files. When Use TP As
Source Domain is Yes, the file name is in the form
domain name-trading partner ID-
document ID.xml
. When the field is No, you can add your own prefix in the Source ID field;
this replaces the domain name.
The program creates an activity log for each document in the specified dump directory. It shows
the document definitions that were unloaded, a list of any non-QAD functions needed to support
transformation, and any error messages that were generated during processing.
Additionally, if transformation processing calls for user-defined functions, the system attempts to
find the program files in the Function Directory specified in eCommerce Control. If it finds the
files, it includes the source code in the XML file. The functions can then be created during the load
process.

72 User Guide — QAD EDI eCommerce
Deleting Trading Partner Setup Data
Use Trading Partner Document Delete (35.17.10) to clean up your database by deleting trading
partner document definitions that are no longer needed.
Fig. 2.53
Trading Partner Document Delete
(35.17.10)
When Select Documents is Yes, the system displays all available trading partner documents, as
defined in Trading Partner Maintenance. By default, the Delete column is No. Use the space bar to
toggle it to Yes for documents you want to delete.
When you click Next and confirm the selection,
the system deletes the following records:
• The trading partner document
• The corresponding record in Trading Partner Parameter Maint, if the site/address combination
is not used elsewhere in EDI eCommerce
• The transformation, implementation, exchange, and application document definitions, if they
are not used for other documents in the system
• The Trading Partner Maintenance record, if all the documents have been deleted from it
When Create Log File is Yes, the system summarizes the records
that were deleted in the process
log directory specified in eCommerce Control. If that field is blank, the file is created in the user
startup directory. The file naming convention is
tpdocdelete_MM-DD-YYYY_HHMMSS.log.
Storing and Retrieving Turnaround Data
In EDI eCommerce, turnaround data is data imported into a business document that does not have
an equivalent field in the database. However, the imported value must be retained so it can be
included in an associated exported file.
This section describes the steps used to define turnaround data in inbound and outbound
imple
mentation definitions. It includes an example based on a customer’s requirement to include a
department number from the original imported purchase order on the associated exported invoice.
See “Defining a Specific Implementation” on page 29.
Storing Inbound Turnaround Data
In Implementation Definition Maintenance, select the implementation that is being used for the
inbound document. In the example shown in Figure 2.54, this is called Sales-Order.

Setting Up EDI eCommerce 73
By convention, the turnaround data fields are defined in the ext record definitions. Most
implementation definitions contain ext records at both the header and detail levels of the
document. You can store turnaround data any level—depending on which field values are selected
for the Turnaround data index or key.
The example illustrated in Figure 2.54 uses the Hdr-Ext record, storing the inbound purchase order
department number as turnaround data in the DepartmentNo field.
Fig. 2.54
Inbound Turnaround Data Implementation Record
Set the Src/Dst field to T to indicate that the field is to be stored as turnaround data. The system
then prompts you to define the table and index names to be used for storing the inbound value.
• Table Name: You can enter any constant value here; it becomes part of the index. By
convention, using a table name helps create a logical reference to the data. For example, the
record shown in Figure 2.55 uses so_mstr, because the inbound purchase order results in a
sales order.
• Index Name: This must be a valid variable name for the implementation you are using. During
transformation, it will contain the data that you want to store (index) the DepartmentNo data
on. You can enter multiple data variables using commas (without any spaces) as separators.
For example, this record uses the variable ED_SO
_PO as the index. This variable will contain
the purchase order number to be associated with the inbound department number. During
invoice export, the system uses the PO number to retrieve the correct department number.
Important The variable used for the index must contain data—that is, the record containing the
data must precede the data being stored. For example, you cannot use a data variable from a detail
record as an index to store turnaround at the header level.
Another consideration is the way you make the index unique. For example, you must ensure that
su
bsequent records do not overwrite data you want to retain. Conversely, you should not make the
index so detailed that it is difficult to retrieve.

74 User Guide — QAD EDI eCommerce
Fig. 2.55
Turnaround Data Storage Index Prompt
Figure 2.56 illustrates an example of an imported record—as shown in Turnaround Data
Maintenance—created using this implemen
tation definition. The imported department number is
022.
Fig. 2.56
Turnaround Data Record
Retrieving Turnaround Data for Export
Basic Implementation Definition setup for retrieving outbound turnaround data for export is
similar to the equivalent inbound setup.
This time, you select the implementation definition that i
s being used for the outbound document.
In this example, this is Invoice. You can define turnaround data on both header and detail level,
and the convention is to use ext records definitions. The example in Figure 2.57 uses
HEADER-EXT.
Fig. 2.57
Outbound Turnaround Data Implementation Record
Set Src/Dest to T. For outbound implementations, the system next prompts you for the retrieval
function to be used.
GetTadData is a QAD-provided generic transformation function that ca
n retrieve any turnaround
data based on the specified parameters. When you enter the function name and click Next, the
system displays the function record so you can update parameters for this instance.

Setting Up EDI eCommerce 75
In Figure 2.58, the parameters are set up to retrieve the DepartmentNo field from the turnaround
data table using the ih_po record from invoice
history. The associated department number is then
placed in the application repository HDR-EXT record DepartmentNo field, from which it is
exported with the invoice data.
Fig. 2.58
Turnaround Data Retrieval Function Parameters
Using eCommerce with Multiple Domains
You can use a single instance of eCommerce to import and export documents between multiple
domains and the EC subsystem.
This section describes how the system processes EDI transactions and how you
set up multiple
domain features.
Multiple-Domain Processing
The primary factor the system uses in determining how to process EDI transactions in a multiple-
domain environment is the eCommerce processing domain—the domain in which repository
records and business documents are stored. This domain is one of the following:
• By default, the login domain of the EDI eCommerce user—either at initial login or modified
by changing the domain during a processing session
• The processing domain specified after login using Change Current eCommerce Domain
(35.11.11)
• The domain associated with the user’s login domain in Domain Cross-Reference Maintenance
(35.11.1)
In some cases, all EDI eCommerce processing and document creation happens within a single
domain. For exa
mple, the user who imports a purchase order is logged in to the same domain
where the resulting sales order will be created. System-generated repository records are in the
user’s domain, so that error-reporting and repository maintenance functions have direct access to
the records that the transformation and gateway processes use to create the sales order.
In a different scenario, the user might not create records i
n the login domain, based on one of the
following factors:

76 User Guide — QAD EDI eCommerce
• A record created in Domain Cross-Ref Maintenance associates the user’s login domain and a
second domain used for eCommerce processing. See
“Specifying Domain Cross-References”
on page 78.
• A domain identifier in the transformation definition sets the value of the DOMAIN token
during transformation. In this case, a token variable set to this value causes the document to be
created in the EDI eCommerce processing domain. However, the transaction data is created in
a different domain. See
“Changing the Target Domain During Transformation” on page 78.
In either of these cases, the system can load repository data and create the business document—the
sales order, for example—in a different domain than where the user is logged in.
Note If any user transformation functions were defined prior to the release of multiple-domain
functionality, you must update them to reference an additional Progress include file and a domain-
associated variable used during transformation. See
“Updating Legacy User-Defined Functions”
on page 79.
During export, the system similarly uses either the user’s session login domain or a cross-reference
record to determine the eCommerce processing domain that provides domain-specific data—such
as trading partner information—for outbound documents. It uses the DOMAIN variable for
reference to determine the correct source domain for exported data, including any turnaround data.
Turnaround data is stored based on the eCommerce processing domain used when the source
document is imported. When you update turnaround data using Turnaround Data Maintenance
(35.9.17), use the Target Domain field to specify the domain associated with the turnaround data
you want to maintain. You also can specify the target domain when you archive and delete
turnaround data using Turnaround Data Archive/Delete (35.17.16).
Note When you use a single-domain database, the domain is essentially transparent to the EDI
eCommerce setup and processing functions. No special setup or implementation steps are needed,
with the exception of updating existing user-defined functions that access the database to let them
handle system-required domain values. See
“Updating Legacy User-Defined Functions” on
page 79.

Setting Up EDI eCommerce 77
Figure 2.59 is an overview of how EDI eCommerce processes documents in a multiple-domain
environment.
Fig. 2.59
EDI eCommerce Multiple-Domain Processing Flow
Load
Load
Transform
Transform
Gateway
Gateway
Domain
1
Domain
1
Repository Tables (Dynamic,
Domain-Specific)
Repository Tables (Dynamic,
Domain-Specific)
Domain
2
Domain
2
Multi-Domain
eCommerce Data
(Shared Setup,
Doc Definitions)
Multi-Domain
eCommerce Data
(Shared Setup,
Doc Definitions)
Domain-Specific
eCommerce Data
(Control, Trading
Partner, Other
Static Data)
Domain-Specific
eCommerce Data
(Control, Trading
Partner, Other
Static Data)
ERP Application
Data (Domain-
Specific)
EDI eCommerce
Processing
Multiple-Domain Setup
The majority of data-intensive records—including the exchange file, application document,
implementation, and transformation definitions—are shared by all the domains in a database.
However, to use the product in a multiple-domain environment, several kinds of data must be set
up in each domain. These types of data are records that typically vary between domains, such as
trading partner records and control settings.
Note Each domain has its own eCommerce Control (35.13.24) record. This lets you set up
different inbound directories so that the location where the system looks for imported files can
vary by login domain.
To enter domain-specific setup data, either log in to the
target domain at sign-on, switch to the
appropriate domain, or use Change Current eCommerce Domain (35.11.11). The system
automatically assigns the records you create to the appropriate eCommerce processing domain.
Table 2.2 lists the programs used to set up required domain-specific
records.
Table 2.2
Domain-Specific Setup Programs
Program Menu Comments
Turnaround Data Maintenance 35.9.17
EC Subsystem/Exchange Maint 35.13.3
EC Subsystem/Application Maint 35.13.5
Trading Partner Maintenance 35.13.7
Trading Partner Parameter Maint 35.13.10
Data Cross-Reference Maintenance 35.13.16 Optional functionality

78 User Guide — QAD EDI eCommerce
When you are loading new data from trading partner library files rather than entering it manually
using one of the listed programs, the system automatically separates domain-specific information
and loads it into the EDI eCommerce domain you specify during the load process.
See “Loading Trading Partner Library Records” on page 79.
Specifying Domain Cross-References
By default, EDI eCommerce processing is based on the domain of the logged-in user session. The
system uses domain-specific setup records, looks for data associated with that domain, and
generates repository records using that domain as a key field. However, in some EDI
environments, not all of those elements are in the login domain. For example, a centralized EDI
processing area that supports several domains can load data for each domain individually, but can
maintain the EDI data within a central domain.
Use Domain Cross-Reference Maintenance (35.11.1) to se
t up a cross-reference record between
the user’s login domain and a domain used in EDI eCommerce processing.
The system uses a cross-reference record under either of the
following circumstances:
• The user’s login domain is the same as the specified value.
• The user changes to this domain.
When no cross-reference records a
re set up, the system uses the login domain of the user as the
eCommerce domain. To switch to a different processing domain during a session, use Change
Current eCommerce Domain (35.11.11).
Note No cross-reference records are needed in a single-domain environment.
Fig. 2.60
Domain Cross Reference Maintenance (35.11.1)
Changing the Target Domain During Transformation
By default, during document import the system creates application repository documents and the
resulting business documents—such as sales orders—in the eCommerce processing domain. It
also is possible to have the system map the document to a different domain by assigning a target
domain during transformation.
Use Transformation Definition Maintenan
ce (35.15.17) to specify an event action that determines
the domain associated with the document. For example, the event action shown in Figure 2.61
assigns the domain variable a value of 1. The import gatewa
y associated with the transformation
creates the resulting document in domain 1.
Data Validation Maintenance 35.13.21 Optional functionality
eCommerce Control 35.13.24
Program Menu Comments

Setting Up EDI eCommerce 79
Fig. 2.61
Transformation Definition Maintenance (35.15.17), Event Action Example
Loading Trading Partner Library Records
Although most elements added by Trading Partner Library Load (35.17.7) are shared by all
domains, several kinds of data are domain specific.
Use the Target Domain field to specify which domain the domain-specific pa
rts of the new setup
data will be associated with. The field defaults from the user’s login domain. You can change it to
any valid domain defined in Domain Maintenance (36.1.1.1).
Updating Legacy User-Defined Functions
EDI eCommerce assigns a shared variable to user-defined transformation functions when you
generate them using eCommerce Function Maintenance (35.15.21). This variable, trgt_domain,
lets functions identify the correct domain associated with the data that the function will access or
process. For example, it is used to set the target domain to the value of the DOMAIN token.
If you have legacy functions designed in an earlier, non-domain version of the product, you must
upda
te the code for any existing functions that access the database to let them continue to support
transformation with no risk of degrading processing performance. Additionally, the functions
should have a reference to the Progress include file
mgdomain.i.
To update user-defined functions, use a text editor to add the following code to
the beginning of
each Progress function program:
{mgdomain.i}
define shared variable trgt_domain like global_domain no-undo.
User-defined functions are stored in the directory specified in the Function Directory field in
eCommerce Control (35.13.24).

80 User Guide — QAD EDI eCommerce
Chapter 3
Using EDI eCommerce
This chapter discusses day-to-day use of EDI eCommerce.
Introduction to eCommerce Use 82
Illustrates some of the basic uses of eCommerce and how to begin using it.
Importing Documents 84
Describes how to use Document Import (35.1).
Exporting Documents 86
Describes how to use Document Export (35.4).
Tracking Import/Export Document Status 102
Describes the tracking processes and illustrates how to use them most effectively.
Maintaining the Document Repository 108
Explains how programs can be used to modify repository data and documents.

82 User Guide — QAD EDI eCommerce
Introduction to eCommerce Use
Because the system does most of the processing automatically based on the way trading partner
documents, exchange files, and transformation maps are set up, day-to-day users of eCommerce
generally use only a few programs to import and export files. Figure 3.1 shows a typical task flow.
Fig. 3.1
eCommerce User Task Flow
Use import or export program
to select documents for
processing.
Use import or export program
to select documents for
processing.
Review reports to determine
errors.
Review reports to determine
errors.
Correct conditions that created
errors.
Correct conditions that created
errors.
Reprocess documents.
Reprocess documents.
EDI eCommerce’s process control logic can be started in one of three ways:
• A system user can begin processing by selecting documents using either Document Import
(35.1) or one of the programs on the Document Export menu (35.4).
• The system can search at regular intervals for inbound files from an EC subsystem or
outbound documents in the database. When it finds new files or documents, the system
automatically begins processing.
• You can write a custom program that lets the EC subsystem invoke eCommerce processing
whenever it has files to send to your system. See “Scheduling Automatic Processing” on
page 67.
This chapter assumes that proces
sing begins when the operator selects documents using one of the
menu programs.
In addition to import and export programs,
eCommerce provides several tools for viewing and
modifying data in the data repository. Items in the data repository include documents in various
stages of transition between the EC subsystem and your system. Routinely using these programs to
change data is not recommended. However, they can be valuable for modifying such things as
erroneous control records that prevent the system from processing a file.
To regain disk space, you can archive and delete data when it is no longer needed.
For example,
you can delete exchange file and application documents that have already completed processing,
transformation, and loading to the EC subsystem or the database. Other programs let you archive
and delete turnaround data records and comments linked to imported orders.
See “Maintaining the Document Repository” on page 108.
Note The gateway programs used to import and export documents check for blocked
customer/supplier transactions defined for the corresponding menu program. For example, you can
use Document Import to import a customer’s purchase order, which creates a sales order during
gateway processing. However, if the customer address is blocked from creating transactions in
Sales Order Maintenance, EDI eCommerce issues error messages during import and does not
create a sales order from the imported document. See “Archiving and Deleting EDI eCommerce
Data” on page 113.
See Use
r Guide: QAD Master Data for information on blocked transactions.

Using EDI eCommerce 83
Using eCommerce with EMT
EDI eCommerce supports Enterprise Material Transfer (EMT), which lets you automatically
generate purchase orders from sales orders. You can use eCommerce to exchange EMT purchase
orders, PO change and acknowledgment documents, and shipping documents with your trading
partners up and down the supply chain.
Several eCommerce programs are designed specifically for use with EMT. To put them in the
appropriate context, these programs are described in the EMT chapter of User Guide: QAD Sales.
• eCommerce Manager (35.22.13)
• PO Change Ack Export (35.22.15)
• PO Change Export (35.22.16)
See User Guide: QAD Sales.
Using eCommerce with Trade Sales
Under trade sales agreements, trade sales suppliers do not communicate directly with the customer.
A sales agreement exists between you and your customer that you create orders, transact, and
document the material delivery from a trade sales supplier to the customer; however, the trade
sales supplier delivers the actual material to the customer. You transact the order and shipment and
inventory is temporarily added and issued; however, no trade sales supplier materials are ever
physically added to your inventory or consumed.
When you create customer trade sales orders in Customer Scheduled Order Maintenance (7.3.13),
the system automatically:
• Creates supplier scheduled orders
• Creates supplier planning or shipping schedules when you import active trade sales customer
planning or shipping schedules
• Creates the following shipment documents when you import an ASN for a trade sales supplier
scheduled order: PO shipper, PO shipper receipt, SO shipper, SO shipper confirmation, and
optional ASN sent to the customer
See User Guide: QAD Scheduled Order Management.
Fields in EDI eCommerce work with parameter settings in Trading Partner Parameter
Maintenance (35.13.10) to automate trade sales processing. You can set up EDI eCommerce to
manage two ASN processes:
• Trade sales suppliers send you an original ASN.
• Trade sales suppliers send you a copy of the ASN.
If the trade sales supplier sends you the original ASN, you send your own ASN to the customer.
The system automatically creates your ASN from the SO shipper. If the trade sales supplier sends
you a copy, you typically do not send your own ASN to the customer as this duplicates data the
customer receives and can lead to confusion.
The system creates an SO Shipper automatically from the ASN data that the trade sales supplier
sends to you, so no additional ASN setup is required to create the SO shipper.

84 User Guide — QAD EDI eCommerce
Set the following to send ASNs to the customer automatically:
• Export ASN to Yes in eCommerce Manager
• Queue Trade Sales ASN to Yes in Trading Partner Parameter Maintenance for the supplier
Set the following to automatically se
nd system-created supplier planning or shipping schedules to
trade sales suppliers:
• Export Supplier Schedules to Yes in eCommerce Manager
• Queue TS Schedules to Yes in Trading Partner Parameter Maintenance for the supplier
• Send EDI Plan Schedule or Send EDI Ship Schedule to Yes in Trading Partner Parameter
Maintenance for the supplier
The system adds exported schedules to
the eCommerce Session Report.
Importing Documents
Use Document Import (35.1) in two ways:
• To start the process of loading SNF files from the EC subsystem, transforming them into
usable formats, and transferring them into the database using a gateway program. See
“Imports” on page 7.
This feature also lets you import files containing documents used in EMT. Ordinarily, you use
eCommerce Manager to import such file
s. However, Document Import lets you select
individual files from the specified import directory. See User Guide: QAD Sales for
information on EMT.
• To load files from the EC subsystem directly into the data repository. This feature lets you
transform inbound files and export them again without ever creating business documents.
The system generates a report on imported files to the devic
e specified in Output. You can choose
to run this process later using the Batch ID field.
Note The system associates several field values with your user ID. Next time you run this
program, the field defaults to the same values you entered previously.
Fig. 3.2
Document Import (35.1)
File Type (New/Error). Specify the type of files to be listed in the Select File(s) frame.

Using EDI eCommerce 85
• Enter New to display a list of unprocessed files located in either the Inbound Directory or
the Outbound Scan Directory specified in eCommerce Control (35.13.24), depending on
the setting of Direction.
• Enter Error to display only files containing documents that encountered errors during
previous imports. These files are located in either the Error File Directory or the Outbound
Error Directory specified in eCommerce Control, depending on the setting of Direction.
Direction. Specify the source of the files the system will select for import:
Inbound: The program selects files from the directory specified in the Inbound Directory
field in eCommerce Control. It then imports EDI documents to the exchange repository
based on a standards-neutral format (SNF) by transforming them using specified maps,
placing them in the application document repository, and loading them into the database.
Outbound: The system selects files from the directory specified in the Outbound Scan
Directory field in eCommerce Control. Instead of using exchange records based on an
SNF, the system imports these files directly into the application document repository for
processing.
See “Configuring eCommerce Control” on page 15.
For example, you would specify this directory as the source of files that are provided by an
external system and are to be transformed and exported using EDI eCommerce without
creating business documents.
See “Direct Import to Application Repository” on page 4.
Print Details. Enter Yes to include detailed error and warning messages on the report generated
when this program executes. If you enter No, the report is limited to higher-level summary
information.
Pre-Select All. Enter Yes to have all files selected—that is, marked with an asterisk (*)—when
displayed on the Select File(s) list. If this field is No, the files still display, but none are
initially selected.
Print Fail/Pass/Both. Specify the status of documents to be included in the output report of this
program.
Failed (the default): The report is limited to documents that failed to process.
Passed: The report is limited to documents that processed correctly.
Both: The report includes all documents regardless of status.
Input Directory. Enter the directory path to the location of the files to be processed. This must
be a valid directory.
Initially, the field defaults from eCommerce Control. If you change it, the system associates
the value you enter with your user ID. Next time you run this program, the field defaults to the
same value you entered previously.
File Mask. Specify one or more patterns, including wildcards (*), for the system to use in
selecting files for processing. For example, if you enter *.GEN, the system selects all files
with an extension of GEN. Separate multiple entries with commas.
Files. Enter the names of the files to be processed, including extensions. Separate multiple file
names with commas. The system validates your input.

86 User Guide — QAD EDI eCommerce
Do not enter the full path to these files. The system automatically looks in either the Inbound
Directory or the Outbound Scan Directory specified in eCommerce Control, depending on the
setting of Direction.
You can also leave Files blank and choose Go to display a list of files—either new files or
previously imported files that encountered errors during load processing, depending on how
File Type (New/Error) is set. Select or deselect files from the list as required. Selected files are
marked with an asterisk (*).
After selecting files from the list, choose Go. Selected files display in the Files field.
Sessions. These system-assigned numbers group all the files imported during a particular
session. Use them to track the status of the documents you have imported and to identify any
errors that occurred during processing.
Additionally, the system assigns a sequence number to each file selected. This number is used
to group the documents within the file. If any documents cannot be loaded, the system writes
them to an error file that uses the process session number as a file name.
See “Tracking Import/Export Document Status” on page 102.
Exporting Documents
The Document Export menu (35.4) includes programs used for exporting several types of
documents:
• Shipment ASN Export (35.4.1)
• Consignment Usage Export (35.4.2)
• Invoice Export (35.4.3)
• Purchase Order Acknowledgment (35.4.5)
• Supplier Shipping Schedule (35.4.8)
• Purchase Order Export (35.4.9)
• Supplier Self Billing Export (35.4.11)
• Inventory Cycle Count Export (35.4.13)
• Packing List Export (35.4.15)
• DO Packing List Export (35.4.16)
• Price Catalog Export (35.4.17)
• Warehouse Shipment Advice (35.4.18)
• Generic Gateway Export (35.4.20). See “Exports” on page 8.
Two additional document export programs are designed specifically for use with Enterprise
Material Transfer (EMT). To place them in the appropriate context, these programs are available
from the eCommerce EMT menu (35.22):
• PO Change Ack Export (35.22.15)
• PO Change Export (35.22.16)
See User Guide: QAD Sales.

Using EDI eCommerce 87
Based on trading partner setup data, the system can create optional tracking records when it
exports documents. These records are automatically updated with status information when
acknowledgments are imported from the EC subsystem.
See “Tracking Exported Documents” on page 105.
Audit report functions are associated with severa
l export programs; these are available on the
Export Audit Reports menu (35.4.6). You can use these programs to view information about
exported documents. Specific details vary by document type; for example, the ASN report
includes the site, shipper number, ship-to address, and shipping date, as well as status data. All
reports include batch information.
The following table lists the audit report programs.
Menu Menu Label
Program
Name
35.4.6.1 ASN Export Audit Report edexasrp.p
35.4.6.2 Invoice Export Audit Report edexivrp.p
35.4.6.3 Order Export Audit Report edexporp.p
35.4.6.4 Schedule Export Audit Report edexscrp.p
35.4.6.5 Order Ack Export Audit Report edexparp.p
Exporting ASNs
An advance ship notice (ASN) document informs customers when items have left the supplier’s
site.
Depending on specific trading partner implementations, an ASN can provide a wide variety of
shipment-relat
ed data items. Typically, an ASN includes the following:
• Purchase order number
• Item number
• Authorization number
• Quantity shipped
• Cumulative quantities
• Shipment time
In Shipment ASN Export (35.4.1), enter selection criteria to indicat
e which shipments should have
ASNs sent. The system uses these criteria to execute the appropriate gateway program, select the
appropriate trading partner information, and transform the outbound data to the format required by
the receiving party’s EC subsystem.
This export uses the following trading partner parameters, which ar
e set up in Trading Partner
Parameter Maint (35.13.10):
• Logical position 01: Send EDI ASNs; set to Yes or No
• Character: Shipping Document Name; set to the name of the application document definition
to use; for example, Shipping-Notice
• Integer: Shipping Document Ver; set to the version number of the application document
definition to use
See “Defining Trading Partner Parameters” on page 53.

88 User Guide — QAD EDI eCommerce
EMT suppliers can use this program to export an ASN indicating that a secondary sales order has
been shipped. Ordinarily, you use eCommerce Manager to export such ASNs. However, Shipment
ASN Export lets you enter selection criteria to specify a range of shipments or even a single
shipment to have an ASN exported.
See User Guide: QAD Sales for information on ASNs in EMT.
Fig. 3.3
Shipment ASN Export (35.4.1)
Bill of Lading (BOL), Shipper, Ship-From, Ship-To/Dock, Inventory Movement Code, Ship
Date.
Use these fields to specify ranges of selection criteria for the system to use in selecting
ASNs for export.
Include Confirmed Shippers Only. Enter Yes to include only confirmed shippers in the
selection.
Print Details. Enter Yes to include detailed error and warning message information on the
report generated when this program executes. If you enter No, the report is limited to higher-
level summary information.
Update/Export/Both. Specify whether the system should prompt you to update previously
defined fields before exporting the documents meeting the selection criteria:
Update: The system displays the fields you have
set up as editable in the implementation
definition for exporting this document type. You can modify them as needed.
Any updates you make are not reflected in the database. The
y affect only the outbound
document.
See page 35.
Important If you set this field to Update, you must export the documents in two steps. First, enter
selection criteria and update the selected documents as needed. Then run the program again with
the same selection criteria and set this field to Export.
Export: The system exports the documents that me
et the selection criteria without
prompting you to update them.
Both: The system prompts you to update the documents, then exports them as pa
rt of the
same process.
Print Fail/Pass/Both. Specify the status of documents to be included in the output report of this
program.
Failed (the default): The report is limited
to documents that failed to process.

Using EDI eCommerce 89
Passed: The report is limited to documents that processed correctly.
Both: The report includes all documents regardless of status.
EDI Batch No. To reexport a group of documents, enter the batch number assigned to the
group.
When exporting a new group of documents, le
ave this field set to zero. The system assigns a
new batch number to each group of exported documents.
Show Warning Messages. When this field is Yes, the system displays warning messages
stating that some of the selected documents were skipped during export because of trading
partner parameter setup data. Otherwise, the system skips the documents without displaying
the messages.
In some circumstances, you may need to
combine multiple shipment lines into a single shipping
document. For example, bar-code scanning can produce many more lines than necessary, such as
one line for each container.
When you want to combine similar line
items into one line for ASN processing for a trading
partner, you can set up a record in Trading Partner Parameter Maintenance (35.13.10) to define the
combining logic.
For the selected address/site combination, create a record in the
Integer Parameters frame. In the
Integer Param Desc field of any available line, enter Combine Like Items Level. For Integer Param
Value, enter the appropriate value from Table 3.1 to indicate the selected combining level code.
See “Defining Trading Partner Parameters” on page 53.
Table 3.1
ASN Combining Logic Codes
Implementation Record Name
Level
Code Combining Logic Structure
CTR-TARE (CT) 5 CT,CP,CI,I.item-no,I.reference
CTR-PRIM (CP) 4 CP,CI,I.item-no,I.reference
CTR-ITEM (CI) 3 CI,I.item-no,I.reference
ITEM (I) 2 I.item-no,I.reference
1 I.item-no
0 No items are combined.
Example If you specify a level code 4 for a trading partner, the system will combine shipping
records for items, container items, and the primary container into a single ASN for that trading
partner’s shipments.
Exporting Consignment Usage Data
Use Consignment Usage Export (35.4.2) to notify your supplier that you have consumed inventory
shipped to your location on a consignment basis. Since ownership of consigned inventory items is
not transferred from the supplier to the customer until the items are used, the supplier can use the
information in the exported file to determine how much of the total order quantity is available for
invoicing.
For information on Supplier C
onsignment Inventory, see User Guide: QAD Purchasing.
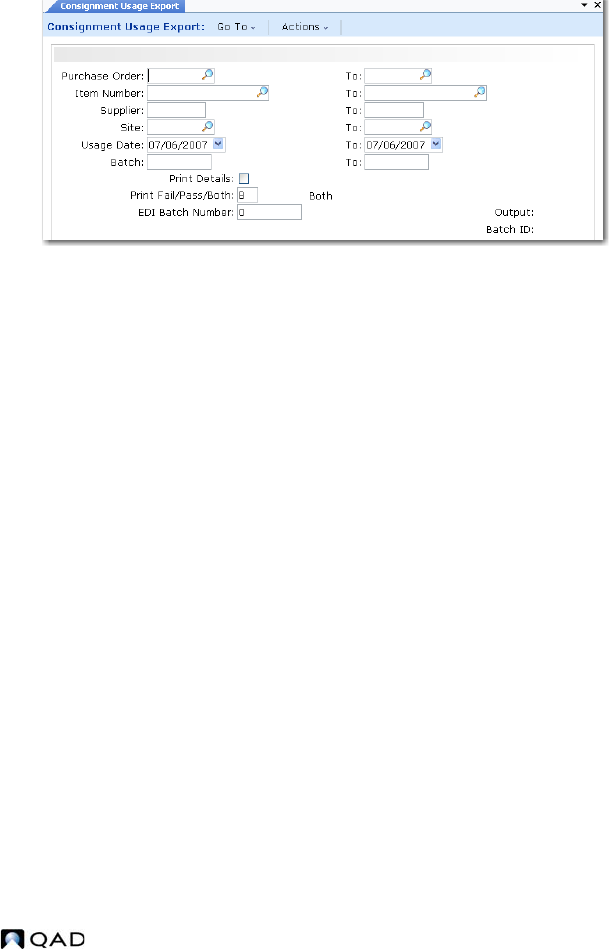
90 User Guide — QAD EDI eCommerce
This export uses the following trading partner parameters, which are set up in Trading Partner
Parameter Maint (35.13.10):
• Logical position 14: Send EDI Consignment; set to Yes or No
• Character: Supplier Consign Doc; set to the name of the application document definition to
use; for example, Consignment
• Integer: Supplier Consign Ver; set to the version number of the application document
definition to use
See “Defining Trading Partner Parameters” on page 53.
Enter ranges of selection criteria for purchase order
, item number, supplier, ship-to site, and
transaction dates that apply to the records you want to export. You can also select records based on
batch numbers, which are assigned by some Supplier Consignment Inventory functions when
consumption is recorded.
Fig. 3.4
Consignment Usage Export (35.4.2)
Exporting Invoices
Use Invoice Export (35.4.3) to export individual, multiple, or cumulative invoices to a customer.
This export uses the following trading partner parameters, which ar
e set up in Trading Partner
Parameter Maint (35.13.10):
• Logical position 02: Send EDI Invoices; set to Yes or No
• Character: Invoicing Document Name; set to the name of the application document definition
to use; for example, Invoice
• Integer: Invoicing Document Ver; set to the version number of the application document
definition to use
Enter ranges of selection criteria for invoice numbe
r, ship date, and so on as required to select
invoices for export. The system uses these criteria to execute the appropriate gateway program,
select the appropriate trading partner information, and transform the outbound data to the format
required by the receiving party’s EC subsystem.

Using EDI eCommerce 91
Fig. 3.5
Invoice Export (35.4.3)
While the selection criteria are different and more numerous, this program works very similarly to
Shipment ASN Export. Like the ASN program, it includes the capability to update fields on
outbound documents before exporting them, as long as those fields have been defined as editable
in Implementation Definition Maint.
See “Exporting ASNs” on page 87.
Note The country of the bill-to customer determines the numeric and date formats.
Exporting Purchase Orders
Use Purchase Order Export (35.4.9) to export a purchase order to a supplier.
Create purchase orders using Purchase Order Maintenance (5.7).
This export uses the following trading partner parameters, which ar
e set up in Trading Partner
Parameter Maint (35.13.10):
• Logical position 06: Send EDI PO; set to Yes or No
• Character: PO Document Name; set to the name of the application document definition to use
(for example, MFG850)
• Integer: PO Document Ver; set to the version number of the application document definition
to use
See Use
r Guide: QAD Purchasing for information on purchase orders.
Important When you plan to export purchase orders to a supplier, set Send EDI PO to Yes for
that supplier in Trading Partner Parameter Maint. This sets the EDI PO field to Yes in the purchase
order trailer so that the order is available for selection in Purchase Order Export.
This program is similar to the other export programs
on the menu. Enter selection criteria to
indicate which purchase orders should be exported. To reexport a purchase order, enter the batch
number that was assigned during an earlier export process.

92 User Guide — QAD EDI eCommerce
You can also use this program to export purchase orders that have been automatically generated
from EMT sales orders. Ordinarily, you use eCommerce Manager to export such POs. However,
Purchase Order Export lets you enter selection criteria to specify a range of POs or even a single
PO to be exported.
See User Guide: QAD Sales for information on EMT.
Fig. 3.6
Purchase Order Export (35.4.9)
Acknowledging Purchase Orders
Use Purchase Order Acknowledgment (35.4.5) to notify your trading partner that you have
received a purchase order and entered it as a confirmed sales order. Sales orders must be confirmed
to be acknowledged.
This export uses the following trading partner parameters, which ar
e set up in Trading Partner
Parameter Maint (35.13.10):
• Logical position 03: Send EDI PO Ack; set to Yes or No
• Character: PO Ack Document Name; set to the name of the application document definition to
use; for example, MFG855
• Integer: POAck Document Ver; set to the version number of the application document
definition to use
See “Defining Trading Partner Parameters” on page 53.
Fig. 3.7
Purchase Order Acknowledgment (35.4.5)

Using EDI eCommerce 93
A purchase order acknowledgment reflects the contents of the sales order. This is not necessarily
identical to the original purchase order that generated the sales order. For example, the quantity
ordered may not be available on the due date. The acknowledgment document in that case reflects
a different quantity, a different due date, or both.
Note Use the Include Invoiced field to control whether the system scans the Invoice History
(ih_hist) table when selecting records for export. The default is No, since typically PO
acknowledgements will be sent before the resulting sales order is shipped and invoiced. Leaving
the field set to No can significantly improve program performance. You should change the field to
Yes only if you send out PO acknowledgements after shipment.
You can also use this program to export purc
hase order acknowledgments that have been
automatically generated from EMT sales orders. Ordinarily, you use eCommerce Manager to
export such PO acknowledgments. However, Purchase Order Acknowledgment lets you enter
selection criteria to specify a range of POs or even a single PO to be acknowledged.
See Use
r Guide: QAD Sales for information on EMT.
Optionally, you can use Purchase Order Ack. Maintenance (35.4.4) to assign or modify the status
of purchase
orders before sending the acknowledgments to the customer.
Enter selection criteria to specify which purchase orders to
update based on the customer, the
customer’s purchase order number, or your sales order number. You can update all lines of all the
purchase orders meeting the selection criteria at once by setting Update Purchase Orders
Automatically to Yes. Then set Status to indicate which status all the lines should be changed to.
Leave Update Purchase Orders Automatically set to No to display the individual purchase order
lines. You can then assign an individual status code to each line.
Valid status codes are:
0: Pending
1: Accepted in full
2: Accepted with a change
3: Rejected
When you choose to update the se
lected purchase orders automatically, you can generate a report
for review before actually updating the status. To do this, set Create Purchase Order
Acknowledgments to No. When this field is Yes, the system selects the purchase orders and
automatically updates the status.
Fig. 3.8
Purchase Order Ack. Maintenance (35.4.4)

94 User Guide — QAD EDI eCommerce
Exporting Supplier Schedules
Use Supplier Shipping Schedule (35.4.8) to send your suppliers planning and shipping
schedules—based on scheduled orders—to communicate short-term and long-term requirements.
Supplier schedules are cumulative, schedule-driven purchase orders with multiple line items from
which releases of requirements and due dates are issued. They are typically used by companies
with long-term supplier contracts that require regular weekly or daily deliveries. The schedules
specify, for the near term, dates and even hours of deliveries. They also inform MRP and the
supplier about long-term plans.
See User Guide: QAD Scheduled Order Management for information on Supplier Schedules.
The types of schedules you can export are determined by whether you use the optional Supplier
Shipping Schedules module.
If you are not using Supplier Shipping Schedules, you create and export schedules that combine
planning and shipping data. With the optional functionality, you can separate long-term planning
requirements from specific daily and hourly delivery requirements.
If you have this module installed and enabled in Supplier Schedule Control (5.5.7.24), you can
update the Export Planning Schedule and Export Shipping Schedule fields in Supplier Schedule
Export. Otherwise, Export Supplier Schedule is the only available option.
For details, see User Guide: QAD Scheduled Order Management
This export uses the following trading partner parameters, which are set up in Trading Partner
Parameter Maint (35.13.10):
• Logical position 04: Send EDI Plan Schedules; set to Yes or No
• Character: Plan Sch Document Name; set to the name of the application document definition
to use; for example, MFG830
• Integer: Plan Sch Document Ver; set to the version number of the application document
definition to use
• Logical position 05: Send EDI Ship Schedules; set to Yes or No
• Character: Ship Sch Document Name; set to the name of the application document definition
to use; for example, MFG830
• Integer: Ship Sch Document Ver; set to the version number of the application document
definition to use
See “Defining Trading Partner Parameters” on page 53.

Using EDI eCommerce 95
Fig. 3.9
Supplier Shipping Schedule (35.4.8)
These fields are
active only when
you are using
the Supplier
Shipping
Schedules
module.
You select schedules for export by specifying criteria, just as in the other export programs.
Supplier Shipping Schedule has four additional fields:
Export Supplier Schedule. Enter Yes to export supplier schedules that match the selection
criteria. Otherwise, enter No.
When the Supplier Shipping Schedules module is acti
ve, this field defaults to No and cannot
be modified.
When the Supplier Shipping Schedules module is not acti
ve, this field defaults to Yes and can
be modified as needed.
Export Planning Schedule. Enter Yes to export planning schedules that match the selection
criteria. Otherwise, enter No.
When the Supplier Shipping Schedules module is acti
ve, this field defaults to Yes and can be
modified as needed.
When the Supplier Shipping Schedules module is not active, this field defaults to No and
cannot be modified.
Export Shipping Schedule. Enter Yes to export shipping schedules that match the selection
criteria. Otherwise, enter No.
When the Supplier Shipping Schedules module is acti
ve, this field defaults to No and can be
modified as needed.
When the Supplier Shipping Schedules module is not active, this field defaults to No and
cannot be modified.
Include EDI Only Schedules. Enter No to export both EDI and non-EDI schedules. Supplier
Shipping Schedules disregards the setting for EDI Schedules in Supplier Scheduled Order
Maintenance and includes both EDI and non-EDI supplier schedules for export.
Enter Yes to export only schedules that have EDI Schedules se
t to Yes in Supplier Scheduled
Order Maintenance.
When this is No and the system cannot find
valid associated settings in Trading Partner
Parameter Maint (35.13.10), errors result. By setting the field to Yes, you can avoid having to
review error messages associated with schedules that should not be exported.

96 User Guide — QAD EDI eCommerce
Print Zero Schedules. Enter Yes to select all scheduled orders that meet the other selection
criteria, including those with no requirements. You can use this option to select a zero
schedule to inform your supplier that requirements from a previous schedule are no longer
needed.
If No, only scheduled orders with at least one
non-zero requirement quantity are selected.
Exporting Self-Billing Information
Use Supplier Self Billing Export (35.4.11) to export payment invoice information to your suppliers
in a self-billing environment. They can then use this information in either a self-billing or receipt-
advice context to associate your payments with their corresponding sales order and shipping
records. For example, you could use this program to export self-billing information to suppliers
using the Self-Billing module.
Enter selection criteria to specify which supplier invoice da
ta to export based on the receiver
number, purchase order number, supplier, buyer, or date you received the order. The system then
exports data from supplier invoices. For example, you can export supplier invoices created with
Evaluated Receipts Settlement (ERS).
Fig. 3.10
Supplier Self Billing Export (35.4.11)
To ensure that the same supplier invoice cannot be exported twice, the system records the batch ID
in the vendor purchase order detail table (vpo_det).
Note The batch number is recorded whenever a supplier invoice is selected for export, even if the
document does not export successfully.
To be able to select a supplier’s inv
oices for export by this program, you must define some related
parameters in Trading Partner Parameter Maintenance (35.13.10). The parameter record of each
supplier who can receive self-billing documents must include:
• Logical position 11: Send Supplier Invoice; set to Yes or No
• Character: ERS Document Name; set to Supplier Invoice
• Integer: ERS Document Ver; set to 1
See “Defining Trading Partner Parameters” on page 53.
Exporting Cycle Count Data
Use Inventory Cycle Count Export (35.4.13) to export cycle count information that can be used by
your trading partner to compare inventory discrepancies between physical counts and the
inventory levels recorded in the trading partner’s database.

Using EDI eCommerce 97
The exported document includes the information generated when you run Inventory Balance
Update (3.16.21) in response to a request for a cycle count.
See User Guide: QAD Master Data for information on cycle counts.
Fig. 3.11
Inventory Cycle Count Export (35.4.13)
Enter an ID number range in Inventory Advice Number to select records for export. This number
is included on the cycle count request.
Based on the implementation definition,
you can optionally update some of the data in the
document before exporting it. Use the Update/Export/Both field to control this feature.
This export uses the following trading partner parameters, which ar
e set up in Trading Partner
Parameter Maint (35.13.10):
• Logical position 12: Send Inv/Recv Adjustments; set to Yes or No
• Character: Inv Adv CC Doc Name; set to the name of the application document definition to
use; for example, Inv-Cycle-Count
• Integer: Inv Adv CC Doc Name; set to the version number of the application document
definition to use
See “Defining Trading Partner Parameters” on page 53.
Exporting Packing Lists
Use Packing List Export (35.4.15) used to communicate a request for shipment of product from a
public warehouse to a customer location.
For example, you can create a shipping order that informs
a public warehouse that the listed items
and quantities should be shipped to the end customer’s location.
Note This program generates packing lists for shipment to customers based on sales order
picklists. To instruct a warehouse to deliver to another warehouse based on a distribution order
packing list, use DO Packing List Export.
This program is similar to Sales Order Packing List
(79.13). However, instead of sending standard
packing list data to a specified output device, Packing List Export uses EDI eCommerce setup
records to generate an export file in the format specified for the receiving trading partner.
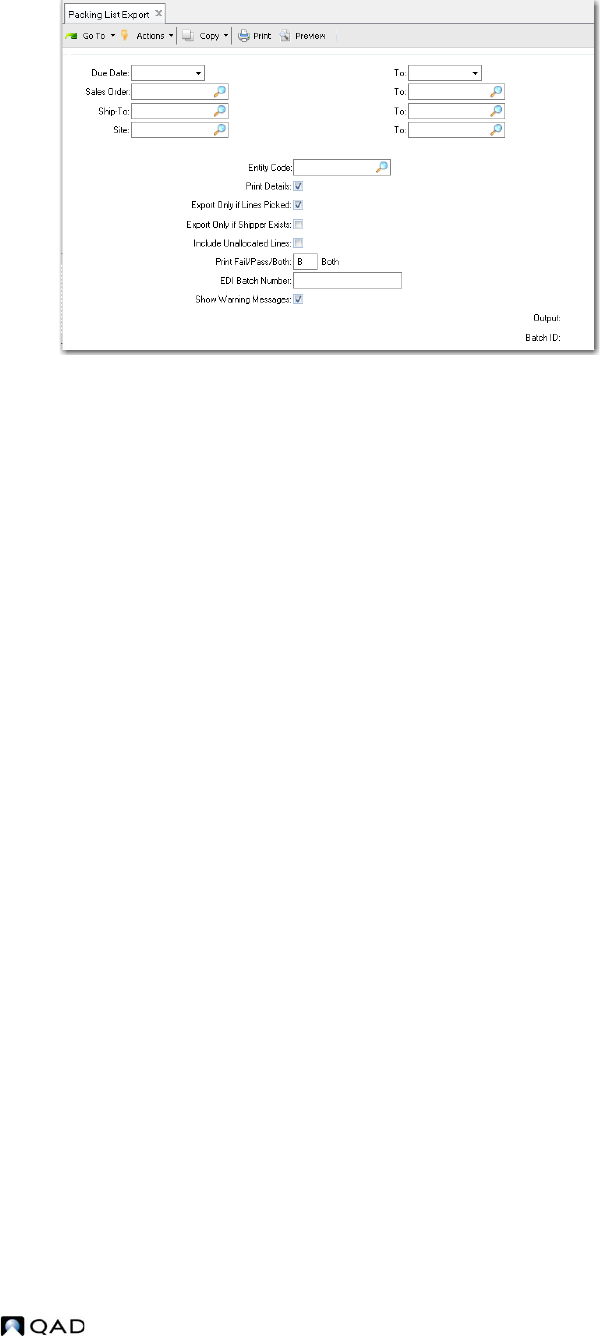
98 User Guide — QAD EDI eCommerce
Fig. 3.12
Packing List Export (35.4.15)
This export uses the following trading partner parameters, which are set up in Trading Partner
Parameter Maint (35.13.10):
• Logical position 13: Send Packing Lists; set to Yes or No
• Character: Packing List Doc Name; set to the name of the application document definition to
use (for example, Packing-List)
• Integer: Packing List Doc Name; set to the version number of the application document
definition to use
To determine whether to select packing lists
for export, the system first looks for a trading partner
parameter record matching the site and company address specified in the selection criteria. If not
found, the system uses the site and bill-to from the sales order to look for a parameter record with
Send Packing Lists set to Yes.
Optionally, you can limit the export to
documents for which items have been picked or that are
already included on a shipper. Additionally, you can choose to include order lines that have not
been allocated.
Note Include Unallocated Lines can be Yes only when Export Only Picked Lines and Export If
Shipper Exists are No.
See “Defining Trading Partner Parameters” on page 53.
Exporting Distribution Order Packing Lists
Use DO Packing List Export (35.4.16) to generate and export a warehouse distribution order
packing list, such as one used as an ANSI X12 format 940 warehouse shipping order.
For example, you can use DO Packing List E
xport to create a shipping order that informs a
warehouse that the listed items and quantities should be shipped to another warehouse.
Note This program generates packing lists for other warehouses based on distribution orders. To
instruct a warehouse to deliver to a customer address based on a sales order picklist, use Packing
List Export. See “Exporting Packing Lists” on page 97.

Using EDI eCommerce 99
Fig. 3.13
DO Packing List Export (35.4.16)
This program is similar to Distribution Order Picklist Print (12.17.19). However, instead of
sending standard packing list data to a specified output device, DO Packing List Export uses EDI
eCommerce setup records to generate an export file in the format specified for the receiving
trading partner.
See Use
r Guide: QAD Supply Chain Planning for information on distribution orders.
This export uses the following trading partner parameters, which ar
e set up in Trading Partner
Parameter Maint (35.13.10):
• Logical position 19: Send DO Packing List; set to Yes or No
• Character: DO Packing List Doc Name; set to the name of the application document definition
to use; for example, Packing-List
• Integer: DO Packing List Doc Ver; set to the version number of the application document
definition to use
Exporting Price Lists
Use Price Catalog Export (35.4.17) to export item and price information as an EDI message to an
external system. For example, the external system could be a catalog system or a customer who
wants the latest list of prices.
Fig. 3.14
Price Catalog Export (35.4.17)

100 User Guide — QAD EDI eCommerce
Enter selection criteria as needed to identify ranges of customers and characteristics of items that
will have pricing data exported. If you use Customer Item Maintenance (1.16) to define cross-
references between your item numbers and those used by your customers, set Customer Item Only
to Yes to limit the export to items that have cross-references.
This export uses the following trading partner parameters, which are set up in Trading Partner
Parameter Maint (35.13.10):
• Logical position 16: Send Price Catalog; set to Yes or No
• Character: Price Catalog Doc Name; set to the name of the application document definition to
use; for example, Price-Catalog
• Integer: Price Catalog Doc Name; set to the version number of the application document
definition to use
The system uses information in the Address and Site fields to find cross-references to trading
partner identifiers defined in Trading Partner Maintenance. This determines where the exported
data is sent.
Best pricing functionality determines the price for each selected item based on price lists or item
master data, as appropriate. Run this program with Report Only set to Yes to review a report on
items selected and their prices before actually exporting data. If you want the pricing to be based
on information for a date other than the current one, modify Effective Date.
See “Defining Trading Partner Parameters” on page 53.
Note Prices are exported in the currency associated with the customer in Customer Maintenance.
Exporting Warehouse Shipment Advice Documents
Use Warehouse Shipment Advice (35.4.18) to advise a receiving warehouse that materials have
been shipped from another warehouse based on a received distribution order packing list. This
document type supports such EDI standards as ANSI X12 943, Warehouse Stock
Transfer/Shipment Advice.
This is the equivalent of an ASN in cases where the shipment is based on a sales order.
This export uses the following trading partner parameters, which are set up in Trading Partner
Parameter Maint (35.13.10):
• Logical position 20: Send Warehouse Shipment; set to Yes or No
• Character: Warehouse Shipment Doc Name; set to the name of the application document
definition to use
• Integer: Warehouse Shipment Doc Ver; set to the version number of the application document
definition to use
See “Defining Trading Partner Parameters” on page 53.
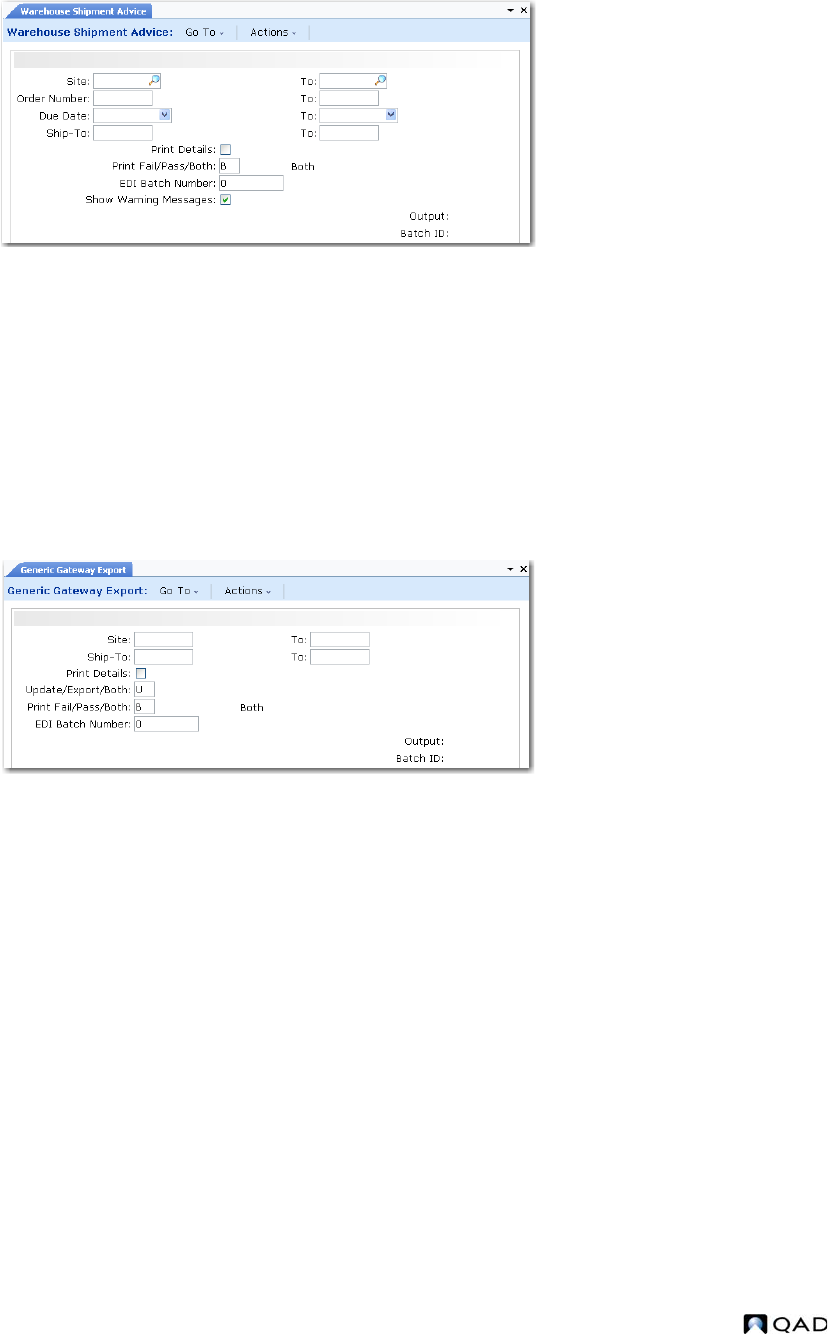
Using EDI eCommerce 101
Fig. 3.15
Warehouse Shipment Advice (35.4.18)
Exporting Data Using the Generic Gateway
Use Generic Gateway Export (35.4.20) to enter and export EDI data based on implementation
definitions when a specific export gateway program is not available for the associated document
type. You can enter data for any field defined in the implementation definition. The values you
enter are then mapped to the outbound document as specified in the associated transformation
definition.
See “Defining a Specific Implementation” on page 29.
Fig. 3.16
Generic Gateway Export (35.4.20)
To use the program, enter site and ship-to address criteria. The system searches for matching
cross-reference records defined in Trading Partner Maintenance (35.13.7) and displays a list of
available trading partners and document types for the site/ship-to combination. Select the trading
partner and document type you want to export and choose Go to display the structure of the first
record in the implementation definition. Choose Insert to display the entire record structure. You
can then select records and enter data in fields as needed.
See “Setting Up Trading Partners” on page 47.
Note Mandatory fields are marked with an asterisk (*).
When you complete data entry and choose Go, the
system creates the document based on the
values you entered. Depending on the value of Update/Export/Both, you can also have the system
automatically export it at the end of the process.
Note Unlike other export programs, Generic Gateway Export does not use trading partner
parameters, which are set up in Trading Partner Parameter Maint (35.13.10). Instead, the program
exports for any Site and Address combination defined in Trading Partner Maintenance (35.13.7).
See “Setting Up Trading Partners” on page 47.

102 User Guide — QAD EDI eCommerce
Tracking Import/Export Document Status
Status and error tracking are important concepts in eCommerce. The process is designed to run
continuously:
• During import, from initially loading the SNF file through transforming it and transferring it to
the database
• During export, from initially selecting a business document through transforming it and
unloading it into an SNF file for transmission to the EC subsystem.
These are complex processes, and errors can occ
ur at any of the three major steps: load/unload,
transformation, or gateway transfer.
Each time you run an import or export program, the
system automatically assigns a session
number. You can use that number to track the status of documents processed during that session
Session Report (35.7) shows the status of document imports or
exports at each processing step.
Use the report to analyze where problems occurred, then resolve the problems either at the
source—for example, by adding missing data with the appropriate maintenance program—or in
the data repository. Once the problems are corrected, either start the import or export again or use
one of the reprocessing programs.
See “EDI eCommerce Processing” on page 6.
See “Reprocessing Documents” on page 105.
Fig. 3.17
Session Report (35.7)
Direction. Enter the direction of the document transfers to be included in this report.
Documents imported into your system are inbound, while those exported to the EC subsystem
are outbound.
Print Details. Enter Yes to include error messages on the report. If you enter No, the report
includes only the status code for each document processed during the session.
Pre-Select All. Enter Yes to have all sessions selected—that is, marked with an asterisk (*)—
when displayed in the selection list. When this field is No, the sessions still display, but none
are initially selected.
When the list displays, you can select or dese
lect sessions as needed.
Print Fail/Pass/Both. Specify the status of documents to be included in the output report of this
program.
Failed (the default): The report is limited
to documents that failed to process.
Passed: The report is limited to documents that processed correctly.

Using EDI eCommerce 103
Both: The report includes all documents regardless of status.
From/To Dates. Enter an optional date range to limit the selection to session numbers
processed between those dates.
Session. Enter the session numbers of the process sessions to be included in this report.
Separate multiple entries with commas. Choose Go to display a list of sessions showing the
date and time they were started. Selected sessions are marked with an asterisk (*). You can
deselect sessions as needed.
Note If you enter both a date range and one or more session numbers, the report includes the
specified sessions only if they fall within the date range. If none of the sessions match the date
range, the system displays the message
No files to process.
Summary Only. Set this field to Yes to limit the report to the summary section, which includes
a trading-partner-level summary of which documents were processed, how many passed, and
how many failed. The Load, Transformation, and Gateway Process sections do not display.
Summary Details. Set this field to Yes to have each section of the report include additional
processing details, including status information for each sequence number created, as well as
cross-references between exchange file and application document reference IDs and
sequences.
Fig. 3.18
Session Report, Select Process Session Numbers Frame
After selecting sessions from the list, Choose Go. Selected sessions display in the Session field.
Then, select an output for the report or specify a batch ID.
The system assigns a status code to each document
at each step of the process. Status codes are
listed in Table 3.2.
Table 3.2
Document Processing Status Codes
Code Direction Status
11 Inbound Load process failed. Could indicate
problem in SNF file or with
trading partner or document definition.
12 Inbound Exchange file load successful.
13 Inbound Exchange file transformation errors.
14 Inbound Exchange file transformation successful.
21 Inbound Application document created, but
has not moved to transfer
process. May indicate a problem with gateway processing.
22 Inbound Application document transfer errors.
23 Inbound Application document transfer successful.
31 Outbound Application document transfer err
ors. Correct in application,
then treat as new export.
32 Outbound Application document transfer successful.

104 User Guide — QAD EDI eCommerce
When you know the status of the document, which tells you where in the process any errors
occurred, you can use one of the document repository inquiry or report programs to display the
error messages and identify the causes of specific problems:
• Exchange Doc Status Inquiry (35.9.1) or Report (35.9.2)
• Application Doc Status Inquiry (35.9.8) or Report (35.9.9)
Correcting Errors
In addition to processing status codes, which indicate the general state of documents within the
import or export process, the system generates detailed error messages during eCommerce
processing. These display on the terminal running the process session and are summarized on a
number of reports. How you correct an error depends on where in the process the error occurred.
Chapter 4 lists processing error messages and related corrective actions.
See Chapter 4, “EDI eCommerce Error Messages,” on page 117.
Example The system detects an error while loading an imported file into the exchange file
repository (status 11). The document is copied into an error file that is placed in the directory
specified in eCommerce Control.
If the load error involves the way mapping is defined in eCommerce, resolve the mapping problem
in the appropriate maintenance program. Then, in Document Import (35.1), set File Type
(New/Error) to Error. The selection list shows only error files, whose names begin with the prefix
specified in eCommerce Control. Select the appropriate file, then rerun the import.
If the load error originated in an SNF file sent by the EC subsystem—for example, missing data in
a mandatory field—you might have to contact the trading partner to have them correct the file. In
that case, you would start the import over again, treating the corrected file as new input.
See “Importing Documents” on page 84.
In a similar case involving an exported file—when required data is missing from a business
document, producing a status 31—correct the document in the appropriate maintenance program
and reexport it as a new document.
When documents successfully complete the load or transfer process and are placed in the
document repository, you can fix some errors there. eCommerce provides a set of programs you
can use for modifying data in the exchange file or application document repository.
See “Maintaining the Document Repository” on page 108.
33 Outbound Application document transformation errors.
34 Outbound Application document transformation successful.
41 Outbound Exchange file created, but has not moved to unload process. May
indicate a problem with gateway processing.
42 Outbound Exchange file unload errors.
43 Outbound Exchange file unload successful.
Code Direction Status

Using EDI eCommerce 105
Reprocessing Documents
After resolving a problem with import or export processing, use the appropriate program—Import
Reprocessing (35.9.21) or Export Reprocessing (35.9.22)—to repeat processing for selected
process sequence numbers. Based on the status of the document, the system automatically begins
the processing flow from the point the error occurred.
The system generates a report on the
reprocessed files to the device specified in Output. You can
choose to run this process later using the Batch ID field.
Fig. 3.19
Export Reprocessing (35.9.22)
Pre-Select All. Enter Yes to have all documents selected—that is, marked with an asterisk
(*)—when displayed on the selection list. When this field is No, the documents still display,
but none are initially selected.
When the list displays, you can select or dese
lect documents as needed.
Print Details. Enter Yes to include detailed information on the report that is output when this
program is executed. If you enter No, the report includes only summary information.
Application. Enter a code representing the application that will have documents processed. The
default is EDI.
Exchange, Application Sequence Mask. Specify one or more patterns, including wildcards
(*), for the system to use in selecting records from the exchange or application repository for
processing. For example, if you enter EDW* in Exchange Sequence Mask, the system selects
all sequence numbers in the exchange repository that begin with EDW. Separate multiple
entries with commas.
The system associates the values y
ou enter with your user ID. Next time you run this program,
the field defaults to the same values you entered previously.
Tracking Exported Documents
For exported documents, the system can automatically create tracking records that let you
determine the status of the document both within your system and from the viewpoint of the EC
subsystem and your trading partner’s application.
When Track is Yes in a document-level record in T
rading Partner Maintenance (35.13.7), the
system generates a tracking record each time you export a document of that type to that trading
partner. After receiving the exported EDI file from your system, the EC subsystem can send an
acknowledgment message. When this message is imported, the system updates the related tracking
record with the status code assigned by the EC subsystem. If the message also includes an optional
status code assigned by the trading partner’s application, it is added to the tracking record.

106 User Guide — QAD EDI eCommerce
See “Setting Up Trading Partners” on page 47.
Example The EC subsystem returns an acknowledgment status of Received, along with an
application status of Accepted. When you import acknowledgment messages using Document
Import (35.1), the system updates the tracking record to include both status codes.
The acknowledgment message typica
lly includes an interchange control number assigned by the
EC subsystem, which is also added to the tracking record. Your system has no knowledge of this
control number when the document is exported, so being able to associate it with the exported
document can provide a valuable cross-reference tool.
Note Documents are tracked only when the Primary Reference field in the exchange repository
master record contains a value. For example, this can be a purchase order, invoice, or ASN
number.
When tracking records are no longer needed
online, you can delete them from the system and
optionally archive them using Document Tracking Archive/Delete (35.9.16.13).
See page 115.
Use of Tracking Data
Use Document Tracking Inquiry (35.9.16.3) to view document and status information based on
tracking records.
Fig. 3.20
Document Tracking Inquiry (35.9.16.3), First Frame
Tracking is
currently
available only
for outbound
documents.
Enter ranges of selection criteria for displaying documents and click Next. The system displays a
list of documents that match the criteria, along with a status summary. To view more information,
select a record, then click Next. Subsequent screens let you view exchange file or application
document status, as well as the content of the associated repository records, for the original
document and each acknowledgment or status update document received from the EC subsystem.
Manually Updating Tracking Records
Under some circumstances, you might need to make manual changes to a system-maintained
document tracking record; for example, if a communication error prevents your system from
importing an acknowledgment message from the EC subsystem.
Use Document Tracking Maintenance (35.9.16.1) to
make manual updates to system-maintained
tracking records associated with exported documents.

Using EDI eCommerce 107
Fig. 3.21
Document Tracking Maintenance (35.9.16.1)
Trading Partner. Enter the identifier representing the trading partner that received the exported
document tracked with this record.
Entries are validated against IDs defined in Trading Partner Maintenance.
Document Reference. Enter the number of the exported business document tracked with this
record. For example, this could be a purchase order, invoice, or ASN number.
Document Type. Enter the type of the exported document tracked with this record. For
example, this could be ANSI X12 document 856 or EDIFACT document DESADV.
Entries are validated against document types defined
for the specified ID in Trading Partner
Maintenance (35.13.7).
Control Number. Enter the interchange control number assigned by the EC subsystem to the
exported document.
Exchange File Seq. Enter the exchange sequence number of the exported document associated
with this tracking record. Entries are validated against exchange repository master records.
Current Status. Enter the processing status code assigned most recently to the exported
document.
For example, when a document is successfully exported, the sys
tem sets this status to
Exported. After all acknowledgments are received from the EC subsystem and the trading
partner’s application, it can be changed to Completed.
When this field is updated, the syste
m maintains a history of previous processing status codes.
Set Previous Statuses to Yes to view a list.
Current Ack Status. Enter the most recent status code assigned by the EC subsystem.
When Ack is Yes for the document type in Tra
ding Partner Maintenance, the system leaves
this field blank until an acknowledgment message is imported from the EC subsystem.
When Ack is No, the tracking record is created with None Expected in thi
s field. If an
acknowledgment status is received from the EC subsystem, the new status overwrites the
system-assigned value.
Current App Status. Enter the most recent status code assigned by the trading partner’s
application.

108 User Guide — QAD EDI eCommerce
Application Sequence. Enter the application document repository sequence number associated
with the document that reported the current status, acknowledgment status, or application
status.
Additional fields show the dates and times associated with document creation and status updates.
Set Previous Statuses to Yes to list the processing status codes and associated application
repository sequence numbers previously assigned to a document tracking record. The list includes
values that previously displayed in the Current Status field.
Maintaining the Document Repository
You can use menu programs to modify all three types of data in the repository: exchange file
document data, application document data, or turnaround data.
Additionally, if you are using the QAD .NET UI, you can use a menu collection to view, update,
and reprocess related exchange file and application repository documents in a workbench-style
interface. This is described in
“Maintain eCommerce Repository Data Collection” on page 110.
You can also archive and delete repository data to reduce disk space requirements.
Important Use caution when modifying repository data. Changing data in the repository can lead
to database synchronization problems. Use menu security to restrict access to the repository
maintenance programs.
Exchange Data Repository
Use Exchange Data Repository Maint (35.9.3) to modify or add data in the exchange file portion
of the data repository. For example, you might use this program to add a value to a missing
mandatory field that is preventing the transformation process from completing.
The exchange file repository includes two types of data:
• Inbound exchange files that have been loaded from the EC subsystem SNF files but have not
been transformed for transfer into your system
• Outbound exchange files consisting of transformed business document data that has not been
unloaded to the EC subsystem
Note The repository stores all exchange files that pass through it during processing, whether or
not they complete all the subsequent steps. These exchange files remain in the repository until they
are archived and deleted. See
“Archiving and Deleting EDI eCommerce Data” on page 113.
This program includes three frames. When you select an exchange file to maintain in the first
frame, the system displays trading partner data and reference information about the exchange file.
Use the second and third frames to select the exchange file record and field that contains the data
you want to maintain.
Note A .NET UI menu collection lets you select a repository record through a browse and view
or update associated records in both repositories, as well as reprocess them after correcting
problems, through a single UI. Its repository maintenance functionality is similar to this program.
See
“Maintain eCommerce Repository Data Collection” on page 110.

Using EDI eCommerce 109
Fig. 3.22
Exchange Data Repository Maint (35.9.3)
Ref ID. Enter the reference number of the repository record you want to maintain. Use the
arrow keys to scroll through the list of available record IDs.
When you choose Go, two addi
tional frames display.
Because of the possible many-to-one or one-to-many
relationships between exchange files and
application files, the sequence numbers assigned to the files do not stay the same throughout
processing. eCommerce provides a tool for determining cross-references between numbers.
See “Identifying Cross-References Between Repository Files” on page 112.
Fig. 3.23
Exchange Data Repository Maint, EF Record and Field Data Frames
Select a record in the left frame.
Select a field and change its
value as required.
Seq and Record Name. The sequence numbers and names associated with the records in the
selected exchange file.
Use the arrow keys to move through the records
in the file. Choose Go to select the record
whose fields you want to change.
Seq and Field Name. The sequence numbers and names associated with the fields in the
selected exchange file record.
Use the arrow keys to move through the field seque
nce numbers. Choose Go to select the field
whose value you want to change.
Field Value. The system displays the current value of this field in the selected record.
Enter or change data as required. Choose Go to rec
ord the change and return to the Seq field.
When all field entries are complete, choose End
to return to the EF Record Data frame.
Application Document Repository
Use Application Data Repository Maint (35.9.10) to modify or add data to an imported or exported
document. For instance, you can use the program to add missing data to a required field.

110 User Guide — QAD EDI eCommerce
The application document repository includes two types of data:
• Outbound documents that have been transferred from the database with an export gateway but
have not been transformed into an exchange file format
• Inbound documents consisting of transformed business document data that has not been
transferred by a gateway program to the database
The repository stores all documents that pass through
it during processing, whether or not they
complete all the subsequent steps. These documents remain in the repository until they are
archived and deleted. See “Archiving and Deleting EDI eCommerce Data” on page 113.
Warning Any changes you make to data fields with this program do not update actual business
documents—only the eCommerce repository tables. Changing repository data can lead to data
synchronization problems. Use menu security to limit access to this program.
This program works the same way as Exchange Dat
a Repository Maint (35.9.3). See page 108.
Note A .NET UI menu collection lets you select a repository record through a browse and view
or update associated records in both repositories, as well as reprocess them after correcting
problems, through a single UI. Its repository maintenance functionality is similar to this program.
See “Maintain eCommerce Repository Data Collection”.
Fig. 3.24
Application Data Repository Maint (35.9.10)
Maintain eCommerce Repository Data Collection
In the QAD .NET UI, Maintain eCommerce Repository Data allows you to view and update EDI
eCommerce repository and status records from a single workbench-style access point.
In the initial browse window, you
can use standard .NET UI filtering functions to limit the
selection of documents displayed by process date, status, document direction, trading partner ID,
and several other criteria. Next, select a record from the main browse window. The system
populates the Sequence ID field in each of the five associated programs (shown as tabs below the
browse window) based on the selected record:
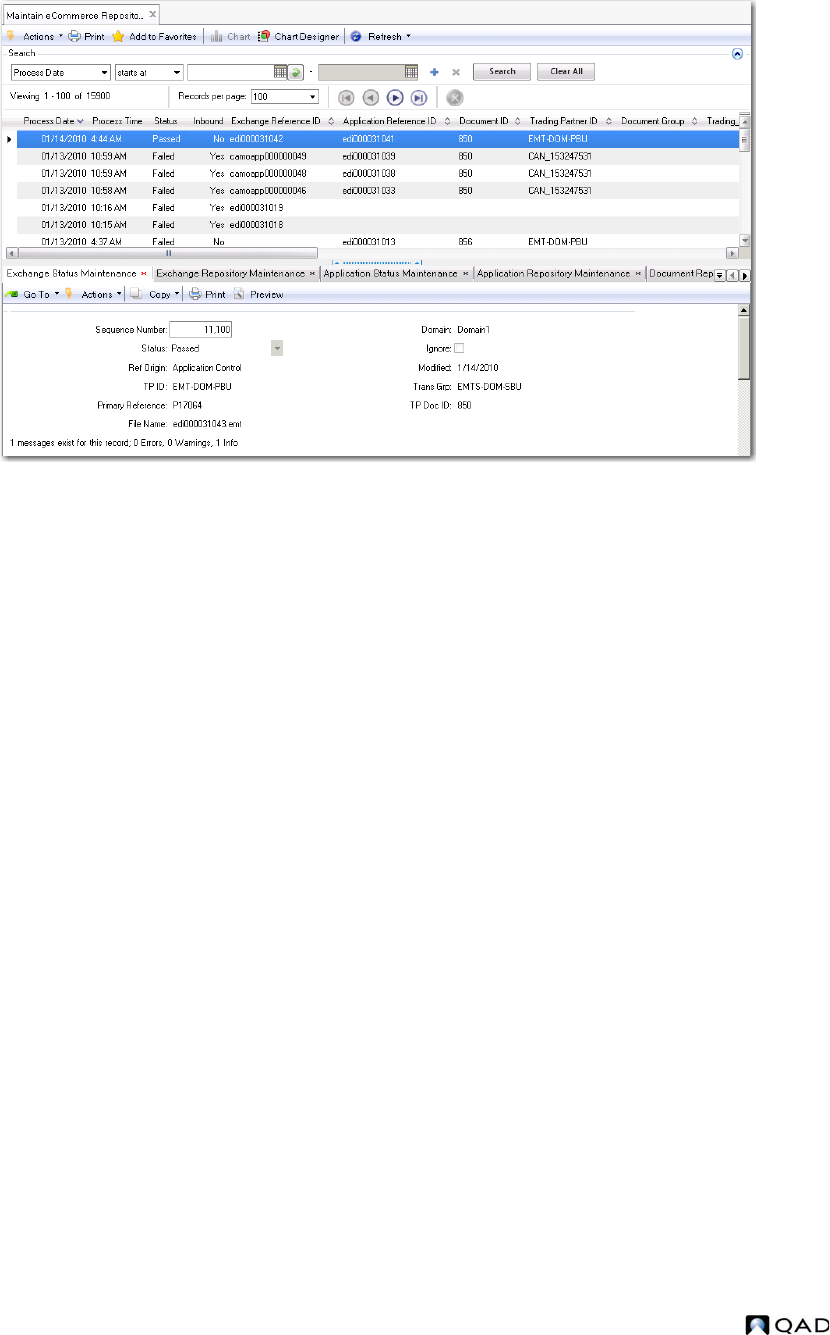
Using EDI eCommerce 111
Fig. 3.25
Maintain eCommerce Repository Data
After selecting a record, you can use the workbench functions to:
• View status and processing messages in either the exchange or application repository. This is
similar to the standard Exchange Doc Status Inquiry and Application Doc Status Inquiry
programs, with some added functionality: You also can update the Passed/Failed status in
either repository. Additionally, you can select an Ignore field, which makes the document
unavailable for reprocessing through either the workbench Document Reprocess program or
the menu-level Import Reprocessing/Export Reprocessing programs.
• Modify information in the associated exchange or application repository document. The two
workbench repository maintenance programs are very similar to the menu-level Exchange
Data Repository Maint and Application Data Repository Maint functions. The main difference
is that the workbench programs display less read-only data because it is available in the main
browse window.
• Reprocess the updated records in both repositories using values that you have updated in the
other programs. This is similar to the menu-level Import Reprocessing and Export
Reprocessing functions. Note that reprocessing only takes place on the repository level. To re-
import or re-export a file, use Document Import or the appropriate program—based on the
document type—from the Document Export menu.
Turnaround Data
Turnaround data consists of inbound data items that do not match existing database fields but are
required for related outbound documents.
Turnaround data is generally defined
in Implementation Definition Maint (35.15.13). During
gateway processing, the system relates it to index information provided in Implementation
Definition Maint and stores it in the turnaround data table. During outbound processing, the
system uses the turnaround data mapping table to relate the turnaround data to the outbound
document.

112 User Guide — QAD EDI eCommerce
Use Turnaround Data Maintenance (35.9.17) to modify turnaround data.
You can edit only one field in this program—Turnaround Data Item Value. The other key fields
identify the location of the data.
See “Turnaround Data” on page 4.
Fig. 3.26
Turnaround Data Maintenance (35.9.17)
Target Domain. Enter the domain associated with the turnaround data you want to maintain.
The default is your current working domain.
Table Name. Enter the name of the table associated with this turnaround data item, or use the
arrow keys to scroll through a list of tables. The table name is specified in the turnaround data
mapping table. For example, if the turnaround data is related to a sales order, this could be
so_mstr.
Note Turnaround data is not actually stored in the table. Instead, it is stored in a set of
turnaround repository tables that use the table and field names as part of the index.
Index Field Name. The name of the field associated with this turnaround data item. The field
name is specified in the turnaround data mapping table. For example, if the turnaround data is
related to a sales order, this could be so_nbr.
Index Field Value. The value of the variable associated with this turnaround data. For example,
if the turnaround data is related to a sales order, this could be the sales order number.
Turnaround Data Item. The name of the turnaround variable.
Turnaround Data Item Value. The value of the turnaround data. Modify it as needed and
choose Go to save your changes.
Identifying Cross-References Between Repository Files
Files exchanged between your system and an EC subsystem can be converted on a one-to-many,
many-to-one, or many-to-many basis. This means that a one-to-one correspondence between
document sequence numbers may not exist.
Two programs let you determine cross-references betwe
en application document sequence
numbers and exchange file sequence numbers:
• Use Exchange-Application Xref Browse (35.9.13) to view exchange file sequence numbers
and their corresponding application document sequence numbers.
• Use Exchange-Application Xref Report (35.9.14) to generate a report on cross-references for
selected ranges of application document and exchange file sequence numbers.

Using EDI eCommerce 113
Fig. 3.27
Exchange-Application Xref Report (35.9.14)
Archiving and Deleting EDI eCommerce Data
EDI eCommerce provides no automated features for purging the database of repository documents
and other information that are no longer needed. To maintain control of disk space, you should
regularly run an archive/delete utility. EDI eCommerce includes delete/archive programs used for
several types of data:
• Repository document data
• Text comment data
• Turnaround data
• Document tracking records
Repository Data
Two programs are available for deleting unneeded repository documents:
• Use Inbound Delete/Archive (35.17.13) to delete and archive imported documents from the
exchange file and application document repositories.
• Use Outbound Delete/Archive (35.17.14) to delete and archive exported documents from
repositories.
The two programs function identically. Enter selection criteria
to select repository documents by
combinations of file sequence numbers and processing dates. Then, specify whether to select
documents that passed, failed, or both.
The outbound program selects records based on appl
ication sequence numbers; the inbound
program uses the exchange sequence as the selection key. Each program automatically looks up
cross-references to corresponding records in the other repository (exchange or application) and
deletes/archives them.
An archive program is usually run twice. First, run the program with all Del
ete fields set to No and
review the report. Then, run it again with the appropriate field or fields set to Yes.
When Archive is set to Yes, the system stores deleted data in a file named
xxyymmdd.hst, where
xx is ob for outbound documents and ib for inbound documents, and yymmdd is the date you ran
the archive function.You can restore this file to the system using Archive File Reload (36.16.5).
Warning Deleted data that is not archived cannot be recovered.
Important Date and time in the stored data are formatted based on the country code associated
with the user who archived the data. If a user with a different date and time format reloads the data,
load errors and corrupted data can occur.

114 User Guide — QAD EDI eCommerce
To avoid these problems, use the same settings when archiving and reloading the data. Before
loading data, use User Maintenance (36.3.1) to temporarily change your country code to match
that of the user who archived the data.
Fig. 3.28
Outbound Delete/Archive (35.17.14)
Text Comments
Use Comment Cross-Ref Archive/Delete (35.17.15) to archive and delete records containing
imported text comments cross-referenced to sales orders or scheduled orders.
The system deletes such document
s automatically only when the trading partner’s record in
Trading Partner Parameter Maintenance (35.13.10) includes a Remove Connected Comments
parameter set to Yes. Otherwise, you should run this program to delete unneeded comment files.
See “Defining Trading Partner Parameters” on page 53.
Fig. 3.29
Comment Cross-Ref Archive/Delete (35.17.15)
This program is similar to the repository delete/archive programs. Enter selection criteria as
required to select documents by ID numbers included in the imported comments file or processing
dates. Then, specify whether to select documents that completed processing by successfully
attaching the comment text to the order, those that did not, or both.
Optionally, you can have the system display the c
omments selected for deletion. When you choose
to archive comment data, the system places it in a file named
obyymmdd.hst, where yymmdd is
the date you ran the archive function.
Turnaround Data
Use Turnaround Data Archive/Delete (35.17.16) to delete from the system and optionally archive
turnaround data that is no longer required.
See “Turnaround Data” on page 4.

Using EDI eCommerce 115
Fig. 3.30
Turnaround Data Archive/Delete (35.17.16)
There is no other mechanism for selecting and deleting turnaround data records. How often you
should run this function depends on how long you need to retain turnaround data in your database.
This program is similar to the repository delete/archiv
e programs. Select records based on ranges
of dates and user IDs. When you choose to archive turnaround data, the system places it in a file
named
tayymmdd.hst, where yymmdd is the date you ran the archive function.
Document Tracking Records
Use Document Tracking Archive/Delete (35.9.16.13) to delete from the system and optionally
archive document tracking records that are no longer required. How often you should run this
function depends on how long you need to retain tracking data in your database.
See “Tracking Exported Documents” on page 105.
Fig. 3.31
Document Tracking Archive/Delete (35.9.16.13)
This program is similar to the repository delete/archive programs. Select records based on ranges
of document information and dates. You can also enter comma-separated lists of document types
and status codes. To select all records regardless of document type or status code, leave the
asterisk (*) in the appropriate field.
Note Leave Direction set to Out. Document tracking currently supports only exported
documents.
When you choose to archive document tracking data, the
system places it in a file named
obyymmdd.hst, where yymmdd is the date you ran the archive function.

116 User Guide — QAD EDI eCommerce
Chapter 4
EDI eCommerce Error Messages
This chapter describes eCommerce-specific error messages. It explains the conditions that cause
the errors and suggests solutions.

118 User Guide — QAD EDI eCommerce
No. Message Cause Solution
4400 <directory> listed in control
program does not exist
• Control program was not
initially set up or the specified
path is incorrect.
• Directory was removed after
control program setup.
• Use eCommerce Control
(35.17.24) to add or correct
the directory name or path.
• Contact the system
administrator to have the
directory created.
4401 User does not have write
privileges to <directory>
Directory was created by user other
than system administrator.
or
System administrator did not grant
read, write, create, modify, and
delete rights to all users for the
specified directory.
Contact the system administrator.
Users must have read, write,
create, modify, and delete rights
to the specified directory.
or
Change the directory location.
• For an inbound document, use
eCommerce Control
(35.17.24).
• For an outbound document,
use Transmission Group
Maintenance (35.13.13).
4402 Mandatory exchange file data
record is missing: <subsystem>;
<record name>; <exchange file
name>; <version>;
<filename>; <error file>
Note: <filename> and
<error file> are not applicable
on outbound documents.
• The trading partner did not send
the data record specified, or the
SNF file <filename> was not
complete.
• <record name> has been
defined as mandatory in the
document definition for this
combination of <exchange file
name>, <version>, and
document direction when it
should be defined as optional.
• Have the trading partner
correct the problem and
resend the document.
• If this is a recurring error for
this <exchange file name>,
<version>, and direction, use
Exchange Definition
Maintenance (35.15.6) to
select the appropriate
combination of exchange file
name, version, and direction,
go to <record name>, and set
Requirement to Optional.
4403 No matching quote found in
record. <record> (first 5
characters); <file name>; <error
file>
The EC subsystem is defined as
variable-format with a quote
character surrounding
alphanumeric data. A beginning
quote character was found without
a matching closing quote.
Have the trading partner correct
the problem and resend the
document.
or
Open the error file in a text editor
and locate the subject record.
Insert the closing quote character
at the end of the data field. Then,
use Document Import (35.1) to
import the error file.
4404 Duplicate <record code>
records: <subsystem>;
<filename>; <error file>
A control or data record is repeated
within the document without the
data information. A control record
can only appear once for a
document. Data records are
expected to follow the control
records and come before the next
document’s control record.
Have the trading partner correct
the problem and resend the
document.
or
Open the error file in a text editor
and locate the duplicate control
records. Verify that the data
within the records are the same.
If they are the same, remove one
of the control records and use
Document Import (35.1) to
import the error file.

EDI eCommerce Error Messages 119
4405 Mandatory control record is
missing in input file: <record
code>; <subsystem>;
<direction>; <filename>;
<error file>
• The trading partner did not send
the data record specified or the
SNF file <filename> was not
complete.
• The control record identified in
<record code> has been defined
as mandatory in the definition
for this EC subsystem and
direction when it should be
defined as optional.
• Have the trading partner
correct the problem and
resend the document.
• If this is a recurring error for
this EC subsystem and
direction, then use EC
Subsystem Definition Maint
(35.13.1) to select the EC
Subsystem and direction, go
to the <record code>, and set
Requirement to Optional.
4406 Unknown or blank record code:
<record code>; <subsystem>;
<file name>; <error file>
The EC subsystem sent a record
code that has not been defined as a
control code or a data control code.
Open the error file in a text editor
and determine if this code is for a
data segment or a control
segment. Then, define the
segment as required.
• For a data segment, use EC
Subsystem/Exchange Maint
(35.13.3) to define the data
control code.
• For a control segment, use EC
Subsystem Definition Maint
(35.13.1) to define the control
code.
4407 Control field length outside
boundaries: <subsystem>;
<record sequence>; <field
name>; <field length>; <file
name>; <error file>
The EC subsystem is defined as
using variable-format control field
lengths. The number of characters
<field length> is not within the
minimum and maximum values
specified for the field.
Using EC Subsystem Definition
Maint (35.13.1), locate the
specified sequence number
<record sequence>. Select the
field name for the appropriate
record sequence and adjust the
minimum and maximum values.
4408 Mandatory control field has not
been set: <subsystem>; <record
sequence>; <field name>; <file
name>; <error file>
• The trading partner did not send
the data specified. The SNF file
<filename> was not complete.
• The control record field <field
name> for the <record
sequence> has been defined as
mandatory in the definition for
EC Subsystem <subsystem> and
direction when it should be
defined as optional.
• Have the trading partner
correct the problem and
resend the document.
• If this is a recurring error for
this EC subsystem and
direction, then use EC
Subsystem Definition Maint
(35.13.1) to select the EC
subsystem and direction, go to
the <record sequence>, locate
the <field name>, and set the
requirement to optional.
No. Message Cause Solution

120 User Guide — QAD EDI eCommerce
4409 Mandatory data field has not
been set: <subsystem>;
<exchange file name>;
<version>; <record sequence>;
<field name>; <file name>;
<error file>
Note: <filename> and
<error file> are not applicable
on outbound documents.
• The trading partner did not send
the data specified, or the SNF
file <filename> was not
complete.
• The data record field <field
name> for the <record
sequence> has been defined as
mandatory in the exchange file
document definition for the
<exchange file name>,
<version>, and direction when it
should be defined as optional.
• Have the trading partner
correct the problem and
resend the document.
• If this is a recurring error for
this exchange file name,
version, and direction, then
use Exchange Definition
Maintenance (35.15.6) to
select the appropriate
exchange file document
definition, go to the <record
sequence>, locate the <field
name>, and set Requirement
to Optional.
4410 Data field length outside
boundaries: <subsystem>;
<exchange file name>;
<version>; <record sequence>;
<field name>; <field length>;
<file name>; <error file>
Note: <filename> and
<error
file> are not applicable
on outbound documents.
EC subsystem is defined as using
variable-length fields. The number
of characters <field length> is not
within the minimum and maximum
values specified for the field.
Use Exchange Definition
Maintenance (35.15.6) to locate
the specified sequence number
<record sequence> for the
specified EC subsystem
<subsystem>, <exchange file
name>, <version>, and direction.
Locate the field name <field
name> for the record sequence
and adjust the minimum and
maximum values.
4411 EC Subsystem does not exist:
<subsystem>; <file name>;
<error file>
The specified EC subsystem
<subsystem> has not been defined.
• Use EC Subsystem Definition
Maint (35.13.1) to define the
subsystem and its control
codes.
• Use EC Subsystem/Exchange
Maint (35.13.3) to create the
data control codes.
4412 Unknown file format: <file
name>; <error file>
The file extension is used to
identify the subsystem name and
file format. If a subsystem cannot
be identified by the extension, then
the system attempts to locate the
subsystem definition of the default
subsystem defined in the control
program.
• Use EC Subsystem Definition
Maint (35.13.1) to define the
subsystem and its control
codes.
• Use EC Subsystem/Exchange
Maint (35.13.3) to create the
data control codes.
4413 Input control record is not in
sequence: <sequence number>
The SNF file was not complete. Have the trading partner correct
the problem and resend the
document.
4414 Exchange file record table record
does not exist: <exchange file
name>; <version>; <record
sequence number>
The record was deleted from the
exchange file document definition
after the EC subsystem/exchange
cross-reference was defined.
Use Exchange Definition
Maintenance (35.15.6) to
redefine the record sequence for
the specified exchange file name
and version.
4415 Current record sequence has
exceeded its loop occurrence:
<exchange file name>;
<version>; <record sequence>
There are more occurrences of the
record type within the data than
allowed by the exchange file
document definition.
Use Exchange Definition
Maintenance (35.15.6) to locate
the record sequence for the
specified exchange file name and
version. Increase the loop
occurrences allowed for the
record.
No. Message Cause Solution

EDI eCommerce Error Messages 121
4416 Invalid document transmission
group name: <transmission
group name>
The specified transmission group
has not been defined.
Use Transmission Group
Maintenance (35.13.13) to define
the transmission group.
4417 Destination dir/file prefix is
blank for transmission group:
<transmission group name>
The directory or file prefix for the
specified transmission group has
been left blank.
Use Transmission Group
Maintenance (35.13.13) to add
the missing information.
4418 Exchange file repository master
record not found
Database corruption. Contact database administrator.
4419 EC Subsystem control record
does not exist: <subsystem>;
<transmission group name>
Control record codes have not been
defined for the subsystem.
• Use EC Subsystem Definition
Maint (35.13.1) to define the
subsystem and its control
codes.
• Use EC Subsystem/Exchange
Maint (35.13.3) to create the
data control codes.
4420 Repository detail record does not
exist for sequence
Database corruption. Contact database administrator.
4421 EC Subsystem cross-reference
record not available for:
<subsystem>; <document type>;
<record sequence number>
Cross-reference was not set up
completely, or a record sequence
was added to the exchange file
document definition after the cross-
reference was set up.
Use EC Subsystem/Exchange
Maint (35.13.3) to create the data
control code.
4422 Record code is blank for data
records: <subsystem>;
<document type>; <record
sequence number>
Cross-reference was not set up
completely, or a record sequence
was added to the exchange file
document definition after the cross-
reference was set up.
Use EC Subsystem/Exchange
Maint (35.13.3) to create the data
control code.
4423 Unable to create directory
<directory> for transmission
group: <transmission group
name>
Directory was created by user other
than system administrator.
or
System administrator did not grant
read, write, create, modify, and
delete rights to all users for the
specified directory.
Contact the system administrator.
Users must have read, write,
create, modify, and delete rights
to the specified directory.
or
Change the directory location.
• For an inbound document, use
eCommerce Control
(35.17.24).
• For an outbound document,
use Transmission Group
Maintenance (35.13.13).
4424 Unable to create directory:
<directory>
Directory was created by user other
than system administrator.
or
System administrator did not grant
read, write, create, modify, and
delete rights to all users for the
specified directory.
Contact the system administrator.
Users must have read, write,
create, modify, and delete rights
to the specified directory.
or
Change the directory location.
• For an inbound document, use
eCommerce Control
(35.17.24).
• For an outbound document,
use Transmission Group
Maintenance (35.13.13).
No. Message Cause Solution

122 User Guide — QAD EDI eCommerce
4425 Mandatory control token limits
are not met: <subsystem>;
<record sequence>; <field
name>; <token>; <field length>
EC subsystem is defined as using
variable-length fields. The number
of characters <field length> is not
within the range of minimum and
maximum values specified for the
field.
Use EC Subsystem Definition
Maint (35.13.1) to locate the
specified sequence number
<record sequence> for the
specified EC subsystem
<subsystem>. Locate the field
name <field name> for the record
sequence and adjust the
minimum and maximum values.
4426 Optional control token limits are
not met: <subsystem>; <record
sequence>; <field name>;
<token>; <field length>
EC subsystem is defined as using
variable-length fields. The number
of characters <field length> is not
within the range of minimum and
maximum values specified for the
field.
Use EC Subsystem Definition
Maint (35.13.1) to locate the
specified sequence number
<record sequence> for the
specified EC Subsystem
<subsystem>. Locate the field
name <field name> for the record
sequence and adjust the
minimum and maximum values.
4427 EC Subsystem control field
records not found: <subsystem>;
<exchange file sequence
number>
An outbound subsystem has not
been defined.
Use EC Subsystem Definition
Maint (35.13.1) to define the
subsystem and its control codes.
4428 Document status record does not
exist:
Database corruption. Contact database administrator.
4429 Invoice history header record
does not exist: <invoice
number>; <sales order number>
Database corruption.
or
Data may have been archived.
Contact database administrator.
4430 Trading partner location cross-
reference does not exist:
<document name>; <version>;
<site>; <address>
Trading partner has not been set up
properly.
• Use Trading Partner Report
(35.13.9) to print a list of all
trading partners.
• Locate a trading partner ID on
the report where the
Application Site = <site> and
the Application Address =
<address>.
• With the trading partner ID
retrieved from the report, use
Trading Partner Maintenance
(35.13.7) to create a cross-
reference record.
4431 Implementation record does not
exist: <document name>; <doc
vers>; <imp name>; <imp vers>;
<record sequence or record
name>
Setup of implementation definition
not complete.
or
The specified record has been
deleted.
Use Implementation Definition
Maint (35.15.13) to create the
required record.
4432 Repository master record does
not exist:
Database corruption. Contact database administrator.
No. Message Cause Solution

EDI eCommerce Error Messages 123
4434 Variable not found while
obtaining variable name
<variable name> <variable
type>
Variable defined for transformation
is no longer available to
transformation process.
Verify definitions exist in the
exchange or implementation
definition records. If they exist,
delete them and recreate them. If
they do not exist, create them in
the exchange or implementation
definition records, then delete
them.
4435 Variable not available to be set:
<recid of variable>
Variable defined for transformation
is no longer available. Possibly, it
was deleted prior to loading the
transformation definitions.
Restart the transformation. If it
still does not work, contact
database administrator to report
possible data corruption.
4436 Variable not available while
obtaining variable value: <recid
of variable>
Variable defined for transformation
is no longer available. Possibly, it
was deleted prior to loading the
transformation definitions.
Restart the transformation. If it
still does not work, contact
database administrator to report
possible data corruption.
4437 Variable has not been assigned a
value: <variable name>
<variable qualifier>
Variable within transformation has
not been assigned a value or
initialized.
Verify that the variable <variable
name> has been assigned a value
before using it as a source for
another target variable.
4438 Function or variable is not
available: <variable/function
name> <variable qualifier>
Value for function or variable did
not return a valid value.
Correct the returning value from
the function program or verify
that the function program
compiled properly.
4439 Value not available for variable:
<variable/function name>
<variable qualifier>
Value for function or variable did
not return a valid value.
Transformation definition is
requesting a value from a
variable, but variable has not yet
been assigned a value. Assign the
variable as a target before using
it as a source.
4440 Function not found: <function
name>
Function defined within the
transformation definitions does not
exist within function definitions.
Check function definitions for
the function requested from the
transformation definition map. If
the record exists, contact
database administrator.
Otherwise, create the record
being requested.
Note: If the function has been
saved to disk already and the
function definition has been
removed, do not reprocess it to
the disk. This will overwrite the
program currently on the disk.
4441 Function returned error:
<returned value set by function>
Function did not perform correctly
and was not able to return a value.
• Check that the function on
disk compiles correctly.
• Check the parameter values
being sent to the function for
correct data type matching.
• If the function is user-defined,
look at the function program
to see the error message and
why it occurs.
No. Message Cause Solution

124 User Guide — QAD EDI eCommerce
4442 Illegal target qualifier found:
<target qualifier that is illegal>
An invalid target qualifier was
mistakenly entered or allowed in
transformation definitions.
Change the target qualifier to a
valid target qualifier (I, O, or V).
All others are considered illegal.
4443 Sequence number not processed
<sequence number>
Either no repository exists, no
trading partner information exists,
or no map exists.
• Verify that the repository has
been created. If not, then load
or unload the file again.
• If the repository is being
created, verify that the trading
partner information has been
set up for the information
found on the repository
master records.
• If the trading partner
information is missing, create
the missing information again.
If the information is not
missing, confirm that the
trading partner map definition
is pointing to a valid and
existing map.
4444 Function has not been processed
to disk: <function name>;
<internal function name)
Transformation process tried to run
the function from the disk and the
program was not found.
• Verify that the program
resides in the function
directory specified in
eCommerce Control
(35.13.24). If it does not, it to
the correct directory.
• If the program does not exist,
use eCommerce Function
Maintenance (35.15.21) to
create a program shell and
then modify the program as
required.
4445 BILL-TO does not exist in
address master <bill to address>
The application document
repository has a BILL-TO address
that has not been defined.
Use Customer Address
Maintenance (2.1.1) to define the
customer bill-to address.
4449 Sequence number not set from
conditional write function
The conditional write function
check-hash did not return a valid
sequence number.
Note: The check-hash function is
used only to write master records;
for example, a new application
document such as an order header
or schedule header. This function is
not used for lower data record
writes. Use IF logic to perform
lower-level conditional writes.
• Verify that the parameters are
being sent to the function.
• If so, and this error still
occurs, call QAD support.
4450 Invoice history detail record does
not exist: <invoice number>;
<sales order number>
Database corruption.
or
Data may have been archived.
Contact database administrator.
4451 Turnaround Mapping record
does not exist: <document
name>;document
version>;<Implementation
name>;<Implementation
version>;<record
sequence>;<field name>
The implementation definition does
not have a Table Name and Index
Name specified for a field with
Src/Dest set to T.
Use Implementation Definition
Maint (35.15.13) to add the
missing information.
No. Message Cause Solution

EDI eCommerce Error Messages 125
4452 Field(s) # cannot be blank Blank field number. Enter field number.
4453 Control record cannot be deleted The control record is being used
and therefore cannot be deleted.
Remove all references to the
control record before deleting.
4454 Invalid default subsystem Subsystem has not been defined. Enter a valid subsystem set up in
in EC Subsystem Definition
Maint (35.13.1).
4455 Directory does not exist:
<directory name>; attempting to
create
Warning issued when specifying
directory path names in
eCommerce Control and
Transmission Group Maint.
If you want to use this path,
ignore warning. If incorrect,
manually delete unneeded
directory and modify path as
needed.
4456 Positive/negative integer
expected from check-hash
function: <returned value>
The write function was called with
a function that returned an invalid
sequence number.
Verify that the conditional write
is on a record defined as
sequence number 1. Also verify
that the function being used is the
check-hash function.
4460 Additional error message can be
found in <file name>
Errors were discovered after control
was passed to the gateway program.
Error messages have been captured
and written to <file name>.
Open the file with a viewer or
editing program and review the
error messages.
4464 Processing flat file. Please hold. This is a normal status message
during an EDI session and is for
information only.
No action necessary.
4465 Transformation occurring. Please
hold.
This is a normal status message
during an EDI session and is for
information only.
No action necessary.
4466 Processing application
documents. Please hold.
This is a normal status message
during an EDI session and is for
information only.
No action necessary.
4469 No matching else or endif within
record seq <record sequence>
and action type <event type>
An If statement used in
transformation did not have an Else
or closing Endif statement within
the record sequence and event type.
Use Transformation Definition
Maint (35.15.17) to change the
transformation definitions to
include a closing Else or Endif
within the same record and event
type.
4470 Else with no matching if within
record seq <record sequence>
and action type <action type>
An Else statement used in
transformation did not have an If
beginning statement within the
record sequence and event type.
Use Transformation Definition
Maint (35.15.17) to change the
transformation definitions to
include a beginning If within the
same record and event type.
4471 No closing endif within record
seq <record sequence> and
action type <action type>
An If or Else statement in the
transformation definitions is not
closed by an Endif statement within
the record sequence and event type.
Use Transformation Definition
Maint (35.15.17) to change the
transformation definitions to
include a closing Endif within
the same record and event type.
No. Message Cause Solution

126 User Guide — QAD EDI eCommerce
4472 No invoices were exported One or more invoices were selected
on the invoice export that were
unable to cross-reference the site
and address to retrieve a valid
implementation file name and
version number.
Check the following intruding
Partner Parameter Maint
(35.17.10) for the address and
site of the invoice being
exported:
• Logical parameter 2: Send
Invoice must be set to Yes.
• Char parameter 2: Invoicing
Document Name must be set
to a valid application
document definition name.
• Integer parameter 2: Invoicing
Document Version must be
set to a valid application
document definition version
number.
In addition, check to see that the
address and site are entered in the
correct Trading Partner
Maintenance (35.13.7) record.
4473 Code does not exist in validation
codes table <document
name>;<document
version>;<implemention
name>;<implementation
version>;<record
sequence>;<field
sequence>;<field name>
The implementation definition has
Validate set to Yes for this field
name and the code has not been
defined in Data Validation
Maintenance (35.13.21).
Do one of the following:
• Correct the invalid code data.
• Enter the code in Data
Validation Maintenance.
• Change Validate to No in the
implementation definition for
this field.
4474 Cannot delete record; related
record found in # # #
This error is displayed while trying
to delete a record or field in
Exchange Definition Maintenance,
Application Definition
Maintenance or Implementation
Definition Maintenance when it is
being used in a transformation map.
Delete the record or field from
the transformation map.
4475 A seq in a many-to-many list
failed. All sequences were
deleted: <list of bad sequences>
A map defined as many-to-many
had either a single or multiple
document sequence fail, which
caused all of the related input
documents to fail.
Correct the error in the failed
document, then reprocess the
files as a group.
4477 <file name> file record cannot
have 2 records with the same
name
When entering a file definition the
record names within the file must
be unique.
If duplicate record names occur
in a file, the record name must be
unique but can be cross-
referenced in EC Subsystem/
Exchange Maint (35.13.3) to the
same record code using the
Break Level field.
4478 Cannot delete exchange file
record; used in map:
Exchange file definition is being
used in an active transformation
map; deletion is not allowed.
Definition can only be deleted if
it is not in use.
No. Message Cause Solution

EDI eCommerce Error Messages 127
4479 No files to process. This error message is displayed
under one of the following
conditions:
• No files are found in the inbound
directory during Document
Import (35.1).
• No sequences are available with
Failed status during Import
Reprocessing (35.9.21) or
Export Reprocessing (35.9.23)
• No records are available in both
exchange and application
statuses during Session Report
(35.7).
Make sure that SNF flat file
exists in the inbound directory
and that Exchange Document
Status / Application Document
Status records exists for
reprocessing.
4480 No files selected, procedure
cancelled
This error message is displayed
when no files are selected during
Document Import (35.1) or when
no sequences are selected using
Import Reprocessing (35.9.21),
Export Reprocessing (35.9.23), or
Session Report (35.7).
Make sure that SNF flat files are
selected during Document
Import, and that Exchange /
Application Document
sequences are selected during
import/export processing and
session report.
4481 <function name> function not
defined
A function name has been used that
has not been defined.
Define function in 35.15.21
eCommerce Function Maint
4482 <##> not found. Press down
arrow to get selection
This error message is displayed in
Transformation Definition
Maintenance (35.15.17) when no
action type (read, write, and so on)
is specified in the Type field.
Make sure that at least one action
type is selected before leaving
the Type field.
4483 Trading Partner name cannot be
blank.
A valid trading partner name must
be entered
Enter a valid trading partner
name.
4484 Cannot use target qualifier
<qualifier> with action type
<action type>.
This error message is displayed
when action types such as Read,
Clear, Write, New, Loop, Loopend,
Repeat, Repeatend, Else (without
If) are selected, and when the
Target Qualifier is not O (output) or
I (Input).
Make sure that the record or field
from Input or Output is selected.
4485 Cannot find Trading Partner
record.
This error message is displayed in
Data Cross-Reference Maintenance
(35.13.16) when an entered Trading
Partner ID does not exist.
Make sure that the entered
Trading Partner ID exists in
Trading Partner Maintenance
(35.13.7).
4486 Document definition does not
exist.
Invalid application document
definition name.
Use correct application
document name or add using
Application Definition
Maintenance (35.15.10).
4487 Document record definition does
not exist.
Invalid application document
record name.
Use correct application
document record name OR add
the record to the application
document definition using
Application Definition
Maintenance (35.15.10).
No. Message Cause Solution

128 User Guide — QAD EDI eCommerce
4488 File <gateway program name>
not found for gateway document:
<document name> version:
<document version>
This error message is displayed
when the Gateway Report Program
specified in Application Definition
Maintenance (35.15.10) is blank.
Make sure that the proper
Gateway Report Program is
specified in Application
Definition Maintenance.
4489 Document field definition does
not exist.
Invalid application document field
name.
Use correct application
document field name or add the
field using Application
Definition Maintenance
(35.15.10).
4490 Function cannot contain spaces. Function name with spaces. Remove spaces from function
name.
4491 Data type not defined. Must be
AN, I, R, D or L.
Invalid data type entered. Enter valid data type—AN, I, R,
D, or L.
4492 Process function to disk? This prompt displays when a new
function has been defined in
eCommerce Function Maintenance
(35.15.21).
• Yes: The system writes a shell
program source code to the
user function directory with
the name of the function. To
make the function operational,
you must add logic to the code
that will calculate the return
value.
• No: Source code for the new
function is not created.
4493 Sequence value of <sequence
value> is not numeric. It will be
discarded.
This error message is displayed in
various programs.
• Import and Export
Reprocessing. This error is
displayed when a sequence
number selected is not numeric.
This can happen when a user
enters the sequence number
manually.
• When defining REPEAT logic in
Transformation Definition
Maintenance (35.15.17). During
transformation processing, the
REPEAT logic repeats the
number of times specified in the
transformation map. If the value
specified is non-numeric, this
error message displays.
Specify a numeric value when
using these functions.
4494 Processed function <function
name> to disk
This status message displays when
a new function has been defined in
eCommerce Function Maintenance
(35.15.21) and you have answered
Yes to the Process to disk prompt.
No action needed; message
indicates that the .p program
source code has been written to
the user function directory with
the name of the function. To
make the function operational,
logic must be added to the code
that will calculate the return
value.
4496 Enter the data type for new #
variable (#)
This prompt displays when a new
variable has been specified in
Transformation Definition Maint
(35.15.17).
Enter the data type for the new
variable: AN, I, R, D, or L.
No. Message Cause Solution

EDI eCommerce Error Messages 129
4497 BILL-TO does not exist in
address master <bill to address>
The application repository has a
BILL-TO address that has not been
defined.
Use Customer Address
Maintenance (2.1.1) to define the
customer bill-to address.
4498 Document record <document
sequence number> skipped; not
supported.
This error message is displayed
during Shipment ASN Export
(35.4.1) when Implementation
Definition Maint (35.15.13) has
record names other than the
following: HDR, HDR-EXT, HDR-
USER-FLDS, CTR-USER-FLDS,
ITM, ITM-EXT, ITM-USER-
FLDS, CTR-DATA, ITM-
CHARGES, CTR-ITEM-LID,
TARE-HDR, TARE-DET, ITM-
SEQ, ITM-SUMM, CTR-SUMM,
CTR-TARE-SUMM, and PLT-
SUMM
Use only valid record names
when setting up implementation
definitions for outbound ASNs.
4700 Status record in use: <record id> This error message is displayed
when during Shipment ASN Export
(35.4.1) the sequence in the
application document status master
record is locked by another user.
This check is done as a
precautionary measure. This
situation will not arise in a
normal condition.
4701 Turnaround data repository does
not exist
This warning message is displayed
when the QAD-defined function
GetTadData is unable to locate a
turnaround data record for the
passed parameter.
Make sure that turnaround data
exists in the turnaround data
repository master table for the
data passed as parameters.
4702 Schedule has not been printed Status message information only No action.
4703 Implementation record does not
exist: <document
name>;<document
version>;<implementation
name>;<implementation
version>
Invalid implementation record
name.
Use correct implementation
record name or add using
Implementation Definition Maint
(35.15.13).
4704 Sequence <sequence number> is
invalid for reprocessing.
Reprocessing EDI and this record
cannot reprocess.
Rerun the EDI import or export
process to reprocess this record.
4706 Sequence <sequence number>
does not exist
This error message is displayed
during import or export
reprocessing when an entered
application document sequence
does not exist in the application
document status table.
Enter a valid application
sequence.
4707 Map does not exist with name:
<map name>
The trading partner setup has
specified a Document Map
(transformation definition name)
that does not exist.
For the document type and
trading partner being processed,
enter a valid Document Map
name in Trading Partner
Maintenance (35.13.7).
4708 Two parameters within same
function cannot have the same
name
When entering the parameter names
in EC Function Maintenance
(35.15.21), each parameter name
must be unique.
Correct the parameter name
being entered.
No. Message Cause Solution

130 User Guide — QAD EDI eCommerce
4709 Function exists on disk!
Overwrite?
Creating a new function where the
.p program for the function already
exists in the user’s function
directory.
Answering Yes to this prompt
will cause the system to
overwrite the .p function
program in the user’s function
directory with the newly created
shell .p program. Answer No and
enter a new function name to
keep the existing .p program.
4710 Function name cannot be blank Blank function name Enter a function name.
4711 <definition record name>
Definition record does not exist
The file definition record name that
has been entered cannot be found.
Enter a valid file definition
record name
4712 Please confirm delete of EC
Subsystem/Exchange File Cross-
Ref
Warning message prompt. Enter Yes to delete.
4713 Transformation Function does
not exist
A function name has been used that
has not been defined.
Define function in eCommerce
Function Maint (35.15.21).
4714 Record Code <record code>
already exists
A record code that has already been
used cannot be entered.
Entering a different Break Level
will allow duplicate record
codes.
4715 Record Name already exists Record Name must be unique Enter unique record name.
4716 Field Name already exists Field names must be unique within
a record.
Enter unique field name.
4717 Please confirm delete of Control
Record Fields
Confirmation prompt. Enter Yes to proceed with the
deletion.
4718 Invalid token name Name entered is not a valid token
name.
Enter a valid token name.
4719 Cannot flush record until header
record has been flushed.
The header record must always be
the first record written. Attempting
to write another record before the
header will cause this.
Correct the transformation write
logic.
4720 Va ri a bl e <variable name> can
not be source; has not been
targeted for update
Using a variable as a source before
it has a value assigned to it.
Correct the transformation to
initialize the variable before
using it as the source in an event
action statement.
4721 Adding new control record field Message Status message
4722 Adding new control record Message Status message
4723 Invalid number of characters in
record code
The value entered for the record
code has exceeded the specified
record code length.
Enter an allowable record code
or expand the allowable length of
the record code in the EC
Subsystem Definition Maint
(35.13.1).
4724 Record code length must be
between 1 and 4
The record code length entered is
greater than the field length limit.
In eB2 and later the record code
field length is expanded to 20.
4725 Cannot delete a Qad designed
function: #
Attempting to delete a QAD-
provided function.
Deleting a QAD function is not
allowed.
4726 Cannot change File Name or
Ve rs i on
Attempting to change a file name or
version is not allowed.
Cannot change file name or
version.
No. Message Cause Solution

EDI eCommerce Error Messages 131
4727 Order does not exist for
incoming schedule: <Ship
from>;<ship to>;<item>;<PO>
Schedule load EDI gateway cannot
find scheduled order for this
incoming release
Enter order for this ship-from/
ship-to for item/PO in Customer
Scheduled Order Maintenance
(7.3.13).
4728 Record code is blank for control
record: <subsystem>;
<direction>; <record sequence
number>
The specified EC subsystem
<subsystem> has not been defined.
• Use EC Subsystem Definition
Maint (35.13.1) to define the
subsystem and its control
codes.
• Use EC Subsystem/Exchange
Maint (35.13.3) to create the
data control codes.
4729 Mandatory data record is
missing: <document name>;
<document version>;
<implementation name>;
<implementation version>;
<record name>
• The trading partner did not send
the data specified, or the SNF
file <filename> was not
complete.
• The data record field noted
<field name> for the <record
sequence> has been defined as
mandatory in the exchange file
document definition for the
<exchange file name>,
<version> and direction when it
should be defined as optional.
• Have the trading partner
correct the problem and
resend the document.
• If this is a recurring error for
this <exchange file name>,
<version> and direction, use
Exchange Definition
Maintenance (35.15.6) to
select the appropriate
combination of exchange file
name, version, and direction.
Then, select the <record
sequence>, locate the <field
name>, and set Requirement
to Optional.
4730 Data field length outside
boundaries: <document
name>;<document
version>;<implementation
name>;<implementation
version>;<record sequence>;
<field name>;<field length>
The data in <record sequence> is
greater than the maximum allowed
in the implementation definition for
the specified field.
Correct the invalid data or
change field length in
Implementation Definition Maint
(35.15.13).
4731 Created <directory name>
successfully
Status message Information only
No. Message Cause Solution

132 User Guide — QAD EDI eCommerce
4732 Master table locked, document
not processed
This error message is displayed
when during the export of the
following gateways, the sequence
in the Application Document Status
Master record is locked by another
user:
• PO Change Export (35.22.16)
• Inventory Cycle Count Export
(35.4.13)
• Generic Gateway Export
(35.4.20)
• Invoice Export (35.4.3)
• Purchase Order Export (35.4.9)
• PO Change Ack. Export
(35.22.15)
• Purchase Order
Acknowledgement (35.4.5)
• Packing List Export (35.4.15)
• Purchase Order Ack.
Maintenance (35.4.4)
• Supplier Shipping Schedule
(35.4.8)
• Consignment Usage
Export(35.4.2)
• Supplier Self Billing
Export(35.4.11)
This check is done as a
precautionary measure. This
situation will not arise in a
normal condition. If this
happens, make sure that no other
process or user is locking this
record.
4733 Data field length outside
boundaries: <document
name>;<document
version>;<implementation
name>;<implementation
version>;<record sequence>;
<field name>;<field length>
The data in <record sequence> is
greater than the maximum allowed
in the implementation definition for
the specified field.
Correct the invalid data or
change field length in
Implementation Definition Maint
(35.15.13).
4734 Loop occurrence must be 1 or
greater
This error message is displayed in
the following programs when the
Loop Occurrence value of the
current record is less than or equal
to zero:
• Exchange Definition
Maintenance (35.15.6)
• Implementation Definition
Maintenance (35.15.13)
• Application Definition
Maintenance (35.15.10)
Make sure that the Loop
Occurrence of the current record
is greater than or equal to zero.
4735 End loop cannot be less than
current loop sequence
This error message is displayed
when adding a record using the
following programs if the Loop End
Sequence of the current record is
less than the Record Sequence:
• Exchange Definition
Maintenance (35.15.6)
• Implementation Definition
Maintenance (35.15.13)
• Application Definition
Maintenance (35.15.10)
Make sure that the Loop End
Sequence of the current record is
greater than or equal to the Loop
End Sequence.
No. Message Cause Solution

EDI eCommerce Error Messages 133
4736 Directory does not exist:
<directory name>; Create it?
Control program is initially doing
set up or the specified path is
incorrect.
Use one of the following
methods:
• Answer Yes to create the
directory.
• If permission is not granted,
then contact the system
administrator to have the
directory created.
4737 Transmission group name can
not be blank
Blank transmission group is not
allowed for outbound documents.
Enter a valid transmission group
name.
4739 Extension already defined The file extension must be unique
for each EC Subsystem.
Enter a unique file extension.
4740 Exchange file document status
record does not exist
This error message is displayed
when the Sequence Number entered
in Exchange Doc Status Inquiry
(35.9.1) does not exist in the
Exchange Document Status Master
table.
Enter a valid Exchange
Sequence.
4742 Distribution dump file created Status message Status message
4743 Transformation definition
<transformation definition>
flagged as nonrunnable
The transformation definition
record has the Can Run field set to
No.
In Transformation Definition
Maint (35.15.17), change the
transformation definition by
setting Can Run to Yes.
4745 Exchange file definition does not
exist
The exchange file definition name
cannot be found.
Enter valid exchange file
definition name.
4746 Minimum length greater than
maximum length
Entering a minimum field length
that is greater than the maximum
field length is not allowed.
Change either the minimum or
maximum length to allowable
range.
4747 Cross reference already exists Cross-reference must be unique. Enter a unique cross-reference.
4748 Va ri a bl e <variable name> could
not be validated with the value
<value>
This error is displayed when
transformation processing tries to
validate the data written to a field
by looking up in EDI eCommerce
Validation Master (edval_mstr).
This is done when a Write is
performed in an inbound document
and when a Read is performed on
an outbound document.
Make sure that validation codes
are set up correctly in Data
Validation Maintenance
(35.13.21).
4749 Trading partner parameter does
not exist for site <site id> /
address <address id>
The system is unable to find a
parameter record for the trading
partner.
This is an abnormal situation,
because Trading Partner Maint
(35.13.7) automatically creates
the trading partner parameter
record when the site and address
are entered.
Delete the site and address entry
in Trading Partner Maint, then
reenter the line to create a TP
parameter record. Go to Trading
Partner Parameter Maint
(35.13.10) to verify the record
has been added.
No. Message Cause Solution

134 User Guide — QAD EDI eCommerce
4750 Trading partner parameter states
document should not be exported
At least one of the documents that
have been selected for export does
not have the trading partner
parameter set to Yes for exporting
the specified document type.
Using Trading Partner Parameter
Maint (35.13.10) to ensure that
the export parameters have been
set to Yes to allow the EDI
export.
4751 Using default shipment
document: Shipping Notice
Normal status message Normal status message
4752 Document definition is not
defined correctly # / #
This error message is displayed
when the application document
definition record does not exist.
Make sure that application
document definition being used
does exist in Application
Definition Maintenance
(35.15.10).
4753 Skipping Shipment <shipment
number>
The ASN export is skipping this
shipper for export. This is caused
by the Trading Partner Parameter
not being set properly to export
ASN for this site / address.
Can be a normal situation if
shippers are selected for export
that should not be exported.
Correct the Trading Partner
Parameter 35.13.10 setup if
shippers are being skipped that
should be exported.
4754 Using default invoicing
document: Invoice
Normal status message Normal status message
4755 Skipping Invoice <invoice
number>
The Invoice export is skipping this
invoice for export because a trading
partner parameter is not set to
export invoices for this site/address.
This can be a normal situation if
invoices are selected for export
that should not be exported.
If this is not the case, correct the
Trading Partner Parameter
(35.13.10).
4756 Implementation does not exist: The implementation file definition
specified in the transformation
definition (document map) does not
exist
Correct the implementation file
specification. In Transformation
Definition Maintenance 35.15.17
make sure that the
Implementation file name and
version number are the same as
an entry in Implementation
Definition Maintenance
35.15.13. The application
document definition must also be
the same
4757 Function returned warning:
<warning description>
Transformation has made a call to a
function that has encountered an
error that is not fatal and returns a
warning with a description of the
error condition.
Analyze the warning description
to determine any corrective
action if necessary.
No. Message Cause Solution

EDI eCommerce Error Messages 135
4761 Document HEADER record does
not exist:
Reference from the status table to a
application header record has
failed.
Normally this is a problem with
exporting a document. Check the
application definition and
version being used in TP
Parameter setup. Try re-
exporting.
4766 Record written out of sequence This is displayed when an error
occurs while creating records in
Application Data Repository Detail
table; for example, when trying to
create duplicate records in
Application Data Repository
Detail. This situation should not
happen in a normal environment.
This is done just as a precaution.
Correct the transformation logic.
No. Message Cause Solution

136 User Guide — QAD EDI eCommerce

Index
Numerics
35.1 84, 104
35.4.1 87
35.4.2 89
35.4.3 90
35.4.5 92
35.4.8 94
35.4.9 91
35.4.11 96
35.4.13 96
35.4.15 97
35.4.16 98
35.4.17 99
35.4.18 100
35.4.20 101
35.7 102
35.9.1 104
35.9.2 104
35.9.3 108
35.9.8 104
35.9.9 104
35.9.10 109
35.9.13 112
35.9.14 112
35.9.16.1 106
35.9.16.3 106
35.9.16.13 115
35.9.17 112
35.9.21 105
35.9.22 105
35.11.1 75
35.11.11 75
35.13.1 18
35.13.2 22
35.13.3 27
35.13.5 29
35.13.7 47
35.13.10 53
35.13.13 46
35.13.16 55
35.13.17 55
35.13.18 55
35.13.19 56
35.13.21 57
35.13.22 58
35.13.23 58
35.13.24 15
35.15.1 62
35.15.3 63
35.15.4 44
35.15.2 62
35.15.6 23
35.15.10 58
35.15.13 30
35.15.17 36
35.15.21 41, 64
35.15.22 66
35.15.23 66
35.17.1 64
35.17.2 41, 66
35.17.3 67
36.17.5 67
35.17.7 69
35.17.8 71
35.17.10 72
35.17.13 113
35.17.14 113
35.17.15 114
35.17.16 114
35.17.24 15
35.21.1 14
A
adapter, HTTP 56
addresses
cross-reference for eCommerce 51
trading partner cross-reference 51
advance ship notice
determining process 83
advance ship notice (ASN)
combining lines 89
exporting 87
updating on export 88
Application Data Repos Maint 109
Application Definition Copy 62
Application Definition Maintenance 58
Application Doc Status Inquiry 104
Application Doc Status Report 104
archive/delete
comment cross-references 114
document tracking records eCommerce
deleting/archiving 115
eCommerce document repository records 113
turnaround data 114
B
blocked transactions 82
C
Change Current eCommerce Domain 75
changing domains
EDI eCommerce processing 78

138 User Guide — QAD EDI eCommerce
Comment Cross-Ref Archive/Delete 114
company addresses
trading partner cross-reference 51
Consignment Usage Export 89
control programs
eCommerce 15
copy of ASN 83
copying
application document definitions 62
exchange file definitions 62
implementation definitions 63
transformation definitions 64
transformation functions 66
Create eCommerce Doc Definitions 44
cross-reference
EC subsystem to application document 29
EC subsystem to exchange file 27
exchange file to application document 112
trading partner to application 51
cross-references
EDI eCommerce processing domains 78
cycle count, exporting 96
D
Data Cross-Reference Browse 55
Data Cross-Reference Maintenance 55
Data Cross-Reference Report 55
Data Validation Browse 58
Data Validation Maintenance 57
Data Validation Report 58
delete/archive
comment cross-references 114
document tracking records 115
eCommerce document repository records 113
turnaround data 114
DO Packing List Export 98
Document Import 84, 104
Document Tracking Archive/Delete 115
document tracking in EDI eCommerce 105
Document Tracking Inquiry 106
Document Tracking Maintenance 106
Domain Cross-Reference Maintenance 75, 78
DTD, use in eCommerce 24
E
EC Number Range Maintenance 14
EC Subsystem Definition Maint 18
EC Subsystem Report 22
EC Subsystem/Application Maintenance 29
EC Subsystem/Exchange Maint 27
EC subsystems
defined 2
setting up 18
eCommerce Control 15
eCommerce Function Copy/Delete 41, 66
eCommerce Function Inquiry 66
eCommerce Function Maintenance 41, 64, 79
eCommerce Function Report 66
EDI eCommerce
archiving and deleting data 113
automatic processing 67
copying definitions 62
cross-reference
EC subsystem to application document 29
EC subsystem to exchange file 27
exchange file to application document 112
trading partner to application 51
data directories 12
document repository 3, 108
Enterprise Material Transfer (EMT) 83
error messages 117–135
errors
correcting 104, 117–135
detecting 7
exchange file definitions 23
exporting documents 86
field delimiter 19
field length 22
file extensions
EC subsystem 19
gateway programs 2
implementation definitions 29
importing documents 84
load and unload process 7
loading trading partner library data 69
multi-domain processing 75
overview 1–8
process flow 6
record naming conventions 31
reprocessing documents 105
session number 86
setting up 9–79
status codes 103
test fields 37
token variables 22, 38
tool set 5
tracking documents 105
trading partners 47
transfer process 7
transformation
definitions 36
event action types 40
functions 64
process 7
transformation definitions 78
turnaround data 4
using 81–116
Enterprise Material Transfer (EMT) 83
Exchange Data Repository Maint 108
Exchange Definition Copy 62
Exchange Definition Maintenance 23
Exchange Doc Status Inquiry 104
Exchange Doc Status Report 104
Exchange-Application Xref Browse 112
Exchange-Application Xref Report 112
Export Reprocessing 105
Export/Import Controller 67
exporting documents 8
extensible markup language (XML)
setup in EDI eCommerce 35
exchange definition 23
HTTP adapter 46, 56
implementation definition 30
translation in EDI eCommerce 2
F
flat file
standards-neutral format for eCommerce 2

Index
139
functions, transformation 64
G
Generic Gateway Export 101
groups, transmission 45
H
HTTP Adapter Maintenance 56
I
implementation definition 35
Implementation Definition Copy 63
Implementation Definition Maint 30
Import Reprocessing 105
importing documents 84
Inbound Delete/Archive 113
Inventory Cycle Count Export 96
Invoice Export 90
invoices
exporting 90
L
loop structure, in EDI eCommerce 25
M
Maintain eCommerce Repository Data 110
messages
EDI eCommerce 117–135
multi-domain processing 75
O
original ASN 83
Outbound Delete/Archive 113
P
Packing List Export 97
Price Catalog Export 99
Purchase Order Acknowledgment 92
Purchase Order Export 91
purchase orders
acknowledging 92
eCommerce export 91
R
record names, EDI eCommerce 31
renumbering transformation actions 46
S
self-bill, exporting 96
sequence numbers, generating 14
Session Report 102
Shipment ASN Export 87
sites
cross-reference for eCommerce 51
trading partner cross-reference 51
SNF. See standards-neutral format (SNF)
standards-neutral format (SNF) 2
status
eCommerce codes 103
tracking documents in EDI eCommerce 105
supplier ASN 83
supplier schedules
exporting 94
Supplier Self Billing Export 96
Supplier Shipping Schedule 94
T
token variables, in EDI eCommerce 22, 38
tracking documents in EDI eCommerce 105
Trading Partner Document Delete 72
Trading Partner Library Load 69, 79
Trading Partner Library Unload 71
Trading Partner Maintenance 47
Trading Partner Parameter Maint 53
trading partners 47
transformation
defining 36
renumbering events 67
Transformation Definition Copy 64
Transformation Definition Maint 36
Transformation Definition Maintenance
changing domains 78
Transformation Renumber Utility 67
Transmission Group Maintenance 46
Turnaround Data Archive/Delete 114
Turnaround Data Maintenance 112
turnaround data, in EDI eCommerce
defined 4
deleting/archiving 114
maintaining 112
setting up 36
storing 112
U
user-defined functions, EDI eCommerce 79
W
Warehouse Shipment Advice 100
X
XML. See extensible markup language (XML)

140 User Guide — QAD EDI eCommerce
