
www.elanhomesystems.com/dealer Tech Support: 800-622-3526
Page 1 of 15
TechNotes
Revision 8/31/2011
Messaging Alerts
Overview:
This TechNote describes how to setup Event Based Messaging Alerts in the g! System. These alerts include the
ability to call, email and text message a single contact or list of contacts based on event triggers. In addition,
core module 5.2 and up also provide the ability to “Pop” a message onto an Elan Touch Screen. Event Triggers
come from an array of internal triggers in the g! System and external triggers from controlled devices such as
security zone faults, or thermostat temperature readings. Alerts can be stacked, so that multiple alert types
(phone & email, for example) are sent from a single trigger. Alerts can also be added to existing event maps.
Phone Alerts:
Note:
Phone Alerts are not available on the MultiBrick.
Phone Alerts Overview:
Phone alerts allow the g! controller to dial out and deliver a TTS (Text-To-Speech) message over the phone.
To setup Phone Alerts, you must configure Contacts with Phone Numbers on the System Tab, so the Controller
has numbers to call; configure the modem, so the Controller may interface with the phone line; configure TTS
messages on the Messaging tab, which are what the Controller will say when dialing the alert; and create
event maps to trigger the call when a specific event happens.
NOTE: The Messaging Pro App is REQUIRED for phone features such as phone alerts.
Configure Phone Alerts:
1. Setup Contacts with phone numbers on the System Tab under Contacts and Users. Enter the phone
number as it should be dialed, including any prefix or area code information. Omit punctuation such as
dashes or parentheses. For example:
Under this tab you will also see settings for the Number of Dials (N.Dials)--how many times the
Controller should attempt to call this contact; and Ack Ends Call--which prompts for the contact to
acknowledge receipt, so the Controller will stop attempting calls for this alert.
2. Setup the Controller modem so the Controller can interface with the phone line and dial out. (If you
have already set up your Modem as part of Messaging configuration, skip to Step 3.)
a. To configure the Controller for interfacing with the Phone Line, connect the phone line to the
modem as appropriate.
b. In Configurator, under the Messaging Tab, right-click Telephone Systems and choose “Add New
Device”.
c. Add a Generic Telephone Controller. (Note: 4.0 Build 1512 or later this has been renamed
Internal Telephone Controller).

www.elanhomesystems.com/dealer Tech Support: 800-622-3526
Page 2 of 15
3. Configure a TTS message on the Messaging Tab. This will be read by the Controller using its Text-to-
Speech engine, and will be read as typed.
a. Add a new Text/Speech message by right-clicking on Text/Speech Messages and choosing “Add
New Text/Speech Message”.
b. Name your message something memorable as to the type of the alert it will be, for example
name a security panel related message something like “Security Alert” or “Security Alarm”.
c. Type in text to be read by the Controller to your contact when triggered.
Tokens are optional. See
Using Tokens
below for details.
4. Create an Event Map to set the Controller to send the message when a certain system event occurs.
a. Under the Event Mapper tab, right-click Event Maps and Add New Event Map. We recommend
naming all your messaging alert event maps with the prefix Alert: to keep them organized.
b. Add an Event to trigger sending your message in the first box, labeled Events. For this example,
we want to send a message when the Safe Security Partition is disarmed:
c. Add a Command to select the action of sending your message in the 3
rd
box, labeled
Commands. In this Example, we are sending our Security Alert Text/Speech message to Contact
Johnny Alertzberger. Choose the System Family: Messaging, and then choose your contact
under Command Groups. Finally, choose the Call command and the specific message you wish
to send under Options.

www.elanhomesystems.com/dealer Tech Support: 800-622-3526
Page 3 of 15
5. Test your alert to ensure proper function. Remember, pressing “Test Commands Now” on the Event
Map will only test that the message is sent correctly (the outgoing phone call), and will not test that
the message is being
triggered
correctly.
Pop Message Alerts
Pop Message Alerts allow a pre-configured message to “pop up” on an Elan g! Touch Screen. The
Pop Message will appear as text inside a bubble on top of the current Viewer screen. Pop
Messages can interrupt things like screen saver, and will wake up a screen that is asleep. A user
may dismiss a Pop Message by tapping anywhere on the screen, or the message will disappear
on its own after about 10 seconds. Pop Message is not available on OSD or iOS devices. To
Configure a Pop Message Alert, you must add a TTS message to provide the text content for the
Pop Message, and create an Event Map to trigger the Pop Message to appear.
1. Configure a TTS message on the Messaging Tab. This will be displayed on the touch screen as Pop
Message.
a. Add a new Text/Speech message by right-clicking on Text/Speech Messages and choosing “Add
New Text/Speech Message”.
b. Name your message something memorable as to the type of the alert it will be, for example
name a HVAC related message something like “Temperature Alert”.

www.elanhomesystems.com/dealer Tech Support: 800-622-3526
Page 4 of 15
c. Type in text to be display by Touch Screen as a Pop Message when triggered.
Tokens are optional. See
Using Tokens
below for details.
2. Create an Event Map to set the Controller to send the message when a certain system event occurs.
a. Under the Event Mapper tab, right-click Event Maps and Add New Event Map. We recommend
naming all your messaging alert event maps with the prefix Alert: to keep them organized.
b. Add an Event to trigger sending your message in the first box, labeled Events. For this example,
we want to send a message when the House temperature sensor is too hot or cold.
Note: Numeric Trigger setup is explained in the
Advanced
section at the end of this document.
c. Add a Command to select the action of Pop Message in the 3
rd
box, labeled Commands. In this
Example, we are displaying the message on a In Wall Touch Screen. Choose the System Family:
General System, and then choose your Touch Screen under Command Groups. Finally, choose
the Pop Message command and the specific message you wish to use under Options.

www.elanhomesystems.com/dealer Tech Support: 800-622-3526
Page 5 of 15
3. Test your alert to ensure proper function. Remember, pressing “Test Commands Now” on the Event
Map will only test that the Pop Message appears as desired on the desired touch screen, and will not
test that the message is being
triggered
correctly.

www.elanhomesystems.com/dealer Tech Support: 800-622-3526
Page 6 of 15
E-mail Alerts:
E-Mail Alerts Overview:
Email alerts allow the g! controller to connect to the internet and send a pre-configured email message to
desired recipients. To setup E-Mail Alerts, you must configure Contacts with E-Mail address on the System
Tab; configure the outgoing server, so the g! System can send E-Mails; configure E-Mail messages (outbound)
on the Messaging tab, which are what the Controller email; and create event maps to trigger the e-mail when
a specific event happens. Note: The Controller/MultiBrick must have internet access to send an alert via E-
mail.
NOTE: The messaging tab is NOT required for e-mail/txt message alerts.
Configure E-Mail Alerts:
1. Setup Contacts with e-mail addresses on the System Tab under Contacts and Users.
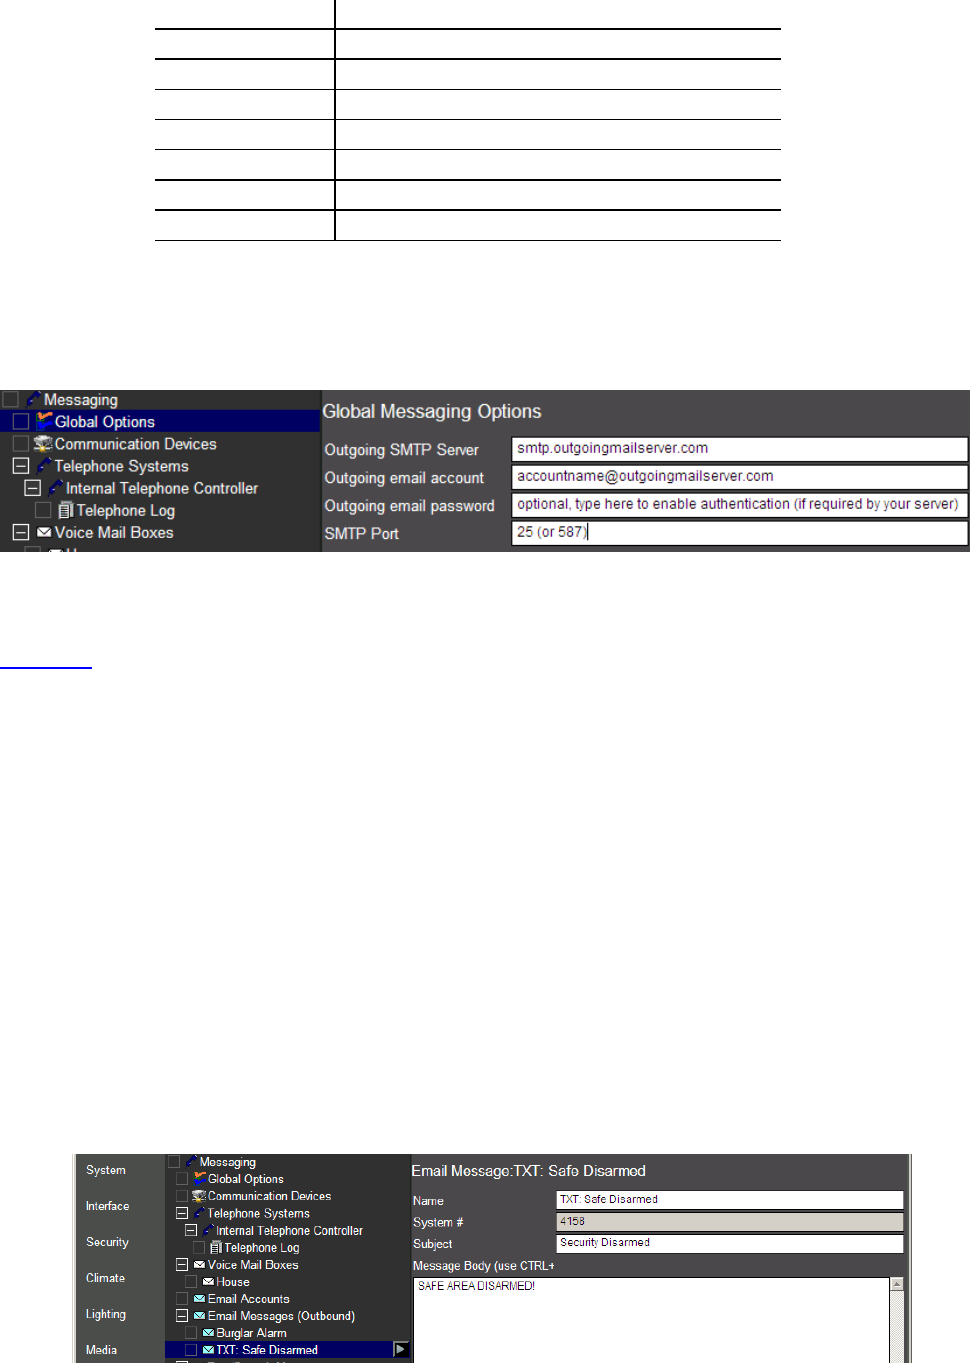
2. Configure the outgoing mail server on the Messaging Tab under Global Options. You may need to
find out the customers email server information to set this up, or you may use your own if your
company has its own outgoing server.
Note: the default address included in this area is non-functional. You must enter your own server here.
If you do not have one of your own, you may use a free account, however, only standard SMTP is
supported currently, and there is no support for SSL encryption used by services like hotmail or gmail.
GMX.com
is a free e-mail provider that is known to work. You may also wish to setup a company alert
e-mail if you have your own hosting (website) provider.
NOTE: Many ISP’s block SMTP transmissions on port 25 that are not going to their server to prevent
spam. GMX.COM is known to support access on port 587 as well as port 25, or you may use the
customers ISP e-mail account instead.
3. Configure E-mail messages to send out when triggered.
a. Add a new E-Mail Message by right-clicking on E-Mail Messages (outbound) and choosing “Add
New E-Mail Message”.
b. Name your message something memorable as to the type of the alert it will be, for example
name a security alarm message something like “Burglar Alarm”.

www.elanhomesystems.com/dealer Tech Support: 800-622-3526
Page 7 of 15
c. Format the E-Mail like you would normally with a subject and a message body. (Note that
Tokens may be used here as well)
4. Create an Event Map to set the Controller to send the message when a certain system event occurs.
d. Under the Event Mapper tab, right-click Event Maps and Add New Event Map. We recommend
naming all your messaging alert event maps with the prefix Alert: to keep them organized.
e. Add an Event to trigger sending your message in the first box, labeled Events. For this example,
we want to send a message when the House Security Partition is in a Alarm State:
f. Add a Command to select the action of sending your message in the 3
rd
box, labeled
Commands. In this Example, we are sending our Burglar Alarm E-Mail message to Contact
Johnny Alertzberger. Choose the System Family: Messaging, and then choose your contact
under Command Groups. Finally, choose the E-Mail command and the specific message you
wish to send under Options.

www.elanhomesystems.com/dealer Tech Support: 800-622-3526
Page 8 of 15
5. Test your alert to ensure proper function. Remember, pressing “Test Commands Now” on the Event
Map will only test that the message is sent correctly, and will not test that the message is being
triggered
correctly.
Text Message Alerts:
Text Message Alerts Overview:
Text Message Alerts use the email feature to send SMS messages to available cellular handsets. To setup Text
Message Alerts, you must setup E-Mail Alerts. Configure Contacts with an E-Mail address formatted for text
messaging on the System Tab; configure the outgoing server, so the g! System can send E-Mails; configure E-
Mail messages (outbound) on the Messaging tab, which are what the Controller text message; and create
event maps to trigger the text message when a specific event happens. Note: The Controller/MultiBrick must
have internet access to send a text message.
NOTE: The messaging tab is NOT required for e-mail/txt message alerts.
Configure E-Mail Alerts:
1. Setup Contacts with the text messaging e-mail address on the System Tab under Contacts and Users.
Create this Contact as a
new
contact to enter the text messaging e-mail address if you are also sending
regular E-Mail Alerts.
Note that you will format the email address as is specified for your particular provider. See the table
below for major wireless carriers, or consult with the customers wireless service provider for this
information. You may also find this info on the internet: http://www.notepage.net/smtp.htm
www.elanhomesystems.com/dealer Tech Support: 800-622-3526
Page 9 of 15
Carrier Format
T-Mobile [email protected]
Virgin Mobile [email protected]
Cingular phonenumber@cingularme.com
Sprint phonenumber@messaging.sprintpcs.com
Verizon [email protected]
Nextel phonenumb[email protected].com
ATT [email protected].net
phonenumber = 10 digit phone number
2. Configure the outgoing mail server on the Messaging Tab under Global Options. You may need to find
out the customers email server information to set this up, or you may use your own if your company
has its own outgoing server.
Note: the default address included in this area is non-functional. You must enter your own server here.
If you do not have one of your own, you may use a free account, however, only standard SMTP is
supported currently, and there is no support for SSL encryption used by services like hotmail or gmail.
GMX.com
is a free e-mail provider that is known to work. You may also wish to setup a company alert
e-mail if you have your own hosting (website) provider.
NOTE: Many ISP’s block SMTP transmissions on port 25 that are not going to their server to prevent
spam. GMX.COM is known to support access on port 587 as well as port 25, or you may use the
customers ISP e-mail account instead.
3. Configure E-mail messages to send out when triggered.
a. Add a new E-Mail Message by right-clicking on E-Mail Messages (outbound) and choosing “Add
New E-Mail Message”.
b. Name your message something memorable as to the type of the alert it will be, for example
name a security disarmed message something like “Security Disarmed” or “Disarm Alert”. You
may also wish to add a TXT: prefix to all the E-Mail Messages you intend to text message. Note
that you should be able to get double duty out of E-Mail Messages sent through e-mail or sent
as a text message.
c. Format the E-Mail like you would normally with a subject and a message body. When E-Mails
are sent as text, it is common for the Text Message to be delivered with all text in one area, but
the subject text contained in parentheses.

www.elanhomesystems.com/dealer Tech Support: 800-622-3526
Page 10 of 15
4. Create an Event Map to set the Controller to send the message when a certain system event occurs.
a. Under the Event Mapper tab, right-click Event Maps and Add New Event Map. We recommend
naming all your messaging alert event maps with the prefix Alert: to keep them organized.
b. Add an Event to trigger sending your message in the first box, labeled Events. For this example,
we want to send a message when the Safe Security Zone has been disarmed:
c. Add a Command to select the action of sending your message in the 3
rd
box, labeled
Commands. In this Example, we are sending our Safe Disarmed E-Mail message to Contact
HomeLogic TXT. Choose the System Family: Messaging, and then choose your contact under
Command Groups. Finally, choose the E-Mail command and the specific message you wish to
send under Options.
5. Test your alert to ensure proper function. Remember, pressing “Test Commands Now” on the Event
Map will only test that the message is sent correctly, and will not test that the message is being
triggered correctly.

www.elanhomesystems.com/dealer Tech Support: 800-622-3526
Page 11 of 15
Advanced Features:
There are many different things you can do with Alerts. Contained here is a quick guide to a few of
the different Events (triggers), conditions and commands that you can use with Alerts. This not
intended to be a complete list of possible uses, but rather as a starting point.
Trigger: Temperature
To trigger alerts based on temperatures, you must setup a Numeric Trigger. Numeric Triggers are
configured on the Input/Output tab and can be attached to a specific thermostat, temperature sensor, or
internet temperature reading. Each Numeric Trigger can only be attached to a single source however, so
remember to create Triggers for each Thermostat or Sensor you wish to trigger an Alert from.
1. On the Input/Output Tab, Add a New Numeric Trigger by right-clicking on Numeric Triggers and
choosing “Add New Numeric Trigger”.
2. Edit the properties of the Numeric Trigger to suit your particular need. It is recommended that you
name in a memorable way, such as “Basement Stat: Temp Low” for a basement low temperature
trigger, or “Nursery Room: Temp Range” for a Trigger that will alert on a high or low value for the
Nursery. This will become helpful especially in instances where you have multiple triggers.
3. Choose a thermostat, sensor, internet reading or other source from the Numeric Value drop down.
4. Choose a Trigger Type as appropriate. Options Include:
o Trigger If Less Than (Useful for Low Temperature Trigger)
o Trigger If Greater Than (Useful for High Temperature Trigger)
o Trigger If In Between
o Trigger If Not In Between (Useful for setting an acceptable temperature range to trigger when
the temp is too low OR too high)
o Trigger If Equals
5. Choose appropriate values for the Trigger Source (Numeric Value) and Trigger Type selected. See the
example that follows:

www.elanhomesystems.com/dealer Tech Support: 800-622-3526
Page 12 of 15
6. Create Event Map Trigger from the Inputs System Family, and then choose the appropriate Numeric
Trigger. For Example:
Trigger: Climate Error
It is possible to create an event map to notify you if supported thermostats stop responding, lockup or go
offline. The event will occur when the red “Connecting to Thermostat” box appears on the Viewer. This event
can enable you to be notified if a thermostat locks up or otherwise stops communicating, which could prevent
a “stuck” HVAC call from the thermostat or other undesirable operation of the climate control.
Note: This feature is currently only supported on AprilAire 8870 communicating
thermostats and requires 4.0 Build 1619
or later.
1. Setup supported thermostats as per the appropriate Integration Note.
2. Create email or TTS message(s) as desired on the Messaging tab. Name the alert something
specific like “Thermostat Error”, and setup an alert to state “One or more thermostats is offline
<DATE> <TIME>” or something similar.

www.elanhomesystems.com/dealer Tech Support: 800-622-3526
Page 13 of 15
3. (Optional)On the Event Mapper tab of Configurator, create a Run-Once System Timer. This will
be used to prevent a flood of messages and only allow the system to alert once per a
customized time period. This is useful if the thermostats drop off in sequence, as each
thermostat will generate a new event and potentially a new message.
4. Create a new event map and call it something like Alert: Thermostat Error.
5. Add an Event trigger for each thermostat in the system from System Family: Climate System,
then Event Group:
Thermostat Name
then Event: System Not Responding. Note that you
should be creating ONE event map with MANY event triggers. Recall that events will trigger as
OR, so if any of the events occurs it will trip the event map.
6. (Optional) Add a Condition for the Run-Once Timer from System Family: General System,
Event Group:
Run Once Timer Name
, with the Condition: Timer Active = FALSE. This will
prevent the event map from tripping if the timer is running.
7. Add Commands to send the message alert from System Family: Messaging, Command Group:
Contact
Contact Name,
Command: Send
Message.
8. (Optional) Add a 2
nd
command to start the Run-Once System Timer from System Family:
General System, Command Group: Run Once Timer Name, and choose “Start Timer At…” to
manually enter the desired run time. This will start the timer after the alert is sent, and while
the timer is still running, the event map will not trip again due to the Timer Active condition.
The final event map should look something like the following:
Note: If desired, you may create individual messages and event maps for each thermostat, to get
particular detail on what thermostat has failed. However, one event map when any thermostat is
offline will likely be sufficient to prompt an inquiry into the system.

www.elanhomesystems.com/dealer Tech Support: 800-622-3526
Page 14 of 15
Trigger: House Modes
To trigger alerts from a House Mode selection, create a trigger with the System Family: General System, then
choose the Event Group: System Notifications. Select the appropriate House Mode. For Example:
Trigger: Other Triggers
If you cannot find the trigger you want looking through System Families and Event Groups on the Event
Mapper Tab, it may be easier to go the appropriate subsystem and create the Event Map from there.
For example, if you want to trigger a messaging alert off of a specific security zone fault, find the zone you
want in the list on the Security Tab, right-click and choose Create Event Map For> Faulted:
The same type of Event Map creation may be created for specific controls on custom interfaces by right-
clicking on them:

www.elanhomesystems.com/dealer Tech Support: 800-622-3526
Page 15 of 15
Using Tokens
When creating alert messages for e-mail/txt or phone (TTS) messages, Tokens are available to pull certain
system information out in real time for inclusion in the outgoing message.
Tokens are listed under the TTS message screen, but are supported in e-mail/txt messages as well. A full list
of tokens is below:
To use tokens, simply insert the token as listed into your message. Example:
For tokens that include an “x”, this should be replaced with the system number of the device. The system
number is a unique number associated with each system in g! and is typically displayed with that particular
device. For example:
The System Number of the House Mailbox is 1.
To use a token requiring a system number, simply input the system number for the “x”, like so:
<NVMAIL:1>
