

Profile Management 2402 LTSR
Contents
Profile Management 2402 LTSR 7
What’s new 7
Cumulative Update 1 (CU1) 7
Fixed issue in 2402 LTSR CU1 8
What’s new 9
Fixed issues 9
Known issues 9
Third party notices 11
System requirements 11
Quick start guide 14
How Profile Management works 17
About profiles 18
Assign profiles 20
Profile Management architecture 21
Profile Management use cases 25
Access multiple resources 28
Logon diagram 29
Logo diagram 32
Plan your deployment 34
Decide on a configuration 34
Pilot or production 36
Migrate or create profiles 37
Persistent or provisioned and dedicated or shared 38
© 1999–2024 Cloud Soware Group, Inc. All rights reserved. 1

Profile Management 2402 LTSR
Mobile or static 40
Which applications are in use 41
Plan for multiple platforms 45
Share Citrix user profiles on multiple file servers 47
Administer profiles within and across OUs 48
Domain and forest support in Profile Management 50
High availability and disaster recovery with Profile Management 50
Scenario 1 ‑ Basic setup of geographically adjacent user stores and failover clusters 51
Scenario 2 ‑ Multiple folder targets and replication 56
Scenario 3 ‑ Disaster recovery 58
Scenario 4 ‑ The traveling user 60
Scenario 5 ‑ Load‑balancing user stores 60
Plan folder redirection with Profile Management 62
Third‑party directory, authentication, and file services 64
FAQs about profiles on multiple platforms and Profile Management migration 65
Install and set up 69
Download the installation package 69
Install Profile Management 70
Test Profile Management with a local GPO 74
Create the user store 75
Upgrade and migrate 77
Upgrade Profile Management 80
Migrate user profiles 82
Configure 85
© 1999–2024 Cloud Soware Group, Inc. All rights reserved. 2

Profile Management 2402 LTSR
Configuration precedence 85
Enable Profile Management 87
Specify the path to the user store 88
Include and exclude items 91
Default inclusions and exclusions 93
Include and exclude items 96
Use wildcards 99
Enable logon exclusion check 100
Stream user profiles 101
Replicate user stores 105
Set up profile containers 108
Enable multi‑session write‑back for profile containers 117
Control access to applications 120
Enable and configure user‑level policy settings 127
Enable support for Azure AD joined and non‑domain‑joined VDA machines 156
Enable credential‑based access to user stores 157
Enable large file handling 160
Enable file deduplication 161
Enable native Outlook search experience 165
Enable the OneDrive container 169
Enable UWP app roaming 171
Configure VHD settings 172
Resolve conflicting profiles 179
Specify a template or mandatory profile 180
© 1999–2024 Cloud Soware Group, Inc. All rights reserved. 3

Profile Management 2402 LTSR
Choose a migration policy 181
Define which groups’profiles are processed 182
Migrate user store 183
Automatic migration of existing application profiles 185
Store certificates 187
Configure folder redirection 188
Manage transactional folders 189
Configure oline profiles 194
Configure the Customer Experience Improvement Program (CEIP) 195
Configure active write‑back 196
Configure cross‑platform settings 197
Operating systems and applications supported by cross‑platform settings 200
Create a definition file 202
Application definition file structure 205
Cross‑platform settings ‑ Case study 211
Initial configuration 211
Plan the new site 213
Execute the plan 214
Other considerations 219
Enable application profiler 219
Force user logos 220
Synchronize file security attributes 220
Enable asynchronous processing for user Group Policy on logon 221
Profile Management policies 222
© 1999–2024 Cloud Soware Group, Inc. All rights reserved. 4

Profile Management 2402 LTSR
Profile Management policies 235
Profile Management policy descriptions and defaults 247
Policies for file‑based and container‑based solutions 280
Integrate 289
Profile Management and Citrix Virtual Apps 289
Profile Management and Citrix Virtual Desktops 290
Profile Management and UE‑V 295
Profile Management and Citrix Content Collaboration 295
Profile Management and App‑V 296
Profile Management and Provisioning Services 297
Preconfigure Profile Management on provisioned images 299
Profile Management and Self‑service Plug‑in 300
Profile Management and Outlook 300
Using Windows profiles with Password Manager and single sign‑on 301
Firefox browser 305
Google Chrome browser 305
Secure 306
Troubleshoot 309
Check Profile Management settings 310
Check Profile Management log files 310
Check Windows events 316
Troubleshoot common issues 331
Perform advanced troubleshooting 337
Contact Citrix Technical Support 340
© 1999–2024 Cloud Soware Group, Inc. All rights reserved. 5


Profile Management 2402 LTSR
Profile Management 2402 LTSR
May 17, 2024
Profile Management is intended as a profile solution for Citrix Virtual Apps servers, virtual desktops
created with Citrix Virtual Desktops, and physical desktops. You install Profile Management on each
computer whose profiles you want to manage.
Active Directory Group Policy Objects allow you to control how Citrix user profiles behave. Although
many settings can be adjusted, in general you only need to configure a subset, as described in these
topics.
The best way of choosing the right set of policy selections to suit your deployment is to answer the
questions in the Decide on a configuration article.
Usage rights for Profile Management are described in the EULA.
For information on the terminology used in these topics, see Glossary.
What’s new
September 3, 2024
Cumulative Update 1 (CU1) is the latest release of the Profile Management 2402 LTSR. CU1 has 7 fixes
compared to the 2402 LTSR initial release of Profile Management.
Cumulative Update 1 (CU1)
September 3, 2024
Release date: August 20, 2024
What’s new
• Profile streaming for folders feature is enabled by automatic configuration in the file‑based pro‑
file solution
• Citrix profile management supports new Microso Teams registration in user roaming scenario.
© 1999–2024 Cloud Soware Group, Inc. All rights reserved. 7

Profile Management 2402 LTSR
About this release
Profile Management 2402 LTSR Cumulative Update 1 (CU1) fixes seven issues reported since the initial
release of the 2402 LTSR.
Profile Management (initial release)
Known issues in this release
Deprecation and removals
Citrix Product Subscription Advantage Eligibility Dates
Fixed issue in 2402 LTSR CU1
August 30, 2024
Compared to: Profile Management 2402 LTSR initial release
• When you use Citrix Profile Management LTSR 2402 and when you copy ctxprofile.adml in
Japanese from the 2402 ISO version to the AD server, you are unable to edit Group Policy Object
(GPO). [CVADHELP‑25354]
• You might encounter issues with Microso Teams, browser extensions, Profile Management,
and Profile Container working together in a session. For more information, see Enable roam‑
ing for the new Microso Teams. [CVADHELP‑24599]
• You might encounter errors with the latest version of AutoCAD, when you manage your profile
with a full profile container using Profile Management. [CVADHELP‑25662]
• Enabling the Replicate user stores policy may cause Citrix Profile Management to se‑
lect a user store with high latency, even when configured to prioritize the store with the best
performance.[CVADHELP‑25362]
• You might face issues with direct access profile container reattachment and replication for file‑
based (roaming) profile solutions, including version update issues.[CVADHELP‑25604]
• You might encounter missing files and folders in the mirror folder when using Citrix Profile Man‑
agement in a multi‑session environment. [UPM‑7255]
• You might encounter multiple Event Tracing for Windows (ETW) event registrations for the same
event in Citrix Profile Management. [CVADHELP‑25331]
© 1999–2024 Cloud Soware Group, Inc. All rights reserved. 8

Profile Management 2402 LTSR
What’s new
August 21, 2024
This release addresses several issues that help to improve overall performance and stability.
Fixed issues
August 21, 2024
Profile Management 2402 LTSR includes the following fixed issues:
• VDA uninstallation or upgrade fails because the Citrix Profile Management drivers are not in‑
stalled successfully. [UPM‑6191]
• When the AAD user group is used in the non‑domain‑joined environment, App Access Control
does not function. [UPM‑6322]
• You might not be able to see and open user‑installed UWP apps when there are concurrent ses‑
sions for the same user. [UPM‑6411]
• When you upgrade profile containers generated from Citrix Profile Management 2203 or earlier,
the profile path changes incorrectly. [UPM‑6522]
• In the non‑domain‑joined environment, you might fail to open the UWP apps. [UPM‑6269]
• In a non‑domain‑joined environment, Citrix Profile Management incorrectly removes the con‑
tents of the profile container while the user is logged in. [UPM‑6331]
• In Citrix Profile Management, two profile container disks are incorrectly mounted simultane‑
ously. [UPM‑6190]
Known issues
August 6, 2024
• The latest Windows 11 update causes Profile Management to fail in creating the user‑level
search index database file. This issue is aecting the proper functioning of the Outlook
container. [UPM‑6233]
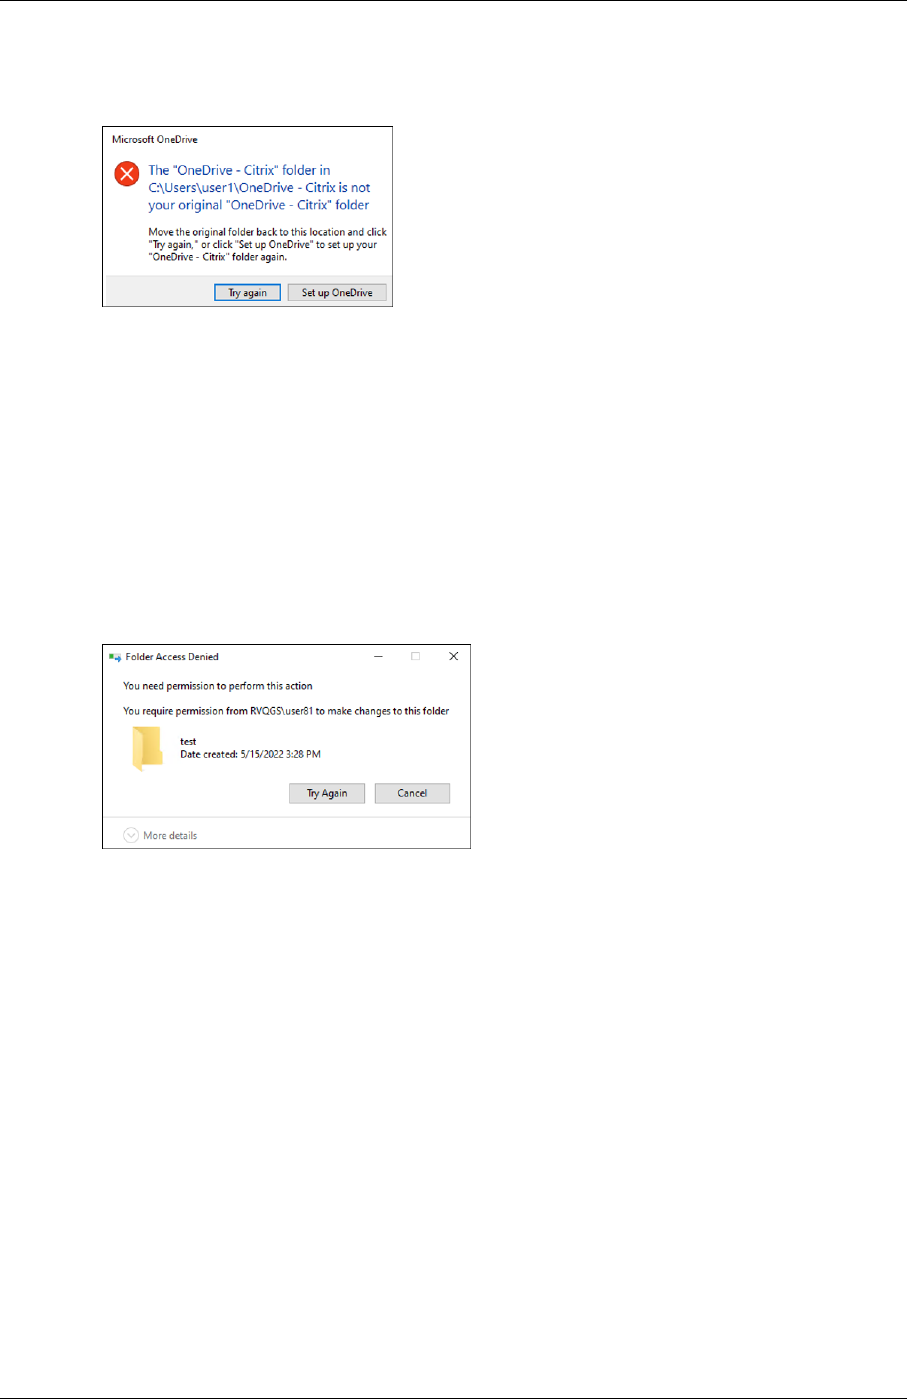
• With the full profile container or the OneDrive container enabled, the following message ap‑
pears when a user logs on to a machine:
© 1999–2024 Cloud Soware Group, Inc. All rights reserved. 9
Profile Management 2402 LTSR
– The user has been using the OneDrive folder before the container is enabled, and
– This is the first time that the user logs on to a machine aer the container is enabled.
To resolve the issue, click Try again. The OneDrive folder is then successfully migrated to the
container. [UPM‑4166]
• The message “Folder Access Denied”appears when users move a folder to the Recycle Bin in the
following situations:
– With the partial profile container or the OneDrive container enabled, users try to delete a
folder from either container.
– With the full profile container enabled, users try to delete a folder that is not in the user
profile folder but on the same disk as the profile.
To work around this issue, perform permanent deletion instead:
– Select the folder, and press Shi + Delete to delete it permanently.
– Set Recycle Bin Properties to Don’t move files to the Recycle Bin. Remove files imme‑
diately when deleted. [UPM‑4165]
© 1999–2024 Cloud Soware Group, Inc. All rights reserved. 10

Profile Management 2402 LTSR
• Some sections of the Start menu might not populate. To work around this issue, run the
gpupdate /force command from the command prompt. [UPM‑1933]
• The registry changes in the first RO session are discarded when Enable multi‑session write‑
back for profile container and Profile container are enabled. If Replicate user stores is also
configured, the registry exclusion or inclusion does not work once switching from the current
store to another replicator. For example, the current store is inaccessible due to permissions or
network issues. [UPM‑6684] [UPM‑6753] [UPM‑6651]
Third party notices
August 6, 2024
The current release of Profile Management might include third‑party soware licensed under the
terms defined in the following document:
Profile Management Third Party Notices
System requirements
August 6, 2024
Soware requirements
Systems running Profile Management must be based on one of the following operating systems:
© 1999–2024 Cloud Soware Group, Inc. All rights reserved. 11

Profile Management 2402 LTSR
• Desktops ‑ Microso Windows 11, Windows 10
In Citrix virtual desktops environments, Windows Store applications (also known as UWP apps)
are supported.
• Servers ‑ Standard and Datacenter Editions of Windows Server 2022, Windows Server 2019, Win‑
dows Server 2016
Note:
Citrix Profile Management is supported only on operating system versions that are supported by
their manufacturer. You might need to purchase extended support from your operating system
manufacturer.
With Enhanced Protected Mode (EPM), cookies in Microso Internet Explorer 10 or later are not sup‑
ported on Windows 7 or later. When EPM is enabled, Profile Management does not process or handle
cookies.
Every user must have access to the user store, a network folder where profiles are stored centrally. Al‑
ternatively, profiles can be stored in users’home drives if preferred. For more information, see Profile
Management architecture.
Unless you use XenDesktop 7, where Profile Management is integrated into Citrix Studio, Active Direc‑
tory (AD) Group Policy Objects (GPOs) are required for configuration. AD forest functional and domain
functional levels of Windows Server 2008 and Windows Server 2012 native mode are supported. For
more information, see Domain and forest support in Profile Management. Alternatively, you can use
a local .ini file for configuration settings, but in general, the .ini file is used for testing purposes only.
Settings in the .ini file are applied for any setting not configured in the GPO, that is any Group Policy
setting that is le in the Not Configured state.
If short file names (also known as 8.3 file names) are mandated in a Citrix product or component you
are usingwith Profile Management, do not disable short file name support in your Profile Management
deployment. Doing so might cause issues when files are copied to and from the user store.
On computers running the Profile Management Service, store profiles on a single disk mounted by
drive letter. If a disk is mounted into a folder that is used to store a user’s profile (a typical example is
C:\Users), it might be masked from the Service and not processed.
Citrix product compatibility
Profile Management can be used with the following Citrix products:
• Citrix Virtual Desktops
• Citrix Virtual Apps
• Citrix Virtual Apps and Desktops
© 1999–2024 Cloud Soware Group, Inc. All rights reserved. 12

Profile Management 2402 LTSR
• Citrix DaaS (formerly Citrix Virtual Apps and Desktops service)
For the compatibility matrix of Profile Management and Citrix Virtual Apps and Desktops, see Addi‑
tional Lifecycle Information for Citrix Profile Management.
Formore information about using this CurrentRelease(CR) in a Long Term Service (LTSR) environment
and other FAQs, see Knowledge Center article.
Downloads
To download Profile Management
1. Navigate to the Citrix download page.
2. Log on to My Account. Your account must be associated with the licensing entitlement for the
Citrix product that you have deployed. If your account is not associated with your license enti‑
tlement, contact Citrix Customer Service.
3. In Find Downloads, select your product and select Components as the download type.
4. Download the latest version of Profile Management.
Diagnostics feature
Before you can use Citrix Diagnostic Facility to capture trace logs, ensure it is available with the Citrix
product or component that is used on the device, virtual desktop, or Citrix server whose profiles you
want to monitor.
Cross‑platform settings
To use the cross‑platform settings feature in this release, install Microso Core XML Services (MSXML)
6.0 Service Pack 1 or later on all computers running the Profile Management Service. This component
is part of Microso .NET Framework 3.5 and is required to process definition files.
Use this feature only with the supported set of operating systems and applications. For more infor‑
mation, see Operating systems and applications supported By cross‑platform settings.
Migrating existing profiles to Citrix user profiles
Migration from the following profile types to Citrix user profiles is supported:
• Windows roaming profiles
• Local profiles based on any of the following operating systems:
– Windows 11
© 1999–2024 Cloud Soware Group, Inc. All rights reserved. 13

Profile Management 2402 LTSR
– Windows 10
– Windows 8
– Windows 7
– Windows Vista
– Windows XP
– Windows Server 2022
– Windows Server 2019
– Windows Server 2016
– Windows Server 2012 R2
– Windows Server 2012
– Windows Server 2008 R2
– Windows Server 2008
– Windows Server 2003
• Citrix user profiles created with User Profile Manager 2.0
Migration from the following profile types to Citrix user profiles is unsupported:
• Microso mandatory profiles.
Tip: You can use the template profile feature of Profile Management to configure a Microso
mandatory profile as a Citrix mandatory profile. Citrix mandatory profiles are used for all logons
and function exactly like regular Citrix user profiles except that no user changes are saved. For
information, see
Specify a template or mandatory profile.
• Citrix mandatory profiles.
• Citrix user profiles created with a User Profile Manager Technical Preview release or beta release.
• Third‑party profiles (including sepagoPROFILEs).
You cannot upgrade from a 32‑bit Citrix user profile to a 64‑bit one.
Quick start guide
August 6, 2024
This article provides a quick reference to installing and configuring Profile Management.
Prerequisites
Verify that all system requirements are met. For details, see System requirements.
© 1999–2024 Cloud Soware Group, Inc. All rights reserved. 14

Profile Management 2402 LTSR
Install Profile Management
Profile Management is included with the installation of the Virtual Delivery Agent (VDA). For VDAs, to
install or upgrade Profile Management, simply install or upgrade your VDA soware.
Deploying Profile Management consists of installing an .msi file and either an .adm, or an .admx file.
To install the files, follow the steps in Install and set up.
Note:
To avoid potential conflicts, add the Citrix Profile Management process (%ProgramFiles%\
Citrix\User Profile Manager\UserProfileManager.exe) to your antivirus so‑
ware’s exclusion list. For more information, see Citrix Antivirus Best Practices.
Decide on where to centrally configure Profile Management
There are three ways you can centrally configure Profile Management. Choose one way from the fol‑
lowing:
• Using a GPO in Active Directory
• Using policies in Citrix Studio
• Using Workspace Environment Management (WEM)
For instructions on configuring Profile Management using a GPO in Active Directory, see Knowl‑
edge Center article CTX222893.
For instructions on configuring Profile Management using policies in Citrix Studio, see Knowl‑
edge Center article CTX222893.
For instructions on configuring Profile Management using WEM, see Knowledge Center article
CTX229258.
Configure Profile Management
Configure basic settings
1. Create the user store
Recommendations on creating secure user stores –including creating a file share and setting
folder permissions –are available in the Microso article Deploying Roaming User Profiles.
These minimum recommendations ensure a high level of security for basic operation.
2. Specify the path to the user store
3. Enable Profile Management
© 1999–2024 Cloud Soware Group, Inc. All rights reserved. 15

Profile Management 2402 LTSR
4. Verify basic settings
To verify your basic settings, complete the following steps:
a) In Citrix Studio, set the Enable logging, Logon, and Logo policies to Enabled.
b) Log on to a VDA and run gpupdate /force as an administrator.
c) Log o and log back on to the VDA.
d) Go to the defaultlog file path, C:\Windows\System32\Logfiles\UserProfileManager
, open the pm.log file, look for logon events, and verify that the following messages are
present:
1 Starting logon processing …
2 Finished logon processing successfully in [s]:
Plan your Profile Management configuration
1. To plan a Profile Management deployment, decide on a set of policy settings that, together,
form a configuration that is suitable for your environment and users. The Automatic config‑
uration feature in User profiles simplifies some of this decision‑making for Citrix virtual apps
and desktops deployments.
To determine the recommended approach to deploying, answer the following basic questions
about your environment:
• Pilot or production
• Migrate or create profiles
• Persistent or provisioned and dedicated or shared
• Mobile or static
• Which applications are in use
2. Do the following to configure Profile Management accordingly:
• Stream user profiles, see Stream user profiles.
• Enable active write back, see Configure active write back.
• Specify a mandatory profile, see Specify a template or mandatory profile.
• Configure exclusions, see Include and exclude items.
• Configure folder redirection, see Configure folder redirection.
• Configure applications, see Enable native Outlook search experience.
© 1999–2024 Cloud Soware Group, Inc. All rights reserved. 16

Profile Management 2402 LTSR
3. Verify Profile Management settings.
a) Verify basic settings as stated earlier in this article.
b) Check the pm_configure.log file for policy settings. Verify that the following mes‑
sages are present:
1 Configuration value read from Policy: LoggingEnabled=
2 Configuration value read from INI file: CEIPEnabled=
3 Configuration value PSAlwaysCache set neither in policy nor in
INI file. Defaulting to:
Troubleshoot
For details, see Troubleshoot.
How Profile Management works
August 6, 2024
Profile Management addresses user profile deficiencies in environments where simultaneous domain
logons by the same user introduce complexities and consistency issues to the profile. For example, if
a user starts sessions to two dierent virtual resources based on a roaming profile, the profile of the
session that terminates last overrides the profile of the first session. This problem, known as “last
write wins,”discards any personalization settings that the user makes in the first session.
You can tackle the problem by using separate profiles for each resource silo. However, this approach
results in increased administration overhead and storage capacity requirements. Another drawback
is that users experience dierent settings depending on the resource silo they access.
Profile Management optimizes profiles in an easy and reliable way. At interim stages and at logo,
registry changes and the files and folders in the profile are saved to the user store for each user. If, as
is common, a file exists, it is overwritten if it has an earlier time stamp.
At logon, users’registry entries and files are copied from the user store. If a locally cached profile
exists, the two sets are synchronized. As a result, all settings for all applications and silos are available
during the session. And it is no longer necessary to maintain a separate user profile for each silo. Citrix
streamed user profiles can further enhance logon times.
Profile Management helps to safeguard application settings for mobile users who experience network
disruption (if the oline profiles features are configured) and users who access resources from dier‑
ent operating systems (if the cross‑platform settings feature is configured).
Note: Profile Management processes domain user logons not local accounts.
© 1999–2024 Cloud Soware Group, Inc. All rights reserved. 17

Profile Management 2402 LTSR
Where network‑based profiles are employed, consider adopting Profile Management in your organi‑
zation. You might be able to implement other solutions such as mandatory or roaming profiles, and
maintain them with standard knowledge of Microso Windows. However, unless your deployment is
restricted (for example, a call center where user customization is limited so mandatory profiles are
appropriate), Profile Management might be preferred.
Citrix recommends using folder redirection so that user‑specific data is saved separately from the pro‑
file.
The home‑folder and template paths must be configured only with the network location.
About profiles
August 6, 2024
A Windows user profile is a collection of folders, files, and registry and configuration settings that
define the environment for a user who logs on with a user account. These settings can be customiz‑
able by the user, depending on the administrative configuration. Examples of settings that can be
customized are:
• Desktop settings such as wallpaper and screen saver
• Shortcuts and Start menu setting
• Internet Explorer Favorites and Home Page
• Microso Outlook signature
• Printers
Some user settings and data can be redirected by folder redirection. However, if folder redirection is
not used, these settings are stored within the user profile.
Types of profiles
Windows includes several types of profiles:
Profile Type Storage Location
Configuration
Location Application Save Changes?
Local Local device Local device Local device only Yes
Roaming Network Active Directory Any device
accessed
Yes
© 1999–2024 Cloud Soware Group, Inc. All rights reserved. 18

Profile Management 2402 LTSR
Profile Type Storage Location
Configuration
Location Application Save Changes?
Mandatory
(Mandatory
Roaming)
Network Active Directory Any device
accessed
No
Temporary Not Applicable Not Applicable Local device only No
A temporary profile is only assigned when a specific profile type cannot be assigned. Except manda‑
tory profiles, a distinct profile typically exists for each user. Mandatory profiles do not allow users to
save any customizations.
For Remote Desktop Services users, a specific roaming or mandatory profile can be assigned to avoid
issues that might occur if the same profile is assigned to a user within a Remote Desktop Services
session and a local session.
Profile versions
Versions of Microso Windows user profiles are as follows:
• Version 6 –Windows 11, Windows 10 1607 and later, Windows Server 2016, Windows Server 2019,
and Windows Server 2022
• Version 5 –Windows 10 RTM
• Version 4 –Windows 8.1 and Windows Server 2012 R2
• Version 3 ‑ Windows 8 and Windows Server 2012
• Version 2 ‑ Windows Vista, Windows 7, Windows Server 2008, and Windows Server R2
• Version 1 –Operating systems earlier than Windows Vista and Windows Server 2008
The folder structure (or namespace) of Microso’s Version 1 profiles is mostly interchangeable. For
example, the folders on Windows XP and Windows Server 2003 are almost identical. Likewise, the
structure of Version 2 profiles is mostly interchangeable.
However, the namespace is dierent between Version 1 and later profiles. This folder structure
was changed in the later operating systems to provide user‑specific folders isolated for user and
application data. Version 1 profiles store data in the root folder, Documents and Settings. Version
2 profiles store data in a more intuitively named folder called Users. For example, the folder
contents of AppData\Local in Windows Vista is the same as the contents of Documents and
Settings\<username>\Local Settings\Application Data in Windows XP.
For more information about the dierences between Version 1 and later profiles, see Managing Roam‑
ing User Data Deployment Guide.
© 1999–2024 Cloud Soware Group, Inc. All rights reserved. 19

Profile Management 2402 LTSR
Assign profiles
August 6, 2024
What methods can I use in Windows to assign profiles to users?
This article refers to the assignment of profiles in Microso Windows not Citrix Profile Management.
You can assign profiles to users in several ways:
• Using their user account properties in Active Directory (AD)
• Using Group Policy (GP)
• Using the preceding methods to assign profiles specific to Remote Desktop Services (formerly
known as Terminal Services) sessions
Some of these methods are only available in specific operating systems:
• Remote Desktop Services. To assign Remote Desktop Services profiles on Windows Server
2008 R2, use the GPO setting Set path for Remote Desktop Services Roaming User Profile. It
is located in Computer Configuration\Administrative Templates\Windows Component\Remote
Desktop Services\Remote Desktop Session Host\Profiles. On earlier multi‑session operating
systems, use the setting Set path for TS Roaming Profiles, which is located in Computer Con‑
figuration\Administrative Templates\Windows Components\Terminal Services.
To configure profiles for individual users, you can also set Set path for TS Roaming Profiles on
the individual accounts in the User Account Properties pages in AD. However, typically it is much
better to make this assignment in GP.
You can use the setting Use mandatory profiles on the terminal server to force the use of manda‑
tory profiles.
• Windows 7, Windows 8, and Windows Server: Set roaming profiles on individual accounts
using the User Account Properties pages. Also, for Windows Server 2008 AD and Windows 7 de‑
vices, you can use the GPO setting Set roaming profile path for all users logging on to this com‑
puter. This is located in Computer\Administrative Templates\System\User Profiles. For users
logging on to Windows 8 or Windows Server 2012 computers, you can also set users’home fold‑
ers using Active Directory in Windows Server 2012.
What is the priority order for delivering profiles to domain users if more than one
method is used?
When Profile Management is used to manage a user’s profile, it takes precedence over any other pro‑
file assignment method. A user whose profile data is not managed by Profile Management might be
© 1999–2024 Cloud Soware Group, Inc. All rights reserved. 20

Profile Management 2402 LTSR
assigned a profile using multiple methods. The actual profile used is based on the following prece‑
dence:
1. Citrix user profile (that is, a profile created by Profile Management)
2. Remote Desktop Services profile assigned by a GPO
3. Remote Desktop Services profile assigned by a User Property
4. Roaming profile assigned by a GPO (Windows Server 2008 AD and Windows 7 only)
5. Roaming profile assigned by a User Property
Profile Management architecture
August 6, 2024
This article describes the folderstructure of the user store and of the cross‑platformsettings store. The
user store is the central location for Citrix user profiles. The cross‑platform settings store is a separate
location.
Important information about Profile Management stores
The structures of the user store and cross‑platform settings store are described here for information
purposes and to assist with localizing and troubleshooting. Follow these important recommenda‑
tions, which are designed to minimize problems with profile data and maintain security:
• Do not change the structure of either store.
• Do not write files and folders directly to any part of a store. The user store is dierent in this
respect from any redirected folders.
• Keep the user store separate from any redirected folders. You can keep them on disjoint shares
of the same file server or DFS namespace, for example \\server1\profiles\%username% and
\\server1\folders\%username%. This technique also makes it much easier to support Version 1
and Version 2 profiles together, and to support a single set of redirected folders shared by both
profile versions.
• Users do not need to see the user store, so do not map a drive letter to it.
• Do not impose quotas on the user store. If you restrict profile size, consider excluding items
rather than using a quota.
Folder structure of the user store
The user store defaults to the WINDOWS folder in the user’s home directory. This simplifies pilot in‑
stallations, but for production systems, configure the user store to be a network share or (for best scal‑
© 1999–2024 Cloud Soware Group, Inc. All rights reserved. 21

Profile Management 2402 LTSR
ability) a DFS namespace. Supported configurations for enterprise‑ready user stores are described in
High availability and disaster recovery with Profile Management.
Recommendations on creating secure user stores are available in the article called Create a file share
for roaming user profiles on the Microso TechNet website. These minimum recommendations en‑
sure a high level of security for basic operation. Also, when configuring access to the user store, in‑
clude the Administrators group, which is required to modify or remove a Citrix user profile.
Note: On Windows 7 and Windows 2008 R2 client devices, do not select the Encrypt data access
check box while creating the share on Windows 2012 R2 File Server.
The folder structure of the user store at the root level is shown in this table.
Folder Notes
\ The root of a profile in the user store.
\UPM_Profile This folder contains files and folders from the
profile.
\UPM_Drive_C This folder contains any included items from
outside the profile (in this case from drive C).
This folder is present during upgrades from
Profile Management 4.x or earlier. Managing
items outside the profile is not supported in
Profile Management 5.0.
\Pending This folder contains the lock file, any pending
files, and the stamp file if the streaming feature
is in use.
Some examples are shown in this table.
Example Folder Name Notes
\UPM_Profile\Data The synchronized content of the Data folder in
the user profile.
\UPM_Profile\AppData_upm_var The synchronized content of the de‑localized
Application Data folder in the user profile. This
folder is present during upgrades from Profile
Management 4.x or earlier. Managing Version 1
profiles (of which Application Data is an example
folder) is not supported in Profile Management
5.0.
© 1999–2024 Cloud Soware Group, Inc. All rights reserved. 22

Profile Management 2402 LTSR
Pending area
The user store includes the pending area. This area is a holding area used by the streamed user profiles
and active write back features. All files are synchronized from the pending area to the user store aer
a user logs o from their last session. New sessions download files from both the user store and the
pending area, so the user always experiences an up‑to‑date profile.
If a server becomes unresponsive, a timeout can be set that releases files in the pending area back to
the user store (if configured as part of the streamed user profiles feature).
Folder structure of the user store with multiple platforms
When using the cross‑platform settings feature, multiple platforms are involved. You must de‑
fine platform‑specific folders to separate the profiles for each platform. Typically, you do this
using Profile Management variables in the Path to user store policy (for example, using %USER‑
NAME%\!CTX_OSNAME!!CTX_OSBITNESS! in the path).
The cross‑platform settings store holds the settings for supported applications aer the cross‑
platform settings feature is configured. You specify the name and location of the store during
configuration (using the Path to cross‑platform settings store policy). The store holds the subset of
the user’s settings that roam between operating systems.
For example, you might want to roam settings between Windows XP and Windows 7. The platform‑
specific folders contain the user settings that are unique to Windows XP and Windows 7. The cross‑
platform settings store contains the subset of the settings that roam between these operating systems.
At logon, this subset is copied into, and remains part of, the platform‑specific folders. At logo, any
changes to the subset are extracted and placed back into the cross‑platform settings store.
Each platform‑specific folder contains standard subfolders (for example, UPM_Profile). For more in‑
formation, see
Folder structure of the user store. In addition, the UPM_CPS_Metadata subfolder is
present. This system‑created folder contains temporary settings that are shared across operating sys‑
tems.
The user store and AD forests
Citrix user profiles cannot be managed across forests. They can be managed across domains in the
same forest allowing multiple users with the same logon name to access the same resources in the for‑
est. This involves uniquely identifying profiles with the %USERDOMAIN% and %USERNAME% variables
in the path to the user store.
However, in this case you must use variables to disambiguate identical logon names when setting
the path to the user store. To do this, append the domain name variable to the path. You must also
© 1999–2024 Cloud Soware Group, Inc. All rights reserved. 23

Profile Management 2402 LTSR
set permissions on the user store and enable Profile Management’s Processed Groups setting using
Active Directory’s Universal Groups.
You can use a manually defined system variable such as %ProfVer% to set the operating system ver‑
sion. Or you can use a Profile Management variable to set the operating system name, bitness, or the
profile version. For examples of user store paths in AD forests, see Specify the path to the user store.
Localizing the user store
The following table provides an overview of how Profile Management localizes and de‑localizes fold‑
ers when profile data is moved to and from the user store. Only folder names are localized and de‑
localized. For example, Start menu entries and registry settings are not translated into the correct
language by Profile Management.
This information is relevant only when upgrading from Profile Management 4.x or earlier, when Ver‑
sion 1 profiles might be present. Managing Version 1 profiles is not supported in Profile Management
5.0.
© 1999–2024 Cloud Soware Group, Inc. All rights reserved. 24

Profile Management 2402 LTSR
Version 1 English Folder User Store Folder
Full Path Relative to the User
Profile
Accessibility
Accessories
Administrative Tools
Application Data
Cookies
Desktop
Entertainment
Favorites
History
Links
Local Settings
My Documents
My Music
My Pictures
My Videos
NetHood
PrintHood
Programs
Recent
Start Menu
Templates
Temporary Internet Files
SendTo
Startup
System Tools
Accessibility_upm_var
Accessories_upm_var
AdminTools_upm_var
AppData_upm_var
Cookies_upm_var
Desktop_upm_var
Entertainment_upm_var
Favorites_upm_var
History_upm_var
Links_upm_var
LocalSettings_upm_var
MyDocuments_upm_var
MyMusic_upm_var
MyPictures_upm_var
MyVideos_upm_var
NetHood_upm_var
PrintHood_upm_var
Programs_upm_var
Recent_upm_vars
StartMenu_upm_var
Templates_upm_var
TemporaryInternetFiles_upm_var
SendTo_upm_var
Startup_upm_var
SystemTools_upm_var
\Start
Menu\Programs\Accessories
\Start Menu\Programs
\Start Menu\Programs
\Local Settings
\Start
Menu\Programs\Accessories
\Local Settings
\Favorites
\My Documents
\My Documents
\My Documents
\Start Menu
\Local Settings
\Start Menu\Programs
\Start
Menu\Programs\Accessories
Profile Management use cases
August 6, 2024
Citrix Profile Management can be implemented to manage users’profiles in dierent scenarios regard‑
less of how applications are delivered to users or where they are housed. The following are examples
© 1999–2024 Cloud Soware Group, Inc. All rights reserved. 25

Profile Management 2402 LTSR
of these scenarios:
• Citrix Virtual Apps with published applications
• Citrix Virtual Apps with published desktops
• Citrix Virtual Apps with applications streamed into an isolation environment
• Applications streamed to Citrix virtual desktops
• Applications installed on Citrix virtual desktops
• Applications streamed to physical desktops
• Applications installed locally on physical desktops
Of these scenarios, Citrix sees the following as the most common use cases:
• Multiple sessions ‑ The user accesses multiple Citrix virtual apps server silos and therefore has
multiple sessions open. Note however that application isolation and streaming on the server
are alternatives to server silos. This scenario is described in more detail in this topic.
• “Last write wins”and roaming profile consistency issues ‑ The last write to the roaming pro‑
file causes all settings to be saved. Therefore, roaming profiles might not retain the right data
if multiple sessions are open and interim changes are made. In addition, settings might not be
written correctly to the profile as a result of network, storage issues, or other problems. This
scenario is described in more detail in this topic.
• Large profiles and logon speed ‑ Profile bloat can make user profiles unwieldy resulting in stor‑
age and management issues. Typically, during logon Windows copies the user’s entire profile
over the network to the local user device. For bloated profiles, this behavior can prolong the
user’s logon time.
Multiple sessions
Especially in large environments, it might be necessary for users to open multiple sessions to access
dierent applications that are housed on dierent Citrix virtual apps servers, whether in the same
farm or multiple farms. Where possible, consider application isolation or streaming to house appli‑
cations on the same Citrix virtual apps server to allow users to access all applications from a single
server and thus a single session. However, this might not be possible if a business unit controls spe‑
cific servers or applications cannot be streamed.
Once it has been determined that it is indeed necessary for users to access applications from various
Citrix virtual apps servers, the impact on profiles must be ascertained.
The following diagram illustrates an example where application settings can be lost when multiple
sessions exist.
© 1999–2024 Cloud Soware Group, Inc. All rights reserved. 26

Profile Management 2402 LTSR
For example, Mary wants to access App A, App B, and App C and she is routed to Server 1, Server 8,
and Server 12 respectively. Upon logon to each application, Mary’s Terminal Services roaming profile
is loaded onto each server and folders are redirected for each session. When Mary is logged on to App
A on Server1, Mary changes Setting1 and logs o that session. Mary then completes work in the other
two applications and logs o.
At logo, the change that Mary made within the session on Server 1 is overwritten because the settings
within the last closed session are retained, not the interim change. When Mary logs on to App A the
next day, she is frustrated because the change she made is not visible.
Profile Management can generally prevent this situation from occurring. Profile Management only
writes back the specific settings that were changed during a session; all other unchanged settings
remain untouched. So the only potential conflict that would arise is if Mary changed Setting1 within
another session. However, the user would likely expect that the most recent change was retained,
which is the case, if Profile Management is used in this scenario.
© 1999–2024 Cloud Soware Group, Inc. All rights reserved. 27

Profile Management 2402 LTSR
“Last write wins”and roaming profile consistency issues
This scenario is similar to the first one in this topic. “Last write wins”issues can present themselves in
various ways, and user frustration can mount as the number of devices accessed increases.
Because the roaming profile retains all profile data, except folders that have been redirected, the user
profile can grow large. Not only does this add to the logon time because the profile must be down‑
loaded, the potential for inconsistency grows during the write phase of the logo, especially where
network issues exist.
Profile Management enables specific data to be excluded from the user profile, enabling the user pro‑
file to be kept to a minimal size. Because only dierences are written to the profile, the write phase of
the logo involves less data and is faster. Profile Management can be beneficial for applications that
use profiles for temporary data but do not clean them up when the applications terminate.
Access multiple resources
August 6, 2024
Profiles become more complex as users access multiple resources. With profiles stored on a network,
Microso Windows uses the registry to store user settings. Profiles are copied from the network to
the local device at logon, and copied back to the network at logo. On a daily basis, users access
multiple computers, switch between desktops and laptops, and access virtual resources created with
Citrix Virtual Apps and Desktops or Citrix DaaS (formerly Citrix Virtual Apps and Desktops service).
This diagram illustrates how a single Citrix user profile follows a user who logs on to multiple re‑
sources.
© 1999–2024 Cloud Soware Group, Inc. All rights reserved. 28

Profile Management 2402 LTSR
For example, a user has a local, physical desktop and from it accesses applications published with
Citrix Virtual Apps. They also access a virtual desktop created with Citrix Virtual Desktops. The user’
s settings are not uniform across all of these resources unless the settings are appropriately config‑
ured.
In addition, when they access a shared resource, the behavior of roaming profiles means that the “last
write wins.”For example, an administrator enables a roaming profile and a user changes the back‑
ground color of the local desktop. The user then logs on to a Citrix virtual desktop, logs o the local
desktop, and logs o the virtual desktop. Both the local and virtual desktops were open at the same
time and the last logo was from the virtual desktop. Therefore, the settings from the virtual desktop
session were the last written to the profile, and the change to the background color is lost.
Logon diagram
August 6, 2024
This diagram helps you work out the details of your user profile migration strategy. It also explains
these aspects of performance:
• When you migrate a profile, two network copies can take place, which slows down the logon
process. For example, the operation Copy default profile to local Pm profile and to user store
involves the following two copies: one full profile copy from the roaming profile store to the
local computer and the other full profile copy from the local computer to the user store.
• When a cached profile is used, no copying of profile data across the network takes place.
© 1999–2024 Cloud Soware Group, Inc. All rights reserved. 29

Profile Management 2402 LTSR
Read the diagram from the bottom to the top. Check the desired operations in the boxes at the bottom
(for example, Copy default profile to local Pm profile and to user store. And then track a path back
to identify the required migration settings.
© 1999–2024 Cloud Soware Group, Inc. All rights reserved. 30

Profile Management 2402 LTSR
© 1999–2024 Cloud Soware Group, Inc. All rights reserved. 31

Profile Management 2402 LTSR
Logo diagram
August 6, 2024
This diagram describes the logic used to copy or merge profile data at logo.
© 1999–2024 Cloud Soware Group, Inc. All rights reserved. 32

Profile Management 2402 LTSR
© 1999–2024 Cloud Soware Group, Inc. All rights reserved. 33

Profile Management 2402 LTSR
Plan your deployment
August 6, 2024
To plan a Profile Management deployment, you decide on a set of policy settings that together form
a configuration that is suitable for your environment and users. The automatic configuration feature
simplifies some of this decision‑making for Citrix virtual desktops deployments. As a guide to carrying
out this important task on any deployment, see Decide on a configuration.
Having decided on a configuration, and reviewed and tested it, a typical deployment then consists
of:
1. Creating the user store
2. Installing Profile Management
3. Enabling Profile Management
Plan a pilot study with the .ini file
The following information is intended to assist you using the Profile Management .ini file during a pilot
study or evaluation.
Important: If you intend to use the .ini file (UPMPolicyDefaults_all.ini) for evaluation purposes, re‑
name the file before you switch to using Group Policy (GP) in a production environment. For example,
rename the file to UPMPolicyDefaults_all_old.ini. Renaming the file allows you to be certain that only
production settings are applied, and that no settings you specified during your evaluation are used.
If the file is not renamed, Profile Management examines it for any settings not configured in Group
Policy and adopts any non‑default settings it finds. So, to eliminate the risk of unwanted settings
being introduced, configure all the settings you want to use in your production environment using
Group Policy, not the .ini file.
The .ini file contains the same policies as the .adm and .admx files, but the policies have dierent
names. If you are familiar with the names in GP and planning a pilot study with the .ini file, compare
the names using the tables in Profile Management policies.
For more information on .ini file deployments, see Upgrade Profile Management and Test Profile Man‑
agement with a local GPO.
Decide on a configuration
August 6, 2024
© 1999–2024 Cloud Soware Group, Inc. All rights reserved. 34

Profile Management 2402 LTSR
To configure Profile Management, the recommended approach is to answer these basic questions
about your environment:
1. Pilot or production
2. Migrate or create profiles
3. Persistent or provisioned and dedicated or shared
4. Mobile or static
5. Which applications are in use
Based on your answers, configure Profile Management for your deployment. You can leave all other
policies as default.
Next steps
• Install and set up
• Troubleshoot
Tips
Refer to the following tips when checking and deploying Profile Management settings.
Check settings using the UPMConfigCheck tool
UPMConfigCheck is a PowerShell script that examines a live Profile Management deployment and
determines whether it’s optimally configured. For more information, see Knowledge Center article
CTX132805.
Group computers into OUs
If your answers to the questions are the same for dierent sets of computers, consider grouping them
into an Active Directory Organizational Unit (OU). Also, consider configuring Profile Management by
using a single Group Policy Object (GPO) attached to that OU.
If your answers to these questions are dierent, consider grouping the computers into separate
OUs.
Alternatively, where a domain supports WMI filtering, you can group all computers into the same OU
and use WMI filtering to select between appropriately configured GPOs.
© 1999–2024 Cloud Soware Group, Inc. All rights reserved. 35

Profile Management 2402 LTSR
Pilot or production
August 6, 2024
The aim of a pilot deployment is to be able to demonstrate a solution quickly and reliably. An impor‑
tant goal might be to reduce the number of components in the pilot. For Profile Management, two
components are the user store and the selection of users whose profiles are processed.
Policy: Path to user store
Setting up a user store for Citrix user profiles is exactly like setting up a profile store for Windows roam‑
ing profiles.
For a pilot deployment, you can oen ignore these considerations. The default value for the Path
to user store policy is the Windows folder in the user’s home directory. This works well for a single‑
platform pilot so long as only one operating system (and therefore only one profile version) is de‑
ployed. For information on profile versions, see About profiles. This option assumes that enough
storage is available in users’home directories and that no file‑server quotas are applied. Citrix does
not recommend the use of file‑server quotas with profiles. The reasons for this are given in Share
Citrix user profiles on multiple file servers.
For a production deployment, you must carefully consider security, load balancing, high availability,
and disaster recovery. Follow the recommendations in these topics for creating and configuring the
user store:
• Profile Management architecture
• Create the user store
• Specify the path to the user store
• High availability and disaster recovery with Profile Management
Policies: Processed groups, Excluded groups
The complexity of production deployments means that you might need to phase the rollout of Profile
Management, rather than release it to all users at the same time. You might tell users that they receive
dierent profile experiences when connecting to dierent resources while the deployment is in the
process of being rolled out.
For performance reasons, Profile Management is licensed by an EULA not built‑in license checking.
You might choose to manage license allocation by assigning users to an Active Directory (AD) user
group or using an existing AD group if a suitable one exists.
© 1999–2024 Cloud Soware Group, Inc. All rights reserved. 36

Profile Management 2402 LTSR
In pilot deployments, use of Profile Management is restricted by invitation to a small group of users,
possibly from several departments, where no single, representative AD group can be used. In this
case, leave the Processed groups and Excluded groups policies unconfigured. Profile Management
performs no checking on group membership and all users are processed.
For more information on these policies, see Define which groups’profiles are processed.
Important: In all cases, you must ensure that the number of users processed by Profile Management
does not exceed the limits set by the relevant EULA.
Migrate or create profiles
August 6, 2024
You can take advantage of a Profile Management deployment to refresh your organization’s profiles,
initially using a small, customized profile, and rigidly controlling additions to it. Alternatively, you
might need to migrate existing profiles into the Profile Management environment and preserve the
personalizations that have built up over many years.
If you decide to migrate existing profiles, configure the Migration of existing profiles and the Local
profile conflict handling policies.
The following diagram illustrates how to configure these policies based on your answer to this ques‑
tion.
© 1999–2024 Cloud Soware Group, Inc. All rights reserved. 37

Profile Management 2402 LTSR
Policy: Template profile
If you decide to create an entirely new set of profiles, consider creating a template for this purpose
using the Template profile policy. For information, see Specify a template or mandatory profile. If you
do not create a template, Profile Management gives users the default Windows profile. If no template
is required, leave this policy disabled.
The Template profile policy is similar to the Path to user store policy. This policy specifies the loca‑
tion of a profile that can be used as the basis for creating a user profile when the user first logs on to
a computer managed by Profile Management.
You can optionally use the template as a Citrix mandatory profile for all logons. As part of your plan‑
ning, you must perform tasks such as identifying the applications that users access. You must config‑
ure the registry states, shortcuts, and desktop settings in the profile accordingly. You must set permis‑
sions on profile folders and modify users’logon scripts.
Note:
When selecting mandatory profiles in Citrix virtual desktops deployments, we recommend that
you use Citrix Studio rather than the Profile Management .adm or .admx file.
Persistent or provisioned and dedicated or shared
August 6, 2024
The types of machines that create profiles aect your configuration decisions. The primary factors
are whether machines are persistent or provisioned, and whether they are shared by multiple users
or dedicated to just one user.
Persistent systems have some type of local storage, the contents of which can be expected to persist
when the system turns o. Persistent systems might employ storage technology such as SANs to pro‑
vide local disk mimicking. In contrast, provisioned systems are created “on the fly”from a base disk
and some type of identity disk. Local storage is usually mimicked by a RAM disk or network disk, the
latter oen provided by a SAN with a high‑speed link. The provisioning technology is generally Provi‑
sioning Services or Machine Creation Services (or a third‑party equivalent). Sometimes provisioned
systems have persistent local storage, which might be provided by Personal vDisks. They are classed
as persistent.
Together, these two factors define the following machine types:
• Both persistent and dedicated ‑ Examples are single‑session OS machines with a static assign‑
ment and a Personal vDisk that are created with Machine Creation Services (in Citrix virtual desk‑
tops), desktops with Personal vDisks that are created with physical workstations and laptops.
© 1999–2024 Cloud Soware Group, Inc. All rights reserved. 38

Profile Management 2402 LTSR
• Both persistent and shared ‑ Examples are multi‑session OS machines that are created with
Machine Creation Services (in Citrix virtual desktops), and Citrix virtual apps servers.
• Both provisioned and dedicated ‑ Examples are single‑session OS machines with a static as‑
signment but without a Personal vDisk that are created with Provisioning Services (in Citrix vir‑
tual desktops).
• Both provisionedand shared ‑ Examplesaresingle‑session OS machines with a randomassign‑
ment that are created with Provisioning Services (in Citrix virtual desktops), desktops without
Personal vDisks that are created with Citrix virtual apps servers.
The following Profile Management policy settings are suggested guidelines for the dierent machine
types. They usually work well, but you might want to deviate from them as your deployment re‑
quires.
Note: In Citrix virtual desktops deployments, Delete locally cached profiles on logo, Profile stream‑
ing, and Always cache are enforced by the auto‑configuration feature.
Policy
Both persistent
and dedicated
Both persistent
and shared
Both provisioned
and dedicated
Both provisioned
and shared
Delete locally
cached profiles
on logo
Disabled Enabled Disabled (note 5) Enabled
Profile streaming Disabled Enabled Enabled Enabled
Always cache Enabled (note 1) Disabled (note 2) Disabled (note 6) Disabled
Active write back Disabled Disabled (note 3) Enabled Enabled
Process logons of
local
administrators
Enabled Disabled (note 4) Enabled Enabled (note 7)
Notes
1. Because Profile streaming is disabled for this machine type, the Always cache setting is always
ignored.
2. Disable Always cache. However, you can ensure that large files are loaded into profiles as soon
as possible aer logon by enabling this policy and using it to define a file size limit (in MB). Any
file this size or larger is cached locally as soon as possible.
3. Disable Active write back except to save changes in profiles of users who roam between Citrix
virtual apps servers. In this case, enable this policy.
4. Disable Process logons of local administrators except for Hosted Shared Desktops. In this case,
enable this policy.
© 1999–2024 Cloud Soware Group, Inc. All rights reserved. 39

Profile Management 2402 LTSR
5. Disable Delete locally cached profiles on logo. This retains locally cached profiles. Because
the machines are assigned to individual users, logons are faster if their profiles are cached.
6. Disable Always cache. However, you can ensure that large files are loaded into profiles as soon
as possible aer logon by enabling this policy and using it to define a file size limit (in MB). Any
file this size or larger is cached locally as soon as possible.
7. Enable Process logons of local administrators except for profiles of users who roam between
Citrix virtual apps servers. In this case, disable this policy.
Mobile or static
August 6, 2024
Are your machines permanently connected to the Active Directory domain? Laptops and similar mo‑
bile devices probably are not. Similarly, some deployments might have fixed machines with persis‑
tent local storage but the machines are separated from the data center for significant periods of time.
For example, a remote branch oice is linked to the corporate headquarters by satellite communi‑
cations. Another example is disaster recovery, where infrastructure is being restored and power or
communications are intermittent.
Typically, Profile Management is resilient to short network outages (less than 24 hours) so long as
the user does not log o while the network is unavailable. In these circumstances, you can optimize
Profile Management in several ways that significantly speed up the logon process. This is the static
case.
Where extended periods of disconnection are expected or users must be able to log o or shut down
their computers while disconnected from the corporate network, you cannot optimize Profile Manage‑
ment. When users reconnect, logons are slow while the entire profile is fetched from the user store.
This is the mobile case.
The mobile case
For extended periods of disconnection (and only intermittent periods of connection to the Active Di‑
rectory domain), enable the Oline profile support policy. This approach automatically disables the
eect of the following policies, controlling optimizations that are not supported. The policies might
not appear to be disabled in Group Policy but they have no eect:
• Profile streaming
• Always cache
© 1999–2024 Cloud Soware Group, Inc. All rights reserved. 40

Profile Management 2402 LTSR
Note: If
Oline profile support is enabled,
Active write back is honored but can only work when the computer is connected to the network.
The static case
Policy: Oline profile support
For short periods of disconnection, disable the Oline profile support policy. This allows the configu‑
ration of any of the following policies.
Policy: Streamed user profile groups
Set the Streamed user profile groups policy to Unconfigured. Enabling this policy is eective only if
Profile streaming is also enabled. Streameduser profile groups is used to limit the use of streamed pro‑
files to specific Active Directory user groups. It is useful in some scenarios when migrating from older
versions of Profile Management. For instructions on setting this policy, see Stream user profiles.
For information on high availability and disaster recovery as it applies to this policy, see Scenario 4 ‑
The traveling user.
Policy: Timeout for pending area lock files
Set the Timeout for pending area lock files policy to Unconfigured to apply the default operation,
which is a one‑day timeout for the pending area lock. This is the only supported value, so do notadjust
this policy.
Policy: Active write back
For information on this policy, see Persistent or provisioned and dedicated or shared
Which applications are in use
August 6, 2024
The applications in use in your deployment aect how you configure Profile Management. However,
in contrast to the other configuration decisions you make, there are no simple yes‑or‑no recommen‑
dations. Your decisions depend on where the applications store persistent customizations (in the
registry or in the file system).
© 1999–2024 Cloud Soware Group, Inc. All rights reserved. 41

Profile Management 2402 LTSR
Analyze and understand your users’applications thoroughly to establish where the applications store
their settings and users’customizations. Use a tool such as Process Monitor to monitor application
binaries. Google is another resource. For information on Process Monitor, see https://docs.microsoft
.com/en‑us/sysinternals/downloads/procmon.
Once you understand how the applications behave, use inclusions to define which files and settings
are processed. Use exclusions to define which aren’t. By default, everything in a profile is processed
except for files in AppData\Local. You might need to include the subfolders of AppData\Local explicitly
when your deployment includes any of the following applications:
• DropBox
• Google Chrome
• Applications created with the one‑click publish in Visual Studio
Simple applications
Simple applications are those applications that are well behaved. They store personalization settings
in the HKCUregistry hive and personalization files within the profile. Simple applicationsrequirebasic
synchronization, which in turn requires you to include and exclude items using:
• Relative paths (relative to %USERPROFILE%) in these policies:
– Directories to synchronize
– Files to synchronize
– Exclusion list ‑ directories
– Exclusion list ‑ files
– Folders to mirror
Note: %USERPROFILE% is implied by Profile Management. Do not add it explicitly to these
policies.
• Registry‑relative paths (relative to the HKCU root) in these policies:
– Exclusion list
– Inclusion list
For instructions on including and excluding items, see Include and exclude items.
Legacy applications
Legacy applications are badly behaved; they store their personalization files in custom folders outside
the profile. The recommended solution is not to use Profile Management with legacy applications but
instead to use the Personal vDisk feature of Citrix Virtual Desktops.
© 1999–2024 Cloud Soware Group, Inc. All rights reserved. 42

Profile Management 2402 LTSR
Complex applications
Complex applications require special treatment. The application’s files can cross‑reference each
other and must be treated as an inter‑related group. Profile Management supports two behaviors
associated with complex applications: cookie management and folder mirroring.
Cookie management in Internet Explorer is a special case of basic synchronization in which both of
the following policies are always specified:
• Process Internet cookie files on logo
• Folders to mirror
For more information on folder mirroring, cookie management, and instructions on setting these poli‑
cies, see Manage transactional folders.
Cross‑platform applications
Cross‑platform applications are the applications that might be hosted on multiple platforms. For spe‑
cific versions of Internet Explorer and Microso Oice, Profile Management supports sharing of per‑
sonalization settings across platforms. Those settings are stored either in the registry or as files in the
profile.
Recommended policy settings for cross‑platform applications are documented at Cross‑platform set‑
tings ‑ Case study.
If you want to share other applications’settings across platforms, we recommend you use Profile Mi‑
grator from Sepago.
Java and Web Applications
Java applications can leave many small files in a profile, which can dramatically increase profile load
times. Thus, consider excluding AppData\Roaming\Sun\Java.
Summary of policies
The following table summarizes the policies you use to configure Profile Management for dierent
types of applications. The following terms are used in the table:
• Relative. A relative path on a local volume, relative to %USERPROFILE% (which must not be
specified). Examples: AppData\Local\Microso\Oice\Access.qat, AppData\Roaming\Adobe\.
• Absolute. An absolute pathon a local volume. Examples: C:\BadApp\*.txt, C:\BadApp\Database\info.db.
© 1999–2024 Cloud Soware Group, Inc. All rights reserved. 43

Profile Management 2402 LTSR
• Registry Relative. Refers to a path within the HKCU hive. Examples: Soware\Policies, So‑
ware\Adobe.
• Flag. Uses flags to enable or disable processing where no path information is required. Exam‑
ples: Enabled, Disabled.
Policy
Policy Type
(Registry,
Folder, or File)
Wildcard
Support?
Application
Type ‑ Simple
Application
Type ‑ Legacy
Application
Type ‑
Complex
Directories to
synchronize
Folder Yes Relative Absolute
Files to
synchronize
File Yes Relative Absolute
Exclusion list ‑
directories
Folder Yes Relative Absolute
Exclusion list ‑
files
File Yes Relative Absolute
Inclusion list Registry Registry
relative
Exclusion list Registry Registry
relative
Folders to
Mirror
Folder Absolute Relative
Process
Internet
cookie files on
logo
Flag
Wildcard processing in file and folder names
Policies that refer to files and folders (rather than registry entries) support wildcards. For more infor‑
mation, see Use wildcards.
Inclusion and exclusion rules
Profile Management uses rules to include and exclude files, folders, and registry keys from user pro‑
files in the user store. These rules result in sensible and intuitive behavior. All items are included by
default. From that starting point, you can configure top‑level exceptions as exclusions, then configure
deeper exceptions to the top‑level exceptions as inclusions, and so on. For more information on the
rules, including instructions on including and excluding items, see Include and exclude items.
© 1999–2024 Cloud Soware Group, Inc. All rights reserved. 44

Profile Management 2402 LTSR
Non‑English folder names in profiles
For non‑English systems that use Version 1 profiles, specify relative paths in the inclusion and exclu‑
sion lists in the local language. For example, on a German system, use Dokumenten not Documents.
If you support multiple locales, add each included or excluded item in each language.
Next steps
1. Answer all question listed in Decide on a configuration.
2. Based on your answers, configure Profile Management for your deployment. You can leave all
other policies as default.
3. Test and review the settings, and then enable Profile Management, as described in Test Profile
Management with a local GPO.
Plan for multiple platforms
August 6, 2024
Why are user profiles on multiple platforms such a challenge?
It is common for users to access multiple computing devices. The challenge with any type of roaming
profile results from the dierences between systems on these devices. For example, if I create a short‑
cut on my desktop to a local file that does not exist when I move to a dierent device, I have a broken
shortcut on my desktop.
A similar issue exists when roaming between a single‑session operating system (OS) and a multi‑
session OS. Some settings might not be applicable on the server (such as power settings or video
settings). Furthermore, if applications are not installed similarly on each device, when I roam other
issues might emerge.
Some personalization settings (such as My Documents, Favorites, and other files that function inde‑
pendently of OS or application version) are much easier to manage than others. But even these set‑
tings might be diicult to roam when a document type is only supported on one system. For example,
a user has Microso Project installed on one system, but on another device that file type is not rec‑
ognized. This situation is exacerbated if the same application is present on two systems but on one
system, dierent add‑ons are installed and expected by a document.
© 1999–2024 Cloud Soware Group, Inc. All rights reserved. 45

Profile Management 2402 LTSR
How does changing the way an application is installed cause issues?
Even though the platforms are installed identically, if an application is configured dierently on each,
errors might occur when the application starts. For example, a macro or add‑on might activate in
Excel on one platform but not another.
The Start menu
The Start menu contains links (LNK and LNK2 files). The user‑specific part of the menu is stored in the
profile and users can modify that part of the menu. Adding customlinks (to executablesor documents)
is common. In addition, links that are language‑specific result in multiple Start menu entries for the
same application. Furthermore, links pointing to documents might be invalid on other computers.
The reason is that the path to the document is relative to another system, or it is a network path that
is inaccessible.
By default, Profile Management does notsave the content of the Start menu folder because links point‑
ing to executables are oen computer‑dependent. However, in situations where the systems are sim‑
ilar, including the Start menu in your Profile Management configuration improves the consistency
when users roam from desktop to desktop. Alternatively, you can process the Start menu with folder
redirection.
Note: Unpredictable side eects can oen result from what appears to be the most innocuous of
changes. For example, see the article at https://helgeklein.com/blog/2009/09/citrix‑user‑profile‑
manager‑upm‑and‑the‑broken‑rootdrive/ on the Sepago blog.
Always test and verify the behavior of the Start menu across platforms.
The Quick Launch toolbar
The Quick Launch toolbar contains links and is configurable by users. By default, the Quick Launch
toolbar is saved by Profile Management. In some environments, saving the Quick Launch toolbar
might not be desirable because the links might be computer‑dependent.
To exclude the toolbar from profiles, add the following entry to the folder exclusion list: App‑
Data\Roaming\Microso\Internet Explorer\Quick Launch.
What types of profiles to create?
Important: Because of the dierence in their structure, we recommend creating separate Version 1
and Version 2 profiles for each user in any environment that contains multiple platforms. Dierences
between the Windows Vista and Windows 7 profile namespace make it diicult to share profiles across
© 1999–2024 Cloud Soware Group, Inc. All rights reserved. 46

Profile Management 2402 LTSR
these platforms. And failures can also occur between Windows XP and Windows Server 2003. For more
information on Version 1 and Version 2 profiles, see
About profiles.
The definition of multiple platforms here includes not just multiple operating systems (including ones
of dierent bitness) but also multiple application versions running on the same operating system. The
following examples illustrate the reasons for this recommendation:
• 32‑bit systems might contain registry keys that instruct the operating system to start applica‑
tions in locations specific to 32‑bit operating systems. If the keys are used by a Citrix user profile
on a 64‑bit system, the location might not exist on that system and the application fails to start.
• Microso Oice 2003, Oice 2007, and Oice 2010 store some Word settings in dierent registry
keys. Even if these applications run on the same operating system, you must create separate
profiles for the three dierent versions of the Word application.
We recommend using Microso folder redirection with Citrix user profiles to help ensure profile inter‑
operability. Within an environment where Windows Vista or Windows 7 must co‑exist with Windows
XP, it is even more important.
Tip: Depending on your organization’s data management policy, it is good practice to delete profiles
from the user store and the cross‑platform settings store for user accounts that have been removed
from Active Directory.
Share Citrix user profiles on multiple file servers
August 6, 2024
The simplest implementation of Profile Management is one in which the user store is on one file server
that covers all users in one geographical location. This topic describes a more distributed environ‑
ment involving multiple file servers. For information on highly distributed environments, see High
availability and disaster recovery with Profile Management.
Note: Disable server‑side file quotas for the user store because filling the quota causes data loss and
requires the profile to be reset. It is better to limit the amount of personal data held in profiles (for
example, Documents, Music and Pictures) by using folder redirection to a separate volume that does
have server‑side file quotas enabled.
The user store can be located across multiple file servers, which has benefits in large deployments
where many profiles must be shared across the network. Profile Management defines the user store
with a single setting, Path to user store, so you define multiple file servers by adding attributes to
this setting. You can use any LDAP attributes that are defined in the user schema in Active Directory.
© 1999–2024 Cloud Soware Group, Inc. All rights reserved. 47

Profile Management 2402 LTSR
For more information, see https://docs.microsoft.com/en‑us/windows/win32/adschema/attributes‑
all?redirectedfrom=MSDN.
Suppose that your users are in schools located in dierent cities and the #l# attribute (lower case L,
for location) is configured to represent this. You have locations in London, Paris, and Madrid. You
configure the path to the user store as:
\\#l#.userstore.myschools.net\profile\#sAMAccountName#\%ProfileVer%\
For Paris, this is expanded to:
\\Paris.userstore.myschools.net\profile\JohnSmith\v1\
You then divide up your cities across the availableservers, for example, setting up Paris.userstore.myschools.net
in your DNS to point to Server1.
Before using any attribute in this way, check all of its values. They must only contain characters that
can be used as part of a server name. For example, values for #l# might contain spaces or be too
long.
If you can’t use the #l# attribute, examine your AD user schema for other attributes such as #company#
or #department# that achieve a similar partitioning.
You can also create custom attributes. Use Active Directory Explorer, which is a Sysinternals tool,
to find which attributes have been defined for any particular domain. Active Directory Explorer is
available at https://docs.microsoft.com/en‑us/sysinternals/downloads/adexplorer.
Note: Do not use user environment variables such as %homeshare% to distinguish profiles or servers.
Profile Management recognizes system environment variables but not user environment variables.
You can, however, use the related Active Directory property, #homeDirectory#. So, if you want
to store profiles on the same share as the users’HOME directories, set the path to the user store as
#homeDirectory#\profiles.
The use of variables in the path to the user store is described in the following topics:
• Specify the path to the user store
• Administer profiles within and across OUs
• High availability and disaster recovery with Profile Management
Administer profiles within and across OUs
August 6, 2024
© 1999–2024 Cloud Soware Group, Inc. All rights reserved. 48

Profile Management 2402 LTSR
Within OUs
You can control how Profile Management administers profiles within an Organizational Unit (OU). In
Windows Server 2008 environments, use Windows Management Instrumentation (WMI) filtering to
restrict the .adm or .admx file to a subset of computers in the OU. WMI filtering is a capability of the
Group Policy Management Console with Service Pack 1 (GPMC with SP1).
For more information on WMI filtering, see https://docs.microsoft.com/en‑us/previous‑versions
/windows/it‑pro/windows‑server‑2003/cc779036(v=ws.10) and https://docs.microsoft.com/en‑
us/previous‑versions/windows/it‑pro/windows‑server‑2003/cc758471(v=ws.10).
For more information on GPMC with SP1, see https://www.microsoft.com/en‑us/download/details.
aspx?id=21895.
The following methods let you manage computers with dierent OSs using a single Group Policy Ob‑
ject (GPO) in a single OU. Each method is a dierent approach to defining the path to the user store:
• Hard‑coded strings
• Profile Management variables
• System environment variables
Hard‑coded strings specify a location that contains computers of just one type. This allows profiles
from those computers to be identified by Profile Management uniquely. For example, if you have
an OU containing only Windows 7 computers, you might specify \server\profiles$\\%
USERNAME%.%USERDOMAIN%\Windows7 in Path to user store. In this example, the Windows7
folder is hard‑coded. Hard‑coded strings do not require any setup on the computers that run the
Profile Management Service.
Profile Management variables are the preferred method because they can be combined flexibly
to identify computers uniquely and do not require any setup. For example, if you have an OU
containing Windows 7 and Windows 8 profiles running on operating systems of dierent bitness,
you might specify \server\profiles$\\%USERNAME%.%USERDOMAIN%!CTX_OSNAME!!
CTX_OSBITNESS! in Path to user store. In this example, the two Profile Management variables
might resolve to the folders Win7x86 (containing the profiles running on the Windows 7 32‑bit
operating system) and Win8x64 (containing the profiles running on the Windows 8 64‑bit operating
system). For more information on Profile Management variables, see Profile Management policies.
System environment variables require some configuration. They must be set up on each computer
that runs the Profile Management Service. Where Profile Management variables are not suitable, con‑
sider incorporating system environment variables into the path to the user store as follows.
On each computer, set up a system environment variable called %ProfVer%. (User environment vari‑
ables are not supported.) Then, set the path to the user store as:
pre codeblock \\upmserver\upmshare\\%username%.%userdomain%\\%ProfVer
%
© 1999–2024 Cloud Soware Group, Inc. All rights reserved. 49

Profile Management 2402 LTSR
For example, set the value for %ProfVer% to Win7 for your Windows 7 32‑bit computers and Win7x64
for your Windows 7 64‑bit computers. For Windows Server 2008 32‑bit and 64‑bit computers, use 2k8
and 2k8x64 respectively. Setting these values manually on many computers is time‑consuming, but
if you use Provisioning Services, you only have to add the variable to your base image.
Tip: In Windows Server 2008 R2 and Windows Server 2012, you can speed up the creation and appli‑
cation of environment variables using Group Policy. In Group Policy Management Editor, click
Computer Configuration >
Preferences >
Windows Settings >
Environment, and then
Action >
New >
Environment Variable.
Across OUs
You can control how Profile Management administers profiles across OUs. Depending on your OU
hierarchy and GPO inheritance, you can separate into one GPO a common set of Profile Management
policies that apply to multiple OUs. For example, Path to user store and Enable Profile Management
must be applied to all OUs. So you might store them separately in a dedicated GPO, enabling only
these policies there (and leaving them unconfigured in all other GPOs).
You can also use a dedicated GPO to override inherited policies. For information on GPO inheritance,
see the Microso website.
Domain and forest support in Profile Management
August 6, 2024
Profile Management supports the domain and forest functional levels of Windows Server 2008 and
Windows Server 2012. Older operating systems are unsupported.
The use of system environment variables can help to disambiguate user names in multiple domains.
For more information, see Administer profiles within and across OUs.
High availability and disaster recovery with Profile Management
August 6, 2024
© 1999–2024 Cloud Soware Group, Inc. All rights reserved. 50

Profile Management 2402 LTSR
As a prerequisite, familiarize yourself with the structure of the user store and how to create it. For
more information, see Profile Management architecture and Create the user store.
These topics describe the supported scenarios for high availability and disaster recovery as they apply
to Citrix Profile Management. It relates the scenarios to the relevant, underlying Microso technolo‑
gies and identifies what is supported:
• Scenario 1: Basic setup of geographically adjacent user stores and failover clusters
• Scenario 2: Multiple folder targets and replication
• Scenario 3: Disaster recovery
• Scenario 4: The traveling user
• Scenario 5: Load‑balancing user stores
Profile Management assumes that it operates in an environment that is reliable. Principally, this re‑
liability applies to the availability of Active Directory (AD) and a networked user store (NUS). When
either is not available, Profile Management cannot provide a profile, and hands over responsibility to
Windows, which generally provides a default profile.
Comparison with roaming profiles
In disasterrecovery and high availabilityscenarios, Citrix Profile Management might be aected by the
same issues as aect Microso roaming profiles. Unless stated to the contrary, Profile Management
does not resolve such issues.
In particular, note the following:
• Profile Management support is limited to the scenarios where roaming profiles are also sup‑
ported.
• The cache option for oline files must be disabled on roaming user profile shares. The same
restriction applies to Profile Management shares.
• A roaming profile is not loaded from a DFS share. The same restriction applies to Profile Manage‑
ment shares. For more information, see https://support.microsoft.com/en‑us/help/2533009.
Scenario 1 ‑ Basic setup of geographically adjacent user stores and
failover clusters
August 6, 2024
“I want my users to always use a geographically adjacent, preferred networked user store (NUS) for
their profiles.”Options 1 and 2 apply in this case.
© 1999–2024 Cloud Soware Group, Inc. All rights reserved. 51

Profile Management 2402 LTSR
“I want my NUS to be on a failover cluster, to give me high availability.”Option 2 applies in this case.
The following graphic illustrates this scenario. Users in North America (NA) want to use the NUS in
New York rather than the NUS in Brisbane. The aim is to reduce latency and to minimize the traic
sent over the intercontinental link to Australia or New Zealand (ANZ).
Option 1
–
DFS Namespaces
Background reading
• For an overview of the Microso DFS Namespaces technology, see DFS Namespaces overview.
• For advice on load balancing user stores, see the Citrix blog at https://www.citrix.com/blogs/2
009/07/21/profile‑management‑load‑balancing‑user‑stores/.
Implementing this option
DFS Namespaces can resolve some of the issues presented in the blog article.
Let us set up a namespace for the NUS called \\MyCorp\Profiles. It is the namespace root. We set up
namespace servers in New York and Brisbane (and any of the other sites). Each namespace server has
© 1999–2024 Cloud Soware Group, Inc. All rights reserved. 52

Profile Management 2402 LTSR
folders corresponding to each Active Directory location, which in turn have targets on a server in New
York or Brisbane.
We might have the following locations configured in Active Directory (part of the user records).
AD Location Attribute (#l#) Geographic Location
Wagga Wagga ANZ
Darwin ANZ
Brisbane ANZ
Auckland ANZ
Seattle NA
San Diego NA
West Palm Beach NA
Poughkeepsie, New York NA
The following graphic shows one way of setting this up using DFS Namespaces.
© 1999–2024 Cloud Soware Group, Inc. All rights reserved. 53

Profile Management 2402 LTSR
Once it is set up, we configure the Path to user store setting as:
\\MyCorp\Profiles\#l#
The profiles of users belonging to the eight sites are distributed to just two servers, meeting the geo‑
graphical constraints required of the scenario.
© 1999–2024 Cloud Soware Group, Inc. All rights reserved. 54

Profile Management 2402 LTSR
Alternatives
You can order namespace targets and use the ordering rules as follows. When DFS Namespaces re‑
solves which target to use, it is possible to specify that only targets in the local site are chosen. It
works so long as you are sure that, for any given user, every desktop and server are guaranteed to
belong to the same site.
This technique fails if, say, a user normally based at Poughkeepsie visits Wagga Wagga. Their laptop
profile might come from Brisbane, but the profile used by their published applications might come
from New York.
The recommended technique, using AD attributes, ensures that the same DFS Namespace choices are
made for every session that the user initiates. The reason is that the #l# derives from the user’s AD
configuration rather than from machine configurations.
Option 2 ‑ DFS Namespaces with failover clustering
Background reading
• For a step‑by‑step guide to configuring a two‑node file server failover cluster, see Deploying a
two‑node clustered file server.
• For information about choosing a namespace type, see https://docs.microsoft.com/en‑us/win
dows‑server/storage/dfs‑namespaces/choose‑a‑namespace‑type.
Implementing this option
Adding failover clustering allows you to provide basic high availability.
The key point in this option is to turn the file servers into failover clusters, so that folder targets are
hosted on a failover cluster rather than a single server.
If you require the namespace server itself to have high availability, you must choose a standalone
namespace. Domain‑based namespaces do not support the use of failover clusters as namespace
servers. Folder targets might be hosted on failover clusters, regardless of the type of namespace
server.
Important: The state of file locks might not be preserved if a server in a failover cluster fails. Profile
Management takes out file locks on the NUS at certain points during profile processing. It is possible
that a failover at a critical point might result in profile corruption.
© 1999–2024 Cloud Soware Group, Inc. All rights reserved. 55
Profile Management 2402 LTSR
Scenario 2 ‑ Multiple folder targets and replication
August 6, 2024
“If my local NUS is not available, I want my users to be able to get their profile data from a backup
location somewhere else on the corporate network. If they make changes, those changes need to get
back to their preferred NUS when it is available again.”
The basic requirement in this scenario is to provide alternative locations for profiles on the network.
The use case includes the partial failure of the network infrastructure or the complete unavailability
of a folder target such as a failover cluster.
Options you need consider are the use of multiple folder targets and the use of DFS replication.
Option 1 ‑ Referrals to multiple folder targets
Background reading
For information about tuning DFS namespaces, see https://docs.microsoft.com/en‑us/windows‑
server/storage/dfs‑namespaces/tuning‑dfs‑namespaces.
About this option
A referral is an ordered list of targets that are tried in turn by a user device. It is designed for scenarios
where the targets are read‑only, such as soware libraries. There is no linkage between targets, so
using this technique with profiles might create multiple profiles that cannot be synchronized.
However, it is possible to define both an ordering method and a target priority for targets in referrals.
Choosing a suitable ordering method appears to result in a consistent choice of target by all user ses‑
sions. But in practice, even when all of a user’s devices are within the same site, intra‑site routing
problems can still result in dierent targets being chosen by dierent sessions. This problem can be
compounded when devices cache referrals.
Important: This option is not suitable for Profile Management deployments and is not supported.
However, file replication has been used in some specialized deployments in which only a single ses‑
sion can be guaranteed and
Active write back is disabled. For information on these special cases, contact Citrix Consulting.
© 1999–2024 Cloud Soware Group, Inc. All rights reserved. 56

Profile Management 2402 LTSR
Option 2 ‑ Distributed file system replication
Background reading
• For an overview of Distributed File System Replication (DFSR), see https://docs.microsoft.com
/en‑us/windows‑server/storage/dfs‑replication/dfsr‑overview.
• For a statement of support about replicated user profile data, see https://techcommunity.micr
osoft.com/t5/ask‑the‑directory‑services‑team/microsoft‑8217‑s‑support‑statement‑around‑
replicated‑user/ba‑p/398230.
• To understand why DFSR does not support distributed file locking, see https://blogs.technet.
com/b/askds/archive/2009/02/20/understanding‑the‑lack‑of‑distributed‑file‑locking‑in‑
dfsr.aspx.
Implementing this option
DFS Replication provides folder synchronization across limited bandwidth network connections. This
option appears to solve the problems in Option 1 because it synchronizes multiple folder targets that
a single namespace folder definition refers to. Indeed, when folders are added as targets to a folder
definition, they can be specified as belonging to a replication group.
There are two forms of replication to consider:
• One‑way replication (also known as active‑passive replication) is designed for backing up criti‑
cal data to a safe repository. This replication makes it suitable for maintaining a disaster recov‑
ery site, for example. It can be made to work with Profile Management so long as the passive
targets are disabled for referrals, and are only invoked when the disaster recovery plan is acti‑
vated.
• Two‑way replication (also known as active‑active replication) is intended to provide local read‑
write access to global shared data. Instantaneous replication is not necessarily a requirement
here. The shared data might be modified infrequently.
Important: Active‑active DFSR is not supported.
A schedule defines the frequency with which data is replicated. A frequent schedule is more intensive
on both CPU and bandwidth, but does not guarantee instantaneous updates.
At various points in its operation, Profile Management requires certain files to be locked in the NUS to
coordinate updates to the (shared) user store. Typically these updatestake place when a session starts
and ends, and in the middle of a session if active write‑back is enabled. Since distributed file locking
is not supported by DFS Replication, Profile Management can only select one target as an NUS. This
set eectively eliminates any value of two‑way replication (active‑active replication), which is there‑
fore not suitable for Profile Management and is not supported. One‑way replication (active‑passive
© 1999–2024 Cloud Soware Group, Inc. All rights reserved. 57

Profile Management 2402 LTSR
replication) is suitable for Profile Management only as part of a disaster recovery system. Other uses
are not supported.
Scenario 3 ‑ Disaster recovery
August 6, 2024
“How do I set up a full disaster recovery site to handle Citrix user profiles?”
Profile Management supports key features required for disaster recovery (DR) :
• DFS namespaces. Domain‑based namespace servers are preferred in this scenario because
they allow the DR site to have its own namespace server. (A standalone namespace server can‑
not be replicated, but it can be hosted on a failover cluster.)
• Multiple folder targets and DFS Replication. For each NUS, you provide at least two targets,
but only enable one in normal operation. You set up one‑way DFS Replication to ensure that
the disabled targets (at the DR sites) are kept up‑to‑date.
• Failover clusters for hosting individual folder targets. Optional. It might be wasteful of re‑
sources on the DR site.
In this diagram, a domain‑based namespace manages the NUS. (The diagram in Scenario 1 deliber‑
ately did not include namespaces.) You can include a namespace server in each site, including the DR
site. The servers all support the same view of the namespace.
© 1999–2024 Cloud Soware Group, Inc. All rights reserved. 58
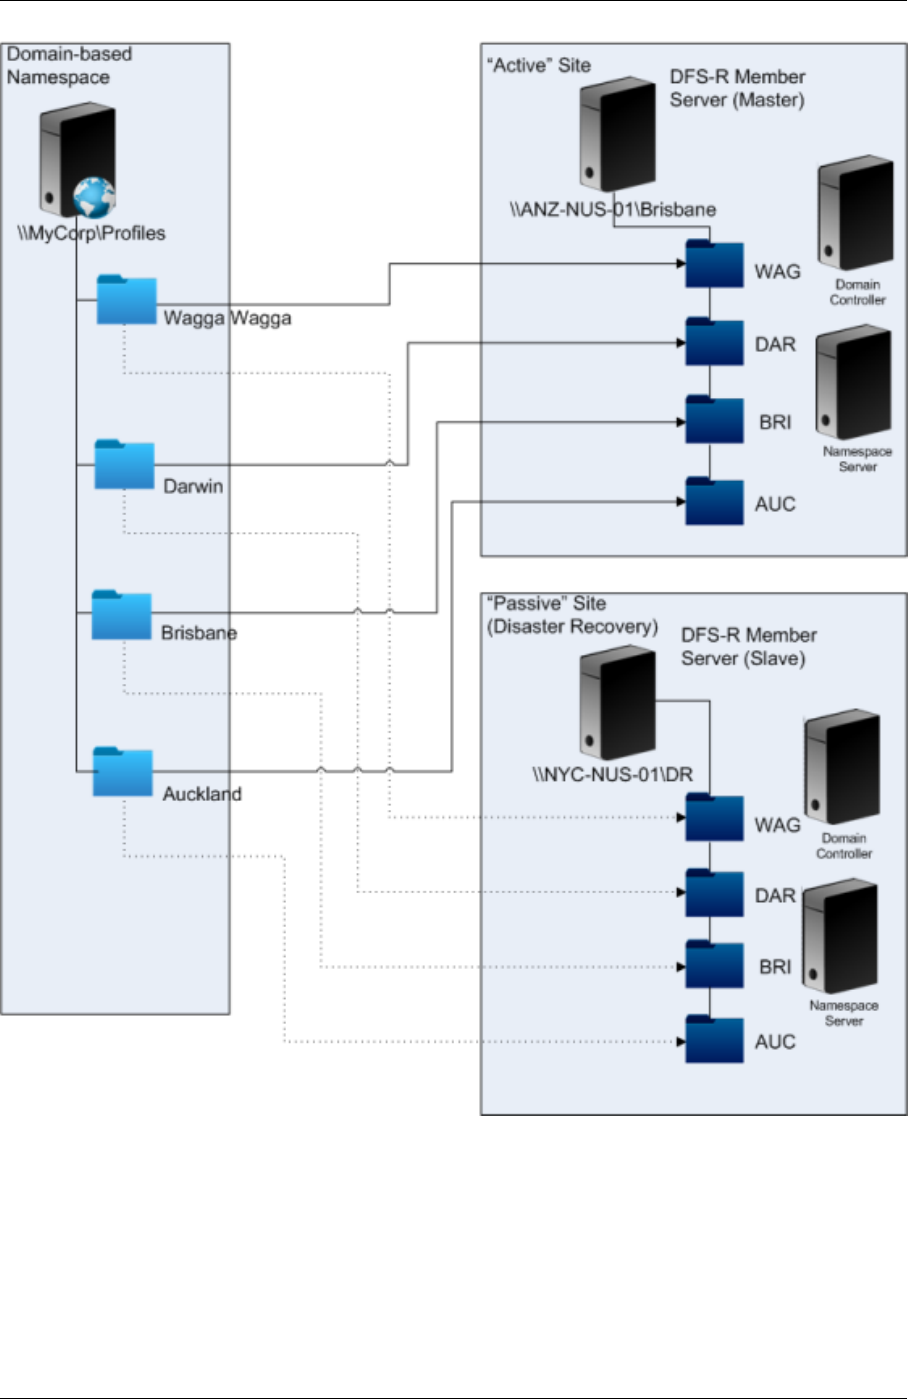
Profile Management 2402 LTSR
If the DR plan is activated, the DR site’s NUS is up‑to‑date with the changes replicated from the master
NUS. However, the namespace server still reflects the wrong view of the namespace, so its configura‑
tion must be updated. For each folder, the folder target on the master site must be disabled and the
folder target on the DR site enabled.
Aer AD updates have propagated, the namespace server correctly locates the DR folder targets and
© 1999–2024 Cloud Soware Group, Inc. All rights reserved. 59

Profile Management 2402 LTSR
the DR site is ready to use by Profile Management.
Note: The
Path to user store setting refers to namespace folders, not real servers, so there is no need to update
the Profile Management configuration.
In practice, one‑way or two‑way replication is possible because the DR site is not normally used for pro‑
files. Once the disaster is over, a connection from the DR site to the master site ensures that changes
made to the NUS during the disaster are replicated on the master site.
Scenario 4 ‑ The traveling user
August 6, 2024
“When my sta roam between dierent oices, I want their preferred NUS to change, so that they’re
still using a geographically adjacent NUS.”
The diiculty with this scenario is that a user’s logon session might be aggregated from multiple lo‑
cations. They typically roam their desktop session from one site to another. But many of their appli‑
cations are hosted on back‑end servers that have no awareness of the current location of the user’s
desktop.
Furthermore, the user might reconnect to disconnected sessions, probably hosted at their home loca‑
tion. If the sessions were for some reason forced to switch to an NUS in the user’s new location, their
performance degrades.
For travelers who hot‑desk, using the Profile streaming and Always cache settings is the best option.
With a fixed machine, they still log on quickly, using Citrix streamed user profiles. Enabling Always
cache loads the remainder of the profile in the background.
Scenario 5 ‑ Load‑balancing user stores
August 6, 2024
“I want to load‑balance my users across several geographically adjacent networked user stores
(NUSs).”
Background reading
• For an overview of the Microso DFS Namespaces technology, see DFS Namespaces overview.
© 1999–2024 Cloud Soware Group, Inc. All rights reserved. 60

Profile Management 2402 LTSR
• For advice on load balancing user stores, see the Citrix blog at https://blogs.citrix.com/2009/07
/21/profile‑management‑load‑balancing‑user‑stores/.
Unlike Scenario 1, this scenario has a single site that is large enough to require multiple NUSs. Using
DFS namespaces, we can improve on the solution in Scenario 1.
Scenario 1 (Option 1) used DFS Namespaces to map multiple sites to dierent folders on the same
server. You can use a similar technique to map subfolders of a namespace to folders on dierent
servers.
Ideally, you need an AD attribute that partitions user accounts into similarly sized chunks, such as
#department#. As in Scenario 1, #department# must always be defined and must be guaranteed to
contain a correct folder name.
As in Scenario 1, we set up a namespace for the NUS called \\MyCorp\Profiles.
This diagram shows how to set up the namespace.
© 1999–2024 Cloud Soware Group, Inc. All rights reserved. 61

Profile Management 2402 LTSR
Once you complete the setup, you configure the Path to user store setting as:
\\MyCorp\Profiles\#l#\#department#
With this configuration, the users in Wagga Wagga are distributed across two NUS servers, both lo‑
cal.
Plan folder redirection with Profile Management
August 6, 2024
Profile Management supports folder redirection and its use is encouraged.
© 1999–2024 Cloud Soware Group, Inc. All rights reserved. 62

Profile Management 2402 LTSR
Active Directory (AD) allows folders, such as Application Data or Documents, to be saved (redirected)
to a network location. The contents of the folders are stored in the redirected location and not in‑
cluded within the user profile, which therefore reduces in size. Depending on the version of AD, some
folders can be redirected but not others. In addition, configuring folder redirection allows users with
mandatory profiles to save some settings, files, and other data while still restricting profile usage.
As a general guideline, we recommend enabling folder redirection for all user data that is not accessed
regularly within a session if network bandwidth permits.
Not all folders which can be redirected are accessible with AD. The folders that can be redirected
on a specific operating system are in the registry under HKEY_CURRENT_USER\SOFTWARE\
Microsoft\Windows\CurrentVersion\Explorer\User Shell Folders.
Important information about folder redirection
Note the following important points about using folder redirection with Profile Management:
• In XenDesktop 7, you specify the folders to redirect in Studio using Citrix Virtual Desktops poli‑
cies. For more information, see the Citrix Virtual Desktops documentation.
• To configure folder direction successfully, be aware of the dierences in folder structure be‑
tween Version 1 and Version 2 profiles.
• For more security considerations when using folder redirection, see Secure and the article
Folder Redirection Overview on the Microso TechNet website.
• Treat the user store dierently to the share used for redirected folders.
• Do not add redirected folders to exclusion lists.
Watch this video to learn more:
© 1999–2024 Cloud Soware Group, Inc. All rights reserved. 63

Profile Management 2402 LTSR
Third‑party directory, authentication, and file services
August 6, 2024
This article describes support for directory, authentication, and file services other than those provided
by Microso.
Directory services
Important: Active Directory (AD) is critical to the operation of Profile Management. Other directory
services are not supported. These services include:
• Novell eDirectory.
• Windows 2000 server or earlier operating systems (OSs). Windows 2000 server supports AD but
not at the required level; for more information, see Domain and forest support in Profile Man‑
agement. Microso Windows NT 4.0 pre‑dates AD.
• Samba 4 or earlier.
© 1999–2024 Cloud Soware Group, Inc. All rights reserved. 64

Profile Management 2402 LTSR
Authentication services
Other authentication services can co‑exist with AD within a domain but are not supported by Profile
Management. The reason is that, like the Profile Management Service, they can interact with winl‑
ogon.exe and cause problems with the user logon process. For example, the authentication service
from Novell allows users to access Novell resources, such as printers and file shares, but is not sup‑
ported.
File services
Third‑party file services can be used for the user store and folder redirection (if supported by the Win‑
dows operating system being used). File servers must be of the type Server Message Block (SMB) or
Common Internet File System (CIFS) and must support the NTFS file system. For these reasons, the
following are supported:
• Windows Server 2003 or later
• Samba 3
Important: Because it requires authentication against the Novell directory, the Novell file service is
not supported.
FAQs about profiles on multiple platforms and Profile Management
migration
August 6, 2024
This section contains questions and answers about using profiles in environments with multiple Win‑
dows operating systems, or multiple versions or bitnesses of a single operating system.
How can I be certain of avoiding compatibility issues with my profiles?
Balance the need to support heterogeneous environments with the need for personalization settings
to track users and their devices. Typically, the balance between these two needs can only be deter‑
mined by administrators and IT departments. You manage the dierent systems by adjusting the user
profiles as follows. When profiles roam, any issues must be handled properly or, if necessary, settings
must be ignored completely and not tracked at all. This is the basis of many third‑party soware so‑
lutions.
© 1999–2024 Cloud Soware Group, Inc. All rights reserved. 65

Profile Management 2402 LTSR
To minimize troubleshooting, try to roam profiles across the same devicesetup (installedapplications,
OS version, and so on). In many scenarios in the modern world however, that is not easily achieved,
which makes for an imperfect user experience. For example, a user does not need to replicate their
Favorites or My Documents just because they use multiple operating systems. Administrators can
enhance the user experience in this case by using Folder Redirection. The use of this Microso feature
is also encouraged in other scenarios.
Can I share profiles across dierent systems?
Citrix recommends having one base profile for each platform. This is not necessarily the same as one
profile per operating system. For more information on this recommendation, see Plan for multiple
platforms. This minimizes the number of settings that might not work together or that do not apply
to any given OS. For example, desktop power settings are not applicable in a server scenario or one
involving Remote Desktop Services (formerly Terminal Services).
As you try to simplify and reduce the number of profiles and they are used on more than one OS, there
is greater risk of conflicting settings. This is further compounded when the systems are not the same.
For example, Microso Oice add‑ins might not exist on every device. Fortunately, settings such as
this one that are not applicable on a given device are oen ignored. Support issues arise when they
are not ignored. Microso Excel fails to start if an add‑in is not present.
How does Profile Management enable settings across multiple versions or platforms?
Citrix provides the ability to roam common settings across multiple base profiles. Citrix enables roam‑
ing of settings such as Microso Oice, Internet Explorer, and wallpaper. The ability to support these
types of scenarios is limited by the degree to which applications support the roaming of settings be‑
tween platforms. The links in the next question cover Microso’s position and best practices.
How does Microso support roaming profiles across platforms and versions?
For relevant information, see Deploying Roaming User Profiles.
For Oice 2007 toolbar settings, see Customize the Quick Access Toolbar.
Where the standard Microso Windows profile solutions do not fully address technical, custom, or
business requirements, Profile Management represents a viable solution.
Is sharing a profile between x86 and x64 platforms possible?
Sharing one profile between Windows x86 and x64 might generally work, but some issues are possi‑
ble.
© 1999–2024 Cloud Soware Group, Inc. All rights reserved. 66

Profile Management 2402 LTSR
There are several reasons. For example, one reason is that per‑use file associations are stored in
HKEY_CURRENT_USER\SOFTWARE\Classes. If a non‑administrator sets Firefox as their default
browser, the following is stored on a 32‑bit system:
HKEY_CURRENT_USER\SOFTWARE\Classes\FirefoxHTML\shell\open\command ‑> “C:\Program
Files\Mozilla Firefox\firefox.exe”‑requestPending ‑osint ‑url “%1”
If a profile containing this path is used on Windows x64, the OS looks for a 64‑bit version of Firefox,
but this does not exist. Instead, a 32‑bit version is probably installed at C:\Program Files (x86)\Mozilla
Firefox. This results in the browser not starting.
The reverse is also true. A path is set on an x64 platform but is used on an x86 one.
I want to test how one profile behaves across multiple platforms. Where do I start?
Testing and validating are key to experimenting with the use of one profile on more than one platform.
The recommended approach is to have one profile per platform. If you want to explore how a single
profile behaves across multiple platforms, the following information might be helpful.
Start by identifying what might cause issues by answering the next question. Use the remaining ques‑
tions in this topic for ideas for tackling and tracking the issues.
Items that work across platforms:
• My Documents and Favorites
• Applications that store their configuration information (with defaults) completely within the
profile
Items that might not work:
• Applications that store hard‑coded data, path data, and so on
• Settings specific to x64 or x86 platforms
• Installations of applications that are not identical, such as Excel Add‑ins that are not present on
all systems. These installations might cause all types of error conditions that vary by application
Can I assign profiles based on the computer a user logs on to?
Yes. Profile Management can apply a profile based on the local desktop, Citrix virtual apps, or Citrix
virtual desktops, or any combination of these.
With the correct Profile Management setting enabled, a Remote Desktop Services (formerly Terminal
Services) profile is used only when a user has a Terminal Server or Citrix virtual app session. This
setting overrides any existing profile (except for a Citrix user profile) when the user logs on through a
Remote Desktop Services session.
© 1999–2024 Cloud Soware Group, Inc. All rights reserved. 67

Profile Management 2402 LTSR
On Windows 7, you can use a GPO computer setting to assign a profile based on the computer a user
logs on to. Again, because this is based on GP, the profile assignment depends on the OU to which the
GPO is applied.
Why are profile assignments based on computer desirable?
It is useful to assign a profile to the computer a user logs on to if a distinct user experience is desired.
For example, administrators might decide that profiles used with Remote Desktop Services (formerly
Terminal Server) sessions are kept separate from profiles used with desktops.
Does Profile Management migrate Windows user profiles to Citrix user profiles?
You can configure Profile Management to automatically migrate existing roaming and local profiles
when users log on. You can also use a template profile or the default Windows profile as the basis for
new Citrix user profiles.
For information about planning and setting up your Profile Management migration, see Migrate or
create profiles. For details of how the soware migrates Windows user profiles to Citrix user profiles,
see Logon diagram.
Which profiles can be migrated to Citrix user profiles?
Profile Management can migrate Windows local profiles and Windows roaming profiles. Mandatory
profiles (.man files) are ignored by Profile Management but they can be used as templates for Citrix
user profiles. To ensure Profile Management works correctly, deactivate the assignment of mandatory
profiles to all users.
To use your existing Windows mandatory profile as a template, see
Specify a template or mandatory
profile.
How do I use a template profile?
Profile Management allows you to specify a template profile that is used as the basis for the creation
of new Citrix user profiles. Typically, a user who is assigned a profile for the first time receives the
default user profile of the Windows device they log on to. This might be acceptable, but it means any
variation in dierent devices’default user profiles results in dierences in the base profile created for
the user. Therefore, you can regard the template profile feature as a global default user profile.
If you want to prevent users making any change to their profile data, you can also identify a template
profile as a Citrix mandatory profile.
For more information, see Specify a template or mandatory profile.
© 1999–2024 Cloud Soware Group, Inc. All rights reserved. 68

Profile Management 2402 LTSR
Install and set up
August 6, 2024
This article provides the general workflow for installing Profile Management using its installer. It also
provides best practices for setting up Profile Management.
The general workflow for installing Profile Management is as follows:
1. Download the installation package
2. Install Profile Management
Refer to the following best practices when setting up Profile Management:
• Test Profile Management with a local GPO
• Create the user store
Download the installation package
August 6, 2024
Before you start, make sure that you have a valid Citrix account.
Follow these steps to complete the download:
1. Access the Citrix Virtual Apps and Desktops download page.
2. Locate and expand the version that you want to download (for example, 2206), and then click
Sign in to access restricted downloads.
3. Sign in with your Citrix account credentials.
4. Select Citrix Virtual Apps and Desktops 7 <Version_Number> > Product Soware > Citrix
Virtual Apps and Desktops 7 <Version_Number>, All Editions.
5. Expand the Components that are on the product ISO but also packaged separately node,
and then click Download File in the Profile Management subnode.
6. In the Download Agreement dialog box that appears, accept the agreement to start the down‑
load.
Aer the download completes, the ProfileMgmt_<version_number>.zip file (for exam‑
ple, ProfileMgmt_2206.zip) appears in the Downloads folder.
© 1999–2024 Cloud Soware Group, Inc. All rights reserved. 69

Profile Management 2402 LTSR
Files included in the download
Unzip the downloaded package. See the following table for files included in the package.
File Names Description location
x86.msi
x64.msi
CitrixBase.adml and
CitrixBase.admx
Installer for 32‑bit systems
Installer for 64‑bit systems
ADMX template files for Profile
Management policy hierarchy
\Group Policy
Templates\CitrixBase
ctxprofile.adml and
ctxprofile.admx
ADMX template files for Profile
Management policy settings
\Group Policy
Templates\<language>
(Example: \Group Policy
Templates\en)
Install Profile Management
August 6, 2024
Profile Management is an optional component of the VDA installer. You can install it along with the
VDA or separately. This article provides guidance on how to install Profile Management using its own
installer.
For more information about installing Profile Management along with VDAs, see Install VDAs in the
Citrix Virtual Apps and Desktops document.
Overview
You must install Profile Management on each computer whose user profiles you want to manage.
Typically, you run its MSI installer on computers using a distribution tool, an imaging solution, or a
streaming technology. You can also install it directly on any computer. Unattended installations are
supported.
The general installation procedure is as follows:
1. Run the MSI installer.
2. To configure Profile Management using Group Policy, add ADMX template files to Group Policy.
© 1999–2024 Cloud Soware Group, Inc. All rights reserved. 70

Profile Management 2402 LTSR
Note:
We recommend installing the same version of Profile Management on all user computers. Also,
add the same version of ADMX template files to Group Policy. This approach prevents corruption
of profile data that might occur when dierent user store structures (from dierent versions) ex‑
ist.
Run the MSI installer
This procedure installs Profile Management on a single computer:
1. Log on to the computer as an administrator.
2. Run the MSI installer in the root folder of the installation package. The installation wizard ap‑
pears.
3. Follow the onscreen instructions to complete the installation.
4. Restart the computer.
In addition to DLLs and other files, the installer creates these files in the installation location (by de‑
fault, C:\Program Files\Citrix\User Profile Manager).
File Name Description
UPMPolicyDefaults_all.ini Profile Management .ini file
UserProfileManager.exe Windows service carrying out functions on
computers managed by Profile Management
Run the MSI installer from the command line
Running the MSI installer from the command line lets you complete the installation without user in‑
teraction.
The command line installation also provides the following installation options:
• Suppress the restart using the /norestart option.
Depending on the operating system, Profile Management might not function until the computer
has restarted. For example, you do not need to restart Windows 7 workstations.
• Specify INSTALLDIR if needed.
• Set INSTALLPOLICYINIFILES to no to prevent the installation of the Profile Management
.ini file.
© 1999–2024 Cloud Soware Group, Inc. All rights reserved. 71

Profile Management 2402 LTSR
If you have used the .ini file with a previous version and want to use the previous settings in this
version, aer installation, transfer each setting manually to the equivalent Profile Management
policy in the Group Policy Editor.
• Use the OVERWRITEINIFILES=yes option for upgrade. For more information, see Upgrade
Profile Management.
The following example installs Profile Management without displaying a user interface and a restart. If
UAC is enabled, run the msiexec command with elevated privileges. For example, from an elevated
command prompt.
pre codeblock msiexec /i <path to the MSI file> /quiet [/norestart
] [INSTALLDIR=<installation directory>] [OVERWRITEINIFILES=yes] [
INSTALLPOLICYINIFILES=no]
Uninstall Profile Management
This procedure uninstalls Profile Management from a single computer. Before you start, make sure
that you’re the computer administrator.
1. To avoid data loss, make sure that all users are logged o.
2. From the list of installed programs in Programs and Features, select Profile Management and
click Uninstall.
3. Click Yes.
4. Restart the computer.
You can also uninstall Profile Management in unattended mode.
Add ADMX template files to Group Policy
Depending on how you configure Profile Management using Group Policy, add ADMX template files to
domain controllers or computers:
• To centrally configure Profile Management for computers in an OU, add the ADMX template files
to all domain controllers.
• To configure Profile Management individually for each computer, add the ADMX template files
to the computer.
Copy the following files from the installation package and paste them to the locations on the domain
controllers or computers. See the following table for detailed instructions.
© 1999–2024 Cloud Soware Group, Inc. All rights reserved. 72

Profile Management 2402 LTSR
File Names From (installation package)
To (domain controller or
computer)
CitrixBase.adml \Group Policy
Templates\CitrixBase
C:\Windows\
PolicyDefinitions\<
language> (Example:
C:\Windows\
PolicyDefinitions\en-
US)
CitrixBase.admx \Group Policy
Templates\CitrixBase
C:\Windows\
PolicyDefinitions
ctxprofile.adml \Group Policy
Templates\<language>
(Example: \Group Policy
Templates\en)
C:\Windows\
PolicyDefinitions\<
language> (Example:
C:\Windows\
PolicyDefinitions\en-
US)
ctxprofile.admx \Group Policy
Templates\<language>
(Example: \Group Policy
Templates\en)
C:\Windows\
PolicyDefinitions
For more information about ADMX template files, see this Microso article.
Configure Profile Management policies with GPOs
Aer you add ADMX files to domain controllers, follow these steps to view and configure Profile Man‑
agement policies:
1. On a domain controller, open Active Directory Users and Computers. Identify OUs containing
the computers where Profile Management is installed.
2. Open Group Policy Management, right‑click an OU, select Create a GPO in this domain, and
link it here, and then create a GPO.
Note:
If you apply security filtering to the GPO, do so using either the Authenticated Users group
or a computer group. Don’t use a security group that contains only individual users.
© 1999–2024 Cloud Soware Group, Inc. All rights reserved. 73

Profile Management 2402 LTSR
3. From Group Policy Objects, right‑click the newly created GPO, and then select Edit. The Group
Policy Management Editor window appears.
4. Select Computer Configuration > Administrative Templates…> Citrix Components > Pro‑
file Management. You can see all Profile Management policies.
5. Configure Profile Management as needed.
Test Profile Management with a local GPO
August 6, 2024
We recommend you set up a test environment before deploying Profile Management in a production
environment. A fully supported and easier means of transferring settings to the domain Group Policy
Objects (GPOs) is based on a local installation on a machine.
The general workflow is as follows:
1. Install Profile Management on a machine.
2. Based on your answers to questions listed in Decide a configuration, configure Profile Manage‑
ment policies with a local GPO.
3. Enable Profile Management.
4. Test logon and logo behaviors.
5. Adjust the local GPO settings until you receive satisfactory results.
Overview
You can test Profile Management safely using a local GPO if the machine is a member of a produc‑
tion OU. Local GPO policies take eect when OU and domain ones are not available. When using a
local GPO, make sure no Profile Management GPOs are used elsewhere (for example, in the domain
or sites).
If you can’t configure group policies using domain GPOs, you can use local GPOs as a long‑term solu‑
tion. However, this way introduces complexities into the environment, such as:
• Each machine must have the Profile Management ADMX files installed.
• Domain users possibly can’t maintain settings when accessing multiple machines.
© 1999–2024 Cloud Soware Group, Inc. All rights reserved. 74

Profile Management 2402 LTSR
Important:
We do not recommend using local GPOs as a long‑term, enterprise solution.
Test the user experience
When implementing a profile solution, you must minimize the user experience dierences when users
access resources from various machines.
Users’registry and files might vary depending on the physical machine, profile configuration, and op‑
erating system. Thus, you must configure Profile Management to address the dierences between
system installations on machines where the users roam.
To do so, check user access to resources in ways that mimic your production environment. These
resources might include:
• A machine with locally installed applications
• A virtual desktop including streamed or locally installed applications
• A virtual app, either published on or streamed from a virtual apps server
• A Terminal Services client
Test operating system variations
Users might access applications from dierent operating systems. The variation between them might
create conflicting settings within a single user profile.
For more information, see Profile versions.
Create the user store
August 6, 2024
This article helps you create the user store in a way that best suits your organization. In addition to
reviewing the information here, be sure to configurethe path tothe user store as eiciently as possible.
For example, configure the path by the sensible use of variables. For advice and examples on that
subject, see Specify the path to the user store.
The user store is the central, network location for storing Citrix user profiles.
Any Server Message Block (SMB) or Common Internet File System (CIFS) file share can be used for the
user store. The best practice is to ensure that:
© 1999–2024 Cloud Soware Group, Inc. All rights reserved. 75

Profile Management 2402 LTSR
• The share is accessible to the accounts used with Citrix user profiles.
• The share is large enough to store profile data.
• The share is robust in case of disk or network failure.
This diagram illustrates an example user store in relation to storage for redirected folder items, the
cross‑platform settings store (on a separate file server), and Windows 11 virtual desktops (published
with Citrix Virtual Desktops) running Microso Oice. User devices that access the virtual desktops
are also shown for reference.
Recommendations on creating secure user stores are available in the article called Create a file share
for roaming user profiles on the Microso TechNet website. These minimum recommendations en‑
sure a high level of security for basic operation. Also, when configuring access to the user store, in‑
clude the Administrators group, which is required to modify or remove a Citrix user profile.
If your deployment includes multiple platforms, review the information on Version 1 and Version 2
profile types in Plan for multiple platforms. As for the structure of the user store, see Profile Manage‑
ment architecture.
© 1999–2024 Cloud Soware Group, Inc. All rights reserved. 76

Profile Management 2402 LTSR
Note: If an application modifies the access control list (ACL) of a file in the user’s profile, Profile Man‑
agement does not replicate those changes in the user store. This behavior is consistent with Windows
roaming profiles.
Watch this video to learn more:
Upgrade and migrate
August 6, 2024
This section contains procedures for upgrading Profile Management soware and information about
transitioning your existing Windows user profiles to Citrix user profiles. For example, you can easily
upgrade from Version 3.x to Version 5.x using the procedures.
Before upgrading, understand which Profile Management features and settings are available in the
release you are upgrading from and to. To review this information, see Profile Management policies.
To facilitate upgrades from .ini files to Group Policy, that topic also maps the settings in the .ini file to
the settings in the .adm and .admx files.
Do not configure Profile Management (either in Group Policy or with the .ini file) while upgrading. Sep‑
arate these two tasks by upgrading your deployment first and then configuring settings as required,
ideally by answering the questions in Decide on a configuration.
© 1999–2024 Cloud Soware Group, Inc. All rights reserved. 77

Profile Management 2402 LTSR
Tip: You can hotfix your deployment of Profile Management 2.1.1 or later by upgrading to the latest
version. Aer upgrading, you can enable any later feature as needed.
Mixed Deployments
For deployments in which dierent versions of Profile Management coexist, do the following:
• Minimize the time that a mixed deployment exists.
• Add the latest version’s .adm or .admx file to each Group Policy Object on all domain controllers.
Ensure all new features are disabled and allowing time for the new policies to propagate.
• Upgrade all computers to the latest version of Profile Management before enabling any policy.
Mixeddeployments that contain Versions 5.x and 3.2 are supported. However, treat such deployments
as a temporary state that exists during migration from the earlier version to the later one.
Important: Deployments that contain Version 5.x with Version 2.1.1 or any earlier version, including
Citrix Technical Preview or beta releases, are unsupported. However, if you cannotupgrade, and those
versions must coexist in your deployment, you might find the rest of this topic helpful.
Mixed Deployments Involving Profile Management 2.1.1 or Earlier
The rest of this topic contains information on the coexistence of Profile Management 2.1.1 or earlier,
and Profile Management 3.x, or 5.x. It tells you how to migrate from one version to the other. In this
topic, the terms Version 2 and Version 5 are used as shorthand for these versions.
Isolate each version in a separate OU and maintain separate user stores for the computers running
each version. Alternatively, if a single user store serves computers running both versions, ensure that
all Version 5 settings are disabled until all the computers have been upgraded to Version 5. Aer you
enable any Version 4 setting in a “mixed”user store, users can still log on to a computer that runs
Version 2. But they receive a temporary Windows user profile (not their network, Citrix user profile)
and the changes they make to that profile are not saved. You must consider mixed deployments to be
temporary, and minimize the time they exist before completing the upgrade.
Using separate OUs and user stores can be inconvenient. To avoid these constraints, you can use one
of the following two strategies. You configure each group in the appropriate version of Profile Manage‑
ment using the Processed groups setting. Strategy 2 is more work than Strategy 1. With the former,
you keep updating the Version 5 processed user groups. And you maintain two sets of applications
and desktops (but you can automate by exporting application definitions from Citrix virtual apps).
The advantage is that you can take your time over the migration.
Note: As an alternative to the following strategies, with Windows Server 2008 Active Directory you can
use WMI filtering to apply a GPO to a subset of computers in an OU, and determine which version of
© 1999–2024 Cloud Soware Group, Inc. All rights reserved. 78

Profile Management 2402 LTSR
Profile Management is installed. Thus, you can automatically adjust which policy is applied, to match
the version.
Strategy 1: One‑o Migration
This scenario assumes that some downtime is acceptable. All computers are migrated at the same
time.
The migration strategy is:
1. Replace the Version 2 ADM file with the Version 5 file. The latter is compatible with the earlier
version, so Version 2 computers continue to operate normally.
2. Ensure all Version 5 settings are disabled. Do not rely on the default Not enabled.
3. Start upgrading all the computers from Version 2 to Version 5. Fit this in with your normal main‑
tenance and update schedules. With one exception, Version 5 acts as Version 2 until you enable
any Version 5 setting. The exception is as follows. It is rare but more likely to occur if this up‑
grade step is staggered over a long time. If a user accesses their Citrix user profile from multiple
servers, multiple Version 4 sessions are created. For example, they first use a workstation to
access a virtual desktop on one server and then a laptop to access a published application on
another. Profile Management must use the pending area for the second, laptop session. At this
point, the entire OU is treated as a Version 5 deployment (albeit one without any configured
Version 5 features). And PmCompatibility.ini is updated to reflect this change.
4. Optionally, set your Version 5 processed users group to include only the members of a small
pilot group. Wait for the AD Group Policy changes to propagate throughout the network (for
example, over a weekend). You do not need to prevent access for any other users while this
change is happening. Back up the profiles of the pilot group. Then let the pilot group test Profile
Management.
5. When you are happy with the pilot group results, ensure that you have backed up the other
users’profiles.
6. Use the next scheduled maintenance period to add the remaining users to the Version 5
processed users group. Allow suicient time for the AD Group Policy changes to propagate,
and let the remaining users log on.
Strategy 2: Phased Migration
This scenario assumes that you cannot move all your machines or your users to the new version in
one go, so you select subsets of users that you migrate in batches. It suits deployments with several
data centers or geographically distributed users.
The migration strategy is:
© 1999–2024 Cloud Soware Group, Inc. All rights reserved. 79

Profile Management 2402 LTSR
1. Replace the Version 2 ADM file with the Version 5 file. The latter is compatible with the earlier
version, so Version 2 computers continue to operate normally.
2. Ensure all Version 5 settings are disabled. Do not rely on the default Not enabled.
3. Upgrade a few computers (the first batch) to Version 5. Alternatively, install Version 5 on new
computers. By default, your Version 5‑processed users group contains an empty group, so no
user is processed as a Version 5 user. Be aware of the exception described in Strategy 1, which
might also apply when you upgrade computers in a phased migration.
4. Publish new applications (using Citrix Virtual Apps) or virtual desktops (using Citrix Virtual Apps
or Citrix Virtual Desktops) from your Version 5 computers. These applications and desktops
are identical to the ones previously published from your Version 2 computers, except for their
names. These names identify them as for use by Version 5 users.
5. The selected users in this batch log on to the applications or desktops (for example, using Web
Interface). They choose the new applications. (Use Web Interface to enforce this step, based on
user name or group membership). As a result, their sessions run on the Version 4 computers
but they are processed with Version 2 settings.
6. Ensure that you have backed up all users’profiles.
7. Move the users out of the Version 2 processed users group and into the Version 4 group. Wait
for the AD Group Policy changes to propagate to the Version 5 computers. Next time they log
on, the users’sessions are processed with Version 5 settings.
8. Upgrade the next batch of computers and migrate the next batch of users, as described earlier.
Upgrade Profile Management
August 6, 2024
This article provides guidance on upgrading your Profile Management deployment by using Active
Directory.
Important: It is important that you follow the order of the steps in this upgrade process. Upgrade the
soware on all computers only aer adding the new .adm or .admx file to Group Policy. If you upgrade
beforehand, log files might be stored in two locations. One contains log files for the old version and
the other contains the files for the new version. This consideration particularly aects Citrix virtual
desktops deployments.
It is also important to upgrade during a scheduled maintenance period. Or upgrade at a time when
Active Directory replication allows the changes to propagate through your deployment. Typically, up‑
grade can take up to 24 hours.
The upgrade process involves:
1. Creating a Group Policy Object (GPO) and adding the new .adm or .admx file to the new GPO
© 1999–2024 Cloud Soware Group, Inc. All rights reserved. 80

Profile Management 2402 LTSR
‑ or ‑
Upgrading an existing .adm or .admx file as described later in this article.
2. Upgrading the .msi file on all computers as described later in this article.
3. Applying the GPO.
To upgrade an existing .adm file
If any earlier version of the Profile Management .adm file exists in Group Policy, you can upgrade it
by using the following procedure. All policy settings in the earlier version are preserved when you
upgrade.
1. On the domain controller, do one of the following:
• Import the existing .adm file. The file resides in the GPO_Templates folder in the download
package.
• Copy the .admx file from the GPO_Templates folder in the download package to the
C:\Windows\PolicyDefinitions folderand copy the .adml file to the C:\Windows\PolicyDefinitions\<localized
folder>. For example, on English operating systems, <localized folder> is en‑US.
2. On the computer you use to configure Profile Management, open the Group Policy Object Editor.
3. In the Group Policy Object Editor, right‑click Administrative Templates and select Add/Re‑
move Templates.
4. Select the existing version of the Profile Management .adm file (for example, ctxprofile5.4.1),
click Remove and then Close. The Administrative Templates\Citrix folder is deleted.
5. Right‑click Administrative Templates and select Add/Remove Templates again.
6. Click Add, browse to the location of the new version of the .adm or .admx file (for example, ctx‑
profile5.5.0), select it, and click Close. The new file is imported but the old settings are retained.
To upgrade the .msi file
We recommend that you install the same version of Profile Management on all user devices and that
you add the .adm or .admx file of that same version to each Group Policy Object on all domain con‑
trollers. Doing so prevents corruption of profile data, which might result when dierent user store
structures (from dierent versions) exist.
We recommend that you upgrade all computers to the latest version of Profile Management before
enabling any new setting. To check whether a setting is new in the version you are using, see Profile
Management policies.
1. Ensure that all users are logged o from the computers you want to upgrade.
© 1999–2024 Cloud Soware Group, Inc. All rights reserved. 81

Profile Management 2402 LTSR
2. Install the new version of Profile Management over the existing version by running the .msi file
on each computer. For more information, see Install and set up.
To upgrade the .ini file
You edit the .ini file in an earlier version of Profile Management and upgrade to a newer version. The
soware can detect that the file was edited and, by default, does not overwrite it. To preserve your
.ini file settings, and use the new settings in the newer version, you must do one of the following:
• Manually add the new settings from the .ini file of the newer version to your existing, edited .ini
file.
• Save a copy of the existing, edited version’s .ini file. Use the OVERWRITEINIFILES=yes command‑
line option to force an overwrite of the file during the upgrade. Add your saved settings to the
upgraded .ini file. For example:
msiexec /i <path to the MSI file\> /quiet [INSTALLDIR=<installation
directory>] [OVERWRITEINIFILES=yes] [INSTALLPOLICYINIFILES=no]
Note
To configure Profile Management policy through HDX, you must:
• upgrade your Delivery Controllers. The reason is that HDX reads the Profile Management
policy settings from the UserProfileManager_PowerShellSnapIn.msi file present in the Xe‑
nApp and XenDesktop layout image‑full\x64\Citrix Desktop Delivery Controller.
• upgrade your VDAs to get the latest version of Profile Management.
More Resources
• Profile Management policies
• Install and set up
Migrate user profiles
August 6, 2024
This article guides you through two migration workflows:
• Migration to the Citrix container‑based profile solution
• Migration to Windows roaming profile solution
For more information about migration strategies, see Upgrade and migrate.
© 1999–2024 Cloud Soware Group, Inc. All rights reserved. 82

Profile Management 2402 LTSR
Migrate to the Citrix container‑based profile solution
You can use the migration tool in the Profile Management installation package to migrate user profiles
from the following profile solutions to the Citrix container‑based profile solution:
• Windows local profile solution
• Citrix file‑based profile solution
• FSLogix Profile Container
Migration workflow
To migrate your current profile solution to the Citrix container‑based profile solution, follow these
steps:
1. Set up the Citrix user store on a storage server and configure its Windows Access Control Lists
(ACLs).
For more information, see Create the user store.
2. Migrate user profiles using the migration tool delivered with Profile Management.
For more information, see Example: Migrate user profiles for FSLogix Profile Container
3. Install Profile Management on your machines.
For more information, see Install and set up.
4. Set up the container‑based profile solution by configuring specific Profile Management policies.
The essential workflow is as follows:
a) Enable Profile Management
b) Specify the path to the user store (Path to user store)
c) Enable profile containers for the entire user profile �Profile container�
For more information about advanced settings for profile containers, see Citrix Profile Manage‑
ment profile container.
5. (For FSLogix Profile Container) Disable FSLogix Profile Container on your machines. Otherwise,
the Citrix container‑based solution can’t work properly. Detailed steps are as follows:
a) In Registry Editor, go to HKEY_LOCAL_MACHINE\SOFTWARE\FSLogix\Profiles.
b) Set Enabled to 0.
© 1999–2024 Cloud Soware Group, Inc. All rights reserved. 83

Profile Management 2402 LTSR
Example: Migrate user profiles for FSLogix Profile Container
This section details how to migrate user profiles from VHDX‑based FSLogix Profile Container to the
Citrix container‑based profile solution.
Before you begin, make sure that you meet the following requirements:
• Have set up the Citrix user store on a storage server and configured its Windows Access Control
Lists (ACL).
• Have the VHDX location of the FSLogix Profile Container.
• Have the credentials of a domain administrator.
Detailed steps are as follows:
1. Log on to a machine using the domain administrator account.
2. Run Windows PowerShell ISE as an administrator.
3. In the PowerShell console, access the \tool folder in the Profile Management installation pack‑
age, and then run CPM_ProfileContainer_Migration_Tool.ps1.
4. When prompted, choose migration type 3, which represents migrating user profiles from FS‑
Logix Profile Container (VHDX) to the Citrix container‑based profile solution.
5. Enter users and groups that you want to migrate, separated by commas. Example: <DOMAIN
NAME>\<USER NAME1>,<DOMAIN NAME>\<GROUP NAME1>
6. Enter the VHDX location of the FSLogix Profile Container.
7. Enter the path to the Citrix VHDX store.
Note:
• You can use either the Citrix user store or a dierent network storage as the Citrix VHDX
store.
• Only %USERNAME% is supported among all variables.
8. Specify the Windows OS version of your machines by entering its short name. To get short
names of Windows OS versions, see Profile Management policies.
Note:
Only user profiles with the specified OS type are migrated.
Upon completion, the migration results appear on the screen.
© 1999–2024 Cloud Soware Group, Inc. All rights reserved. 84

Profile Management 2402 LTSR
Migrate to Windows roaming profiles
You can migrate Citrix user profiles to Windows roaming profiles at any time. Move profile data to a
network location where the roaming profiles are stored. Aer migration, Profile Management takes
no part in processing user logons or application settings.
1. Make sure that all users are logged o.
2. Remove the Profile Management Service from all computers that the soware manages.
3. In the user store, move the contents of \UPM_Profile to your roaming profile location. You do
not have to move the contents of the cross‑platform settings store.
4. (For Version 1 profiles only) Remove the _upm_var suix from all subfolders of \UPM_Profile.
Note: You might find that scripting simplifies this step.
Configure
August 6, 2024
This topic introduces how to configure Profile Management policies to meet your deployment require‑
ments.
Configuration precedence
August 6, 2024
You can configure Profile Management using Group Policies and the .ini file. Configuration settings
are applied as follows:
1. Settings defined by Group Policies take precedence. The .ini file is queried only if a policy setting
is set to Not Configured.
Note: If you apply a Group Policy Object selectively to sites and domains within an Organiza‑
tional Unit, a further precedence applies. See Group Policy: Filtering and Permission. Domain
and OU Group Policies take precedence over local policies.
2. Where a setting is not defined by a policy, Profile Management tries to read the setting from the
.ini file.
3. If a setting is not configured by a group policy or in the .ini file, the default setting is used.
© 1999–2024 Cloud Soware Group, Inc. All rights reserved. 85

Profile Management 2402 LTSR
There might be situations where you want to configure the same setting dierently in Group Policy
and the .ini file. For example when you want to activate default logging with a Group Policy setting
but activate verbose logging using the .ini file on a computer that you use for troubleshooting.
About the Profile Management .ini file
Default configuration
Profile Management comes with a default configuration stored in an .ini file. This file must be in the
installation folder so that the Profile Management Service can recognize it. The default configuration
is suitable for most environments. It processes the profiles of all users in all groups.
If you have a non‑English deployment of Profile Management running on Windows XP or Windows
Server 2003, you must create an appropriate language version of the .ini file using UPMPolicy‑
Defaults_all.ini. Rename a copy of this file to reflect your language (for example, UPMPolicyDe‑
faults_all_es.ini for Spanish) and localize the folder names. Use these file names:
• For French operating systems, UPMPolicyDefaults_all_fr.ini
• For German operating systems, UPMPolicyDefaults_all_de.ini
• For Spanish operating systems, UPMPolicyDefaults_all_es.ini
• For Japanese operating systems, UPMPolicyDefaults_all_ja.ini
• For Simplified Chinese operating systems, UPMPolicyDefaults_all_zh‑CN.ini
Modify the .ini file
If you add entries to the .ini file, ensure that the variables and values have the correct format.
Flags (on/o indicators) must be of this form:
1 <variable>=<value>
A value of 1 enables a setting and any other value or no value disables it. For example, the following
entry enables the ServiceActive setting:
1 ServiceActive=1
Any of the following entries disable the setting:
1 ServiceActive=ON
2 ServiceActive=OFF
3 ServiceActive=TRUE
4 ServiceActive=FALSE
5 ServiceActive=
List entries must be of this form:
© 1999–2024 Cloud Soware Group, Inc. All rights reserved. 86

Profile Management 2402 LTSR
1 <value>=
The following entry specifies Microso Oice files to be synchronized:
1 [SyncFileList]
2 AppData\Local\Microsoft\Office\*.OfficeUI
Changes to Group Policy settings take eect when a manual or automatic policy refresh occurs on the
target computers. Changes to the .ini file take eect when you issue the command gpupdate /force,
which is recommended. Or the changes take eect when you restart the Profile Management Service
on the target computers.
Enable Profile Management
August 6, 2024
By default, to facilitate deployment, Profile Management does not process logons or logos. Enable
Profile Management only aer carrying out all other setup tasks and testing how Citrix user profiles
perform in your environment.
To enable Profile Management using Group Policy, follow these steps:
1. Open the Group Policy Management Editor.
2. Under Computer Configuration > Policies > Administrative Templates: Policy definitions
(ADMX files) > Citrix Components > Profile Management, double‑click the Enable Profile
management policy.
3. Select Enabled.
You can also enable Profile Management using the UPMPolicyDefaults_all.ini file. To do so, follow
these steps:
1. On the machine where Profile Management is installed, navigate to C:\Program Files\
Citrix\User Profile Manager\UPMPolicyDefaults.ini.
2. Open UPMPolicyDefaults.ini using Notepad.
3. Edit the configurations to reflect your specifics.
If this setting is not configured in Group Policy, the value from the .ini file is used. If this setting is
not configured in Group Policy or in the .ini file, Profile Management does not process Windows user
profiles in any way.
You can also choose to enable Profile Management using:
• Citrix Studio. For instructions on enabling Profile Management using Citrix Studio, see Knowl‑
edge Center article CTX222893.
© 1999–2024 Cloud Soware Group, Inc. All rights reserved. 87

Profile Management 2402 LTSR
• Workspace Environment Management (WEM). For instructions on enabling Profile Management
using WEM, see Knowledge Center article CTX229258.
For your changes to take eect, run the gpupdate /force command from the command prompt
as documented at https://docs.microsoft.com/en‑us/windows‑server/administration/windows‑
commands/gpupdate.
Watch this video to learn more:
Specify the path to the user store
August 6, 2024
Before specifying the path to the user store, refer to
Profile Management architecture and, if relevant to your deployment, understand the eect of:
• Storing multilingual profiles
• Combining inclusions and exclusions
1. Under Profile Management, double‑click the Path to user store policy.
2. Select Enabled and enter the path to the directory (the user store) in which the user settings
(registry changes and synchronized files) are saved.
The path can be:
© 1999–2024 Cloud Soware Group, Inc. All rights reserved. 88

Profile Management 2402 LTSR
• A relative path. This path must be relative to the home directory, which is typically configured
as the #homeDirectory# attribute for a user in Active Directory (AD).
• A UNC path. This path typically specifies a server share or a DFS namespace.
• Disabled or unconfigured. In this case, a value of #homeDirectory#\Windows is assumed.
The following types of variables can be used for this setting:
• System environment variables enclosed in percent signs (for example, %ProfVer%). System
environment variables generally require extra setup. For more information, see Administer pro‑
files within and across OUs.
• Attributes of the AD user object enclosed in hashes (for example, #sAMAccountName#).
• Profile Management variables. For more information, see Profile Management policies.
User environment variables cannot be used, except for %username% and %userdomain%. You can
also create custom AD attributes to define organizational variables such as location or users. Attrib‑
utes are case‑sensitive.
Examples:
• \\server\share\#sAMAccountName# stores the user settings to the UNC path \\server\share\JohnSmith
(if #sAMAccountName# resolves to JohnSmith for the current user)
• \\server\profiles$\%USERNAME%.%USERDOMAIN%\!CTX_OSNAME!!CTX_OSBITNESS! might
expand to \\server\profiles$\JohnSmith.Finance\Win8x64
Important: Whichever attributes or variables you use, check that this setting expands to the folder
one level higher than the folder containing NTUSER.DAT. For example, if this file is contained
in \\server\profiles$\JohnSmith.Finance\Win8x64\UPM_Profile, set the path to the user store as
\\server\profiles$\JohnSmith.Finance\Win8x64 (not the \UPM_Profile subfolder).
This diagram illustrates the components of a typical path to the user store that incorporates AD attrib‑
utes, environment variables, and Profile Management variables.
© 1999–2024 Cloud Soware Group, Inc. All rights reserved. 89
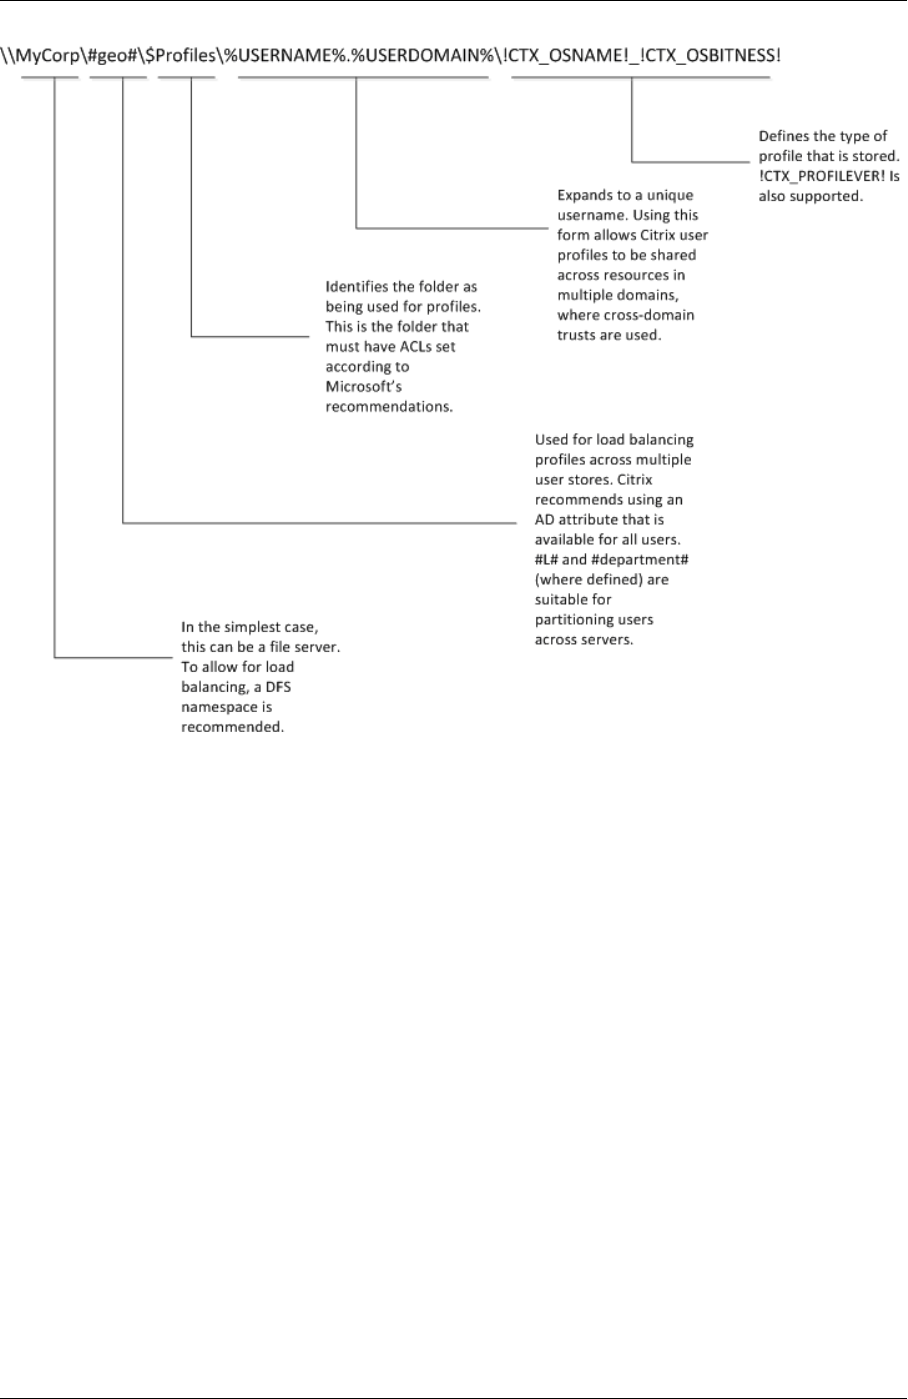
Profile Management 2402 LTSR
For more information on using variables when specifying the path to the user store, see the following
topics:
• Share Citrix user profiles on multiple file servers
• Administer profiles within and across OUs
• High availability and disaster recovery with Profile Management
If Path to user store is disabled, the user settings are saved in the Windows subdirectory of the home
directory.
If this setting is not configured here, the setting from the .ini file is used. If this setting is not configured
here or in the .ini file, the Windows directory on the home drive is used.
For your changes to take eect, run the gpupdate /force command from the command prompt
as documented at https://docs.microsoft.com/en‑us/windows‑server/administration/windows‑
commands/gpupdate.
© 1999–2024 Cloud Soware Group, Inc. All rights reserved. 90

Profile Management 2402 LTSR
Include and exclude items
August 6, 2024
This article describes the process that Profile Management uses to include and exclude items from
users’profiles. Ensure that you understand this process if you decide to modify the default inclusion
or exclusion lists to improve the logon and logo experience of your users. To help you determine
whether this modification is required, see Which applications are in use.
For example, you might include Microso Word because it is a highly customizable and frequently
used application that must present the same experience to roaming users however it is accessed. Con‑
versely, you might exclude an enterprise application because it is infrequently used by some groups
so its profile data does not need to be downloaded at each logon and logo.
By default, all files and folders in local profiles are synchronized with the user store. You can specify
files and folders that you do not want to synchronize by adding them to an exclusion list. If you exclude
a folder, you can specify its subfolders that you do want to synchronize by adding them to an inclusion
list.
You can include and exclude:
• Files and folders contained inside profiles.
• Registry entries in the HKCU hive that store personalization settings. Entries in the HKLM hive
are not processed by default and cannot be configured to do so.
Before including and excluding items
Before tuning the contents of your users’profiles, consider using the set of built‑in Windows Perfor‑
mance Monitoring (Perfmon) counters. These provide insights into the behavior of your profiles. Avail‑
able countersinclude measurements of the profile size and the time taken to create a Citrix user profile
on the local computer.
You might need to decide whether to cache profiles locally (on the computers that run Profile Manage‑
ment). Factors that aect the decision include the Citrix products in your deployment, the available
space on the local computers, and the number of users in the deployment.
Files and folders
All included and excluded folder names are language specific. However, folder names in the user store
are in a format independent of the operating system language.
You can synchronize files or folders on disks that are treated as local by the operating system. You
cannot synchronize files or folders on network mapped drives.
© 1999–2024 Cloud Soware Group, Inc. All rights reserved. 91

Profile Management 2402 LTSR
The registry
For existing users, the entire HKCU hive is copied to the user store. For new users, the hive of their
Microso local, roaming, default, or template profile is copied. Inclusions are added and exclusions
are removed from the hive when changes are made to the user store.
If you have a template profile that contains unwanted keys, use a tool such as Profile Nurse from Sep‑
ago to eliminate them from the user store.
About exclusions
Exclusions are processed at logo not logon. They do not delete data from the user store but prevent
new data from being written to it.
Other than the default exclusions, typically you do not need to exclude any items when you first roll
out Profile Management. Later, as you track application performance and gather feedback from users,
you might need to exclude items if settings from multiple applications clash or if a user’s NTUSER.DAT
file grows large as a result of collecting unneeded settings.
Do not add redirected folders as exclusions.
Important: Citrix recommends excluding the AppData\LocalLow folder from synchronization. In
the default configuration, the exclusion list already contains AppData\LocalLow. Besides, you
can also choose to exclude partial content from the AppData\Local folder. If you do not exclude
AppData\LocalLow or AppData\Local, a large amount of data can be transferred over the net‑
work and users can experience logon delays. The folders are not synchronized by standard Windows
roaming profiles.
Inclusion and exclusion rules
The following rules are used when Profile Management includes and excludes files, folders, and reg‑
istry keys:
1. All items are included by default
2. If the same path is configured as both an inclusion and an exclusion, the inclusion takes prece‑
dence
3. An inclusion takes precedence over an exclusion in the same folder
4. An inclusion takes precedence over an exclusion higher up in the folder hierarchy
5. An exclusion takes precedence over an inclusion higher up in the folder hierarchy
These rules result in sensible and intuitive behavior. All items are included by default. From that
starting point, you can configure top‑level exceptions as exclusions, then configure deeper exceptions
to the top‑level exceptions as inclusions, and so on.
© 1999–2024 Cloud Soware Group, Inc. All rights reserved. 92

Profile Management 2402 LTSR
Default inclusions and exclusions
August 6, 2024
Note:
Default inclusions and exclusions apply only to the file‑based profile solution.
This topic describes the default items that Profile Management includes in and excludes from its pro‑
cessing. Depending on the applications in your deployment, extra (non‑default) items might be re‑
quired. To help you determine which extra items you include or exclude, see Which applications are
in use
Important: If you use Group Policy rather than the .ini file (or you are rolling out a Group Policy de‑
ployment aer a successful test with the .ini file), unlike the installed .ini file, no items are included
or excluded by default in the .adm or .admx file. You must add the default items manually to the file.
These items are shown in the tables in this topic. Note the following:
• Use Profile Management policies to map setting names in the .ini file and the .adm or .admx file,
and to understand how the Profile Management variables (for example, !ctx_internetcache!)
expand
• When pasting inclusions and exclusions from the .ini file, remove the trailing = (equals sign) from
each item
• Do not add an initial backslash to inclusions and exclusions
Registry inclusion list
Default Value
Registry exclusion list
Default Value
Soware\Microso\AppV\Client\Integration=
Soware\Microso\AppV\Client\Publishing=
Soware\Microso\Speech_OneCore=
© 1999–2024 Cloud Soware Group, Inc. All rights reserved. 93

Profile Management 2402 LTSR
Note: If you are using Microso App‑V, this exclusion is not correct and dierent exclusions are re‑
quired as documented at
Profile Management and App‑V.
Folder inclusion list
Default Value
All folders in the profile are included by default.
Folder exclusion list
Folders in this table are excluded from synchronization.
Default Value
!ctx_internetcache!=
!ctx_localappdata!\Google\Chrome\User Data\Default\Cache=
!ctx_localappdata!\Google\Chrome\User Data\Default\Cached Theme Images=
!ctx_localappdata!\Google\Chrome\User Data\Default\JumpListIcons=
!ctx_localappdata!\Google\Chrome\User Data\Default\JumpListIconsOld=
!ctx_localappdata!\GroupPolicy=
!ctx_localappdata!\Microso\AppV=
!ctx_localappdata!\Microso\Messenger=
!ctx_localappdata!\Microso\Oice\15.0\Lync\Tracing=
!ctx_localappdata!\Microso\OneNote=
!ctx_localappdata!\Microso\Outlook=
!ctx_localappdata!\Microso\Terminal Server Client=
!ctx_localappdata!\Microso\UEV=
!ctx_localappdata!\Microso\Windows Live=
!ctx_localappdata!\Microso\Windows Live Contacts=
!ctx_localappdata!\Microso\Windows\Application Shortcuts=
© 1999–2024 Cloud Soware Group, Inc. All rights reserved. 94

Profile Management 2402 LTSR
Default Value
!ctx_localappdata!\Microso\Windows\Burn=
!ctx_localappdata!\Microso\Windows\CD Burning=
!ctx_localappdata!\Microso\Windows\Notifications=
!ctx_localappdata!\Packages=
!ctx_localappdata!\Sun=
!ctx_localappdata!\Windows Live=
!ctx_localsettings!\Temp=
!ctx_roamingappdata!\Microso\AppV\Client\Catalog=
!ctx_roamingappdata!\Sun\Java\Deployment\cache=
!ctx_roamingappdata!\Sun\Java\Deployment\log=
!ctx_roamingappdata!\Sun\Java\Deployment\tmp=
$Recycle.Bin=
AppData\LocalLow=
Tracing=
File inclusion list
Default Value
All files in the profile are included by default.
File exclusion list
Default Value
No files in the profile are excluded by default.
© 1999–2024 Cloud Soware Group, Inc. All rights reserved. 95

Profile Management 2402 LTSR
Include and exclude items
August 6, 2024
As a prerequisite, ensure that you understand how inclusions and exclusions work. For more informa‑
tion, see Include and exclude items. For information on the default included and excluded items, see
Default inclusions and exclusions.
Use Enter to separate multiple entries when you include and exclude items.
To exclude items
1. Under Profile Management > Registry, click the Exclusion list policy.
2. Select Enabled.
3. Click Show and add any registry keys in the HKCU hive that you do not want Profile Management
to synchronize during logo. Example: Software\Policies.
4. Under Profile Management > File system, double‑click the Exclusion list ‑ directories policy.
5. Select Enabled.
6. Click Show and add any folders that you do not want Profile Management to synchronize.
Be aware of the following:
• Specify the folders using paths relative to the user profile (%USERPROFILE%) and omit
initial backslashes from paths.
• Use the variable %USERPROFILE% to locate the profile but do not enter the variable itself
in this policy.
• As of Profile Management 2112, wildcards in folder names are supported but are not ap‑
plied recursively.
Examples:
– Desktop. Does not synchronize the Desktop folder.
– MyApp\tmp. Does not synchronize the %USERPROFILE%\MyApp\tmp folder.
7. Under Profile Management > File system, double‑click the Exclusion list ‑ files policy.
8. Select Enabled.
9. Click Show and add any files that you do not want Profile Management to synchronize.
Be aware of the following:
© 1999–2024 Cloud Soware Group, Inc. All rights reserved. 96

Profile Management 2402 LTSR
• Specify the file names with paths relative to the user profile (%USERPROFILE%). Do not
enter the variable (%USERPROFILE%) in this policy.
• Wildcards in file names are supported and applied recursively. As of Profile Management
7.15, you can use the vertical bar (|) to restrict the policy only to the current folder.
• As of Profile Management 2112, wildcards in folder names are supported but are not ap‑
plied recursively.
Examples:
– Desktop\Desktop.ini. Ignores Desktop.ini in the Desktop folder.
– AppData\*.tmp. Ignores all files with the .tmp extension in the AppData folder
and its subfolders.
– AppData\*.tmp|. Ignores all files with the .tmp extension only in the AppData
folder.
– Downloads\*\a.txt. Ignores a.txt in any immediate subfolder of the
Downloads folder.
If Exclusion list is disabled, no registry keys are excluded. If this setting is not configured here, the
value from the .ini file is used. If this setting is not configured here or in the .ini file, no registry keys
are excluded.
If Exclusion list ‑ directories is disabled, no folders are excluded. If this setting is not configured here,
the value from the .ini file is used. If this setting is not configured here or in the .ini file, no folders are
excluded.
If Exclusion list ‑ files is disabled, no files are excluded. If this setting is not configured here, the value
from the .ini file is used. If this setting is not configured here or in the .ini file, no files are excluded.
For your changes to take eect, run the gpupdate /force command from the command prompt
as documented at https://docs.microsoft.com/en‑us/windows‑server/administration/windows‑
commands/gpupdate.
To include items
Tip:
You can include specific top‑level folders. In a collaborative environment, this step has the ad‑
vantage of flagging critical folders to other administrators.
1. Under Profile Management > Registry, double‑click the Inclusion list policy.
2. Select Enabled.
3. Click Show and add any profile‑related registry keys in the HKEY\\_CURRENT\\_USER hive
that you want Profile Management to process during logo. Example: Software\Adobe.
© 1999–2024 Cloud Soware Group, Inc. All rights reserved. 97

Profile Management 2402 LTSR
4. Under Profile Management > File system > Synchronization, double‑click the Directories to
synchronize policy.
5. Select Enabled.
6. Click Show and add folders that are inside excluded folders but that you want Profile Manage‑
ment to synchronize. Example: Desktop\exclude\include ensures that the include
subfolder is synchronized even if the folder Desktop\exclude is not.
Be aware of the following:
• Specify the folders using paths relative to the user profile.
• As of Profile Management 2112, wildcards in folder names are supported but are not ap‑
plied recursively.
7. Under Profile Management > File system > Synchronization, double‑click the Files to syn‑
chronize policy.
8. Select Enabled.
9. Click Show and add files that are inside excluded folders but that you want Profile Management
to synchronize.
Be aware of the following:
• Specify the files with paths relative to the user profile.
• Wildcards in file names are supported and applied recursively. But wildcards cannot be
nested. As of Profile Management 7.15, you can use the vertical bar (|) to restrict the policy
only to the current folder so that the policy does not apply to the subfolders.
• As of Profile Management 2112, wildcards in folder names are supported but are not ap‑
plied recursively.
Examples:
– AppData\Local\Microsoft\Office\Access.qat. Specifies a file inside a
folder that is excluded in the default configuration.
– AppData\Local\MyApp\*.cfg. Specifies all files with the .cfg extension in the
AppData\Local\MyApp folder and its subfolders.
– Downloads\*\a.txt. Specifies a.txt in any immediate subfolder of the
Downloads folder.
• Profile Management synchronizes each user’s entire profile between the system it is in‑
stalled on and the user store. It is not necessary to include files in the user profile by adding
them to this list.
If Inclusion list is not configured here, the value from the .ini file is used. If this setting is not config‑
ured here or in the .ini file, the entire HKEY_CURRENT_USER hive is processed.
© 1999–2024 Cloud Soware Group, Inc. All rights reserved. 98

Profile Management 2402 LTSR
If Directories to synchronize is not configured here, the value from the .ini file is used. If this setting
is not configured here or in the .ini file, only non‑excluded folders in the user profile are synchronized.
Disabling this setting has the same eect as enabling it and configuring an empty list.
If Files to synchronize is not configured here, the value from the .ini file is used. If this setting is not
configured here or in the .ini file, only non‑excluded files in the user profile are synchronized. Disabling
this setting has the same eect as enabling it and configuring an empty list.
For your changes to take eect, run the gpupdate /force command from the command prompt
as documented at https://docs.microsoft.com/en‑us/windows‑server/administration/windows‑
commands/gpupdate.
Use wildcards
August 6, 2024
You can use DOS‑style wildcard characters such as the question mark (?) and asterisk (*) in policies
that refer to files and folders. Examples include file inclusion and exclusion lists and folder inclusion
and exclusion lists. The question mark (?) matches a single character. The asterisk (*) matches zero
or more characters.
Starting with Profile Management 7.15, you can use the vertical bar (|) to restrict the policy only to
the current folder.
Be aware of the following:
• Wildcards in file names work recursively while wildcards in folder names don’t. Ensure that you
specify a valid path when using wildcards.
• Policies that support wildcards do not support any other type of variable, such as the use of
environment variables or Active Directory attributes. You cannot use wildcards in policies that
refer to registry entries.
Examples
The wildcard <path name>\h*.txt matches house.txt, h.txt, and house.txt.txt, but does not
match ah.txt.
The wildcard <path name>\a?c.txt matches abc.txt, but does not match ac.txt.
The wildcard <path name>\a?c*d.txt matches abcd.txt and abccd.txt, but does not match
acd.txt.
Configuring policies in the profile root folder:
© 1999–2024 Cloud Soware Group, Inc. All rights reserved. 99

Profile Management 2402 LTSR
• *.txt specifies all files with the extension .txt in the root folder and its subfolders.
• *h.txt specifies all files that match this wildcard in the root folder and its subfolders.
• h*.txt specifies all files that match this wildcard in the root folder and its subfolders.
• a?c.txt specifies all files that match this wildcard in the root folder and its subfolders.
• *.txt| specifies all files with the extension .txt only in the root folder.
Configuring policies in non‑profile root folders:
• AppData\*.txt specifies all files that match this wildcard in the AppData folder and its sub‑
folders.
• AppData\*h.txt specifies all files that match this wildcard in the AppData folder and its sub‑
folders.
Enable logon exclusion check
August 6, 2024
The Enable Logon exclusion check feature controls what Profile Management does if a profile in
the user store contains excluded files and folders when a user logs on. By default, the feature is dis‑
abled.
Excluded files and folders refer to files and folders that you add to the Exclusion list ‑ files and Exclu‑
sion list ‑ directories policies respectively. When users log o, Profile Management doesn’t synchro‑
nize excluded files and folders to the user store. However, excluded files and folders might exist in the
user store before you add them to exclusion lists. With the Enable logon exclusion check policy, you
can have Profile Management ignore those files and folders or delete them from the user store when
users log on.
To use this feature, follow these steps:
1. Open the Group Policy Management Editor.
2. Under Computer Configuration > Policies > Administrative Templates: Policy definitions
(ADMX files) > Citrix Components > Profile Management > File system, double‑click the Lo‑
gon Exclusion Check policy.
3. Select Enabled.
4. Select an option from the drop‑down menu. By default, Delete excluded files or folders is
selected.
5. Click OK.
This feature provides the following three options:
© 1999–2024 Cloud Soware Group, Inc. All rights reserved. 100

Profile Management 2402 LTSR
• Delete excluded files or folders. Deletes the excluded files and folders from the user store
when a user logs on.
• Ignore excluded files or folders. Ignores the excluded files and folders from the user store
when a user logs on.
• Synchronize excluded files or folders. Synchronizes the excluded files and folders from the
user store to a local profile when a user logs on.
Warning:
If you select Delete excluded files or folders, Profile Management deletes your excluded files
and folders from the user store permanently. If you include the excluded files and folders again,
Profile Management still deletes them from the cached local profile when you log on.
For your changes to take eect, run the gpupdate /force command from the command prompt.
Log o and log back on. For more information, see https://docs.microsoft.com/en‑us/windows‑
server/administration/windows‑commands/gpupdate.
To enable logon exclusion check using the .ini file, do the following:
1. Open the Profile Management .ini file.
2. Add the EnableLogonExclusionCheck item in the [General Settings] section.
3. Set a value for the EnableLogonExclusionCheck item as follows:
• To ignore the excluded files and folders specified in the exclusion list from the user store,
set the value to 1; for example, EnableLogonExclusionCheck=1.
• To delete the excluded files and folders specified in the exclusion list from the user store,
set the value to 2; for example, EnableLogonExclusionCheck=2.
• To disable the check, set the value to 0; for example, EnableLogonExclusionCheck=0.
4. Save and close the Profile Management .ini file.
5. Run the gpupdate /force command to make your changes take eect.
Configuration precedence:
1. If this setting isn’t configured in Group Policy Objects (GPOs), the value in the .ini file is used.
2. If this setting is configured in neither the GPOs nor the .ini file, the policy is disabled.
Stream user profiles
August 21, 2024
© 1999–2024 Cloud Soware Group, Inc. All rights reserved. 101

Profile Management 2402 LTSR
By default, Citrix Profile Management fetches the entire user profile from the user store to the local
computer when a user logs on. Large files in the user profile can cause a slow logon. To improve the
user logon experience, you can enable the profile streaming feature.
With this feature enabled, Profile Management fetches profile files and folders only when they are
accessed aer logon.
Enable the profile streaming feature
Enable the profile streaming feature by using the following policies:
• Profile streaming. With this policy enabled, profile files are fetched to the local computer when
the user accesses them.
• Enable profile streaming for folders. With this policy enabled, profile folders are fetched to
the local computer when the user accesses them.
Follow these steps to enable the policies:
1. Open the Group Policy Management Editor.
2. Access Policies > Administrative Templates: Policy definitions (ADMX files) > Citrix Com‑
ponents > Profile Management > Streamed user profiles.
3. Double‑click Profile streaming. Select Enabled, and then click OK.
4. Double‑click Enable profile streaming for folders. Select Enabled, and then click OK.
Enable enhancements for profile streaming
Aer you enable the profile streaming feature, you can apply a range of enhancements based on your
needs.
Example 1: Users reported slow loading of large profile files. In this case, enable the Always cache
policy and specify a minimum size for large files. Profile Management caches files larger than that size
to the local profile during user logons.
Example 2: In your organization, users access certain profile folders frequently. Therefore, you want
to fetch those folders to the local profile on user logon even if the profile streaming is enabled. To
achieve this goal, enable the Profile Streaming Exclusion list ‑ directories policy and exclude the
folders from profile streaming.
Enable the enhancements as needed. Detailed steps are as follows:
1. Access
Policies > Administrative Templates: Policy definitions (ADMX files) > Citrix Com‑
ponents > Profile Management > Streamed user profiles.
2. To reduce load times for large files, enable Profile Management to cache large files to the local
profile during logon. Detailed steps are as follows:
© 1999–2024 Cloud Soware Group, Inc. All rights reserved. 102

Profile Management 2402 LTSR
a) Double‑click Always cache.
b) Select Enabled.
c) Set a lower limit (MB) on the size of profile files to cache. To cache the entire profile, set
the limit to zero.
Notes:
• Any files that exceed the limit are cached to the local profile as soon as Profile Man‑
agement starts the back‑end processing thread during user logons.
• Any files that are below the limit are still fetched to the local profile when users access
them.
d) Click OK.
3. To apply profile streaming only to certain user groups in your domain, follow these steps:
a) Double‑click Streamed user profile groups.
b) Select Enabled.
c) Enter a list of user groups. Press Enter to separate entries.
d) Click OK.
Note: By default, the policy is disabled and profile streaming applies to all user groups in your
domain.
4. To exclude certain profile folders and files from profile streaming, follow these steps:
a) Double‑click the Profile Streaming Exclusion list ‑ directories policy.
b) Select Enabled.
c) Click Show.
d) Add folders that you do not want Profile Management to stream. For more information,
see enable profile streaming exclusion, later in this article.
5. To ensure an optimal logon experience in concurrent sessions of the same user, follow these
steps:
a) Double‑click Enable profile streaming for pending area.
b) Select Enabled.
c) Click OK.
For more information, see profile streaming for the pending area, later in this article.
For your changes to take eect, run the gpupdate /force command from the command prompt.
For more information, see https://technet.microsoft.com/en‑us/library/bb490983.aspx.
© 1999–2024 Cloud Soware Group, Inc. All rights reserved. 103

Profile Management 2402 LTSR
Configuration precedence
Configuration precedence for each policy in Streamed user profiles is as follows:
• If Profile streaming isn’t configured in the GPO or in the .ini file, Profile streaming is disabled.
• If Always cache isn’t configured in the GPO, the value from the .ini file is used. If this setting
isn’t configured here or in the .ini file, it is disabled.
• If Streamed user profile groups is disabled, all user groups are processed. If this setting isn’t
configured in the GPO, the value from the .ini file is used. If this setting isn’t configured in the
GPO or in the .ini file, all users are processed.
• If Enable profile streaming for folders isn’t configured in the GPO or in the .ini file, profile
streaming for folders is disabled.
• If Enable profile streaming exclusion isn’t configured in the GPO or in the .ini file, all folders
are streamed.
• If Enable profile streaming for pending area isn’t configured in the GPO or in the .ini file, pro‑
file streaming for the pending area is disabled.
Enable profile streaming exclusion
When profile streaming exclusion is enabled, Profile Management does not stream folders in the ex‑
clusion list. All folders and files in the exclusion list are fetched immediately from the user store to the
local computer when a user logs on.
To enable profile streaming exclusion, follow these steps:
1. Under Profile Management, double‑click Streamed user profiles.
2. Double‑click the Profile Streaming Exclusion list ‑ directories policy.
3. Select Enabled.
4. Click Show.
5. Add folders that you do not want Profile Management to stream. The folder names can be spec‑
ified as absolute paths or as paths relative to the user profile (%USERPROFILE%). Use that
variable to locate the profile but do not enter the variable itself in this policy. Omit initial back‑
slashes from paths.
For example:
• Desktop. The Desktop folder is fetched on user logons.
• MyApp\tmp. The %USERPROFILE%\MyApp\tmp folder is fetched on user logons.
If this setting isn’t configured here, the following folders in the .ini file are excluded by default:
© 1999–2024 Cloud Soware Group, Inc. All rights reserved. 104

Profile Management 2402 LTSR
• AppData\Local\Microso\Credentials
• Appdata\Roaming\Microso\Credentials
• Appdata\Roaming\Microso\Crypto
• Appdata\Roaming\Microso\Protect
• Appdata\Roaming\Microso\SystemCertificates
Note:
• This policy only takes eect when Profile Streaming is enabled.
• This policy does not support wildcards * and ?.
• Type Enter to separate entries.
• When manually editing the profile streaming exclusion list, you must add the preceding default
excluded folders to avoid logons hanging.
Profile streaming for the pending area
Profile Management uses the pending area to temporarily store profile files and folders changed in
concurrent sessions of the same user. By default, that area is an exception to the profile streaming
feature. Even with the feature enabled, files and folders in that area are still fetched to the local profile
when users log on.
To ensure an optimal logon experience in concurrent sessions of the same user, enable the Enable
profile streaming for pending area feature as an enhancement to the profile streaming feature. With
this policy enabled, Profile Management fetches files and folders in the pending area to the local pro‑
file when users access them instead of when they log on. If there are large files in that area, user logon
time reduces significantly.
Note:
When this policy is enabled, a disk named PendingArea.vhdx is created in the user store
for each user when they start sessions. If a user starts multiple concurrent sessions, additional
disks named Diff-V<version number>.vhdx (for example, Di‑V1.vhdx) are created for
each session.
Starting with version 2402, the following profile streaming features are enabled by default in the
file‑based profile solution: Profile streaming, Enable profile streaming for folders, Profile stream‑
ing for pending area.
Replicate user stores
August 6, 2024
© 1999–2024 Cloud Soware Group, Inc. All rights reserved. 105

Profile Management 2402 LTSR
With the Replicate user stores policy, you can replicate the user store to multiple paths on each user
logon and logo. Doing so provides profile redundancy and guarantees a high level of availability for
user profiles.
Note:
• This feature applies to both file‑based and container‑based profile solutions.
• Replicated profile containers provide profile redundancy for user logons but not for
in‑session failover.
• Enabling the policy increases system I/O and might prolong logos.
How it works
In addition to the user store configured using the Path to user store policy, you can configure more
user stores using the Replicate user stores policy. When multiple user stores are deployed and con‑
figured in your environment, Profile Management works as follows:
• During user logon, Profile Management selects the user store with the latest profile for the user.
If multiple user stores have the latest profile, by default, Profile Management selects the earli‑
est configured store. You can also enable Profile Management to select the store with the best
access performance. For more information, see Change the user store selection method.
• During user logo, Profile Management writes the local profile back to all user stores.
Configure replicated user stores
To provide profile redundancy, set up additional user stores beyond the user store configured using
the Path to user store policy. To configure replicated user stores using Group Policy, follow these
steps:
To complete the configuration using Group Policy, follow these steps:
1. Open the Group Policy Management Editor.
2. Access Computer Configuration > Administrative Templates > Citrix Components > Profile
Management > Advanced settings, and then double‑click the Replicate user stores policy.
3. Set the policy to Enabled.
4. Click Show next to Paths to replicate a user store.
5. In the Value field, enter the path for a replicated user store. Repeat this step for the other repli‑
cated user stores.
If the profile container is enabled for part of the user profile, you can replicate container‑based
profiles and file‑based profiles to dierent locations. To do so, enter the path in this form:
© 1999–2024 Cloud Soware Group, Inc. All rights reserved. 106

Profile Management 2402 LTSR
<path to the replicated container-based profiles>|<path to the
replicated file-based profiles>. For example: \\path_a|\\path_b indicates
that Profile Management replicates container‑based profiles to \\path_a and file‑based
profiles to \\path_b.
6. Click OK and OK again.
Note:
To synchronize files and folders modified during a session to the user store, enable the Enable
active write‑back policy.
Change the user store selection method
By default, when multiple user stores are available, Profile Management selects the store with the
latest profile. If there are multiple options, it selects the one configured earliest. When necessary, you
can enable Profile Management to select the store with the best access performance. Detailed steps
are as follows:
1. Open the Group Policy Management Editor.
2. Access Computer Configuration > Administrative Templates > Citrix Components > Profile
Management > Advanced settings, and then double‑click the User store selection method
policy.
3. Set the policy to Enabled.
4. In the Selection method field, select Access performance. To revert to the configuration order‑
based selection, select
Configuration order
.
• Configuration order. Profile Management selects the earliest configured store.
• Access performance. Profile Management selects the store with the best access perfor‑
mance.
5. Click OK.
Configuration precedence:
1. If this setting isn’t configured here, the value from the .ini file is used.
2. If this setting isn’t configured here or in the .ini file, Configuration order is used.
Tip:
To trace a store selection event at user logon, open Windows Event Viewer on the machine, go
© 1999–2024 Cloud Soware Group, Inc. All rights reserved. 107

Profile Management 2402 LTSR
to Windows Logs > Applications, and apply a filter for Citrix Profile Management events with
the ID 5.
Set up profile containers
August 6, 2024
Important:
This feature does not work on Windows 7.
Large folders in a user profile can cause a slow user logon. To improve the logon experience, Profile
Managementprovides the profile container, a VHDX‑based profile solution. This solution letsyou store
the profile folders of your choice on the VHDX profile disk. When users log on, the VHDX profile disk is
mounted and the profile folders are available immediately.
You can achieve one of the following goals using profile containers:
• Set up the container‑based profile solution: Store the entire user profile in the profile container.
• Optimize user experiences for the file‑based profile solution: Store a portion of the user profile
in the profile container.
Workflow
The general workflow for deploying the profile container is as follows:
1. (Optional) Customize the storage capacity and path for profile containers.
2. Enable the profile container in a way that suits your needs:
• Enable the profile container for a portion of the user profile (file‑based profile optimization
solution)
• Enable the profile container for the entire user profile (container‑based profile solution)
Note:
With the container‑based profile solution enabled, the following user profiles (if any) are
automatically migrated to the container upon its first use:
• Local Windows user profile
• User profiles from the Citrix file‑based profile solution
3. To prevent the profile container from bloating, exclude folders and files.
© 1999–2024 Cloud Soware Group, Inc. All rights reserved. 108

Profile Management 2402 LTSR
4. If multi‑session scenarios are common in your deployment, enable multi‑session write‑back for
profile containers as needed.
5. To enable profile containers to dynamically grow in size as the profile data expands, enable and
configure VHD auto‑expansion for profile containers.
6. To reduce the storage costs resulting from identical files in user profiles, you can enable and
configure file deduplication policies:
a) Specify files to deduplicate from profile containers.
b) (Optional) Specify files to exclude from deduplication.
c) (Optional) Specify the minimum size of files to deduplicate from profile containers.
7. (Optional) Grant AD users Read access to profile containers.
8. If you’ve enabled the profile container for the entire user profile (container‑based profile solu‑
tion), you can enable one of the following policies as necessary:
• To provide profile redundancy to guarantee a high level of profile availability, enable Repli‑
cate user stores.
• To cache the user profile on the local computer, enable local caching for profile containers.
• To allow only one access to profile containers at a time, enable exclusive access to profile
containers.
Note:
If the enable exclusive access to profile containers setting is enabled for profile
containers, the Enable multi‑session write‑back for profile containers setting is
automatically disabled.
• Specify whether to log o users when profile container is not available during logon.
Considerations
When the container‑based profile solution is enabled, be aware of these considerations:
• The file‑based profile solution is disabled automatically and the following policies no longer
apply:
– Profile streaming
Exception: profile streaming applies to the profile container only when the Enable local
caching for profile containers policy is enabled. For more information, see Enable local
caching for profile containers.
– File System
© 1999–2024 Cloud Soware Group, Inc. All rights reserved. 109

Profile Management 2402 LTSR
– Active write‑back
– Delete locally cached profiles on logo
To view policies that apply to the container‑based profile solution, see Policies for file‑based
and container‑based solutions.
• To maintain backward compatibility with the Search index roaming for Outlook feature, Profile
Management keeps the two VHDX disks that are used to store the following files, respectively:
– Outlook search index database
– Oline Outlook Data Files (.ost)
(Optional) Customize the storage capacity and path for profile containers
By default, the profile container is stored in the user store with a default storage capacity of 50 GB.
For example, you configure the path of the user store as:
\\myprofileserver\profiles$\\%username%.%domain%\!ctx_osname!.!
ctx_osbitness!.
The profile container is then stored in:
\\myprofileserver\profiles$\\%username%.%domain%\!ctx_osname!.!
ctx_osbitness!\ProfileContainer\!ctx_osname!.
You can specify a dierent network location for the profile container and change its default storage
capacity. For more information, see Specify the storage capacity and path for VHD files.
Enable the profile container for a portion of the user profile
To reduce logon time with the user store, you can enable the profile container feature and add those
large profile folders to the profile container.
Note:
The folders you add to the profile container also exist in the user store. Aer you enable the pro‑
file container feature, Profile Management keeps the folders synchronized between the profile
container and the user store.
Suppose you enable the profile container feature and then you disable it. To ensure a consistent
user profile, Profile Management synchronizes the user store profile with a profile container. This
synchronization occurs during the user logon. Folders in the exclusion list are not copied to the
user store.
1. Open the Group Policy Management Editor.
© 1999–2024 Cloud Soware Group, Inc. All rights reserved. 110

Profile Management 2402 LTSR
2. Under Computer Configuration > Policies > Administrative Templates: Policy definitions
(ADMX files) > Citrix Components > Profile Management > Profile container settings,
double‑click the Profile container policy.
3. Select Enabled.
4. Click Show and add the folders in the form of relative paths to the user profile. We recommend
that you add folders that contain large cache files. For example, add the Citrix Files content
cache folder to the list: AppData\Local\Citrix\Citrix Files\PartCache.
Enable the container‑based profile solution
To enable the container‑based profile solution, follow these steps:
1. Open the Group Policy Management Editor.
2. Under Computer Configuration > Policies > Administrative Templates: Policy definitions
(ADMX files) > Citrix Components > Profile Management > Profile container settings,
double‑click the Profile container policy.
3. Select Enabled.
4. Click Show, and then add an asterisk (*) to the profile container list.
5. Click OK.
(Optional) Include and exclude folders and files
To prevent the profile container from bloating, you can exclude folders and files from it. If needed,
you can include folders and files when their parent folders are excluded.
Exclude folders from the profile container
Important:
If you enable the profile container for the entire user profile, the folder redirection setting still
takes eect. Do notput folders to be redirected in the Folders to exclude from profile container
list. Otherwise, folder redirection does not work.
1. Under Profile Management > Profile container settings, double‑click the Folders to exclude
from profile container policy.
2. Select Enabled.
3. Click Show, and then enter the folders to exclude in the form of relative paths to the user profile.
Wildcards in folder names are supported but are not applied recursively. Example:
• Desktop indicates the Desktop folder.
© 1999–2024 Cloud Soware Group, Inc. All rights reserved. 111

Profile Management 2402 LTSR
• Downloads\* indicates all immediate subfolders of the Downloads folder.
Note:
If you enable the profile container for the entire user profile (container‑based profile solution),
the appdata\local\temp folder is automatically excluded from the profile container.
Configuration precedence:
1. If the setting is disabled, no folder is excluded.
2. If the setting isn’t configured here, the value from the .ini file is used.
3. If the setting isn’t configured either here or in the .ini file, no folder is excluded.
Include folders into the profile container
To include subfolders of the excluded folders in the profile container, follow these steps:
1. Under Profile Management > Profile container settings, double‑click the Folders to include
in profile container policy.
2. Select Enabled.
3. Click Show, and then enter the folders to include in the form of relative paths to the user profile.
Be aware of the following:
• Folders on this list must be subfolders of the excluded folders. Otherwise, this setting does not
work.
• Wildcards in folder names are supported but are not applied recursively.
• Enabling the policy and configuring an empty list have the same eect as disabling the setting.
Configuration precedence:
1. If the setting isn’t configured here, the value from the .ini file is used.
2. If the setting isn’t configured either here or in the .ini file, folders not on the exclusion list are
included in the profile container.
Include files into the profile container
Aer you exclude a folder from the profile container, you can include files inside the folder into the
profile container. Detailed steps are as follows:
1. Under Profile Management > Profile container settings, double‑click the Files to include in
profile container policy.
2. Select Enabled.
3. Click Show, and then enter the files to include in the form of relative paths to the user profile.
© 1999–2024 Cloud Soware Group, Inc. All rights reserved. 112

Profile Management 2402 LTSR
Be aware of the following:
• Files on this list must be inside the excluded folders. Otherwise, this setting does not work.
• Wildcards in file names are applied recursively. To restrict the policy only to the current folder,
use the vertical bar (|).
• Starting with Profile Management 2112, wildcards in folder names are supported but are not
applied recursively.
Examples:
‑ Desktop\Desktop.ini indicates the Desktop\Desktop.ini file.
‑ AppData\*.tmp indicates all files with the .tmp extension in the AppData folder and its subfold‑
ers.
‑ AppData\*.tmp| indicates all files with the .tmp extension only in the AppData folder.
‑ Downloads\*\a.txt indicates a.txt in any immediate subfolder of the Downloads folder.
Enabling the policy and configuring an empty list have the same eect as disabling the setting.
Configuration precedence:
1. If the setting isn’t configured here, the value from the .ini file is used.
2. If the setting isn’t configured either here or in the .ini file, files not on the exclusion list are in‑
cluded in the profile container.
Exclude files from the profile container
Startingwith ProfileManagement 2112, you can excludefiles from the profile container. Detailedsteps
are as follows.
1. Under Profile Management > Profile container settings, double‑click the Files to exclude
from profile container policy.
2. Select Enabled.
3. Click Show, and then enter the files to exclude in the form of relative paths to the user profile.
Be aware of the following:
• Wildcards in file names are applied recursively. To restrict the policy only to the current folder,
use the vertical bar (|).
• Starting with Profile Management 2112, wildcards in folder names are supported but are not
applied recursively.
Configuration precedence:
1. If the setting is disabled, no file is excluded.
2. If the setting isn’t configured here, the value from the .ini file is used. If the setting isn’t config‑
ured either here or in the .ini file, no file is excluded.
© 1999–2024 Cloud Soware Group, Inc. All rights reserved. 113

Profile Management 2402 LTSR
(Optional) Enable and configure VHD auto‑expansion
User profiles typically grow over time. To simplify storage management, enable the VHD auto‑
expansion feature for profile containers. With this feature enabled, when the container reaches 90%
utilization, it automatically expands by 10 GB, with a maximum capacity of 80 GB. If needed, you can
customize these default settings to meet your specific needs.
Tip:
You can use user‑levelpolicy settingsfor more granular controloverVHD auto‑expansion settings.
Your organization can have a standard set of auto‑expansion settings while providing unique
settings, such as larger maximum capacity, for specific users.
1. Open the Group Policy Management Editor.
2. Enable VHD auto‑expansion using the following steps:
a) Go to Computer Configuration > Policies > Administrative Templates: Policy defini‑
tions (ADMX files) > Citrix Components > Profile Management > Profile container set‑
tings.
b) Double‑click the Enable VHD auto‑expansion for profile container policy.
c) Select Enabled.
d) Click OK.
3. To change the default storage utilization percentage at which profile containers trigger auto‑
expansion, follow these steps:
a) Go to Computer Configuration > Policies > Administrative Templates: Policy defini‑
tions (ADMX files) > Citrix Components > Profile Management > Advanced settings.
b) Double‑click the Profile container auto‑expansion threshold policy.
c) Select Enabled.
d) In the Auto‑expansion threshold (%) field, enter a percentage as needed.
e) Click OK.
4. To change the amount of storage capacity by which profile containers automatically expand,
follow these steps:
a) Go to Computer Configuration > Policies > Administrative Templates: Policy defini‑
tions (ADMX files) > Citrix Components > Profile Management > Advanced settings.
b) Double‑click the Profile container auto‑expansion increment policy.
c) Select Enabled.
d) In the Auto‑expansion increment (in GB) field, enter a number as needed. The default is
10 (GB).
e) Click OK.
© 1999–2024 Cloud Soware Group, Inc. All rights reserved. 114

Profile Management 2402 LTSR
5. To change the maximum storage capacity to which profile containers can automatically expand,
follow these steps:
a) Go to Computer Configuration > Policies > Administrative Templates: Policy defini‑
tions (ADMX files) > Citrix Components > Profile Management > Advanced settings.
b) Double‑click the Profile container auto‑expansion limit policy.
c) Select Enabled.
d) In the Auto‑expansion limit (in GB) field, enter a number as needed. The default is 80
(GB).
e) Click OK.
(Optional) Enable multi‑session write‑back for profile containers
Profile Management supports concurrent access to the profile container by default. However, among
all concurrent sessions, only one session has read/write permission and can merge profile changes
into the container.
The following is how Profile Management processes concurrent access:
• On session logon:
Checks whether a read/write session exists. If one is found, the current session becomes read‑
only. Otherwise, it’s a read/write session.
• On session logo:
1. Dismounts the profile container.
2. Discards profile changes if the current session is read‑only.
3. Merges profile changes of the read/write session to the profile container if there are no
other concurrent sessions.
To enable multi‑session write‑back, use the Enable multi‑session write‑back for profile containers pol‑
icy.
(Optional) Enable exclusive access to profile containers
By default, profile containers allow concurrent access. If needed, you can disable concurrent access to
profile containers through Profile container settings > Enable exclusive access to VHD containers.
As a result, profile containers allow only one access at a time.
Note:
• This setting applies only to profile containers that are enabled for the entire user profile.
• If this setting is enabled for profile containers, the Enable multi‑session write‑back for
© 1999–2024 Cloud Soware Group, Inc. All rights reserved. 115

Profile Management 2402 LTSR
profile containers setting is automatically disabled.
For more information, see Enable exclusive access to VHD containers.
(Optional) Enable local caching for profile containers
The Enable local caching for profile containers feature takes eect only when the profile container
is enabled for the entire user profile. If you enable the Enable local caching for profile containers
policy, during user logon, the user’s profile in the profile container is cached in the user’s local user
profile.
Important:
Applications that work only with the container‑based profile solution, such as OneDrive, might
not work properly when this policy is enabled. To ensure OneDrive functions correctly, either
disable this policy or enable the OneDrive container policy.
By default, the entire user profile is cached during user logon. To reduce user logon time, you can
enable the Profile streaming policy. As a result, the profile folders in the user profile are cached on
demand aer logon.
Note:
To exclude files or folders from local caching, use exclusion and inclusion policies in File system
rather than those in Profile container settings.
(Optional) Specify whether to log o users when the profile container is not available
during logon
By default, when the profile container is unavailable during user logon, users log on using temporary
profiles instead. However, this behavior leads to data loss for any changes made during the session.
Alternatively, you can enable the Log o users when profile container is not available during lo‑
gon policy to force log‑o users in such cases. With this policy enabled, users receive an error message
that states Unable to set up your profile: profile container is not available. Clicking OK will log
you o, and any changes made during this session will be lost. Clicking OK in this message im‑
mediately logs them o. If necessary, you can also customize the error message when enabling this
policy.
To enable this policy using GPO, follow these steps:
1. Under Profile Management > Profile container settings, double‑click the Log o users when
profile container is not available during logon policy.
2. Select Enabled.
© 1999–2024 Cloud Soware Group, Inc. All rights reserved. 116

Profile Management 2402 LTSR
3. In the Error message field, enter the message users will see when the profile container isn’t
available during logon. Leaving it empty will display a default message.
4. Click OK.
Note:
When configuring Profile Management policies using Studio, performing the Disable action can’
t disable this policy. Instead, to disable it, edit the policy to change its value to Disabled, and
then clear the policy checkbox.
Configuration precedence:
1. If this policy is not configured here, the value from the .ini file is used.
2. If this policy is not configured either here or in the .ini file, the setting is disabled.
(Optional) Grant AD users Read access to profile containers
Applies to: both file‑based and container‑based profile solutions.
By default, a profile container is accessible only to its owner. To extend its access to other users in
your AD domains, you can enable the Users and groups to access profile container policy. Profile
Management grants Read & Execute permission to users and user groups specified in this policy.
Detailed steps are as follows:
1. Under Profile Management > Profile container settings, double‑click the Users and groups
to access profile container policy.
2. Select Enabled.
3. In the Users and groups to access profile container field, click Show, and then add AD users
and groups to which you want to grant Read and Execute permission for the container. Use
the format domain name\user or group name or the Security Identifier (SID) to identify
an AD user or group.
4. Click OK and OK again.
Configuration precedence:
1. If this policy is not configured here, the setting from the .ini file is used.
2. If this policy is not configured either here or in the .ini file, the profile container is accessible only
to its owner.
Enable multi‑session write‑back for profile containers
August 6, 2024
© 1999–2024 Cloud Soware Group, Inc. All rights reserved. 117

Profile Management 2402 LTSR
Tip:
For more information about the FSLogix Profile Container, see https://docs.microsoft.com/en‑
us/fslogix/configure‑profile‑container‑tutorial. For more information about Citrix Profile
Management profile container, see Citrix Profile Management profile container
Overview
VHD‑based profile solutions such as the FSLogix Profile Container and the Citrix Profile Management
profile container do not support saving changes in multi‑session scenarios. They let only one session
(in read/write mode) write changes. Changes in other sessions (in read‑only mode) are discarded.
However, multi‑session scenarios are common in use cases of Citrix virtual apps. To ease these use
cases, we provide the Enable multi‑session write‑back for profile containers policy. The policy
lets you enable multi‑session write‑back for both FSLogix Profile Container and Citrix Profile Manage‑
ment profile container. If the same user launches multiple sessions on dierent machines, Profile
Management synchronizes and saves changes made in each session to the user’s profile container.
During user logon, the user’s profile container disk is mounted and I/O requests are redirected to the
mounted disk. Profile Management then synchronizes changes from the user store to the local pro‑
file.
During the user logo process, Profile Management works dierently depending on which FSLogix
Profile Container mode is used in the session:
• If read‑only mode is used, Profile Management writes back changes to the user store.
• If read/write mode is used, Profile Management applies changes from the user store to the local
profile. Then the changes are merged to the user’s profile container.
Note:
The multi‑session write‑back feature is not compatible with profile streaming if the FSLogix Pro‑
file Container is in use.
The following events qualify as changes:
• Creation
• Modification
• Deletion
• Rename
Write‑back strategy
Profile Management uses the “last write wins”strategy to apply changes.
© 1999–2024 Cloud Soware Group, Inc. All rights reserved. 118

Profile Management 2402 LTSR
• For file/folder creation and modification, it writes back changes by comparing the file/folder
last write time.
• For file/folder deletion and rename, it writes back changes by comparing the time stamps asso‑
ciated with the changes. Profile Management logs time stamps when changes occur.
Enable multi‑session write‑back for profile containers
You can use the multi‑session write‑back feature by setting the Enable multi‑session write‑back for
profile containers policy to Enabled. The policy is set to Disabled by default.
• To use the feature for the FSLogix Profile Container, complete the following steps:
– FSLogix Profile Container
*
Verify that FSLogix Profile Container is installed and enabled.
*
Verify that the profile type is set to Try for read‑write profile and fall back to read‑
only.
– Citrix Profile Management
*
Set the Enable Profile Management policy to Enabled.
*
Set the Path to user store policy with a valid path.
*
(Optional) Set the Processed groups and Excluded groups policies. Verify that the
user groups to process are consistent with those groups in the FSLogix Profile Con‑
tainer.
*
Set the Enable multi‑session write‑back for profile containers policy to Enabled.
You can set the policy in a GPO or in Citrix Studio. See instructions later in this article.
• To use the multi‑session write‑back feature for the Citrix Profile Management profile container,
complete the following steps:
– Set the Enable multi‑session write‑back for profile containers policy to Enabled.
– Enable the Citrix Profile Management profile container feature.
To enable the Enable multi‑session write‑back for profile containers policy, follow these steps:
1. Open the Group Policy Management Editor.
2. Under Computer Configuration > Administrative Templates > Citrix Components > Profile
Management > Advanced settings, double‑click the Enable multi‑session write‑back for
profile containers policy.
3. Select Enabled and then click OK.
For your changes to take eect, run the gpupdate /force command from the command prompt
on the machine where Profile Management is installed. Log o from all sessions and then log back on.
© 1999–2024 Cloud Soware Group, Inc. All rights reserved. 119

Profile Management 2402 LTSR
For more information, see https://docs.microsoft.com/en‑us/windows‑server/administration/wind
ows‑commands/gpupdate.
Control access to applications
August 6, 2024
The app access control feature lets you control access to applications using rules. With this feature,
you can streamline the management of applications and images. For example, you can deliver iden‑
tical machines to dierent departments while meeting their unique application requirements, thus
reducing the number of images.
This article walks you through the process of enabling app access control and configuring the con‑
trol rules. It also provides an example of using this feature to simplify image management in virtual
environments.
Note:
This feature applies to both Active Directory (AD) and non‑domain‑joined (NDJ) environments.
Overview
With the app access control feature, you can hide applications from users, machines, and processes
by configuring hiding rules.
A hiding rule consists of two parts:
• Objects to hide. Files, folders, and registry entries you want to hide for an application.
For example, to hide an application, you must specify all objects associated with this applica‑
tion, such as files, folders, and registry entries.
• Assignments. Users, machines, and processes you want to hide the application from.
Assignment types
Assignments in hiding rules come in three categories: processes, users, and machines. The specific
assignment types are listed as follows:
Category Type
Processes Not applicable
© 1999–2024 Cloud Soware Group, Inc. All rights reserved. 120

Profile Management 2402 LTSR
Category Type
Users
• AD and Azure Active Directory (AAD) users
• AD and AAD user groups
Machines
• AD, AAD, and NDJ machines
• Groups of AD Machines (grouped in
Organizational Units (OUs))
• Groups of NDJ machines (grouped in
machine catalogs)
Note:
• In the context of app access control, OUs are used as containers only for machines, but not
for users. As a result, an OU assignment hides the app only from machines in the OU and
not from users in the OU.
• NDJ machines are limited to those machines that Citrix creates and power manages.
When a hiding rule has multiple assignments configured, be aware of the following considerations:
• If those assignments are of the same category (for example, user A and user group B), the ap‑
plication is hidden from all objects specified in those assignments (user A and all users in user
group B).
• If those assignments are of dierent categories (for example, user A and machine X), the appli‑
cation is hidden when the conditions specified in all those assignments are met (when user A
signs in to machine X).
• If those assignments are of the process category, the application is hidden from all processes
specified in those assignments.
Note:
If no assignments are configured for a rule, the application specified in the rule is hidden.
Workflow
With the app access control feature, Profile Management can hide applications from users, machines,
and processes based on the rules you provide. At a high level, the workflow of implementing app
access control is as follows:
1. Create and generate hiding rules. There are two tools that you can use:
• GUI‑based tool –WEM Tool Hub > Rule Generator for App Access Control
• PowerShell tool –available with the Profile Management installation package. For more
information, see Create, manage, and deploy rules using Rule Generator.
© 1999–2024 Cloud Soware Group, Inc. All rights reserved. 121

Profile Management 2402 LTSR
2. Use GPOs to apply hiding rules to machines in your environment. For more information, see
Enable app access control using GPOs.
Create, manage, and deploy rules using Rule Generator
This section guides you through using the PowerShell‑based Rule Generator to create, manage, and
deploy rules.
Before you begin, make sure that the machine where you run the tool meets the following require‑
ments:
• Runs on Windows 10 or 11, or Windows Server 2016, 2019, or 2022.
• (For AD environments only) Is in the same domain as your users and machines.
The general procedure is as follows:
1. Run Windows PowerShell as an administrator.
2. Access the \tool folder in the Profile Management installation package, and then run
CPM_App_Access_Control_Config.ps1.
3. Follow the onscreen instructions to create, manage, and generate hiding rules:
a) View each application installed on the machine and its state:
• Not configured. No rules are configured for the application.
• Configured. One or more rules are configured for the application and none of them
are applied to machines.
• Configured and applied. One or more rules are configured for the application and at
least one rule is applied to machines.
b) From the application list, select an application you want to hide by entering its index. All
files, folders, and registry entries associated with the application appear.
© 1999–2024 Cloud Soware Group, Inc. All rights reserved. 122

Profile Management 2402 LTSR
c) To hide an additional file, folder, or registry entry for the selected application, select the
corresponding action type, and then add the object by entering its name and path. Repeat
this step to add more.
Considerations:
• System environment variables (such as %windir%) in the paths are supported while
user environment variables (such as %appdata%) aren’t.
• Wildcards * and ? are supported for files and folders. When there are multiple aster‑
isks (‘*’) in a string, characters between two asterisks are ignored. For example, in
the string c:\users\Finance*Manangement*, the characters *Management
* are treated as a single asterisk (*).
Note:
You can also manually define an application by associating it with certain files, fold‑
ers, and registry entries.
d) Configure assignments for the rule. In detail, specify the assignment type and then enter
the specific objects that you want to hide the application from. For more information, see
the following table.
© 1999–2024 Cloud Soware Group, Inc. All rights reserved. 123

Profile Management 2402 LTSR
Note:
If you don’t configure any assignments for a rule, the app specified in the rule is in‑
visible.
Assignment type Description
AD users, user groups, or OUs Enter their AD domain names, separated by the
vertical bars (|).
AD machines Enter their DNS host names, separated by the
vertical bars (|).
NDJ machine catalogs Enter catalog names, separated by the vertical
bars (|). Example: Machine_catalog_name1
|Machine_catalog_name2
NDJ machines
Collect machine names using AAD/NDJ object
selector in the WEM web console, and then enter
those names, separated by the vertical bars (|).
Example:
Machine_name1|Machine_name2. To add
all non‑domain‑joined machines, enter NDJ*.
Wildcards * and ? are supported for NDJ
machine names.
Note: When there are multiple asterisks (*) in a
string, the characters between two asterisks are
ignored. For example, in the string
ResearchDep*Virtual*TeamMachine*,
the characters *Virtual* are treated as a
single asterisk (*).
Azure AD users Collect the users’SIDs and names using AAD/NDJ
object selector in the WEM web console, and
then enter them in the form:
sid1\name1|sid2\name2.
Example:/azuread/989c2938
-6527-4133-bab1-f3860dd15098\
Tester1|/azuread/82bdde32-d5d9-4
d64-b0ff-9876d4488d05\Tester2
© 1999–2024 Cloud Soware Group, Inc. All rights reserved. 124

Profile Management 2402 LTSR
Assignment type Description
Azure AD groups Collect the groups’SIDs and names using
AAD/NDJ object selector in the WEM web
console, and then enter them in the form:
sid1\name1|sid2\name2. Example:/
azuread/989c2938-6527-4133-bab1-
f3860dd15098\TestGroup1|/azuread
/82bdde32-d5d9-4d64-b0ff-9876
d4488d05\TestGroup2
4. Repeat step 3 to create hiding rules for other applications.
5. Follow the onscreen prompt to generate the raw data for the rules you configured and then save
it in a .txt file for future use.
6. To test whether the rules work as expected, follow the onscreen prompt to deploy them to this
machine or a group of machines.
Note:
We don’t recommend using this tool to deploy rules to production environments.
Enable app access control using GPOs
Aer you create and generate hiding rules, you can use GPOs to apply them to machines in your envi‑
ronment.
To apply control rules to machines using a GPO, follow these steps:
1. Open the Group Policy Management Editor.
2. Access Policies > Administrative Templates: Policy definitions (ADMX files) > Citrix Com‑
ponents > Profile Management > App access control.
3. Double‑click App access control.
4. In the policy window that appears, select Enabled.
5. Open the .txt file where you saved the generated rules, copy the content, and paste it to the App
access control rules field.
6. Click OK.
The configuration precedence for the feature is as follows:
1. If this setting isn’t using a GPO, Studio, or WEM, the value from the .ini file is used.
2. If this setting isn’t configured anywhere, the feature is disabled.
© 1999–2024 Cloud Soware Group, Inc. All rights reserved. 125

Profile Management 2402 LTSR
Example
This section uses an example to guide you through implementing app access control for an image.
Requirements
Requirements in this example are as follows:
• Use a single image to create virtual machines for the Sales, HR, and Engineering departments.
• Control access to the following applications:
– Microso Excel: invisible to users in the HR department.
– Visual Studio Code: invisible to users in the Sales or HR department.
Solution
Install Profile Management to control access to installed applications.
Install a template machine
Install a template machine for capturing the image. The procedure is as follows:
1. Join a new machine to the same AD domain as your users and machines.
2. Install the following soware on the machine:
• Windows 10 or 11, or Windows Server 2016, 2019, or 2022, as needed
• Profile Management version 2303 or later
• All required applications
Create and generate hiding rules
1. On the template machine, use the Rule Generator tool to create and generate hiding rules.
• Rule 1: To hide Microso Excel from users in the HR department (Application: Microso
Excel; Assignment: HR user group)
• Rule 2: To hide Visual Studio Code from users in the Sales or HR department (Application:
Visual Studio Code; Assignments: Sales user group and HR user group)
2. Generate raw data for the two rules and save it to a .txt file.
For more information about how to use the tool, see Create, generate, and deploy rules using Rule
Generator.
Now you can capture the image from the template machine.
© 1999–2024 Cloud Soware Group, Inc. All rights reserved. 126

Profile Management 2402 LTSR
Enable app access control using GPOs
Aer virtual machines are created, use GPOs to centrally enable app access control and apply the
generated rules to machines. For more information, see Enable app access control using GPOs.
Enable and configure user‑level policy settings
August 6, 2024
By default, most Profile Management policies work at the machine level. Aer you apply those policy
settings to a container (site, domain, or OU), they apply to machines within that container regardless
of who logs on to them.
With the user‑level policy settings feature enabled, those machine‑level policies can work at the user
level—you can configure user‑ or group‑specific settings for them. Aer you apply those settings to a
container, they apply only when the specified users or users in the specified groups log on to machines
within that container.
If setting conflicts occur, Profile Management handles them using this priority order:
1. User‑specific settings
2. User group‑specific settings
3. Machine‑level settings
Configuration procedure
To enable and configure user‑level policy settings, follow this procedure:
1. Enable user‑level policy settings
2. Configure policy settings for users or groups
3. (Optional) Specify the priority order for user groups.
Enable user‑level policy settings
To apply user‑level Profile Management settings, you must first enable the user‑level policy settings
feature. You can accomplish this goal using various tools such as Group Policy Object (GPO), Work‑
space Environment Management (WEM), or Web Studio.
To enable the feature using a GPO, follow these steps:
1. Create a GPO and link it to a container that holds target machines, such as a site, domain, or OU.
© 1999–2024 Cloud Soware Group, Inc. All rights reserved. 127

Profile Management 2402 LTSR
2. Open the Group Policy Management Editor for the GPO.
3. Access Policies > Administrative Templates: Policy definitions (ADMX files) > Citrix Com‑
ponents > Profile Management > Advanced settings.
4. Double‑click the Enable the user‑level policy settings policy.
5. In the policy window that appears, select Enabled, and then click OK.
The configuration precedence is as follows:
1. If this setting is not configured here, the value from the .ini file is used.
2. If this setting is not configured either here or in the .ini file, it is disabled.
Configure policy settings for users and groups
This section describes how to configure user‑ or group‑specific policy settings.
For example, your organization has the following groups: accounting, sales, marketing, and more.
The accounting group uses its own user store and the other groups share a user store. To meet this
requirement, configure a user‑level Path to user store policy for the accounting group, and configure
a machine‑level Path to user store setting for your organization.
To configure a user‑ or group‑specific policy setting, follow these steps:
1. Get the Security Identifiers (SIDs) of users and groups
2. Configure user‑ or group‑specific policy settings
Get Security Identifiers (SIDs) of users and groups
Before you configure user‑specific Profile Management settings for a user or group, first get its SID
based on its domain name. Detailed steps are as follows:
1. Log on to the Domain Controller.
2. Run Windows PowerShell as an administrator.
3. From the PowerShell command line, run one of the following commands as needed:
• To get the SID of a user, enter Get-ADUser -Identity <ADUser>. For example,
Get-ADUser -Identity user5
• To get the SID of a group, enter Get-ADGroup -Identity <ADGroup>. For example,
Get-ADGroup -Identity HR_Group
4. Copy the SID from the returned results (for example, S-1-5-21-2069497100-3951106413-1778302672-1117
in the following results).
© 1999–2024 Cloud Soware Group, Inc. All rights reserved. 128

Profile Management 2402 LTSR
Configure user‑ or group‑specific policy settings
You can configure user‑level policy settings using:
• Group Policy Preferences (GPP)
• WEM Web Console
Configure settings using GPPs You can configure user‑level policy settings using GPPs. As part
of Group Policy, GPP settings are automatically distributed to domain‑joined computers through
GPOs.
To configure a policy setting for a user or group, follow these steps:
1. Open the Group Policy Management Editor for the target GPO.
2. Go to Computer Configuration > Preferences > Windows Settings > Registry, and then right‑
click New > Registry Item. The New Registry Properties window appears.
© 1999–2024 Cloud Soware Group, Inc. All rights reserved. 129

Profile Management 2402 LTSR
3. On the General tab, configure a user‑ or group‑specific policy as described in the following table.
You can also see a configuration example for setting the Path to user store policy for a user (SID:
S-1-5-21-259756655-2069503554-2063751945-1108) in this table.
Field Description Example
Action Leave the default. Update
Hive Leave the default. HKEY_LOCAL_MACHINE
Key Path Type the registry key path of
the user‑ or group‑specific
policy. First, get the key path by
searching for the policy name
in the GPP property settings
table. Next, replace <SID> in
the key path with the actual
SID.
SOFTWARE\Citrix\
UserProfileManager\
UserGroupConfigs\S
-1-5-21-259756655-2069503554-2063751945-1108
Value name Type the registry value name of
the policy. To locate the value
name of a policy, search for the
policy name in the GPP
property settings table.
Pathtouserstore
Value type Select the registry value type of
the policy: REG_SZ or
REG_DWORD. To locate the
value type of a policy, search
for the policy name in the GPP
property settings table.
REG_SZ
© 1999–2024 Cloud Soware Group, Inc. All rights reserved. 130

Profile Management 2402 LTSR
Field Description Example
Value data Type a registry value data
(setting value) for the policy.
Value data varies with policies.
For more information, see the
GPP property settings table.
\\WXFRP-DDC-1\UPM1\\#
sAMAccountName#\!
CTX_OSNAME!!
CTX_OSBITNESS!
4. Click the Common tab, and then select Remove this item when it is no longer applied. A
message box appears.
5. Click OK to confirm your acknowledgment. The Action option on the General tab changes to
Replace.
6. Click OK or Apply. The changes are saved on the Domain Controller. The configuration result
(for example, the Path to user store policy) is shown.
7. To configure more user‑ or group‑specific policy settings for this GPO, repeat steps 2–6 for each.
See the configuration example in the Examples section.
To manually sync those policy settings to a computer, run the groupupdate/force command on
the computer. For user‑level policy settings to take eect, log o from the computer and log back
on.
As shown in the following screenshot, the user‑level policy settings appear in the following registry
key, HKLM\SOFTWARE\Citrix\UserProfileManager\UserGroupConfigs\<SID>.
Configure settings using WEM Web Console You can configure user‑level policy settings using
WEM Web Console. For more information, see Create a GPO in the Workspace Environment Manage‑
ment Service documentation.
Examples
This section provides several examples for configuring user‑level policy settings.
© 1999–2024 Cloud Soware Group, Inc. All rights reserved. 131

Profile Management 2402 LTSR
Enable Profile Management Configure the Enable Profile Management policy for a user or group
using the GPP settings.
Field Value
Key Path SOFTWARE\Citrix\UserProfileManager\UserGroupConfigs\S‑
1‑5‑21‑259756655‑2069503554‑2063751945‑1108
Value name ServiceActive
Value type REG_DWORD
Value data 1
Location in the Registry:
Folders to mirror
Note:
To configure a user‑specific policy containing a list of files and folders, you must configure multi‑
ple GPP Registry Items.
To configure the Folders to mirror policy for a user or group, follow these steps:
1. Enable the policy using these GPP settings.
Field Value
Key Path SOFTWARE\Citrix\UserProfileManager\UserGroupConfigs\S‑
1‑5‑21‑259756655‑2069503554‑2063751945‑
1108\MirrorFoldersList
Value name Enabled
Value type REG_DWORD
Value data 00000001
Location in the Registry:
© 1999–2024 Cloud Soware Group, Inc. All rights reserved. 132

Profile Management 2402 LTSR
2. Add a folder that you want to mirror (for example, AppData\Local\Packages) using these GPP
settings.
Field Value
Key Path SOFTWARE\Citrix\UserProfileManager\UserGroupConfigs\S‑
1‑5‑21‑259756655‑2069503554‑2063751945‑
1108\MirrorFoldersList\List
Value name AppData\Local\Packages
Value type REG_SZ
Value data AppData\Local\Packages
Note:
In both the Value name and the Value data fields, enter the folder to be mirrored.
Location in the Registry:
3. Repeat step 2 to add more folders to this policy.
(Optional) Specify the priority order for user groups
When a user belongs to multiple groups with conflicting policy settings, specify the priority order for
those groups.
When setting conflicts occur, the policy settings of the group with the highest priority take precedence.
If priorities are unspecified, the group with the earliest alphabetical SID is prioritized.
To configure the priority order using a GPO, follow these steps:
1. Open the Group Policy Management Editor.
2. Access Policies > Administrative Templates: Policy definitions (ADMX files) > Citrix Com‑
ponents > Profile Management > Advanced settings.
© 1999–2024 Cloud Soware Group, Inc. All rights reserved. 133

Profile Management 2402 LTSR
3. Double‑click the Set the priority order for user groups policy. The policy window appears.
4. Select Enabled.
5. In the Priority order for user groups field, enter the Security Identifiers (SIDs) or domain
names of the groups in descending order of priority, separated by semicolons (;).
Example:
ctxxa.local\groupb;S-1-5-21-674278408-26188528-2146851469-1174;
ctxxa.local\groupc;
6. Click OK.
The configuration precedence is as follows:
1. If this setting is not configured here, the value from the .ini file is used.
2. If this setting is not configured either here or in the .ini file, no priority order is specified.
GPP property settings
This table lists GPP property settings for user‑level Profile Management policies.
Note:
This table contains six columns. Part of them might extend beyond the viewport. To view the
hidden columns, scroll down and use the horizontal scroll bar.
Policy Name Key Path Value Type Value Name Value Data
Value
Description
Enable Profile
Management
SOFTWARE\
Citrix\
UserProfileManager
\
UserGroupConfigs
\<SID>
REG_DWORD ServiceActive 0:Disable;
1:Enable;
© 1999–2024 Cloud Soware Group, Inc. All rights reserved. 134

Profile Management 2402 LTSR
Policy Name Key Path Value Type Value Name Value Data
Value
Description
Processed
groups
SOFTWARE\
Citrix\
UserProfileManager
\
UserGroupConfigs
\<SID>\
ProcessedGroups
REG_DWORD Enabled 0:Disable;
1:Enable;
SOFTWARE\
Citrix\
UserProfileManager
\
UserGroupConfigs
\<SID>\
ProcessedGroups
\List
REG_SZ List item List item
Excluded
groups
SOFTWARE\
Citrix\
UserProfileManager
\
UserGroupConfigs
\<SID>\
ExcludedGroups
REG_DWORD Enabled 0:Disable;
1:Enable;
SOFTWARE\
Citrix\
UserProfileManager
\
UserGroupConfigs
\<SID>\
ExcludedGroups
\List
REG_SZ List item List item
© 1999–2024 Cloud Soware Group, Inc. All rights reserved. 135

Profile Management 2402 LTSR
Policy Name Key Path Value Type Value Name Value Data
Value
Description
Process
logons of local
administra‑
tors
SOFTWARE\
Citrix\
UserProfileManager
\
UserGroupConfigs
\<SID>
REG_DWORD ProcessAdmins 0:Disable;
1:Enable;
Path to user
store
SOFTWARE\
Citrix\
UserProfileManager
\
UserGroupConfigs
\<SID>
REG_SZ PathToUserStoreAbsolute path
or path
relative to the
home
directory.
Migrate user
store
SOFTWARE\
Citrix\
UserProfileManager
\
UserGroupConfigs
\<SID>
REG_SZ MigrateUserStoreThe user store
path that you
previously
used.
Active write
back
SOFTWARE\
Citrix\
UserProfileManager
\
UserGroupConfigs
\<SID>
REG_DWORD PSMidSessionWriteBack0:Disable;
1:Enable;
Active write
back registry
SOFTWARE\
Citrix\
UserProfileManager
\
UserGroupConfigs
\<SID>
REG_DWORD PSMidSessionWriteBackReg0:Disable;
1:Enable;
© 1999–2024 Cloud Soware Group, Inc. All rights reserved. 136

Profile Management 2402 LTSR
Policy Name Key Path Value Type Value Name Value Data
Value
Description
Active write
back on
session lock
and
disconnection
SOFTWARE\
Citrix\
UserProfileManager
\
UserGroupConfigs
\<SID>
REG_DWORD PSMidSessionWriteBackSessionLock0:Disable;
1:Enable;
Oline profile
support
SOFTWARE\
Citrix\
UserProfileManager
\
UserGroupConfigs
\<SID>
REG_DWORD OlineSupport 0:Disable;
1:Enable;
Delete locally
cached
profiles on
logo
SOFTWARE\
Citrix\
UserProfileManager
\
UserGroupConfigs
\<SID>
REG_DWORD DeleteCachedProfilesOnLogo0:Disable;
1:Enable;
Delay before
deleting
cached
profiles
Soware\Policies\Citrix\UserProfileManagerREG_DWORD ProfileDeleteDelayDelay (in
seconds).
Migration of
existing
profiles
SOFTWARE\
Citrix\
UserProfileManager
\
UserGroupConfigs
\<SID>
REG_DWORD MigrateWindowsProfilesToUserStoreEnabled0:Disable;
1:Enable;
SOFTWARE\
Citrix\
UserProfileManager
\
UserGroupConfigs
\<SID>
REG_DWORD MigrateWindowsProfilesToUserStore1:Local and
Roaming;
2:Local;
3:Roaming;
4:None;
© 1999–2024 Cloud Soware Group, Inc. All rights reserved. 137

Profile Management 2402 LTSR
Policy Name Key Path Value Type Value Name Value Data
Value
Description
Automatic
migration of
existing
application
profiles
SOFTWARE\
Citrix\
UserProfileManager
\
UserGroupConfigs
\<SID>
REG_DWORD ApplicationProfilesAutoMigrationEnabled0:Disable;
1:Enable;
Local profile
conflict
handling
SOFTWARE\
Citrix\
UserProfileManager
\
UserGroupConfigs
\<SID>
REG_DWORD LocalProfileConflictHandling1:Use local
profile;
2:Delete local
profile;
3:Rename
local profile;
Template
profile
SOFTWARE\
Citrix\
UserProfileManager
\
UserGroupConfigs
\<SID>
REG_SZ TemplateProfilePathPath to the
template
profile.
SOFTWARE\
Citrix\
UserProfileManager
\
UserGroupConfigs
\<SID>
REG_DWORD TemplateProfileOverridesLocalProfile0:Disable;
1:Enable;
Template
profile
overrides
local profile
SOFTWARE\
Citrix\
UserProfileManager
\
UserGroupConfigs
\<SID>
REG_DWORD TemplateProfileOverridesRoamingProfile0:Disable;
1:Enable;
Template
profile
overrides
roaming
profile
© 1999–2024 Cloud Soware Group, Inc. All rights reserved. 138

Profile Management 2402 LTSR
Policy Name Key Path Value Type Value Name Value Data
Value
Description
SOFTWARE\
Citrix\
UserProfileManager
\
UserGroupConfigs
\<SID>
REG_DWORD TemplateProfileIsMandatory0:Disable;
1:Enable;
Template
profile used
as a Citrix
mandatory
profile for all
logons
Number of
retries when
accessing
locked files
SOFTWARE\
Citrix\
UserProfileManager
\
UserGroupConfigs
\<SID>
REG_DWORD LoadRetries Number of
retries.
Disable
automatic
configuration
Soware\Policies\Citrix\UserProfileManagerREG_DWORD DisableDynamicConfig0:Disable; 1:Enable;
Log o user if
a problem is
encountered
Soware\Policies\Citrix\UserProfileManagerREG_DWORD LogoRatherThanTempProfile0:Disable;
1:Enable;
Customer
Experience
Improvement
Program
SOFTWARE\
Citrix\
UserProfileManager
\
UserGroupConfigs
\<SID>
REG_DWORD CEIPEnabled 0:Disable;
1:Enable;
Enable search
index roaming
for Outlook
SOFTWARE\
Citrix\
UserProfileManager
\
UserGroupConfigs
\<SID>
REG_DWORD OutlookSearchRoamingEnabled0:Disable;
1:Enable;
© 1999–2024 Cloud Soware Group, Inc. All rights reserved. 139

Profile Management 2402 LTSR
Policy Name Key Path Value Type Value Name Value Data
Value
Description
Outlook
search index
database ‑
backup and
restore
SOFTWARE\
Citrix\
UserProfileManager
\
UserGroupConfigs
\<SID>
REG_DWORD OutlookEdbBackupEnabled0:Disable;
1:Enable;
Enable
concurrent
session
support for
Outlook
search data
roaming
SOFTWARE\
Citrix\
UserProfileManager
\
UserGroupConfigs
\<SID>
REG_DWORD OutlookSearchRoamingConcurrentSessionEnabled0:Disable;
1:Enable;
SOFTWARE\
Citrix\
UserProfileManager
\
UserGroupConfigs
\<SID>
REG_DWORD OutlookOstVhdxMaxNumMaximum
number of
VHDX disks for
storing
Outlook OST
files.
Enable
multi‑session
write‑back for
profile
containers
SOFTWARE\
Citrix\
UserProfileManager
\
UserGroupConfigs
\<SID>
REG_DWORD FSLogixProfileContainerSupport0:Disable;
1:Enable;
Replicate user
stores
SOFTWARE\
Citrix\
UserProfileManager
\
UserGroupConfigs
\<SID>\
MultipleRemoteStoreReplication
REG_DWORD Enabled 0:Disable;
1:Enable;
© 1999–2024 Cloud Soware Group, Inc. All rights reserved. 140

Profile Management 2402 LTSR
Policy Name Key Path Value Type Value Name Value Data
Value
Description
SOFTWARE\
Citrix\
UserProfileManager
\
UserGroupConfigs
\<SID>\
MultipleRemoteStoreReplication
\List
REG_SZ List item List item
Enable
credential‑
based access
to user stores
SOFTWARE\
Citrix\
UserProfileManager
\
UserGroupConfigs
\<SID>
REG_DWORD CredBasedAccessEnabled0:Disable;
1:Enable;
Customize
storage path
for VHDX files
SOFTWARE\
Citrix\
UserProfileManager
\
UserGroupConfigs
\<SID>
REG_SZ PathToVhdStore Path to store
VHDX files.
Automatically
reattach VHDX
disks in
sessions
SOFTWARE\
Citrix\
UserProfileManager
\
UserGroupConfigs
\<SID>
REG_DWORD EnableVolumeReattach0:Disable;
1:Enable;
Enable
asynchronous
processing for
user Group
Policy on
logon
SOFTWARE\
Citrix\
UserProfileManager
\
UserGroupConfigs
\<SID>
REG_DWORD SyncGpoStateEnabled0:Disable;
1:Enable;
© 1999–2024 Cloud Soware Group, Inc. All rights reserved. 141

Profile Management 2402 LTSR
Policy Name Key Path Value Type Value Name Value Data
Value
Description
Enable
OneDrive
container
SOFTWARE\
Citrix\
UserProfileManager
\
UserGroupConfigs
\<SID>\
OneDriveContainer
REG_DWORD Enabled 0:Disable;
1:Enable;
SOFTWARE\
Citrix\
UserProfileManager
\
UserGroupConfigs
\<SID>\
OneDriveContainer
\List
REG_SZ List item List item
Free space
ratio to trigger
VHD disk
compaction
SOFTWARE\
Citrix\
UserProfileManager
\
UserGroupConfigs
\<SID>
REG_DWORD CompactVHDFreePortionFree space
ratio (%).
Number of
logos to
trigger VHD
disk
compaction
SOFTWARE\
Citrix\
UserProfileManager
\
UserGroupConfigs
\<SID>
REG_DWORD CompactVHDIterationsNumber of
logos.
Disable de‑
fragmentation
for VHD disk
compaction
SOFTWARE\
Citrix\
UserProfileManager
\
UserGroupConfigs
\<SID>
REG_DWORD CompactVHDnDefrag0:Disable;
1:Enable;
© 1999–2024 Cloud Soware Group, Inc. All rights reserved. 142

Profile Management 2402 LTSR
Policy Name Key Path Value Type Value Name Value Data
Value
Description
Profile
container
SOFTWARE\
Citrix\
UserProfileManager
\
UserGroupConfigs
\<SID>\
ProfileContainer
REG_DWORD Enabled 0:Disable;
1:Enable;
SOFTWARE\
Citrix\
UserProfileManager
\
UserGroupConfigs
\<SID>\
ProfileContainer
\List
REG_SZ List item List item
Enable local
caching for
profile
containers
SOFTWARE\
Citrix\
UserProfileManager
\
UserGroupConfigs
\<SID>
REG_DWORD ProfileContainerLocalCache0:Disable;
1:Enable;
Folders to
exclude from
profile
container
SOFTWARE\
Citrix\
UserProfileManager
\
UserGroupConfigs
\<SID>\
ProfileContainerExclusionListDir
REG_DWORD Enabled 0:Disable;
1:Enable;
© 1999–2024 Cloud Soware Group, Inc. All rights reserved. 143

Profile Management 2402 LTSR
Policy Name Key Path Value Type Value Name Value Data
Value
Description
SOFTWARE\
Citrix\
UserProfileManager
\
UserGroupConfigs
\<SID>\
ProfileContainerExclusionListDir
\List
REG_SZ List item List item
Folders to
include in
profile
container
SOFTWARE\
Citrix\
UserProfileManager
\
UserGroupConfigs
\<SID>\
ProfileContainerInclusionListDir
REG_DWORD Enabled 0:Disable;
1:Enable;
SOFTWARE\
Citrix\
UserProfileManager
\
UserGroupConfigs
\<SID>\
ProfileContainerInclusionListDir
\List
REG_SZ List item List item
Files to
exclude from
profile
container
SOFTWARE\
Citrix\
UserProfileManager
\
UserGroupConfigs
\<SID>\
ProfileContainerExclusionListFile
REG_DWORD Enabled 0:Disable;
1:Enable;
© 1999–2024 Cloud Soware Group, Inc. All rights reserved. 144

Profile Management 2402 LTSR
Policy Name Key Path Value Type Value Name Value Data
Value
Description
SOFTWARE\
Citrix\
UserProfileManager
\
UserGroupConfigs
\<SID>\
ProfileContainerExclusionListFile
\List
REG_SZ List item List item
Files to
include in
profile
container
SOFTWARE\
Citrix\
UserProfileManager
\
UserGroupConfigs
\<SID>\
ProfileContainerInclusionListFile
REG_DWORD Enabled 0:Disable;
1:Enable;
SOFTWARE\
Citrix\
UserProfileManager
\
UserGroupConfigs
\<SID>\
ProfileContainerInclusionListFile
\List
REG_SZ List item List item
Enable VHD
disk
compaction
SOFTWARE\
Citrix\
UserProfileManager
\
UserGroupConfigs
\<SID>
REG_DWORD EnableVHDCompact0:Disable;
1:Enable;
© 1999–2024 Cloud Soware Group, Inc. All rights reserved. 145

Profile Management 2402 LTSR
Policy Name Key Path Value Type Value Name Value Data
Value
Description
Exclusion list SOFTWARE\
Citrix\
UserProfileManager
\
UserGroupConfigs
\<SID>\
ExclusionListRegistry
REG_DWORD Enabled 0:Disable;
1:Enable;
SOFTWARE\
Citrix\
UserProfileManager
\
UserGroupConfigs
\<SID>\
ExclusionListRegistry
\List
REG_SZ List item List item
Inclusion list SOFTWARE\
Citrix\
UserProfileManager
\
UserGroupConfigs
\<SID>\
InclusionListRegistry
REG_DWORD Enabled 0:Disable;
1:Enable;
SOFTWARE\
Citrix\
UserProfileManager
\
UserGroupConfigs
\<SID>\
InclusionListRegistry
\List
REG_SZ List item List item
© 1999–2024 Cloud Soware Group, Inc. All rights reserved. 146

Profile Management 2402 LTSR
Policy Name Key Path Value Type Value Name Value Data
Value
Description
NTUSER.DAT
backup
SOFTWARE\
Citrix\
UserProfileManager
\
UserGroupConfigs
\<SID>
REG_DWORD LastKnownGoodRegistry0:Disable;
1:Enable;
Exclusion list ‑
files
SOFTWARE\
Citrix\
UserProfileManager
\
UserGroupConfigs
\<SID>\
SyncExclusionListFiles
REG_DWORD Enabled 0:Disable;
1:Enable;
SOFTWARE\
Citrix\
UserProfileManager
\
UserGroupConfigs
\<SID>\
SyncExclusionListFiles
\List
REG_SZ List item List item
Exclusion list ‑
directories
SOFTWARE\
Citrix\
UserProfileManager
\
UserGroupConfigs
\<SID>\
SyncExclusionListDir
REG_DWORD Enabled 0:Disable;
1:Enable;
© 1999–2024 Cloud Soware Group, Inc. All rights reserved. 147

Profile Management 2402 LTSR
Policy Name Key Path Value Type Value Name Value Data
Value
Description
SOFTWARE\
Citrix\
UserProfileManager
\
UserGroupConfigs
\<SID>\
SyncExclusionListDir
\List
REG_SZ List item List item
Logon
Exclusion
Check
SOFTWARE\
Citrix\
UserProfileManager
\
UserGroupConfigs
\<SID>
REG_DWORD LogonExclusionCheck0:Synchronize
excluded files
or folders;
1:Ignore
excluded files
or folders;
2:Delete
excluded files
or folders;
Large File
Handling ‑
Files to be
created as
symbolic links
SOFTWARE\
Citrix\
UserProfileManager
\
UserGroupConfigs
\<SID>\
LargeFileHandlingList
REG_DWORD Enabled 0:Disable;
1:Enable;
SOFTWARE\
Citrix\
UserProfileManager
\
UserGroupConfigs
\<SID>\
LargeFileHandlingList
\List
REG_SZ List item List item
© 1999–2024 Cloud Soware Group, Inc. All rights reserved. 148

Profile Management 2402 LTSR
Policy Name Key Path Value Type Value Name Value Data
Value
Description
Directories to
synchronize
SOFTWARE\
Citrix\
UserProfileManager
\
UserGroupConfigs
\<SID>\
SyncDirList
REG_DWORD Enabled 0:Disable;
1:Enable;
SOFTWARE\
Citrix\
UserProfileManager
\
UserGroupConfigs
\<SID>\
SyncDirList
\List
REG_SZ List item List item
Files to
synchronize
SOFTWARE\
Citrix\
UserProfileManager
\
UserGroupConfigs
\<SID>\
SyncFileList
REG_DWORD Enabled 0:Disable;
1:Enable;
SOFTWARE\
Citrix\
UserProfileManager
\
UserGroupConfigs
\<SID>\
SyncFileList
\List
REG_SZ List item List item
© 1999–2024 Cloud Soware Group, Inc. All rights reserved. 149

Profile Management 2402 LTSR
Policy Name Key Path Value Type Value Name Value Data
Value
Description
Folders to
mirror
SOFTWARE\
Citrix\
UserProfileManager
\
UserGroupConfigs
\<SID>\
MirrorFoldersList
REG_DWORD Enabled 0:Disable;
1:Enable;
SOFTWARE\
Citrix\
UserProfileManager
\
UserGroupConfigs
\<SID>\
MirrorFoldersList
\List
REG_SZ List item List item
Accelerate
folder
mirroring
SOFTWARE\
Citrix\
UserProfileManager
\
UserGroupConfigs
\<SID>
REG_DWORD AccelerateFolderMirroring0:Disable;
1:Enable;
Profile
streaming
SOFTWARE\
Citrix\
UserProfileManager
\
UserGroupConfigs
\<SID>
REG_DWORD PSEnabled 0:Disable;
1:Enable;
Enable profile
streaming for
pending area
SOFTWARE\
Citrix\
UserProfileManager
\
UserGroupConfigs
\<SID>
REG_DWORD PSForPendingAreaEnabled0:Disable;
1:Enable;
© 1999–2024 Cloud Soware Group, Inc. All rights reserved. 150

Profile Management 2402 LTSR
Policy Name Key Path Value Type Value Name Value Data
Value
Description
Always cache SOFTWARE\
Citrix\
UserProfileManager
\
UserGroupConfigs
\<SID>
REG_DWORD PSAlwaysCache 0:Disable;
1:Enable;
SOFTWARE\
Citrix\
UserProfileManager
\
UserGroupConfigs
\<SID>
REG_DWORD PSAlwaysCacheSizeCache files
this size or
larger (in MB).
Timeout for
pending area
lock files
(days)
SOFTWARE\
Citrix\
UserProfileManager
\
UserGroupConfigs
\<SID>
REG_DWORD PSPendingLockTimeoutTimeout for
pending area
lock files
(days).
Streamed
user profile
groups
SOFTWARE\
Citrix\
UserProfileManager
\
UserGroupConfigs
\<SID>\
PSUserGroupsList
REG_DWORD Enabled 0:Disable;
1:Enable;
SOFTWARE\
Citrix\
UserProfileManager
\
UserGroupConfigs
\<SID>\
PSUserGroupsList
\List
REG_SZ List item List item
© 1999–2024 Cloud Soware Group, Inc. All rights reserved. 151

Profile Management 2402 LTSR
Policy Name Key Path Value Type Value Name Value Data
Value
Description
Profile
Streaming
Exclusion list ‑
directories
SOFTWARE\
Citrix\
UserProfileManager
\
UserGroupConfigs
\<SID>\
StreamingExclusionList
REG_DWORD Enabled 0:Disable;
1:Enable;
SOFTWARE\
Citrix\
UserProfileManager
\
UserGroupConfigs
\<SID>\
StreamingExclusionList
\List
REG_SZ List item List item
Enable cross‑
platform
settings
SOFTWARE\
Citrix\
UserProfileManager
\
UserGroupConfigs
\<SID>
REG_DWORD CPEnabled 0:Disable;
1:Enable;
Cross‑
platform
settings user
groups
SOFTWARE\
Citrix\
UserProfileManager
\
UserGroupConfigs
\<SID>\
CPUserGroupList
REG_DWORD Enabled 0:Disable;
1:Enable;
© 1999–2024 Cloud Soware Group, Inc. All rights reserved. 152

Profile Management 2402 LTSR
Policy Name Key Path Value Type Value Name Value Data
Value
Description
SOFTWARE\
Citrix\
UserProfileManager
\
UserGroupConfigs
\<SID>\
CPUserGroupList
\List
REG_SZ List item List item
Path to cross‑
platform
definitions
SOFTWARE\
Citrix\
UserProfileManager
\
UserGroupConfigs
\<SID>
REG_SZ CPSchemaPath Path to cross‑
platform
definitions.
Path to cross‑
platform
settings store
SOFTWARE\
Citrix\
UserProfileManager
\
UserGroupConfigs
\<SID>
REG_SZ CPPath Path to cross‑
platform
settings store.
Source for
creating cross‑
platform
settings
Soware\Policies\Citrix\UserProfileManagerREG_DWORD CPMigrationFromBaseProfileToCPStore0:Disable;
1:Enable;
Enable Citrix
Virtual Apps
Optimization
SOFTWARE\
Citrix\
UserProfileManager
\
UserGroupConfigs
\<SID>
REG_DWORD XenAppOptimizationEnabled0:Disable;
1:Enable;
© 1999–2024 Cloud Soware Group, Inc. All rights reserved. 153

Profile Management 2402 LTSR
Policy Name Key Path Value Type Value Name Value Data
Value
Description
Path to Citrix
Virtual Apps
optimization
definitions
SOFTWARE\
Citrix\
UserProfileManager
\
UserGroupConfigs
\<SID>
REG_SZ XenAppOptimizationDefinitionPathPath to Citrix
Virtual Apps
optimization
definitions.
Files to
include in the
shared store
for
deduplication
SOFTWARE\
Citrix\
UserProfileManager
\
UserGroupConfigs
\<SID>\
SharedStoreFileInclusionList
REG_DWORD Enabled 0:Disable;
1:Enable;
SOFTWARE\
Citrix\
UserProfileManager
\
UserGroupConfigs
\<SID>\
SharedStoreFileInclusionList
\List
REG_SZ List item List item
Files to
exclude from
the shared
store
SOFTWARE\
Citrix\
UserProfileManager
\
UserGroupConfigs
\<SID>\
SharedStoreFileExclusionList
REG_DWORD Enabled 0:Disable;
1:Enable;
© 1999–2024 Cloud Soware Group, Inc. All rights reserved. 154

Profile Management 2402 LTSR
Policy Name Key Path Value Type Value Name Value Data
Value
Description
SOFTWARE\
Citrix\
UserProfileManager
\
UserGroupConfigs
\<SID>\
SharedStoreFileExclusionList
\List
REG_SZ List item List item
Enable VHD
auto‑
expansion for
profile
container
SOFTWARE\
Citrix\
UserProfileManager
\
UserGroupConfigs
\<SID>
REG_DWORD Enabled 0:Disable;
1:Enable;
Profile
container
auto‑
expansion
threshold
SOFTWARE\
Citrix\
UserProfileManager
\
UserGroupConfigs
\<SID>
REG_DWORD AutoExtendThresholdAuto‑
expansion
threshold
(percent)
Profile
container
auto‑
expansion
increment
SOFTWARE\
Citrix\
UserProfileManager
\
UserGroupConfigs
\<SID>
REG_DWORD AutoExtendSize Auto‑
expansion
increment (in
GB)
Profile
container
auto‑
expansion
limit
SOFTWARE\
Citrix\
UserProfileManager
\
UserGroupConfigs
\<SID>
REG_DWORD AutoExtendLimit Auto‑
expansion
limit (in GB)
© 1999–2024 Cloud Soware Group, Inc. All rights reserved. 155

Profile Management 2402 LTSR
Policy Name Key Path Value Type Value Name Value Data
Value
Description
Default
capacity of
VHD
containers
SOFTWARE\
Citrix\
UserProfileManager
\
UserGroupConfigs
\<SID>
REG_DWORD VhdCapacity Default
capacity (in
GB)
Enable
exclusive
access to VHD
containers
SOFTWARE\
Citrix\
UserProfileManager
\
UserGroupConfigs
\<SID>
REG_DWORD DisableConcurrentAccessToProfileContainer0:Disable;
1:Enable;
Profile
container
SOFTWARE\
Citrix\
UserProfileManager
\
UserGroupConfigs
\<SID>
REG_DWORD DisableConcurrentAccessToOneDriveContainer0:Disable;
1:Enable;
OneDrive
container
UWP app
roaming
SOFTWARE\
Citrix\
UserProfileManager
\
UserGroupConfigs
\<SID>
REG_DWORD EnableUwpAppsRoaming0:Disable;
1:Enable;
Enable support for Azure AD joined and non‑domain‑joined VDA
machines
August 6, 2024
Citrix Profile Management can now provide profile management for Azure AD joined and non‑domain‑
joined VDA machines in a customer‑managed Azure subscription.
© 1999–2024 Cloud Soware Group, Inc. All rights reserved. 156

Profile Management 2402 LTSR
Prerequisites
• Profile Management 2203 or later
• VDA version 2203 or later
• If Workspace Environment Management (WEM) is used to store the profile storage server’s cre‑
dentials, WEM agent version 2109.2.0.1 or later
Enable Profile Management
To enable Profile Management on Azure AD joined or non‑domain‑joined VDA machines, complete the
following settings:
1. On Profile Management, Set the Enable Profile management policy to enabled.
2. Set the Path to user store policy to a valid path that is accessible to your VDA. For example, a
user store is accessible when it resides on a file server or an Azure Files share.
3. Set the Profile container policy to Enable, and then add an asterisk (*) to the profile container
list. For more information, see Enable the profile container for the entire user profile.
4. Set the Enable credential‑based access to user stores policy to Enabled. Next, save the pro‑
file storage server’s credentials in WEM or Windows Credential Manager so that Profile Manage‑
ment can access user stores. For more information, see Enable credential‑based access to user
stores.
Enable credential‑based access to user stores
August 6, 2024
By default, Citrix Profile Management impersonates the current user to access the user store. This
behavior requires the current user to have permission to directly access the user store. By contrast,
the Enable credential‑based access to user stores policy lets Profile Management access the user
store using the store’s own credentials.
This policy gives you more flexibility in deploying and accessing the user store. For example, this
policy lets you deploy the user store on a file share that the current user doesn’t have permission to
access, such as Azure Files. Or, you can enable this policy if you don’t want Profile Management to
impersonate the current user when accessing user stores.
© 1999–2024 Cloud Soware Group, Inc. All rights reserved. 157

Profile Management 2402 LTSR
Note:
Profile Management provides two types of profile solutions, and the user store can serve as the
storage location for both of them:
• File‑based solution. User profiles are fetched from the remote user store to the local com‑
puter on logon and written back on logo.
• Container‑based solution. User profiles are stored in VHDX files (known as profile contain‑
ers). Those VHDX files are attached on logon and detached on logo.
This policy is available both for the file‑based and container‑based solutions. For Profile Manage‑
ment versions earlier than 2212, this policy is available only for the container‑based solution.
For more information about creating secure user stores, see Create a file share for roaming user
profiles on the Microso TechNet website.
To let Profile Management access the user store by using the store’s own credentials, you must per‑
form both of the following actions:
• Enable the Enable credential‑based access to user stores policy on each machine where Pro‑
file Management runs.
• Add the store’s credentials to those machines.
You can use one of the following ways to achieve that goal: Workspace Environment Management
(WEM) service and GPOs.
Note:
With the container‑based solution enabled, NTFS permissions are retained for the user store.
Enable credential‑based access using the WEM service
Using WEM eliminates the need to enter the same credentials for each machine where Profile Manage‑
ment runs. You enable the policy and enter the credentials for the user store only once in the WEM
service console. The WEM service then applies these settings to each machine.
Detailed steps are as follows:
1. In the administration console, go to Policies and Profiles > Citrix Profile Management Set‑
tings > User Store Credentials.
2. On the User Store Credentials tab, select the Enable credential‑based access to user store
check box.
© 1999–2024 Cloud Soware Group, Inc. All rights reserved. 158

Profile Management 2402 LTSR
3. Click Add. The New Credential dialog box appears.
4. Type the FQDN or IP address of your profile storage server and its credentials.
5. Click OK.
Enable credential‑based access using GPOs
When you choose to enable the policy using GPOs, you must manually add the credentials on each
machine where Profile Management runs.
© 1999–2024 Cloud Soware Group, Inc. All rights reserved. 159

Profile Management 2402 LTSR
Enable the policy
Detailed steps are as follows:
1. Open the Group Policy Management Editor.
2. Access Policies > Administrative Templates: Policy definitions (ADMX files) > Citrix Compo‑
nents > Profile Management > Advanced settings, and then double‑click Enable credential‑
based access to user stores.
3. Select Enabled.
4. Click OK.
Add the credentials to Windows Credential Manager
Profile Management uses the credentials saved on the machine to access the user store. Add the
credentials for the user store to Windows Credential Manager on each machine where Profile Man‑
agement runs. Detailed steps are as follows:
1. Download PsExec from the Sysinternals website and unzip files to C:\PSTools.
2. From the Start menu, right‑click Command Prompt and select Run as administrator. A com‑
mand shell starts.
3. Run the C:\PSTools\PsExec -s -i cmd command. Another command shell starts.
Note:
The -s parameter indicates you’re running the tool using the Local System account. As a
result, the credentials can be securely saved.
4. In the new command shell, run the rundll32.exe keymgr.dll, KRShowKeyMgr com‑
mand. The Stored User Names and Passwords dialog box appears.
5. In the Stored User Names and Passwords dialog box, click Add.
6. Type the FQDN or IP address of your profile storage server and its credentials, leave the default
credential type as is, and then click OK.
Enable large file handling
August 6, 2024
Large files existingin a profile are a commonreasonfor a slow logon or logo. Citrix provides an option
to redirect large files to the user store. This option eliminates the need to synchronize those files over
the network.
© 1999–2024 Cloud Soware Group, Inc. All rights reserved. 160

Profile Management 2402 LTSR
To enable large file handling in group policy, do the following:
1. Under Profile Management, open the File system folder.
2. Double‑click the Large File Handling ‑ Files to be created as symbolic links policy.
3. Specify files to be handled.
To enable large file handling in the UPMPolicyDefaults_all.ini file, do the following:
1. Add the [LargeFileHandlingList] section in the .ini file.
2. Specify files to be handled under that section.
You can use wildcards in policies that refer to files. For example,
!ctx_localappdata!\Microso\Outlook\*.ost
Make sure that these files are not added to the exclusion list from Citrix Profile Management.
Note
Some applications do not allow concurrent file access. Citrix recommends that you take appli‑
cation behavior into consideration when you define your large file handling policy.
Citrix recommends thatyou apply Microso security updateMS15‑090. As a general security prac‑
tice, make sure that you keep your Microso Windows systems updated.
Enable file deduplication
August 6, 2024
Identical files can exist in various user profiles in the user store. Having duplicate instances of files
stored in the user store increases your storage cost.
File deduplication policies let Profile Management remove duplicatefiles from the user store and store
one instance of them in a central location (called shared store). Doing so avoids file duplication in the
user store, thus reducing your storage cost. The deduplication is applied to the user store and each
replicated user store.
To enable file deduplication and specify files to include in the shared store, configure the following
policies:
1. File deduplication > Files to include in the shared store for deduplication
2. (Optional) File deduplication > Files to exclude from the shared store
3. (Optional) File deduplication > Minimum size of files to deduplicate from profile containers
© 1999–2024 Cloud Soware Group, Inc. All rights reserved. 161

Profile Management 2402 LTSR
Note:
Starting with 2311, file deduplication policies also apply to profile containers. To ensure
the optimal user logon experience, Profile Management deduplicates a maximum of 10
files from profile containers (although you can define more than 10 files in the Files to
include in the shared store for deduplication policy). Deduplicationoccurswhen a listed
file is updated or created and exceeds the specified size, as long as there are fewer than 10
deduplicated files.
Aer you configure file deduplication policies, Profile Management creates the shared store in the
same path as the user store. For example,
• Path to the user store: \\server\profiles$\\%USERDOMAIN%\\%USERNAME%\!
CTX_OSNAME!!CTX_OSBITNESS!
• Path to the shared store: \\server\profiles$\\%USERDOMAIN%\SharedFilesStore
Include files in the shared store for deduplication
If duplicated files exist in the user store, enable file deduplication and specify files to include in the
shared store for deduplication.
Important:
Since all files deduplicated into the shared store can be read by all domain users, we recommend
against deduplicating personal and sensitive data.
Detailed steps are as follows:
1. Open the Group Policy Management Editor.
2. Access Policies > Administrative Templates: Policy definitions (ADMX files) > Citrix Com‑
ponents > Profile Management > File deduplication.
3. Double‑click Files to include in the shared store for deduplication.
4. Select Enabled.
5. In the List of files to include in the shared store field, click Show.
6. Enter the file names with paths relative to the user profile.
Wildcards are supported with the following considerations:
• Wildcards in file names are applied recursively. To restrict them only to the current folder,
use the vertical bar (|).
© 1999–2024 Cloud Soware Group, Inc. All rights reserved. 162

Profile Management 2402 LTSR
• Wildcards in folder names are not applied recursively.
Examples:
• Downloads\profilemgt_x64.msi —The profilemgt_x64.msi file in the Downloads
folder
• *.cfg —Files with the .cfg extension in the user profile folder and its subfolders
• Music\* —Files in the Music folder and its subfolders
• Downloads\*.iso —Files with the .iso extension in the Downloads folder and its sub‑
folders
• Downloads\*.iso| —Files with the .iso extension only in the Downloads folder
• AppData\Local\Microsoft\OneDrive\*\*.dll —Files with the .dll extension
in any immediate subfolder of the AppData\Local\Microso\OneDrive folder
7. Click OK and OK again.
Configuration precedence
1. If this setting is disabled, the shared store is disabled.
2. If this setting isn’t configured here, the value from the .ini file is used.
3. If this setting is not configured either here or in the .ini file, the shared store is disabled.
Exclude files from the shared store
Wildcardcharacters let you include a group of files in the shared store all at once. To exclude some files
from the group, enable and configure the Files to exclude from the shared store policy as follows:
1. Open the Group Policy Management Editor.
2. Access Policies > Administrative Templates: Policy definitions (ADMX files) > Citrix Com‑
ponents > Profile Management > File deduplication.
3. Double‑click Files to exclude from the shared store.
4. Select Enabled.
5. In the
List of files to exclude from the shared store
field, click
Show
.
6. Enter the file names with paths relative to the user profile.
Wildcards are supported with the following considerations:
• Wildcards in file names are applied recursively. To restrict them only to the current folder,
use the vertical bar (|).
• Wildcards in folder names are not applied recursively.
© 1999–2024 Cloud Soware Group, Inc. All rights reserved. 163

Profile Management 2402 LTSR
Examples:
• Downloads\profilemgt_x64.msi —The profilemgt_x64.msi file in the Downloads
folder
• *.tmp —Files with the .tmp extension in the user profile folder and its subfolders
• AppData\*.tmp —Files with the .tmp extension in the AppData folder and its subfolders
• AppData\*.tmp| —Files with the .tmp extension only in the AppData folder
• Downloads\*\a.txt —The a.txt file in any immediate subfolder of the Downloads
folder
7. Click OK and OK again.
Configuration precedence
1. If this setting is disabled, no files are excluded.
2. If this setting isn’t configured here, the value from the .ini file is used.
3. If this setting is not configured either here or in the .ini file, no files are excluded.
Specify the minimum size of files to deduplicate from profile containers
When profile containers areenabled, you can specify the minimum size of files todeduplicate from pro‑
file containers. By default, Profile Management deduplicates files from profile containers only when
they exceed 256 MB. If necessary, you can increase this threshold size using these steps:
1. Open the Group Policy Management Editor.
2. Access Policies > Administrative Templates: Policy definitions (ADMX files) > Citrix Com‑
ponents > Profile Management > File deduplication.
3. Double‑click Minimum size of files to deduplicate from profile containers.
4. Select Enabled.
5. In the Minimum size in megabytes field, enter a value greater than 256 as needed.
6. Click OK.
Configuration precedence
1. If this setting is not configured here, the value from the .ini file is used.
2. If this setting is not configured either here or in the .ini file, the value is 256.
Configure shared store security settings
If no shared store exists, Profile Management automatically creates one with the following permission
settings:
© 1999–2024 Cloud Soware Group, Inc. All rights reserved. 164

Profile Management 2402 LTSR
• Domain computers: Full control access
• Domain users: Read access
Since the default settings grant full control access to domain computers, we recommend you manu‑
ally create the shared store and implement credential‑based access for improved security. To do so,
follow these steps:
1. Create the shared store folder at the same directory level as the %USERNAME% parame‑
ter in the Path to user store setting. For example, the Path to user store setting is
\\SERVER\UPM_USER_STORE\\%USERNAME%.%USERDOMAIN%\!CTX_OSNAME!!
CTX_OSBITNESS!, then the shared store folder must be \\SERVER\UPM_USER_STORE\
SharedStore.
2. Grant the following permissions for the shared store. As shown in this figure, the user
SharedStoreManagementUser is the credential used to access the shared store.
3. On each VDA, add Windows credentials for the SharedStoreManagementUser user
account to access the shared store. You can use Windows Credential Manager or Work‑
space Environment Management for this purpose. See the procedures described in Enable
credential‑based access to user stores for details.
Enable native Outlook search experience
August 6, 2024
The Enable search index roaming for Outlook feature provides native Outlook search experience.
With this feature, the Oline Outlook Data File (.ost) and the search database specific to a user are
roamed along with the user profile.
© 1999–2024 Cloud Soware Group, Inc. All rights reserved. 165

Profile Management 2402 LTSR
Prerequisites
This feature is available for machines that meet the following requirements:
• Operating system:
– Microso Windows 10 1709 or later
– Windows Server 2016 or later
• Microso Outlook 2019, 2016, or 2103, or Microso Oice 365
For the feature to take eect, make sure that machines have the Microso Windows Search Service
enabled. By default, it’s enabled on Windows desktops and disabled on Windows servers. For more
information about how to enable the service on Windows servers, see this Microso article. The fol‑
lowing versions have been tested and are supported:
• 7.0.20348.380, 7.0.20348.138,7.0.20344.1
• 7.0.21286.1000, 7.0.21343.1000
• 7.0.17134.376, 7.0.17134.285, 7.0.17134.228, 7.0.17134.1
• 7.0.16299.402, 7.0.16299.248, 7.0.16299.15
• 7.0.15063.413
• 7.0.14393.2457,7.0.14393.2430, 7.0.14393.2368, 7.0.14393.2312, 7.0.14393.2273, 7.0.14393.2248,
7.0.14393.1884, 7.0.1493.1593
• 7.0.1393.2125, 7.0.1393.1884, 7.0.1393.1770
• 7.0.10240.17443
• 7.0.9600.18722
Note:
This feature is expected to support the future versions of the Microso Windows Search Service.
If you find that the feature does not support specific future versions of the Microso Windows
Search Service, contact Citrix Technical Support.
How it works
The VHDX (Virtual Hard Disk) is a disk file format that is used to represent virtual and logical disk stor‑
age space for virtual machines. The Enable search index roaming for Outlook feature relies on VHDX
files to work.
VHDX files are created for each user that uses the feature. VHDX files store a user‑specific profile on a
separate virtual disk that is dedicated to that user’s profile. Profile Management mounts VHDX files
on logon and unmounts them on logo. There are two VHDX files:
© 1999–2024 Cloud Soware Group, Inc. All rights reserved. 166

Profile Management 2402 LTSR
• OutlookOST.vhdx file, storing the Oline Outlook Data File (.ost)
• OutlookSearchIndex.vhdx file, storing the search index database for the oline folder file stored
in the OutlookOST.vhdx file
Note:
By default, Profile Management automatically reattaches VHDX files that are detached during a
session. For more information, see Automatically reattach detached VHDX disks in sessions.
Profile Management provides a default VHDX capacity of 30 GB. Plan your storage quota accord‑
ingly. If the actual usage of your VHDX exceeds the quota you configured earlier, your VHDX file
is unmounted.
Automatic switching between Cached Exchange mode and Online mode
Profile Management provides an uninterrupted Outlook service on Outlook container‑enabled ma‑
chines:
• When detecting that all conditions for Outlook container to work are met on user logon, Pro‑
file Management automatically enables Cached Exchange mode for Outlook. With Cached Ex‑
change mode enabled, users are linked to their Outlook containers for mailbox data. Those
conditions include:
– The Enable search index roaming for Outlook policy is enabled.
– The Outlook container is attached.
– The customized OST path is not set or set to appdata\local\microsoft\outlook,
the mounting path of Outlook container.
• When detecting that the container is detached during the session, Profile Management switches
Outlook from Cached Exchange mode to Online mode. Users are linked to the Exchange Server
for mailbox data.
• When detecting that the container is reattached during the session, Profile Management
switches Outlook back to Cached Exchange mode.
Support for concurrent sessions
With the Enable concurrent session support for Outlook search data roaming feature, Profile Man‑
agement provides the native Outlook search experience in concurrent sessions of the same user.
The feature assigns a copy of the Outlook OST file to each concurrent session of a user. By default,
Profile Management provides two VHDX disks to store Outlook OST files (one file per disk). If the user
starts more sessions, the additional Outlook OST files are stored in the local profile.
© 1999–2024 Cloud Soware Group, Inc. All rights reserved. 167

Profile Management 2402 LTSR
If you have storage capacity available, you can increase the default number of the VHDX disks. For
example, set the number to 3. As a result, Profile Management stores the OST files for the first three
sessions on VHDX disks and those OST files for any subsequent sessions in the local profile.
Automatic backup and restore of Outlook search index database
Profile Management can automatically save a backup of the last known good copy of the search index
database and revert to the copy if corruption occurs.
If this feature is enabled, Profile Management saves a backup of the search index database each time
the database is mounted successfully on logon. Profile Management deletes the previously saved
backup aer a new backup is saved successfully. Profile Management treats the backup as the good
copy of the search index database. When an attempt to mount the search index database fails, Profile
Management automatically reverts the search index database to the last known good copy.
Important:
• Profile Management does not save a backup of the search index database aer the policy
takes eect the first time the search index database is created.
• Profile Management deletes the previously saved backup aer a new backup is saved suc‑
cessfully. The backup consumes more of the available storage space of the VHDX files.
Enable the feature
To provide native Outlook search experience, enable the Enable search index roaming for Outlook
feature and enable its enhancements if needed. Detailed steps are as follows.
1. Open the Group Policy Management Editor.
2. Access Policies > Administrative Templates: Policy definitions (ADMX files) > Citrix Com‑
ponents > Profile Management > Advanced settings.
3. Enable the feature using the following steps:
a) Double‑click the Enable search index roaming for Outlook policy.
b) Select Enabled.
c) Click OK.
4. To support the feature in concurrent sessions of the same user, follow these steps:
a) Double‑click the Enable concurrent session support for Outlook search data roaming
policy.
b) Select Enabled.
© 1999–2024 Cloud Soware Group, Inc. All rights reserved. 168

Profile Management 2402 LTSR
c) If you have storage capacity available, increase the number of the default VHDX disks in
the Maximum number of VHDX disks for storing Outlook OST files field. For more infor‑
mation about this field, see Support for concurrent sessions.
d) Click OK.
5. To provide a high level of stability for the feature, follow these steps:
a) Double‑click the Outlook search index database‑backup and restore policy.
b) Select Enabled.
c) Click OK.
6. To provide a high level of availability for the feature, follow these steps:
a) Double‑click the Automatically reattach VHDX disks in sessions policy.
b) Select Enabled.
c) Click OK.
For your changes to take eect, run the gpupdate /force command from the command prompt,
log o from all sessions, and then log on again. For details, see https://docs.microsoft.com/en‑
us/windows‑server/administration/windows‑commands/gpupdate.
Note:
To let this feature work on Microso Windows 10 1809 and later, and on Windows Server 2019 and
later, add a DWORD value EnablePerUserCatalog = 0 under HKEY_LOCAL_MACHINE\
SOFTWARE\Microsoft\Windows Search. Restart the VDA to make your registry setting
take eect.
Enable the OneDrive container
August 6, 2024
With the OneDrive container, OneDrive folders can roam with users. As a result, a user can access the
same OneDrive folders on any computer.
The OneDrive container is a VHDX‑based folder roaming solution. Profile Management creates a VHDX
file per user on a file share and stores the users’OneDrive folders into the VHDX files. The VHDX files
are attached when users log on and detached when users log o.
Profile Management provides the following two profile solutions, and the OneDrive container applies
to both of them:
• File‑based. User profiles are fetched from the remote user store to the local computer on logon
and written back on logo.
© 1999–2024 Cloud Soware Group, Inc. All rights reserved. 169

Profile Management 2402 LTSR
• Container‑based. User profiles are stored in VHDX files (known as profile containers). Those
VHDX files are automatically attached on logon and detached on logo.
The general workflow for deploying the OneDrive container is as follows:
1. (Optional) specify the storage path for the VHDX files
2. Enable and configure the OneDrive container
Note:
• Starting with Citrix Profile Management 2206, if you use the container‑based solution,
OneDrive folders roam with users by default. However, if you want to roam OneDrive
folders using a separate container, you can also enable the OneDrive container.
• Starting with Citrix Profile Management 2311, OneDrive container supports the follow‑
ing sync features:
– Multi‑session runtime sync. Any changes a user makes to the OneDrive files in
one session are now instantly visible in all concurrent sessions.
– Single Sign‑On (SSO) sync. Users don’t need to reenter credentials for
OneDrive during subsequent logons.
(Optional) specify the storage path for the VHDX files
By default, the VHDX files for the OneDrive container are stored on the same storage server as the user
store.
For example, you configure the path of the user store as
\\myprofileserver\profiles$\\%username%.%domain%\!ctx_osname!.!
ctx_osbitness!
The VHDX files for the OneDrive container are then stored in
\\myprofileserver\profiles$\\%username%.%domain%\!ctx_osname!.!
ctx_osbitness!\OneDrive
If needed, you can specify a dierent file share to store VHDX disks for OneDrive folders. For more
information, see Specify the storage path for VHDX files.
Enable and configure the OneDrive container
Enable the OneDrive container policy and specify the OneDrive folders to store in the VHDX files. De‑
tailed steps are as follows:
1. Open the Group Policy Management Editor.
© 1999–2024 Cloud Soware Group, Inc. All rights reserved. 170

Profile Management 2402 LTSR
2. Access Policies > Administrative Templates: Policy definitions (ADMX files) > Citrix Compo‑
nents > Profile Management > Advanced settings, and then double‑click Enable OneDrive
container.
3. Select Enabled.
4. In the List of OneDrive folders field, click Show.
5. Enter your OneDrive folders in the form of the path relative to the user profile, and then click
OK.
For example, if the absolute path of your OneDrive folder is %userprofile%\OneDrive -
Citrix, add OneDrive - Citrix to the list.
Note:
The relative paths cannot include any variables, such as !CTX_OSNAME! and !
CTX_OSBITNESS!.
6. Click OK.
Enable UWP app roaming
August 12, 2024
With the Enable UWP apps roaming policy, you can let UWP (Universal Windows Platform) apps roam
with users. As a result, users can access the same UWP apps from dierent devices.
Note:
This policy is compatible only with Windows 10 and is incompatible with other Windows versions
or Windows Server versions.
How it works
When the Enable UWP apps roaming policy is enabled, Profile Management operates as follows:
1. When a user starts the installation of a UWP app, Profile Management monitors the installation
process.
2. If it’s the initial installation of the app in your environment, Profile Management creates a VHDX
disk in the { User_Store_File_Share_Path } \AppStore\ folder (referred to as
UWP app container) and stores the app (except personal settings) in that disk. For subsequent
installation of the same app, Profile Management doesn’t create an additional VHDX disk. Thus,
each UWP app has a single VHDX disk within the UWP app container.
© 1999–2024 Cloud Soware Group, Inc. All rights reserved. 171

Profile Management 2402 LTSR
3. Upon user logon to a machine, VHDX disks of the UWP apps installed by the user are attached.
Upon user logo, those disks are detached.
Important:
• UWP app roaming applies only to UWP apps installed using per‑user packages aer the
policy is enabled. In other words, if the policy is enabled aer an app is installed, the app
won’t benefit from roaming until it’s reinstalled using a per‑user package.
• All users share UWP VHDX disks.
Enable the UWP app roaming policy using a GPO
Detailed steps are as follows:
1. Open the Group Policy Management Editor.
2. Access Policies > Administrative Templates: Policy definitions (ADMX files) > Citrix Com‑
ponents > Profile Management > Advanced settings.
3. Double‑click the UWP apps roaming policy.
4. In the policy window that appears, select Enabled, and then click OK.
5. To provide a better logon and logo experience for UWP roaming, enable the Accelerate folder
mirroring policy as follows:
a) Access Policies > Administrative Templates: Policy definitions (ADMX files) > Citrix
Components > Profile Management > File system > Synchronization.
b) Double‑click the Accelerate folder mirroring policy.
c) In the policy window that appears, select Enabled, and then click OK.
The configuration precedence is as follows:
• If this setting isn’t configured using a GPO, Studio, or Workspace Experience Management
(WEM), the value from the .ini file is used.
• If this setting isn’t configured anywhere, this feature is disabled.
For your changes to take eect, run the gpupdate /force command from the command prompt
as documented at https://docs.microsoft.com/en‑us/windows‑server/administration/windows‑
commands/gpupdate.
Configure VHD settings
August 26, 2024
This article shows you how to customize and optimize VHDX‑based features:
© 1999–2024 Cloud Soware Group, Inc. All rights reserved. 172

Profile Management 2402 LTSR
• Specify the storage capacity and path for VHD containers
Applies to: profile containers, OneDrive containers, folder mirroring containers, and Outlook
search index containers.
• Enable and configure VHD disk compaction settings
Applies to: profile containers, OneDrive containers, and folder mirroring containers
• Enable exclusive access to VHD containers
Applies to: profile containers and OneDrive containers
• Enable automatic reattachment of VHDX disks in sessions
Applies to: profile containers, Outlook search index containers, folder mirroring containers, and
OneDrive containers.
For more information about these containers see:
• Profile container
• Outlook search index roaming (called Outlook search index container)
• Accelerating folder mirroring solution (called folder mirroring container)
• OneDrive container
Specify the storage capacity and path for VHD containers
By default, each VHDX container is stored in the user store with a disk capacity of 50 GB. If needed, you
can choose a dierent storage path for it and change its default capacity.
The following lists the default and custom storage paths of VHDX files:
• Profile container settings
– Default: {USER_STORE_PATH}\ProfileContainer\{OS_NAME_SHORT}\
– Custom: {VHDX_STORE_PATH}\ProfileContainer\{OS_NAME_SHORT}\
• Outlook search index roaming
– Default: {USER_STORE_PATH}\VHD\{OS_NAME_SHORT}\
– Custom: {VHDX_STORE_PATH}\VHD\{OS_NAME_SHORT}\
• Accelerate folder mirroring
– Default: {USER_STORE_PATH}\MirrorFolders\
– Custom: {VHDX_STORE_PATH}\MirrorFolders\
• Enable OneDrive container
© 1999–2024 Cloud Soware Group, Inc. All rights reserved. 173

Profile Management 2402 LTSR
– Default: {USER_STORE_PATH}\OneDrive\
– Custom: {VHDX_STORE_PATH}\OneDrive\
Profile Management now impersonates the current user to access the VHDX files and does not grant
Domain Computers full control permission to the storage path of the VHDX files.
Specify the storage path
Prepare a network storage location for the VHDX containers. Make sure that you grant your users
Modify permission or higher to the storage location.
Specify the storage path for VHDX containers by following these steps:
1. Open the Group Policy Management Editor.
2. Under Computer Configuration > Administrative Templates > Citrix Components > Profile
Management > Advanced settings, double‑click the Customize storage path for VHDX files
policy.
3. Select Enabled.
4. In the Path to store VHDX files field, type the full path of the storage location. Example: \\
myservername\vhdx_store.
5. Click Apply, and then click OK.
To enable the setting to take eect, do the following:
1. Log o from all sessions that are using the user profile.
2. Run the gpupdate /force command from the command prompt.
When the policy takes eect varies depending on the use cases:
• If it is the first time you specify a storage path for VHDX files, the policy takes eect aer
the user logs on.
• If it is you change the storage path for VHDX files, the policy takes eect aer the user logs
o for the first time.
For more information about the gpupdate command, see the Microso document.
If this setting is not configured here, the value from the .ini file is used. If this setting is not configured
here or in the .ini file, Profile Management stores the VHDX files in the user store.
Specify the default storage capacity for a VHD container
Each VHD container has a default storage capacity of 50 GB. To change the capacity, follow these
steps:
© 1999–2024 Cloud Soware Group, Inc. All rights reserved. 174

Profile Management 2402 LTSR
1. Open the Group Policy Management Editor.
2. Under Computer Configuration > Administrative Templates > Citrix Components > Profile
Management > Advanced settings, double‑click the Default capacity of VHD containers (GB)
policy.
3. Select Enabled.
4. In the Default capacity (in GB) field, type a new number as needed.
5. Click OK.
Enable and configure VHD disk compaction settings
VHD disk compaction is a process that reduces the size of a VHD file by removing empty space and
combining the data within the file. With the Enable VHD disk compaction policy, you can enable
VHD disk compaction for Profile Management. VHD files created by Profile Management are automati‑
cally compacted on user logo when certain conditions are met, thus saving space on central or cloud
storage.
This section guides you through enabling VHD disk compaction and adjusting the default compaction
settings and behavior.
Overview
VHDX disk compaction applies to the following VHDX files in Profile Management:
• Profile container
• OneDrive container
• Folder mirroring container
With the Enable VHD disk compaction policy enabled, a VHDX file is automatically compacted on
user logo when one of the following conditions is met:
• The free space ratio of the VHD file exceeds a specified value (by default, 20%)
Free space ratio = (current VHD file size –required minimum VHD file size*) ÷ current VHD file size
* Obtained using the GetSupportedSize method of the MSFT_Partition class from the Mi‑
croso Windows operating system. See Get the required minimum size for a VHD file for details.
• The number of logos since the last compaction reaches a specified value (by default, 5)
Note:
When a user logs o, the process of compacting VHD disks occurs in parallel with the logo
process. Thus, disk compaction does not prolong logo time. If the VHD disk compaction
process is not complete when the user attempts to log back on, Profile Management pre‑
© 1999–2024 Cloud Soware Group, Inc. All rights reserved. 175

Profile Management 2402 LTSR
vents the logon attempt.
Depending on your needs and the resources available, you can adjust those default settings using the
following policies in Advanced settings:
• Free space ratio to trigger VHD disk compaction
• Number of logos to trigger VHD disk compaction
When VHD disk compaction is enabled, the VHD disk file is first defragmented using the Windows built‑
in defrag tool, and then compacted. VHD disk defragmentation produces better compaction results
while disabling it can save system resources. If needed, you can disable defragmentation using the
following policy in Advanced settings:
• Disable defragmentation for VHD disk compaction
Enable VHD disk compaction
With VHD disk compaction enabled, you can save storage space consumed by profile container,
OneDrive container, and folder mirroring container.
To enable VHD disk compaction using a GPO, follow these steps:
1. Open the Group Policy Management Editor.
2. Access Policies > Administrative Templates: Policy definitions (ADMX files) > Citrix Com‑
ponents > Profile Management > Profile Container settings.
3. Double‑click the VHD disk compaction policy.
4. In the policy window that appears, select Enabled, and then click OK.
The configuration precedence is as follows:
1. If this setting isn’t configured using a GPO, Studio, or Workspace Environment Management
(WEM), the value from the .ini file is used.
2. If this setting isn’t configured anywhere, the feature is disabled.
Change the compaction settings and behavior
Enabling VHD disk compaction can save storage space, but it also consumes system I/O and network
bandwidth. You can monitor the system and network resource usage during the compaction process
to determine whether to adjust the following settings:
• Free space ratio to trigger VHD disk compaction
• Number of logos to trigger VHD disk compaction
• Disable defragmentation for VHD disk compaction
© 1999–2024 Cloud Soware Group, Inc. All rights reserved. 176

Profile Management 2402 LTSR
To change the default compaction settings and behavior using a GPO, follow these steps:
1. Open the Group Policy Management Editor.
2. Access Policies > Administrative Templates: Policy definitions (ADMX files) > Citrix Com‑
ponents > Profile Management > Advanced settings.
3. To change the free space ratio to trigger the compaction, follow these steps:
a) Double‑click the Free space ratio to trigger VHD disk compaction policy.
b) In the policy window that appears, select Enabled, enter a percentage as needed, and
then click OK.
4. To change the number of logos (since the last compact) to trigger the compaction, follow these
steps:
a) Double‑click the Number of logos to trigger VHD disk compaction policy.
b) In the policy window that appears, select Enabled, enter a value as needed, and then click
OK.
5. To disable defragmentation for VHD disk compaction, follow these steps:
a) Double‑click the Disable defragmentation for VHD disk compaction policy.
b) In the policy window that appears, select Enabled, and then click OK.
The configuration precedence is as follows:
• Free space ratio to trigger VHD disk compaction
1. If this setting isn’t configured using a GPO, Studio, or WEM, the value from the .ini file is
used.
2. If this setting isn’t configured anywhere, the default value 20 (%) is used.
• Number of logos to trigger VHD disk compaction
1. If this setting isn’t configured using a GPO, Studio, or WEM, the value from the .ini file is
used.
2. If this setting isn’t configured anywhere, the default value 5 is used.
• Disable defragmentation for VHD disk compaction
1. If this setting isn’t configured using a GPO, Studio, or WEM, the value from the .ini file is
used.
2. If this setting isn’t configured anywhere, defragmentation is enabled by default.
Get the required minimum size for a VHD file
Detailed steps are as follows:
© 1999–2024 Cloud Soware Group, Inc. All rights reserved. 177

Profile Management 2402 LTSR
1. Ensure that the VHD file is attached to the operating system.
2. Run this PowerShell command as an administrator:
Get-WmiObject -Class MSFT_Partition -Namespace ROOT\Microsoft\
Windows\Storage
All partitions of your current desktop appear.
3. Locate the partition corresponding to the VHD file, and then get the required minimum size
(SizeMin) using the GetSupportedSize method.
Enable exclusive access to VHD containers
Note:
• This setting applies to OneDrive containers and the profile containers that are enabled for
the entire user profile.
• If this setting is enabled for profile containers, the Enable multi‑session write‑back for
profile containers setting is automatically disabled.
By default, VHD containers allow concurrent access. If needed, you can disable concurrent access for
profile containers and OneDrive containers.
Detailed steps are as follows:
1. Open the Group Policy Management Editor.
2. Under Computer Configuration > Administrative Templates > Citrix Components > Profile
Management > Profile container settings, double‑click the Enable exclusive access to VHD
containers policy.
3. Select Enabled.
4. Select the containers to which you want to enable exclusive access. Options include Profile
container and OneDrive container.
5. Click OK.
To enable the setting to take eect, do the following:
1. Log o from all sessions that are using the user profile.
2. Run the gpupdate /force command from the command prompt.
If this policy is not configured here, the value from the .ini file is used. If this policy is not configured
either here or in the .ini file, the setting is disabled.
© 1999–2024 Cloud Soware Group, Inc. All rights reserved. 178

Profile Management 2402 LTSR
Enable automatic reattachment of VHDX disks in sessions
With the Automatically reattach VHDX disks in sessions feature, Profile Management ensures a high
level of stability of VHDX‑based policies.
Each VHDX‑related policy relies on the relevant VHDX disk to function properly. Profile Management
attaches those disks during logons and detaches them during logos. However, those VHDX disks
might be accidentally detached during a session, preventing the policies from functioning properly.
Possible causes for a VHDX disk to be detached include:
• File server encountering a transient error
• Slow network connection
With the Automatically reattach VHDX disks in sessions policy enabled, Profile Management moni‑
tors VHDX disks that are in use by the preceding VHDX‑based policies. If any of the disks is detached,
Profile Management reattaches the disk automatically.
Enable the policy
By default, the policy is enabled. We recommend you keep its default setting to ensure the high sta‑
bility of VHDX‑based policies.
If you experience performance issues with the VHDX‑based policies, follow these steps to check the
policy setting:
1. Open the Group Policy Management Editor.
2. Under Citrix Components > Profile Management > Advanced settings, double‑click the Au‑
tomatically reattach VHDX disks in sessions policy.
3. If the setting is Disabled, select Enabled, and then click OK.
For your changes to take eect, run the gpupdate /force command from the command prompt,
as documented in the Microso article.
Configuration precedence:
1. If this policy isn’t configured here, the value from the .ini file is used, which defaults to enabled.
2. If this setting is not configured either here or in the .ini file, the policy is enabled by default.
Resolve conflicting profiles
August 6, 2024
© 1999–2024 Cloud Soware Group, Inc. All rights reserved. 179

Profile Management 2402 LTSR
Conflicts between local Windows user profiles and Citrix user profiles (in the user store) can occur
when you add Profile Management to an existing deployment. In this scenario, you must determine
how the data in the local Windows profile is managed.
1. Under Profile Management, open the Profile handling folder.
2. Double‑click the Local profile conflict handling policy.
3. Select Enabled.
4. Select one of the following options from the drop‑down list:
• Use local profile. Profile Management processes the local Windows user profile but does
not change it in any way.
• Delete local profile. Profile Management deletes the local Windows user profile and then
imports the Citrix user profile from the user store.
• Rename local profile. Profile Management renames the local Windows user profile (for
backup purposes) and then imports the Citrix user profile from the user store.
If Local profile conflict handling is not configured here, the value from the .ini file is used. If this setting
is not configured here or in the .ini file, existing local profiles are used.
For your changes to take eect, run the gpupdate /force command from the command prompt
as documented at https://docs.microsoft.com/en‑us/windows‑server/administration/windows‑
commands/gpupdate.
Specify a template or mandatory profile
August 6, 2024
By default, new Citrix user profiles are created from the default user profile on the computer where a
user first logs on. Profile Management can alternatively use a centrally stored template when creating
profiles. The template can be a standard roaming, local, or mandatory profile that resides on any
network file share.
Any variation in dierent devices’default user profiles results in dierences in the base profile created
for the user. You can regard your selection of a template profile as a Global Default User profile.
As prerequisites:
• Ensure that the template profile does not contain any user‑specific data
• Ensure that users have read access to the template profile
• Convert a mandatory profile to a template profile by renaming the file NTUSER.MAN to
NTUSER.DAT
• Remove SACLs from NTUSER.DAT in the template profile
© 1999–2024 Cloud Soware Group, Inc. All rights reserved. 180

Profile Management 2402 LTSR
For information on creating template profiles by customizing existing Microso profiles, see https:
//support.microsoft.com/kb/959753and https://support.microsoft.com/kb/973289.
1. Under Profile Management, open the Profile handling folder.
2. Double‑click the Template profile policy.
3. Select Enabled.
4. In Path to the template profile, enter the location of the profile you want to use as a template
or mandatory profile. This path is the full path to the folder containing the NTUSER.DAT registry
file and any other folders and files required for the template.
Important: If the path consists only of NTUSER.DAT, ensure that you do not include the file name
in the path. For example, with the file \\myservername\myprofiles\template\ntuser.dat, set the
location as \\myservername\myprofiles\template.
Use absolute paths, which can be UNC paths or paths on the local machine. You can use the
latter, for example, to specify a template profile permanently on a Citrix Provisioning Services
image. Relative paths are not supported.
This policy does not support expansion of Active Directory attributes, system environment vari‑
ables, or the %USERNAME% and %USERDOMAIN% variables.
5. Optionally, select a check box to override any existing Windows user profiles. If a user has no
Citrix user profile, but a local or roaming Windows user profile exists, by default the local profile
is used. And this file is migrated to the user store, if this is not disabled. You can change the
setting by enabling the Template profile overrides local profile or Template profile over‑
rides roaming profile check box. Also, identify the template as a Citrix mandatory profile. Like
Windows mandatory profiles, changes cannot be saved to Citrix mandatory profiles.
If Template profile is not configured here, the value from the .ini file is used. If this setting is not
configured here or in the .ini file, no template or mandatory profile is used.
For your changes to take eect, run the gpupdate /force command from the command prompt
as documented at https://docs.microsoft.com/en‑us/windows‑server/administration/windows‑
commands/gpupdate.
Choose a migration policy
August 6, 2024
When a user first logs on aer Profile Management is enabled, no Citrix user profile for them exists. But
you can migrate their existing Windows user profile “on the fly”during logon. Decide which existing
profile (roaming, local, or both) is copied and used in all further processing.
© 1999–2024 Cloud Soware Group, Inc. All rights reserved. 181

Profile Management 2402 LTSR
For more information on planning a migration strategy, see Migrate or create profiles. In addition,
review the system requirements for migrating existing profiles in System requirements.
1. Under Profile Management, open the Profile handling folder.
2. Double‑click the Migration of existing profiles policy.
3. Select Enabled.
4. Select one of the following options from the drop‑down list:
• Local. Use this setting if you are migrating local profiles.
• Local and Roaming. Use this setting if you are migrating local and roaming profiles (includ‑
ing Remote Desktop Services profiles, formerly known as Terminal Services profiles).
• Roaming. Use this setting if you are migrating roaming profiles or Remote Desktop Ser‑
vices profiles.
If Migration of existing profiles is not configured here, the value from the .ini file is used. If this setting
is not configured either here or in the .ini file, existing local and roaming profiles are migrated. If this
setting is disabled, no profile is migrated. If this setting is disabled and no Citrix user profile exists
in the user store, the existing Windows mechanism for creating profiles is used as in a setup without
Profile Management.
For your changes to take eect, run the gpupdate /force command from the command prompt
as documented at https://docs.microsoft.com/en‑us/windows‑server/administration/windows‑
commands/gpupdate.
Define which groups’profiles are processed
August 6, 2024
You can define the users whose profiles are processed and profiles that are not. You can use both
computer local groups and domain groups (local, global, and universal). Specify domain groups in
the format <DOMAIN NAME>\<GROUP NAME>. Specify local groups in the format GROUP NAME.
Note� Computer local groups must be newly created local groups and the members must be domain
users.
1. Under Profile Management, double‑click the Processed groups policy.
2. Select Enabled.
3. Click Show.
4. Add the groups containing the users whose profiles you want Profile Management to process.
Use Enter to separate multiple entries.
© 1999–2024 Cloud Soware Group, Inc. All rights reserved. 182

Profile Management 2402 LTSR
If this setting is not configured here, the value from the .ini file is used. If this setting is not
configured here or in the .ini file, members of all user groups are processed unless you exclude
them using the Excluded groups policy.
5. Under Profile Management, double‑click the Excluded groups policy.
6. Select Enabled.
7. Click Show.
8. Add the groups containing the users you do not want Profile Management to process. Use Enter
to separate multiple entries.
If this setting is not configured here, the value from the .ini file is used. If this setting is not
configured here or in the .ini file, no members of any groups are excluded.
9. To manage the profiles of local administrators, under Profile Management, double‑click the
Process logons of local administrators policy and click Enabled.
Important: By default, Profile Management recognizes which operating system is in use, and
processes the accounts of local administrators on desktop, not server, operating systems. The
reason is that users are typically members of the Local Administrators group only on desktops,
and excluding local administrators from processing in server environments assists with trou‑
bleshooting. Therefore only enable this policy if you want to modify the default behavior.
The Excluded groups policy takes precedenceover the Process logons of local administrators
policy. If an account appears in both policies, Profile Management does not process it.
If this setting is not configured here, the value from the .ini file is used. If this setting is not
configured here or in the .ini file, the profiles of local administrators are not processed.
For your changes to take eect, run the gpupdate /force command from the command prompt
as documented at https://docs.microsoft.com/en‑us/windows‑server/administration/windows‑
commands/gpupdate.
Migrate user store
August 6, 2024
Profile Management provides a solution to migrate your user store without losing any data. This fea‑
ture can be useful in cases where you want to migrate your user store to a more scalable file server.
To migrate your user store, use the Migrate user store policy along with the Path to user store pol‑
icy. The Migrate user store policy lets you specify the path to the folder where the user settings (reg‑
istry changes and synchronized files) were previously saved (the user store path that you previously
used).
© 1999–2024 Cloud Soware Group, Inc. All rights reserved. 183

Profile Management 2402 LTSR
The path can be an absolute UNC path or a path relative to the home directory. In both cases, you can
use the following types of variables:
• System environment variables (enclosed in percent signs)
• Attributes of the Active Directory user object (enclosed in hash signs)
Examples:
• The folder Windows\\%ProfileVer% stores the user settings in a subfolder called
Windows\W2K3 of the user store (if %ProfileVer% is a system environment variable that
resolves to W2K3).
• \\server\share\\#SAMAccountName# stores the user settings to the UNC path \\
server\share\<JohnSmith> (if #SAMAccountName# resolves to JohnSmith for the
current user).
In the path, you can’t use user environment variables except %username% and %userdomain%.
If this setting is disabled, the user settings are saved in the current user store.
If this setting is not configured here, the corresponding setting from the .ini file is used.
If this setting is not configured here or in the .ini file, the user settings are saved in the current user
store.
Aer the changes to the policy settings take eect, the user settings stored in the previous user store
are migrated to the current user store specified in the Path to user store policy.
To configure the migration of the user store in Group Policy, complete the following steps:
1. Open the Group Policy Management Editor.
2. Under Policies > Administrative Templates: Policy definitions (ADMX files) > Citrix Compo‑
nents > Profile Management, double‑click the Migrate user store policy.
3. Select Enabled.
4. In the Options pane, type the user store path that you previously used.
5. Click OK.
For your changes to take eect, run the gpupdate /force command from the command prompt.
Log o from all sessions and then log on again. For details, see https://docs.microsoft.com/en‑
us/windows‑server/administration/windows‑commands/gpupdate.
You can also choose to configure the Profile Management policies in Citrix Studio. To do so, complete
the following steps:
1. In the le pane of Citrix Studio, click Policies.
2. In the Create Policy window, type the policy in the search box. For example, type “Migrate user
store.”
3. Click Select to open the Migrate user store policy.
© 1999–2024 Cloud Soware Group, Inc. All rights reserved. 184

Profile Management 2402 LTSR
4. Select Enabled and then type the user store path that you previously used.
5. Click OK.
Automatic migration of existing application profiles
August 6, 2024
Profile Management provides a solution that can automatically migrate existing application profiles.
The application profiles include both the application data in the AppData folder and the registry en‑
tries under HKEY_CURRENT_USER\SOFTWARE.
This feature can be useful in cases where you want to migrate your application profiles across dierent
operating systems (OSs). For example, suppose you upgrade your OS from Windows 10 version 1803
to Windows 10 version 1809. If this feature is enabled, Profile Management automatically migrates the
existing application settings to Windows 10 version 1809 the first time each user logs on. As a result,
the application data in the AppData folder and the registry entries under HKEY_CURRENT_USER\
SOFTWARE are migrated. Users no longer need to configure the applications again.
Note:
This feature requires you to specify the short name of the OS by including the !CTX_OSNAME!
variable in the user store path.
This feature currently supports Windows 10 1909 and earlier, Windows Server 2019, Windows
Server 2016, and Windows Server 2012 R2.
This feature is disabled by default. To enable it in Group Policy, complete the following steps:
1. Open the Group Policy Management Editor.
2. Under Policies > Administrative Templates: Policy definitions (ADMX files) > Citrix Com‑
ponents > Profile Management > Profile handling, double‑click the Automatic migration of
existing application profiles policy.
3. Select Enabled and then click OK.
For your changes to take eect, run the gpupdate /force command from the command prompt.
Log o from all sessions and then log on again. For more information, see https://docs.microsoft.c
om/en‑us/windows‑server/administration/windows‑commands/gpupdate.
You can also choose to configure the Profile Management policies in Citrix Studio. To do so, complete
the following steps:
1. In the le pane of Citrix Studio, click Policies.
© 1999–2024 Cloud Soware Group, Inc. All rights reserved. 185

Profile Management 2402 LTSR
2. In the Create Policy window, type the policy in the search box. For example, type “Automatic
migration of existing application profiles.”
3. Click Select to open the Automatic migration of existing application profiles policy.
4. Select Enabled and then click OK.
How it works
Profile Management performs the migration when a user logs on and there are no user profiles in the
user store. Before the migration starts, Profile Management locates the application profiles to be mi‑
grated. It does so through automatic discovery. It automatically locates and migrates the following:
• Applicationsettings under %userprofile%\Appdata\Local\ and %userprofile%\Appdata\Roaming.
The following Microso folders that contain the current OS platform information are ignored:
1 - %userprofile%\AppData\Local\Temp
2 - %userprofile%\AppData\Local\Packages
3 - %userprofile%\AppData\Local\TileDataLayer
4 - %userprofile%\AppData\Local\Microsoft\Temp
5 - %userprofile%\AppData\Local\Microsoft\Credentials
6 - %userprofile%\AppData\Local\Microsoft\Windows
7 - %userprofile%\AppData\Local\Microsoft\Windows\
InputPersonalization
8 - %userprofile%\AppData\Local\Microsoft\Windows\Side bars
9 - %userprofile%\AppData\Local\Microsoft\WindowsApps
10 - %userprofile%\Appdata\Roaming\Microsoft\Credentials
11 - %userprofile%\Appdata\Roaming\Microsoft\SystemCertificates
12 - %userprofile%\Appdata\Roaming\Microsoft\Crypto
13 - %userprofile%\Appdata\Roaming\Microsoft\Vault
14 - %userprofile%\Appdata\Roaming\Microsoft\Windows
• Registry keys under HKEY_CURRENT_USER\SOFTWARE and HKEY_CURRENT_USER\
SOFTWARE\Wow6432Node (except for HKEY_CURRENT_USER\SOFTWARE\Microsoft
and HKEY_CURRENT_USER\SOFTWARE\Classes)
If there are multiple existing application profiles, Profile Management performs the migration in the
following order of priority:
1. Profiles of the same OS type (single‑session OS to single‑session OS and multi‑session OS to
multi‑session OS).
2. Profiles of the same Windows OS family; for example, Windows 10 to Windows 10, or Windows
Server 2016 to Windows Server 2016).
3. Profiles of an earlier version of the OS; for example, Windows 7 to Windows 10, or Windows
Server 2012 to Windows 2016.
4. Profiles of the closest OS.
© 1999–2024 Cloud Soware Group, Inc. All rights reserved. 186

Profile Management 2402 LTSR
Note:
You must specify the short name of the OS by including the !CTX_OSNAME! variable in the user
store path. Doing so lets Profile Management locate the existing application profiles.
Suppose you configure the user store path as \\fileserver\userstore\\%username%\!
CTX_OSNAME!!CTX_OSBITNESS! and your OS is Windows 10 version 1803 64‑bit (Win10RS4x64).
Profile Management first locates the previous profile folder and then migrates it to the application
profile folder in the user store in the following order:
1. \fileserver\userstore\user1\Win10RS3x64
2. \fileserver\userstore\user1\Win10RS2x64
3. \fileserver\userstore\user1\Win10RS1x64
4. \fileserver\userstore\user1\Win10x64
5. \fileserver\userstore\user1\Win10RS5x64
6. \fileserver\userstore\user1\Win10RS6x64
7. \fileserver\userstore\user1\Win8x64
8. \fileserver\userstore\user1\Win7x64
9. \fileserver\userstore\user1\Win2016
10. \fileserver\userstore\user1\Win2012R2
11. \fileserver\userstore\user1\Win2012
12. \fileserver\userstore\user1\Win2008
13. \fileserver\userstore\user1\Win2019
If none of them is available, Profile Management ends the migration process and returns an error.
Store certificates
August 6, 2024
Follow this procedure to save personal certificates that have been imported into the certificate store
during a session. By default, certificates are automatically synchronized.
Add the path Application Data\Microsoft\SystemCertificates\My to the setting Di‑
rectories to synchronize. The operating system language determines the Application Data folder in
this location. If a policy is used to configure multi‑language systems, add each language’s location to
the list.
© 1999–2024 Cloud Soware Group, Inc. All rights reserved. 187

Profile Management 2402 LTSR
Example
On an English system, the path is Application Data\Microsoft\SystemCertificates\
My. On a German system, it is Anwendungsdaten\Microsoft\SystemCertificates\My.
For your changes to take eect, run the gpupdate /force command from the command prompt
as documented at https://docs.microsoft.com/en‑us/windows‑server/administration/windows‑
commands/gpupdate.
Configure folder redirection
August 6, 2024
Folder redirection is a feature of Microso Windows and can be used with Profile Management.
Important:
Configure folder redirection using only one of these methods: Microso Active Directory (AD)
GPOs or Citrix policies. Using multiple methods to configure folder redirection might cause un‑
predictable results.
To configure folder redirection, complete the following steps:
1. Move applicable users to an OU that Profile Management manages.
2. Create a GPO and then open it for editing.
3. Navigate to User Configuration > Administrative Templates > Citrix Components > Profile
Management > Folder Redirection and then select the folder you want to redirect.
4. Enable the Redirect the <folder name> folder policy and then type the redirected path. Do
not add redirected folders as exclusions. Do not add user names or folder names to the path.
For example, if you set the path to the Desktop folder as \\server\share\, the folder in the
user environment is redirected as \\server\share\<user name>\Desktop.
5. For your changes to take eect, run the gpupdate /force command from the command
prompt. For details, see https://docs.microsoft.com/en‑us/windows‑server/administration/
windows‑commands/gpupdate.
The following folders can be redirected:
• AppData(Roaming)
• Desktop
• Start menu
© 1999–2024 Cloud Soware Group, Inc. All rights reserved. 188

Profile Management 2402 LTSR
• Documents
• Pictures
• Music
• Videos
• Favorites
• Contacts
• Downloads
• Links
• Searches
• Saved Games
When redirecting folders, keep the following in mind:
• The Documents folder. You can redirect it to the user’s home directory.
• The Music, Pictures, and Videos folders. You can redirect them to folders relative to the Docu‑
ments folder.
How to verify that folder redirection works
To verify that folder redirection works, complete the following steps:
1. In a session, navigate to a folder you directed, right‑click the folder, and then select Properties.
2. In the properties window, navigate to the Shortcut tab and then check the Target field. If the
field displays a redirected path, folder redirection works. Otherwise, folder redirection does not
work.
Folder redirection logs
Note:
Profile Management writes information to the Windows event log only when folder redirection
fails.
Profile Management writes information to the Windows event log. You can view the events in the
Application pane of the Windows Event Viewer. The information helps you troubleshoot issues you
experience when using the folder redirection feature.
Manage transactional folders
August 6, 2024
© 1999–2024 Cloud Soware Group, Inc. All rights reserved. 189

Profile Management 2402 LTSR
A transactional folder refers to a folder that contains interdependent files, where one file references
other files. The Folders to mirror policy ensures the integrity of transactional folders during profile
synchronization. With this policy, Profile Management mirrors the entire transactionalfolder between
the user store and the local user profile.
The Accelerate folder mirroring policy is available with Profile Management 2106 and later.
This article guides you through the process of managing transactional folders using the Folders to
mirror policy. It also gives an example of how to manage Internet Explorer cookie folders using this
policy.
How the folder mirroring works
Generally, when Profile Management synchronizes user profiles between the user store and the local
profiles, it synchronizes only updated files by comparing time stamps. However, in a transactional
folder, files in it are associated, and Profile Management must synchronize the entire folder to avoid
integrity issues. An example of transactional folders is a folder that contains transaction log files and
the corresponding database files. Mixing transaction log files and database files from dierent ses‑
sions can cause transactional integrity issues.
To synchronize transactional folders correctly, Profile Management provides the Folders to mirror
policy. When synchronizing a transactional folder to the destination, Profile Management mirrors the
folder to the destination by using the following steps:
1. Copies all contents in the folder to the destination, ignoring time stamps.
2. Deletes any additional contents in the destination.
Caution:
Mirroring transactional folders means the “last write wins.”Files that are modified in more than
one session are overwritten by the latest update and profile changes might be lost.
Specify folders to mirror
Enable the Folders to mirror policy and specify the folders to mirror.
Let’s take Google Chrome as an example. The bookmark‑related files and subfolders in AppData\
Local\Google\Chrome\User Data\Default are interdependent and must be processed as
a whole during profile synchronization. To achieve this goal, you need to add this folder to the Folders
to mirror policy.
You can also exclude files and subfolders from a folder to mirror. In the previous example, the
AppData\Local\Google\Chrome\User Data\Default folder also contains files and
© 1999–2024 Cloud Soware Group, Inc. All rights reserved. 190

Profile Management 2402 LTSR
subfolders unrelated to bookmarks. You can use the Exclusion list –directories and Exclusion list –
files policies to exclude them.
Detailed steps are as follows:
1. Go to Profile Management > File system > Synchronization, and then double‑click the Fold‑
ers to mirror policy.
2. Select Enabled.
3. In the List of folders to mirror field, type the list of folders that you want to mirror in the format
of relative paths to the user store. Type Enter to separate folders.
Note:
This policy works recursively. Don’t add subfolders to the list.
For example, if you add AppData\Roaming\Microsoft\Windows\Cookies, don’t add
AppData\Roaming\Microsoft\Windows\Cookies\Low.
4. Click OK.
5. To exclude certain files and subfolders in a mirrored folder from the mirroring process, follow
these steps:
a) Go to Profile Management > File system, and then double‑click the Exclusion list –di‑
rectories policy or the Exclusion list –files policy.
b) Specify thee files and subfolders to exclude.
Configuration precedence:
1. If this policy isn’t configured here, the value from the .ini file is used.
2. If this setting is not configured either here or in the .ini file, no folders are mirrored.
Accelerate folder mirroring
Starting with Profile Management 2106, you can accelerate folder mirroring by enabling the Acceler‑
ate folder mirroring
policy.
With this policy enabled, Profile Management stores mirrored folders on a VHDX‑based virtual disk.
Profile Management attaches the virtual disk during logons and detaches it during logos, eliminating
the need to copy the folders between the user store and the local profiles.
To enable this policy, follow these steps:
1. Under Profile Management > File system > Synchronization, double‑click the Accelerate
folder mirroring policy.
© 1999–2024 Cloud Soware Group, Inc. All rights reserved. 191

Profile Management 2402 LTSR
2. Select Enabled.
3. Click OK.
Configuration precedence:
1. If this policy isn’t configured here, the value from the .ini file is used.
2. If this setting is not configured either here or in the .ini file, the policy is disabled.
Example: Manage Internet Explorer cookie folders
When managing the Internet Explorer cookies folder, you need to ensure transactional integrity while
reducing profile bloat. To achieve this goal, use the Folders to mirror and Process Internet cookie
files on logo policies.
Detailed steps are as follows:
1. Specify cookie folders to mirror.
2. If the profile bloat issue occurs, enable deletion of stale cookies on user logo.
For your changes to take eect, run the gpupdate /force command from the command prompt,
as documented in this Microso article.
Overview
This section explains how the two policies help manage cookies folders.
Let’s take the Internet Explorer 8 cookies folder as an example. That folder contains index.dat and
cookies files. Index.dat references cookie files when users browse the Internet. For example, a user
has two Internet Explorer sessions, each from a dierent device, and the user visits dierent sites in
each session. Cookies from each site are added to the corresponding devices.
How to ensure transactional integrity Let’s see what happens when the user logs o from both
sessions in the preceding example. Cookies from the sessions are merged while the index.dat file
is synchronized with the one from the last logged o session. As a result, the cookies files and the
references to those cookie files in index.dat become unmatched.
The Folders to mirror policy resolves the issue. With this policy set, Profile Management copies the
entire folder to the destination during profile synchronization. For more information about how this
policy works, see Manage transactional folders.
© 1999–2024 Cloud Soware Group, Inc. All rights reserved. 192

Profile Management 2402 LTSR
How to avoid profile bloat Browsing in new sessions results in a bloated cookie folder. Also, when
websites are revisited, stale cookies build up. The Process Internet cookie files on logo policy
resolves the issue by removing stale cookies from the profile on user logo.
Note:
Cookies and browsing history information from InternetExplorer9 and earlier are not compatible
with cookies and browsing history information from Internet Explorer 10 and later. Users are
advised not to move across multiple systems that have dierent versions of Internet Explorer
installed. [#474200]
Specify cookie folders to mirror
Enable the Folders to mirror policy. In the policy, based on the OS versions supported in your de‑
ployment, specify the cookie folders to mirror.
1. Go to Profile Management > File system > Synchronization.
2. Double‑click the Folders to mirror policy.
3. Select Enabled.
4. In the List of folders to mirror field, add the following cookie folders. Use Enter to separate
folders.
• AppData\Roaming\Microsoft\Windows\Cookies for Version 2 profiles.
• AppData\Local\Microsoft\Windows\INetCookies (cookies folder for Win‑
dows 8.1 and later)
• AppData\Roaming\Microsoft\Windows\Cookies (cookies folder for Windows 7
and Windows 8)
• AppData\Local\Microsoft\Windows\WebCache (folder available for Internet Ex‑
plorer 10 and later where the cookie database file Webcache01.dat is stored)
5. Click OK.
6. If you’re using Profile Management 2106 or later, double‑click the Accelerate folder mirroring
policy, and then select Enabled.
(Optional) Delete stale cookies on logo
To have Profile Management delete stale cookies on user logo, enable the Process Internet cookie
files on logo policy.
The policy increases the logo time, so enable it only when you experience profile bloat issues.
1. Go to Profile Management > Advanced Settings.
© 1999–2024 Cloud Soware Group, Inc. All rights reserved. 193

Profile Management 2402 LTSR
2. Double‑click the Process Internet cookie files on logo policy.
3. Select Enabled.
4. Click OK.
Configure oline profiles
August 6, 2024
Citrix oline profiles are intended for laptop users or mobile‑device users who roam with intermittent
access to a network. This feature allows profiles to synchronize with the user store at the earliest
possible opportunity. When a network disconnection occurs, profiles remain intact on the laptop or
device even aer restarting or hibernating. As mobile users work, their profiles are updated locally
and are eventually synchronized with the user store when the network connection is re‑established.
This feature works only with domain‑joined computers (including ones running Citrix XenClient). It
is not intended for use with servers or desktop computers, whose network connections tend to be
permanent.
Typically, you don’t enable both oline profiles and streamed user profiles. For this reason, oline
profilestake over precedenceand disable streamed user profiles and the Delete locally cached profiles
on logo setting. Ensure that users always have a complete profile on their laptop or mobile device
when they first log on.
You can configure oline profiles in these ways:
• Using Group Policy. This policy gives you centralized administrative control of the fea‑
ture but you must create a separate OU containing the laptops or devices that use oline
profiles.</span>
• Using the .ini file. It is an easier option if you prefer not to create a special OU just for laptops
and mobile devices. But it eectively hands control of this feature to individual device owners.
This option requires a once‑only configuration of each laptop or mobile device.</span>
If Oline profile support is not configured using Group Policy, the value from the .ini file is used. If this
setting is not configured in Group Policy or in the .ini file, oline profiles are disabled.
Using Group Policy
1. Create an OU containing all computers managed by Profile Management. Include the laptops
and mobile devices that use oline profiles, your Citrix virtual apps servers, and your virtual
desktops.
2. Create a child OU containing only the laptops and mobile devices.
© 1999–2024 Cloud Soware Group, Inc. All rights reserved. 194

Profile Management 2402 LTSR
3. In Group Policy Management, create a baseline Group Policy Object (GPO) that enforces your
site‑wide policies, and link it to both OUs.
4. Configure the baseline GPO with the Profile Management settings common to all computers.
5. Create a second, oline GPO and link it to the child OU.
6. Configure the oline GPO as follows:
a) Under Profile Management, double‑click Oline profile support.
b) Select Enabled and click OK.
c) Configure any other settings that you want to apply only to laptops and mobile devices.
For your changes to take eect, run the gpupdate /force command from the command prompt
as documented at https://docs.microsoft.com/en‑us/windows‑server/administration/windows‑
commands/gpupdate.
Using the .ini file
As a prerequisite, ensure that Oline profile support is unconfigured (the default) in both the baseline
and oline GPO. If these settings are configured, the .ini file setting is overridden.
1. On each laptop or mobile device, locate the .ini file created by the Profile Management installer.
To locate the .ini file, see Files included in the download.
2. Uncomment this line (by removing the semi‑colon from it):
pre codeblock ;OfflineSupport=
3. Save the .ini file.
For your changes to take eect, run the gpupdate /force command from the command
prompt as documented at https://docs.microsoft.com/en‑us/windows‑server/administration/
windows‑commands/gpupdate.
Configure the Customer Experience Improvement Program (CEIP)
August 6, 2024
To configure the CEIP, follow these steps:
1. Open the Group Policy Management Editor.
2. Under Computer Configuration > Policies > Administrative Templates: Policy definitions
(ADMX files) > Citrix Components > Profile Management > Advanced settings, double‑click
Customer Experience Improvement Program.
© 1999–2024 Cloud Soware Group, Inc. All rights reserved. 195

Profile Management 2402 LTSR
3. Select Enabled or Disabled, then click OK.
4. For your changes to take eect, run the gpupdate /force command from the command
prompt as documented at https://docs.microsoft.com/en‑us/windows‑server/administration/
windows‑commands/gpupdate.
Note:
• For machines in non‑European regions, if this policy isn’t configured in GPOs, the value
from the .ini file is used. If this policy isn’t configured in GPOs or in the .ini file, CEIP is
enabled.
• For machines in European regions, if this policy isn’t configured in GPOs, CEIP is disabled
regardless of the value from the .ini file.
For more information about CEIP, see About the Citrix Customer Experience Improvement Program
(CEIP).
Configure active write‑back
August 6, 2024
By default, Profile Management writes changes that are made to the local user profile back to the user
store when a user logs o. If a user starts a second session before logging o the first, local profile
changes made in the first session aren’t available in the second.
To improve profile consistency across concurrent sessions, you can enable the active write‑back fea‑
ture. With this feature, Profile Management writes local profile changes back to the user store
during
a session, rather than waiting until users log o.
Overview
Profile Management provides the Active write‑back policy and two extension policies as follows:
• Active write‑back. Has Profile Management write changes made to the local profile files and
folders back to the user store. By default, Profile Management performs active write‑back every
five minutes.
• Active write back registry. Use it along with the Active write‑back policy. Has Profile Man‑
agement write changes made to the local registry entries back to the user profile.
• Active write back on session lock and disconnection. Use it along with the Active write‑
back policy. Has Profile Management perform active write‑back only when a session is locked
or disconnected, instead of every five minutes.
© 1999–2024 Cloud Soware Group, Inc. All rights reserved. 196

Profile Management 2402 LTSR
Enable active write‑back
To enable active write‑back using a GPO, follow these steps:
1. Open the Group Policy Management Editor.
2. Access Policies > Administrative Templates: Policy definitions (ADMX files) > Citrix Com‑
ponents > Profile Management.
3. Double‑click Active write back.
4. In the policy window that appears, select Enabled, and then click OK.
By default, active write‑back occurs every five minutes.
5. To enable active write‑back for registry entries, follow these steps:
a) Double‑click Active write back registry.
b) In the policy window that appears, select Enabled, and then click OK.
6. To have Profile Management perform active write‑back only when a session is locked or discon‑
nected, follow these steps:
a) Double‑click Active write back on session lock and disconnection.
b) In the policy window that appears, select Enabled, and then click OK.
Note:
As a best practice, we recommend that you enable the Active write back on session
lock and disconnection policy.
The configuration precedence for an active write‑back policy is as follows:
• If the setting isn’t configured using a GPO, Studio, or Workspace Environment Management
(WEM), the value from the .ini file is used.
• If the setting isn’t configured anywhere, Profile Management configures it dynamically.
For your changes to take eect, run the gpupdate /force command from the command prompt
as documented at https://docs.microsoft.com/en‑us/windows‑server/administration/windows‑
commands/gpupdate.
Configure cross‑platform settings
August 6, 2024
Important: Note the following important information for this feature:
• Cross‑platform settings in Profile Management support a set of supported operating systems
(OSs) and applications. Configure this feature only in a production environment.
© 1999–2024 Cloud Soware Group, Inc. All rights reserved. 197

Profile Management 2402 LTSR
• Microso Oice settings do not roam between versions of that application. For more informa‑
tion, see Operating systems and applications supported By cross‑platform settings.
• This feature is suitable for registry and application settings. It is not for files or folders, or objects
typically used with folder redirection (for example, browser favorites, and desktop and Start
menu settings).
• If you use this feature to migrate user profiles between systems with dierent profile versions,
disable it aer the migration has been completed for all users. There is some performance im‑
pact, primarily to logos, when using this feature. So it is best to leave it disabled unless you
support roaming between profile versions.
This topic contains an example of the steps you can take to configure cross‑platform settings. For a
more detailed case study, see Cross‑platform settings ‑ Case study.
Tip: We recommend restricting this feature to a small, test set of users before putting it into produc‑
tion. Use the
Cross‑platform settings user groups option to achieve it. If this setting is configured, the cross‑
platform settings feature of Profile Management processes only members of these user groups. If
this setting is disabled, the feature processes all the users specified by the
Processed groups setting. If
Cross‑platform settings user groups is not configured in Group Policy or the .ini file, all user groups
are processed.
1. For the settings that are common to all platforms, create a common Group Policy Object (com‑
mon GPO), link it to the Profile Management .adm or .admx file, and configure the settings as
required. This setup is best practice because it minimizes duplicate settings that can make any
later troubleshooting awkward. Depending on your requirements, all Profile Management set‑
tings work on multiple platforms except Path to user store. Configure Path to user store sep‑
arately for each platform due to the dierent user store structures of Version 1 and Version 2
profiles. In the common GPO, leave this setting unconfigured.
2. Create separate OUs for your dierent platforms. For example, if you are migrating from Win‑
dows 7 to Windows 8, create separate OUs for these operating systems), and set Path to user
store appropriately in each OU.
3. Locate the definition (.xml) files for the supported applications whose personalizations you
want to work across the platforms. These files are located in the CrossPlatform folder in the
download package. You can create your own application definition files. For details, see Create
a definition file.
4. Copy the .xml files to a suitable location on your network.
5. Edit the common GPO in Group Policy Management Editor. Under Profile Management open
the Cross‑platform settings folder and configure these settings:
• Cross‑platform settings user groups. Restricts the users who experience cross‑platform
settings. This setting is optional. It is useful when testing this feature or rolling it out in
© 1999–2024 Cloud Soware Group, Inc. All rights reserved. 198

Profile Management 2402 LTSR
stages.
• Path to cross‑platform definitions. Identifies the network location of the definition files
that you copied from the download package. This path must be a UNC path. Users must
have read access to this location, and administrators must have write access to it. The
location must be a Server Message Block (SMB) or Common Internet File System (CIFS) file
share.
• Path to cross‑platform settings store. It is the common area of the user store where profile
data shared by multiple platforms is located. Users must have write access to this area.
The path can be an absolute UNC path or a path relative to the home directory. You can
use the same variables as for Path to user store.
6. Specify a base platform by ensuring Source for creating cross‑platform settings is set to Enabled
in that platform’s OU. This setting migrates data from the base platform’s profiles to the cross‑
platform settings store. In the other platforms’OUs, set this policy to Disabled or Unconfigured.
Each platform’s own set of profiles are stored in a separate OU. You must decide which plat‑
form’s profile data to use to seed the cross‑platform settings store. This is referred to as the
base platform. If the cross‑platform settings store contains a definition file with no data, or the
cached data in a single‑platform profile is newer than the definition’s data in the store, Profile
Management migrates the data from the single‑platform profile to the store unless you disable
this setting.
Important: If
Source for creating cross‑platform settings is enabled in multiple OUs, the platform that the first
user logs on to becomes the base profile.
7. Set Enable cross‑platform settings to Enabled. By default, to facilitate deployment, cross‑
platform settings is disabled until you turn on this setting.
8. Run a Group Policy update.
9. If you are migrating profiles across platforms but not supporting roaming of them, when the
migration is complete, set Enable cross‑platform settings to Disabled.
If Path to cross‑platform definitions is not configured here, the value from the .ini file is used. If this
setting is not configured here or in the .ini file, no cross‑platform settings are applied.
If Path to cross‑platform settings store is disabled, the default path Windows\PM_CP is used. If this
setting is not configured here, the value from the .ini file is used. If this setting is not configured here
or in the .ini file, the default path is used.
If Enable cross‑platform settings is not configuredhere, the valuefrom the .ini file is used. If this setting
is not configured here or in the .ini file, no cross‑platform settings are applied.
© 1999–2024 Cloud Soware Group, Inc. All rights reserved. 199

Profile Management 2402 LTSR
Example: Roaming Microso Oice settings between Windows Server 2008 and
Windows 7
This example describes the major steps involved in allowing users’application settings to roam be‑
tween two operating systems that create Version 2 profiles. Microso Oice 2010 is the example ap‑
plication, and roaming takes places between Citrix XenApp 6.5 on Windows Server 2008 and Windows
7. Both OSs are 64‑bit.
1. Users are accustomed to accessing Oice 2010 and InternetExplorer 9 as published applications
on Citrix virtual apps servers, and change several settings in these applications. For example,
they modify their email signature in Oice and choose a new home page in Internet Explorer.
2. At a future date, virtual desktops (created with Citrix Virtual Desktops) are created but not yet
released to users. The desktops run Windows 7 and are preconfigured with Oice 2010 and
Internet Explorer 9.
3. The users expect their settings to be the same on their new desktops. You configure the cross‑
platform settings feature according to the procedure in this topic. It includes enabling Source
for creating cross‑platform settings in the OU for Windows Server 2008.
4. When users next run the published versions of the applications (not the new, virtual desktops),
their settings are copied to the cross‑platform settings store.
5. The new desktops are then released to users. When they log on and run the local versions of Of‑
fice and Internet Explorer, the settings from the earlier Windows Server 2008 sessions are used.
Users’modified email signatures and home pages are available on their Windows 7 machines.
6. Users browse in Internet Explorer from their virtual desktop, and decide to change their home
page again.
7. Users log o and leave work. They don’t have access to their virtual desktop at home, but they
can run the published version of Internet Explorer 9 remotely. They find their most recent home
page, created on Windows 7 in the previous step, has been preserved.
Operating systems and applications supported by cross‑platform
settings
August 6, 2024
This article describes the applications and operating systems (OSs) supported by the cross‑platform
settings feature in this release of Profile Management.
© 1999–2024 Cloud Soware Group, Inc. All rights reserved. 200

Profile Management 2402 LTSR
About definition files
Definition files contain common personalizations for selected Windows applications. Each file and
the definitions within it allow users to connect to the same application on multiple OSs, presenting
essentially identical profiles on each platform. For example, users might access two instances of Mi‑
croso Oice. One is installed on a Windows 7 virtual desktop and the other is published with Citrix
Virtual Apps on Windows Server 2003. Whichever instance is accessed, users’experience of Oice is
consistent.
Preconfigured definition files are a key aspect of the cross‑platform settings feature. There is a defin‑
ition file for each supported application. Definition files are in an XML format.
Important: Without a thorough analysis of an application’s behavior across all OSs and a full under‑
standing of this feature’s operation, editing of definition files can result in unexpected changes to
users’profiles that can be diicult to troubleshoot. For this reason, Citrix does not support the edit‑
ing of the supplied definition files or the creation of new ones. In addition, some application settings
cannot be duplicated across OSs due to the nature of Windows user profiles.
In addition note that, although this feature is suitable for registry and application settings, it is not
suitable for files or folders, or objects typically used with folder redirection (for example, browser
favorites, and desktop and Start menu settings).
Supported operating systems
You can roam profiles between any of the supported single‑session OSs, and between any of the sup‑
ported multi‑session OSs.
The following are supported (x86 and x64 versions as applicable):
• Single‑session OSs. Windows XP, Windows 7, and Windows Vista.
• Multi‑session OSs. Windows Server 2003, Windows Server 2008, and Windows Server 2008 R2.
Supported Citrix products
The cross‑platform settings feature supports the following Citrix products:
• XenApp 5 Feature Pack for Windows Server 2003 and later
• XenDesktop 4 and later
Supported applications
The following definition files are available in this release. The XML file name indicates the supported
application and versions.
© 1999–2024 Cloud Soware Group, Inc. All rights reserved. 201

Profile Management 2402 LTSR
• Internet Explorer 7 Plus.xml. This file supports the roaming of Versions 7, 8, and 9 of Inter‑
net Explorer (except favorites) across platforms. The roaming of favorites and feeds is not sup‑
ported.
• Oice 2007.xml.
• Oice 2010.xml.
• Wallpaper.xml. This file supports the roaming of desktop wallpaper across platforms. The
roaming of themes across platforms is not supported.
Important: Use the definition files for each application only in the preceding supported scenarios.
For example, Internet Explorer 7 Plus.xml roams settings between multiple versions of that browser.
But you cannot use Oice 2007.xml or Oice 2010.xml to roam settings between versions of Oice.
Create a definition file
August 6, 2024
Definition files define the folders, files, or registries to be synchronized. You can create your own ap‑
plication definition files.
Use the Microso UE‑V template generator to create a UE‑V template file.
1. Downloadthe Windows Assessment and Deployment Kit (Windows ADK) for Windows 10 from
Microso website.
2. Install Windows ADK. Select Microso User Experience Virtualization (UE‑V) Template Gen‑
erator. Click Install. Click Finish to close the wizard aer the installation completes.
3. Click Start, click Microso User Experience Virtualization, and then click Microso User Ex‑
perience Virtualization Generator.
4. Click Create a settings location template.
5. Follow the wizard to specify application related parameters. Click Next to continue.
Take Notepad as an example. Specify the file path as C:\Windows\System32\notepad.exe.
6. Aer the specified application starts, close it.
7. Aer the process completes, click Next to continue.
8. Choose Review Locations in the le pane. Select all the check boxes in the lists for standard
and nonstandard registry/files.
9. Click Create to save the template XML file.
Take Notepad as the example. Save the template XML file as Notepad.xml.
Note
You might have multiple applications defined in a single UE‑V template file.
© 1999–2024 Cloud Soware Group, Inc. All rights reserved. 202

Profile Management 2402 LTSR
To convert the UE‑V template file to a cross‑platform definition file, do the following:
1. Download the conversion tool here.
2. From a command prompt, run the command convert show filename to display all application
names in the definition file.
3. Run the following command to convert the UE‑V template file to a definition file.
convert source destination [/Index] [/V]
[/Index]: Convert only the application specified by index number.
By default, this tool converts all applications in the UE‑V template.
[/V]: Display verbose information for the conversion.
For cross‑platform settings, you must repeat the preceding steps for other operating systems and
merge the definition files into one. You can use the Platform element with the OSVersionNumber
attribute to merge the files. On Windows 7, a setting folder is at AppData\Application\Win7\folder.
On Windows 10, at AppData\Application\Win10\folder.
On Windows 7, the definition file you created looks as follows:
1 <?xml version="1.0" encoding="utf-8"?>
2
3 <GroupDefinitions Version="4.0.0.0" GUID="93E41C6E-2091-1B9B-36BC-7
CE94EDC677E">
4
5 <Group Name="Common Settings" GUID="32D83BB6-F3AD-985F-D4BC-655
B3D9ACBE2">
6
7 <Object Name="!CTX_ROAMINGAPPDATA!\Application\Win7\folder"
GUID="1B43DE3F-EC9C-463c-AC19-CD01D00219B6">
8
9 <Platform>
10
11 <Folder>
12
13 <Path>!CTX_ROAMINGAPPDATA!\Application\Win7\folder
</Path>
14
15 <Recurse/>
16
17 </Folder>
18
19 </Platform>
20
21 </Object>
22
23 </Group>
24
25 </GroupDefinitions>
© 1999–2024 Cloud Soware Group, Inc. All rights reserved. 203

Profile Management 2402 LTSR
On Windows 10, the definition file you created looks as follows:
1 <?xml version="1.0" encoding="utf-8"?>
2
3 <GroupDefinitions Version="4.0.0.0" GUID="93E41C6E-2091-1B9B-36BC-7
CE94EDC677E">
4
5 <Group Name="Common Settings" GUID="32D83BB6-F3AD-985F-D4BC-655
B3D9ACBE2">
6
7 <Object Name="!CTX_ROAMINGAPPDATA!\Application\Win10\folder"
GUID="1B43DE3F-EC9C-463c-AC19-CD01D00219B6">
8
9 <Platform>
10
11 <Folder>
12
13 <Path>!CTX_ROAMINGAPPDATA!\Application\Win10\folder
</Path>
14
15 <Recurse/>
16
17 </Folder>
18
19 </Platform>
20
21 </Object>
22
23 </Group>
24
25 </GroupDefinitions>
Aer merging, the contents of the definition file look as follows:
1 <?xml version="1.0" encoding="utf-8"?>
2
3 <GroupDefinitions Version="4.0.0.0" GUID="93E41C6E-2091-1B9B-36BC-7
CE94EDC677E">
4
5 <Group Name="Common Settings" GUID="32D83BB6-F3AD-985F-D4BC-655
B3D9ACBE2">
6
7 <Object Name="!CTX_ROAMINGAPPDATA!\Application\%osname%\folder"
GUID="1B43DE3F-EC9C-463c-AC19-CD01D00219B6">
8
9 <!-- Assuming that the folder locates differently when in
different platforms -->
10
11 <Platform OSVersionNumber="6.1"> <!-- Win7 -->
12
13 <Folder>
14
15 <Path>!CTX_ROAMINGAPPDATA!\Application\Win7\folder
</Path>
© 1999–2024 Cloud Soware Group, Inc. All rights reserved. 204

Profile Management 2402 LTSR
16
17 <Recurse/>
18
19 </Folder>
20
21 </Platform>
22
23 <Platform OSVersionNumber="10.0"> <!-- Win10 -->
24
25 <Folder>
26
27 <Path>!CTX_ROAMINGAPPDATA!\Application\Win10\folder
</Path>
28
29 <Recurse/>
30
31 </Folder>
32
33 </Platform>
34
35 </Object>
36
37 </Group>
38
39 </GroupDefinitions>
For information about configuring cross‑platform settings, see Configure cross‑platform settings.
For information about the architecture of definition files, see Application definition file structure.
For information about enabling application profiler, see Enable application profiler.
Application definition file structure
August 6, 2024
This article describes the XML structure of Profile Management application definition files. This struc‑
ture applies to both application profiler and cross‑platform settings.
© 1999–2024 Cloud Soware Group, Inc. All rights reserved. 205

Profile Management 2402 LTSR
Architecture Chart
• XML Declaration and Encoding Attribute
The XML declaration must specify the attribute, <?xml version=
”
1.0
”
>.
Encoding=”UTF‑8”is a recommended attribute.
• GroupDefinitions
A container of collections of groups. It acts as the root element of the XML document. Its attrib‑
utes include version and GUID. They are mandatory attributes.
• Group
Defines settings of a subapplication. Its attributes are name and GUID. They are mandatory
attributes.
• Object
Defines one setting of a subapplication. Its attributes are name and GUID. They are mandatory
attributes.
• Platform
Platform provides dierent definitions in dierent operating systems. It can use an optional at‑
tribute OSVersionNumber to specify the operating system. When there is no attribute, all plat‑
forms accept the inner definition of the setting. Platform must contain one of the following
elements: RegKey, RegValue, File, Folder, and Wallpaper.
• RegKey
Defines a setting as a key in the registry. It must contain the Key element. It includes two op‑
tional subelements, Recurse and Merge. Recurse and Merge define the performance when Pro‑
© 1999–2024 Cloud Soware Group, Inc. All rights reserved. 206

Profile Management 2402 LTSR
file Management roams the key. Another optional subelement is ExcludeValues. ExcludeValues
defines the registry values that can be excluded.
• RegValue
Defines a setting as a value in the registry. It must contain Key to specify the path of its parent
key.
• Folder
Defines a setting as a folder. It must contain Path to specify the path of the folder. It has op‑
tional subelements, Recurse and Merge. Recurse and Merge define the performance when
Profile Management roams the folder. Another optional subelement is ExcludeFiles, which
defines the files that can be excluded.
• File
Defines a setting as a file. It must contain Path to specify the path of its parent folder, and
FileName to specify the name of a file.
• Wallpaper
Defines all wallpaper settings. No attributes or subelements are required. Profile Management
roams these settings automatically.
• Key
Specifies the path of the registry key or the path of the parent registry key. Key is the subelement
of RegKey and RegValue.
• ValueName
Specifies the name of the registry value. It is a subelement of RegValue.
• Path
Specifies the path of the folder or the path of the parent folder. It is a subelement of Folder and
File. Profile Management variables can be adopted.
• FileName
Specifies the name of a file. It is s subelement of File.
• Recurse
Optional subelement of RegKey and Folder. If this element exists, Profile Management roams
the key and the folder recursively.
• Merge
Optional subelement of RegKey and Folder. If this element exists, Profile Management merges
(but does not substitute) the key and the folder.
© 1999–2024 Cloud Soware Group, Inc. All rights reserved. 207

Profile Management 2402 LTSR
• ExcludeValues
Optional subelement of RegKey. Specifies the values that can be excluded when roaming the
key.
• ExcludeFiles
Optional subelement of Folder. Specifies the files that can be excluded when roaming the folder.
• Exclude
Subelement of ExcludeValues and ExcludeFiles. Specifies the excluded items of files or registry
values.
Note
Make sure that your document contains a correct syntax format. Profile Management checks
these files by using the CPSValidationSchema.xsd validation file when these files load. You can
find the validation file under the installation path of Profile Management. Profile Management
ignores incorrect files and record error messages in the log.
Sample
1 <?xml version="1.0" encoding="UTF-8"?>
2
3 <!-- Copyright 2011 Citrix Systems, Inc. All Rights Reserved. -->
4
5 <GroupDefinitions GUID="748E63D3-426E-4796-9C32-420B25DB2D9F" Version="
4.0.0.0">
6
7 <!-- Application Settings -->
8
9 <Group GUID="0FCCCF29-0A0E-482d-A77E-3F39A8A854A6" Name="Application
Settings">
10
11 <!-- Registry Key Setting Example -->
12
13 <Object GUID="637EC13C-2D47-4142-A8EB-3CEA6D53522A" Name="Software\
Application\certain key">
14
15 <Platform>
16
17 <RegKey>
18
19 <Key>Software\Microsoft\Office\certain key</Key>
20
21 <Merge/>
22
23 <Recurse/>
24
25 <ExcludeValues>
© 1999–2024 Cloud Soware Group, Inc. All rights reserved. 208

Profile Management 2402 LTSR
26
27 <Exclude>excluded value 1</Exclude>
28
29 <Exclude>excluded value 2</Exclude>
30
31 <Exclude>excluded value 3</Exclude>
32
33 </ExcludeValues>
34
35 </RegKey>
36
37 </Platform>
38
39 </Object>
40
41 <!-- Registry Value Setting Example -->
42
43 <Object GUID="3C896310-10C4-4e5f-90C7-A79F4E653F81" Name="Software\
Application\certain value">
44
45 <!-- Folder Setting Example -->
46
47 <Object GUID="7F8615D0-5E63-4bd0-982D-B7740559C6F9" Name="!
CTX_ROAMINGAPPDATA!\Application\setting folder">
48
49 <Platform>
50
51 <Folder>
52
53 <!-- We can use Citrix variable if necessary -->
54
55 <Path>!CTX_ROAMINGAPPDATA!\Application\setting folder</Path>
56
57 <Merge/>
58
59 <Recurse/>
60
61 <ExcludeFiles>
62
63 <Exclude>excluded file 1</Exclude>
64
65 <Exclude>excluded file 2</Exclude>
66
67 <Exclude>excluded file 3</Exclude>
68
69 </ExcludeFiles>
70
71 </Folder>
72
73 </Platform>
74
75 </Object>
76
© 1999–2024 Cloud Soware Group, Inc. All rights reserved. 209

Profile Management 2402 LTSR
77 <!-- File Setting Example -->
78
79 <Object GUID="7F8615D0-5E63-4bd0-982D-B7740559C6F9" Name="!
CTX_ROAMINGAPPDATA!\Application\file.txt">
80
81 <Platform>
82
83 <File>
84
85 <!-- We can use Citrix variable if necessary -->
86
87 <Path>!CTX_ROAMINGAPPDATA!\Application</Path>
88
89 <FileName>file.txt</FileName>
90
91 </File>
92
93 </Platform>
94
95 </Object>
96
97 <!-- Setting based on different OS -->
98
99 <Object GUID="1B43DE3F-EC9C-463c-AC19-CD01D00219B6" Name="!
CTX_ROAMINGAPPDATA!\Application\%osname%\folder">
100
101 <!-- Assuming that the folder locates differently when in different
platforms -->
102
103 <Platform OSVersionNumber="6.1">
104
105 <!-- Win7 -->
106
107 <Folder>
108
109 <Path>!CTX_ROAMINGAPPDATA!\Application\Win7\folder</Path>
110
111 <Recurse/>
112
113 </Folder>
114
115 </Platform>
116
117 <Platform OSVersionNumber="10.0">
118
119 <!-- Win10 -->
120
121 <Folder>
122
123 <Path>!CTX_ROAMINGAPPDATA!\Application\Win10\folder</Path>
124
125 <Recurse/>
126
© 1999–2024 Cloud Soware Group, Inc. All rights reserved. 210

Profile Management 2402 LTSR
127 </Folder>
128
129 </Platform>
130
131 </Object>
132
133 </Group>
134
135 </GroupDefinitions>
Cross‑platform settings ‑ Case study
August 6, 2024
The cross‑platform settings feature is primarily used for migrating from Windows 7 and Windows
Server 2008 to Windows 8 and Windows Server 2012. This migration might also move from Microso
Oice 2003 or Oice 2007 to Oice 2010. Given the typical investment in Windows 2003 systems, a
significant coexistence phase is expected. The feature is expected to support both migration and sus‑
tained coexistence.
This case study starts with an existing Windows 7 and Windows 2008 environment running Oice 2007
and adds Windows 8 shared, provisioned virtual desktops.
The case study consists of:
• Initial configuration
• Plan the new site
• Execute the plan
• Other considerations
Initial configuration
August 6, 2024
The following graphic illustrates the environment configuration in this case study.
© 1999–2024 Cloud Soware Group, Inc. All rights reserved. 211

Profile Management 2402 LTSR
Windows 7 machines are configured to use Oice 2007 published on Citrix XenApp 6.5.
The domain includes Windows 2008 domain controllers running Active Directory at Windows 2008
level. All the machines belong to an OU called 2k8_Farm and the Profile Management 5.0 .adm file is
added to a GPO called 2k8_Farm_PO. The following policies are configured.
Policy Value
Path to user store \FileServ1\Profiles#sAMAccountName#\%ProfVer%
Profile streaming Enabled
Active write back Enabled
A machine logon script, which sets the system environment variable %ProfVer%, runs on all ma‑
chines in the OU.
© 1999–2024 Cloud Soware Group, Inc. All rights reserved. 212

Profile Management 2402 LTSR
Machine Type %ProfVer%
XenApp server on Windows 2008 Win2008
Windows 7 desktops Win7
So, for example, user john.smith has a profile at \\FileServ1\Profiles\john.smith\Win7 for the Windows
7 desktop and at \\FileServ1\Profiles\john.smith\Win2008 for the Citrix virtual apps servers. Separate
profiles are maintained for desktops and servers. The administrator is aware that issues exist when
profiles roam between workstation and multi‑session operating systems and is being cautious.
Folder redirection is set up using Group Policy in User Configuration > Policies > Windows Settings
> Folder Redirection.
Plan the new site
August 6, 2024
The network administrators have decided to set up a new domain for the new environment, based on
Windows Server 2012 domain controllers and Active Directory 2012. Ultimately, a new virtual apps
site is planned, based on Windows Server 2012 running virtual apps. But for now, the new domain is
used only for the Windows 7 virtual desktops site.
The site is based on a shared Windows 7 base image that is hosted in a XenServer (formerly Citrix
Hypervisor) environment and accessed by Windows terminals. Oice 2007 is included in the base
image.
Because users from both domains are expected to use the new domain, a two‑way trust is set up
between OldDomain and NewDomain. Both domains must belong to the same AD forest.
The following graphic illustrates the configuration of the new virtual desktops site.
© 1999–2024 Cloud Soware Group, Inc. All rights reserved. 213

Profile Management 2402 LTSR
Execute the plan
August 6, 2024
Phase 1: Configure the new file servers
You set up file servers in NewDomain for managing cross‑platformsettings (\\FileServ3) and for storing
profiles for 2k12_Farm (\\FileServ2).
In this case, we choose to set up separatefile servers forthe profilesand forthe cross‑platform settings.
This way is not strictly necessary, but it is an easy way of making the cross‑platform settings server
© 1999–2024 Cloud Soware Group, Inc. All rights reserved. 214

Profile Management 2402 LTSR
available. The profile server might be designed dierently, using DFS namespaces for example, and
so take longer to implement.
In both cases, set up the server shares according to the security recommendations for roaming user
profiles on shared folders. For more information, see https://docs.microsoft.com/en‑us/windows‑
server/storage/folder‑redirection/deploy‑roaming‑user‑profiles.
Phase 2: Upgrade the machines in 2k8_Farm to Profile Management 5.0
For instructions, see Upgrade Profile Management.
Phase 3: Choose which definition files to deploy
Some configuration files (called definition files) are supplied for Microso Oice, Internet Explorer,
and Windows wallpaper.
Important: Do not update these files unless instructed to by Citrix personnel.
Choose the configuration files that are relevant to your deployment, and copy only these files to \\File‑
Serv3\CrossPlatform\Definitions. In this example, copy just Oice 2007.xml.
Phase 4: Configure the machines in 2k8_Farm for Profile Management 5.0
Once the upgrade is complete, make the following configuration changes to (partially) enable the
cross‑platform settings feature. At this stage, only \\FileServ3\CrossPlatform needs to be available.
Policy Value Notes
Path to user store \FileServ1\Profiles#sAMAccountName#\%ProfVer%No change. This path is only
used by OldDomain users, so
there is no need to change it to
support NewDomain users.
Enable cross‑platform settings Enabled
Cross‑platform settings user
groups
Disabled All user groups are processed.
Path to cross‑platform
definitions
\FileServ3\CrossPlatform\DefinitionsThis path is where the
definition files are located.
© 1999–2024 Cloud Soware Group, Inc. All rights reserved. 215

Profile Management 2402 LTSR
Policy Value Notes
Path to cross‑platform settings
store
\FileServ3\CrossPlatform\Store\%USERNAME%.%USERDOMAIN%The cross‑platform settings
store is shared by users of both
domains, so both
%USERNAME% and
%USERDOMAIN% must be
specified in the path.
Source for creating
cross‑platform settings
Enabled Ensures that cross‑platform
settings from OldDomain are
used to initialize the
cross‑platform settings store,
before giving users access to
NewDomain resources.
No changes are required to the machine logon script.
No changes are required to the folder redirection policy.
The OU 2k8_Farm can now be le to run. As users log on, Profile Management copies the settings
identified in the definition file Oice 2007.xml to the cross‑platform settings store.
Phase 5: Prepare the machines in 2k12_Farm
Now that the file servers are set up in 2k8_Farm, it is time to build the Citrix virtual desktops site.
Install Profile Management 5.0 when the Windows 7 virtual desktops are running. Here is a suitable
configuration.
Policy Value Notes
Path to user store \FileServ2\Profiles\%USERNAME%.%USERDOMAIN%\%ProfVer%As this file share is used by
users from both domains, it is
important also to include
domain information.
Active write back Disabled
Enable cross‑platform settings Enabled
Cross‑platform settings user
groups
Disabled All user groups are processed.
© 1999–2024 Cloud Soware Group, Inc. All rights reserved. 216

Profile Management 2402 LTSR
Policy Value Notes
Path to cross‑platform
definitions
\FileServ3\CrossPlatform\DefinitionsThis path is where the
definition files are located. This
setting must match the setting
in 2k8_Farm.
Path to cross‑platform settings
store
\FileServ3\CrossPlatform\Store\%USERNAME%.%USERDOMAIN%Users of both domains share
the cross‑platform settings
store, so both %USERNAME%
and %USERDOMAIN% must be
specified in the path. This
setting must match the setting
in 2k8_Farm.
Source for creating
cross‑platform settings
Disabled Prevents settings from
NewDomain being used for the
initial setup of the profile data
in the cross‑platform settings
store. It ensures that settings
from OldDomain take
precedence.
A machine logon script, which sets the system environment variable %ProfVer%, runs on all machines
in the OU.
Machine Type %ProfVer% Notes
XenApp server on Windows
2012
Win2012x64 It is required when your
planned 64‑bit servers become
available. See Other
considerations for more
information.
Windows 7 desktops Win7 If both 32‑bit and 64‑bit
versions of Windows 7 are
deployed, it is recommended
that they have separate
profiles. So %ProfVer% must
be configured dierently on
each platform.
So the OldDomain user john.smith has a profile at \\FileServ2\Profiles\ john.smith.
© 1999–2024 Cloud Soware Group, Inc. All rights reserved. 217

Profile Management 2402 LTSR
OldDomain\Win7 for the Windows 7 desktop and at \\FileServ2\Profiles\ john.smith.
OldDomain\Win2012x64 for the Citrix virtual apps servers.
And a NewDomain user william.brown has a profile at \\FileServ2\Profiles\ william.brown
.NewDomain\Win7 for the Windows 7 desktop and at \\FileServ2\Profiles\william.
brown.NewDomain\Win2012x64 for the XenApp servers.
Again, you set up folder redirection using Group Policy. Because the domain is based on Windows
Server 2012, set folder redirection from <Group Policy Object Name> > User Configuration > Poli‑
cies > Windows Settings > Folder Redirection.
Policy Value
Favorites \FileServ2\Redirected\%USERNAME%.%USERDOMAIN%\Favorites
My Documents \FileServ2\Redirected\%USERNAME%.%USERDOMAIN%\Documents
%USERDOMAIN% has been added to the folder redirection path. This setup is not necessary because
this policy only applies to NewDomain users. But it might be useful if in the future, you decide to
migrate OldDomain users to the same server. For now, OldDomain users continue to use the Folder
Redirection policy from OldDomain which redirects their folders to \\FileServ1.
Phase 6: Live testing
You perform testing in two stages:
1. You test that the profile data for users from NewDomain operates correctly. These users have no
data set up in the cross‑platform settings store. As the policy Source for creating cross‑platform
settings is set to disabled, their profile changes do not propagate to OldDomain.
2. You test with a few users from OldDomain. When they first log on, the cross‑platform settings
data is copied to their profile. For later logons, changes from either domain are copied to the
other. If a user from OldDomain logs on to NewDomain and no profile data is present (because
the user has not used their profile in OldDomain since OldDomain was upgraded to Profile Man‑
agement 5.0), the cross‑platform settingsstore is not updated. With the configuration described
in this topic, a user must log on to OldDomain before their settings roam between the domains.
This way ensures that user settings (possibly created over many years) are not overwritten by
default settings from NewDomain.
© 1999–2024 Cloud Soware Group, Inc. All rights reserved. 218

Profile Management 2402 LTSR
Other considerations
August 6, 2024
As configured in this case study, Profile Management does not use the settings from NewDomain to
initialize the cross‑platform settings store. Only settings from OldDomain can be used to initialize the
store. It is acceptable until NewDomain contains more than one type of profile (such as Windows 7
32‑bit and Windows 7 64‑bit). Alternatively, users from NewDomain might need to access resources
in OldDomain. In these cases, you must enable the policy Source for creating cross‑platform settings
on further types of machine appropriately.
Caution:
If
Source for creating cross‑platform settings is set incorrectly, it is possible that a new profile oblit‑
erates an existing profile with many accumulated and treasured settings. So we recommend that
this policy is set on only one platform type at a time. This platform is generally the older (more
mature) platform, where settings that users most likely want to keep have accumulated.
In this case study, separate domains are used to illustrate some points. Also, the cross‑platform set‑
tings feature can manage the roaming of settings between two OUs, or even between machines of
dierent types in a single OU. In this case, you might have to set the policy Source for creating cross‑
platform settings dierently for the dierent machine types. This setup can be achieved in several
ways:
• Use the setting CPMigrationsFromBaseProfileToCPStore in the .ini file to set the policy dier‑
ently on each machine type. Do not set the policy Source for creating cross‑platform settings.
• Use Windows Management Instrumentation (WMI) filtering to manage dierent GPOs on the
same OU. You can configure the common settings in a GPO that applies to all machines in the
OU. But you add only the policy Source for creating cross‑platform settings to additional GPOs
and filter using a WMI query.
Enable application profiler
August 6, 2024
This feature defines application‑based profile handling. When you enable this feature, only the set‑
tings defined in the definition file are synchronized.
To enable the application profiler, do the following:
© 1999–2024 Cloud Soware Group, Inc. All rights reserved. 219

Profile Management 2402 LTSR
1. Under Profile Management, open the Citrix Virtual Apps Optimization settings folder.
2. Enable the Enable Citrix Virtual Apps Optimization policy.
3. Enable the Path to Citrix Virtual Apps optimization definitions policy.
4. Specify a folder where the definition files of Citrix virtual apps optimization are located.
5. Run the gpupdate /force command to enforce policy deployment.
Note:
For information about creating definition files, see Create a definition file.
During logo, only settings in the definition file are synchronized, all other settings are discarded.
Use folder redirection in case you want to view or update user documents in the session. For
configuring folder redirection, see Configure folder redirection.
Force user logos
August 6, 2024
By default, users are given a temporary profile if a problem is encountered (for example, the user store
is unavailable). However, you can instead configure Profile Management to display an error message
and then log users o. The error message can help with troubleshooting.
1. Under Profile Management, open the Advanced settings folder.
2. Double‑click the Log o user if a problem is encountered policy.
3. Select Enabled.
Synchronize file security attributes
August 6, 2024
Security attributes can be synchronized when Profile Management copies files and folders in a user
profile between the system on which the profile is installed and the user store. This feature aims to
prevent inconsistencies among security attributes. It requires Windows 10 and later, and in Windows
Server 2016.
This feature is enabled by default. To disable it, do the following:
1. In the UPMPolicyDefaults_all.ini file, add SecurityPreserveEnabled=0 in the General Set‑
tings section.
2. From a command line, run the gpupdate /force command.
© 1999–2024 Cloud Soware Group, Inc. All rights reserved. 220

Profile Management 2402 LTSR
Profile Management synchronizes profile changes based on the latest modification time of the profile.
Profile Management does not synchronize a file if the changes are made only to the file’s security
attributes.
Enable asynchronous processing for user Group Policy on logon
August 6, 2024
Windows provides two processing modes for user Group Policy: synchronous and asynchronous. Win‑
dows uses a registry value to determine the processing mode for the next user logon. If the registry
value doesn’t exist, synchronous mode is applied.
The registry value is a machine‑level setting and doesn’t roam with users. Thus, asynchronous mode
is not applied as expected if users:
• Log on to dierent machines.
• Log on to the same machine where the Delete locally cached profiles on logo policy is enabled.
Citrix Profile Management provides the Enable asynchronous processing for user Group Policy on
logon policy to resolve this issue. With this policy enabled, Profile Management roams the registry
value with users. As a result, the actual processing mode is applied each time users log on.
This feature applies to both Windows and Windows Server OSs.
Prerequisites
For asynchronous mode to take eect on Windows machines, you don’t need to take any additional
actions. However, for this mode to take eect on Windows Server machines, make sure that they meet
the following requirements:
• Have the Remote Desktop Session Host role installed.
• Have the Group Policies set as follows:
– Computer Config > Admin Templates > System > Logon > Always wait for the network
at computer startup and logon: Disabled
– Computer Config > Admin Templates > System > Group Policy > Allow asynchronous
user Group Policy processing when logging on through Remote Desktop Services: En‑
abled
© 1999–2024 Cloud Soware Group, Inc. All rights reserved. 221

Profile Management 2402 LTSR
Enable the policy
Follow these steps to enable the policy:
1. Open the Group Policy Management Editor, and then access Policies > Administrative Tem‑
plates: Policy definitions (ADMX files) > Citrix Components > Profile Management.
2. Under Profile Management, click Advanced settings.
3. Double‑click the Enable asynchronous processing for user Group Policy on logon policy.
4. Select Enabled.
5. Click OK.
For your changes to take eect, run the gpupdate /force command from the command prompt.
Log o from all sessions and then log on again. For details, see https://docs.microsoft.com/en‑
us/windows‑server/administration/windows‑commands/gpupdate.
Configuration precedence:
1. If this setting isn’t configured here, the corresponding setting from the .ini file is used.
2. If this setting is neither configured here nor in the .ini file, the policy is disabled.
Profile Management policies
August 6, 2024
This article describes important aspects of the policies in the .adm and .admx files.
Profile Management variables
In this version of ProfileManagement, the followingvariables are available for use in both Group Policy
and the .ini file.
For policies that define files and registry entries, the following variables expand as follows:
Variable Expansion for Version 1 profiles Expansion for Version 2 profiles
!ctx_localsettings! Local Settings\Application Data AppData\Local
!ctx_roamingappdata! Application Data AppData\Roaming
!ctx_startmenu! Start Menu AppData\Roaming\Microsoft\Windows\Start menu
!ctx_internetcache! Local Settings\Temporary Internet Files AppData\Local\Microsoft\Windows\Temporary Internet Files
© 1999–2024 Cloud Soware Group, Inc. All rights reserved. 222

Profile Management 2402 LTSR
Variable Expansion for Version 1 profiles Expansion for Version 2 profiles
!ctx_localappdata! Local Settings\Application Data AppData\Local
For policies that are used to build paths, the !ctx_osbitness! variable expands to x86 or x64
depending on the operating system. The following variables also expand:
• !ctx_osname! expands to the short name as follows depending on the operating system.
• !ctx_profilever! expands to the profile version as follows depending on the operating
system.
The long name is written to the log files when the Profile Management Service starts.
Long Name Short Name Profile Version
Windows 11 Win11 v6
Windows 10 Redstone 6 Win10RS6 v6
Windows 10 Redstone 5 Win10RS5 v6
Windows 10 Redstone 4 Win10RS4 v6
Windows 10 Redstone 3 Win10RS3 v6
Windows 10 Redstone 2 Win10RS2 v6
Windows 10 Redstone 1 Win10RS1 v6
Windows 10 Win10 v5
Windows 8.1 Win8.1 v4 or v2
Windows 8 Win8 v3 or v2
Windows 7 Win7 v2
Windows Server 2022 Win2022 v6
Windows Server 2019 Win2019 v6
Windows Server 2016 Win2016 v6
Windows Server 2012
R2
Win2012R2 v4 or v2
Windows Server 2012 Win2012 v3 or v2
Windows Server 2008
R2
Win2008 v1
Windows Server 2008 Win2008 v1
© 1999–2024 Cloud Soware Group, Inc. All rights reserved. 223

Profile Management 2402 LTSR
Long Name Short Name Profile Version
Note:
For Windows 10 starting with 20H1, the long name is Windows10 <postfix>, and the correspond‑
ing short name is Win10_<postfix>. The <postfix> value is obtained from two specific registry
entries:
• Entry: HKLM\Soware\Microso\Windows NT\CurrentVersion > Value Name: DisplayVer‑
sion
• Entry: HKLM\Soware\Microso\Windows NT\CurrentVersion > Value Name: ReleaseId
If the first registry entry contains a value, it is used as the <postfix>. Otherwise, the value from
the second registry entry is used.
For Windows 8, Windows 8.1, Windows Server 2012, and Windows Server 2012R2, the actual pro‑
file version might change depending on the settingof the UseProfilePathExtensionVersion
registry key under HLKM\System\CurrentControlset\Services\ProfSvc\
Parameters:
• If it’s set to 1, the profile version is v3 or v4 depending on the operating system.
• If it’s not set or set to 0, the profile version is v2.
Policies by version
As an aid to migration, the following tables show the policies that are available in dierent versions
of Profile Management, the location of each policy in the .adm (or .admx) file and in the .ini file, and
the feature each policy is designed for (or whether it is part of the base configuration of all deploy‑
ments).
The location in the .adm or .admx file is relative to Citrix > Profile Management.
Policies available from Version 2311
Policy in .adm or
.admx file
Location in .adm or
.admx file Policy in .ini file Feature
SelectBestPerfUS \AdvancedSettings SelectBestPerfUS User store selection
method
SharedStoreProfileContainerFileSizeLimit\FileDeduplication SharedStoreProfileContainerFileSizeLimitFile Deduplication
© 1999–2024 Cloud Soware Group, Inc. All rights reserved. 224

Profile Management 2402 LTSR
Policy in .adm or
.admx file
Location in .adm or
.admx file Policy in .ini file Feature
PreventLoginWhenProfileContainerMountFailed\ProfileContainerSettingsPreventLoginWhenProfileContainerMountFailedLog o users when
profile container is not
available during logon
GroupsToAccessProfileContainer\ProfileContainerSettingsGroupsToAccessProfileContainerUsers and groups to
access profile
container
Policies available from Version 2308
Policy in .adm or
.admx file
Location in .adm or
.admx file Policy in .ini file Feature
AutoExtend \ProfileContainerSettingsAutoExtend Enable VHD
auto‑expansion for
profile container
AutoExtendThreshold \AdvancedSettings AutoExtendThreshold Profile container
auto‑expansion
threshold
AutoExtendSize \AdvancedSettings AutoExtendSize Profile container
auto‑expansion
increment
AutoExtendLimit \AdvancedSettings AutoExtendLimit Profile container
auto‑expansion limit
VhdCapacity \AdvancedSettings VhdCapacity Default capacity of
VHD containers
DisableConcurrentAccessToProfileContainer\ProfileContainerSettingsDisableConcurrentAccessToProfileContainerEnable exclusive
access to VHD
containers
DisableConcurrentAccessToOneDriveContainer\ProfileContainerSettingsDisableConcurrentAccessToOneDriveContainerEnable exclusive
access to VHD
containers
EnableUwpAppsRoaming\AdvancedSettings EnableUwpAppsRoamingUWP app roaming
Policies available from Version 2305
© 1999–2024 Cloud Soware Group, Inc. All rights reserved. 225

Profile Management 2402 LTSR
Policy in .adm or
.admx file
Location in .adm or
.admx file Policy in .ini file Feature
UserGroupLevelConfigEnabled\AdvancedSettings UserGroupLevelConfigEnabledEnable user‑level
policy settings
OrderedGroups \AdvancedSettings OrderedGroups Set priority order for
user groups
Policies available from Version 2303
Policy in .adm or
.admx file
Location in .adm or
.admx file
Policy in .ini file
Feature
PSMidSessionWriteBackSessionLock\BasicSettings PSMidSessionWriteBackSessionLockEnable active
write‑back on session
lock and
disconnection
AppAccessControl \AppAccessControl AppAccessControl Enable app access
control
EnableVHDDiskCompaction\ProfileContainerSettingsEnableVHDDiskCompactionEnable VHD disk
compaction
FreeRatio4Compaction \AdvancedSettings FreeRatio4Compaction Free space ratio to
trigger VHD disk
compaction
NLogos4Compaction \AdvancedSettings NLogos4Compaction Number of logos to
trigger VHD disk
compaction
NDefrag4Compaction \AdvancedSettings NDefrag4Compaction Disable
defragmentation for
VHD disk compaction
Policies available from Version 2209
Policy in .adm or
.admx file
Location in .adm or
.admx file Policy in .ini file Feature
SharedStoreFileInclusionList\File deduplication SharedStoreFileInclusionListFiles to include in the
shared store for
deduplication
© 1999–2024 Cloud Soware Group, Inc. All rights reserved. 226

Profile Management 2402 LTSR
Policy in .adm or
.admx file
Location in .adm or
.admx file Policy in .ini file Feature
SharedStoreFileExclusionList\File deduplication SharedStoreFileExclusionListFiles to exclude from
the shared store
Policies available from Version 2206
Policy in .adm or
.admx file
Location in .adm or
.admx file
Policy in .ini file
Feature
SyncGpoStateEnabled \AdvancedSettings SyncGpoStateEnabled Enable asynchronous
processing for user
Group Policy on logon
OneDriveContainer \AdvancedSettings OneDriveContainer Enable the roaming
OneDrive folders
OutlookSearchRoamingConcurrentSessionEnabled\AdvancedSettings OutlookSearchRoamingConcurrentSessionEnabledEnable Outlook search
data roaming in
concurrent sessions
PSForPendingAreaEnabled\Streamed user
profiles
PSForPendingAreaEnabledEnable profile
streaming for pending
area
Policies available from Version 2203
Policy in .adm or
.admx file
Location in .adm or
.admx file Policy in .ini file Feature
EnableVolumeReattach \AdvancedSettings EnableVolumeReattach Automatically reattach
VHDX disks in sessions
Policies available from Version 2112
Policy in .adm or
.admx file
Location in .adm or
.admx file Policy in .ini file Feature
ProfileContainerExclusionListFileProfile container
settings
ProfileContainerExclusionListFileExclude files from the
profile container
© 1999–2024 Cloud Soware Group, Inc. All rights reserved. 227

Profile Management 2402 LTSR
Policy in .adm or
.admx file
Location in .adm or
.admx file Policy in .ini file Feature
ProfileContainerInclusionListFileProfile container
settings
ProfileContainerInclusionListFileInclude files in the
profile container
VhdStorePath AdvancedSettings PathToVhdStore Specify a network
storage location for
VHDX files
Policies available from Version 2109
Policy in .adm or
.admx file
Location in .adm or
.admx file Policy in .ini file Feature
CredBasedAccessEnabledAdvancedSettings CredBasedAccessEnabledEnable
credential‑based
access to user stores
Policies available from Version 2106
Policy in .adm or
.admx file
Location in .adm or
.admx file Policy in .ini file Feature
AccelerateFolderMirroring\FileSystemSettings\FSSynchronizationAccelerateFolderMirroringAccelerate folder
mirroring
CredBasedAccessEnabledAdvancedSettings
CredBasedAccessEnabledEnable
credential‑based
access to user store
MultiSiteReplication AdvancedSettings MultiSiteReplication Replicate user stores
Policies available from Version 2103
Policy in .adm or
.admx file
Location in .adm or
.admx file Policy in .ini file Feature
PSForFoldersEnabled \PsSettings PSForFoldersEnabled Profile streaming for
folders
ProfileContainerLocalCache\ProfileContainerSettingsProfileContainerLocalCacheLocal caching for
profile containers
© 1999–2024 Cloud Soware Group, Inc. All rights reserved. 228

Profile Management 2402 LTSR
Policies available from Version 2009
Policy in .adm or
.admx file
Location in .adm or
.admx file Policy in .ini file Feature
ProfileContainerExclusionListDir\ProfileContainerSettingsProfileContainerExclusionListDirProfile container
ProfileContainerInclusionListDir\ProfileContainerSettingsProfileContainerInclusionListDirProfile container
Policy available from Version 2003
Policy in .adm or
.admx file
Location in .adm or
.admx file Policy in .ini file Feature
FSLogixProfileContainerSupport\AdvancedSettings FSLogixProfileContainerSupportBefore Version 2103:
Enable multi‑session
write‑back for FSLogix
Profile Container
Version 2103 and
later: Enable
multi‑session
write‑back for Profile
Containers
Policies available from Version 1909
Policy in .adm or
.admx file
Location in .adm or
.admx file Policy in .ini file Feature
MigrateUserStore \ MigrateUserStore Migrate UserStore
OutlookEdbBackupEnabled\AdvancedSettings OutlookEdbBackupEnabledOutlook search index
database ‑ backup and
restore
ApplicationProfilesAutoMigration\AdvancedSettings ApplicationProfilesAutoMigrationAutomatic migration of
existing application
profiles
Policy available from Version 1903
© 1999–2024 Cloud Soware Group, Inc. All rights reserved. 229

Profile Management 2402 LTSR
Policy in .adm or
.admx file
Location in .adm or
.admx file Policy in .ini file Feature
ProfileContainer Before Version 2009:
\FileSystemSet‑
tings\FSSynchronization
Version 2009 and
later:
\ProfileContainer
ProfileContainer Profile Container
Policy available from Version 7.18
Policy in .adm or
.admx file
Location in .adm or
.admx file Policy in .ini file Feature
OutlookSearchRoamingEnabled\AdvancedSettings OutlookSearchRoamingEnabledOutlook search
roaming
Policies available from Version 7.16
Policy in .adm or
.admx file
Location in .adm or
.admx file Policy in .ini file Feature
XenAppOptimizationSettings\XenAppOptimizationSettingsXenAppOptimizationSettingsCitrix Virtual Apps and
Desktops application
optimization
XenAppOptimizationDefinitionPath\XenAppOptimizationSettingsXenAppOptimizationDefinitionPathCitrix Virtual Apps and
Desktops application
optimization
LargeFileHandlingList \FileSystemSettings LargeFileHandlingList Large file handling
Policy available from Version 7.15
Policy in .adm or
.admx file
Location in .adm or
.admx file Policy in .ini file Feature
LogonExclusionCheck \FileSystemSettings LogonExclusionCheck Logon exclusion check
© 1999–2024 Cloud Soware Group, Inc. All rights reserved. 230

Profile Management 2402 LTSR
Policy available from Version 5.8
Policy in .adm or
.admx file
Location in .adm or
.admx file Policy in .ini file Feature
StreamingExclusionList \PsSettings StreamingExclusionList Profile streaming
exclusion list
Policies available from Version 5.6
Policy in .adm or
.admx file
Location in .adm or
.admx file Policy in .ini file Feature
CEIPEnabled \AdvancedSettings CEIPEnabled CEIP
PSMidSessionWriteBackReg\ PSMidSessionWriteBackRegActive write back
registry
Policies available from Version 5.5
Policy in .adm or
.admx file
Location in .adm or
.admx file Policy in .ini file Feature
Default Exclusion list \Registry DefaultExclusionListRegistryBase
NTUSER.DAT \Registry LastKnownGoodRegistry Backup NTUSER.DAT
Default Exclusion list ‑
directories
\File system DefaultSyncExclusionListDirBase
Policies available from Version 5.0–5.4
Policy in .adm or
.admx file
Location in .adm or
.admx file Policy in .ini file Feature
Excluded groups \ ExcludedGroups Excluded Groups
Disable automatic
configuration
\Advanced Settings DisableDynamicConfig Automatic
Configuration
© 1999–2024 Cloud Soware Group, Inc. All rights reserved. 231

Profile Management 2402 LTSR
Policy in .adm or
.admx file
Location in .adm or
.admx file Policy in .ini file Feature
Redirect the AppData
(Roaming) folder,
Redirect the Desktop
folder, …
\Folder Redirection (in
User Configuration)
Note: Not applicable Integration with
XenDesktop
Delay before deleting
cached profiles
\Profile handling ProfileDeleteDelay Base
Policies available from Version 4.x
Policy in .adm or
.admx file
Location in .adm or
.admx file Policy in .ini file Feature
Cross‑platform
settings user groups
\Cross‑platform
settings
CPUserGroupList Cross‑platform
settings
Enable cross‑platform
settings
\Cross‑platform
settings
CPEnabled Cross‑platform
settings
Source for creating
cross‑platform
settings
\Cross‑platform
settings
CPMigrationFromBaseProfileToCPStoreCross‑platform
settings
Path to cross‑platform
definitions
\Cross‑platform
settings
CPSchemaPath Cross‑platform
settings
Path to cross‑platform
settings store
\Cross‑platform
settings
CPPath Cross‑platform
settings
Oline profile support \Cross‑platform
settings
OlineSupport Oline profiles
Log o user if a
problem is
encountered
\Advanced Settings LogoRatherThanTempProfileImproved
Troubleshooting
Policies available from Version 3.x
© 1999–2024 Cloud Soware Group, Inc. All rights reserved. 232

Profile Management 2402 LTSR
Policy in .adm or
.admx file
Location in .adm or
.admx file Policy in .ini file Feature
Active write back \ PSMidSessionWriteBack Active profile
writeback (in Version
4.0, renamed Active
write back)
Folders to mirror
(available from Version
3.1)
\File sys‑
tem\Synchronization
MirrorFoldersList Folder mirroring
Process Internet
cookie files on logo
(available from Version
3.1)
\Advanced settings ProcessCookieFiles Folder mirroring
Delete Redirected
Folders (available in
Versions 3.2, 3.2.2, and
4.0)
\Advanced settings DeleteRedirectedFolders Support for folder
redirection
Always cache
\Streamed user
profiles
PSAlwaysCache
Streamed user profiles
Profile streaming \Streamed user
profiles
PSEnabled Streamed user profiles
Timeout for pending
area lock files
\Streamed user
profiles
PSPendingLockTimeout Streamed user profiles
Streamed user profile
groups
\Streamed user
profiles
PSUserGroupsList Streamed user profiles
Policies available from Version 2.x
Policy in .adm or
.admx file
Location in .adm or
.admx file Policy in .ini file Feature
Path to user store \ PathToUserStore Base
Processed groups \ ProcessedGroups Base
Local profile conflict
handling
\Profile handling LocalProfileConflictHandlingBase
Migration of existing
profiles
\Profile handling MigrateWindowsProfilesToUserStoreBase
© 1999–2024 Cloud Soware Group, Inc. All rights reserved. 233

Profile Management 2402 LTSR
Policy in .adm or
.admx file
Location in .adm or
.admx file Policy in .ini file Feature
Template profile \Profile handling TemplateProfilePath,
TemplateProfileOver‑
ridesRoamingProfile,
TemplateProfileOver‑
ridesLocalProfile
Base
Delete locally cached
profiles on logo
\Profile handling DeleteCachedProfilesOnLogoBase
Directory of the MFT
cache file (removed in
Version 5.0)
\Advanced settings USNDBPath Base
Directories to
synchronize
\File sys‑
tem\Synchronization
SyncDirList Base
Exclusion list \Registry ExclusionListRegistry Base
Files to synchronize \File sys‑
tem\Synchronization
SyncFileList Base
Inclusion list \Registry InclusionListRegistry Base
Exclusion list ‑
directories
\File system SyncExclusionListDir Base
Exclusion list ‑ files \File system SyncExclusionListFiles Base
Number of retries
when accessing locked
files
\Advanced settings LoadRetries Base
Process logons of local
administrators
\ ProcessAdmin Base
Enable Profile
Management
\ ServiceActive Base
Enable logging \Log settings LoggingEnabled Logging
Log settings \Log settings LogLevel Logging
Maximum size of the
log file
\Log settings MaxLogSize Logging
Path to log file
(available from Version
2.1)
\Log settings PathToLogFile Logging
© 1999–2024 Cloud Soware Group, Inc. All rights reserved. 234

Profile Management 2402 LTSR
Profile Management policies
August 6, 2024
This article describes important aspects of the policies in the .adm and .admx files.
Profile Management variables
In this version of ProfileManagement, the followingvariables are available for use in both Group Policy
and the .ini file.
For policies that define files and registry entries, the following variables expand as follows:
Variable Expansion for Version 1 profiles Expansion for Version 2 profiles
!ctx_localsettings! Local Settings\Application Data AppData\Local
!ctx_roamingappdata! Application Data AppData\Roaming
!ctx_startmenu! Start Menu AppData\Roaming\Microsoft\Windows\Start menu
!ctx_internetcache! Local Settings\Temporary Internet Files AppData\Local\Microsoft\Windows\Temporary Internet Files
!ctx_localappdata! Local Settings\Application Data AppData\Local
For policies that are used to build paths, the !ctx_osbitness! variable expands to x86 or x64
depending on the operating system. The following variables also expand:
• !ctx_osname! expands to the short name as follows depending on the operating system.
• !ctx_profilever! expands to the profile version as follows depending on the operating
system.
The long name is written to the log files when the Profile Management Service starts.
Long Name Short Name Profile Version
Windows 11 Win11 v6
Windows 10 Redstone 6 Win10RS6 v6
Windows 10 Redstone 5 Win10RS5 v6
Windows 10 Redstone 4 Win10RS4 v6
Windows 10 Redstone 3 Win10RS3 v6
© 1999–2024 Cloud Soware Group, Inc. All rights reserved. 235

Profile Management 2402 LTSR
Long Name Short Name Profile Version
Windows 10 Redstone 2 Win10RS2 v6
Windows 10 Redstone 1 Win10RS1 v6
Windows 10 Win10 v5
Windows 8.1 Win8.1 v4 or v2
Windows 8 Win8 v3 or v2
Windows 7 Win7 v2
Windows Server 2022 Win2022 v6
Windows Server 2019 Win2019 v6
Windows Server 2016 Win2016 v6
Windows Server 2012
R2
Win2012R2 v4 or v2
Windows Server 2012 Win2012 v3 or v2
Windows Server 2008
R2
Win2008 v1
Windows Server 2008 Win2008 v1
Note:
For Windows 10 starting with 20H1, the long name is Windows10 <postfix>, and the correspond‑
ing short name is Win10_<postfix>. The <postfix> value is obtained from two specific registry
entries:
• Entry: HKLM\Soware\Microso\Windows NT\CurrentVersion > Value Name: DisplayVer‑
sion
• Entry: HKLM\Soware\Microso\Windows NT\CurrentVersion > Value Name: ReleaseId
If the first registry entry contains a value, it is used as the <postfix>. Otherwise, the value from
the second registry entry is used.
For Windows 8, Windows 8.1, Windows Server 2012, and Windows Server 2012R2, the actual pro‑
file version might change depending on the settingof the UseProfilePathExtensionVersion
registry key under HLKM\System\CurrentControlset\Services\ProfSvc\
Parameters:
• If it’s set to 1, the profile version is v3 or v4 depending on the operating system.
© 1999–2024 Cloud Soware Group, Inc. All rights reserved. 236

Profile Management 2402 LTSR
• If it’s not set or set to 0, the profile version is v2.
Policies by version
As an aid to migration, the following tables show the policies that are available in dierent versions
of Profile Management, the location of each policy in the .adm (or .admx) file and in the .ini file, and
the feature each policy is designed for (or whether it is part of the base configuration of all deploy‑
ments).
The location in the .adm or .admx file is relative to Citrix > Profile Management.
Policies available from Version 2311
Policy in .adm or
.admx file
Location in .adm or
.admx file Policy in .ini file Feature
SelectBestPerfUS \AdvancedSettings SelectBestPerfUS User store selection
method
SharedStoreProfileContainerFileSizeLimit\FileDeduplication SharedStoreProfileContainerFileSizeLimitFile Deduplication
PreventLoginWhenProfileContainerMountFailed\ProfileContainerSettingsPreventLoginWhenProfileContainerMountFailedLog o users when
profile container is not
available during logon
GroupsToAccessProfileContainer\ProfileContainerSettingsGroupsToAccessProfileContainerUsers and groups to
access profile
container
Policies available from Version 2308
Policy in .adm or
.admx file
Location in .adm or
.admx file Policy in .ini file Feature
AutoExtend \ProfileContainerSettingsAutoExtend Enable VHD
auto‑expansion for
profile container
AutoExtendThreshold \AdvancedSettings AutoExtendThreshold Profile container
auto‑expansion
threshold
AutoExtendSize \AdvancedSettings AutoExtendSize Profile container
auto‑expansion
increment
© 1999–2024 Cloud Soware Group, Inc. All rights reserved. 237

Profile Management 2402 LTSR
Policy in .adm or
.admx file
Location in .adm or
.admx file Policy in .ini file Feature
AutoExtendLimit \AdvancedSettings AutoExtendLimit Profile container
auto‑expansion limit
VhdCapacity \AdvancedSettings VhdCapacity Default capacity of
VHD containers
DisableConcurrentAccessToProfileContainer\ProfileContainerSettingsDisableConcurrentAccessToProfileContainerEnable exclusive
access to VHD
containers
DisableConcurrentAccessToOneDriveContainer\ProfileContainerSettingsDisableConcurrentAccessToOneDriveContainerEnable exclusive
access to VHD
containers
EnableUwpAppsRoaming\AdvancedSettings EnableUwpAppsRoamingUWP app roaming
Policies available from Version 2305
Policy in .adm or
.admx file
Location in .adm or
.admx file Policy in .ini file Feature
UserGroupLevelConfigEnabled\AdvancedSettings UserGroupLevelConfigEnabledEnable user‑level
policy settings
OrderedGroups \AdvancedSettings OrderedGroups Set priority order for
user groups
Policies available from Version 2303
Policy in .adm or
.admx file
Location in .adm or
.admx file Policy in .ini file Feature
PSMidSessionWriteBackSessionLock\BasicSettings PSMidSessionWriteBackSessionLockEnable active
write‑back on session
lock and
disconnection
AppAccessControl \AppAccessControl AppAccessControl Enable app access
control
EnableVHDDiskCompaction\ProfileContainerSettingsEnableVHDDiskCompactionEnable VHD disk
compaction
© 1999–2024 Cloud Soware Group, Inc. All rights reserved. 238

Profile Management 2402 LTSR
Policy in .adm or
.admx file
Location in .adm or
.admx file Policy in .ini file Feature
FreeRatio4Compaction \AdvancedSettings FreeRatio4Compaction Free space ratio to
trigger VHD disk
compaction
NLogos4Compaction \AdvancedSettings NLogos4Compaction Number of logos to
trigger VHD disk
compaction
NDefrag4Compaction \AdvancedSettings NDefrag4Compaction Disable
defragmentation for
VHD disk compaction
Policies available from Version 2209
Policy in .adm or
.admx file
Location in .adm or
.admx file Policy in .ini file Feature
SharedStoreFileInclusionList\File deduplication SharedStoreFileInclusionListFiles to include in the
shared store for
deduplication
SharedStoreFileExclusionList\File deduplication SharedStoreFileExclusionListFiles to exclude from
the shared store
Policies available from Version 2206
Policy in .adm or
.admx file
Location in .adm or
.admx file Policy in .ini file Feature
SyncGpoStateEnabled \AdvancedSettings SyncGpoStateEnabled Enable asynchronous
processing for user
Group Policy on logon
OneDriveContainer \AdvancedSettings OneDriveContainer Enable the roaming
OneDrive folders
OutlookSearchRoamingConcurrentSessionEnabled\AdvancedSettings OutlookSearchRoamingConcurrentSessionEnabledEnable Outlook search
data roaming in
concurrent sessions
© 1999–2024 Cloud Soware Group, Inc. All rights reserved. 239

Profile Management 2402 LTSR
Policy in .adm or
.admx file
Location in .adm or
.admx file Policy in .ini file Feature
PSForPendingAreaEnabled\Streamed user
profiles
PSForPendingAreaEnabledEnable profile
streaming for pending
area
Policies available from Version 2203
Policy in .adm or
.admx file
Location in .adm or
.admx file
Policy in .ini file
Feature
EnableVolumeReattach \AdvancedSettings EnableVolumeReattach Automatically reattach
VHDX disks in sessions
Policies available from Version 2112
Policy in .adm or
.admx file
Location in .adm or
.admx file Policy in .ini file Feature
ProfileContainerExclusionListFileProfile container
settings
ProfileContainerExclusionListFileExclude files from the
profile container
ProfileContainerInclusionListFileProfile container
settings
ProfileContainerInclusionListFileInclude files in the
profile container
VhdStorePath AdvancedSettings PathToVhdStore Specify a network
storage location for
VHDX files
Policies available from Version 2109
Policy in .adm or
.admx file
Location in .adm or
.admx file Policy in .ini file Feature
CredBasedAccessEnabledAdvancedSettings CredBasedAccessEnabledEnable
credential‑based
access to user stores
© 1999–2024 Cloud Soware Group, Inc. All rights reserved. 240

Profile Management 2402 LTSR
Policies available from Version 2106
Policy in .adm or
.admx file
Location in .adm or
.admx file Policy in .ini file Feature
AccelerateFolderMirroring\FileSystemSettings\FSSynchronizationAccelerateFolderMirroringAccelerate folder
mirroring
CredBasedAccessEnabledAdvancedSettings CredBasedAccessEnabledEnable
credential‑based
access to user store
MultiSiteReplication AdvancedSettings MultiSiteReplication Replicate user stores
Policies available from Version 2103
Policy in .adm or
.admx file
Location in .adm or
.admx file Policy in .ini file Feature
PSForFoldersEnabled \PsSettings PSForFoldersEnabled Profile streaming for
folders
ProfileContainerLocalCache\ProfileContainerSettingsProfileContainerLocalCacheLocal caching for
profile containers
Policies available from Version 2009
Policy in .adm or
.admx file
Location in .adm or
.admx file Policy in .ini file Feature
ProfileContainerExclusionListDir\ProfileContainerSettingsProfileContainerExclusionListDirProfile container
ProfileContainerInclusionListDir\ProfileContainerSettingsProfileContainerInclusionListDirProfile container
Policy available from Version 2003
© 1999–2024 Cloud Soware Group, Inc. All rights reserved. 241

Profile Management 2402 LTSR
Policy in .adm or
.admx file
Location in .adm or
.admx file Policy in .ini file Feature
FSLogixProfileContainerSupport\AdvancedSettings FSLogixProfileContainerSupportBefore Version 2103:
Enable multi‑session
write‑back for FSLogix
Profile Container
Version 2103 and
later: Enable
multi‑session
write‑back for Profile
Containers
Policies available from Version 1909
Policy in .adm or
.admx file
Location in .adm or
.admx file Policy in .ini file Feature
MigrateUserStore \ MigrateUserStore Migrate UserStore
OutlookEdbBackupEnabled\AdvancedSettings OutlookEdbBackupEnabledOutlook search index
database ‑ backup and
restore
ApplicationProfilesAutoMigration\AdvancedSettings ApplicationProfilesAutoMigrationAutomatic migration of
existing application
profiles
Policy available from Version 1903
Policy in .adm or
.admx file
Location in .adm or
.admx file Policy in .ini file Feature
ProfileContainer Before Version 2009:
\FileSystemSet‑
tings\FSSynchronization
Version 2009 and
later:
\ProfileContainer
ProfileContainer Profile Container
© 1999–2024 Cloud Soware Group, Inc. All rights reserved. 242

Profile Management 2402 LTSR
Policy available from Version 7.18
Policy in .adm or
.admx file
Location in .adm or
.admx file Policy in .ini file Feature
OutlookSearchRoamingEnabled\AdvancedSettings OutlookSearchRoamingEnabledOutlook search
roaming
Policies available from Version 7.16
Policy in .adm or
.admx file
Location in .adm or
.admx file Policy in .ini file Feature
XenAppOptimizationSettings\XenAppOptimizationSettingsXenAppOptimizationSettingsCitrix Virtual Apps and
Desktops application
optimization
XenAppOptimizationDefinitionPath\XenAppOptimizationSettingsXenAppOptimizationDefinitionPathCitrix Virtual Apps and
Desktops application
optimization
LargeFileHandlingList \FileSystemSettings LargeFileHandlingList Large file handling
Policy available from Version 7.15
Policy in .adm or
.admx file
Location in .adm or
.admx file Policy in .ini file Feature
LogonExclusionCheck \FileSystemSettings LogonExclusionCheck Logon exclusion check
Policy available from Version 5.8
Policy in .adm or
.admx file
Location in .adm or
.admx file Policy in .ini file Feature
StreamingExclusionList \PsSettings StreamingExclusionList Profile streaming
exclusion list
© 1999–2024 Cloud Soware Group, Inc. All rights reserved. 243

Profile Management 2402 LTSR
Policies available from Version 5.6
Policy in .adm or
.admx file
Location in .adm or
.admx file Policy in .ini file Feature
CEIPEnabled \AdvancedSettings CEIPEnabled CEIP
PSMidSessionWriteBackReg\ PSMidSessionWriteBackRegActive write back
registry
Policies available from Version 5.5
Policy in .adm or
.admx file
Location in .adm or
.admx file Policy in .ini file Feature
Default Exclusion list \Registry DefaultExclusionListRegistryBase
NTUSER.DAT \Registry LastKnownGoodRegistry Backup NTUSER.DAT
Default Exclusion list ‑
directories
\File system DefaultSyncExclusionListDirBase
Policies available from Version 5.0–5.4
Policy in .adm or
.admx file
Location in .adm or
.admx file Policy in .ini file Feature
Excluded groups \ ExcludedGroups Excluded Groups
Disable automatic
configuration
\Advanced Settings DisableDynamicConfig Automatic
Configuration
Redirect the AppData
(Roaming) folder,
Redirect the Desktop
folder, …
\Folder Redirection (in
User Configuration)
Note: Not applicable Integration with
XenDesktop
Delay before deleting
cached profiles
\Profile handling ProfileDeleteDelay Base
Policies available from Version 4.x
© 1999–2024 Cloud Soware Group, Inc. All rights reserved. 244

Profile Management 2402 LTSR
Policy in .adm or
.admx file
Location in .adm or
.admx file Policy in .ini file Feature
Cross‑platform
settings user groups
\Cross‑platform
settings
CPUserGroupList Cross‑platform
settings
Enable cross‑platform
settings
\Cross‑platform
settings
CPEnabled Cross‑platform
settings
Source for creating
cross‑platform
settings
\Cross‑platform
settings
CPMigrationFromBaseProfileToCPStoreCross‑platform
settings
Path to cross‑platform
definitions
\Cross‑platform
settings
CPSchemaPath Cross‑platform
settings
Path to cross‑platform
settings store
\Cross‑platform
settings
CPPath Cross‑platform
settings
Oline profile support \Cross‑platform
settings
OlineSupport Oline profiles
Log o user if a
problem is
encountered
\Advanced Settings LogoRatherThanTempProfileImproved
Troubleshooting
Policies available from Version 3.x
Policy in .adm or
.admx file
Location in .adm or
.admx file Policy in .ini file Feature
Active write back \ PSMidSessionWriteBack Active profile
writeback (in Version
4.0, renamed Active
write back)
Folders to mirror
(available from Version
3.1)
\File sys‑
tem\Synchronization
MirrorFoldersList Folder mirroring
Process Internet
cookie files on logo
(available from Version
3.1)
\Advanced settings ProcessCookieFiles Folder mirroring
© 1999–2024 Cloud Soware Group, Inc. All rights reserved. 245

Profile Management 2402 LTSR
Policy in .adm or
.admx file
Location in .adm or
.admx file Policy in .ini file Feature
Delete Redirected
Folders (available in
Versions 3.2, 3.2.2, and
4.0)
\Advanced settings DeleteRedirectedFolders Support for folder
redirection
Always cache \Streamed user
profiles
PSAlwaysCache Streamed user profiles
Profile streaming \Streamed user
profiles
PSEnabled Streamed user profiles
Timeout for pending
area lock files
\Streamed user
profiles
PSPendingLockTimeout Streamed user profiles
Streamed user profile
groups
\Streamed user
profiles
PSUserGroupsList Streamed user profiles
Policies available from Version 2.x
Policy in .adm or
.admx file
Location in .adm or
.admx file Policy in .ini file Feature
Path to user store \ PathToUserStore Base
Processed groups \ ProcessedGroups Base
Local profile conflict
handling
\Profile handling LocalProfileConflictHandlingBase
Migration of existing
profiles
\Profile handling MigrateWindowsProfilesToUserStoreBase
Template profile \Profile handling TemplateProfilePath,
TemplateProfileOver‑
ridesRoamingProfile,
TemplateProfileOver‑
ridesLocalProfile
Base
Delete locally cached
profiles on logo
\Profile handling DeleteCachedProfilesOnLogoBase
Directory of the MFT
cache file (removed in
Version 5.0)
\Advanced settings USNDBPath Base
Directories to
synchronize
\File sys‑
tem\Synchronization
SyncDirList Base
© 1999–2024 Cloud Soware Group, Inc. All rights reserved. 246

Profile Management 2402 LTSR
Policy in .adm or
.admx file
Location in .adm or
.admx file Policy in .ini file Feature
Exclusion list \Registry ExclusionListRegistry Base
Files to synchronize \File sys‑
tem\Synchronization
SyncFileList Base
Inclusion list \Registry InclusionListRegistry Base
Exclusion list ‑
directories
\File system SyncExclusionListDir Base
Exclusion list ‑ files \File system SyncExclusionListFiles Base
Number of retries
when accessing locked
files
\Advanced settings LoadRetries Base
Process logons of local
administrators
\ ProcessAdmin Base
Enable Profile
Management
\ ServiceActive Base
Enable logging \Log settings LoggingEnabled Logging
Log settings \Log settings LogLevel Logging
Maximum size of the
log file
\Log settings MaxLogSize Logging
Path to log file
(available from Version
2.1)
\Log settings PathToLogFile Logging
Profile Management policy descriptions and defaults
August 12, 2024
This topic describes the policies in the Profile Management .adm and .admx files.
For more information about the policies, see Profile Management policies.
Sections in the .adm and .admx files
Profile Management policies reside in the following sections:
© 1999–2024 Cloud Soware Group, Inc. All rights reserved. 247

Profile Management 2402 LTSR
Profile Management
Profile Management\Folder Redirection (User Configuration)
Profile Management\Profile handling
Profile Management\Advanced settings
Profile Management\Log settings
Profile Management\Registry
Profile Management\File system
Profile Management\File system\Synchronization
Profile Management\File deduplication
Profile Management\Streamed user profiles
Profile Management\Cross‑platform settings
In the Group Policy Object Editor, most of the policies appear under Computer Configuration > Ad‑
ministrative Templates > Classic Administrative Templates > Citrix. Redirected folder policies ap‑
pear under User Configuration > Administrative Templates > Classic Administrative Templates >
Citrix.
In the Group Policy Editor, the policies appear under Computer Configuration unless the policies are
under the section labeled User Configuration.
Profile Management
Enable Profile Management
Lets you enable Profile Management. By default, to ease deployment, Profile Management does not
process logons or logos. Enable Profile Management only aer you do all other setup tasks and test
how Citrix user profiles behave in your environment.
Configuration precedence:
1. If this policy isn’t configured here, the value from the .ini file is used.
2. If this policy is not configured either here or in the .ini file, Profile Management does not process
Windows user profiles in any way.
Processed groups
Lets you specify users whose profiles are processed. Specify users using the following user groups:
© 1999–2024 Cloud Soware Group, Inc. All rights reserved. 248

Profile Management 2402 LTSR
• Domain groups (local, global, and universal) in the format of <DOMAIN NAME>\<GROUP
NAME>
• Local groups in the format of GROUP NAME
Configuration precedence:
1. If this policy is configured here, Profile Management processes only members of these user
groups. If this policy is disabled, Profile Management processes all users.
2. If this policy isn’t configured here, the value from the .ini file is used.
3. If this policy is not configured either here or in the .ini file, members of all user groups are
processed.
Excluded groups
Lets you specify users whose profiles aren’t processed. You can specify users by using the following
user groups:
• Domain groups (local, global, and universal) in the format of <DOMAIN NAME>\<GROUP
NAME>
• Local groups in the format of GROUP NAME
Configuration precedence:
1. If this setting is configured here, Profile Management excludes members of those user groups.
2. If this setting is disabled, Profile Management does not exclude any users.
3. If this setting isn’t configured here, the value from the .ini file is used.
4. If this setting is not configured either here or in the .ini file, no members of any groups are ex‑
cluded.
Process logons of local administrators
Lets you specify whether Profile Management processes logons of members of the BUILTIN
\Administrators group. Enabling this policy is recommended for Citrix virtual desktops
deployments, in which most users are local administrators.
Citrix virtual apps environments are the typical use cases of multi‑session operating systems. If
this policy is disabled or not configured on multi‑session operating systems, Profile Management
processes logons of domain users but not of local administrators. Citrix virtual desktops environ‑
ments are the typical use cases of single‑session operating systems. On single‑session operating
systems, Profile Management processes local administrator logons.
© 1999–2024 Cloud Soware Group, Inc. All rights reserved. 249

Profile Management 2402 LTSR
Domain users with local administrator permissions are typically Citrix virtual desktops users with as‑
signed virtual desktops. When a desktop experiences problems with Profile Management, this policy
allows the user to log on by bypassing any logon processing and to troubleshoot the problems.
Note:
Domain users’logons might be subject to restrictions imposed by group membership, typically
to ensure compliance with product licensing.
Configuration precedence:
1. If this policy is disabled, Profile Management does not process logons by local administrators.
2. If this policy isn’t configured here, the value from the .ini file is used.
3. If this policy is not configured either here or in the .ini file, administrators aren’t processed.
Path to user store
Lets you specify the storage path of the user store. The user store is the central network location where
user profiles (registry changes and synchronized files) are stored.
The path can be:
• A path relative to the home directory. The home directory is typically configured as the
#homeDirectory# attribute for a user in the Active Directory.
• A UNC path. It typically specifies a server share or a DFS namespace.
• Disabled or unconfigured. In this case, the path is #homeDirectory#\Windows.
The following types of variables can be used in the path setting:
• System environment variables enclosed in percent signs (for example, %ProfVer%). System
environment variables generally require extra setup.
• Attributes of the Active Directory user object enclosed in hashes (for example, #sAMAccountName
#).
• Profile Management variables. For more information, see the Profile Management variables
product document.
User environment variables cannot be used, except for %username% and %userdomain%. You can
also create custom attributes to define organizational variables such as location or users fully. Attrib‑
utes are case‑sensitive.
Examples:
• \\server\share\\#sAMAccountName# stores the user settings to the UNC path \\
server\share\JohnSmith (if #sAMAccountName# resolves to JohnSmith for the current
user)
© 1999–2024 Cloud Soware Group, Inc. All rights reserved. 250

Profile Management 2402 LTSR
• \\server\profiles$\\%USERNAME%.%USERDOMAIN%\!CTX_OSNAME!!CTX_OSBITNESS
! might expand to \\server\profiles$\JohnSmith.DOMAINCONTROLLER1\
Win8x64
Important: Whichever attributes or variables you use, check that this policy expands to the
folder one level higher than the folder containing NTUSER.DAT. For example, if this file exists
in \server\profiles$\JohnSmith.Finance\Win8x64\UPM_Profile, set the path to the user store as
\server\profiles$\JohnSmith.Finance\Win8x64 (not the \UPM_Profile subfolder).
For more information on using variables when specifying the path to the user store, see the following
topics:
• Share Citrix user profiles on several file servers
• Administer profiles within and across OUs
• High availability and disaster recovery with Profile Management
Configuration precedence:
1. If Path to user store is disabled, the user settings are saved in the Windows subdirectory of the
home directory. If this policy is disabled, the user settings are saved in the Windows subdirec‑
tory of the home directory.
2. If this policy isn’t configured here, the value from the .ini file is used.
3. If this policy is not configured either here or in the .ini file, the Windows directory on the home
drive is used.
Migrate user store
Lets you specify the storage path of the user store that Profile Management previously used (the path
to user store setting that you previously specified).
If this setting is configured, the user settings stored in the previous user store are migrated to the
current user store.
The path can be an absolute UNC path or a path relative to the home directory.
In both cases, you can use the following types of variables:
• System environment variables enclosed in percent signs
• Attributes of the Active Directory user object enclosed in hash signs
Examples:
• If %ProfileVer% is a system environment variable that resolves to W2K3, the folder Windows
\\%ProfileVer% stores the user settings in a subfolder called Windows\W2K3 of the user
store.
© 1999–2024 Cloud Soware Group, Inc. All rights reserved. 251

Profile Management 2402 LTSR
• If #SAMAccountName# resolves to JohnSmith for the current user, \\server\share
\\#SAMAccountName# stores the user settings to the UNC path \\server\share\<
JohnSmith>.
Configuration precedence:
1. In the path, you can use user environment variables except %username% and %userdomain
%. If this setting is disabled, the user settings are saved in the current user store.
2. If this setting isn’t configured here, the corresponding setting from the .ini file is used.
3. If this setting is not configured either here or in the .ini file, the user settings are saved in the
current user store.
Active write back
Lets you enable the active write‑back feature. With this feature enabled, Profile Management synchro‑
nizes files and folders that are modified on the local computer to the user store during a session.
Configuration precedence:
1. If this policy isn’t configured here, the value from the .ini file is used.
2. If this policy is not configured either here or in the .ini file, it is disabled.
Active write back registry
Lets you enable Profile Management to synchronize registry entries that are modified on the local
computer to the user store during a session. Use this policy with the Active write back policy.
Configuration precedence:
1. If you do not configure this setting here, the value from the .ini file is used.
2. If you configure this setting neither here nor in the .ini file, the active write‑back registry is dis‑
abled.
Active write back on session lock and disconnection
With both this policy and the Active write back policy enabled, profile files and folders are written
back only when a session is locked or disconnected.
With this policy and both the Active write back and Active write back registry policies enabled,
registry entries are written back only when a session is locked or disconnected.
Configuration precedence:
© 1999–2024 Cloud Soware Group, Inc. All rights reserved. 252

Profile Management 2402 LTSR
• If this setting isn’t configured here, the value from the .ini file is used.
• If this setting is not configured either here or in the .ini file, this policy is disabled.
Oline profile support
Lets you enable the oline profile feature. This feature allows profiles to synchronize with the user
store at the earliest opportunity.
This feature aims at laptop or mobile device users who oen roam. When a network disconnection
occurs, profiles remain intact on the laptop or device even aer restart or hibernation. When mobile
users start sessions, their profiles are updated locally. Profile Management synchronizes their profiles
with the user store only aer the network connection restores.
Configuration precedence:
• If this policy isn’t configured here, the value from the .ini file is used.
• If this policy is not configured either here or in the .ini file, oline profiles are disabled.
Profile Management\Advanced settings
Number of retries when accessing locked files
Lets you specify the number of retries when accessing locked files.
It is most unlikely that you need to enable this policy.
During logo, if there are any locked files, Profile Management tries the specified number of times to
access the files and copy them back to the user store. But typically Profile Management only reads
(not writes to) the files for the copy operation to succeed. If any locked files exist, Profile Management
doesn’t delete the local profile and instead leaves it “stale”(as long as the appropriate policy was
enabled).
We recommend that you do not enable this policy.
Configuration precedence:
1. If this policy is disabled, the default value of five retries is used.
2. If this policy isn’t configured here, the value from the .ini file is used.
3. If this policy is not configured either here or in the .ini file, the default value is used.
Process Internet cookie files on logo
Some deployments leave extra Internet cookies that Index.dat does not reference. The extra cook‑
ies le in the file system aer sustained browsing can lead to profile bloat. This policy lets you en‑
© 1999–2024 Cloud Soware Group, Inc. All rights reserved. 253

Profile Management 2402 LTSR
able Profile Management to force processing of Index.dat and remove the extra cookies. The policy
increases logo times, so enable it only aer you experience this issue.
Configuration precedence:
1. If this policy isn’t configured here, the value from the .ini file is used.
2. If this policy is not configured either here or in the .ini file, no processing of Index.dat takes place.
Disable automatic configuration
Profile Management examines any Citrix virtual desktops environment, for example for the presence
of personal vDisks, and configures Group Policy accordingly. Only Profile Management policies in the
Not Configured state are adjusted, so any customizations you have made are preserved.
This policy lets you speed up deployment and simplifies optimization. You do not need to configure
this policy. However, you can disable automatic configuration when doing one of the following:
• Upgrading to retain settings from earlier versions
• Troubleshooting
You can regard automatic configuration as a dynamic configuration checker that automatically con‑
figures the default policy settings according to environments at runtime. It eliminates the need to
configure the settings manually. Runtime environments include:
• Windows OS
• Windows OS versions
• Presence of Citrix virtual desktops
• Presence of personal vDisks
Automatic configuration might change the following policies if the environment changes:
• Active write back
• Always cache
• Delete locally cached profiles on logo
• Delay before deleting cached profiles
• Profile streaming
See the following table for the default status of the preceding policies on dierent OSs:
Multi‑session OS Single‑session OS
Active write back Enabled Enabled
Always cache Disabled Enabled
© 1999–2024 Cloud Soware Group, Inc. All rights reserved. 254

Profile Management 2402 LTSR
Multi‑session OS Single‑session OS
Delete locally cached profiles
on logo
Enabled Disabled if Citrix virtual
desktop is assigned or Citrix
virtual desktop is not installed.
Otherwise, enabled.
Delay before deleting cached
profiles
0 seconds 60 seconds if user changes are
not persistent; otherwise, 0
seconds.
Profile streaming Enabled Enabled
Profile streaming for folders Enabled Enabled
However, with automatic configuration disabled, all policies above default to Disabled.
To ensure that Start menu roaming works properly on Windows 10, Windows Server 2016, and Win‑
dows Server 2019, follow these steps:
1. Enable automatic configuration or set the Disable automatic configuration policy to Enabled.
2. Complete the configuration steps, as described in the Profile Management best practices article.
Configuration precedence:
1. If this setting isn’t configured here, the value from the .ini file is used.
2. If this setting is neither configured here nor in the .ini file, automatic configuration is turned on.
In this case, Profile Management settings might change if the environment changes.
Log o user if a problem is encountered
Lets you specify whether Profile Management logs o users if a problem is encountered.
If this policy is disabled or not configured, Profile Management gives a temporary profile to users if a
problem is encountered. For example, the user store is unavailable.
Configuration precedence:
1. If this setting is enabled, an error message is displayed and users are logged o. This setup can
simplify troubleshooting of the problem.
2. If this setting isn’t configured here, the value from the .ini file is used.
3. If this setting is neither configured here nor in the .ini file, a temporary profile is provided.
© 1999–2024 Cloud Soware Group, Inc. All rights reserved. 255

Profile Management 2402 LTSR
Customer Experience Improvement Program
By default, the Customer Experience Improvement Program is enabled to help improve the quality
and performance of Citrix products by sending anonymous statistics and usage data.
If this setting isn’t configured here, the value from the .ini file is used.
Enable search index roaming for Outlook
With this policy enabled, Profile Management provides native Outlook search experience to users by
automatically roaming Outlook search data with user profiles. This policy requires extra storage to
store the search index for Outlook.
Log o and then log on again for this policy to take eect.
Outlook search index database –backup and restore
Lets you specify what Profile Management does during logon when the Enable search index roaming
for Outlook policy is enabled.
If this policy is enabled, Profile Management backs up the search index database each time the data‑
base is mounted successfully on logon. Profile Management treats the backup as the good copy of the
search index database. When an attempt to mount the search index database fails due to database
corruption, Profile Management reverts the search index database to the last‑known good copy.
Note:
Profile Management deletes the previously saved backup aer a new backup is saved success‑
fully. The backup consumes the available VHDX storage.
Enable concurrent session support for Outlook search data roaming
Lets Profile Management provide native Outlook searchexperiencein concurrent sessions of the same
user. Use this policy with the Search index roaming for Outlook policy.
With this policy enabled, each concurrent session uses a separate Outlook OST file.
By default, only two VHDX disks can be used to store Outlook OST files (one file per disk). If the user
starts more sessions, their Outlook OST files are stored in the local user profile. You can specify the
maximum number of VHDX disks for storing Outlook OST files.
© 1999–2024 Cloud Soware Group, Inc. All rights reserved. 256

Profile Management 2402 LTSR
Enable multi‑session write‑back for profile containers
Lets you enable write‑back for profile containers in multi‑session scenarios.
Note:
Citrix Profile Management profile container is available starting with Citrix Profile Management
2103. The FSLogix Profile Container is available starting with Citrix Profile Management 2003.
If the policy is enabled, changes in all sessions are written back to profile containers. Otherwise, only
changes in the first session are saved because only the first session is in read/write mode in profile
containers.
To use this policy for the FSLogix Profile Container, ensure that the following prerequisites are met:
• The FSLogix Profile Container feature is installed and enabled.
• The profile type is set to Try for read‑write profile and fallback to read‑only in FSLogix.
Replicate user stores
Lets you replicate the remote user profile store to multiple paths on each logon and logo. Doing so
lets Profile Management provide profile redundancy for user logons.
Enabling the policy increases system I/O and might prolong logos.
Note:
• This feature is available for both the user store and the full profile container.
• Replicated profile containers provide profile redundancy for user logons but not for
in‑session failover.
Enable credential‑based access to user stores
Lets you enable credential‑based access to user stores.
By default, Citrix Profile Management impersonates the current user to access user stores. Therefore,
it requires the current user to have permission to access the user store. In some situations, you want
to put user stores in a storage repository (for example, Azure Files) that the current user has no per‑
mission to access. In those cases, enable this policy to let Profile Management access the user stores
by using the credentials of the storage repository.
To ensure that Profile Management can access user stores using credentials, save the credentials in
Workspace Environment Management (WEM) or Windows Credential Manager. We recommend you
use Workspace Environment Management to eliminate the need of configuring the same credentials
for each machine running Profile Management. If you use the Windows Credential Manager, use the
Local System account to securely save the credentials.
© 1999–2024 Cloud Soware Group, Inc. All rights reserved. 257

Profile Management 2402 LTSR
Note:
This policy is available both for file‑based and VHDX‑based user stores. For Profile Management
versions earlier than 2212, this policy is available only for VHDX‑based user stores.
Configuration precedence:
1. If this setting isn’t configured here, the value from the .ini file is used.
2. If this setting is not configured either here or in the .ini file, it is disabled by default.
Specify the storage path for VHDX files
Lets you specify a storage path to store VHDX files used in Profile Management.
Citrix Profile Management provides the following VHDX‑based policies: Enable native Outlook search
experience, Citrix Profile Management profile container, and Accelerate folder mirroring. By default,
VHDX files are stored in the user store.
Configuration precedence:
1. If this setting isn’t configured here, the value from the .ini file is used.
2. If this setting is not configured either here or in the .ini file, it is disabled by default.
Default capacity of VHD containers
Lets you specify the default storage capacity (in GB) of VHD containers.
Configuration precedence:
1. If this policy is not configured here, the value from the .ini file is used.
2. If this policy is not configured either here or in the .ini file, the default is 50 (GB).
Automatically reattach VHDX disks in sessions
With this policy enabled, Profile Management ensures a high level of stability of VHDX‑based policies.
By default, this policy is enabled.
When this policy is enabled, Profile Management monitors VHDX disks that are in use by VHDX‑based
policies. If any of the disks is detached, Profile Management reattaches the disk automatically.
© 1999–2024 Cloud Soware Group, Inc. All rights reserved. 258

Profile Management 2402 LTSR
Enable asynchronous processing for user Group Policy on logon
Windows provides two processing modes for user Group Policy: synchronous and asynchronous. Win‑
dows uses a registry value to determine the processing mode for the next user logon. If the registry
value doesn’t exist, synchronous mode is applied. The registry value is a machine‑level setting and
doesn’t roam with users. Thus, asynchronous mode will not be applied as expected if users:
• Log on to dierent machines.
• Log on to the same machine where the Delete locally cached profiles on logo policy is enabled.
With this policy enabled, the registry value roams with users. As a result, processing mode is applied
each time users log on.
Free space ratio to trigger VHD disk compaction
Applicable when Enable VHD disk compaction is enabled. Lets you specify the free space ratio to trig‑
ger VHD disk compaction. When the free space ratio exceeds the specified value on user logo, disk
compaction is triggered.
Free space ratio = (current VHD file size –required minimum VHD file size*) ÷ current VHD file size
* Obtained using the GetSupportedSize method of the MSFT_Partition class from the Microso
Windows operating system.
Configuration precedence:
1. If this setting isn’t configured here, the value from the .ini file is used.
2. If this setting is not configured either here or in the .ini file, the default value 20 (%) is used.
Number of logos to trigger VHD disk compaction
Applicable when Enable VHD disk compaction is enabled. Lets you specify the number of user logos
to trigger VHD disk compaction.
When the number of logos since the last compaction reaches the specified value, disk compaction is
triggered again.
Configuration precedence:
1. If this setting isn’t configured here, the value from the .ini file is used.
2. If this setting is not configured either here or in the .ini file, the default value 5 is used.
© 1999–2024 Cloud Soware Group, Inc. All rights reserved. 259

Profile Management 2402 LTSR
Disable defragmentation for VHD disk compaction
Applicable when Enable VHD disk compaction is enabled. Lets you specify whether to disable file
defragmentation for VHD disk compaction.
When VHD disk compaction is enabled, the VHD disk file is first automatically defragmented using
the Windows built‑in defrag tool, and then compacted. VHD disk defragmentation produces better
compaction results while disabling it can save system resources.
Configuration precedence:
1. If this setting isn’t configured here, the value from the .ini file is used.
2. If this setting is not configured either here or in the .ini file, defragmentation is enabled by de‑
fault.
Profile container auto‑expansion threshold
Lets you specify the utilization percentage of storage capacity at which profile containers trigger auto‑
expansion.
Configuration precedence:
• If this policy is not configured here, the value from the .ini file is used.
• If this policy is not configured here or in the .ini file, the default is 90 (%) of storage capacity.
Profile container auto‑expansion increment
Lets you specify the amount of storage capacity (in GB) by which profile containers automatically ex‑
pand when auto‑expansion is triggered.
Configuration precedence:
• If this policy is not configured here, the value from the .ini file is used.
• If this policy is not configured either here or in the .ini file, the default is 10 (GB).
Profile container auto‑expansion limit
Lets you specify the maximum storage capacity (in GB) to which profile containers can automatically
expand when auto‑expansion is triggered.
Configuration precedence:
• If this policy is not configured here, the value from the .ini file is used.
• If this policy is not configured either here or in the .ini file, the default is 80 (GB).
© 1999–2024 Cloud Soware Group, Inc. All rights reserved. 260

Profile Management 2402 LTSR
Enable OneDrive container
Lets OneDrive folders roam with users.
The OneDrive container is a VHDX‑based folder roaming solution. Profile Management creates a VHDX
file per user on a file share and stores the users’OneDrive folders into the VHDX files. The VHDX files
are attached when users log on and detached when users log o.
UWP app roaming
Lets you enable UWP (Universal Windows Platform) apps to roam with users. As a result, users can
access the same UWP apps from dierent devices.
With this policy enabled, Profile Management lets UWP apps roam with users by storing the apps on
separate VHDX disks. Those disks are attached during user logons and detached during user logos.
Configuration precedence:
If this setting is not configured here, the value from the .ini file is used.
If this setting is configured neither here nor in the .ini file, this feature is disabled.
Enable user‑level policy settings
With this policy enabled, machine‑level policy settings can work at the user level, and user‑level set‑
tings override machine‑level settings.
Configuration precedence:
1. If this policy is not configured here, the value from the .ini file is used.
2. If this policy is not configured either here or in the .ini file, it is disabled.
Set priority order for user groups
Specify the priority order for user groups. The order determines which group takes precedence when
a user belongs to multiple groups with dierent policy settings.
When a user belongs to multiple groups with conflicting policy settings, consider the following:
• If the user belongs to one or more groups defined in this policy, the group with the highest
priority takes precedence.
• If the user doesn’t belong to any of the groups defined in this policy, the group with the SID
listed earliest in alphabetical order takes precedence.
Configuration precedence:
© 1999–2024 Cloud Soware Group, Inc. All rights reserved. 261

Profile Management 2402 LTSR
1. If this setting is not configured here, the value from the .ini file is used.
2. If this setting is not configured either here or in the .ini file, no priority order is specified.
User store selection method
Lets you specify the user store selection method when multiple user stores are available. Options
include:
• Configuration order. Profile Management selects the earliest configured store.
• Access performance. Profile Management selects the store with the best access performance.
Configuration precedence:
1. If this setting isn’t configured here, the value from the .ini file is used.
2. If this setting isn’t configured here or in the .ini file, Configuration order is used.
Profile Management\Citrix Virtual Apps Optimization settings
Enable Citrix Virtual Apps Optimization
When you enable this feature, only the settings specific to the published applications a user launches
or exits are synchronized.
Configuration precedence:
1. If this setting isn’t configured here, the value from the .ini file is used.
2. If this setting is not configured either here or in the .ini file, no optimization settings for Citrix
virtual apps are applied.
Path to Citrix Virtual Apps optimization definitions
Lets you specify a folder to store definition files of the Citrix virtual apps optimization.
Configuration precedence:
1. If this setting isn’t configured here, the value from the .ini file is used.
2. If this setting is not configured either here or in the .ini file, no Citrix virtual apps optimization
settings are applied.
Note:
The folder can reside in the local storage or on an SMB file share.
© 1999–2024 Cloud Soware Group, Inc. All rights reserved. 262

Profile Management 2402 LTSR
Profile Management\Cross‑platform settings
Enable cross‑platform settings
Lets you enable the cross‑platform settings. The cross‑platform settings feature is primarily used for
migration from Windows 7 and Windows Server 2008 to Windows 8 and Windows Server 2012. This
migration might also move from Microso Oice 2003 or Oice 2007 to Oice 2010.
By default, to ease deployment, cross‑platform settings are disabled. Enable this policy only aer
thorough planning and testing of this feature.
Configuration precedence:
1. If this policy isn’t configured here, the value from the .ini file is used.
2. If this policy is not configured either here or in the .ini file, no cross‑platform settings are applied.
Cross‑platform settings user groups
Lets you specify Windows user groups to which the cross‑platform settings feature applies. For exam‑
ple, you can use this policy to process only the profiles from a test user group.
Configuration precedence:
1. If this policy is configured, the cross‑platform settings feature of Profile Management processes
only members of these user groups. If this policy is disabled, the feature processes all users
specified by the Processed groups policy.
2. If this policy isn’t configured here, the value from the .ini file is used.
3. If this policy is not configured either here or in the .ini file, all user groups are processed.
Path to cross‑platform definitions
Lets you specify the network location where the definition files reside.
This path must be a UNC path. Users must have read access to this location, and administrators must
have write access to it. The location must be a Server Message Block (SMB) or Common Internet File
System (CIFS) file share.
Configuration precedence:
1. If this policy isn’t configured here, the value from the .ini file is used.
2. If this policy is not configured either here or in the .ini file, no cross‑platform settings are applied.
© 1999–2024 Cloud Soware Group, Inc. All rights reserved. 263

Profile Management 2402 LTSR
Path to cross‑platform settings store
Lets you specify the path to the cross‑platform settings store. The store refers to the folder in which
users’cross‑platform settings are saved.
This store resides in the user store where profile data shared by multiple platforms is located. Users
must have write access to the store. The path can be an absolute UNC path or a path relative to the
home directory. You can use the variables used in
Path to user store
.
Configuration precedence:
1. If this policy is disabled, the Windows\PM_CP path is used.
2. If this policy isn’t configured here, the value from the .ini file is used.
3. If this policy is not configured either here or in the .ini file, the default value is used.
Source for creating cross‑platform settings
Lets you specify a platform as the base platform if this policy is enabled in that platform’s OU. This
policy migrates data from the base platform’s profiles to the cross‑platform settings store. By default,
this policy is disabled.
Each platform’s own set of profiles are stored in a separate OU. Decide which platform’s profile data
that you want to use as the base platform to seed the cross‑platform settings store.
With this policy enabled, when one of the following situations occurs, Profile Management migrates
the data from the single‑platform profile to the store.
• The cross‑platform settings store contains a definition file with no data.
• The cached data in a single‑platform profile is newer than the definition’s data in the store.
Important:
If this policy is enabled in multiple OUs, user objects, or machine objects, the platform that the
first user logs on to become the base profile.
Profile Management\File system
Exclusion list ‑ files
Lets you specify the files that Profile Management ignores during synchronization. File names must
be paths relative to the user profile (%USERPROFILE%). Wildcards are allowed and are applied recur‑
sively.
Examples:
© 1999–2024 Cloud Soware Group, Inc. All rights reserved. 264

Profile Management 2402 LTSR
• Desktop\Desktop.ini ignores the Desktop.ini file in the Desktop folder.
• %USERPROFILE%\*.tmp ignores all files with the .tmp extension in the entire profile.
• AppData\Roaming\MyApp\*.tmp ignores all files with the .tmp extension in one part of
the profile.
Configuration precedence:
1. If this policy is disabled, no files are excluded.
2. If this policy isn’t configured here, the value from the .ini file is used.
3. If this policy is not configured either here or in the .ini file, no files are excluded.
Enable Default Exclusion List ‑ directories
Lets you specify the default list of directories that Profile Management ignores during synchronization.
Use this policy to specify GPO exclusion directories without having to fill them in manually.
Configuration precedent:
1. If you disable this policy, Profile Management does not exclude any directories by default.
2. If you do not configure this policy here, Profile Management uses the value from the .ini file.
3. If you do not configure this policy here or in the .ini file, Profile Management does not exclude
any directories by default.
Exclusion list ‑ directories
Lets you specify the folders that Profile Management ignores during synchronization. Folder names
must be specified as paths relative to the user profile (%USERPROFILE%).
Example:
• Desktop ignores the Desktop folder in the user profile
Configuration precedence:
1. If this policy is disabled, no folders are excluded.
2. If this policy isn’t configured here, the value from the .ini file is used.
3. If this policy is not configured either here or in the .ini file, no folders are excluded.
Logon Exclusion Check
Lets you specify what Profile Management does if a profile in the user store contains excluded files or
folders.
Configuration precedence:
© 1999–2024 Cloud Soware Group, Inc. All rights reserved. 265

Profile Management 2402 LTSR
1. If this setting is disabled or set to the default value of Synchronize excluded files or folders,
Profile Management synchronizes those excluded files or folders from the user store to the local
profile when a user logs on.
2. If this setting is set to Ignore excluded files or folders, Profile Management ignores the ex‑
cluded files or folders in the user store on user logon. If this setting is set to Delete excluded
files or folders, Profile Management deletes the excluded files or folders in the user store on
user logon.
3. If this setting isn’t configured here, the value from the .ini file is used.
4. If this setting is neither configured here nor in the .ini file, Profile Management synchronizes
excluded files or folders from the user store to the local profile.
Large File Handling ‑ Files to be created as symbolic links
Lets you specify the files that are created as symbolic links. This setting is used to improve logon
performance and to process large‑size files.
You can use wildcards in policies that refer to files. Example, !ctx_localappdata!\Microsoft
\Outlook*.OST.
To process the Oline Outlook Data File (*.ost), make sure that the Outlook folder is not excluded
for Profile Management.
Those files cannot be accessed in multiple sessions simultaneously.
Profile Management\File system\Synchronization
Directories to synchronize Lets you specify folders that you want Profile Management to synchro‑
nize when their parent folders are excluded.
Paths on this list must be relative to the user profile.
Profile Management synchronizes each user’s entire profile between the system where it is installed
and the user store. It is not necessary to include subfolders of the user profile by adding them to this
list.
Disabling this policy has the same eect as enabling it and configuring an empty list.
Configuration precedence:
1. If this policy isn’t configured here, the value from the .ini file is used.
2. If this policy is not configured either here or in the .ini file, only non‑excluded folders in the user
profile are synchronized.
© 1999–2024 Cloud Soware Group, Inc. All rights reserved. 266

Profile Management 2402 LTSR
Files to synchronize Lets you specify files that you want Profile Management to synchronize when
their parent folders are excluded.
Paths on this list must be relative to the user profile. Wildcards can be used in file names and folder
names. But wildcards are applied recursively only in file names.
Examples:
• AppData\Local\Microso\Oice\Access.qat specifies a file in a folder that is excluded in the de‑
fault configuration
• AppData\Local\MyApp*.cfg specifies all files with the extension .cfg in the profile folder App‑
Data\Local\MyApp and its subfolders
Profile Management synchronizes each user’s entire profile between the system where it is installed
and the user store. It is not necessary to include files in the user profile by adding them to this list.
Disabling this policy has the same eect as enabling it and configuring an empty list.
Configuration precedence:
1. If this policy isn’t configured here, the value from the .ini file is used.
2. If this policy is not configured either here or in the .ini file, only non‑excluded files in the user
profile are synchronized.
Folders to mirror This policy can help solve issues involving any transactional folder (also known
as a referential folder). That type of folder contains interdependent files, where one file references
other files.
With the policy, Profile Management processes a transactional folder and its contents as a single entity
when synchronizing user profiles.
Configuration precedence:
1. If this policy isn’t configured here, the value from the .ini file is used.
2. If this policy is not configured either here or in the .ini file, no folders are mirrored.
Accelerate folder mirroring With both this policy and the Folders to mirror policy enabled, Profile
Management stores mirrored folders on a VHDX‑based virtual disk. It attaches the virtual disk during
logons and detaches it during logos. Enabling this policy eliminates the need to copy the folders
between the user store and local profiles and accelerates folder mirroring.
Profile Management\File deduplication
Identical files can exist among various user profiles in the user store. Having duplicate instances of
files stored in the user store increases your storage cost.
© 1999–2024 Cloud Soware Group, Inc. All rights reserved. 267

Profile Management 2402 LTSR
File deduplication policies let Profile Management remove duplicatefiles from the user store and store
one instance of them in a central location (called shared store). Doing so avoids file duplications in the
user store, thus saving your storage cost.
Files to include in the shared store for deduplication
Lets you enable file deduplication and specify files to include in the shared store for deduplication.
Files to exclude from the shared store
Lets you specify files to exclue from the shared store. Use this policy along with the Files to include in
the shared store for deduplication policy.
Minimum size of files to deduplicate from profile containers
Lets you specify the minimum size of files to deduplicate from profile containers. This size must be
256 MB or greater.
Configuration precedence:
1. If this setting is not configured here, the value from the .ini file is used.
2. If this setting is not configured either here or in the .ini file, the value is 256.
Profile Management\Log settings
Enable logging
Lets you specify whether to enable logging for Profile Management. Enable this policy only when you
are troubleshooting Profile Management.
Configuration precedence:
1. If this policy is disabled, only errors are logged. If this policy isn’t configured here, the value
from the .ini file is used.
2. If this policy is not configured either here or in the .ini file, only errors are logged.
Log settings
Lets you select which events or actions Profile Management logs. Select them all only if you are re‑
quested to do so by Citrix personnel.
Configuration precedence:
© 1999–2024 Cloud Soware Group, Inc. All rights reserved. 268

Profile Management 2402 LTSR
1. If the policy isn’t configured here, Profile Management uses the values from the .ini file.
2. If this policy is not configured either here or in the .ini file, errors and general information are
logged.
The checkboxes for this policy correspond to the following settings in the .ini file: LogLevelWarnings,
LogLevelInformation, LogLevelFileSystemNotification, LogLevelFileSystemActions, LogLevelReg‑
istryActions, LogLevelRegistryDierence, LogLevelActiveDirectoryActions, LogLevelPolicyUserLogon,
LogLevelLogon, LogLevelLogo, and LogLevelUserName.
Maximum size of the log file
Lets you specify the maximum size of the Profile Management log file in bytes.
The default value for the maximum size of the Profile Management log file is 10 MB. If you have suf‑
ficient disk space, increase the value. If the log file grows beyond the maximum size, the following
happens:
1. An existing backup of the file (.bak) is deleted.
2. The log file is renamed to .bak.
3. A new log file is created.
The log file is created in %SystemRoot%\System32\Logfiles\UserProfileManager or in
the location that the Path to log file policy specifies.
Configuration precedence:
1. If this policy is disabled, the default value of 10 MB is used.
2. If this policy isn’t configured here, the value from the .ini file is used.
3. If this policy isn’t configured either here or in the .ini file, the default value is used.
Path to log file
Lets you configure an alternative path to store the log files.
The path can point to a local drive or a network‑based one (a UNC path):
• Remote drives are recommended in large, distributed environments. However, they can create
significant network traic, which might not be appropriate for log files.
• Local drives are oen used in provisioned virtual machines with a persistent hard drive.
This setting ensures that log files are preserved when the machine restarts. For virtual machines with‑
out a persistent hard drive, setting a UNC path allows you to retain the log files. But the system ac‑
count for the machines must have write access to the UNC share. Use a local path for any laptops
managed by the oline profiles feature.
© 1999–2024 Cloud Soware Group, Inc. All rights reserved. 269

Profile Management 2402 LTSR
If a UNC path is used for log files, Citrix recommends that you apply an appropriate access control
list to the log file folder. Access control ensures that only authorized user or computer accounts can
access the stored files.
Examples:
• D:\LogFiles\ProfileManagement.
• \server\LogFiles\ProfileManagement
If this policy isn’t configured here, the value from the .ini file is used. If this policy is not configured ei‑
ther here or in the .ini file, the defaultlocation %SystemRoot%\System32\Logfiles\UserProfileManager
is used.
Profile Management\Profile container settings
Profile container
Lets you use a VHDX‑based network disk (profile container) to store user profiles. You can use it to
store a user profile in whole or in part. On user logon, the profile container is mounted to the user
environment and the profile folders are available immediately.
Enable local caching for profile containers
Lets you enable local caching for Citrix Profile Management profile containers. This policy takes eect
only when the profile container is enabled for the entire user profile.
With the policy set to Enabled, each local profile serves as a local cache of its Citrix Profile Manage‑
ment profile container. If profile streaming is in use, locally cached files are created on demand. Oth‑
erwise, they are created during user logons.
Folders to exclude from profile container
Lets you specify folders to exclude from the Citrix Profile Management profile container.
Folders to include in profile container
Lets you specify folders to keep in the Citrix Profile Management profile container when their parent
folders are excluded.
Folders on this list must be subfolders of the excluded folders. Otherwise, this setting does not
work.
Disabling this setting has the same eect as enabling it and configuring an empty list.
© 1999–2024 Cloud Soware Group, Inc. All rights reserved. 270

Profile Management 2402 LTSR
Files to include in profile container
Lets you specify files to include in the Citrix Profile Management profile container when their parent
folders are excluded.
Files on this list must be inside the excluded folders. Otherwise, this setting does not work.
Files to exclude from profile container
Lets you specify files to exclude from the Citrix Profile Management profile container.
Enable VHD disk compaction
Lets you enable VHD disk compaction for Profile Management. If enabled, VHD disks are automatically
compacted on user logo when certain conditions are met. This policy enables you to save the storage
space consumed by profile container, OneDrive container, and mirror folder container.
Depending on your needs and the resources available, you can adjust the default VHD compaction
settings and behavior using the Free space ratio to trigger VHD disk compaction, Number of logos
to trigger VHD disk compaction, and Disable defragmentation for VHD disk compaction policies
in Advanced settings.
Configuration precedence:
1. If this setting isn’t configured here, the value from the .ini file is used.
2. If this setting is not configured either here or in the .ini file, the feature is disabled.
Enable VHD auto‑expansion for profile container
Lets you specify whether to enable VHD auto‑expansion for the profile container. When enabled, all
VHD auto‑expansion settings apply to the profile container.
Configuration precedence:
• If this policy is not configured here, the value from the .ini file is used.
• If this policy is not configured either here or in the .ini file, it is disabled.
Enable exclusive access to VHD containers
By default, VHD containers allow concurrent access. With this setting enabled, they allow only one
access at a time. This feature applies to profile containers and OneDrive containers.
© 1999–2024 Cloud Soware Group, Inc. All rights reserved. 271

Profile Management 2402 LTSR
Note:
In the container‑based profile solution, enabling this setting for profile containers automatically
disables the Enable multi‑session write‑back for profile containers setting.
Configuration precedence:
1. If this policy is not configured here, the value from the .ini file is used.
2. If this policy is not configured either here or in the .ini file, the setting is disabled.
Log o users when profile container is not available during logon
Lets you specify whether to force log‑o users when the profile container is unavailable during user
logon and customize the error message users see.
Configuration precedence:
1. If this policy is not configured here, the value from the .ini file is used.
2. If this policy is not configured either here or in the .ini file, the setting is disabled.
Users and groups to access profile container
Lets you specify which AD domain users and groups have Read & Execute permission on profile con‑
tainers. By default, a profile container is accessible only to its owner.
Configuration precedence:
1. If this policy is not configured here, the setting from the .ini file is used.
2. If this policy is not configured either here or in the .ini file, the profile container is accessible only
to its owner.
Profile Management\Profile handling
Delete locally cached profiles on logo
Lets you specify whether locally cached profiles are deleted aer logo.
If this policy is enabled, a user’s local profile cache is deleted aer user logo. This setting is recom‑
mended for terminal servers. If this policy is disabled, cached profiles are not deleted.
Note:
© 1999–2024 Cloud Soware Group, Inc. All rights reserved. 272

Profile Management 2402 LTSR
You can control when profile caches are deleted on logo using the Delay before deleting the
cached profiles policy.
Configuration precedence:
1. If this policy isn’t configured here, the value from the .ini file is used.
2. If this policy is not configured either here or in the .ini file, cached profiles are not deleted.
Delay before deleting cached profiles
Lets you specify an optional extension to the delay before locally cached profiles are deleted on logo.
Extending the delay is useful if you know that a process keeps files or the user registry hives open
during logo. With large profiles, this setup can also speed up logo.
A value of 0 deletes the profiles immediately, at the end of the logo process.
Profile Management checks for logos every minute. A value of 60 ensures that profiles are deleted
between one and two minutes aer user logos depending on when the last check takes place.
Important: This policy works only if Delete locally cached profiles on logo is enabled.
If this policy isn’t configured here, the value from the .ini file is used. If this policy is not configured
either here or in the .ini file, profiles are deleted immediately.
Migration of existing profiles
Lets you specify Profile Management migrate which types of user profiles to the user store if the user
store is empty.
Profile Management can migrate existing profiles “on the fly”during logon if the user has no profile
in the user store. Select Roaming if you are migrating roaming profiles or Remote Desktop Services
profiles.
The following event takes place during logons. If the user has a Windows profile instead of a Citrix user
profile in the user store, Profile Management migrates the Windows profile to the user store. Aer this
process, Profile Management uses the user store profile in the current and other sessions that are
configured with the path to the same user store.
Configuration precedence:
1. If this setting is enabled, profile migration can be activated for roaming and local profiles (the
default), roaming profiles only, local profiles only. Or profile migration can be disabled.
2. If this policy is disabled and no Citrix user profile exists in the user store, the existing Windows
mechanism for creating profiles is used.
© 1999–2024 Cloud Soware Group, Inc. All rights reserved. 273

Profile Management 2402 LTSR
3. If profile migration is disabled and no Citrix user profile exists in the user store, the existing
Windows mechanism for creating profiles is used.
4. If this policy isn’t configured here, the value from the .ini file is used.
5. If this policy is not configured either here or in the .ini file, Profile Management migrates existing
local and roaming profiles to the user store.
Automatic migration of existing application profiles
This setting enables or disables the automatic migration of existing application profiles across dif‑
ferent operating systems. The application profiles include both the application data in the AppData
folder and the registry entries under HKEY_CURRENT_USER\SOFTWARE. This setting can be useful
in cases where you want to migrate your application profiles across dierent operating systems.
For example, you need to upgrade your operating system (OS) from Windows 10 version 1803 to Win‑
dows 10 version 1809. If this setting is enabled, Profile Management automatically migrates the exist‑
ing application settings to Windows 10 version 1809 the first time each user logs on. The application
data in the AppData folder and the registry entries under HKEY_CURRENT_USER\SOFTWARE are
migrated.
If there are several existing application profiles, Profile Management performs the migration in the
following order of priority:
1. Profiles of the same OS type (single‑session OS to single‑session OS and multi‑session OS to
multi‑session OS).
2. Profiles of the same Windows OS family; for example, Windows 10 to Windows 10, or Windows
Server 2016 to Windows Server 2016).
3. Profiles of an earlier version of the OS; for example, Windows 7 to Windows 10, or Windows
Server 2012 to Windows 2016.
4. Profiles of the closest OS.
Note:
You must specify the short name of the OS by including the !CTX_OSNAME! variable in the user
store path. Doing so lets Profile Management locate the existing application profiles.
If this setting isn’t configured here, the setting from the .ini file is used.
If this setting is neither configured here nor in the .ini file, it is disabled by default.
Local profile conflict handling
Lets you specify how Profile Management behaves if both a profile in the user store and a local Win‑
dows user profile (not a Citrix user profile) exist.
© 1999–2024 Cloud Soware Group, Inc. All rights reserved. 274

Profile Management 2402 LTSR
Configuration precedence:
1. If this policy is disabled or set to the default value of Use local profile, Profile Management uses
the local profile, but does not change it in any way.
2. If this policy is set to Delete local profile, Profile Management deletes the local Windows user
profile. And then imports the Citrix user profile from the user store. If this policy is set to Re‑
name local profile, Profile Management renames the local Windows user profile (for backup
purposes). And then imports the Citrix user profile from the user store.
3. If this policy isn’t configured here, the value from the .ini file is used. If this policy is not config‑
ured either here or in the .ini file, existing local profiles are used.
Template profile
Lets you specify the storage path of the profile you want to use as a template. This path is the full path
of the folder containing the NTUSER.DAT registry file and any other folders and files required for the
template profile.
Important: Ensure that you do not include NTUSER.DAT in the path setting. For example, with
the \\myservername\myprofiles\template\ntuser.dat file, set the location as \\
myservername\myprofiles\template.
Use absolute paths, which can be UNC ones or paths on the local computer. You can use the latter, for
example, to specify a template profile permanently on a Citrix Provisioning Services image. Relative
paths are not supported.
This policy does not support expansion of Active Directory attributes, system environment variables,
or the %USERNAME% and %USERDOMAIN% variables.
Configuration precedence:
1. If this policy is disabled, templates aren’t used.
2. If this policy is enabled, Profile Management uses the template instead of the local default pro‑
file when creating user profiles. If a user has no Citrix user profile, but a local or roaming Win‑
dows user profile exists, by default the local profile is used. And the local profile is migrated to
the user store, if this policy is not disabled. This setup can be changed by enabling the Template
profile overrides local profile or Template profile overrides roaming profile check box. Also,
identifying the template as a Citrix mandatory profile means that, like Windows mandatory pro‑
files, changes are not saved.
3. If this policy isn’t configured here, the value from the .ini file is used.
4. If this policy is not configured either here or in the .ini file, no template is used.
© 1999–2024 Cloud Soware Group, Inc. All rights reserved. 275

Profile Management 2402 LTSR
Profile Management\Registry
Exclusion list
Lets you specify the registry keys in the HKCU hive that Profile Management ignores during logo.
Example: Soware\Policies
Configuration precedence:
• If this policy is disabled, no registry keys are excluded.
• If this policy isn’t configured here, the value from the .ini file is used.
• If this policy is not configured either here or in the .ini file, no registry keys are excluded.
Inclusion list
Lets you specify registry keys in the HKCU hive that Profile Management processes during logo.
Example: Soware\Adobe.
Configuration precedence:
1. If this policy is enabled, only keys on this list are processed. If this policy is disabled, the com‑
plete HKCU hive is processed.
2. If this policy isn’t configured here, the value from the .ini file is used.
3. If this policy is not configured either here or in the .ini file, all of HKCU is processed.
Enable Default Exclusion List ‑ Profile Management 5.5
Lets you specify registry keys in the HKCU hive that Profile Management does not synchronize to the
user profiles. Use this policy to specify GPO exclusion files without having to fill them in manually.
Configuration precedence:
1. If you disable this policy, Profile Management does not exclude any registry keys by default.
2. If you do not configure this policy here, Profile Management uses the value from the .ini file.
3. If you configure this policy neither here nor in the .ini file, Profile Management does not exclude
any registry keys by default.
NTUSER.DAT backup
Lets you enable a backup of the last‑known good copy of NTUSER.DAT and roll back when any corrup‑
tion occurs.
© 1999–2024 Cloud Soware Group, Inc. All rights reserved. 276

Profile Management 2402 LTSR
If you do not configure this policy here, Profile Management uses the value from the .ini file. If you con‑
figure this policy neither here nor in the .ini file, Profile Management does not back up NTUSER.DAT.
Profile Management\App access control
Lets you control access to files, folders, and registries.
App access control
If enabled, Profile Management controls user access to items (such as files, folders, and registries)
based on the rules you provide.
Use the following ways to create application rules:
• GUI‑based tool –WEM Tool Hub > Rule Generator for App Access Control
• PowerShell tool –available with the Profile Management installation package
Configuration precedence:
1. If this policy isn’t configured here, the value from the .ini file is used.
2. If this policy is not configured either here or in the .ini file, it is disabled.
Profile Management\Streamed user profiles
Profile streaming
Lets you enable the profile streaming feature. With this feature enabled, files in user profiles are
fetched from the user store to the local computer only when users access them. The NTUSER.DAT
file and any files in the pending area are the exception. They are fetched immediately. NTUSER.DAT
stores registry entries.
Configuration precedence:
1. If this policy isn’t configured here, the value from the .ini file is used.
2. If this policy is not configured either here or in the .ini file, it is disabled.
Enable profile streaming for folders
Lets you enable the profile streaming feature for folders in user profiles.
With both this policy and the Profile streaming policy set to Enabled, folders in a user profile are
fetched from the user store to the local computer only when users access them.
© 1999–2024 Cloud Soware Group, Inc. All rights reserved. 277

Profile Management 2402 LTSR
Configuration precedence:
1. If this policy isn’t configured here, the value from the .ini file is used.
2. If this policy is not configured either here or in the .ini file, it’s disabled.
Always cache
Lets you specify the lower limit on the size of files that are fetched from the user store to the local
computer immediately aer logon.
When the profile streaming feature is enabled, files in user profiles are fetched to the local computers
when users access them. This on‑demand file‑fetching mechanism causes slow loading when files
that users request are large. With this policy enabled, Profile Management fetches files larger than a
specified size to the local computers immediately aer logon.
To fetch the entire profile to the local computer immediately aer logon, set this limit to zero.
Configuration precedence:
1. If this policy isn’t configured here, the value from the .ini file is used.
2. If this policy is not configured either here or in the .ini file, it’s disabled.
Timeout for pending area lock files
Lets you specify a timeout period (days) aer which Profile Management frees up users’files. When
the timeout occurs, users’files are written to the user store from the pending area if the user store
remains locked when its storage server becomes unresponsive. Use this policy to prevent bloat in the
pending area and to ensure that the user store always contains the most up‑to‑date files.
Configuration precedence:
1. If this policy isn’t configured here, the value from the .ini file is used.
2. If this policy is not configured either here or in the .ini file, the default value of one day is used.
Streamed user profile groups
Lets you specify Windows user groups whose user profiles are streamed.
This policy streams the profiles of a subset of Windows user groups in the OU. The profiles of users in
all other groups are not streamed.
Configuration precedence:
1. If this policy is disabled, all user groups are processed.
2. If this policy isn’t configured here, the value from the .ini file is used. If this policy is not config‑
ured either here or in the .ini file, all users are processed.
© 1999–2024 Cloud Soware Group, Inc. All rights reserved. 278

Profile Management 2402 LTSR
Profile Streaming Exclusion list ‑ directories
Lets you specify the folders that Profile Streaming ignores. Folder names must be specified as paths
relative to the user profile.
Examples:
Entering Desktop ignores the Desktop directory in the user profile.
Configuration precedence:
1. If this setting is disabled, no folders are excluded.
2. If this setting isn’t configured here, the value from the .ini file is used.
3. If this setting is not configured either here or in the .ini file, no folders are excluded.
Note:
Profile Streaming exclusions do not indicate that the configured folders are excluded from profile
handling. Citrix Profile Management still processes them.
Enable profile streaming for pending area
Lets you enable the profile streaming feature for files and folders in the pending area.
The pending area is used to ensure profile consistency while profile streaming is enabled. It temporar‑
ily stores profile files and folders changed in concurrent sessions.
By default, this policy is disabled, and all files and folders in the pending area are fetched to the local
profile on logon. With this policy enabled, files in the pending area are fetched to the local profile only
when they are requested. Use the policy with the Profile streaming policy to ensure optimal logon
experience in concurrent session scenarios.
The policy applies to folders in the pending area when the Enable profile streaming for folders policy
is enabled.
Profile Management\Folder Redirection (User Configuration)
Lets you specify whether to redirect folders that commonly appear in profiles and specify the redirec‑
tion target. Specify targets as UNC paths (for server shares or DFS namespaces) or as paths relative
to users’home directory. The home directory is typically configured with the #homeDirectory#
attribute in the Active Directory.
If a policy isn
’
t configured here, Profile Management does not redirect the specified folder.
© 1999–2024 Cloud Soware Group, Inc. All rights reserved. 279

Profile Management 2402 LTSR
Note:
When you use UNC paths for folder redirection, the #homedirectory# variable is not supported.
Aer you choose the Redirect to the user’s home directory policy, you do not need to specify
the path.
The Redirect <folder-name> folder policy lets you specify how to redirect the <folder-name>
folder. To do so, select Enabled and then type the redirected path.
Caution:
Potential data loss might occur.
You might want to modify the path aer the policy takes eect. However, consider potential data loss
before you do so. The data contained in the redirected folder might be deleted if the modified path
points to the same location as the previous path.
For example, you specify the Contacts path as path1. Later, you change path1 to path2. If path1
and path2 point to the same location, all data contained in the redirected folder is deleted aer the
policy takes eect.
To avoid potential data loss, complete the following steps:
1. Apply Microso policy to machines where Profile Management is running through Active Direc‑
tory Group Policy Objects. Detailed steps are as follows:
a) Open the Group Policy Management Console.
b) Navigate to Computer Configuration > Administrative Templates > Windows Compo‑
nents > File Explorer.
c) Enable Verify old and new Folder Redirection targets point to the same share before
redirecting.
2. If applicable, apply hotfixes to machines where Profile Management is running. For details, see
https://support.microsoft.com/en‑us/help/977229 and https://support.microsoft.com/en‑
us/help/2799904.
Policies for file‑based and container‑based solutions
August 6, 2024
Profile Management provides file‑based and container‑based profile solutions. The following table
lists the Profile Management policies and their availability to each solution.
© 1999–2024 Cloud Soware Group, Inc. All rights reserved. 280

Profile Management 2402 LTSR
Category Policy name
Applies to
file‑based
Applies to
container‑based Comments
NA Reset profile Y Y This setting is a
WMI command
provided by
Profile
Management WMI
plug‑in instead of
a policy setting.
With the
container‑based
solution enabled,
Profile
Management
creates user
profiles and
doesn’t restore
legacy contents
in the profile
folders such as
Downloads and
Pictures.
Profile
Management
Enable Profile
management
Y Y
Processed groups Y Y
Excluded groups Y Y
Process logons of
local
administrators
Y Y
Path to user store Y Y
Migrate user store Y N
Active write back Y N
Active write back
registry
Y N
Active write back
on session lock
and
disconnection
Y N
© 1999–2024 Cloud Soware Group, Inc. All rights reserved. 281

Profile Management 2402 LTSR
Category Policy name
Applies to
file‑based
Applies to
container‑based Comments
Oline profile
support
Y N
Profile Manage‑
ment\Advanced
settings
Number of retries
when accessing
locked files
Y N
Process Internet
cookie files on
logo
Y N
Disable
automatic
configuration
Y N
Log o user if a
problem is
encountered
Y Y
Customer
Experience
Improvement
Program
Y Y
Enable user‑level
policy settings
Y Y
Set priority order
for user groups
Y Y
Enable search
index roaming for
Outlook
Y Y
Enable
concurrent
session support
for Outlook
search data
roaming
Y Y
Enable
multi‑session
write‑back for
profile containers
Y Y
Replicate user
stores
Y Y
© 1999–2024 Cloud Soware Group, Inc. All rights reserved. 282

Profile Management 2402 LTSR
Category Policy name
Applies to
file‑based
Applies to
container‑based Comments
Enable
credential‑based
access to user
stores
Y Y
Customize
storage path for
VHDX files
Y Y
App access
control
Y Y
Automatically
reattach VHDX
disks in sessions
Y Y
Enable
asynchronous
processing for
user Group Policy
on logon
Y Y
Enable OneDrive
container
Y Y
Free space ratio
to trigger VHD
disk compaction
Y Y
Number of logos
to trigger VHD
disk compaction
Y Y
Disable
defragmentation
for VHD disk
compaction
Y Y
Profile container
auto‑expansion
threshold
Y Y
Profile container
auto‑expansion
increment
Y Y
© 1999–2024 Cloud Soware Group, Inc. All rights reserved. 283

Profile Management 2402 LTSR
Category Policy name
Applies to
file‑based
Applies to
container‑based Comments
Profile container
auto‑expansion
limit
Y Y
UWP app
roaming
Y Y
Default capacity
of VHD containers
Y Y
User store
selection method
Y Y
Profile Manage‑
ment\App Access
Control
App access
control
Y Y
Profile Manage‑
ment\Citrix
Virtual Apps
Optimization
Enable Citrix
Virtual Apps
optimization
Y N
Path to Citrix
Virtual Apps
optimization
definitions
Y N
Profile
Management\Cross‑
Platform settings
Enable
cross‑platform
settings
Y N
Cross‑platform
settings user
groups
Y N
Path to
cross‑platform
definitions
Y N
Path to
cross‑platform
settings store
Y N
Source for
creating
cross‑platform
settings
Y N
© 1999–2024 Cloud Soware Group, Inc. All rights reserved. 284

Profile Management 2402 LTSR
Category Policy name
Applies to
file‑based
Applies to
container‑based Comments
Profile
Management\File
deduplication
Files to include in
the shared store
for deduplication
Y Y
Files to exclude
from the shared
store
Y Y
Minimum size of
files to
deduplicate from
profile containers
Y Y
Profile
Management\File
system
Exclusion list ‑
files
Y N
Enable default
exclusion list ‑
directories
Y N
Exclusion list ‑
directories
Y N
Logon exclusion
check
Y N
Large file
handling ‑ Files to
be created as
symbolic links
Y N
Profile
Management\
File sys‑
tem\Synchronization
Directories to
synchronize
Y N
Files to
synchronize
Y
N
Folders to mirror Y N
Accelerate folder
mirroring
Y N
Profile
Management\Log
settings
Enable logging Y Y
© 1999–2024 Cloud Soware Group, Inc. All rights reserved. 285

Profile Management 2402 LTSR
Category Policy name
Applies to
file‑based
Applies to
container‑based Comments
Log settings Y Y
Maximum size of
the log file
Y Y
Path to log file Y Y
Profile Manage‑
ment\Profile
container
settings
Profile container N Y
Folders to
exclude from
profile container
N Y
Folders to include
in profile
container
N Y
Files to exclude
from profile
container
N Y
Files to include in
profile container
N Y
Enable local
caching for
profile containers
N Y With this policy
enabled in the
container‑based
solution, all
policy settings
that apply to the
file‑based
solution also
work for the
container‑based
solution, such as
Profile streaming
and Active write
back.
Enable VHD disk
compaction
Y Y
© 1999–2024 Cloud Soware Group, Inc. All rights reserved. 286

Profile Management 2402 LTSR
Category Policy name
Applies to
file‑based
Applies to
container‑based Comments
Enable VHD
auto‑expansion
for profile
container
Y Y
Enable exclusive
access to VHD
containers
Y Y
Log o users
when profile
container is not
available during
logon
N Y
Users and groups
to access profile
container
Y Y
Profile Manage‑
ment\Profile
handling
Delete locally
cached profiles
on logo
Y N With the
container‑based
solution enabled,
the local profile is
always
automatically
deleted on user
logo even if the
policy is disabled.
Delay before
deleting cached
profiles
Y Y With the
container‑based
solution enabled,
the local profile is
always
automatically
deleted on user
logo even if the
policy is disabled.
© 1999–2024 Cloud Soware Group, Inc. All rights reserved. 287

Profile Management 2402 LTSR
Category Policy name
Applies to
file‑based
Applies to
container‑based Comments
Migration of
existing profiles
Y N With the
container‑based
solution enabled,
the local profile
will be
automatically
migrated to the
container on user
logo.
Automatic
migration of
existing
application
profiles
Y N
Local profile
conflict handling
Y N With the
container‑based
solution enabled,
the local profile
will be
automatically
migrated to the
container on user
logo.
Template profile Y Y
Profile Manage‑
ment\Registry
Exclusion list Y N
Enable Default
Exclusion list
Y N
Inclusion list Y N
NTUSER.DAT
backup
Y N
Profile Manage‑
ment\Streamed
user profiles
Profile streaming Y N
© 1999–2024 Cloud Soware Group, Inc. All rights reserved. 288

Profile Management 2402 LTSR
Category Policy name
Applies to
file‑based
Applies to
container‑based Comments
Enable profile
streaming for
folders
Y N
Enable profile
streaming for
pending area
Y N
Always cache Y N
Timeout for
pending area lock
files (days)
Y N
Streamed user
profile groups
Y N
Profile Streaming
exclusion list ‑
directories
Y N
Integrate
August 6, 2024
This section contains information for Citrix administrators deploying Profile Management with other
Citrix products or components. Use this information in addition to, not instead of, the other topics
in the Profile Management documentation. For example, for solutions to common issues with Profile
Management in such deployments, see Troubleshoot.
This section also contains information about how some third‑party products interact with Profile Man‑
agement or profiles in general.
Profile Management and Citrix Virtual Apps
August 6, 2024
Use of this version of Profile Management on Citrix Virtual Apps servers is subject to the Profile Man‑
agement EULA. You can also install Profile Management on local desktops, allowing users to share
© 1999–2024 Cloud Soware Group, Inc. All rights reserved. 289

Profile Management 2402 LTSR
their local profile with published resources.
Note: Profile Management automatically configures itself in Citrix virtual desktops but not Citrix vir‑
tual apps environments. Use Group Policy or the .ini file to adjust Profile Management settings for
your Citrix Virtual Apps deployment.
Profile Management works in Citrix Virtual Apps environments that employ Remote Desktop Services
(formerly known as Terminal Services). In these environments, you must set up an OU for each sup‑
ported operating system. For more information, see your Microso documentation.
In farms that contain dierent versions of Citrix Virtual Apps or that run dierent operating systems,
Citrix recommends using a separate OU for each server that runs each version or operating system.
Important: Including and excluding folders that are shared by multiple users (for example, folders
containing shared application data published with Citrix Virtual Apps) is not supported.
Streamed applications
Profile Management can be used in environments where applications are streamed to either user de‑
vices directly or streamed to Citrix Virtual Apps servers and, from there, published to users.
Client‑side application virtualization technology in Citrix Virtual Apps is based on application stream‑
ing which automatically isolates the application. The application streaming feature enables applica‑
tions to be delivered to Citrix Virtual Apps servers and client devices, and run in a protected virtual
environment. There are many reasons to isolate the applications that are being streamed to users,
such as the ability to control how applications interact on the user device to prevent application con‑
flicts. For example, isolation of user settings is required if dierent versions of the same application
are present. Microso Oice 2003 might be installed locally and Oice 2007 might be streamed to
users’devices. Failure to isolate user settings creates conflicts, and might severely aect the function‑
ality of both applications (local and streamed).
For requirements relating to the use of Profile Management with streamed applications, see System
requirements.
Profile Management and Citrix Virtual Desktops
August 6, 2024
Important: We recommend using the Profile Management capabilities integrated into Citrix Virtual
Desktops. For more information, see the
Citrix Virtual Desktops documentation. The informationin this topic applies to a dierent deployment
© 1999–2024 Cloud Soware Group, Inc. All rights reserved. 290

Profile Management 2402 LTSR
‑ the use of Citrix Virtual Desktops with the Profile Management component that has been separately
installed and configured.
Install and upgrade Profile Management in Citrix Virtual Desktops deployments
Use of this version of Profile Management with Citrix Virtual Desktops is subject to the Profile Manage‑
ment EULA. Subject to the terms in the EULA, you can also use Profile Management with Citrix Virtual
Apps in a Citrix Virtual Desktops environment.
If you upgrade Profile Management in a Citrix Virtual Desktops deployment, consider the eect on the
log file locations as described in Upgrade Profile Management.
For Citrix Virtual Desktops in Quick Deploy setups, see the recommendations in Decide on a configu‑
ration.
Configure Profile Management in Citrix Virtual Desktops deployments
If Profile Management has not been configured correctly on the images before they are rolled out, the
Profile Management Service starts beforeGroup Policy is applied. To avoid this, perform the configura‑
tion using the documented procedures before you put the images into a production environment.
Important: Including and excluding folders that are shared by multiple users (for example, folders
containing data that can be shared by multiple virtual desktops) is not supported.
Configure Profile Management in Personal vDisk deployments
If you use the Personal vDisk feature of Citrix Virtual Desktops, Citrix user profiles are stored on virtual
desktops’personal vDisks by default, typically the P: drives. The profiles are not stored on users’C:
drives. However, this is where Profile Management expects to find the profiles. So you must modify
the Registry on the master image while installing or upgrading the Virtual Delivery Agent. In addition,
because you have freed up space on the Personal vDisk, it is also good practice to increase the default
allocation of disk space for applications on the master image. For instructions on these modifications,
see Managing Citrix Virtual Desktops documentation.
Do not delete the copy of a profile in the user store while a copy remains on the Personal vDisk. Doing
so creates a Profile Management error, and causes a temporary profile to be used for logons to the vir‑
tual desktop. For more information, see Users Receive New or Temporary Profiles in Troubleshooting
common issues.
© 1999–2024 Cloud Soware Group, Inc. All rights reserved. 291

Profile Management 2402 LTSR
Windows Apps ‑ Microso Store
In Citrix Virtual Desktops environments, applications on the Microso Store (also known as UWP apps)
are supported. To use Microso Store applications on a pooled machine (pooled‑random, static, or
RDS), open the Group Policy Management Editor and then configure the following settings at Policies
> Administrative Templates > Classic Administrative Templates (ADM) > Citrix > Profile Manage‑
ment > File System > Synchronization:
• Enable Folders to mirror and then add appdata\local\packages to the list of folders to
mirror
• Enable Files to synchronize and then add !ctx_localappdata!\Microsoft\Windows
\UsrClass.dat* to the list of files to synchronize
Microso Store applications might not work if users access a dedicated desktop with a Personal vDisk
(the recommended solution) when their profile was already created on another desktop.
Example Settings for Citrix Virtual Desktops
This topiclists Profile Management policy settings used in a typical Citrix Virtual Desktops deployment.
Windows 7 virtual desktops are created with Citrix Provisioning Services and are shared by multiple
users. In this example, the desktops, which are created from a pooled‑random catalog and are deleted
at logo, are intended for use on static workstations (not mobile laptops) and personal vDisks are not
used.
Where no policy is listed, no selection or entry was made in Group Policy, and the default setting ap‑
plies.
Note the following:
• Path to user store ‑ You can incorporate Profile Management variables into the path to the user
store. This example uses !CTX_OSNAME! and !CTX_OSBITNESS!, which expand to Win7 and x86
respectively when the path is interpreted. The AD attribute #sAMAccountName# is also used to
specify user names.
• Delete locally cached profiles on logo ‑ Disabling this policy is safe because the desktops do
not include personal vDisks and get deleted when users log o. Preserving locally cached pro‑
files is therefore unnecessary. (If the desktops were not discarded at logo, enable this policy.)
• Profile streaming ‑ Enabling this setting improves logon times in this deployment.
• Active write back ‑ This policy is enabled because the pooled desktops in this deployment are
only temporarily allocated to users. The users might therefore change their profile but might
forget (or not bother) to close their desktop session. With this setting enabled, local file changes
in the profile are mirrored in the user store before logo.
© 1999–2024 Cloud Soware Group, Inc. All rights reserved. 292

Profile Management 2402 LTSR
Note: If you enable the Active write back policy, performing a significant number of file operations
in a session ‑ such as file creation, file copy, and file deletion –can cause high system I/O activity and
result in temporary performance issues while Profile Management synchronizes the file changes to
the user store.
• Process logons of local administrators ‑ Enabling this setting is recommended for Citrix Virtual
Desktops deployments, in which most users are local administrators.
• Processed groups ‑ All domain users’profiles are managed by Profile Management.
• Exclusion list ‑ directories (file system) and Exclusion list (registry) ‑ These settings prevent
the listed temporary or cached files, and the listed registry entries, from being processed. These
files and entries are commonly stored in user profiles.
• Directories to synchronize and Files to synchronize ‑ Knowledge of where users’application
data is stored helped define these settings.
Important: Citrix Virtual Desktops deployments vary, so the Profile Management policy settings you
decide on are probably dierent to those in this example. To plan your settings, follow the advice in
Decide on a configuration.
Citrix/Profile Management
• Enable Profile Management
Enabled
• Processed groups
MyDomainName\Domain Users
• Path to user store
\\MyServer.MyDomain\MyUserStore\#sAMAccountName#\!CTX_OSNAME!_!CTX_OSBITNESS!
• Active write back
Enabled
• Process logons of local administrators
Enabled
Citrix/Profile Management/Profile handling
• Delete locally cached profiles on logo
Disabled
© 1999–2024 Cloud Soware Group, Inc. All rights reserved. 293

Profile Management 2402 LTSR
Citrix/Profile Management/Advanced settings
• Process Internet cookie files on logo
Enabled
Citrix/Profile Management/File system
• Exclusion list ‑ directories
$Recycle.Bin
AppData\Local\Microso\Windows\Temporary Internet Files
AppData\Local\Microso\Outlook
AppData\Local\Temp
AppData\LocalLow
AppData\Roaming\Microso\Windows\Start Menu
AppData\Roaming\Sun\Java\Deployment\cache
AppData\Roaming\Sun\Java\Deployment\log
AppData\Roaming\Sun\Java\Deployment\tmp
Citrix/Profile Management/File system/Synchronization
• Directories to synchronize
AppData\Microso\Windows\Start Menu\Programs\Dazzle Apps
• Folders to mirror
AppData\Roaming\Microso\Windows\Cookies
Citrix/Profile Management/Streamed user profiles
• Profile streaming
Enabled
© 1999–2024 Cloud Soware Group, Inc. All rights reserved. 294

Profile Management 2402 LTSR
Profile Management and UE‑V
August 6, 2024
Profile Management 5.x and Microso User Experience Virtualization (UE‑V) 2.0 can co‑exist in the
same environment. UE‑V is useful when multiple profile versions are present (for example, Version
1 and Version 2 profiles). For this reason, do not use the cross‑platform settings feature of Citrix Pro‑
file Management when UE‑V is present. UE‑V might be preferred over that feature because it supports
more applications, synchronization during user sessions, and XML configuration and generation for
applications.
When Profile Management co‑exists with UE‑V, no matter whether the cross‑platform settings feature
is enabled:
• Exclude the AppData\Local\Microso\UEV folder. Profile settings captured by UE‑V then over‑
write profile settings captured by Profile Management.
• Do not share profiles controlled by UE‑V with those controlled by Profile Management alone. If
you do, the “last write wins.”In other words, the last component to synchronize the profile (UE‑V
or Profile Management) determines which data is saved, which can lead to data loss.
Note: UE‑V requires the Microso Desktop Optimization Pack (MDOP).
Profile Management and Citrix Content Collaboration
August 6, 2024
The information in this article applies to the use of Profile Management in Citrix Content Collaboration
deployments. Some of it might also be useful for other internet‑based file‑sharing systems.
You can use Citrix Content Collaboration with Profile Management 4.1.2 and later. Citrix Content Col‑
laboration is only supported in On‑Demand mode.
Installation
If you use ShareFile 2.7, to avoid a compatibility issue install this version first before installing Profile
Management. This installation dependency does not exist with ShareFile 2.6.
© 1999–2024 Cloud Soware Group, Inc. All rights reserved. 295

Profile Management 2402 LTSR
Exclusions
Citrix Content Collaboration stores configuration data locally in the \AppData\Roaming\
ShareFile folder. For users with Citrix user profiles, this data must roam with the user profile so
that the user‑specific Citrix Content Collaboration configuration is persisted. Since this ShareFile
folder is part of the profile, no Profile Management configuration is required. The configuration data
roams by default.
However, user data that is managed by Citrix Content Collaboration is contained in the ShareFile
folder that is in the root of the profile (%USERPROFILE%\ShareFile). This data must not roam with
the profile because it is managed by, and synchronizes with, the Citrix Content Collaboration server.
You must therefore add this folder as a Profile Management exclusion. For instructions on setting
exclusions, see Include and exclude items.
Personal vDisks
If you create virtual desktops with Personal vDisks, configure Citrix Content Collaboration with the
location of the user data on the vDisks. This ensures that file synchronization can take place between
the desktops and the Citrix Content Collaboration server. By default, Personal vDisks are mapped as P:
drives on the desktops so the data might be located in P:\Users\<user name>. In this case, you would
set the location using the LocalSyncFolder policy in Citrix Content Collaboration.
Important: To prevent unnecessary synchronizations, which can adversely aect the performance
of Profile Management and Personal vDisks, we recommend using the Folder‑ID setting on folders
that contain large files unless they need to be synchronized on the virtual desktop. This is a ShareFile
setting.
Profile Management and App‑V
August 6, 2024
You can use Profile Management in the same environment as Microso Application Virtualization 5.x
(App‑V 5.x).
Note:
Profile Management supports only globally published App‑V.
Exclude the following items using Profile Management exclusions:
• Profile Management\File system\Exclusion list\directories:
© 1999–2024 Cloud Soware Group, Inc. All rights reserved. 296

Profile Management 2402 LTSR
– AppData\Local\Microso\AppV
– AppData\Roaming\Microso\AppV\Client\Catalog
• Profile Management\registry\Exclusion list:
– Soware\Microso\AppV\Client\Integration
– Soware\Microso\AppV\Client\Publishing
For instructions on setting exclusions, see Include and exclude items.
If the UserLogonRefresh setting is enabled in App‑V, disable the Profile streaming policy in Profile
Management. This restriction is the result of an incompatibility of UserLogonRefresh with Profile
streaming.
For an example of how to sequence an App‑V application, see https://docs.microsoft.com/en‑us/win
dows/application‑management/app‑v/appv‑sequence‑a‑new‑application.
For information on configuring third‑party Profile Management solutions with App‑V enabled, see ht
tps://docs.microsoft.com/en‑us/microsoft‑desktop‑optimization‑pack/appv‑v5/performance‑
guidance‑for‑application‑virtualization‑50. Do not include Soware\Classes on Microso Windows
10 systems.
Profile Management and Provisioning Services
August 6, 2024
This article contains advice on maintaining Citrix user profiles on virtual disks (vDisks) created with
Citrix Provisioning Services. Before following this advice, understand how your vDisk configuration af‑
fects your Profile Management configuration as described in Persistent or provisioned and dedicated
or shared
Supported modes
You can use Profile Management on vDisks running in standard image and private image modes but
not dierence disk image mode.
To remove non‑essential, locally cached profiles from the Master Target Device
To prevent any non‑essential, locally cached profiles being stored, ensure that these profiles are re‑
moved from vDisks running in standard image mode before taking the Master Target Device image.
But do not remove the currently logged‑on local administrator’s profile. A good way of achieving this
is as follows. During this procedure, error messages might be displayed.
© 1999–2024 Cloud Soware Group, Inc. All rights reserved. 297

Profile Management 2402 LTSR
1. Right‑click Computer.
2. Select Properties.
3. Click Advanced system settings.
4. On the Advanced tab, click Settings in User Profiles.
5. Highlight each profile you want to remove and click Delete.
Retrieve log files from vDisk images
This topic provides guidance on using log files that reside on shared (vDisk) images created with Citrix
Provisioning Services. Profile Management saves the files at logo. But, if you use vDisk images, take
account of the fact that base images can be reset, which resultsin log files being deleted. Youtherefore
must take some action to retrieve the files. The action you take depends on whether the log files are
being deleted at logon or logo.
Use of vDisk images is common in Citrix virtual desktops deployments, so the guidance in this topic
uses that product as an example.
To retrieve a log file that is deleted at logo
If entire profiles or parts of them are not saved back to the user store on the network, the log file is
also not saved there.
If the Provisioning Services write‑cache is stored on the computer running Provisioning Services, this
issue does not arise. And the log file is saved back to the user store.
If the write‑cache is stored locally, in this procedure you might have to log on from the same device
as the user. However, even this might fail if the write‑cache is stored locally in RAM.
If the write cache is not on the computer running Provisioning Services, you might have to create a
copy of the vDisk image. You assign it to the new virtual machine, and change the write‑cache on the
image so it is stored on that computer.
1. In Citrix virtual desktops, create a desktop group, add one virtual machine to it, and point it to
your vDisk image.
2. Grant access to the virtual machine to one test user and the administrator.
3. Modify the desktop group’s idle pool count to 1 for all times of the day (to stop power manage‑
ment turning the machine o). Set its logo behavior to Do nothing (to prevent the machine
restarting and resetting the image).
4. Log on as the test user to the virtual desktop and then log o from it.
5. Log on as administrator from the XenCenter or VMware console, and retrieve the log file.
Consult the Citrix Virtual Desktops documentation for more information on creating desktop groups
and modifying their properties.
© 1999–2024 Cloud Soware Group, Inc. All rights reserved. 298

Profile Management 2402 LTSR
To retrieve a log file that is deleted at logon
If a profile is current in the user store on the network but does not load correctly when the user logs
on, log file entries are lost.
1. Map a drive to \\<vmhostname>\C$ and, before the user logs o the session, locate the log file.
The log file is not complete (some entries might be missing) but if the problem you are trou‑
bleshooting is at logon, it can provide enough information for you to isolate the cause of the
issue.
To relocate Provisioning Services log files
Using standard image mode, the Provisioning Services event log files are lost when the system shuts
down. For instructions on changing the default location of the files to prevent this, see Knowledge
Center article CTX115601.
Preconfigure Profile Management on provisioned images
August 6, 2024
Using provisioning soware such as Citrix Provisioning Services, Citrix XenServer, or VMware ESX you
can build images that have Profile Management pre‑installed. When doing so, you likely capture some
Group Policy settings in the registry while you set up the image. For example, it happens while it is
in Private Image mode with Provisioning Services. The settings are still present when you deploy the
image. For example, when you switch back to standard image mode with Provisioning Services. Ide‑
ally, choose defaults that suit the state of the virtual machine when it starts running and your users
requirements when they log on. At a minimum, ensure that you have suitable defaults for those poli‑
cies described in Persistent or provisioned and dedicated or shared
The defaults are used if gpupdate is not run before the Citrix Profile Management Service starts. So
it is best to ensure that they are sensible defaults for most cases. Use this procedure to preconfigure
these and other settings you want to preserve in the image.
Note: If you use Provisioning Services, we recommend that you preconfigure images with the Profile
Management .ini file first. And you transfer the settings to the .adm or .admx file only once your testing
proves successful.
1. If you use the .adm or .admx file, change the desired settings using the file in the appropriate
GPO. If you use the .ini file, omit this step; you make the changes in a later step.
2. Make the same changes to the log level.
© 1999–2024 Cloud Soware Group, Inc. All rights reserved. 299

Profile Management 2402 LTSR
3. Do one of the following:
• Switch the image to Private Image mode (Citrix Provisioning Services) and start the oper‑
ating system on it.
• Start the operating system (Citrix XenServer or VMware ESX).
4. Log on using an Administrator account (not any test user account you might have set up), and
run gpupdate /force. This step ensures that the registry is correctly configured.
5. If you use the .ini file, change the desired settings in the file.
6. Stop the Profile Management Service.
7. To avoid confusion with the new log files that are created, delete the old Profile Management
log file and the configuration log file. These have file names that use the name of the old image.
They are redundant because the updated image has new files (with the name of the new image).
8. Do one of the following:
• Switch the image back to standard image mode (Citrix Provisioning Services).
• Save the updated image (Citrix XenServer or VMware ESX).
9. Start the operating system on the image.
Profile Management and Self‑service Plug‑in
August 6, 2024
By default, Profile Management excludes the Windows Start Menu folder. Citrix Self‑service Plug‑in
users cannot see their subscribed applications in the Start Menu. Adjust this default behavior by re‑
moving the folder %APPDATA%\Microso\Windows\Start Menu from the Exclusion list ‑ directories
policy. In addition, when using GPOs for configuration, it is a best practice to delete the Profile Man‑
agement .ini file. These actions ensure that the Start Menu folder containing subscribed applications
(and any user‑created subfolders) are processed by Profile Management.
Note: If you are using the Profile Management .ini file rather than Group Policy, remove this entry
from the default exclusion list in that file.
Profile Management and Outlook
August 6, 2024
This article describes best practices for integrating Microso Outlook with roaming profiles.
© 1999–2024 Cloud Soware Group, Inc. All rights reserved. 300

Profile Management 2402 LTSR
It is a good practice to ensure that users store Outlook data on a server rather than on a network share
or locally.
With roaming profiles, files and folders in the location defined by the environment variable
%UserProfile% (on the local computer) roam with users, except for one folder, %UserProfile
%\Local Settings. This exception aects Outlook users because a Microso recommendation means
that, by default, some Outlook data (for example, .ost, .pst, and .pab files) is created in this
non‑roaming folder.
Important: Files in this location are typically large and hinder the performance of roaming profiles.
The following practices can reduce troubleshooting of roaming profiles with Outlook and encourage
good email management by users and administrators:
• If possible, use an ADM template for Microso Oice that prohibits the use of .pst files.
• If users need more space, increase storage on your Microso Exchange servers rather than a
network share.
• Define and enforce an email retention policy for the entire company (one that involves a
company‑wide email storage server) rather than granting exceptions for .pst files to indi‑
vidual users or increasing their personal storage capacity. The policy must also discourage
reliance on .pst files by allowing users easily to request email restores to their inbox.
• If .pst files cannot be prohibited, do not configure Profile Management or roaming profiles.
The Enable search index roaming for Outlook feature is not designed for .pst files.
Using Windows profiles with Password Manager and single sign‑on
August 6, 2024
This article does not contain any information specific to Profile Management. It tells you how to con‑
figure certain Windows options so that Citrix Single Sign‑on operates optimally with local profiles,
roaming profiles, mandatory profiles, or hybrid profiles. This topic applies to Citrix Single Sign‑on 4.8
or 5.0.
Local profiles
Local profiles are stored on the local server to which the user has logged on. Password Manager
and single sign‑on save registry information in the HKEY_CURRENT_USER\SOFTWARE\Citrix\
MetaFrame Password Manager hive of the User Registry at:
%SystemDrive%\Documents and Settings\%username%\NTUSER.DAT.
Files are also saved in:
© 1999–2024 Cloud Soware Group, Inc. All rights reserved. 301

Profile Management 2402 LTSR
%SystemDrive%\Documents and Settings\%username%\Application Data\Citrix\MetaFrame Pass‑
word Manager.
On Windows 7, single sign‑on uses:
%APPDATA%\Roaming\Citrix\MetaFrame Password Manager
Important: It is critical that single sign‑on has Full Control Access to the following files:
File Name Description
%username%.mmf User’s credential information file with pointers
to aelist.ini.
entlist.ini Application definition file created at enterprise
level in the synchronization point or Active
Directory.
aelist.ini Application definition file created by merging
user’s local application definition file
(applist.ini) and the enterprise application
definitions (entlist.ini).
Roaming profiles
Roaming profiles are saved on a network share and synchronized to a local server copy each time the
user logs on. Characteristics of a successful roaming profile deployment include high‑speed network
connectivity such as a SAN (System Area Network) or NAS (Network Area Storage). Other common
deployments include clustering solutions where the profiles are stored on high‑availability servers.
Two issues aect roaming and mandatory profile deployments:
• A single roaming profile can only be used with one file synchronization point. When multiple syn‑
chronization points are used, data in the Memory Mapped File (MMF) might become corrupted.
• When roaming profiles are used with multiple concurrent sessions, they share the back‑end
MMF. All active sessions share some common session data such as retry lock counters, last used
data counters, and event log entries.
Mandatory or hybrid profiles
Mandatory profiles are by definition user read‑only profiles. Single sign‑on needs write permission
to the profile folder under Application Data. With mandatory profiles, a user might make changes
but the changes are not saved back to the profile at logo. For single sign‑on to work correctly with
mandatory profiles, the Application Data Folder must be redirected.
© 1999–2024 Cloud Soware Group, Inc. All rights reserved. 302

Profile Management 2402 LTSR
The registry changes are written each time the user logs on. Credential information is synchronized
with the synchronization point but the changes are not saved back to the profile.
Beginning with Windows 2000, Microso provides a mechanism for redirecting the Application Data
folder. However, using Windows NT4 domains requireslogonscriptscapable of modifying the location
of the Application Data folder. You can achieve this using tools such as Kix or VBScript to define
a writeable location for the Application Data folder.
The following example uses Kix to redirect the Application Data folder during user logon:
Important: This sample script is for informational purposes only. Do not use it in your environment
before first testing it.
“‘ pre codeblock
$LogonServer = “%LOGONSERVER%”
$HKCU = “HKEY_CURRENT_USER”
$ShellFolders_Key =
“$HKCU\Soware\Microso\Windows\CurrentVersion\Explorer\Shell
Folders”
$UserShellFolders_Key =
“$HKCU\Soware\Microso\Windows\CurrentVersion\Explorer\User
Shell Folders”
$UserProfFolder =
“$LogonServer\profiles\@userID”
$UserAppData =
“$LogonServer\profiles\@userID\Application Data”
$UserDesktop =
“$LogonServer\profiles\@userID\Desktop”
$UserFavorites =
“$LogonServer\profiles\@userID\Favorites”
$UserPersonal = “X:\My Documents”
$UserRecent =
“$LogonServer\profiles\@userID\Recent”
if (exist(“$UserAppData”) = 0)
shell ‘%ComSpec% /c md “$UserAppData”’
endif
if (exist(“$UserDesktop”) = 0)
shell ‘%ComSpec% /c md “$UserDesktop”’
endif
if (exist(“$UserRecent”) = 0)
shell ‘%ComSpec% /c md “$UserRecent”’
endif
© 1999–2024 Cloud Soware Group, Inc. All rights reserved. 303

Profile Management 2402 LTSR
if (exist(“$UserFavorites”) = 0)
shell ‘%ComSpec% /c md “$UserFavorites”’
endif
“‘
The hybrid profile is another solution for the mandatory profile issue. When the user logs on, the
mandatory profile loads and a custom application loads and unloads user registry hives based on
applications available to the user. As with mandatory profiles, the user can modify those parts of the
registry during a session. The dierence compared with mandatory profiles is that changes are saved
when the user logs o and are reloaded when they log on again.
If a hybrid profile is used, the HKEY_CURRENT_USER\SOFTWARE\Citrix\MetaFrame
Password registry keys must be imported and exported as part of the logon and logo process.
Folder redirection
Folder redirection is implemented using Group Policy Objects and Active Directory. It uses Group Poli‑
cies to define a location for folders that are part of the user profile.
Four folders can be redirected:
• My Documents
• Application Data
• Desktop
• Start menu
Two modes of redirection can be configured using Group Policies: basic redirection and ad‑
vanced redirection. Both are supported by single sign‑on. In Windows 2000, you must reference
the share that stores application data using the %username% variable (for example \\server‑
name\sharename\%username%).
Folder redirection is global for the user and it aects all of their applications. All applications that use
the Application Data folder must support it.
Read the following Microso articles to learn more about folder redirection:
HOW TO: Dynamically Create Secure Redirected Folders By Using Folder Redirections
Folder Redirection Feature in Windows
Enabling the Administrator to Have Access to Redirected Folders
Best practices
• Redirect the Application Data folders where possible. This approach improves network perfor‑
mance, eliminating the need to copy the data in those folders each time users log on.
© 1999–2024 Cloud Soware Group, Inc. All rights reserved. 304

Profile Management 2402 LTSR
• When troubleshooting Password Manager Agent, always verify that the logged‑on user has Full
Control permission on their Application Data folder.
Firefox browser
August 6, 2024
For a seamless user experience, Profile Management synchronizes each user’s entire profile between
the system it is installed on and the user store. As a result, Firefox users might experience slow logons
or logos. The issue occurs because some files associated with Firefox can grow large.
We recommend you customize a logo script to delete the following files and folders and thus to ex‑
clude them from synchronization:
• Appdata\Roaming\Mozilla\Firefox\profiles\*\sessionstore.bak
• AppData\Roaming\Mozilla\Firefox\Profiles\*\sessionstore‑backups
The general workflow is as follows:
1. Write the logo script using the Windows PowerShell or any other languages supported by the
user computers. You can also use Windows Script Host (WSH)–supported languages and com‑
mand files, including VBScript and Jscript.
2. Copy the script to the Netlogon shared folder on the domain controller.
3. In the Group Policy Management Console, associate the script to the user logo event. For
more information, see the Microso article.
Google Chrome browser
August 6, 2024
To provide a seamless user experience, Profile Management synchronizes each user’s entire profile
between the system it is installed on and the user store. As a result, Google Chrome users might ex‑
perience slow logons or logos. This issue occurs because some files associated with Google Chrome
can grow large.
To improve the user experience with Google Chrome, do the following:
1. Add the following folder to the list of folders to mirror:
• AppData\Local\Google\Chrome\User Data\Default
© 1999–2024 Cloud Soware Group, Inc. All rights reserved. 305

Profile Management 2402 LTSR
2. Exclude the following folders from synchronizing:
• Appdata\Local\Google\Chrome\User Data\Default\Cache
• Appdata\Local\Google\Chrome\User Data\Default\JumpListIconsMostVisited
• Appdata\Local\Google\Chrome\User Data\Default\JumpListIconsRecentClosed
• AppData\Local\Google\Chrome\User Data\Default\Media Cache
3. Exclude the following files from synchronizing:
• AppData\Local\Google\Chrome\User Data\Default\Favicons
• AppData\Local\Google\Chrome\User Data\Default\History
• AppData\Local\Google\Chrome\User Data\Default\Preferences
• The files unrelated to bookmarks in the AppData\Local\Google\Chrome\User
Data\Default folder
We recommend that you use the Profile streaming feature if you experience slow logons or logos. For
more information, see Stream user profiles.
Secure
August 6, 2024
This topic contains recommended best practice for securing Profile Management. In general, secure
the servers on which the user store is located to prevent unwanted access to Citrix user profile data.
Recommendations on creating secure user stores are available in the article called Create a file share
for roaming user profiles on the Microso TechNet website. These minimum recommendations en‑
sure a high level of security for basic operation. Also, when configuring access to the user store, in‑
clude the Administrators group, which is required to modify or remove a Citrix user profile.
Permissions
Citrix tests and recommends the following permissions for the user store and the cross‑platform set‑
tings store:
• Share Permissions: Full control of the user store root folder
• The following NTFS permissions, as currently recommended by Microso:
© 1999–2024 Cloud Soware Group, Inc. All rights reserved. 306

Profile Management 2402 LTSR
Group or User Name Permission Apply To
Creator Owner Full Control Subfolders and files only
List Folder / Read Data and
Create Folders / Append Data
This folder only
Local System Full Control This folder, subfolders, and files
Assuming inheritance is not disabled, these permissions allow the accounts to access the stores. And
allow the accounts to create subfolders for users’profiles and perform the necessary read and write
operations.
Beyond this minimum, you can also simplify administration by creating a group of administrators
with full control of subfolders and files only. Then deleting profiles (a common troubleshooting task)
becomes easier for members of that group.
If you use a template profile, users need read access to it.
Access control list (ACL)
If you use the cross‑platform settings feature, set ACLs on the folder that stores the definition files as
follows: read access for authenticated users, and read‑write access for administrators.
Windows roaming profiles automatically remove administrator privileges from the folders contain‑
ing profile data on the network. Profile Management does not automatically remove these privileges
from folders in the user store. Depending on your organization’s security policies, you can do so man‑
ually.
Note: If an application modifies the ACL of a file in the user’s profile, Profile Management does not
replicate those changes in the user store. It is consistent with the behavior of Windows roaming pro‑
files.
Profile streaming and enterprise antivirus products
The streamed user profiles feature of Citrix Profile Management uses advanced NTFS features to sim‑
ulate the presence of files missing from users’profiles. In that respect, the feature is similar to a class
of products known as Hierarchical Storage Managers (HSMs). HSMs are typically used to archive infre‑
quently used files on to slow mass‑storage devices such as magnetic tape or rewritableoptical storage.
When such files are required, HSM drivers intercept the first file request, suspend the process making
the request, fetch the file from the archive storage. And then allow the file request to continue. Given
this similarity, the streamed user profiles driver, upmjit.sys, is in fact defined as an HSM driver.
© 1999–2024 Cloud Soware Group, Inc. All rights reserved. 307

Profile Management 2402 LTSR
In such an environment, configure antivirus products to be aware of HSM drivers, and the streamed
user profiles driver is no dierent. To defend against the most sophisticated threats, antivirus prod‑
ucts must perform some of their functions at the device driver level. And, like HSM drivers, they work
by intercepting file requests, suspending the originating process, scanning the file, and resuming.
It is relatively easy to misconfigurean antivirus program tointerrupt an HSM such as the streameduser
profiles driver, preventing it from fetching files from the user store, and causing the logon to hang.
Fortunately, enterprise antivirus products are written with the possibility of sophisticated storage
products, such as HSMs, in mind. And they can be configured to delay their scanning until the HSM has
done its work. Home antivirus products are less sophisticated in this respect. So the use of home and
SoHo (small oice/home oice) antivirus products is not supported with streamed user profiles.
To configure your antivirus product for use with streamed user profiles, look for one of the following
product features. Feature names are indicative only:
• Trusted process list. Identifies HSMs to the antivirus product, which allows the HSM to com‑
plete the file retrieval process. The antivirus product scans the file when it is first accessed by a
non‑trusted process.
• Do not scan on open or status‑check operations. Configures the antivirus product to scan
only a file when data is accessed (for example, when a file is executed or created). Other types of
file access (for example, when a file is opened or its status checked) are ignored by the antivirus
product. HSMs generally activate in response to file‑open and file‑status‑check operations, so
disabling virus scans on these operations eliminates potential conflicts.
Citrix tests streamed user profiles with versions of the leading enterprise antivirus products to ensure
that they are compatible with Profile Management. These versions include:
• McAfee Virus Scan Enterprise 8.7
• Symantec Endpoint Protection 11.0
• Trend Micro OiceScan 10
Earlier versions of these products are not tested.
If you are using an enterprise antivirus product from other vendors, ensure that it is HSM‑aware. It
can be configured to allow HSM operations to complete before performing scans.
Some antivirus products allow administrators to choose to scan‑on‑read or scan‑on‑write. This
choice balances performance against security. The streamed user profiles feature is unaected by
the choice.
Troubleshoot Profile Management in streaming and antivirus deployments
If you encounter issues, such as logons hanging or taking a long time, there might be a misconfigu‑
ration between Profile Management and your enterprise antivirus product. Try the following proce‑
© 1999–2024 Cloud Soware Group, Inc. All rights reserved. 308

Profile Management 2402 LTSR
dures, in this order:
1. Check that you have the latest version of Profile Management. Your issue might already have
been found and fixed.
2. Add the Profile Management service (UserProfileManager.exe) to the list of trusted processes for
your enterprise antivirus product.
3. Turn o virus checking on HSM operations such as open, create, restore, or status check. Only
perform virus checks on read or write operations.
4. Turn o other sophisticated virus checking features. For example, antivirus products might per‑
form a quick scan of the first few blocks of a file to determine the actual file type. These checks
match the file contents with the declared file type but can interfere with HSM operations.
5. Turn o the Windows search‑indexing service, at least for the folders where profiles are stored
on local drives. This service causes unnecessary HSM retrievals, and has been observed to pro‑
voke contention between streamed user profiles and enterprise antivirus products.
If none of these steps work, turn o streamed user profiles (by disabling the Profile streaming set‑
ting). If it works, re‑enable the feature and disable your enterprise antivirus product. If it also works,
gather Profile Management diagnostics for the non‑working case and contact Citrix Technical Support.
They need to know the exact version of enterprise antivirus product.
To continue using Profile Management, do not forget to re‑enable the enterprise antivirus and turn o
streamed user profiles. Other features of Profile Management continue to function in this configura‑
tion. Only the streaming of profiles is disabled.
Troubleshoot
August 6, 2024
This section provides guidance on how to troubleshoot Profile Management.
The general troubleshooting workflow is as follows:
1. Check Profile Management settings.
2. Check Profile Management log file.
3. Check Windows events logged by Profile Management.
4. Troubleshot common issues.
5. Perform advanced troubleshooting.
6. If you can’t resolve the issues aer trying the preceding procedures, collect as much diagnostic
information as possible and contact Citrix Technical Support.
© 1999–2024 Cloud Soware Group, Inc. All rights reserved. 309

Profile Management 2402 LTSR
Check Profile Management settings
August 6, 2024
As a first step in troubleshooting an issue, check the current Profile Management settings as follows:
1. Start troubleshooting in Citrix Director. This consoledisplays properties of profiles that can help
you diagnose and correct problems.
2. Use the UPMConfigCheck tool to examine a live Profile Management deployment and deter‑
mines whether it’s optimally configured.
For more information about installing and using this tool, see Knowledge Center article
CTX132805.
3. If a Profile Management .ini file is in use, check its configuration on the aected machine.
4. To deactivate any Profile Management policy that you enter as lists (for example, exclusion lists
and inclusion lists), set the policy to Disabled. Do not set the policy to Not Configured.
5. Check the HKEY_LOCAL_MACHINE\SOFTWARE\Policies registry entry on the aected
machine. If there are any stale policies because of GP tattooing issues, delete them. Tattooing
occurs when policies are deleted from GP but remain in the registry.
6. Check the UPMSettings.ini file, which contains the Profile Management settings that have been
applied for each user. This file is present in the root folder of each Citrix user profile in the user
store.
Check Profile Management log files
August 6, 2024
Log files are useful when troubleshooting system behaviors. Aer checking Profile Management set‑
tings, enable Profile Management logging and reproduce the issue to check the log files.
Detailed steps are as follows:
1. Enable Profile Management logging for all events and actions.
2. Reproduce the issue on the machine.
3. Check the Profile Management log file (forexample, #computername#.#domainname#_pm.log)
in the %SystemRoot%\system32\LogFiles\UserProfileManager folder for errors
and warnings. Locate them by searching for the word ERROR or WARNINGS respectively.
For more information about log files, see Reference, later in this article.
© 1999–2024 Cloud Soware Group, Inc. All rights reserved. 310

Profile Management 2402 LTSR
4. Check that the path to the user store is correct.
5. Check that all information from Active Directory was read correctly.
6. Check the time stamps to see whether there’s an action that takes too long.
Tip:
You can use Microso Excel to review Profile Management log files. For more information, see
Knowledge Center article CTX200674.
Enable Profile Management logging
Enable Profile Management logging for all events and actions only when troubleshooting an issue in
your Profile Management deployment. When you have the issue resolved, disable logging and delete
the log files because they might include sensitive information.
This section guides you through using GPOs and UPMPolicyDefaults_all.ini to enable log‑
ging for all events and actions.
You can also achieve this goal using Citrix Studio and Workspace Environment Management (WEM).
For more information, see Decide on where to centrally configure Profile Management.
Enable logging using GPOs
To enable Profile Management logging for all events and actions using a GPO, follow these steps:
1. Open the Group Policy Management Editor, and then create a Group Policy Object.
2. Access Policies > Administrative Templates: Policy definitions (ADMX files) > Citrix Com‑
ponents > Profile Management > Log settings.
3. Enable Profile Management logging as follows:
a) Double‑click Enable logging.
b) Click Enabled.
c) Click OK.
4. Enable Profile Management to log all events and actions:
a) Double‑click Log settings.
b) Select all events and actions. For more information about their descriptions, see Events
and actions.
c) Click OK.
5. To change the default maximum size of the log file, follow these steps:
© 1999–2024 Cloud Soware Group, Inc. All rights reserved. 311

Profile Management 2402 LTSR
a) Double‑click Maximum size of the log file.
b) Click Enable, and then enter a size in the Maximum size in bytes field.
c) Click OK.
Tip:
When the maximum size is reached, Profile Management retains one backup file (for exam‑
ple, Logfilename.log.bak).
6. Run the gpupdate /force command on the machine.
These policies take eect on the machine.
For more information about log setting policies, see Profile Management policy descriptions and de‑
faults.
Enable logging using the .ini file
To enable Profile Management logging for all events and actions using UPMPolicyDefaults_all
.ini, follow these steps:
1. Open UPMPolicyDefaults_all.ini in the Profile Management installation folder (by de‑
fault, C:\Program Files\Citrix\User Profile Manager).
2. Search for Log settings to locate the settings.
3. Enter 1 for LoggingEnabled.
4. Enter 1 for each parameter from LogLevelWarnings through LogLevelUserName. For
more information about those parameters, see Events and actions.
5. To change the default maximum size for the log file, enter a size for MaxLogSize as needed.
6. To change the default folder for the log file, enter a path for PathToLogFile as needed.
Reference
This section provides the following information:
© 1999–2024 Cloud Soware Group, Inc. All rights reserved. 312

Profile Management 2402 LTSR
• Log types
• Events and actions
• Fields in the Profile Management log file
Log types
This table lists logs that you can use to troubleshoot Profile Management.
Informal Name Log File Name Location
Type of Log
Information
Profile Management
log file
#computername#.#domainname#_pm.log%SystemRoot%\system32\LogFiles\UserProfileManagerInformational
messages, warnings,
and errors, are written
to the Profile
Management log file.
The domain name is
the computer’s
domain. If the
computer name
cannot be determined,
this log file is called
UserProfileMan‑
ager.log. If the domain
cannot be determined
while the computer
name is available, the
log file is called #com‑
putername#_pm.log.
© 1999–2024 Cloud Soware Group, Inc. All rights reserved. 313

Profile Management 2402 LTSR
Informal Name Log File Name Location
Type of Log
Information
Profile Management
configuration log file
#computername#.#domainname#_pm_config.log%SystemRoot%\system32\LogFiles\UserProfileManagerThe configuration log
file captures the GPO
and .ini file settings
even if logging is
turned o. If the
computer name
cannot be determined
it is called UserProfile‑
Manager_pm_config.
If the domain cannot
be determined while
the computer name is
available, the log file is
called #computer‑
name#_pm_config.log.
Windows event log Application.evtx %SystemRoot%\System32\winevt\Logs\The Windows events,
which you view with
the Microso Event
Viewer, is used
primarily for error
reporting. Only errors
are written to it.
Events and actions
This table lists events and actions that Profile Management can log.
Type Description Parameter in .ini
Common warnings All common warnings. LogLevelWarnings
Common information All common information. LogLevelInformation
File system notifications One log entry is created each
time a processed file or folder is
changed.
LogLevelFileSystemNotification
© 1999–2024 Cloud Soware Group, Inc. All rights reserved. 314

Profile Management 2402 LTSR
Type Description Parameter in .ini
File system actions File system operations
performed by Profile
Management.
LogLevelFileSystemActions
Registry actions Registry actions performed by
Profile Management.
LogLevelRegistryActions
Registry dierences at logo All registry keys in the hive
HKCU that have been changed
in a session. Important: This
setting produces large amounts
of output in the log file.
LogLevelRegistryDierence
Active Directory actions Each time Profile Management
queries the Active Directory, an
entry is written to the log file.
LogLevelActiveDirectoryActions
Policy values When the Profile Management
service starts or a policy refresh
occurs, policy values are
written to the log file.
LogLevelPolicyUserLogon
Logon The series of actions during
logon are written to the log file.
LogLevelLogon
Logo The series of actions during
logo are written to the log file.
LogLevelLogo
Personalized user information Where applicable, user and
domain names are logged to
dedicated columns of the log
file.
LogLevelUserName
Log file fields
Each line in the Profile Management log file has several fields, separated by semicolons. This table
lists the log file fields.
Field Description
Date Date of the log entry
Time Time of the log entry (including milliseconds)
Severity Either INFORMATION, WARNING, or ERROR
© 1999–2024 Cloud Soware Group, Inc. All rights reserved. 315

Profile Management 2402 LTSR
Field Description
Domain The domain of the user (where applicable)
User name The name of the user (where applicable)
Session ID The session ID (where applicable)
Thread ID The ID of the thread that created this line
Function and description The name of the Profile Management function
running at the time, and the log message
Check Windows events
August 6, 2024
Windows events logged by Profile Management also provide diagnostic information for troubleshoot‑
ing. Windows events are stored in the Application.evtx file under the %SystemRoot%\System32\
winevt\Logs\ folder.
To view the events using Windows Event Viewer, follow these steps:
1. Start Event Viewer on the Windows machine.
2. Select the Windows Logs > Application node in the le pane.
The events appear in the right pane.
List of events
Events logged by Profile Management are not all sequentially numbered and not all are used in this
version of Profile Management. However, they might be logged if you upgrade from an earlier ver‑
sion.
Event ID Description Cause Action
5 Indicates the user
store that Citrix Profile
Management selected
on user logon and the
networking latency.
The Citrix Profile
Management selected
a user store on user
logon.
None. This message is
for information only.
© 1999–2024 Cloud Soware Group, Inc. All rights reserved. 316

Profile Management 2402 LTSR
Event ID Description Cause Action
6 The Citrix Profile
Management service
has started.
The Citrix Profile
Management service
has started. It might
be the result of an
automatic start, a
manual start, or a
restart.
If the start or restart
was not planned,
check the event log for
errors and take any
corrective action
indicated, including
Profile Management
troubleshooting
procedures.
7 The Citrix Profile
Management service
has stopped.
The Citrix Profile
Management service
has stopped. This
might be the result of a
manual stop or as part
of shutdown
processing.
If the service stop was
not planned, check the
event log for errors
and take any
corrective action
indicated, including
Profile Management
troubleshooting
procedures.
8 The profile for user has
been modified by a
later version of Citrix
Profile Management
and can no longer be
used by this version…
The Citrix Profile
Management service
on this machine has
detected that a later
version of Profile
Management has
modified the user’s
profile in the user
store. To prevent
possible data loss,
earlier versions of
Profile Management
revert to using a
temporary profile.
Upgrade this computer
(and all other
computers sharing the
user store and using
earlier versions of
Profile Management)
to use the latest
version.
© 1999–2024 Cloud Soware Group, Inc. All rights reserved. 317

Profile Management 2402 LTSR
Event ID Description Cause Action
9 The logon hook
detection encountered
a problem…
The Citrix Profile
Management service
detected a problem
while setting up logon
notification. The Citrix
Profile Management
service requires that
the installation path
contains no spaces, or
the 8.3 file name
support is enabled on
the volume where the
service is installed.
Reinstall Citrix Profile
Management to a path
with no spaces or
enable 8.3 file name
support on the volume
where Profile
Management is
installed.
10 User path to the user
store is…
A valid Citrix user
profile has been found
at the location
indicated.
None. This message is
for information only.
11 spsMain:
CreateNamedPipe
failed with…
(This event is no longer
used.)
None.
12 StartMonitoringProfile:
A problem was
detected in the
Windows change
journal management
during logon…
The Citrix Profile
Management Service
was unable to monitor
the profile or a folder
configured for
extended
synchronization. A
problem was detected
in the Windows
change journal event
management,
preventing the Service
from monitoring
changes. Citrix Profile
Management does not
process this folder. A
Windows user profile is
used instead.
Ensure that change
journal processing is
configured and
operational for all
volumes managed by
Profile Management.
Ensure that the
computer has
adequate system
resources. Check the
event log for errors
and take any
corrective action
indicated, including
Profile Management
troubleshooting
procedures.
© 1999–2024 Cloud Soware Group, Inc. All rights reserved. 318

Profile Management 2402 LTSR
Event ID Description Cause Action
13 StopMonitoringProfile:
A problem was
detected in the
Windows change
journal management
during logo…
The Citrix Profile
Management Service
was unable to stop
monitoring the profile
or a folder configured
for extended
synchronization. A
problem was detected
in the Windows change
journal management,
preventing the Service
from monitoring
changes. Citrix Profile
Management does not
process this folder. File
and registry changes
are not synchronized
for the user.
Ensure that change
journal processing is
configured and
operational for all
volumes managed by
Profile Management.
Ensure that the
computer has
adequate system
resources. Check the
event log for errors
and take any
corrective action
indicated, including
Profile Management
troubleshooting
procedures.
14 CJIncreaseSizeIfNecessary:
Creating/resizing the
change journal failed…
The Citrix Profile
Management service
was unable to monitor
the profile or a folder
configured for
extended
synchronization. A
problem was detected
while attempting to
create or resize the
NTFS change journal
on a volume,
preventing the service
from monitoring
changes. Citrix Profile
Management does not
process this folder. A
Windows user profile is
used instead.
Ensure that change
journal processing is
configured and
operational for all
volumes managed by
Profile Management.
Ensure that the
computer has
adequate system
resources. Check the
event log for errors
and take any
corrective action
indicated, including
Profile Management
troubleshooting
procedures.
© 1999–2024 Cloud Soware Group, Inc. All rights reserved. 319

Profile Management 2402 LTSR
Event ID Description Cause Action
15 CJInitializeForMonitoring:
Unable to query the
journal…
The Citrix Profile
Management service
was unable to monitor
the profile or a folder
configured for
extended
synchronization. A
problem was detected
while querying the
NTFS change journal
on a volume,
preventing the service
from monitoring
changes. Citrix Profile
Management does not
process this folder. A
Windows user profile is
used instead.
Ensure that change
journal processing is
configured and
operational for all
volumes managed by
Profile Management.
Ensure that the
computer has
adequate system
resources. Check the
event log for errors
and take any
corrective action
indicated, including
Profile Management
troubleshooting
procedures.
16 CJInitializeForMonitoring:
Initial MFT scan
finished with errors.
The Citrix Profile
Management service
was unable to monitor
the profile or a folder
configured for
extended
synchronization. A
problem was detected
while performing an
initial scan of the NTFS
change journal on a
volume, preventing
the service from
monitoring changes.
Citrix Profile
Management does not
process this folder. A
Windows user profile is
used instead.
Ensure that change
journal processing is
configured and
operational for all
volumes managed by
Profile Management.
Ensure that the
computer has
adequate system
resources. Check the
event log for errors
and take any
corrective action
indicated, including
Profile Management
troubleshooting
procedures.
© 1999–2024 Cloud Soware Group, Inc. All rights reserved. 320

Profile Management 2402 LTSR
Event ID Description Cause Action
17 CJInitializeForMonitoring:
Processing FS changes
since service start
failed.
The Citrix Profile
Management service
was unable to monitor
the profile or a folder
configured for
extended
synchronization. A
problem was detected
while performing an
update scan of the
NTFS change journal
on a volume. This
error does not prevent
the service from
monitoring changes.
Citrix Profile
Management
processes this
directory as normal.
Although this error
does not prevent the
operation of Profile
Management, check
for errors anyway.
Make sure that change
journal processing is
configured and
operational for all
volumes managed by
Profile Management.
Make sure that the
computer has
adequate system
resources. Check the
event log for errors
and take any
corrective action
indicated, including
Profile Management
troubleshooting
procedures.
© 1999–2024 Cloud Soware Group, Inc. All rights reserved. 321

Profile Management 2402 LTSR
Event ID Description Cause Action
18 CJProcessAvailableRecords:
Internal Error…
A failure occurred in
the Citrix Profile
Management service
while monitoring the
profile or a folder
configured for
extended
synchronization. A
problem was detected
while performing an
update scan of the
NTFS change journal
on a volume,
preventing the service
from monitoring
recent changes. Citrix
Profile Management
does not complete
processing on this
folder. Back up critical
data manually.
The Citrix Profile
Management Service
was unable to monitor
the profile or a folder
configured for
extended
synchronization. A
problem was detected
in the Windows
change journal event
management,
preventing the Service
from monitoring
changes. Citrix Profile
Management does not
process this folder. A
Windows user profile is
used instead.
© 1999–2024 Cloud Soware Group, Inc. All rights reserved. 322

Profile Management 2402 LTSR
Event ID Description Cause Action
19 USNChangeMonitor:
Initialization of change
journal failed…
A failure occurred in
the Citrix Profile
Management service
while monitoring the
profile or a folder
configured for
extended
synchronization. A
problem was detected
while preparing the
initial scan of the NTFS
change journal on a
volume, preventing
the service from
monitoring changes.
Citrix Profile
Management does not
complete processing
on this directory. Back
up critical data
manually.
The Citrix Profile
Management Service
was unable to monitor
the profile or a folder
configured for
extended
synchronization. A
problem was detected
in the Windows
change journal event
management,
preventing the Service
from monitoring
changes. Citrix Profile
Management does not
process this folder. A
Windows user profile is
used instead.
20 CADUser::Init:
Determining the DNS
domain and ADsPath
failed…
A problem occurred
while querying Active
Directory for
information about the
logged‑on user. Citrix
Profile Management
does not process this
folder. A Windows user
profile is used instead.
Ensure that the
computer has a
functioning network
path to a domain
controller. Ensure that
the computer has
adequate system
resources. Check the
event log for errors
and take any
corrective action
indicated, including
Profile Management
troubleshooting
procedures.
© 1999–2024 Cloud Soware Group, Inc. All rights reserved. 323

Profile Management 2402 LTSR
Event ID Description Cause Action
21 Determining the DNS
domain and ADsPath
failed…
This issue can be
caused by a limit on
memory allocation, as
described in the
Microso TechNet
article 263693.
The resolution for this
issue is described in
the Citrix Knowledge
Center article
CTX124953.
22 File access was slow.
User experienced a
delay while file was
fetched from the user
store.
The user tried to
access the file but
Profile Management
detected a delay in this
operation. The user
received a warning
message. This error
might result from
antivirus soware
preventing access to
the file in the user
store.
Consult the Profile
Management
documentation for
troubleshooting and
configuration advice
on enterprise antivirus
products.
23 File access might be
denied. The user
experienced a long
delay while a file was
fetched from the user
store.
The user tried to
access the file but
Profile Management
detected such a
significant delay in this
operation that access
might be denied. The
user received an error
message. This error
might result from
antivirus soware
preventing access to
the file in the user
store.
Consult the Profile
Management
documentation for
troubleshooting and
configuration advice
on enterprise antivirus
products.
© 1999–2024 Cloud Soware Group, Inc. All rights reserved. 324

Profile Management 2402 LTSR
Event ID Description Cause Action
24 RevertToSelf failed
with error code and
Profile Management
was shut down.
Some logon and logo
processing is
performed using
impersonation. The
RevertToSelf function
is normally invoked
when impersonation is
complete. On this
occasion, the function
failed to be called. So,
for security reasons,
the Profile
Management soware
was shut down. The
user received an error
message.
If you suspect a
security breach, follow
your organization’s
procedures to address
it, and then restart
Profile Management.
25 The profile for user is
managed by Citrix
Profile Management,
but the user store
cannot be reached
…
The Citrix Profile
Management Service
on this computer
cannot reach the
specified user store.
This is normally
because of a network
issue or because the
server hosting the user
store is unavailable.
Ensure the server
hosting the user store
is available and the
network between this
computer and the
server is operational.
26 The default profile
location is invalid.
Profiles in this location
cannot be monitored
correctly…
Profiles on this
computer must be on
a disk mounted on a
drive letter (for
example, C:).
Move the profiles on
this computer to a disk
mounted on a drive
letter, and restart
Profile Management.
© 1999–2024 Cloud Soware Group, Inc. All rights reserved. 325

Profile Management 2402 LTSR
Event ID Description Cause Action
27 The profile folder for
the user is not present
under the default
profile location …
In the registry, the
location of this user’s
profile and of the
default profile do not
match. This can occur,
for example, if profiles
are moved between
dierent volumes on
the machine running
the Profile
Management Service.
Ensure that this user’s
profile is located under
the default folder
location. Use
appropriate tools if
necessary so that the
profile data in the file
system matches the
profile’s registry
settings.
28 An error occurred
while trying to reset
security permissions
on the registry hive for
user.
It is likely that there
are permission issues
with the registry in the
default or template
profile used to create
this Citrix user profile.
If appropriate, reset
the security
permissions on the
user’s registry hive in
the Profile
Management user
store using a
third‑party utility such
as SetAcl.
© 1999–2024 Cloud Soware Group, Inc. All rights reserved. 326

Profile Management 2402 LTSR
Event ID Description Cause Action
29 A template profile path
is configured but no
profile was found…
The specified folder
cannot be used in the
template profile
setting because it does
not contain the file
NTUSER.DAT. This
issue commonly
occurs when the full
path of the
NTUSER.DAT file is
configured instead of
the folder containing
NTUSER.DAT. The
template profile
setting does not
support the expansion
of Active Directory
attributes, system
environment variables,
or the %USERNAME%
and %USERDOMAIN%
variables.
Check that you have
configured a valid path
to the folder
containing the
template profile.
Check that the path
contains NTUSER.DAT.
Make sure that this file
is valid, and that
access rights are set
correctly on the folder
to allow read access to
all files.
33 Citrix Profile
Management created a
profile in the user store
from a local profile at
LOCATION
A profile was created in
the user store from the
location indicated.
None. This message is
for information only.
34 Citrix Profile
Management created a
profile in the user store
from a roaming profile
at LOCATION
A profile was created in
the user store from the
location indicated.
None. This message is
for information only.
35 Citrix Profile
Management created a
profile in the user store
from a template profile
at LOCATION
A profile was created in
the user store from the
location indicated.
None. This message is
for information only
© 1999–2024 Cloud Soware Group, Inc. All rights reserved. 327

Profile Management 2402 LTSR
Event ID Description Cause Action
36 The existing profile
folder for USER cannot
be prepared for this
user’s new Citrix
mandatory profile.
The user is given a
temporary profile if
possible.
Citrix mandatory
profiles use copies of a
template profile for
each logon. Any
existing profiles are
deleted and the Citrix
mandatory profiles are
copied from the
specified template
location. This process
failed.
Delete any existing
profile folder manually.
You might have to
restart the computer if
files are locked by
another process that
causes the deletion to
fail. Ensure that the
template folder exists
and the user has
permissions to read its
contents.
37 The user store path for
user cannot be
reached. A temporary
profile is created for
this user and no
changes are saved to
their profile in this
user store.
The Citrix Profile
Management Service
on this computer
cannot reach the
specified user store.
This is normally
because of a network
issue or because the
server hosting the user
store is unavailable.
Ensure the server
hosting the user store
is available and the
network between this
computer and the
server is operational.
© 1999–2024 Cloud Soware Group, Inc. All rights reserved. 328

Profile Management 2402 LTSR
Event ID Description Cause Action
38 The profile for user is
managed by Citrix
Profile Management,
but the user store path
cannot be found. A
temporary profile is
created for this user
and no changes are
saved to their profile in
this user store.
The Citrix Profile
Management Service
on this computer
cannot find the profile
in the specified user
store. This might be
because of a network
issue or because the
server hosting the user
store is unavailable.
But it might also be
because the profile in
the user store has
been deleted or
moved. Or the path to
the user store has
changed and no longer
correctly points to an
existing profile in the
user store.
Ensure that the server
hosting the user store
is available. And the
network between this
computer and the
server is operational
and the path to the
user store points to an
existing profile. If the
profile in the user store
has been deleted,
delete the profile on
the local machine.
42 An error occurred
while trying to update
policy settings for user
<userdomain>\<
username>. Policy
settings might not
have been applied
correctly. Error
code:<error code>
Citrix Profile
Management failed to
update Citrix group
policy settings.
Verify that Citrix Group
Policy Client‑Side
Extension is installed
and works properly.
© 1999–2024 Cloud Soware Group, Inc. All rights reserved. 329

Profile Management 2402 LTSR
Event ID Description Cause Action
3005 Attempts to mount the
virtual disk from
<path1> to access
point <path2> fail.
Citrix Profile
Management failed to
mount virtual disk to
the access point. This
issue might occur
when the virtual disk is
not accessible, the
access point is not
empty, or the virtual
disk is already
mounted.
Restart the machine
and check whether the
issue is resolved. If not,
collect CDF trace and
contact Citrix
Technical Support.
3008 Attempts to mount the
search database from
<path1> to access
point <path2> fail.
Windows Search
service failed to mount
the search database.
This issue might occur
when the search
database is corrupted.
Collect CDF trace and
contact Citrix
Technical Support.
5000 The network latency
between the local host
and the user store <”
%3”> is <%2>
milliseconds. Session
ID is %1.
NA NA
5001 The current profile size
is <%1> bytes. See the
event data for the
session ID.
NA NA
5002 The pending area size
is <%1> bytes,
comprising <%2> files,
<%3> folders, with
session ID <%4>, and
the username <%5>.
NA NA
5003 Sync of pending area
started. Session ID:
<%1>. Username:
<%2>.
NA NA
© 1999–2024 Cloud Soware Group, Inc. All rights reserved. 330

Profile Management 2402 LTSR
Event ID Description Cause Action
5004 Sync of pending area
completed. Session ID:
<%1>. Username:
<%2>.
NA NA
Troubleshoot common issues
August 6, 2024
This article describes how to troubleshoot common Profile Management issues.
Slow logons
If your users encounter slow logons, follow these steps to troubleshoot:
1. Check the profile load time in the Logon Duration panel of Citrix Director. If it’s substantially
longer than expected, the slow logon is caused by loading user profiles.
See Diagnose user logon issues for details.
2. Check the profile processing time in the Citrix Profile Management log file.
In the Profile Management log file at C:\Windows\System32\Log Files\User
Profile Manager, locate the entry starting with DispatchLogonLogoff. The following
example shows that the logon processing time is 10.22 seconds.
DispatchLogonLogoff: ---------- Finished logon processing successfully
in [s]: <10.22>.
3. Make sure that you
’
ve applied the recommended Profile Management policies.
Follow the recommendations for improving logon performance in Improve user logon perfor‑
mance.
4. Contact Citrix Technical Support.
If slow logons persist, contact Citrix Technical Support for further assistance. For more informa‑
tion, see Contact Citrix Technical Support.
© 1999–2024 Cloud Soware Group, Inc. All rights reserved. 331

Profile Management 2402 LTSR
Check that profiles are being streamed
If you have enabled streamed user profiles and want to verify that this feature is being applied to a
user’s profile, do the following:
1. Check the following type of entry in the Profile Management log file:
pre codeblock 2010-03-16;16:16:35.369;INFORMATION;;;;1140;ReadPolicy
: Configuration value read from policy: PSEnabled=<1>
The last item must be set to PSEnabled=<1> if the feature is enabled.
2. Check the following entry for the user in the Profile Management log file:
pre codeblock 2010-03-16;20:17:30.401;INFORMATION;<domain name
>;<user name>;2;2364;ProcessLogon: User logging on with Streamed
Profile support enabled.
If streamed user profiles aren’t being applied, the item reads ProcessLogon: User logging on
with Streamed Profile support disabled.
Determine which policies are in force
Use the UPMSettings.ini file to determine the Profile Management policies that are being applied. This
file is present in the root folder of each Citrix user profile in the user store. Examining this file might be
more convenient than using the Resultant Set of Policy (RSoP). Doing so especially if you use a mixture
of GPOs and .ini file settings to determine policies.
Use the UPMFRSettings.ini file to determine which profile folders aren’t processed because they are
on an exclusion list. The UPMFRSettings.ini file is also present in the root folder.
Exclude corrupt profile data
If a user profile is corrupt and you’re confident the problem lies with a particular file or folder, exclude
it from the synchronization process. The way is to add the file or folder to the exclusion list.
Clean connections to registry entries
In some scenarios (not just those involving Profile Management), connections to registry profile data
are preserved aer users log o. This preservation can result in slow logos or incomplete termination
of user sessions. The User Profile Hive Cleanup (UPHClean) tool from Microso can help resolve
these scenarios.
© 1999–2024 Cloud Soware Group, Inc. All rights reserved. 332

Profile Management 2402 LTSR
Delete local profiles
Microso Delprof.exe and Sepago Delprof2 are tools that help you delete user profiles.
Identify where profiles are stored
Diagnosing profile issues can involve locating where the files in a user’s profiles are stored. The fol‑
lowing procedure provides a quick way to identify where profiles are stored.
1. In Event Viewer, click Application in the le pane.
2. Under Source in the right pane, locate the Citrix Profile Management event of interest and
double‑click it.
3. The path to the user store associated with the event is displayed as a link on the General tab.
4. Follow the link to browse the user store if you want to explore the files.
Check servers
To determine whether a server is processing a user’s logons and logos correctly, check the file called
PmCompatibility.ini in the user’s profile in the user store. The file is present in the profile’s root folder.
The last entry in the file is the name of the server from which the user last logged o. For example, if
the server runs Profile Management 5.0, the entry would be:
1 [LastUpdateServerName]
2 5.0=<computer name>
Roll back
To roll back to earlier versions of Profile Management, run del /s from the command line on the file
server that hosts the user store. The command deletes the PmCompatibility.ini file from each profile.
For example, if the local path to the user store is D:\UpmProfiles, run:
1 del /s D:\UpmProfiles\pmcompatibility.ini
Aer the command has completed, users can log on to computers running the earlier version and
receive their profile from the user store.
Profile Management running on VMware creates multiple profiles
Replicated VMware folders are created in user profiles. The replicates have incremented folder names
(000, 001, 002, and so on). For more information about this issue and how to resolve it, see Knowledge
Center article CTX122501.
© 1999–2024 Cloud Soware Group, Inc. All rights reserved. 333

Profile Management 2402 LTSR
Long logon times With Novell eDirectory
When users log on to an environment having Citrix products and Novell eDirectory, long logon times
might be experienced and errors written to the event log. Sessions might become unresponsive for up
to 30 seconds at the Applying your personal settings stage. For more information about this issue
and how to resolve it, see Knowledge Center article CTX118595.
Excluded folders in user store
Excluded folders appear in the user store. This issue is expected and no corrective action is required.
Folders on an exclusion list are created in the user store but their contents are not synchronized.
Missing information in log file
Activating debug mode does not automatically enable full logging. In log settings, verify that you’ve
selected all check boxes for the events you want to log.
Tip: You might have to scroll down to enable the last check boxes on the list.
GPO settings inoperative
You change a GPO setting but it isn’t operative on the computer running the Citrix Profile Management
Service. The issue occurs because GP does not refresh immediately but instead is based on events or
intervals specified in your deployment. To refresh GP immediately, run gpupdate /force on the
computer.
For your changes to take eect, run the gpupdate /force command from the command prompt
as documented at https://docs.microsoft.com/en‑us/windows‑server/administration/windows‑
commands/gpupdate.
Users receive new or temporary profiles
By default, users are given a temporary profile when a problem occurred. For example, the user store
is unavailable. Alternatively, you can configure Profile Management to display an error message and
then log users o. This approach can help with troubleshooting.
For instructions on configuring this feature, see Force user logos.
In some circumstances, when they log on, users receive a new profile instead of their cached pro‑
file. For more information about this issue and a workaround for it, see Knowledge Center article
CTX118226.
© 1999–2024 Cloud Soware Group, Inc. All rights reserved. 334

Profile Management 2402 LTSR
Users might also receive a temporary profile if a local profile is present aer the copy in the user store
is removed. This situation can arise if the user store is cleared but local profiles are not deleted at
logo.
Profile Management treats such partial removal of profiles as a network, share, or permissions error,
and provides the user with a temporary profile. For this reason, partial removal isn’t recommended.
To work around this issue, log on to the aected computer and delete the profile manually.
If your deployment includes personal vDisks, users might receive temporary profiles if the default
processing of these disks hasn’t been correctly adjusted. For more information, see Migrate user pro‑
files.
Profile data lost when virtual desktop sessions become unresponsive
In a Citrix virtual desktops deployment, disconnecting from a Remote Desktop Protocol (RDP) session
can cause a virtual desktop to become unresponsive or to restart. The behavior impacts Profile Man‑
agement because it causes profile data to be lost when the session ends. The issue is fixed in Citrix
Virtual Delivery Agent Version 3.1.3242 and later.
Users cannot log on (Event ID: 1000, Source: Userenv)
Users are unable to log on to a Citrix environment and receive the following error message: “Windows
did not load your roaming profile and is attempting to log you on with your local profile…Contact your
network administrator.”This error appears in Windows Application Event Logs (Event ID: 1000, Source:
Userenv).
For more information about this issue and other workarounds for it, see Knowledge Center article
CTX105618.
Printing
In Citrix virtual desktops environments, a user can select a default printer but sometimes the selection
isn’t retained between logons. This issue has been observed when a Citrix virtual desktop’s policy is
used to set printers on pooled virtual desktops based on a Citrix Provisioning Services Personal vDisk
in standard image mode.
This issue does not originate with Profile Management. Though the Profile Management log file shows
that the registry entry for the printer is copied at logo (which is expected), NTUSER.dat for the user
doesn’t contain the entry (which isn’t expected). The issue in fact originates with the way Citrix virtual
desktops uses the DefaultPmFlags registry setting. For more information, see Knowledge Center
article CTX119066.
© 1999–2024 Cloud Soware Group, Inc. All rights reserved. 335

Profile Management 2402 LTSR
Sometimes, unexpected printers are added to profiles. Aerusers remove them, the printersreappear
at the next logon. See the Profile Management support forum for more information.
Problems with application settings on multiple platforms
You might experience problems where application settings don’t roam correctly across multiple plat‑
forms. Typically these problems result from:
• Settings that aren’t applicable from one system to another. For example, hardware‑specific
settings that are not on every system.
• Applications that are installed dierently on dierent systems. Examples:
– An application that is installed on a C: drive on one system but on a D: drive on another.
– An application that is installed in C:\Program Files on one system but in C:\Program Files
(x86) on another.
– An Excel add‑in installed on one system but not on another.
• Applications that don’t store setting information in the profile. For example, information stored
in the local machine’s settings or outside the user profile.
• Language‑specific configuration settings stored in the registry. Profile Management automati‑
cally translates language‑specific folder names in Version 1 profiles but not in the registry.
In most instances, better standardization of the systems that cause these issues can minimize the
issues. However, oen the issues result from inherent incompatibilities (with multiple platforms) of
the OS or the respective application. If the problematic settings aren’t critical, excluding them from
the profile might resolve the issue.
Profiles owned by unknown accounts
On rare occasions, a profile can appear to belong to an unknown account. On the Advanced tab of the
System Properties dialog boxfor a computer, Account Unknown is displayed when you click Settings
in User Profiles. This issue comes along with an event log entry, “Profile notification of event Create
for component <application ID> failed, error code is???” In the registry, the application ID points to the
SHACCT Profile Notification Handler, a Microso component.
To confirm that this issue occurs in your environment, log on as a user whose data Profile Management
doesn’t process, and check for these symptoms.
It isn’t an issue with Profile Management but might be the result of Active Directory interacting badly
with virtual machine snapshots. The operation of Citrix user profiles is unaected. Users can log on
and o, and their profile changes are preserved.
© 1999–2024 Cloud Soware Group, Inc. All rights reserved. 336

Profile Management 2402 LTSR
Perform advanced troubleshooting
August 6, 2024
Aer you check the current Profile Management settings and eliminate the Profile Management logs
as sources of useful information, use this checklist to troubleshoot further.
• Check the Resultant Set of Policies (RSoP) report from the machine you’re analyzing and ensure
all GPOs are applied as expected.
To generate the report, run the gpresult command on the machine.
• Check that you have the latest version of Profile Management installed. For more information,
see Check the Profile Management version
• Check the Profile Management support forum for solutions from other users.
• Try to reproduce the issue on a clean machine with the same operating system as the aected
machine. Install the soware products one by one, and see if you can reproduce the issue aer
each installation. For more information, see Deploy Profile Management in a test environment.
Check the Profile Management version
To examine the version information, follow these steps:
1. Right‑click the UserProfileManager.exe file in Windows Explorer.
2. Click Properties > Version.
3. If it’s not the latest version, download the latest version from the My Account site. Select your
Citrix product and download Profile Management from the Downloads section.
Tip:
Aer upgrading, you can enable any later feature if needed.
Deploy Profile Management in a test environment
If logging files can’t help with troubleshooting the issue, try the troubleshooting approach used in the
following example. You can use this approach to:
• Determine which configuration settings are being read.
• Determine where configuration settings are being read from (when multiple ADM files are
present).
• Check that the log file correctly tracks changes made to profiles.
© 1999–2024 Cloud Soware Group, Inc. All rights reserved. 337

Profile Management 2402 LTSR
Deployment example
Deployment in this example is as follows:
• Citrix virtual apps servers are running on Windows Server 2003.
• Users are connecting to their published resources using the Plug‑in for Hosted Apps for Win‑
dows.
• OU‑based GPOs are used instead of the INI file‑based configuration.
Caution:
Editing the registry incorrectly can cause serious problems that might require you to reinstall the
operating system. We cannot guarantee that problems resulting from improper use of Registry
Editor can be solved. Use Registry Editor at your own risk. Be sure to back up the registry before
you edit it.
Troubleshooting workflow
This example includes a small test OU that comprises only one server. You can edit the profile settings
of the server. Then track setting changes in the log file and in the Resultant Set of Policies (RSoP)
report.
Detailed steps are as follows:
1. From the production environment, remove one of the Citrix virtual apps servers that host the
Citrix user profiles. Next, add the server to a new OU.
2. Remove and reinstall Profile Management on the server. When reinstalling, check that short file
names (also known as 8.3 file names) are activated as follows:
• If the following registry entry is set to 1 (DWORD value), set it to 0 and reinstall Profile Man‑
agement: HKLM\System\CurrentControlSet\Control\FileSystem\NtfsDisable8Dot3NameCreation.
Doing so enables support for short file names.
• If the entry isn’t set to 1, reinstall Profile Management to a location where each subfolder
name is eight characters or less, for example, c:\prof‑man.
For later operating systems, you do not need to adjust this registry entry.
3. Log on as a domain administrator to the server.
4. Examine the local policy and remove the ADM file at this level.
5. Delete any links to GPOs assigned to your new OU.
6. On the server, delete the key and all subkeys from Registry Editor: HKEY_LOCAL_MACHINE\
SOFTWARE\Policies\Citrix\UserProfileManager\.
© 1999–2024 Cloud Soware Group, Inc. All rights reserved. 338

Profile Management 2402 LTSR
7. Remove any Profile Management .ini file.
8. Using My Computer > Properties > Advanced, delete all profiles except those profiles that you
want to test. Research any errors that appear.
9. Grant the Authenticated Users group full control of the file. Doing so enables you
to check the Profile Management log file when logging on as a user. The log file is
C:\Windows\System32\LogFiles\UserProfileManager\<domainname>#<computername>_pm.log
(where <domainname> is the computer’s domain and<computername> is its name). If the
domain cannot be determined, the log file is UserProfileManager.log.
10. Create a GPO that contains only the following settings, and then link it to your new OU. Make
sure that the GPO is assigned to the Authenticated Users group. Enabled and configure these
settings:
a) Enable Profile Management.
b) Path to user store.
c) Enable logging.
d) Log settings. Select all events and actions.
e) Migration of existing profiles. Select Roaming and local profiles.
f) Local profile conflict handling. Select Rename local profile.
g) Delete locally cached profiles on logo.
h) Disable the Process logons of local administrators setting. By doing so, even if Profile Man‑
agement is misconfigured and prevents user logons, you can still log on as an administra‑
tor.
11. Control how the GPO link is applied to the OU by right‑clicking the OU and selecting Block In‑
heritance.
12. Create a domain test user who has never logged on and isn’t a member of any local administra‑
tor group on the server.
13. Publish a full desktop to this user and make sure that the user is in the Remote Desktop Users
group.
14. If the domain has multiple domain controllers (DCs), force AD replication between all DCs in the
same site as the server.
15. Log on to the server as domain Administrator, delete the log file, restart the Citrix Profile Man‑
agement service, and run gpupdate /force.
16. Check the registry and make sure the only values in HKEY_LOCAL_MACHINE\SOFTWARE\
Policies\Citrix\UserProfileManager\ are the ones for your new GPO.
17. Log out as Administrator.
18. Make some setting changes to Internet Explorer, and create a blank test file in your My Docs
folder.
© 1999–2024 Cloud Soware Group, Inc. All rights reserved. 339

Profile Management 2402 LTSR
19. Create a shortcut to the Profile Management log file. Open it and examine the entries. Research
any items that require attention.
20. Log out and then back in as domain Administrator.
21. Generate a RSoP report for the test user and the server by running gpresult.
If the report doesn’t include what you expect, research any items that require attention.
Contact Citrix Technical Support
August 6, 2024
If you’ve checked the troubleshooting advice in this section and believe the problem that you experi‑
enced results from Profile Management, contact Citrix Technical Support. Always collect and provide
the following files and as much other information as possible.
Collect Profile Management log files
Detailed steps are as follows:
1. Enable Profile Management on the machine to log all events and actions. For more information,
see Enable Profile Management logging.
2. Reproduce the problem on the aected machine.
3. Collect the ProfileManagementlog file and its backupfile from %SystemRoot%\System32\Logfiles\UserProfileManager.
The log file from the aected machine includes at least the following information:
• Start of the service (including the version and the build number of Profile Management)
• Reading of the configuration by the service
• One full logon process of the aected user
• The activity the user did when the issue occurred
• One full logo process for the aected user
Collect the Windows event log file
Aer you reproduce the problem on the aected machine, follow these steps to collect the Windows
event log file.
1. Locate the %SystemRoot%\System32\winevt\Logs folder.
2. Collect the Application.evtx file.
© 1999–2024 Cloud Soware Group, Inc. All rights reserved. 340

Profile Management 2402 LTSR
Collect installed soware details
Collect details of the following soware installed on the aected machine:
• Operating system, language, and version.
• Citrix products and versions.
Collect .ini files
Follow these steps to collect .ini files associated with Profile Management:
1. Locate the root folder of each Citrix user profile in the user store.
2. Collect the following .ini files:
• UPMSettings.ini
• UPMFRSettings.ini
• PmCompatibility.ini
Collect the Always On Tracing log file
The Always On Tracing (AOT) logs provide information that can help identify critical problems with
Profile Management, thus reducing the need to reproduce problems.
To collect the AOT log files, follow these steps:
1. On the machine whereproblems occurred, go to C:\ProgramData\Citrix\TelemetryService
\CitrixAOT. You can see all AOT log files.
Note:
If the machine is installed with other Citrix components where AOT is enabled, the AOT log
files also contain logs from those components.
2. To manually generate the latest log file, follow these steps:
a) Run Windows PowerShell as an administrator.
b) Run the command: Restart-Service -Name "Citrix Telemetry Service"
3. Collect all AOT log files and send them to Citrix Technical Support.
© 1999–2024 Cloud Soware Group, Inc. All rights reserved. 341

Profile Management 2402 LTSR
Collect a diagnostic track log using CDFControl
Collect a diagnostic trace log using the CDFControl as follows:
1. Download the CDFControl tool from Knowledge Center article CTX111961.
2. Run the CDFControl executable.
3. In the window that appears, select one or more tracing modules as needed. For more informa‑
tion about their function descriptions, see the following table.
4. Click Start Tracing.
5. Reproduce the problem.
6. Click Stop Tracing.
7. Find your trace log in the same folder as the CDFControl executable.
This table lists the functions of track modules in CDFControl.
Trace Module Description
UPM_DLL_GPCSE Traces the user group policy evaluation request
sent from Profile Management to the Citrix
Group Policy client‑side extension.
UPM_DLL_OUTLOOK_HOOK Traces the Profile Management hook module in
Outlook. Select it to trace issues with the
Outlook search index Roaming feature.
UPM_DLL_Perfmon Traces Windows Performance Monitor counters
associated with Profile Management and errors
generated by Profile Management.
UPM_DLL_SearchSvc_Hook Traces the Profile Management hook module in
Windows Search Service. Select it to trace issues
with the Outlook search index Roaming feature.
UPM_DLL_WfShell Traces the Profile Management Wfshell
plug‑in, which reports the desktop‑ready event
for published applications.
UPM_Driver Traces file‑system changes each time the Citrix
streamed user profiles driver is used.
UPM_Service Traces information each time the Profile
Management Service is called. Example
occasions include at logon, at logo, or when
mid‑session synchronization or periodic
maintenance takes place.
© 1999–2024 Cloud Soware Group, Inc. All rights reserved. 342

Profile Management 2402 LTSR
Trace Module Description
UPM_SessionLaunchEvaluation Traces the launch events associated with the
unique transaction ID in Profile Management.
UPM_WMI Traces the Profile Management VDA WMI plug‑in
events.
Collect other information
Collect the following information if possible:
• The Resultant Set of Policy (RSoP) report for the aected machine and user by running the
gpresult command.
• Application event logs.
• If available, the Userenv debug file. Consult your Microso documentation for information on
this tool.
Notes:
Data collection can become complex if Citrix Provisioning Services is part of your deployment
and the problem occurs when profiles are being initialized. In that scenario, make the preced‑
ing configuration updates in the .ini file (and disable the GPO log settings). We recommend you
follow the instructions in
Preconfigure Profile Management on provisioned images.
Best practices
August 23, 2024
A Windows user profile is a collection of folders, files, registry, and configuration settings defining the
environment for a user who logs on with a particular user account. Users can customize these settings
depending on the administrative configuration.
Configure Profile Management from one location
There are three locations from which you can configure Profile Management. To configure Profile
Management, use one of the following ways:
• A GPO in Active Directory
© 1999–2024 Cloud Soware Group, Inc. All rights reserved. 343

Profile Management 2402 LTSR
• Policies in Citrix Studio
• Workspace Environment Management
We recommend that you choose only one of the three locations to configure Profile Management.
Watch this video to learn more:
Cookie handling
Profile Management supports deleting stale cookies for Internet Explorer 10 and Internet Explorer 11.
You can use the Process Internet cookie files on logo policy to delete stale cookies to avoid cookie
folder bloat. In addition, add the following folders to the list of folders that you want to mirror:
• AppData\Local\Microso\Windows\INetCookies
• AppData\Local\Microso\Windows\WebCache
• AppData\Roaming\Microso\Windows\Cookies
For more information, see Process Internet cookie files on logo.
Outlook and Oice 365
Microso recommends Cached Exchange Mode so that a consistent online and oline Microso Out‑
look experience is enabled. You can turn on the Cached Exchange Mode from the Microso Outlook
© 1999–2024 Cloud Soware Group, Inc. All rights reserved. 344

Profile Management 2402 LTSR
client. For more information, see https://docs.microsoft.com/en‑us/exchange/outlook/cached‑
exchange‑mode.
When you use Cached Exchange Mode, there is always a copy of a user’s Exchange mailbox in an Oline
Outlook Data File (*.ost). The file can grow large.
We recommend avoiding storing Microso Outlook data locally or on shared drives. Use the Enable na‑
tive Outlook search experience feature instead. With this feature, the Oline Outlook Data File (*.ost)
and the Microso search database specific to the user roam along with the user profile. This feature
improves the user experience when searching mail in Microso Outlook. For more information on
using this feature, see Enable native Outlook search experience.
Profile streaming with Microso Credentials Roaming enabled
By default, the following folders in the configuration file are excluded from profile streaming:
• AppData\Local\Microso\Credentials
• Appdata\Roaming\Microso\Credentials
• Appdata\Roaming\Microso\Crypto
• Appdata\Roaming\Microso\Protect
• Appdata\Roaming\Microso\SystemCertificates
If you configure profile streaming exclusion manually, ensure to add the preceding folders to “Profile
streaming exclusion list–directories.”
Start menu roaming
Applications pinned to the Start menu might disappear on the following operating systems aer sev‑
eral logons:
• Windows 10 Version 1607 and later, 32‑bit and 64‑bit
• Windows Server 2016 Standard and Datacenter editions
• Windows Server 2019 Standard and Datacenter editions
• Windows 10 Enterprise for Virtual Desktops
Note:
You cannot use the same policy for both Windows 10 and Windows Server 2016/2019. Configure
separate policies for VDI and shared desktop platforms, or if using Profile Management 2103 or
later, use automatic configuration.
© 1999–2024 Cloud Soware Group, Inc. All rights reserved. 345

Profile Management 2402 LTSR
Automatically enable Start menu roaming
If you’re using Profile Management 2103 or later, when you leave the Disable automatic configura‑
tion policy at its default value (Disabled), Start menu roaming is automatically enabled.
If you are using Profile Management 2106 or later, we recommend you enable the Accelerate folder
mirroring policy, which is locatedunder ProfileManagement> File system > Synchronization. This
setting provides better user logon and logo experience for the folder mirroring feature. For more
information, see Accelerate folder mirroring.
Manually enable Start menu roaming for Windows 10
When the Disable automatic configuration policy is enabled, you can use the following steps to man‑
ually enable
Start menu roaming
for Windows 10:
1. Go to Profile Management > File system > Synchronization.
2. Set the Folders to mirror policy to Enabled, and then add the following folders to the list of
folders to mirror:
• Appdata\Local\Packages
• Appdata\Local\Microsoft\Windows\Caches
• !ctx_localappdata!\TileDataLayer (applicable only to Windows 10 version
1607 and earlier)
Note:
Starting with Citrix Profile Management 1912, a folder added to Default exclusion list –
directories or Exclusion list –directories cannot be synchronized even if you add it to
Folders to mirror. If one of these folders or their parent or ancestor folders are in the
exclusion lists, add it to the Directories to synchronize list.
3. Set the Files to synchronize policy to Enabled, and then add the following file to the list of files
to synchronize.
• Appdata\Local\Microsoft\Windows\UsrClass.dat*
Manually enable Start menu roaming for Windows Servers
When the Disable automatic configuration policy is enabled, you can use the following steps to man‑
ually enable Start menu roaming for Windows Servers:
1. Go to Profile Management > Advanced settings, and then set the Disable automatic config‑
uration policy to Enabled.
© 1999–2024 Cloud Soware Group, Inc. All rights reserved. 346

Profile Management 2402 LTSR
2. Go to Profile Management > File system > Synchronization.
3. Set the Folders to mirror policy to Enabled, and then add the following folders to the list of
folders to mirror:
• Appdata\Local\Packages
• Appdata\Local\Microsoft\Windows\Caches
Note:
Starting with Citrix Profile Management 1912, a folder added to Default exclusion list –
directories or Exclusion list –directories cannot be synchronized even if you add it to
Folders to mirror. If one of these folders or their parent or ancestor folders are in the
exclusion lists, add it to the Directories to synchronize list.
4. Set the Files to synchronize policy to Enabled, and then add the following file to the list of files
to synchronize.
• Appdata\Local\Microsoft\Windows\UsrClass.dat*
Synchronize profiles eiciently
Insuiciently synchronized user profiles can result in slow logons, losses of user settings, and profile
corruption. It can also need excessive administrative eorts. To synchronize profiles eiciently, follow
the recommendations described in this article.
Folder redirection
Folder redirection is a feature of Microso Windows that you can use with Profile Management. Folder
redirection plays a key role in delivering a successful profile solution.
To use folder redirection, ensure that the relevant users are in the OU that Profile Management man‑
ages. We recommend that you configure folder redirection using a GPO in Active Directory.
For example, you can redirect the following folders by enabling the corresponding policies under User
Configuration > Administrative Templates > Classic Administrative Templates (ADM) > Citrix >
Profile Management > Folder Redirection:
Documents, Pictures, Music, Videos, Favorites, Contacts, Downloads, Links, Searches, and Saved
Games
Note:
• Folder redirection eliminates the need to copy the data in those folders each time users log
on and thus accelerates user logons.
© 1999–2024 Cloud Soware Group, Inc. All rights reserved. 347

Profile Management 2402 LTSR
• We strongly recommend not enabling Folder Redirection for AppData (Roaming) and
Start Menu because it might cause issues in applications and the Start menu.
• Do not redirect the Desktop folder if it is too large. Otherwise, a black screen might occur
when a user logs on.
Include and exclude files and folders
Profile Management lets you specify files and folders that you do not want to synchronize by customiz‑
ing inclusion and exclusion lists. To avoid profile bloat, exclude cache files for third party applications,
for example, Chrome cache files located at Appdata\Local\Google\Chrome\UserData\Default\Cache.
For more information, see Include and exclude items.
Profile streaming
Profile Management fetches files in a profile from the user store to the local computer only when users
access them aer they log on. Doing so speeds up the logon process and reduces the profile size. For
example, if a file is not used, it is never copied to the local profile folder. You can also use the Always
cache policy to impose a lower limit on the size of files that are streamed. Any file this size or larger is
cached locally as soon as possible aer logon.
You can enable both the Enable profile streaming for folders and the Profile streaming policies to
eliminate the need to fetch folders that are not accessed.
© 1999–2024 Cloud Soware Group, Inc. All rights reserved. 348

Profile Management 2402 LTSR
Active Write Back and Registry
This feature decreases logo times compared to the Profile streaming feature, especially when there
are many changed files. This feature synchronizes modified files and folders (but not registry entries)
to the user store during the session, but before logo.
Troubleshooting best practice
Always use the Profile Management configuration checker tool (UPMConfigCheck) to identify
potential configuration errors. For more information on this tool, see Knowledge Center article
CTX132805.
When Profile Management does not work, first validate whether the User Store configured is accessi‑
ble.
Windows 10 Start menu customization
We recommend using a partial lockdown customization layout and deploying the customization
through Group Policy. For more information about customizing the layout of the Start menu, see
https://docs.microsoft.com/en‑us/windows‑hardware/customize/desktop/customize‑start‑
layout.
Improve user logon performance
August 6, 2024
Profile Management provides various policies to improve user logon performance. Examples include
the Streamed user profiles, Accelerate folder mirroring, and Profile container policies. These poli‑
cies are helpful in scenarios where user profiles keep growing with daily use.
This section provides two Profile Management solutions that let you improve user logon perfor‑
mance.
Enable streamed profiles and accelerate folder mirroring
Aer deploying the user store in your environment, enable the following policies to improve user lo‑
gon performance:
1. Go to Profile Management > Streamed user profiles, and then enable Profile streaming and
Enable profile streaming for folders.
© 1999–2024 Cloud Soware Group, Inc. All rights reserved. 349

Profile Management 2402 LTSR
2. Go to Profile Management > File system, and then enable Accelerate folder mirroring.
Enable the profile container for the full profile
You can deploy the VHDX‑based Citrix profile solution (called profile container) to improve logon per‑
formance. Those VHDX files are dynamically attached on user logons.
To deploy the VHDX‑based solution, enable the profile container to store the full user profile as fol‑
lows:
1. Go to Profile Management > Profile container settings.
2. Enable Profile container and enter an asterisk (*) to the profile container list.
Performance comparisons
We recommend the preceding solutions based on our tests with a typical user profile. For more infor‑
mation, see Knowledge Center article CTX463658. As shown in the following tables, user logon and
logo times dropped significantly aer we deployed either solution.
Test results of enabling the Streamed user profiles and Accelerating folder mirroring policies:
Parameters Before Aer
Logon time / Total logon time 53.81 s / 56.48 s 1.80 s / 4.45 s
Logo time / Total logo time 42.49 s / 43.67 s 5.62 s / 6.89 s
Test results of enabling the Profile container policy for the full profile:
Parameters Before Aer
Logon time / Total logon time 53.81 s / 56.48 s 2.66 s / 5.26 s
Logo time / Total logo time 42.49 s / 43.67 s 3.63 s / 4.99 s
Save storage space using file deduplication
August 6, 2024
© 1999–2024 Cloud Soware Group, Inc. All rights reserved. 350

Profile Management 2402 LTSR
Identical files can exist in various user profiles in the user store. For example, dierent users download
the same file or install the same soware into their user profiles. With the File deduplication policy,
Profile Management moves duplicate instances of files from the user store to a central location (called
shared store) and deletes the other. Therefore, your storage cost is reduced.
Prerequisites
To enable file deduplication, make sure that you:
• Use %username% or #samaccountname# in the Path to user store setting so that the shared
store can be created automatically.
• Install Citrix Profile Management version 2209 or later.
Enable and configure the File deduplication policy
Take the Workspace Environment Management (WEM) web console for an example. To enable and
configure file deduplication using the console, follow these steps:
1. Go to Profiles > Profile Management Settings > File deduplication.
2. Select Enable file inclusions and specify files to deduplicate. If needed, select Enable file ex‑
clusions and specify files to exclude from the included files. See Enable file deduplication for
more details.
We recommend deduplicating only files that change infrequently, such as:
• Program files that users install:
AppData\Local\Microsoft\Teams\*.exe, AppData\Local\Microsoft\
Teams\*.dll, AppData\Local\Microsoft\OneDrive\*.exe, AppData\Local\
Microsoft\OneDrive\*.dll
• Installer or image files that users download:
Downloads\*.exe, Downloads\*.msi, Downloads\*.iso
We don
’
t recommend deduplicating the following files:
• Documents that users might edit frequently:
Documents\*.elsx, Documents\*.docx
• Data files that might change frequently:
AppData\Local\*.dat
© 1999–2024 Cloud Soware Group, Inc. All rights reserved. 351

Profile Management 2402 LTSR
Note:
The eect of file deduplication can vary with the user environments and the files you specify for
deduplication. We recommend customizing file settings based on the actual situations.
Change permission settings
When creating the shared store folder, Profile Management grants the folder to the following princi‑
pals:
• Domain computers (with Full control access)
• Domain users (with Read access)
With these default permission settings, file deduplication works only on domain‑joined machines. For
it to work on non‑domain‑joined machines, you must assign those machines with a user account that
has Full control access to the shared store folder. Detailed steps are as follows:
1. On the shared store server, grant a user account (for example, admin0) Full control access to
the shared store folder.
2. On each VDA, add a Windows credential for the admin0 user account to sign in to the shared
store folder. To do so, use Windows Credential Manager or Workspace Environment Manage‑
ment. See the procedures described in Enable credential‑based access to user stores for details.
3. (Optional) On the shared store server, locate the shared store folder and remove the permission
entry for domain computers.
Support for data changes to deduplicated files
This feature can handle data changes to deduplicated files. For example, two users install soware
XYZ version 1 and you include it for file deduplication. Later, one user upgrades to version 2, Profile
Management creates a new version of files in the shared store. When the other user also upgrades to
version 2, Profile Management deletes the old version files.
Enable roaming for the new Microso Teams
August 29, 2024
This article provides guidance on how to enable roaming for the new Microso Teams (version 2.1
or later) using Profile Management. The process varies depending on the installer type that you
choose:
© 1999–2024 Cloud Soware Group, Inc. All rights reserved. 352

Profile Management 2402 LTSR
• Install and configure using the per‑machine installer
• Install and configure using the per‑user installer
Install and configure using the per‑machine installer
Requirement: Profile Management version 2402 or later.
As an administrator, follow these steps to create the machines:
1. Install the new Microso Teams using the per‑machine installer on the master image.
For more information about the installation, see this Microso article.
2. Install the Profile Management version 2402 or later on the master image.
3. Create the machines using the master image.
4. Configure required settings for Microso Teams roaming to take eect.
Install and configure using the per‑user installer
Requirement: Profile Management version 2308 or later.
As an administrator, follow these steps to prepare the machines:
1. Upgrade Profile Management to version 2308 or later.
2. Verify that the profile roaming feature functions correctly for users.
3. Enable the Enable UWP apps roaming policy. For more information, see Enable UWP app roam‑
ing.
4. Configure required settings for Microso Teams roaming to take eect.
As a user who wants to use the new Microso Teams on multiple machines, you need to install the
new Microso Teams only on one of those machines:
1. Log on to a machine.
2. Install the new Microso Teams using the per‑user installer.
Profile Management captures the installed Microso Teams and containerizes it. When you log
on to a dierent machine, Profile Management automatically mounts the Microso Teams con‑
tainer to that machine.
Configure required settings
Both file‑based and container‑based profile solutions support roaming on the new Microso Teams.
For the roaming to take eect, complete the following required settings accordingly:
© 1999–2024 Cloud Soware Group, Inc. All rights reserved. 353

Profile Management 2402 LTSR
• Required settings for the file‑based profile solution
• Required settings for the container‑based profile solution
Required settings for the file‑based profile solution
Perform the following required settings for the Microso Teams roaming to take eect:
1. Add the following folders to the Folders to mirror policy:
• AppData\Roaming\Microsoft\Windows\Cookies
• AppData\Local\Microsoft\Windows\INetCookies
• AppData\Local\Microsoft\Windows\WebCache
• AppData\Local\Microsoft\Vault
• AppData\Local\Microsoft\Windows\Caches
• AppData\Local\Packages
2. If the Accelerate folder mirroring policy is disabled, follow Microso’s recommendations to
exclude folders.
3. If Accelerate folder mirroring policy enabled, configure the exclusion list with the following
considerations:
• Don’t follow Microso’s recommendations to exclude folders.
• Ensure that no foldersunder AppData\Local\Packages\MSTeams_8wekyb3d8bbwe
are in the exclusion list if AppData\Local\Packages or AppData\Local\
Packages\MSTeams_8wekyb3d8bbwe is included in the Folders to mirror policy.
• Check the Microso Teams troubleshooting guide ‑ Step 3: Check whether you have the
Read permission to access all the following directories in the AppData folder. Ensure that
all folders in the list, except those folders under AppData\LocalLow, aren’t included in
the exclusion list. (Note: Youcan decide whether to include AppData\LocalLow folders
in the exclusion list).
4. Add the following folders to the Profile streaming exclusion list ‑ directories policy:
• AppData\Local\Packages\MSTeams_8wekyb3d8bbwe\AC
• AppData\Local\Packages\MSTeams_8wekyb3d8bbwe\AppData
• AppData\Local\Packages\MSTeams_8wekyb3d8bbwe\LocalCache
• AppData\Local\Packages\MSTeams_8wekyb3d8bbwe\LocalState
• AppData\Local\Packages\MSTeams_8wekyb3d8bbwe\RoamingState
• AppData\Local\Packages\MSTeams_8wekyb3d8bbwe\Settings
• AppData\Local\Packages\MSTeams_8wekyb3d8bbwe\SystemAppData
• AppData\Local\Packages\MSTeams_8wekyb3d8bbwe\TempState
© 1999–2024 Cloud Soware Group, Inc. All rights reserved. 354

Profile Management 2402 LTSR
5. If the Start menu doesn’t display the new Microso Teams icon (especially on Windows Server
2019 or 2022 and Windows 10), configure the following settings:
• For Windows Server 2022 and Windows 10, add the following path to the exclusion list:
AppData\Local\Packages\Microsoft.Windows.StartMenuExperienceHost_cw5n1h2txyewy
\TempState
• For Windows Server 2019, add the following path to the exclusion list:
AppData\Local\Packages\Microsoft.Windows.ShellExperienceHost_cw5n1h2txyewy
\TempState
• Set the following registry key to 1 (DWORD):
HKCU\Software\Microsoft\Windows\CurrentVersion\ImmersiveShell
\StateStore\ResetCache
6. If the VDA version is earlier than 2402, deploy the following registry key to optimize the new
Microso Teams client. If this registry key is missing, the new Microso Teams client operates
in non‑optimized mode (server‑side rendering).
• Location: HKLM\SOFTWARE\WOW6432Node\Citrix\WebSocketService
• Key (REG_Multi_SZ): ProcessWhitelist
• Value: msedgewebview2.exe
Required settings for the container‑based profile solution
Configure the following required settings for the Microso Teams roaming to take eect:
1. If the Enable local caching for profile containers policy is disabled, configure the exclusion
list with the following considerations:
• Don’t follow Microso’s recommendations to exclude folders. Ensure that no folders un‑
der AppData\Local\Packages\MSTeams_8wekyb3d8bbwe are in the container
exclusion list.
• Check the Microso Teams troubleshooting guide ‑ Step 3: Check whether you have the
Read permission to access all the following directories in the AppData folder. Ensure that
all folders in the list, except those under AppData\LocalLow, aren’t included in the
container exclusion list. (Note: You can decide whether to include AppData\LocalLow
folders in the container exclusion list).
2. If the Enable local caching for profile containers policy is enabled, follow these steps:
a) Follow Microso’s recommendations to exclude folders.
© 1999–2024 Cloud Soware Group, Inc. All rights reserved. 355

Profile Management 2402 LTSR
b) Add the following folders to the Folders to mirror policy:
• AppData\Roaming\Microsoft\Windows\Cookies
• AppData\Local\Microsoft\Windows\INetCookies
• AppData\Local\Microsoft\Windows\WebCache
• AppData\Local\Microsoft\Vault
• AppData\Local\Microsoft\Windows\Caches
• AppData\Local\Packages
3. If the Start menu doesn’t display the new Microso Teams icon (especially on Windows Server
2019 or 2022 and Windows 10), configure the following settings:
• For Windows Server 2022 and Windows 10, add the following path to the exclusion list:
AppData\Local\Packages\Microsoft.Windows.StartMenuExperienceHost_cw5n1h2txyewy
\TempState
• For Windows Server 2019, add the following path to the exclusion list:
AppData\Local\Packages\Microsoft.Windows.ShellExperienceHost_cw5n1h2txyewy
\TempState
• Set the following registry key to 1 (DWORD):
HKCU\Software\Microsoft\Windows\CurrentVersion\ImmersiveShell
\StateStore\ResetCache
4. If the VDA version is earlier than 2402, we recommend deploying the following registry key to
optimize the new Microso Teams client. If this registry key is missing, the new Microso Teams
client operates in non‑optimized mode (server‑side rendering).
• Location: HKLM\SOFTWARE\WOW6432Node\Citrix\WebSocketService
• Key (REG_Multi_SZ): ProcessWhitelist
• Value: msedgewebview2.exe
Glossary
August 6, 2024
This article lists terms and definitions used in the Profile Management soware and documentation.
Profile‑related terms used in other Citrix soware are also included. To understand other concepts
relating to Windows user profiles, visit the Microso website.
© 1999–2024 Cloud Soware Group, Inc. All rights reserved. 356

Profile Management 2402 LTSR
Term Definition
Base platform See cross‑platform settings store.
Base profile The base profile is defined by a UNC path to a
profile in the user store. If the cross‑platform
settings feature is used, registry settings and
files that can be shared across platforms from a
subset of the base profile. This subset is copied
to the cross‑platform settings store, and, from
there, they are added to the profile used as the
target for migration or roaming. Although the
cross‑platform settings store contains a subset
of the base profile, this (and the target profile) is
always stored as complete profiles. And it can, if
necessary, be used as standard Windows
roaming or local profiles. Note however that if
the streamed user profiles feature is used, the
base profile might temporarily be incomplete.
Some files might exist in the pending area until
the user logs o. See roam for considerations
when defining base profiles in roaming
scenarios.
Cache The terms cache and synchronize refer to the act
of downloading files from the user store, or
uploading to it. The term fetch is more specific
and refers to how the streamed user profiles
feature downloads, anytime aer logon when
the user needs them, a subset of files from the
user store.
© 1999–2024 Cloud Soware Group, Inc. All rights reserved. 357

Profile Management 2402 LTSR
Term Definition
Citrix mandatory profile, Citrix roaming profile,
Citrix user profile
Citrix user profile is the general term for the
profile that a user receives when Profile
Management is installed and enabled. There are
two types of Citrix user profiles: Citrix roaming
profiles and Citrix mandatory profiles. A Citrix
roaming profile is the standard collection of files,
folders, and registry settings that users
customize in their day‑to‑day work, that are
saved in the user store at logo, and that are
treated by Profile Management policies. A Citrix
mandatory profile is similar to a Citrix roaming
profile in how Profile Management treats them.
But no changes are saved in the user store at
logo. At logons, a fresh copy of the mandatory
profile is loaded. Citrix user profiles are dierent
from Microso local, Microso roaming, or
Microso mandatory profiles.
Computer As used in these Profile Management topics, the
general term computer can refer to any machine
on which the Citrix Profile Management Service
is installed. It can be a user device, virtual
desktop (possibly provisioned from a Citrix
Virtual Desktops virtual machine), or a Citrix
virtual apps server that hosts published
applications.
Cross‑platform definition file This file is an .xml file supplied with Profile
Management that contains the information
needed to make the cross‑platform settings
feature work. There is one file per supported
application.
Cross‑platform settings store This location, which is separate from the user
store, holds the settings for supported
applications once the cross‑platform settings
feature is configured. Choose which platform’s
profile data is used to seed the cross‑platform
settings store. It is the base platform.
Fetch See cache.
© 1999–2024 Cloud Soware Group, Inc. All rights reserved. 358

Profile Management 2402 LTSR
Term Definition
Legacy application A legacy application is a badly behaved one
because it stores settings in a non‑standard
location. It includes systems that store
temporary application data in user profiles and,
by doing so, create profile bloat.
Migrate Migration is the planned, one‑way movement of
profiles from one platform to another (for
example, from Windows XP to Windows 7).
Profile bloat Windows user profiles can increase in size when
temporary files are not deleted. It causes slow
logons and is referred to as profile bloat.
Roam Roaming is the use of dierent base profiles
from multiple computers or sessions (for
example, one base profile for a computer
running Windows 2008 R2 and a second one for
Windows 7). Users roam when they connect back
and forth between computers or sessions that
have dierent base profiles. Depending on how
you configure your Organizational Units (OUs), a
base profile can be shared across platforms. For
example, both Windows 2008 R2 and Windows 7
OUs can use the same profile. In this case, users
do not roam because the same base profile is
shared. Base profiles can only be shared by
operating systems with the same profile version
(Version 1 or Version 2 profiles). Users always
roam when both Version 1 and Version 2 profiles
are active.
Synchronize See cache.
User store The user store is the central, network location for
storing Citrix user profiles. See also
cross‑platform settings store.
© 1999–2024 Cloud Soware Group, Inc. All rights reserved. 359

Term Definition
vDisk, Personal vDisk A vDisk is a virtual disk created from a master
image by Citrix Provisioning Services. A Personal
vDisk is a disk used by Citrix virtual desktops to
store profiles, user‑installed and departmental
applications, and user data. Personal vDisks are
separate from the disks used for the operating
system, registry, and base applications.
Version 1 profile, Version 2 profile Profiles in Microso Windows XP and Windows
Server 2003 are known as Version 1 profiles.
Those profiles in Windows Vista, Windows 7,
Windows Server 2008, and Windows Server 2008
R2 are known as Version 2 profiles. Version 1 and
Version 2 profiles have dierent namespaces,
which aects some aspects of their
configuration.

Profile Management 2402 LTSR
© 2024 Cloud Soware Group, Inc. All rights reserved. Cloud Soware Group, the Cloud Soware Group logo, and other
marks appearing herein are property of Cloud Soware Group, Inc. and/or one or more of its subsidiaries, and may be
registered with the U.S. Patent and Trademark Oice and in other countries. All other marks are the property of their
respective owner(s).
© 1999–2024 Cloud Soware Group, Inc. All rights reserved. 361
