
DCPDS Guide
For
Managers/Supervisors
People First, Mission Always
Published by the National Guard Bureau Office of Technician Personnel
This page intentionally left blank
DCPDS Reference Guide for Managers/Supervisors
Table of Contents
Topic Page
Section One – General Information
1. Logging into DCPDS 1
2. Setting up Favorites 4
3. Changing Responsibility 5
4. How to Exit from DCPDS 6
5. Navigating within DCPDS 7
-Navigator Window 7
-How the Navigation List is Used 8
-Expanding and Collapsing Headings 8
-Starting a Task from the Navigation List 8
6. The Top Ten List 9
-The Navigation Top Ten List 9
-How to Add Items to Your Top Ten List 9
7. The Toolbar 10
8. List of Values 10
9. Keyboard Shortcuts 11
10. Queries 11
Section Two – Processing the Request for Personnel Action
1. Introduction 12
2. Mass Actions 12
3. Terms 12
4. Step-By-Step Instructions for Initiating a Request for Personnel Action (RPA) 12
5. After the Action is Processed 13
6. Types of Personnel Actions 13
7. Descriptions and Instructions for Different Types of Actions 14
-Award/One Time Payment 14
-Change Actions: Change in Hours 15
-Change Actions: Change in Work Schedule 15
-Change Actions: Name Change 16
-Details 16
-Extension of NTE 16
-Non Pay/Non Duty Status 17
-Position Actions: Establish Position 17
-Position Actions: Position Review 18
-Reassignment 18
-Recruit/Fill 19
-Return to Duty (RTD) 19
-Salary Change: Denial of WRI 20
-Salary Change: Locality Pay 20
-Salary Change: Other Pay 20
-Salary Change: Pay Adjustment 20
-Salary Change: Promotion 21
-Salary Change: Irregular Performance Pay (Quality Step Increase (QSI)) 21
-Salary Change: Termination of Grade Retention 21
-Separation 22
8. Initiating a Request for Personnel Action 22
-Accessing the Request for Personnel Action 22
-Request for Personnel Action Windows 22
-Types of Data Fields 23
9. Attaching a Note to the RPA 27
10. Saving your RPA 28
11. Routing your RPA 29
-The Routing Window 29
-Refreshing your Inbox after Routing 32
12. Tracking an RPA 32
13. Accessing the RPA 32
14. Tracking History 33
15. Printing an RPA or NPA 34
16. Attaching Documents or Comments to an RPA 35
17. Accessing the Request for Personnel Action 35
18. Steps for Attaching a Document or Comment 36
19. Adding a Comment (Long or Short Text) 37
20. Attaching a File 38
21. Viewing and Printing an Attachment 40
22. Deleting an Attachment 41
Section Three – Inboxes
1. Workflow Inbox 42
-Displaying an RPA using the Workflow Inbox 42
-Inbox Views 44
-Closed Actions 45
-Sorting Actions in the Workflow Inbox 46
-Searching the Workflow Inbox 47
-The Simple Search Window 48
-Personalizing Inbox Views 50
2. Civilian Inbox 55
-Displaying the RPA using the Civilian Inbox 55
-Viewing Closed Actions 56
-Searching the Civilian Inbox 56
-Sorting the Civilian Inbox 57
-The Notifications Window 58
-Customizing the Civilian Inbox 58
-Using Folder Tools 59
-Saving a Folder View 60
Sept 2009
1
Section One – General Information
Logging into DCPDS
Step
Action
1
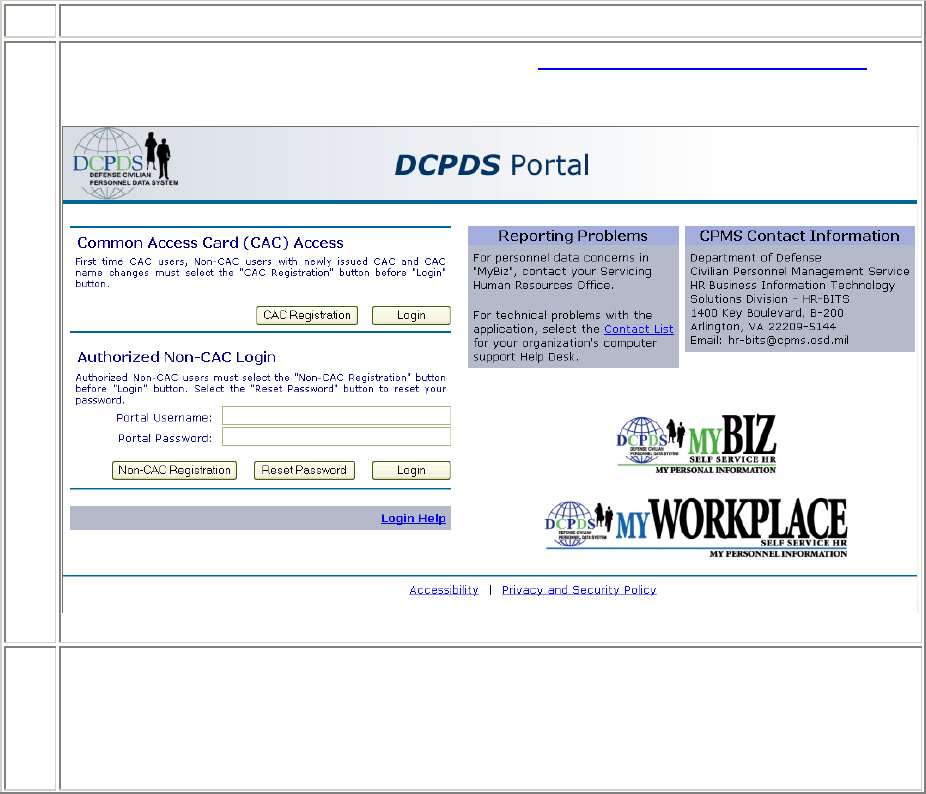
Open your Internet Explorer. Enter the web site: https://compo.dcpds.cpms.osd.mil.
Click “OK” on the DOD Notice and Consent banner page. This will take you to the
DCPDS Portal window. Click the Login Button.
2
You should then receive a window that contains your CAC certificates. Make sure you
select the certificate that is not your E-Mail certificate. You will then have to enter your
CAC PIN. You will then receive the “Accessing your Database” window. Select “NGB
Region”.
Sept 2009
2
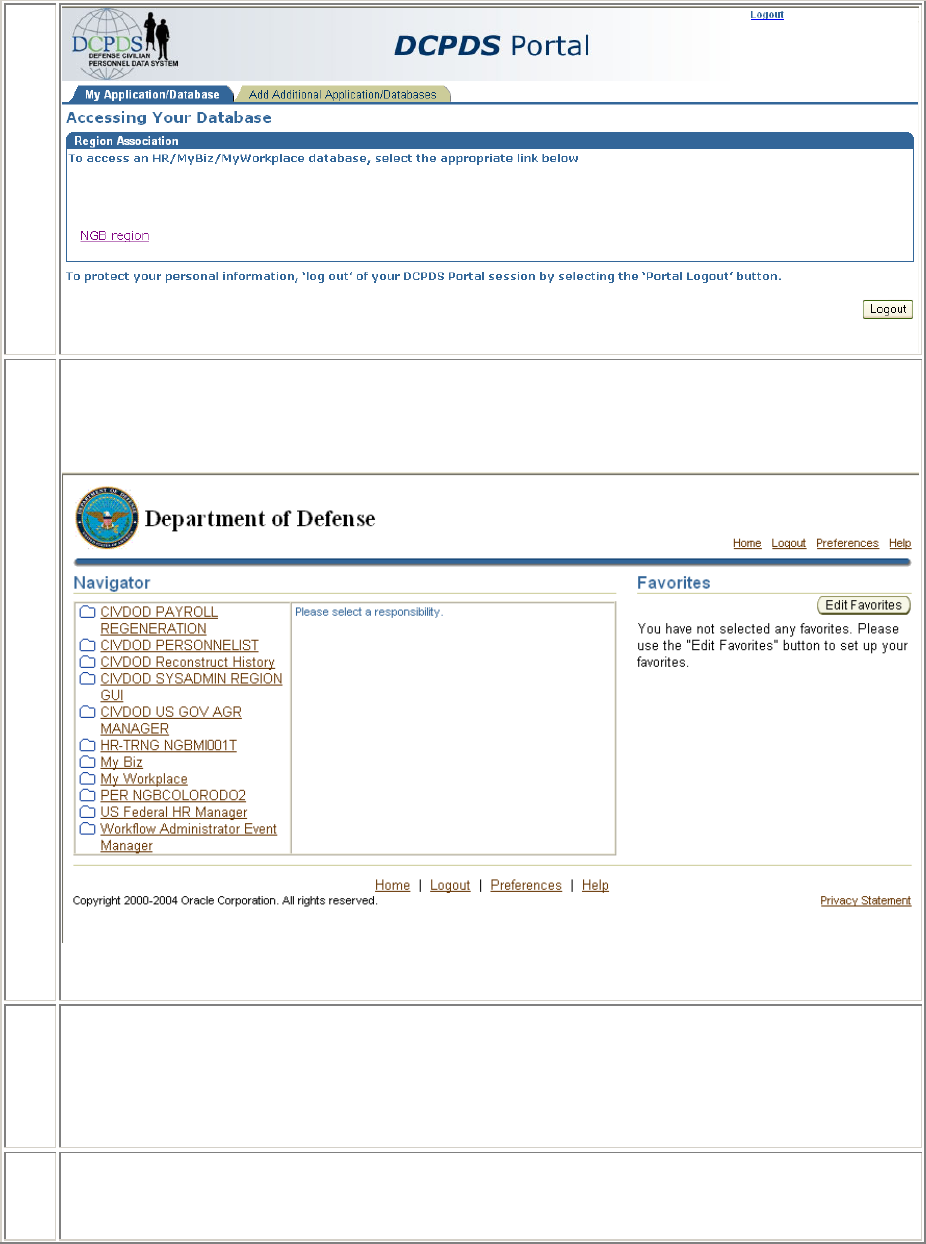
3
The Navigator window displays. On the left side of this window is your DCPDS
responsibility – for most users, this will be a “secure user ID” which is what DCPDS
uses to control access to records.
4
Click on the responsibility.
Some users may have more than one responsibility, in which case they will each be
listed here, and you select the one needed to perform whatever function you need to do
in DCPDS.
5
The center section of the Navigator screen will populate with the tasks appropriate for
the responsibility you select.

Sept 2009
3
On the right side of the Navigator window there's a place for you to set up "favorites" if
you want to (this is optional). See Favorites, below, for instructions.
6
Once you have selected a task, the Oracle Applications 11i Java Applet window opens
briefly, then (depending on what you selected – this does not apply to the Workflow
Inbox) the regular Navigator menu will open in a new window, with the selected task
window opening next.

Sept 2009
4
Setting up Favorites
If you want to set up a “favorites” list on the new navigator, follow the steps below. This is an
optional step, but it can be handy if you perform certain tasks in DCPDS repeatedly (it saves you
from having to scroll through the entire navigator list). Note, if you have more than one
responsibility, you can set up a separate favorites list for each.
Step
Action
1
On the new navigator screen, click the <Edit Favorites> button.
2
On the “Customize Favorites Portlet” window, select the responsibility (if you have more
than one), select the task you want to move onto the favorites list, and click the right arrow
to move it over. Repeat to add additional items to the list. When you’re done, click the
<Apply> button.
1. Select
Responsibility
from the LOV
2. Select the
functions you want
to add
3. When finished,
Click the “Add”
button
4. When finished,
click the “Apply”
button
Responsibility from
the LOV

Sept 2009
5
Changing Responsibility
In most circumstances, a user may have more than one responsibility. If you have more than one
responsibility assigned to your user ID, you can switch to another responsibility without exiting
DCPDS and logging on again.
Step
Action
1
Return to the Navigator window by closing any open windows to return to the
Navigator window.
2
Now that you are in the Navigator Window, click the Switch Responsibility icon (the
top hat) on the Toolbar.
3
Select the responsibility you wish to switch to, and then click <OK>.
The Navigator Window title and contents will now reflect the new responsibility.
Sept 2009
6
How to Exit from DCPDS
When you are done working in DCPDS:
Step
Action
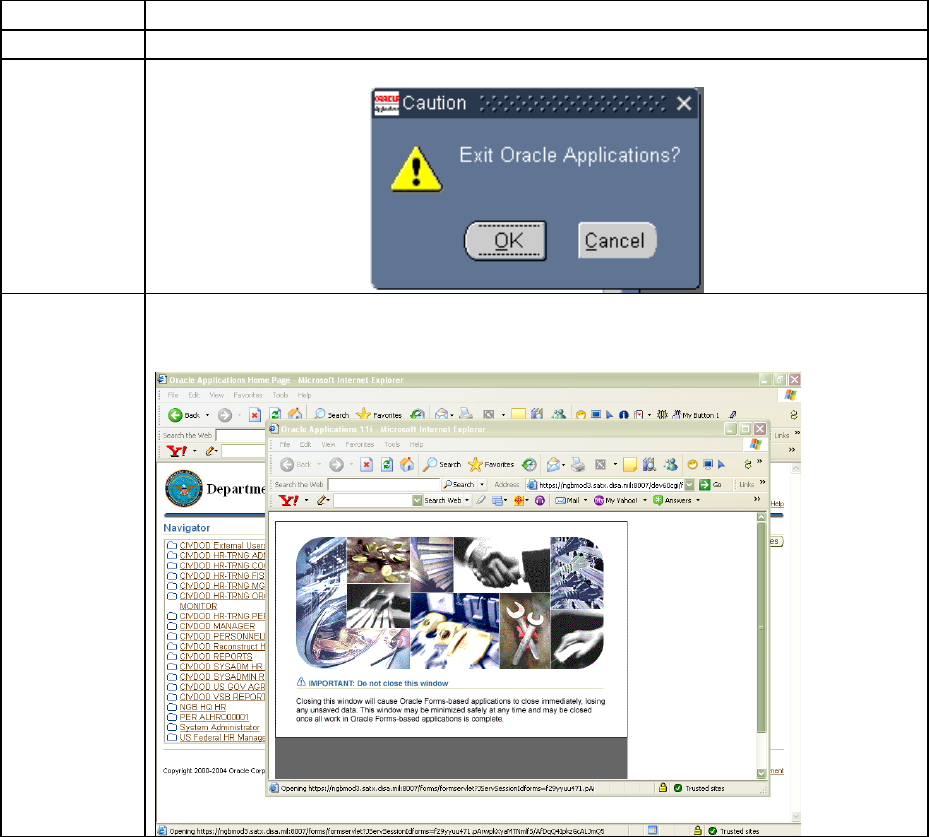
1
Click File
Exit Oracle Applications from the main menu.
2
Click <OK> on the prompt window asking, "Exit Oracle Application?"
3
Close any other windows that were opened during your session (using the
Close Window control button). These may include:

Sept 2009
7
Navigating Within DCPDS
Navigator Window
The Navigator window displays the menu of categories and tasks you can perform in DCPDS,
based on the responsibilities you have been assigned (a supervisor or manager has a somewhat
different list than a personnelist, for instance).
If you have been assigned more than one responsibility, the Navigator menu will be for the
responsibility you selected in the Responsibilities window when you logged on (each
responsibility has a different menu).
At the top of the Navigator Window you will see the name of the responsibility to which you
have logged on (e.g., "MGRALHRO00001).
Illustration
Below is a typical Navigator menu which is displayed if you log on under a
supervisor or manager responsibility (actual items shown on the navigator
will vary depending on your role):
Toolbar
Current Responsibility
Expand and Collapse
Sept 2009
8
How the Navigation List is used
The Navigator menu contains two types of entries: headings and tasks. The tasks are the actual
operations that you can perform (for example, initiate a request for Award). Headings are used to
organize tasks into various categories, and are similar to the hierarchy of a file system, with main
headings and subheadings. Headings and subheadings can be recognized because they have a
plus (+) or minus (-) sign in front of them; every heading and subheading has at least one task
associated with it.
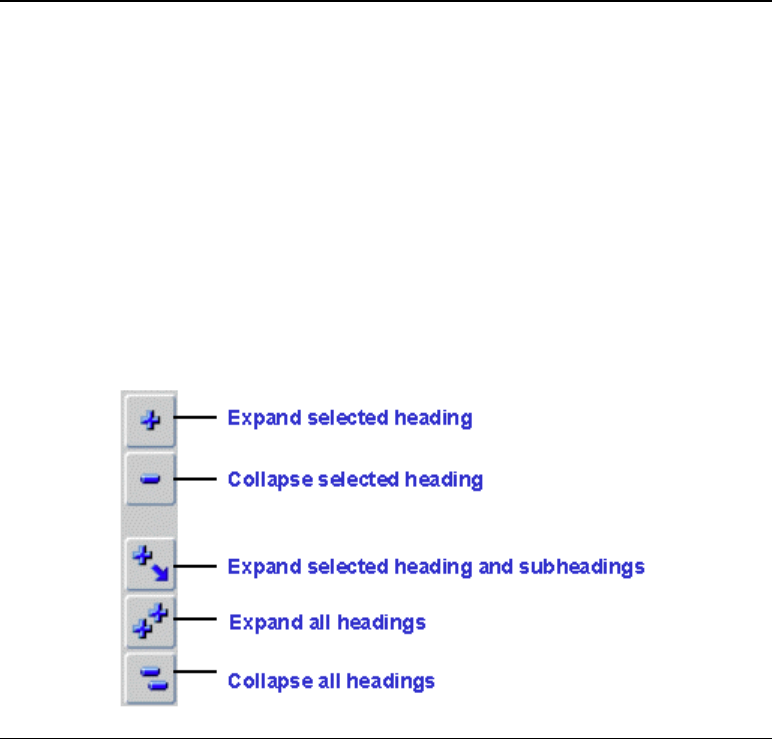
Expanding and Collapsing Headings
Upon logging on, you will see a combination of headings and tasks on the Navigator menu. You
can expand headings that begin with a plus sign (+) to display tasks and additional subheadings
(if there are any).
Subheadings will display indented below the items from which they are expanded.
When a heading has been expanded, a minus sign (-) will display next to it.
Once a heading is expanded, you can collapse it again to see only the main category heading
and thus view a shorter list.
Items with no plus or minus sign are tasks and cannot be expanded or collapsed.
Starting a Task from the Navigation List
To start a task from the Navigator menu ("tasks" are the items that don’t have a plus or minus
sign next to them):
Click the task on the navigation list you need to use, then click <Open>, or
Double-click the task.

Sept 2009
9
The Top Ten List
The Navigation Top Ten List
To quickly find and open menu items that you use frequently, you can create your own "Top
Ten" list. The Top Ten List you create will be located on the right side of the Navigator Window.
To start a task from your top ten list, press the number key on your keyboard that
corresponds with the Top Ten List number of the item you want to open. For instance, to
submit a report request, click the [2] key on the keyboard. You can also double-click the
item from the top ten list or click it once (select it), then click the <Open> button.
If you have more than one responsibility, you can create a different Top Ten List for each
responsibility.
How to Add Items to Your Top Ten List
Follow these steps to add items to your top ten list:
Step
Action
1
Click an item from the navigation menu you use frequently.
Top Ten List
Add
Remove

Sept 2009
10
2
Click the <Add> button.
The item is now displayed in the navigation Top Ten List, with
a Top Ten List number beside it. Note: the wording used for an
item on the Top Ten list may vary somewhat from the wording
used on the navigator list.
3
Repeat steps 1 and 2 for the other items you want to put on your
list (up to ten items). You can add or remove items at any time.
To remove an item, select it (click on it) on the top ten list,
then click the <Remove> button.
Each time you log on, your top ten list will be as you left it
when you last exited.
The Toolbar
Many functions in DCPDS can be performed by using the toolbar icons at the top of the screen
(just below the menu bar). Some general points:
Toolbar buttons will vary between screens depending on what functions are available;
also, some may be displayed but "grayed out."
To display the function of a button, move your mouse over it and an identifier will
display briefly.
Toolbar Button Functions
List of Values
Lists of values are embedded in each field for which there is a list, and the list can be accessed
by clicking on the down arrow (or a button containing three dots) at the right side of the field.
Note, the LOV button is not visible until you have actually clicked in the field.
Add record
Save
Find
Change
responsibility
Prin
t
Cut
Copy
Paste
Delete
Edit
Clear record
Attachment
s
Folder tools
Alt Eff
DT
Date Track
Export
Help

Sept 2009
11
Keyboard Shortcuts
Everything that can be done with a mouse, by "pointing and clicking," can also be done using the
keyboard. Keyboard "shortcuts" are alternate ways of performing the same functions available
through the menu and Toolbar keys.
A list of keyboard shortcuts is available through the DCPDS help menu. To access the list, click
Help on the Main Menu Bar, then click Keyboard Help. Click <OK> when you are done using
the help screen.
Queries
If you use queries in DCPDS (e.g., to retrieve position records, or find a particular DDF in Extra
Information), use [F11] to start the query function and Ctrl-[F11] to run the query.
List of Values:
Appears when
you click in the
field

Sept 2009
12
Section Two – Processing the Request for Personnel Action
Introduction
The RPA is an interactive electronic form that automates the creating, editing, approving,
coordinating, and tracking of personnel actions. It provides a single, integrated process to
supervisors, managers, personnelists and payroll to manage personnel actions electronically,
coordinate to the appropriate officials, and provide reports.
This module explains how to use the automated RPA to initiate personnel actions.
Mass Actions
DCPDS has the capability to initiate and process the following actions for a group of employees
at once (without using an RPA):
Mass Realignments
In general, data needed for processing mass actions must be provided on a spreadsheet or other
electronic file, external to DCPDS, which is filled out by management and which must meet
certain data standards. For the latest information and assistance on these mass actions, contact
your servicing HRO.
Terms
Term
Description
RPA
Request for Personnel Action (also known as the Standard Form 52).
NPA
Notification of Personnel Action (also known as the Standard Form 50).
NOAC
Nature of Action Code. A code that identifies a specific type of personnel action such as
promotion (702), resignation (317), etc.
Step-By-Step Instructions for Initiating a Request for Personnel Action (RPA)
The steps below take you through the process of initiating a Request for Personnel Action, and
link you to pertinent sections of this Guide (or other references) for more detailed information
about that step.
If your role is one of responding to an RPA (for your concurrence, review, or approval), you will
respond to an RPA routed to you by using one of the inbox selections (Civilian Inbox or
Workflow Inbox) on the Navigator Window (see Inboxes). The steps below are for initiating
an RPA.

Sept 2009
13
For security reasons, DCPDS will not allow you to process or view your own RPA. Also,
the person’s RPA that you are processing cannot be routed to that person for any type of
action.
Step
Action
1
Log into DCPDS (see Logging into DCPDS).
2
Determine what type of personnel action you are requesting. See Types of Personnel
Actions below, which describes the types of actions that can be requested by most users. It
also indicates what to include on the RPA. Although this is usually a straightforward
determination, it can be confusing in some situations; if you have questions, contact your
servicing HRO.
3
Access DCPDS via the DCPDS Portal link. When the Oracle logon screen displays, log in to
DCPDS (see Logging into DCPDS).
4
Initiate the RPA (see Initiating a Request for Personnel Action, below, for more detailed
instructions). Follow the instructions in the Types of Personnel Actions section below to
determine what information to include on the RPA. In all cases, you will need to complete
applicable portions of the requesting office information (Part A).
5
If you want to print a hard copy of the RPA, you should do this before routing the action to
the next user (see Printing an RPA or NPA below) (optional).
6
Route the RPA to the next person in the routing chain (see Routing an RPA, below).
After the Action is Processed
Once a personnel action has been approved and processed (updating the employee record), and
the effective date has arrived (or is past), you will be able to print a Notification of Personnel
Action (NPA) to provide to the employee or have the employee go to their My Biz account to
retrieve their own copy of the completed action. See Printing an RPA or NPA, below.
Types of Personnel Actions
The "Request for Personnel Action" heading on the Navigator menu shows the types of actions
that can be requested by most users with a manager or supervisory level of responsibility.
Although most types of personnel actions are self-explanatory, there are some types of
actions that can be confusing. If you have questions about the correct type of action to
select, contact your servicing HRO.
Below is a snapshot of some of the RPAs you can initiate.

Sept 2009
14
Note: DCPDS does not include an "other" category. If the action you want to request is not
covered, consult your servicing HRO for assistance.
Descriptions and Instructions for Different Types of Actions
Each of the following sections provides definitions of one type or family of personnel action(s),
distinctions between other similar types of actions and what information to include on the RPA.
Actions are in the same sequence as they appear on the Navigator menu (under the
"Request for Personnel Action" heading) for managers/supervisors.
This section is intended to provide general information applicable in most cases. For
assistance in determining the correct type of action to submit, or for other questions,
please contact your HRO.
For instructions on completing the required data elements on the RPA, see Initiating a
Personnel Request below.
Award / One-Time Payment
Use for individual awards for employees (monetary or time off).
Do not use for:
Quality Step Increase (QSI) – use Salary Change: Irregular Performance Pay
Mass awards: contact your HRO for assistance and instructions for submitting mass
awards.

Sept 2009
15
Include on the RPA (always complete Part A):
Employee name in part B.
Award Amount in block 20 (tab 2 - Position)
Use the notepad if you have additional comments about the action (see Attaching a Note to your
RPA).
Change Actions: Change in Hours
Change in hours is used for part time employees only.
Do not use for:
Change in hours for two pay periods or less.
Include on the RPA (always complete Part A):
Employee name in Part B of the RPA.
The new biweekly hours (decimals can be used) (tab 3, block 33).
Use the notepad if you have additional comments about the action (see Attaching a Note to your
RPA).
Change Actions: Change in Work Schedule
Change in work schedule is used to change an employee from full- to part-time or vice-versa, or
some other type of schedule change (intermittent, seasonal, etc).
Do not use for:
Change for only one pay period.
Change in work schedule in conjunction with another action such as a reassignment,
salary change, or recruit/fill, please contact your HRO for the appropriate action to
process.
Include on the RPA (always complete Part A):
Employee name in Part B.
Include the new work schedule (tab 3, block 32). If the change is to other than a full-time
schedule, include the biweekly hours (decimals can be used) (tab 3, block 33).

Sept 2009
16
Use the notepad if you have additional comments about the action (see Attaching a Note to your
RPA).
Change Actions: Name Change
Name Change is used when an employee changes names due to marriage, etc.
Include on the RPA (always complete Part A):
Select the employee using the Social Security number rather than the employee name (on
page 1, part B, block 2). After the employee’s name is retrieved, replace the name with
the NEW name in the name block.
Use the Notepad (see Attaching a Note to your RPA) to verify that the employee has notified
the Social Security Administration of the name change.
Details
Use to initiate a detail for an employee, extend a detail, or terminate a detail. A detail is the
assignment of an employee to a different position (or to a set of duties) for a short period of time
without any change in grade or pay.
A Notification of Personnel Action (SF50) will not produce for a detail. If documentation
is needed, the Request for Personnel Action (RPA) is printed out and filed in the
employee’s OPF. Detail actions will not flow to payroll.
Include on the RPA (always complete Part A):
Enter the employee name in Part B of the RPA.
Use the Notepad (see Attaching a Note to your RPA) to indicate the nature of the detail
and the type of position to which the employee is being detailed.
Extension of NTE
Used for any of the following types of extensions of temporary actions:
Extension of a temporary appointment (NOA 760)
Extension of a term appointment (NOA 765)
Extension of a temporary promotion (NOA 769)
Extension of LWOP (NOA 773)

Sept 2009
17
Do not use for:
Initiating a furlough or LWOP action, see Non pay / Non Duty Status below.
Extending a detail; see Details above.
Include on the RPA (always complete Part A):
Employee name in Part B of the RPA.
In Block 5-A you must select the appropriate NOAC from the List of Values (LOV) and
then enter the NTE date of the extension.
Non Pay / Non Duty Status
Used for:
Suspensions (placement in nonpay and nonduty status for disciplinary reasons, either
temporarily or indefinite) (NOAs 450 and 452)
Leave without pay (LWOP) (NOA 460)
LWOP-US (leave without pay to serve in the uniformed services) (NOA 473)
Do not use for:
Extensions of LWOP, see Extension of NTE above.
Return to duty actions, see Return to Duty below.
Include on the RPA (always complete Part A):
Include the employee name in Part B of the RPA.
In Block 5-A you must select the appropriate NOAC from the List of Values (LOV). If
the NOAC requires a NTE date make sure that it is entered.
Enter any Remarks that are applicable to the action in the “Remarks” section of the RPA.
Position Actions: Establish Position
Establish position is used to initiate action to create a new position and it can be used to initiate
recruitment for that position.
Do not use for:
If you already have an established position description with an assigned position number,
use the Recruit/Fill RPA.

Sept 2009
18
Include on the RPA:
Complete Part A.
Also check with your state Classifier to see what additional documentation/information will be
needed i.e.,
Position organization and characteristics
Any conditions of employment or similar items that will have an impact on the
recruitment process (need for security clearance, drug testing, travel requirements, etc.).
Position Actions: Position Review
Position review is used to initiate a classification review action for a position that may result in a
noncompetitive reassignment, promotion, or change to lower grade. The RPA is used for
encumbered jobs only. You will generally need to provide a draft job description and proposed
classification with the RPA. Also check with your state Classifier to see if any additional
information is required.
Do not use for:
If you want to conduct a position review of a vacant job, use the Establish Position RPA.
If any resulting personnel action will require competition, use the Establish Position
RPA.
Include on the RPA:
Complete Part A only.
The Position Title (tab 2, block 15) of the position being reviewed.
Reassignment
Use to move an employee from one position to another with no change in grade. This is for non-
competitive movements from one position to another already-established position description
with no change in grade.
Do not use for:
If the action requires competition, use a Recruit/Fill RPA.
If the position to which the employee is being moved has not been established, use
Position Establish or Position Review as appropriate.

Sept 2009
19
Include on the RPA (always complete Part A):
Employee name in Part B.
The Position Title (tab 2, block 15) of the position to which the employee is being
reassigned.
Recruit / Fill
Use to initiate staffing action for a vacant position. This is for a position that is already classified
and has a PD number assigned, and to fill any established position that requires competition.
Do not use for:
Any recruitment action that requires establishment of a position description should be
initiated using the Position Establish RPA.
Include on the RPA:
Complete Part A.
The Position Title (tab 2, block 15) of the position being filled.
Use the Notepad (see Attaching a Note to your RPA) to indicate what position is being
filled, and whether any position data needs to be changed. Also make sure you include any
conditions of employment or similar items that will have an impact on the recruitment
process (need for security clearance, drug testing, travel requirements, etc.).
Return to Duty (RTD)
Used for the following types of actions that return an employee to pay or duty status after a
documented period of nonpay or nonduty status:
Return to Duty (RTD) (from LWOP, LWOP-US, or suspension) (NOA 292)
Do not use for:
Putting an employee on nonpay or nonduty status, see Nonpay/Non Duty Status.
Extending a period of nonpay or nonduty status, see Extension of NTE.
Include on the RPA (always complete Part A):
Employee name in Part B.
In Block 5-A enter the NOAC 292

Sept 2009
20
Salary Change: Denial of WRI
Used to withhold a within-range increase to an employee because of a determination that the
employee's performance is not an acceptable level of competence. Note: This action must be
coordinated with your state HRO office.
Do not use for:
Initiating an adverse action for disciplinary reasons, contact your HRO for advice.
Include on the RPA (always complete Part A):
Employee name in Part B.
Use the notepad to document the reason for the denial (see Attaching a Note to your RPA).
Salary Change: Locality Pay
This type of action is normally initiated at the HRO or in special situations (not by management).
Salary Change: Other Pay
Used to establish, change or terminate one of these specific types of allowance or premium pay
(i.e., Retention Allowance).
Include on the RPA (always complete Part A):
Employee name in Part B.
Use the Notepad to indicate:
The type of allowance or premium pay
The authorized percentage of basic pay
Whether the allowance is being established, changed or terminated.
Salary Change: Pay Adjustment
This type of action is normally initiated at the HRO or in special situations (not by management).

Sept 2009
21
Salary Change: Promotion
Used for the following types of actions when an employee’s salary will be changed but neither
classification of a position description nor recruitment is required:
Promotion (NOA 702), e.g., career ladder promotions and non-competitive re-promotion
Promotion NTE (temporary promotion) (NOA 703)
Do not use for:
If you are requesting that an employee be non-competitively re-promoted due to accretion
of duties, use the Position Review RPA.
If you are requesting an action that requires competition, use the Recruit/Fill RPA.
Include on the RPA (always complete Part A):
Employee name in Part B.
In Block 5-A you must select the appropriate NOAC from the List of Values (LOV). If
the NOAC requires a NTE date make sure that it is entered.
Salary Change: Irregular Performance Pay (Quality Step Increase (QSI)
Used to increase an employee's basic rate of pay through an additional within-range increase for
sustained high quality performance.
Do not use for:
Most other types of award payments see Award/One-Time Payment above.
Include on the RPA (always complete Part A):
Employee name in Part B.
Use the notepad if you have additional comments about the action (see Attaching a Note to your
RPA).
Salary Change: Termination of Grade Retention
This type of action is normally initiated at the HRO or in special situations (not by management).

Sept 2009
22
Separation
Used for all types of separations (listed below). Contact your HRO if you are not sure of the
correct type of separation.
Retirement (Mandatory) (NOA 300)
Retirement (Disability) (NOA 301)
Retirement (Voluntary) (NOA 302)
Retirement (Special Option) (NOA 303)
Retirement in Lieu of Involuntary Action (NOA 304)
Resignation in Lieu of Involuntary Action (NOA 312)
Resignation (NOA 317)
Removal (NOA 330)
Death (NOA 350)
Termination - Appointment in (NOA 352)
Separation - US (NOA 353)
Termination (NOA 357)
Termination During Probation/Trial Period (NOA 385)
Include on the RPA (always complete Part A):
Employee name in Part B.
In Block 5-A you must select the appropriate NOAC from the List of Values (LOV).
For resignations, print out the original RPA, have the resigning employee sign it in part
D, and forward it to your HRO (in addition to completing and routing the electronic
RPA).
For some separations (e.g., resignation), you will need to provide the reason for the
separation. Please use the Notepad (see Attaching a Note to your RPA) to document the
reason for separation as well as the forwarding address of the separating employee.
Initiating a Request for Personnel Action
Accessing the Request for Personnel Action
From the Navigator window, select Request for Personnel Action <Open> Recruit/Fill (or any
of the other types of actions listed under the Request for Personnel Action menu) to display the
RPA. Recruit/Fill is used in this guide as an example.
Request for Personnel Action Windows
The Request for Personnel Action –Page 1 (Requesting Info) window is displayed.

Sept 2009
23
Types of Data Fields
Data fields on the RPA are colored to represent levels of access:
White: you can enter or edit data in these fields.
Gray: you can view data in these fields but not change it.
The RPA is configured based on the type of action you select and your responsibility; different
actions require different types of information. The coloring scheme makes it very easy to
determine what information you are able to include on the RPA – just look for the white fields.
Follow the instructions in the Types of Personnel Actions section above to determine exactly
what information to include on an RPA.
Explanation of Selected Fields on the RPA, p. 1
Data Field
Description/Action
Part A - Requesting Office of RPA – Page 1
1. Actions
Requested
The data field is automatically populated based on the action selected from the
Navigator menu.
Use tabs to move
between pages
Notepad
RPA number is
generated after saving
Taskflow Buttons
Part A information is
needed on all actions

Sept 2009
24
2. Request
Number
Each RPA is assigned an RPA number by DCPDS for identification. The
format is YYMMM / 2-char State Code/ HRO/ 10-Digit sequence number.
The data field number will populate after the first time the RPA is saved.
Example: 09SEPWIHRO0000352692
3. For
Additional
Information
Call
Click the LOV button on the Toolbar for a listing of database names. Enter
reduction criteria when requested (type the last name or the first few letters of
the last name of the individual and click <OK>), click the name from the LOV,
and click <OK>. This should be someone who can address specific questions
about the action. If the phone number is not automatically populated, be sure
to include it.
4. Proposed
Effective
Date
Enter the proposed effective date for this action in the DD-MMM-YYYY
format, i.e., 09-JUN-2001. Hyphens are required and the month is always
capitalized (or you can click the LOV button on the Toolbar and select the
requested effective date from the calendar LOV).
Alternately, click in the “ASAP” box if you want the effective date on this
action to be As Soon As Possible. However, as a general rule, you should
always enter a specific date rather than selecting “ASAP.”
Note: You cannot select both an effective date and the ASAP field. If you do
not check ASAP or enter a date the system date will automatically default to
ASAP.
5. Action
Requested
By
Click the LOV button on the Toolbar for a listing of names given the
responsibility of requesting (it may just be your own). Click the correct name
if there is a list, and click <OK> to automatically populate the data field.
The Request Date field is automatically populated once the Action Requested
By data field is completed. You can change the date by deleting it and typing
in a new date or use the LOV button on the Toolbar to select another month,
day and year.
6. Action
Authorized
By
Click the LOV button on the Toolbar for a listing of names given the role of
authorizing official (it may just be your own), or leave blank if someone else
will be authorizing this action (this field will be grayed out if you do not have
authorizing responsibility).
The Concurrence Date is automatically populated once the Action Authorized
By data field is completed. You can change the date by deleting it and typing
in a new date.
Part B - For Preparation of SF 50 – Page 1
1. Effective
Date (Block
4)
The effective date must always be entered first. Remember, you must never
use the Date Track feature when processing an RPA.

Sept 2009
25
2. Last
Name (Block
1)
Click the LOV button from the Toolbar, click the name from the list displayed,
and click <OK> to automatically populate the data field. Only the names of
your employees are displayed in the LOV.
If you select a name from the LOV, the First Name, Middle Name, Date of
Birth, and Social Security Number data fields will automatically populate on
the RPA.
3. Social
Security
Number
(Block 2)
This is automatically populated based on the Name data field. If desired, you
can select the employee based on the SSN rather than by name (which will
automatically populate the name field). Use the LOV or enter the SSN with
hyphens (999-99-9999).
4. Nature of
Action,
Block 5-A
Select the appropriate NOA from the LOV.
Request for Personnel Action - Page 2 (Position Data)
Enter Position title
exactly as it
appears in the
position

Sept 2009
26
Page 2 Notes:
Employee and SSN fields are automatically populated at the top of each page of the
RPA once a person has been identified with an action (not applicable for a recruit/fill
action since the selectee has not yet been identified).
The From and To Information data fields are automatically populated (or not populated)
based on the action requested.
Request for Personnel Action – Page 3 (Employee and Position Data)
Page 3 Notes:
Information on this page will vary depending on the type of action requested and whether
an employee name or position title has been entered on pages 1 and 2. Otherwise,
initiators do not normally complete these data fields.
Employee and Position
data populate
automatically from the
database

Sept 2009
27
Request for Personnel Action - Page 4 (Remarks and Address)
Page 4 Notes:
Remarks by Requesting Office (Part D): This section is provided to include additional
information about the action; i.e., information needed to process the action
Employee Resignation/ Retirement (Part E): You will provide the information needed
to process a separation action.
Attaching a Note to the RPA
Use the Notepad button on the top of the RPA to access the notepad.

Sept 2009
28
You can use the notepad to write any notes pertinent to the action. Click in the white text
area and begin typing to start a new note. If there is already information in the notes
section (that is, the action was sent to you from someone else who added a note), add
your notes to the bottom. (You do not need to use the <New> or <Append> buttons).
You should include your name and the date with your note so that others reading the note
will know where it came from. Notes accompany the RPA during its routing and are
accessible to anyone who has access to the RPA.
When you receive an RPA routed to you from another user, you should check for
accompanying notes by clicking on the notepad button.
Notes have a limit of 2000 characters. If you need more room, you should include the
information using the "attach document" feature (see Attaching Documents or
Comments to an RPA).
Saving your RPA
When you are done working on the RPA, click the Save icon on the Toolbar to save your RPA
action OR on the menu bar, select File > Save, then proceed with the routing instructions (see
Routing an RPA, below).
Click here and type your
notes/comments. Click <OK> when
done.

Sept 2009
29
Routing an RPA
Once you click on the Save icon on an RPA, a dialog box is displayed.
o Click <Yes> to display the Routing Window (including routing it to your inbox).
o Click <Cancel> to return to the RPA.
o Click <No> to save your action and return to the RPA (without routing it).
The Routing Window
When you click <Yes> on the routing decision window, the Routing window is displayed. This
window gives you several options for processing your RPA.
o You will normally route the RPA from your inbox to another user by using the
"Select Person" option.
o Some of the options in the Routing window may be grayed out, depending on
your role and responsibility. For instance, the "Update HR" selection is only
available to personnelists in the HRO.

Sept 2009
30
Routing Window options are described below. Note: if you want to print a hard copy of the
RPA, you should do this before routing it; see Printing an RPA or NPA.
Routing
To
Description/Function
Select
Routing
List
This option sends the RPA to a pre-determined sequence of recipients. This option
is not used by the National Guard.
Select
Person
This option routes the action to a particular individual, and is the most commonly
used method of routing an RPA.
Click Select Person to display a listing of individuals, then click the correct
individual to whom you want to route the action. If you know the actual User Name
(User ID) of the person, type in the first few letters of the user name (without using
your mouse) to quickly narrow the list. To search by the name or by an embedded
part of the name or User ID, click the Find block at the top of the window and type
some or all of the last or first name surrounded by percent signs (wild cards), then
click the <Find> button at the bottom of the window. If you do not know the User
Name of the person you wish to route it to, please contact your HRO before making
a selection.
Click <OK> to populate the data field on the Routing Window. Then click <OK>
on the Routing Window to actually "send" the action to that person.

Sept 2009
31
Select
Groupbox
This option sends the RPA to a "groupbox" which is an inbox shared by a group of
people. Groupboxes are most commonly used at the HRO, serving as general "in
boxes" for actions coming into the HRO. Often, the last person to review an RPA
before it goes to the HRO will send the action to a designated HRO groupbox.
Click Select Groupbox to display a listing of established groupboxes (contact your
servicing HRO if you are not sure of the correct groupbox to select). Then click the
groupbox and click <OK> to populate the data field on the Routing Window.
Finally, click <OK> on the Routing Window to route the action to the selected
groupbox.
Save and
Hold in
Personal
Inbox
This is the default option; it saves the RPA in your own inbox.
Important: If you are the initiator of an RPA, you should always select this option
before sending the RPA to another user. This will allow you to track and view the
action later. In addition, the RPA must be in your inbox in order to access the
gatekeeper checklist for that action.
You can also select this option if you have not finished working on the RPA action.
You can then access the action from your inbox later and complete it (see Inboxes).
Click <OK> to save the RPA to your Inbox.
o If you are the initiator of the RPA, the system will generate the RPA
number and display it in a window; click <OK> to close this window.
o The RPA that you saved will be accessible in your inbox and a blank
RPA will be on your screen; close the RPA window to return to the
Navigator window or to the inbox (depending on how you accessed the

Sept 2009
32
action).
Update
HR
This procedure is done at the HRO and will generate a Notification of Personnel
Action (SF50) after all authorizations are done and processing is completed.
Interim
Approval,
Approval
These blocks are used by the HRO.
<Cancel>
Click <Cancel> to stop the process and return to the RPA.
<OK>
Click the <OK> button to route the action to the selected user or inbox.
Refreshing Your Inbox After Routing - IMPORTANT
If you are using the Civilian Inbox it is very important that you refresh your inbox after routing
the RPA to another user or groupbox (see Inboxes section for distinctions between the Civilian
Inbox and the Workflow Inbox).
o After you route an RPA that was opened from your Civilian Inbox, you are
returned to your inbox. The action that you routed is still visible even though it is
not technically "your" action anymore. You can still click the <Respond> button,
display the action, even route it again to another user. However, this can cause
system problems.
o If you are using the Workflow inbox, the RPA will not be in your Workflow
inbox after you route the action.
Always remember to refresh your inbox by pushing Ctrl-[F11] on your keyboard when you
return to the civilian inbox after routing an RPA.
Tracking an RPA
Within DCPDS, you can track any RPA that has been in your inbox using the <References>
icon on the Notification Details window, or the <History> taskflow button on the RPA itself.
This process is explained in this section.
Accessing the RPA
To view the RPA history within DCPDS, you must first retrieve the RPA from your inbox. The
procedure for doing this varies somewhat depending on which inbox you are using (see Inboxes
section for distinctions between the Civilian Inbox and the Workflow Inbox).
Sept 2009
33
o Workflow Inbox:
If the RPA is active in your inbox (open), select (click on) the subject link
in the inbox to display the RPA Notifications window. Scroll down and
click the <References> icon to display the RPA history.
If the RPA is closed (not active in your inbox), change views to display
"All Notifications" (click the <Go> button after selecting the "All
Notifications" view). Then select (click on) the subject link in the inbox
to display the RPA Notifications window. Scroll down and click the
<References> icon to display the RPA history.
o Civilian Inbox:
If the RPA is active in your inbox (open), open your inbox, click the
<Open> button to display the Notification Details window. Click the
<References> icon to display the RPA history.
If the RPA is closed (not active in your inbox), un-check the <Display
Only Open Notifications> checkbox at the top of the window, and push
Ctrl-[F11] on your keyboard. Then select the RPA and click the <Open>
button to display the Notification Details window. Click the
<References> icon to display the RPA history.
Tracking History
Clicking the <Routing History> button (on the Notification Details screen) or the <History>
taskflow button at the bottom of the RPA) will show a history of the routing of the RPA – who
initiated the request, who approved it, who reviewed it, etc. You can see the progress of a form
as it is routed, including personal inboxes and groupboxes.
o Be sure to use the scroll bar on the bottom of the window to display additional
routing information.
o No information can be changed in this window. It is for viewing only.
The “Action History” section, shown below, indicates what user(s) have had the action, and
what action they took (if any).

Sept 2009
34
The “Routing History” section, shown below, displays as you scroll to the right. It shows what
user (inbox or groupbox) had the action, and when. The user (or groupbox) shown in the top line
of the routing history is the user who currently has the action.
Printing an RPA or NPA
To print a hard copy of the RPA, click File , Print on the menu bar while the RPA is displayed
on your screen, or click the Print icon on the Toolbar. The Printing window displays.
Most Recent use at
top, oldest at
bottom
Action taken
by each user

Sept 2009
35
o You have the option of printing the Request for Personnel Action (RPA) or the
Notification of Personnel Action (NPA or SF50). However, this latter option is
grayed out until on or after the effective date of a finalized personnel action. In
addition, the option to print the Notification of Personnel Action is only available
using the Civilian Inbox, not the Workflow Inbox (see Inboxes).
o Most users will have a default printer associated with their user ID, which will
display in the Printer block. If no printer name is showing in the "Printer" block,
click in that block to display the list of values and select the printer you want to
use.
o Click <OK> on the Printing Window to begin the print process.
Attaching Documents or Comments to an RPA
This section shows how to attach word documents, spreadsheets, or other computer files
(including lengthy comments) to a Request for Personnel Action (RPA), how to view and/or
print an attached document, and how to delete an attachment.
o This section does not cover attaching a note using the notepad, see Attaching a
Note to the RPA.
Accessing the Request for Personnel Action
You can attach a document or note to an RPA that you are creating, or to an RPA that has
already been created and is in your inbox.
o See Initiating a Request for Personnel Action for instructions for creating an
RPA; you can then use the processes in this section to attach a document to that
RPA.
o See Inboxes for instructions on viewing and acting on an RPA that is in your
inbox (either an RPA that you created and saved to your inbox, or an RPA that

Sept 2009
36
someone else created and sent to you). Use the processes in this section to attach a
document to an RPA once you have opened it. To view an attachment to an RPA
that you have received, see Viewing and Printing an Attachment.
Step for Attaching a Document or Comment
Follow these steps to get started with the attachment process:
Step
Action
1
While the RPA to which you want to attach a document is open on your screen,
click the Attachments icon (the paperclip) on your toolbar.
2
The Attachment Window is displayed:
3
Click the Category data field. Type in the letter "C" or "M" depending on whether
you are going to type in some comments ("C"), or attach a file ("M" --
Miscellaneous). You can also select one of these using the LOV button.
o Comments allows you to enter text and save it with the RPA. This
is similar to using the notepad, but using Comments does not have the
2000-character size limitation of the notepad.
o Miscellaneous is used to attach an existing document from another
application such as Microsoft Word, Excel, etc.
4
Type a description of the information to be attached in the Description data field
Category is Comments or
Miscellaneous

Sept 2009
37
by typing something descriptive, short, specific, and understandable to users, e.g.,
"Job description PD0314," "Org Chart Trng Div," etc.
5
Click the Data Type data field. Then click the LOV button for a listing of data
types that can be attached. Click the data type you want and click <OK>. The most
commonly used data types are:
o File – allows you to attach a Word document, spreadsheet, etc., to
the RPA. When you select this, an Upload File window will open.
Continue at Attaching a File, below.
o Long Text – allows you to type free-form comments similar to
using the notepad, but without the 2000-character limitation of the
notepad. Continue at Adding a Comment, below.
o Short Text – allows you to type free-form comments similar to the
notepad.
Also like the notepad, Short Text has a 2000-character limitation. Continue
at Adding a Comment, below.
Adding a Comment (Long or Short Text)
Click in the large white area and type your comments:

Sept 2009
38
When you are done typing the comments, click the Save button on the toolbar to save the
attachment information. You can then close the attachment window to return to the RPA, or add
another attachment if desired.
Attaching a File
Follow these instructions to attach a file (Word document, Excel spreadsheet, or other computer
file):
Step
Action
1
When you select "File" as the "Data Type" in step 5 above, a File Upload window
displays:

Sept 2009
39
2
Click the <Browse> button and find the file that you want to attach. You will have
access to the same drives and folders that you normally access from your workstation.
After you have selected the file, click the <OK> button on the File Upload window.
3
Once the file has been uploaded, the following message displays:
4
Close the window to return to the Attachment window, and click the <Yes> button on

Sept 2009
40
the decision window:
5
Click the Save button on the toolbar to save the attachment information. You can then
close the Attachment window to return to the RPA, or add another attachment if
desired.
Viewing and Printing an Attachment
Follow the steps below to view or print an attachment to an RPA.
Step
Action
1
To view the attachment(s) to an RPA, click the Attachment icon on the Toolbar (the
RPA must be open on your screen).
Note: You can tell if there is an attachment to an RPA or any other personnel document
by the "paper" in the paper clip Attachment button on the Toolbar.
2
The Attachments Window is displayed. Click on the line containing the attachment you
want to view or print (if there is more than one item).
o For a file, click the <Open Document> button. The file will open in a
separate browser window where you can view or print it.
o Comments will display automatically when you select a "Comment" item.

Sept 2009
41
3
When you are done, close the Attachment window to return to the RPA.
Deleting an Attachment
To delete an attachment to an RPA, follow these steps:
Step
Action
1
Click the Attachment button on the Toolbar (the RPA must be open on your screen).
Note: You can tell if there is an attachment to an RPA or any other personnel document
by the "paper" in the paper clip Attachment button on the Toolbar.
2
The Attachments Window is displayed. Use your scroll bar to locate and click on the
item you want to delete (if there is more than one item).
3
Click the Delete Record button on the toolbar.
4
The following message is displayed. Click the appropriate button.
o Attachment means that you are "un-attaching" the document from the
RPA, but the document itself will still exist. Note: documents attached to RPAs
in DCPDS are saved (stored) on the DCPDS server. When you use the delete
"Attachment" option, the document will still be using space on the server.
o Document and Attachment means that you are both un-attaching the
document and deleting it. This option will remove the document from the
DCPDS server and should normally be used.
5
Click the <Save> icon on the toolbar to save your changes to the Attachment Window.
Sept 2009
42
Section Three –Inboxes
Workflow Inbox
Displaying an RPA using the Workflow Inbox
The "Workflow Inbox" is the Oracle 11i version of the Civilian Inbox on the navigator menu.
Follow these steps to display an RPA from this inbox:
Step
Action
1
Select Workflow Inbox from the Navigator menu (note, if you move this item to your
"Top Ten" List, it will show as Customizable Workflow Worklist).
2
When you select this, your "Worklist" displays in a separate window:
3
When the Workflow inbox displays, click on the underlined link in the subject field
of the inbox for the RPA that you want to work on.
Current View
Clink link to open
RPA

Sept 2009
43
4
This opens the "Notification Details" window. From here, scroll down to the
"Response" area and click on the RPA icon to open the RPA itself (a "Launching
Form" window displays, it will close automatically).
5
The RPA will display in a different window. Review and/or change the RPA as
needed.
6
When you close the RPA (or route it to someone else), you will return to the
Notification Details window (shown in step 4 above). Click on "Return to
Worklist" to return to your inbox (don’t just close this window as this will also close
your inbox).
Use References icon to display
action history or attachments
Use Response icon to display the
RPA
Use Return to Worklist to return
to inbox

Sept 2009
44
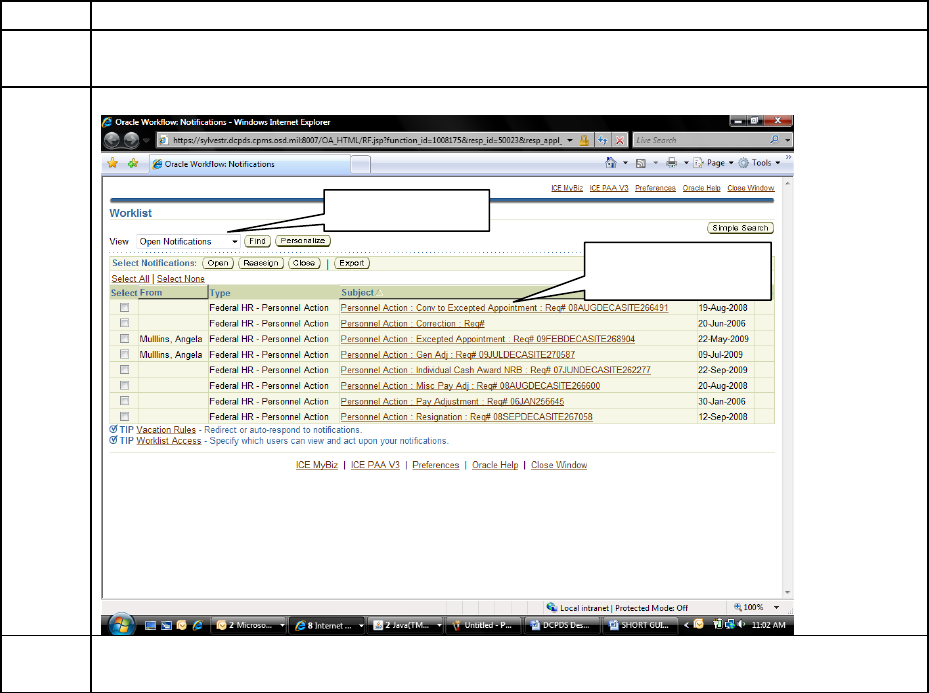
Inbox Views
The Workflow Inbox comes with five standard "views" that you can access by using the drop-
down list to select the one you want, then clicking the <Go> button:
The most commonly used views are "Open Notifications" (the default view) and "All
Notifications" which will display all actions open and closed RPAs in your inbox.
You can create your own views with different columns, sorts, and filtering
criteria.
Use the drop-down list to
change the views, and then
click <Find>

Sept 2009
45
Closed Actions
Use the "All Notifications" view to search for a closed action (one that is no longer open in your
inbox or one that has been completed). If there are lots of actions in your inbox, you will have
links ("Next 25," "Prev 25") that allow you to view additional pages of information. You cannot
actually view a closed RPA from the workflow inbox. You can "open" it to display the
Notifications Details window, but you cannot view or print the RPA form itself.
Use “Next 25” and “Prev25”
to view other pages
Status shows
Open or
Closed

Sept 2009
46
Sorting Actions in the Workflow Inbox
To sort items in your inbox, click on the column heading of the column you want to use for your
sort.
Click on a column
heading to sort inbox
items.

Sept 2009
47
Searching the Workflow Inbox
If you have a lot of actions in your inbox (for example, if you are looking at "All Notifications"
which includes closed actions), you can use "Simple Search" to help locate a specific action.
Begin by clicking the <Simple Search> button on the inbox window:
Simple
Search

Sept 2009
48
The Simple Search Window
On the Simple Search screen, enter your search criteria.
In the "Subject" line, you can search for an RPA number, a type of action (e.g.,
Promotion), or an employee name.
Search criteria is not case sensitive and does not require use of wild cards. To search for
an action for John Smith for example, you can just enter "smith" or "SMITH".
Use the "From" line to search for actions sent to you from another user.
Use the "Sent" line to search for actions sent to you on a specific date.
Once you've entered your search criteria, click the <Go> button. Actions that meet your
search criteria will display.
“Advanced Search" lets you set up more complex search criteria using any of the data
fields used in the Workflow inbox.
Enter search criteria (type of
action, RPA number, name)
then click <Find>

Sept 2009
49
Use advanced search to
set up more complex
search criteria

Sept 2009
50
Personalizing Inbox Views
You can create your own "personalized" views of your inbox which allows you to specify what
columns to display, how the actions should be sorted, and what filtering criteria to use (if any).
Follow these steps to create a custom view:
Step
Action
1
Click the <Personalize> button on the inbox window.
Personalize

Sept 2009
51
2
On the Personal Table Views window, you can create a brand new view using the
<Create View> button, or you can copy an existing view (recommended) by
selecting the view to copy and clicking the <Duplicate> button:
1-Select the
view to
duplicate
2-Click the
<Duplicate>
button

Sept 2009
52
3
Fill out the "General Properties" fields as follows:
View Name: Give your view a new name (this is the name that will display on
the drop-down list of views on the main inbox window).
Number of Rows Displayed: You can specify a different number of rows to
display if desired.
Set as Default: Check the box if you want this to be your default view (the
view that will automatically display when you open the inbox). "Open
Actions" is the standard default. Only one view can be the default.
Description: Optional, add descriptive information if desired.
Check to make this
your default view
Give your view
a name
Add a
description

Sept 2009
53
4
In the "Column Properties" area, you can identify what columns to include in your
view, and what sort order to use.
To add a new column, select (click on) the column from the left side
("Available Columns") and click the right <Move> arrow to add it to the right
side ("Columns Displayed"). To remove a column, select it from the right and
click the left <Remove> arrow.
Use the up- and down-arrows at the right side of the window to change the
left-to-right order of the columns.
To select a column for sorting, select the column from the drop-down list of
columns, then select whether you want it ascending (low to high) or
descending (high to low).
Add to or remove
columns from your
view
Change the order of
your columns

Sept 2009
54
5
You can include filtering criteria if desired. Begin by selecting the column that
will be used for filtering (e.g., use the "Subject" column to filter for a type of
action), then click the <Add Another> button.
6
The screen will re-display with the selected column now available for entering
criteria. Select the type of comparison to be made (is, contains, starts with, ends
with), then enter the comparison value in the adjoining field. For example, to
filter your inbox to show only promotion actions, this section would read Subject
contains Promotion. You can add other data fields to your filtering criteria if
desired by repeating steps 5 and 6.
7
When you are done, click the <Apply> button at the bottom of the window. Your
new view will be available on the list of views for the inbox.
Select a column to
be used for your
filtering criteria click
<Add Another>

Sept 2009
55
Civilian Inbox
The "Civilian Inbox" is the inbox that will display within the Navigator Window. It is the
original inbox view that was created for DCPDS. This inbox will contain the same actions as
the Workflow Inbox, just with a different view.
Displaying the RPA using the Civilian Inbox
Step
Action
1
Select Civilian Inbox from the Navigator menu (note, if you move this item to
your "Top Ten" List, it will show as Civilian Workflow Inbox).
2
The Civilian Inbox will display (called Notifications Summary). It will appear to
be empty -- you need to REFRESH it to display any actions that you may have by
pushing Ctrl-[F11] on your keyboard:
Note: The inbox window is substantially longer than one screen; to see other
columns, use the scroll bar at the bottom of the window to move to the right. You
can customize the display of your Civilian Inbox by rearranging the order of
columns or displaying actions in a different sequence.
To see information
about an RPA, select
it from the list, then
click <Open>
To view an RPA, select it from the
list then click <Respond>
Scroll right to see more
columns
To see actions, un-check
this box and re-query
with Ctrl-[F-11]
Click the folder icon to see
what other inbox views are
available

Sept 2009
56
3
To access a specific action in your inbox, click on it (anywhere on that line) so
that the blue record indicator appears on the left side of the action. If your list is
long, you may need to use the scroll bar on the right side of the inbox window.
To view the action, click the <Respond> button.
To track or view information about the action, click the <Open> button.
Viewing Closed Actions
By default, whenever you open your inbox, you will see only open actions. In order to see closed
actions, click the Query Only Open Notifications block to clear the "X", then push Ctrl-[F11]
on your keyboard to refresh your inbox.
Searching the Civilian Inbox
If you have lots of actions in your inbox (e.g., if you are looking at both open and closed actions)
and want to search for a specific action, use the "Find" function by clicking the Find icon (the
flashlight) or selecting View
Find from the top line menu. The Find window displays:
To see all actions, un-check
this box and re-query with
Ctrl-[F-11]
Use the subject line to
query by type of action
or RPA number
Enter your search
criteria in any of the
fields then click <Find>

Sept 2009
57
Sorting the Civilian Inbox
You can sort the actions in your inbox by any of the first three columns.
If you want to sort on a different column (not one of the first three), you must move that
column to make it one of the first three. By setting up and saving a custom view, you can
also set it up to sort the way you want.
Select Folder
Sort Data from the top line menu. Use the drop-down menu at the right of
any or all three of the columns to select Ascending (low to high) or Descending (high to
low).
Click <OK> to change the sort.
Select Ascending or
Descending for any/all of
these fields then click <OK>
You can sort by any of the
first 3 columns in the inbox

Sept 2009
58
The Notifications Window
The Notifications window provides additional information about the RPA.
You can enter comments that will show in your inbox if desired. These comments are only
for you -- they will not travel with the RPA.
Click <Routing History> icon on the Notifications Window to display the Routing History
Window. This window shows where this action has been, who has had the action, and what
they did with it. This is the same window that displays when you click the <History>
taskflow button at the bottom of an RPA.
Click the <Respond> button to display the actual RPA form itself.
Customizing the Civilian Inbox
You can personalize the appearance of your inbox in a number of ways:
You can specify what columns to show or not show.
You can change the order of columns from left to right.
You can sort the items in different ways.
Click <Respond> to view the
RPA
The Routing History shows
where the action has been
Comments typed here show in
the Comments column of your
inbox

Sept 2009
59
You can expand or shrink the width of columns.
You can save different views with different names.
Using Folder Tools
The folder tools menu lets you change the appearance of your inbox. You can use the Folder
menu or the Folder Tools window that displays when you click the Folder Tools icon.
To change the width of a column, click in the column you want to
change and click the Widen Field or Shrink Field icon (or the
corresponding entries from the Folder menu).
To hide a column, click in the column you want to hide, and click the
Hide Field icon.
To restore a column that you previously hid, click in the column next
to where you want to restore the column, then click the Show Field
icon. This will display a list of hidden columns from which you can
select.
To move columns around (left to right), click in a column and click
the Move Right or Move Left icon. You can do this repeatedly until
the column is located where you want it.

Sept 2009
60
Saving a Folder View
You can save different folder views for various purposes, then the next time you open your
inbox, you can select one of your pre-set views:
Step
Action
1
Once your inbox is set up the way you want it (columns sized and arranged,
sorted, etc.), select Folder
Save As from the menu. The Save Folder
window displays:
2
Make up a descriptive name for the folder view.
3
Select the "Autoquery" choice as follows:
To "Always" for the inbox to auto-populate when the folder is opened.
To "Ask each time" if you want to be prompted to run the query (not
auto-populated).
To "Never" if you never want the inbox to populate when you open this
view (use this if you just want the view to display, with the intention of
running a different query each time you use this view).
4
Select (click) "Open by Default" if you want this view to automatically open
each time you use this folder. You can only have one default view, so if you
make this your default, any former default view will be canceled.
5
Important: Un-check the "Public" box if it is checked – users should
NEVER make their folder views Public (this allows anyone to see this folder
view which could eventually result in thousands of views).
6
Click <OK> to save your new folder view.
The new name of the folder view is now showing next to the folder icon
at the top of the window.
The next time you open your inbox you can retrieve and use this view by
clicking on the folder icon and selecting the view from the list of folders.
If you made this your default view, it will automatically open when you
open your inbox.
Be sure to uncheck the
“Public” check box!
Give your view a descriptive name
Sept 2009
61
