
Oracle Eloqua-Salesforce App
User Guide
©2024 Oracle Corporation. All rights reserved
06-Sep-2024

©2024 Oracle Corporation. All rights reserved
2 of 102
Contents
Salesforce Integration app 4
Supported Salesforce objects 5
Getting started with the app 7
Installing the Salesforce Integration app 8
Configuring connections 10
Creating a connected app 11
Configuring a connection in the Salesforce Integration app 13
Modifying a connection 16
Configuring defaults for a connection 17
Viewing connection errors 19
Creating sample programs 20
Creating step actions 22
Creating campaign actions 27
Creating response actions 33
Copying Salesforce fields into Eloqua 38
Configuring test runs for actions 38
Adding test contacts 39
Running an action with a test payload 40
Excluding the test payload from daily reports 40
Creating imports 41
Scheduling an import 49
Deduplication types 50
Checking email address changes before imports 51
Migrating native Salesforce integration assets 53

©2024 Oracle Corporation. All rights reserved
3 of 102
Adding imports to a canvas 55
Creating campaign imports 58
Creating opportunity imports 62
Creating user imports 69
Creating marketing activity exports 75
Configuring notifications 83
Salesforce Integration app FAQs 85
Using the app in a program or campaign 93
Viewing report data 95
Viewing the global report dashboard 95
Viewing connection errors 97
Viewing imports and exports by target 97
Viewing report data for actions and imports 99
Action report data 100
Import report data 100
Report data for failed actions or imports 102

©2024 Oracle Corporation. All rights reserved
4 of 102
Salesforce Integration app
¤ Tip: If you are using the native Salesforce integration, you can migrate your
assets to the Salesforce Integration app.
The Salesforce Integration app creates an integration between Oracle Eloqua and
Salesforce to send data between the two platforms. Leverage the Salesforce
Integration app in your marketing cloud solution to:
l
Transfer the leads generated from marketing campaigns in Oracle Eloqua into Salesforce so
they are nurtured and synchronized as sales leads.
l
Use the app within a program or campaign canvas to create or update records in supported
Salesforce objects in real time. Typical use cases include lead creation, lead updates, and
contact updates.
l
Schedule imports from Salesforce to Oracle Eloqua for supported Salesforce objects.
You can use the app for various marketing qualification and lead generation use
cases. For example, you can configure a listener step to listen for contacts who
complete a form. Once the contact is added to the program canvas, you may want to
decide to create a lead for the contact. Depending on the next decision, you can
configure this app to either create a new lead or update an existing lead within Oracle
Eloqua.
You can manage user permissions on this app by following the instructions listed here.

©2024 Oracle Corporation. All rights reserved
5 of 102
-Example: A listener step could be configured to listen for contacts who
complete a form. Once the contact is added to the program canvas, you may
want to decide to create a lead for the contact, depending on the next decision,
you can configure this app to either create a new lead or update an existing lead
within Oracle Eloqua.
Supported Salesforce objects
The integration supports bi-directional data flow for all objects available via the
Salesforce API with the following caveats:
l
Objects that are read-only will not be available for use in actions.
l
Objects that are not readable will not be available for use in imports.


©2024 Oracle Corporation. All rights reserved
7 of 102
Getting started with the app
The steps below outline the recommended setup and configuration process for the
Salesforce Integration app.
1. Install the Salesforce Integration app. Once the app is installed, configuration settings for
connections, actions, imports, and notifications can be found in the apps list. Go to Settings
> Apps and click Configure to access the configuration settings.
2. Create a connected app in Salesforce.
3.
Configure one or more connections. Each connection can have multiple connected apps but
only one can be active per connection.
¤ Tip: If you are using the native Salesforce integration, you can migrate your assets
to the Salesforce Integration app.
4. Create actions. Actions are data transactions between Oracle Eloqua and Salesforce.
l
Use step actions to create and update records to be used in a program or campaign.
l
Use campaign actions to send campaign updates from an Oracle Eloqua campaign object to a
custom object in Salesforce. One campaign update action can be active at a time.
l
Use response actions to send data to Salesforce based on response rules configured in your Oracle
Eloqua instance. When a response occurs, Oracle Eloqua records the response based on priority
and the response is sent to Salesforce.
5. Create and schedule imports to import data from Salesforce to Oracle Eloqua periodically.
The Salesforce Integration app executes imports every 15 minutes. If an import needs to be
performed off schedule, it can be executed on demand.

©2024 Oracle Corporation. All rights reserved
8 of 102
l
Use standard imports to import contact record data from Salesforce into Oracle Eloqua. The
following imports are recommended: get leads, get contacts, get accounts.
l
Use campaign imports to import custom object data from Salesforce into Oracle Eloqua
campaigns to allow for bi-directional updates between the two applications.
6. Export Eloqua-generated marketing activities to synchronize data with a Salesforce
connection
7. Setup email notifications to be alerted if there are problems with your imports or actions.
8. Review your reports. The Salesforce Integration app provides reporting on the records being
sent between Eloqua and Salesforce.
9. Use the app in a campaign or program to update or create contact records.
10. Put actions through a test run with pre-configured contacts.
11. Add imports to a canvas to run up to ten post processing actions.
Creating sample programs
Installing the Salesforce Integration app
Z Important: Because deleting or deactivating the installer user account will
impact installed apps, we recommend installing apps using a user account that is
not tied to a specific person. The user account must have customer
administrator rights.
To install the Salesforce Integration app:

©2024 Oracle Corporation. All rights reserved
9 of 102
1. Follow the URL provided.
https://cloudmarketplace.oracle.com/marketplace/app/AppSalesforce
ëNote: If you have IP allowlists enabled, add internal Eloqua IPs to your allowlist .
2. Log in with your Eloqua credentials, if required.
3. Click Accept and Install to add the app to your Apps list.
4. Click Sign In.
5. Confirm your credentials and click Accept to grant permission for the app to communicate
with Eloqua on your behalf.
The app is now installed and can be viewed in your Apps list (Settings > Apps,
under the Platform Extensions section). You can configure your app now or at a later
time.
You can return to the Apps list at any time and view the app description, modify the
configuration settings, reinstall, or uninstall it. You can also check its status and
dependencies.
q Warning: To modify configuration settings, navigate to Apps, select your
app, and click the Configure icon . Selecting the Reinstall icon will force
you to go through the entire configuration process again. The app will be

©2024 Oracle Corporation. All rights reserved
10 of 102
unavailable for all users during the reinstall. All existing assets, configurations
and history are preserved when you reinstall an app. Also, you can choose to
delete an app by clicking the Uninstall . In this case, all current assets,
configurations, and history are permanently deleted.
Configuring connections
You can configure one or more connections and modify connections on the app's
Connections tab.
Prerequisites
l
Install the Salesforce Integration app.
l
Salesforce connected app: Create a connected app in Salesforce so that you can get the
following values to enter when creating a connection:
l
Consumer key: Displayed in the Salesforce connected app after creation.
l
Consumer secret: Displayed in the Salesforce connected app
In this topic, you'll learn about:
l
Creating a connected app
l
Configuring a connection in the Salesforce Integration app
l
Modifying a connection
l
Configuring defaults for a connection
l
Viewing connection errors
l
Creating sample programs

©2024 Oracle Corporation. All rights reserved
11 of 102
Creating a connected app
The following instructions are based on Salesforce Classic. For Lightning Experience
and Classic details, see the Salesforce's connected app documentation.
To create a connected app in Salesforce:
1. Go to https://login.salesforce.com/ and log in to your Salesforce account.
2. From the profile drop-down list, select Setup.
3. In the App Setup section, select Create > Apps. The Apps page is displayed.
4. In the Connected Apps section, click New. The New Connected App page is displayed.
5. Enter the following required values and any optional values if needed:
l
Connected App Name: Enter a descriptive name such as Eloqua Integration.
l
API Name: You can accept the default value or enter a different name.
l
Contact Email: Enter the email address of the user who will manage the connected app.
6. In the API (Enable OAuth Settings) section, select Enable OAuth Settings. Additional
options are displayed. Keep the Require Secret for Web Server Flow option, which is
selected by default.
7. Enter your Oracle EloquaCallback URL, which depends on your Eloqua pod number:
Pod Callback URL
Pod 1 https://apps.p01.eloqua.com/eloqua/salesforce/callback
Pod 2 https://apps.p02.eloqua.com/eloqua/salesforce/callback
Pod 3 https://apps.p03.eloqua.com/eloqua/salesforce/callback
Pod 4 https://apps.p04.eloqua.com/eloqua/salesforce/callback

©2024 Oracle Corporation. All rights reserved
12 of 102
Pod Callback URL
Pod 6 https://apps.p06.eloqua.com/eloqua/salesforce/callback
Pod 7 https://apps.p07.eloqua.com/eloqua/salesforce/callback
Pod 8 https://apps.p08.eloqua.com/eloqua/salesforce/callback
8. In the Selected OAuth Scopes section, select the appropriate scopes or select all available
scopes.
Z Important: At the very least, the three Salesforce OAuth Scopes are required. See
the FAQ for more information.
9. Click Save.
10. Select Create > Apps.
ëNote: The actual Salesforce base URL should be used in the app configuration. The
app name is used for labeling and identification purposes only.
11. In the Connected Apps section, find your connected app in the list and click its name.
12. In the connected app's API (Enable OAuth Settings) section, record the Consumer Key and
Consumer Secret values.
@ Learn more: Salesforce connected app documentation
©2024 Oracle Corporation. All rights reserved
13 of 102
Configuring a connection in the Salesforce Integration app
To configure a connection:
1. Log in to Oracle Eloqua.
2.
Click the settings icon .
3. In the Platform Extensions section, click Apps.
4. From the apps list, click Salesforce Integration for Eloqua. The Salesforce Integration for
Eloqua page is displayed.
5.
Click the configure icon . The App Configuration for Salesforce Integration for Eloqua page
is displayed.
6. Click Connections.
7. Click Create Connection.
8. Enter a connection name and click Create Connection. The Add Connected App button
and default field mappings are displayed.
©2024 Oracle Corporation. All rights reserved
14 of 102
9. Click Add Connected App.
10. In the Add a Connected App section, enter the Consumer Key and Consumer Secret from
your Salesforce connected app.
11. Click Add App.
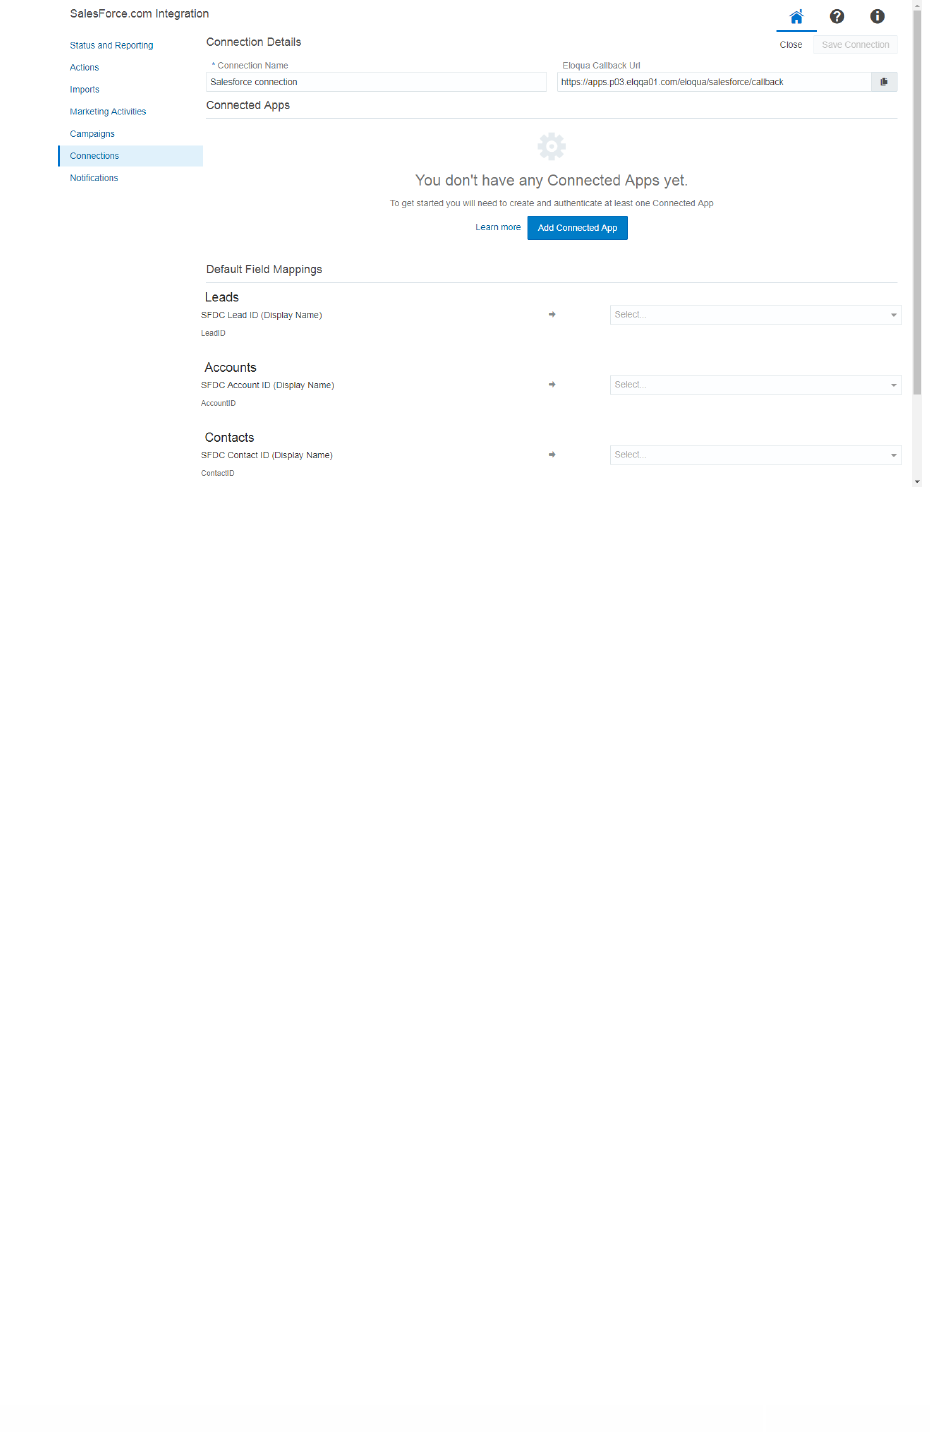
12. In the Default Field Mappings section, select the Oracle Eloqua fields to map to the
corresponding Salesforce Unique Identifier fields.
a. Leads: Select an Eloqua field to map to the lead ID field for Salesforce contacts. By default, it is
named SFDC Lead ID.
b. Accounts: Select an Eloqua field to map to the registry ID field for Salesforce accounts. By default,
it is named SFDC Accounts ID.
c. Contacts: Select an Eloqua field to map to the registry ID field for Salesforce contacts. By default, it
is named SFDC Contact ID.

©2024 Oracle Corporation. All rights reserved
15 of 102
13. Click Save Connection.
ëNote: Please verify the value of the SFDC refresh token policy. If it is set to expire
immediately, the App authentication will fail.
14. Click Close. The Connections page lists existing CRM connections and associated connected
apps.
15. Next to the new connected app, click Authenticate App. A Salesforce login dialog is
displayed.
¤ Tip: You can choose to have your data routed through a CipherCloud gateway. To
do so, configure the login dialog to point to the CipherCloud gateway. You may need
to adjust your CipherCloud firewall settings to allow calls from Oracle Eloqua servers.

©2024 Oracle Corporation. All rights reserved
16 of 102
16. Click the default user name or log in with a different user name. The Allow Access? dialog is
displayed.
17. Click Allow. If authentication succeeds, your connected app is ready to be used.
Modifying a connection
To modify an existing connection:
1. In the Salesforce Integration app, click the Connections tab.
2.
Click the connection's menu icon and select any of the following options:
l
Add Action: Click to create an action and automatically associate it with the current connection.
l
Add Import: Click to create an import and automatically associate it with the current connection.
l
Add New Connected App: Add another connected app to the connection.
l
Configure Defaults: Create default imports, actions, and marketing activities if you did not
already do this as part of the connection set up.
l
Delete: You can delete connections if there are no associated actions or imports. A confirmation
dialog will list any dependencies. The dependent actions and imports need to be disabled and
deleted before deleting the connection.
l
Edit: Open the connection in Edit mode so that you can modify its field mappings or connected
app values. You cannot modify the callback URL.
l
Migrate Native Assets: You can migrate assets from your native integration to the Salesforce
Integration app.

©2024 Oracle Corporation. All rights reserved
17 of 102
3. If a connection has multiple credentials, you can select the radio button to set the default
credential. Only one credential per connection can be active at once. For example, one
connected may have production credentials while another connected app has credentials
linked to a sandbox or test environment.
Configuring defaults for a connection
Once you configure a connection, you can open the Create Defaults section to create
default actions, imports, and marketing activities using default mappings. You can
alternatively create actions, imports, and marketing activities by manually configuring
them.
ëNote: You can only configure defaults for an authenticated connection.

©2024 Oracle Corporation. All rights reserved
18 of 102
To configure default imports, actions, and marketing activities for a connection:
1. In the Salesforce Integration app, click the Connections tab.
2.
Click the connection's menu icon and select Configure Defaults.
The Create Defaults page displays all the available imports, actions, and marketing activities
for your connection.
3. Select the default fields you want to create for this connection.
4. Click Create Defaults. The selected imports, actions, and marketing activities are created
with a name that includes the name of your connection. You need to enable imports before

©2024 Oracle Corporation. All rights reserved
19 of 102
you can use them. To do it, go to the Imports tab and click the import's menu icon .
After an import is done, you can use a feeder service to make updates on a canvas . Unlike
imports, actions and marketing activities are enabled by default and you can start using
them right away in a program or campaign.
ëNote: You will create duplicate actions, imports, and programs if you configure
the same defaults for the same connection more than once. The duplicate asset
names will include the connection name and either the words New Import or New
Action.
Viewing connection errors
The Status and Reporting screen displays errors associated with a current connection.
If you have multiple active connections, and a hidden connection reported an error,
the Salesforce Integration app will display a notification message at the top of the
Status and Reporting screen. To find out which hidden connections have errors, open
the connection drop-down.
Connections that have errors will have a warning icon beside them.

©2024 Oracle Corporation. All rights reserved
20 of 102
Creating sample programs
You can create sample programs from the Configure Defaults option. If you select this
option, the Salesforce Integration app will create the selected programs in a
predefined folder named System - SFDC App. The Salesforce Integration app will
create all assets required to support these programs, and these assets will include the
program name.
ëNote: The Salesforce Integration app will not create a new program (and
related assets) if the program already exists.
To create a sample program:
1. In the Salesforce Integration app, click the Connections tab.
2.
Click the connection's menu icon and select Configure Defaults.

©2024 Oracle Corporation. All rights reserved
21 of 102
3. Select which sample programs should be created. You can create up to three different kinds
of programs:
ëNote: When you select any of the 3 sample programs, required assets are
automatically selected as well. For example, if you select the Create Unique sample
program, then Create Lead, Update Contact, and Update Lead are automatically
selected as well.
l
Create Unique: In this program, a new lead record is created in Salesforce only if there is no
contact or lead record with the same email address in Salesforce. If there is an existing contact
record, the contact record is updated with contact information as defined in the Update Contact
action.
l
Hybrid: In this program, a new lead is created in SFDC only if there is no unconverted lead record
with the same email address in SFDC. Existing unconverted lead records in SFDC are updated with
contact information as defined in the Update Contact action.
l
Point of Interest: A new lead record is created if there are no leads with the same email address in
Salesforce, but an Salesforce contact already exists. If there is an existing contact record, the
contact record is updated with contact information from Oracle Eloqua as defined in the Update
Contact action.
4. Click Create Defaults.
A status bar will display and indicate when the sample program's creation is complete.

©2024 Oracle Corporation. All rights reserved
22 of 102
Creating step actions
ëNote: This page outlines how to create step actions in the Salesforce
Integration app. Learn how to create campaign actions and response actions.
Actions are data transactions between Oracle Eloqua and Salesforce. The Step Actions
page is where you create the types of actions to be used in a program or campaign
when using the app. You can create two types of actions: Create and Update. Create
will create a new record in Salesforce, and Update will take an existing Oracle Eloqua
contact and update their information in Salesforce. You can put actions through a test
run with pre-configured contacts.
Good to know
l
Users can map the Salesforce URL field to the Eloqua Large Text and Text fields. Use the
Large Text field if the value in your URL field contains more than 100 characters. Mapping
the URL field to any other Eloqua field results in an error.
l
For the Account, Contact, and Lead Salesforce objects, you can split the Address field onto a
new line in Oracle Eloqua, and the split will remain at the same place once that address is
pushed to Salesforce and imported back into Eloqua. For example, if you split an address to
a new line after 80 characters, and that's pushed to Salesforce, the address will still be split
to a new line at 80 characters once it's imported back into Eloqua.
Prerequisites

©2024 Oracle Corporation. All rights reserved
23 of 102
l
Configured connection
To create a step action:
1. In the Salesforce Integration app, click Actions.
2. Click Add Action and select a connection for which you want to create a new action.
3. Complete the action details:
ëNote: Each action can map up to a maximum of 249 fields. See the Eloqua
Developer Help Center for more information.
l
Name: Enter a name for the action.
l
Action Type: Select an action type from the list to either create, update, or upsert contact records.
Note that:
l
The Upsert option creates a new campaign member in Salesforce if one doesn't exist, and updates an
existing Campaign Member if it exists. The Upsert action type only applies to campaign responses
managed by the user and not those managed by Oracle Eloqua. Users need to map the fields
themselves and update the status field for Eloqua contacts, as any change to the status of the contact
will not be pushed automatically by Eloqua. You can configure the Upsert action with Eloqua custom
objects.

©2024 Oracle Corporation. All rights reserved
24 of 102
Z Important: When you're using Upsert in an action step in the Campaign Canvas, the
Salesforce Integration app will retrieve the Campaign ID automatically. If you're using Upsert
action steps on the Program Canvas, you will need to provide the Campaign ID as one of the
mappings in the Salesforce Integration app itself.
l
You can map any Eloqua custom object field to a static Salesforce ID for the Update action type.
l
Object Mapping: To see available fields for mapping, select an Eloqua object and Salesforce
object. Top-level objects from your Salesforce instance are available in the Salesforce Object list.
If you select the Lead object from the Salesforce Object list for either a Create or Update action
type, the Trigger Assignment Rule option is displayed. If you select Yes, a default assignment
rule will be triggered in Salesforce upon lead creation when new Eloqua contacts are added. Only
select Yes if you are using lead assignment rules in Salesforce. Setting it to Yes will cause the
action to take longer to run and will increase your Salesforce API usage.
l
Update Salesforce Fields: For each set of fields, specify the Salesforce field that will be mapped to
Oracle Eloqua contacts. If you are updating contact records, the unique identifier is the first
mapping shown in this list. If you are creating records, this option is optional. Add more mappings
by clicking Add Field Mapping. Click the menu to delete the mapping, or switch the field
type to static text, static date, or dynamic date. You can also choose whether or not the Salesforce
Integration app should Allow Eloqua field blank values to be sent to Salesforce. By default, this

©2024 Oracle Corporation. All rights reserved
25 of 102
option is always unchecked, that is, the Salesforce Integration app will not send blank Eloqua fields
values to Salesforce by default.
l
(Optional) Update Eloqua Fields: For each set of fields, specify the Eloqua field that will be
mapped to Salesforce contacts. If you are creating contact records, the unique identifier is the first
mapping shown in this list. If it is a Create or Upsert action type, you can set the To Eloqua field to
None to avoid a callback to Eloqua. Please note that if you choose to avoid a callback to Eloqua,
the related Salesforce record ID will not be populated on an Eloqua object (for example, SFDC Lead
ID). In addition, you can add static text, static dates or dynamic dates to the same callback to
Eloqua. For example, it may be useful to pass the dynamic date on the Create Lead call to track the
exact time when the SFDC Lead ID was populated in Eloqua.
ëNote: After mapping a lead scoring model in an action, the other models will no longer
be available for mapping in that action. Users will need to create another action to map
another lead scoring model.
Add more mappings by clicking Add Field Mapping. Click the menu to delete the mapping
or switch a From Salesforce field type to static text, static date, or dynamic date.
Z Important: If you are mapping fields that have boolean picklist values,
Salesforce requires that your picklist values are represented as either
True/False or 1/0
l
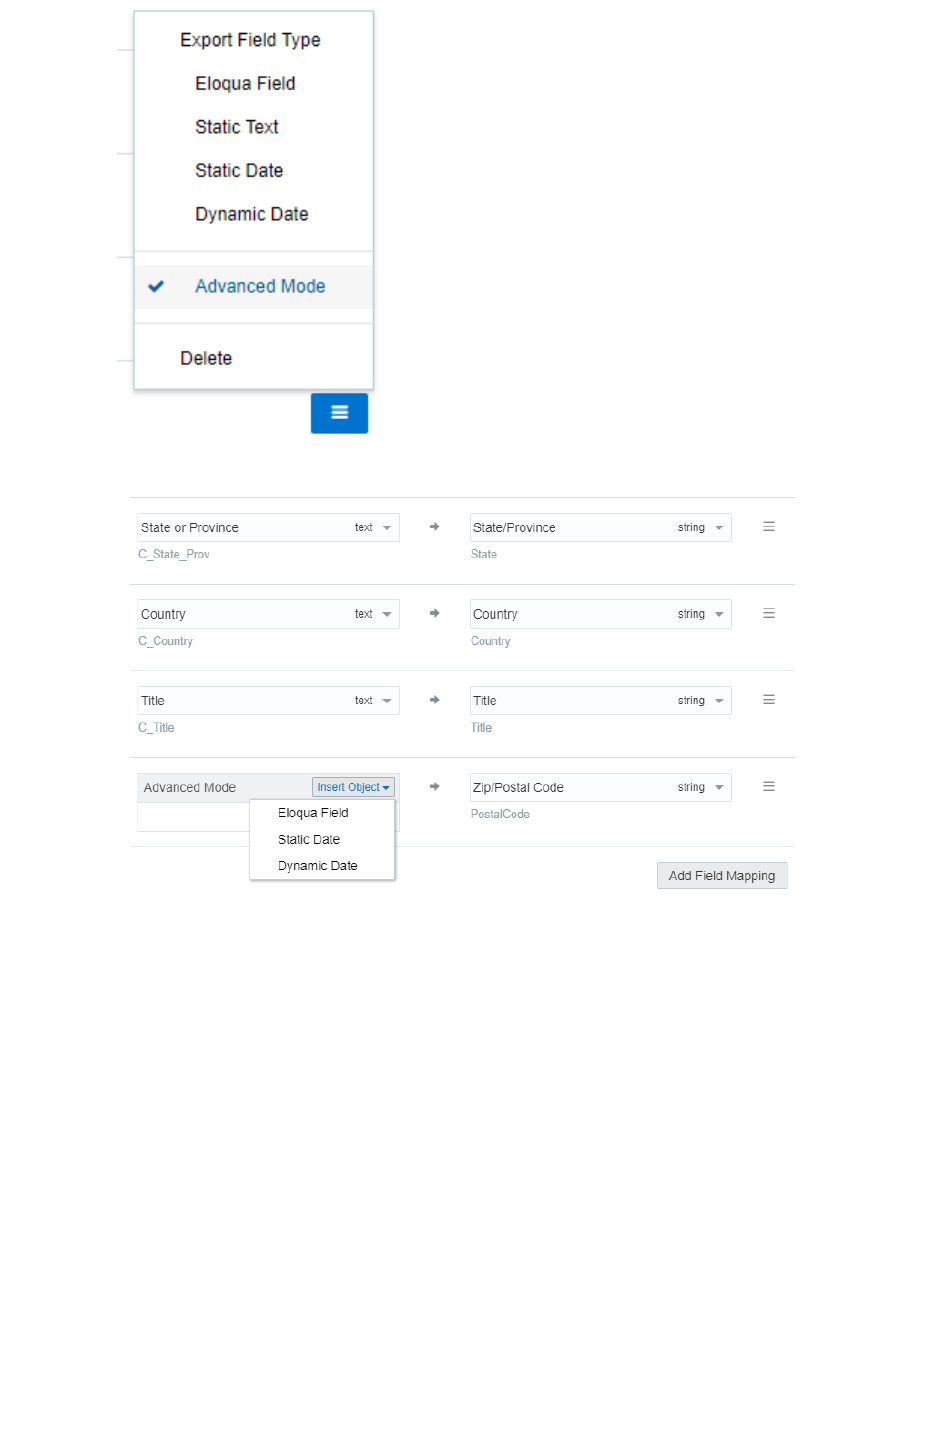
If you select Advanced Mode from the menu, you can enter multiple objects to be sent to a
single Salesforce field: Eloqua Object, Date, or Dynamic Date. You can also type static text into
the box as needed. For contacts, you can use Advanced Mode to select a Contact and its fields. For
custom objects, the Advanced Mode allows you to select a custom object and its related Contact
fields.

©2024 Oracle Corporation. All rights reserved
26 of 102
In Advanced Mode, concatenated Eloqua values can be mapped to Salesforce fields of the
following types: reference, double, currency, text, string, ID type, and integer.
l
Import Rules: Specify data priority.
l
Data Priority: Select the priority of data to resolve conflicts on imports, such as Bulk API and CRM
Integration. If leads and contacts are being imported to Oracle Eloqua contacts, there may be situations
where a lead and contact with the same email address exist. Eloqua's data priority can be used to
instruct Eloqua which source, lead or contact, is higher priority. If the contact import is set to have a
higher priority than the lead import, the data imported from the contact will not be overwritten by the

©2024 Oracle Corporation. All rights reserved
27 of 102
lower priority lead data. Higher priority sources are never overwritten by lower priority sources. Data
priority needs to be specified as part of an action to ensure that higher priority sources are not
overwritten by lower priority sources from other imports.
4. Click Save.
Your action is created and can be used in a program or campaign.
Click the drop-down list to modify the action. You can edit, enable, disable, duplicate,
or view report data for the action. If an action is disabled, you can delete it. If you
attempt to delete an action that is used on a canvas, a warning message will display,
but it can be overwritten if desired.
Z Important: If an action is being used within a program or campaign and the
action is disabled, contacts will not be processed until the action is enabled. Once
the action has been re-enabled, the app will process all contacts.
Creating campaign actions
Actions are data transactions between Oracle Eloqua and Salesforce. The Campaign
Actions page is where you create actions to send data to Salesforce when campaigns
change status. These actions are used for sending newly created campaigns to

©2024 Oracle Corporation. All rights reserved
28 of 102
Salesforce, as well as sending updates to existing campaigns to Salesforce (provided
the Eloqua campaign has a Salesforce campaign ID).
¤ Tip: To sync your campaign with Salesforce, check the Sync with CRM box in
your campaign's advanced settings (open a campaign > Options > Campaign
Settings > Advanced). The CRM Campaign ID field populates after Oracle Eloqua
syncs with Salesforce for the first time. This field (CRM Id) is used as a unique
identifier for campaign actions. Map at least one more field in addition to the
CRM Id.
Campaigns in Salesforce may also be imported into Eloqua to allow for bi-directional
updates between the two applications. When a campaign action is enabled, any
campaign imports using different connections are automatically disabled.
Good to know
l
Users can map the Salesforce URL field to the Eloqua Large Text and Text fields. Use the
Large Text field if the value in your URL field contains more than 100 characters. Mapping
the URL field to any other Eloqua field results in an error.

©2024 Oracle Corporation. All rights reserved
29 of 102
Prerequisites
l
Configured connection
To create a campaign action:
1. In the Salesforce Integration app, click Campaigns.
2. On the Campaign Actions tab, click Add Campaign Action and select a connection for which
you want to create a new action.
3. Complete the action details:
ëNote: Each action can map up to a maximum of 249 fields. See the Eloqua
Developer Help Center for more information.

©2024 Oracle Corporation. All rights reserved
30 of 102
l
Action Name: Enter a name for the action.
l
Object Mapping: The Eloqua Object is set to Campaign and cannot be modified. To see available
fields, select a top-level object from the Salesforce Object list.
l
(Optional) Synchronize Campaign Member Status Values: If you select Campaign for the
Salesforce Object, the Synchronize Campaign Member Status Values option displays. Enable this
option if you want to synchronize Campaign Member status values to Salesforce Campaigns. The
synchronization will occur after updates are sent from an Eloqua Campaign object to a Campaign
Object in Salesforce. The Salesforce App will synchronize values defined under the "Display Name"
column on the "Campaign Member Status Values" screen in Eloqua as Salesforce Campaign
Member statuses, while removing any duplicate values.
Z Important: This feature is currently released under our Controlled Availability program.
To request access to this feature, please log in to My Oracle Support
(https://support.oracle.com) and create a service request.
l
(Optional) Synchronize Campaign Member Status Responded Flag: If you select Campaign for
the Salesforce Object, users can select the Synchronize Campaign Member Status Responded Flag.
Enable this option if you want to set the Campaign Member Status Responded value to true for all
Campaign Member Status Values synced from Eloqua. The synchronization will occur after
updates are sent from an Eloqua Campaign object to a Campaign Object in Salesforce. Note that
the Salesforce App will not sync the “Responded” column setting set in the Eloqua response rules.
In addition, the Salesforce App will not alter the value of any Salesforce Campaign Member Status
Values did not originate from Eloqua.
Z Important: This feature is currently released under our Controlled Availability program.
To request access to this feature, please log in to My Oracle Support
(https://support.oracle.com) and create a service request.

©2024 Oracle Corporation. All rights reserved
31 of 102
l
Update Salesforce Fields: The unique identifiers are automatically determined by the Eloqua and
Salesforce objects in the object mapping section. The Eloqua unique identifier is CRM Id. You must
add at least one additional mapping by clicking Add Field Mapping. For each set of fields, specify
the Salesforce field that will be mapped to Eloqua contacts. Click the menu to delete the
mapping, or switch the field type to static text, static date, or dynamic date.
l
Update Eloqua Fields: The unique identifiers are automatically determined by the Eloqua and
Salesforce Objects in Object Mapping. The Eloqua unique identifier is CRM Id. Add more mappings
by clicking Add Import Field Mapping. For each set of fields, specify the Eloqua field that will be
mapped to Salesforce contacts. Click the menu to delete the mapping or use Advanced
Mode to switch a From Eloqua field type to static text, static date, or dynamic date.
Z Important: If you are mapping fields that have boolean picklist values,
Salesforce requires that your picklist values are represented as either
True/False or 1/0
l
If you select Advanced Mode from the menu, you can enter multiple objects to be sent to a
single Salesforce field: Eloqua Object, Date, or Dynamic Date. You can also type static text into
the box as needed. For contacts, you can use Advanced Mode to select a Contact and its fields. For
custom objects, the Advanced Mode allows you to select a custom object and its related Contact
fields.
©2024 Oracle Corporation. All rights reserved
32 of 102
In Advanced Mode, concatenated Eloqua values can be mapped to Salesforce fields of the
following types: reference, double, currency, text, string, ID type, and integer.
4. Click Create Campaign Action and then click Close to return to the Campaign Actions page.
To modify an action, click its menu and choose and option. You can edit, enable or
disable, duplicate, or view report data for the action. Only one campaign action can be

©2024 Oracle Corporation. All rights reserved
33 of 102
enabled at a given time. Enabling a new action will disable an existing one. You can
delete disabled actions.
Creating response actions
Actions are data transactions between Eloqua and Salesforce. The Campaigns >
Response Actions tab is where you create actions to send data to Salesforce based on
response rules configured in your Oracle Eloqua instance. When a response occurs,
Oracle Eloqua records the response based on priority and the response is sent to a
Salesforce custom object.
Z Important: Avoid uploading contact activities that are older than 30 days.
These contact activities will not be sent to the Salesforce Integration app.
Good to know
l
Users can map the Salesforce URL field to the Eloqua Large Text and Text fields. Use the
Large Text field if the value in your URL field contains more than 100 characters. Mapping
the URL field to any other Eloqua field results in an error.

©2024 Oracle Corporation. All rights reserved
34 of 102
l
Contacts must have a Response ID for campaign response actions. If a contact is missing the
Response ID, Eloqua alerts you with an error message.
l
For the Account, Contact, and Lead Salesforce objects, you can split the Address field onto a
new line in Oracle Eloqua, and the split will remain at the same place once that address is
pushed to Salesforce and imported back into Eloqua. For example, if you split an address to
a new line after 80 characters, and that's pushed to Salesforce, the address will still be split
to a new line at 80 characters once it's imported back into Eloqua.
l
For the Campaign Member Salesforce Object, the Response Action queries Salesforce for an
existing Campaign Member ID for the given CRM Campaign ID and Lead ID or Contact ID. If
the returned Campaign Member ID is not blank, the app initiates an "Update" call to
Salesforce using this Campaign Member ID. Otherwise, it initiates a "Create" call to
Salesforce.
Z Important: This feature is currently released under our Controlled Availability
program. To request access to this feature, please log in to My Oracle Support
(https://support.oracle.com) and create a service request.
l
You can associate both Contact ID and Lead ID in the same Response Action call for
reporting purposes. If both Contact ID and Lead ID are present on an Eloqua Contact, the
Salesforce App will automatically generate two separate calls to Salesforce, associate both
Salesforce Contact and Lead to the Salesforce Campaign.
Z Important: This feature is currently released under our Controlled Availability
program. To request access to this feature, please log in to My Oracle Support
(https://support.oracle.com) and create a service request.

©2024 Oracle Corporation. All rights reserved
35 of 102
Prerequisites
l
A configured connection
l
A campaign object or a custom object in Salesforce for Eloqua campaigns
l
A response rule configured in your Oracle Eloqua instance
To create a response action:
1. In the Salesforce Integration app, click Campaigns.
2. Click the Response Actions tab.
3. Click Add Response Action and select a connection for which you want to create a new
action. The Create Response Action page is displayed.
4. Complete the response action details:
ëNote: Each action can map up to a maximum of 249 fields. See the Eloqua
Developer Help Center for more information.
l
Action Name: Enter a name for the action.

©2024 Oracle Corporation. All rights reserved
36 of 102
l
Campaign Response: The Eloqua object is set to CampaignResponse and cannot be modified.
l
Salesforce Object: Select a top-level object from the list, such as Campaign Member.
If you've selected Campaign Member for the Salesforce Object, the following mappings are set by
the Salesforce Integration app and cannot be modified: Status in the CampaignResponse section,
Contact ID and Lead ID in the Contact section, as well as Campaign ID in the Campaign section.
l
Update Salesforce Fields: The Eloqua unique identifier is Integration Return Value. The
Salesforce unique identifier is determined by the Salesforce Object selected in Object Mapping. For
example, if you select Campaign, the unique identifier is Campaign ID. Add more mappings by
clicking Add Field Mapping. For each set of fields, specify the Salesforce field that will be mapped
to Eloqua contacts. Click the menu icon to delete the mapping, or use Advanced Mode to
switch the field type to static text, static date, or dynamic date.
l
If you select Advanced Mode from the menu, you can enter multiple objects to be sent to a
single Salesforce field: Eloqua Object, Date, or Dynamic Date. You can also type static text into
the box as needed. For contacts, you can use Advanced Mode to select a Contact and its fields. For
custom objects, the Advanced Mode allows you to select a custom object and its related Contact
fields.

©2024 Oracle Corporation. All rights reserved
37 of 102
In Advanced Mode, concatenated Eloqua values can be mapped to Salesforce fields of the
following types: reference, double, currency, text, string, ID type, and integer.
5. (Optional) Click +Add Related Object, select an object from the list, and click Add Related
Object.
6. Click Save Response Action and click Close to be returned to the Response Actions page.
To modify the action, click the menu to display the options. You can edit, enable or
disable, duplicate, or view report data for the action. Only one campaign response
action can be enabled at a given time. Enabling a new action will disable an existing
one. You can delete disabled actions.

©2024 Oracle Corporation. All rights reserved
38 of 102
Copying Salesforce fields into Eloqua
With the Salesforce Integration app, Oracle Eloqua users can copy individual
Salesforce object fields into a standard Oracle Eloqua object or an Oracle Eloqua
custom object. The fields are then available in an action to transfer data from the
Oracle Eloqua object to the Salesforce object.
To copy Salesforce fields into an Oracle Eloqua object or custom object:
1. In the Salesforce Integration app, click Actions.
2. Click on an action.
3. Click Copy Salesforce Fields.
The Copy Salesforce Fields page opens. The Display Name column lists the Salesforce fields
which are not currently available in the Oracle Eloqua object source and so can be copied
into the object source.
4. Check the boxes of the fields you want to copy.
5. Click Copy.
A status bar displays the copying status. Once the copying is complete, you can retry any
failed actions.
Configuring test runs for actions
When using the Salesforce Integration app, you can run any action, including a custom
object action, with a configured test payload immediately without needing to wait until
©2024 Oracle Corporation. All rights reserved
39 of 102
the action is triggered on a canvas. This allows you to test the action for errors using
test contacts selected by you. The test action results will be included in the action daily
report, but you can also choose to exclude these results.
In this topic, you'll learn about:
1. Adding test contacts
2. Running an Action with a test payload
3. Excluding the test payload from daily reports
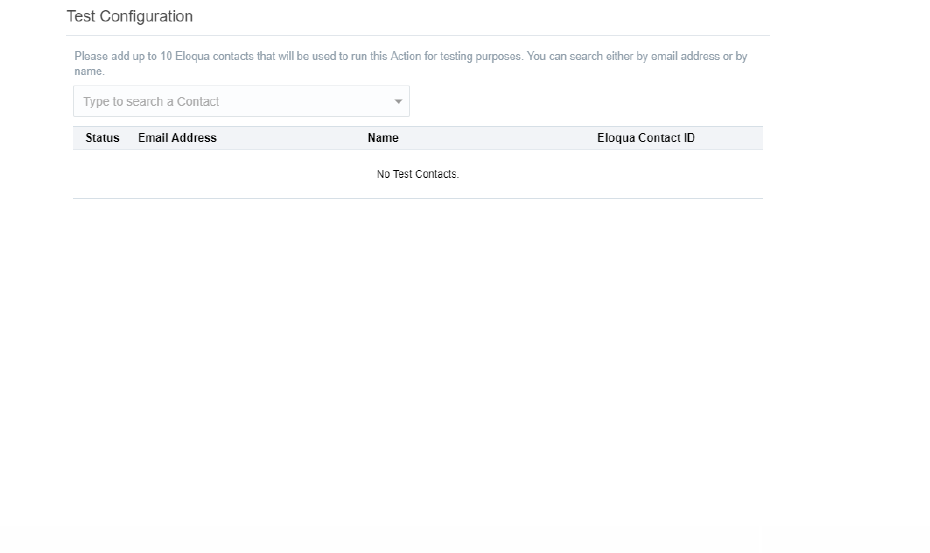
Adding test contacts
Before you're able to run a test action, you'll need to configure the test payload.
To add a contact to a test payload:
1. In the Salesforce Integration app, navigate to the Actions tab.
2. Click on an action.
3. Under Test Configuration, type in a name or email address to search for a contact.
4. Click on the contact to add them.
5. Click Save Action.

©2024 Oracle Corporation. All rights reserved
40 of 102
Running an action with a test payload
Once you've configured the test payload for an action, you can now use the test
payload to run the action.
To run a test action:
1. In the Salesforce Integration app, navigate to the Actions tab.
2.
Click beside an Action and select Run Action.
You will see the action run's status in the status bar at the top of the dialog.
Excluding the test payload from daily reports
If you don't want to mix the data from your test action with other action runs, exclude
the test payload from daily reports.
To exclude the test payload from daily reports:
1. In the Salesforce Integration app, navigate to the Actions tab.
2. Locate the action for which you want to view daily report data, click the list, and select View
Reports.

©2024 Oracle Corporation. All rights reserved
41 of 102
3. Click Hide Runs With Test Contacts.
Creating imports
Imports are data transactions from Salesforce into Oracle Eloqua. The Salesforce
Integration app executes imports every 15 minutes. After an import has been
scheduled, an import schedule does not display because imports are executed so
often. If an import needs to be performed off schedule, it can be executed on demand.
An import may fail due to various reasons such as connection or data related issues.
Some of these issues will cause an entire import to fail. You can setup email
notifications to alert you when import errors occur.
The following imports are recommended:
l
Leads
l
Contacts
l
Accounts
l
Opportunities

©2024 Oracle Corporation. All rights reserved
42 of 102
When viewing your imports, disabled imports are dimmed to indicate their status.
There are several indicators in your list of imports to help you quickly get an overview
of their status.
Good to know
l
Users can map the Salesforce URL field to the Eloqua Large Text and Text fields. Use the
Large Text field if the value in your URL field contains more than 100 characters. Mapping
the URL field to any other Eloqua field results in an error.
l
For the Account, Contact, and Lead Salesforce objects, you can split the Address field onto a
new line in Oracle Eloqua, and the split will remain at the same place once that address is
pushed to Salesforce and imported back into Eloqua. For example, if you split an address to
a new line after 80 characters, and that's pushed to Salesforce, the address will still be split
to a new line at 80 characters once it's imported back into Eloqua.
l
You can update the unsubscribe status using an import from Salesforce to Oracle Eloqua
even if the related contact has been deleted in Oracle Eloqua. If you create this contact
again, by default it will be unsubscribed from all emails. To update the subscription status, in
the import configuration, select the Contact Email Address as the Eloqua target object.
l
You can synchronize up to two Salesforce field values into an existing Eloqua picklist. By
default, the Salesforce App will append values from Salesforce to an existing Eloqua picklist.
Optionally, you can configure the App to overwrite existing Eloqua picklist values by turning
on the "Delete Existing Picklist Values" toggle on the Import Edit screen.
Z Important: The Eloqua picklist Option Name must be unique. Eloqua will reject
two pairs of values with the same Option Name, but different Option Value.

©2024 Oracle Corporation. All rights reserved
43 of 102
Prerequisites
l
Configured connection
ëNote: Campaign, opportunity, and user imports have additional prerequisites.
To create an import:
1. In the Salesforce Integration app, click Imports.
2. Click Add Import and select a connection for which you want to create a new import.
3. Complete the import details:
ëNote: Each import can map up to a maximum of 100 fields. Learn more
l
Name: Enter a name for the import.
l
Object Mapping: To see available fields for mapping, select an Oracle Eloqua object and
Salesforce object and click Fetch. The unique identifiers for field mappings will be determined
once Fetch is clicked. Top-level objects from your Salesforce instance are available in the
Salesforce Object drop-down.
ëNote: Salesforce History Objects, with an exception of Salesforce Login History Object,
are available to Marketers in the app.

©2024 Oracle Corporation. All rights reserved
44 of 102
l
Import Only Deleted Records: Select this option if you want to recognize only deleted Salesforce
records in Eloqua by creating imports for deleted objects.
l
Check Email Address Changes: Select this option to have the Salesforce Integration app check
for email address changes before running an import. The app will then update a changed email
address to the latest before running the import. To use this option, the unique identifier on the
Eloqua side must be Email Address. Use this option with caution, as it will increase the import run
as well as Salesforce API usage. Learn more about the Check Email Address Changes option.
Z Important: To use this feature, you must have history tracking enabled in your
Salesforce account.
l
Filter Details: Enter a Salesforce Object Query Language (SOQL) WHERE clause filter to use on the
CRM source field when querying contacts to import and then click Test to test the filter. For details
about creating SOQL filters, refer to the SOQL developer documentation.
¤ Tip: When you build complex SOQL queries using logical operators, include
parenthesis, otherwise you may encounter a syntax validation error. For example, the filter
FirstName = 'Example' OR LastName = 'Contact' should be (FirstName = 'Example' OR
LastName = 'Contact').
When your import is executed, the Salesforce App will only sync records that were created or
modified since the last successful run. This default behavior is accomplished by adding the
LastModifiedDate filter to your WHERE clause (if any).
If you need to use complex SOQL queries with custom date/time filters, select the Don't Include
LastModifiedDate for scheduled runs option. The app will then skip the default
LastModifiedDate filter when executing the import.
Use the Insert LastSuccessfulUpload option to insert the LastSuccessfulUpload literal into your
query. The actual timestamp of the last successful sync when the import executes.

©2024 Oracle Corporation. All rights reserved
45 of 102
If you use the LastModifiedDate override, the WHERE clause cannot be left blank. For details about
creating SOQL filters, refer to the SOQL developer documentation.
Z Important: The ability to use the LastModifiedDate override is currently released under
our Controlled Availability program. To request access to this feature, please log in to My
Oracle Support (https://support.oracle.com) and create a service request.
l
Update Eloqua Fields: Map your unique identifier to specify the object in Oracle Eloqua to update
or create. For each field, select the Oracle Eloqua field that will be mapped to Salesforce contacts. If
you are creating contact records, the unique identifier is the first mapping shown in this list. Add
more mappings by clicking Add Import Field Mapping. Click the menu to delete the
mapping, to switch the field type to static text, static date, or dynamic date, or to configure the
Eloqua field update rules. If you map fields for related objects, you can select the Keep records
updated option to trigger updates to all fields of a related object when only fields from one of the
objects are changed. For example, if your contact import has a related account object and you
select this option, fields from both objects will be updated even if there is a change to only the
account object. Additionally, note that:
l
You can choose whether or not the Salesforce Integration app will Always update Eloqua fields, even
if the new value is blank upon import.

©2024 Oracle Corporation. All rights reserved
46 of 102
l
For any picklist mapping, you can use the Synchronize picklist values from Salesforce before
running the import option. After saving the import, the Salesforce Integration app adds the Salesforce
picklist values to the existing list of picklist values on the Eloqua side before running the import.
Synchronized picklist values from Salesforce are appended to the end of the existing picklist in Eloqua,
and the app will remove any duplicate picklist values. Additionally, if users choose to synchronize
picklists, it will be reflected in import reports. Specifically, users will see another step in the process and
its status. If the picklist's synchronization fails, the import itself will continue to run.
Z Important: This feature is currently released under our Controlled Availability program. To
request access to this feature, please log in to My Oracle Support (https://support.oracle.com)
and create a service request.
l
For Contact and Account imports, the Last Modified by CRMSys field allows you to record when an
Eloqua contact or account was last modified by the Salesforce Integration app.
l
For Contact, Lead, and Account imports, addresses exceeding 100 characters in Salesforce are split into
up to 3 address fields upon import.
l
The Salesforce Integration app allows users to map Salesforce boolean values to Oracle Eloqua integer
(numeric) values in Eloqua standard objects and custom objects. During the import, Salesforce sends the
values of 1 or 0 for boolean fields. The Salesforce Integration app will assign these values as numbers to
respective Eloqua numeric fields.
l
If you select Advanced Mode from the menu, you can enter multiple objects to be sent to a
single Salesforce field: Eloqua Object, Date, or Dynamic Date. You can also type static text into
the box as needed. For contacts, you can use advanced mode to select contact and related
account fields. For CDOs, advanced mode allows you to select a CDO and its related contact and
account fields. You can also select Advanced Mode for Salesforce fields.

©2024 Oracle Corporation. All rights reserved
47 of 102
l
Import Rules: Specify data priority and deduplication rules.
l
Data Priority: Select the priority of data to resolve conflicts on imports, such as Bulk API and CRM
Integration. If leads and contacts are being imported to Oracle Eloqua contacts, there may be situations
where a lead and contact with the same email address exist. Oracle Eloqua's data priority can be used to
instruct Oracle Eloqua which source, lead or contact, is higher priority. If the contact import is set to have
a higher priority than the lead import, the data imported from the contact will not be overwritten by the
lower priority lead data. Higher priority sources are never overwritten by lower priority sources.
l
Deduplication type: Specify how to handle duplicate import records. For example, you can chose the
most recently updated record or import all records. Deduplication runs per import execution. If multiple
records with the same match field value are imported in a single execution, those records will be
deduplicated based on the setting specified here. . Learn more about how the different deduplication
types work.
l
Post Processing: Specify an action to be performed on a contact after import. You can specify a
maximum of ten post processing items, including the following actions and any Salesforce feeder
elements that you add to a canvas.
l
Add to Shared List / Remove from Shared List: Specify whether after the import, contacts should be
added to or removed from a shared list.
l
Subscribe to Email Group / Unsubscribe from Email Group: Specify whether after the import,
contacts should be subscribed to or unsubscribed from an email group.
l
Global Subscribe: Specify whether after the import, contacts should be globally subscribed globally
unsubscribed.
l
SMS Opt-in Phone Number / SMS Opt-out Phone Number: Specify whether after the import, phone
number(s) should be opted in or opted out from receiving SMS messages.
l
Add Action: Click to add another action to be performed after the import.

©2024 Oracle Corporation. All rights reserved
48 of 102
ëNote: The Post Processing steps are only available if the import is defined on Eloqua
Contact Object.
4. Click Save.
Click the import's drop-down list to modify the import or view reports. You can edit
and enable or disable an import. Once an import is disabled, you can delete it.
Clicking Disable temporarily stops the imports. If the import is currently running and
has not yet started (it is in either the Retrieve from Salesforce or Deduplicating steps),
the import is canceled and disabled. If the import has begun importing to Oracle
Eloqua, the import will finish, then be disabled.
Clicking Enable enables your import. Note that the Salesforce Integration app stops
imports after 20 consecutive failures, in which case a notification displays at the top of
the dialog. The notification remains, and the import is excluded from scheduled runs,
until the import's configuration is edited and saved again. You will also not be able to
manually trigger the import until the issue is resolved.
¤ Tip: It is encouraged that you configure your notification settings so that you
are notified if an import is stopped.

©2024 Oracle Corporation. All rights reserved
49 of 102
Scheduling an import
Once you enable an import, it is scheduled to run automatically every 15 minutes by
default 7 days per week.
You can alternatively specify a delay between when the previous run finishes and
when the next run begins:
l
Time zone
l
15, 20, 30, or 60 minutes
l
1, 2, 3, 4, 6, 8, 12, or 24 hours
l
Monday through Sunday for a specific range of hours
You can also run the import on demand clicking Run Now and then selecting one of
the following:
l
A specific date range: When Run Now is used with a date and time filter, the current date
and time is pre-populated. The date and time can be changed to a time in the past as

©2024 Oracle Corporation. All rights reserved
50 of 102
desired. Selecting a specific date allows a partial import to be performed.
l
All Records: If no date is selected, the import retrieves all matching records from Salesforce
and imports them to Oracle Eloqua.
Once you select a specific date range, click Run Import.
ëNote: The Last Import date indicates the last successful import.
Clicking Disable temporarily stops the imports. If the import is currently running and
has not yet started (it is in either the Retrieve from Salesforce or Deduplicating steps),
the import is canceled and disabled. If the import has begun importing to Oracle
Eloqua, the import will finish, then be disabled. Click Enable to schedule your import
to run every 15 minutes.
Deduplication types
To understand how the different record deduplication types affect an import, we will
take a look at an example import that includes these 5 example Salesforce records:
First
Name
Last
Name
Email Comment
Record
#1
Record One
record_
This is the oldest record by creation
date
Record
#2
Record One
record_
Record
#3
Record One
record_
This is the newest record by last
update date
Record
Record Four
record_

©2024 Oracle Corporation. All rights reserved
51 of 102
Record
#5
Record Five
record_
Based on which deduplication type you select, different records are imported:
Deduplication
Type
Expected Results
Comments
Import
Everything
Only records #4
and #5 are
imported into
Eloqua.
The remaining three records will be marked as
“failed” in the import report with an error
message “C_EmailAddress: Multiple matches”.
Ignore all
duplicates and
do not import
Only records #4,
and #5 are
imported into
Eloqua.
The remaining three records will be ignored. No
error will be reported.
Choose
youngest
record by last
update date
Records #3, #4,
and #5 are
imported into
Eloqua.
The remaining two records will be ignored. No
error will be reported.
Choose oldest
record by
creation date
Records #1, #4,
and #5 are
imported into
Eloqua.
The remaining two records will be ignored. No
error will be reported.
Checking email address changes before imports
Selecting the Check Email Address Changes when setting up an import means that the
Salesforce Integration app checks for email address changes before running the
import. This feature helps marketers keep their records consistent between Eloqua
and Salesforce and prevent duplicate records in Eloqua.

©2024 Oracle Corporation. All rights reserved
52 of 102
To take advantage of this feature, users need to enable the tracking of email address
changes in Salesforce. By default, Salesforce history tracking is turned off. The Check
Email Address Changes option in the Salesforce Integration app's import configuration
dialog is disabled until the app detects that history tracking for the email address field
in Salesforce is turned on. The Salesforce Integration app is always looking for the
most recent email address in Salesforce and compares it to the contact’s email in
Oracle Eloqua.
When users change the email address in Salesforce and synchronize this change to
the Oracle Eloqua contact, the history of the Eloqua contact's activities is fully
preserved. Note that, based on existing Eloqua rules, a contact’s email
subscribe/unsubscribe status and bounceback status are associated with the contact’s
email address, not the ID. The following example illustrates this behavior:
receive emails.
Salesforce.
becomes subscribed because it is a new email address.
and synchronizes this update via the Salesforce Integration app, the email subscription
because of the change in step 2.

©2024 Oracle Corporation. All rights reserved
53 of 102
Migrating native Salesforce integration assets
You can migrate assets from your native integration to the Salesforce Integration app:
l
Native Auto Syncs / Inbound assets are migrated as imports
l
Native External Calls / Outbound assets are migrated as actions
Prerequisites
l
An existing native Salesforce integration with Oracle Eloqua
l
At least one configured connection
To migrate native Salesforce integration assets:
1. In the Salesforce Integration app, click Connections.
2.
Click the connection's menu icon and select Migrate Native Assets.
3.
After fetching native assets for the connection, the app displays the Migrate Assets page.
Select the assets you want to migrate.

©2024 Oracle Corporation. All rights reserved
54 of 102
ëNote: If an asset in your native integration does not have a corresponding asset in
your Salesforce Integration app account, it cannot be selected on the Migrate Assets
page.
4.
Click Migrate.
q Warning: It is not possible to stop a migration once it has started. Clicking the
Cancel button displays the Connections screen, and the migration process continues
running in the background.
The selected assets are migrated with default names. Once the migration is complete, the
Migrate Assets page displays the migration status for each asset:
l
Indicates that the migration of the asset was successful.
l
Indicates that some records could not be migrated because of a mismatch with the native
integration. For example, this warning may indicate that internal or external calls in the native
integration were migrated but some field mappings were not migrated. You can manually correct
these by editing the corresponding imports and actions in the Salesforce Integration app.
l
Indicates that the migration of one or more assets failed because the connection to the
server could not be made at this time. If there is an error, the Salesforce Integration app skips over
it and attempts to migrate the remaining external calls and auto-syncs. If the error is not data-

©2024 Oracle Corporation. All rights reserved
55 of 102
related, like a system or connection error, then the Salesforce Integration app will stop the
migration process.
You can rerun the migration again at a later time if needed to correct issues due to a failed
connection or mismatched records. To correct errors, such as mismatched values, you can
manually fix the corresponding imports and actions. If you rerun the migration for
successfully migrated assets, they will be duplicated and not overwritten.
5. Click Done.
ëNote: You will create duplicate assets if you select Migrate Assets for the
same connection, select the same assets, and click Migrate. The duplicate assets
will have the same names incremented with integers.
Adding imports to a canvas
Using Oracle Eloqua's Salesforce feeder service, you can specify an Salesforce
Integration app import and schedule the import's post processing actions. When the
feeder runs, the post processing actions update the associated import.
You can use this service on the program canvas. The following example shows a
program canvas where the Wait element is configured to run the Salesforce feeder
step at specific intervals. You can also use the Salesforce feeder element with other
audience steps on the program canvas to update or create contact records within a
program.

©2024 Oracle Corporation. All rights reserved
56 of 102
ëNote: Adding the Salesforce feeder element to a canvas counts towards the
limit of ten post processing actions.
To add the Salesforce feeder to a program:
1. Open an existing program or create a new one.
2. From the Data Sources section, drag the Salesforce feeder element onto the canvas.
3. Configure the wait element to run at specific intervals and connect it to the Salesforce feeder
step.
4. Click Save. The canvas must be saved before you can configure the Salesforce feeder step.
5. Double-click the element to open its configure screen. The window that opens enables you
to do the following:

©2024 Oracle Corporation. All rights reserved
57 of 102
l
Change the name of the step to something more meaningful.
l
Click the edit icon to configure the element.
6. Click the edit icon to configure the action. The configuration dialog provides the option to
select an import.

©2024 Oracle Corporation. All rights reserved
58 of 102
¤ Tip: If you are using Firefox and the configuration screen does not load properly,
clear the browser cache.
7. From the Imports list, select the import you want to associate with the Salesforce feeder.
This creates a link between the canvas and the import.
8. Click Save to save the configuration and then click Save to save any changes you made to
the program.
When imports flow through the Salesforce feeder element, its post processing actions
are run at the intervals scheduled by the wait element.
To view a report about the information the Salesforce feeder has processed, its status,
errors, and other details, view its Daily Feeder Run report.
Creating campaign imports
Imports are data transactions from Salesforce into Oracle Eloqua. The Salesforce
Integration app executes imports every 15 minutes. After an import has been
scheduled, an import schedule does not display because imports are executed so
often. If an import needs to be performed off schedule, it can be executed on demand.
An import may fail due to various reasons such as connection or data related issues.
Some of these issues will cause an entire import to fail. You can setup email
notifications to alert you when import errors occur.

©2024 Oracle Corporation. All rights reserved
59 of 102
Custom objects in Salesforce Integration app can be imported into Oracle Eloqua
campaigns to allow for bi-directional updates between the two applications. When a
campaign action is enabled, any campaign imports using different connections are
automatically disabled.
Disabled imports are dimmed to indicate their status. There are several indicators in
your list of imports to help you quickly get an overview of their status.
Good to know
l
Users can map the Salesforce URL field to the Eloqua Large Text and Text fields. Use the
Large Text field if the value in your URL field contains more than 100 characters. Mapping
the URL field to any other Eloqua field results in an error.
l
For the Account, Contact, and Lead Salesforce objects, you can split the Address field onto a
new line in Oracle Eloqua, and the split will remain at the same place once that address is
pushed to Salesforce and imported back into Eloqua. For example, if you split an address to
a new line after 80 characters, and that's pushed to Salesforce, the address will still be split
to a new line at 80 characters once it's imported back into Eloqua.
Prerequisites
l
Configured connection
To create a campaign import:
1. In the Salesforce Integration app, click Campaigns.
2. Click the Campaign Imports tab.

©2024 Oracle Corporation. All rights reserved
60 of 102
3. Click Add Import and select a connection for which you want to create a new import.
4. Complete the import details:
ëNote: Each import can map up to a maximum of 100 fields. Learn more
l
Name: Enter a name for the import.
l
Object Mapping: The Eloqua Object is set to Campaign and cannot be modified. To see available
fields for mapping, select a top-level object from the Salesforce Object list.
ëNote: Salesforce History Objects, with an exception of Salesforce Login History Object,
are available to Marketers in the app.
l
Filter Details: Enter a Salesforce Object Query Language (SOQL) WHERE clause filter to use on the
CRM source field when querying contacts to import and then click Test to test the filter. For details
about creating SOQL filters, refer to the Salesforce SOQL developer documentation.
¤ Tip: When you build complex SOQL queries using logical operators, include
parenthesis, otherwise you may encounter a syntax validation error. For
example, the filter FirstName = 'Example' OR LastName = 'Contact' should be
(FirstName = 'Example' OR LastName = 'Contact').
l
Update Eloqua Fields: The unique identifiers are automatically determined by the Eloqua Object
and Salesforce Object values in the Object Mapping section. For each set of fields, select the
Oracle Eloqua field that will be mapped to Salesforce contacts. Add more mappings by clicking
Add Import Field Mapping. Click the menu to delete the mapping or switch the field type to

©2024 Oracle Corporation. All rights reserved
61 of 102
static text, static date, dynamic date, or advanced mode.
If you select Advanced Mode from the menu, you can enter multiple items to be sent to a
single Eloqua field: Salesforce Field, Static Date, or Dynamic Date. You can also type static text
into the box as needed.
l
Import Rules: Specify deduplication rules.
l
Deduplication type: Specify how to handle duplicate import records. For example, you can chose the
most recently updated record or import all records. Deduplication runs per import execution. If multiple
records with the same match field value are imported in a single execution, those records will be
deduplicated based on the setting specified here.
l
Post Processing: Post processing rules are not available for campaign imports.
5. Click Save.
Click the import's menu to modify the import or view reports. You can edit and enable
or disable an import. Once an import is disabled, you can delete it.

©2024 Oracle Corporation. All rights reserved
62 of 102
Once your import is scheduled, it automatically runs every 15 minutes. For more
details, see scheduling an import.
ëNote: The Last Import date indicates the last successful import.
Clicking Disable temporarily stops the imports. If the import is currently running and
has not yet started (it is in either the Retrieve from Salesforce or Deduplicating steps),
the import is canceled and disabled. If the import has begun importing to Oracle
Eloqua, the import will finish, then be disabled.
Clicking Enable enables your import. Note that the Salesforce Integration app stops
imports after 20 consecutive failures, in which case a notification displays at the top of
the dialog. The notification remains, and the import is excluded from scheduled runs,
until the import's configuration is edited and saved again. You will also not be able to
manually trigger the import until the issue is resolved.
¤ Tip: It is encouraged that you configure your notification settings so that you
are notified if an import is stopped.
Creating opportunity imports
An opportunity is a potential sales deal created and maintained by the sales team. You
can import Salesforce opportunities into Oracle Eloqua to enable marketers to report

©2024 Oracle Corporation. All rights reserved
63 of 102
on opportunities and measure campaign effectiveness. Data imported by the
Salesforce Integration app is required to populate Insight's closed-loop reporting data
for Salesforce opportunities.
Opportunity imports have dependencies: they must be linked to contacts directly or to
contacts via accounts. The Imports list will display the opportunity import as a child of
its parent object.
You must specify at least one parent dependency so that the linked Contact object is
created in Oracle Eloqua before the opportunity is imported. You can specify up to two
parent dependencies (a contact import or contact and account import).
Good to know
l
Users can map the Salesforce URL field to the Eloqua Large Text and Text fields. Use the
Large Text field if the value in your URL field contains more than 100 characters. Mapping
the URL field to any other Eloqua field results in an error.
l
For the Account, Contact, and Lead Salesforce objects, you can split the Address field onto a
new line in Oracle Eloqua, and the split will remain at the same place once that address is
pushed to Salesforce and imported back into Eloqua. For example, if you split an address to
a new line after 80 characters, and that's pushed to Salesforce, the address will still be split
to a new line at 80 characters once it's imported back into Eloqua.
Prerequisites

©2024 Oracle Corporation. All rights reserved
64 of 102
l
A configured connection
l
Identify the correct names of the object and associated fields that you want to import from
Salesforce and use for linking to an Oracle Eloqua object. The linking field is the Salesforce
Contact ID or Account ID.
l
A successful contact import for the connection, which must be enabled before the
opportunity import can be run
l
If you will select Contacts via Account, you will also need a successful account import for
the connection and link the contact import to the account. The linked account and contact
imports must both be enabled before the opportunity import can be run.
To create an opportunity import:
1. In the Salesforce Integration app, click Imports.
2. Click Add Import and select a connection for which you want to create a new import. The
Create Import page displays a default name for the import.
3. Enter a unique name for the opportunity import.
4. Import Only Deleted Records: Select this option if you want to recognize only deleted
Salesforce records in Eloqua by creating imports for deleted objects.
5. Check Email Address Changes: Select this option to have the Salesforce Integration app
check for email address changes before running an import. The app will then update a
changed email address to the latest before running the import. To use this option, the
unique identifier on the Eloqua side must be Email Address. Use this option with caution, as
it will increase the import run as well as Salesforce API usage. Learn more about the Check
Email Address Changes option.

©2024 Oracle Corporation. All rights reserved
65 of 102
Z Important: To use this feature, you must have history tracking enabled in your
Salesforce account.
6. From the Salesforce Object list, select Opportunity.
7. From the Eloqua Object list select Opportunity. The Opportunity Linking section is
displayed.
8. In the Update Eloqua Fields section, you can adjust the default field mappings if necessary.
For each set of fields, select the Oracle Eloqua field that will be mapped to Salesforce
contacts. You can add more mappings by clicking Add Import Field Mapping. Click the
menu to delete a mapping or switch its field type if needed. If you map fields for related
objects, you can select the Keep records updated option to trigger updates to all fields of a
related object when only fields from one of the objects are changed. For example, if your
opportunity import has a related account object and you select this option, fields from both
objects will be updated even if there is a change to only the account object. Additionally,
note that:
l
You can choose whether or not the Salesforce Integration app will Always update Eloqua fields,
even if the new value is blank upon import.
ëNote: Each import can map up to a maximum of 100 fields. Learn more
If you select Advanced Mode from the menu, you can enter multiple items to be sent
to a single Eloqua field: Salesforce Field, Static Date, or Dynamic Date. You can also type
static text into the box as needed.

©2024 Oracle Corporation. All rights reserved
66 of 102
9. In the Import Rules section, adjust the default data priority or deduplication rules if needed.
10. From the Eloqua Entity to link Opportunity records to list, select one of the following:
l
Account (the default): Indicates that the Oracle Eloqua opportunity import should be linked to the
contact import, which is linked with its account import (two parent dependencies). The default
linking is: Salesforce's Account ID field is linked to Eloqua's SFDC Account ID field.

©2024 Oracle Corporation. All rights reserved
67 of 102
l
Contact: Indicates that the Oracle Eloqua opportunity import should be linked to the contact
import (one parent dependency). The default linking is: Salesforce's Contact ID field from is linked
to Eloqua's SFDC Contact ID field.
11. In the Dependencies section, you can add any needed import dependencies by clicking Add
Import Dependency.
a. In the Parent Import column, select the name of the parent object to establish the opportunity
import's dependency on an existing import, such as the name of an existing contact import. If you
have two parent dependencies, click Add Import Dependency again and add the second
dependency. You can establish the dependency while the parent import is disabled. However, the
parent import must be enabled before you can enable its opportunities import.
12. Click Save. The Imports page displays the new opportunity import in the list.
13. If one or more of the opportunity import's parent objects are disabled, click the
corresponding menu and select Enable to run the parent import.
14. Click the menu for the new opportunity import and select Enable to run it.
Note that the Salesforce Integration app stops imports after 20 consecutive failures, in which
case a notification displays at the top of the dialog. The notification remains, and the import
is excluded from scheduled runs, until the import's configuration is edited and saved again.
You will also not be able to manually trigger the import until the issue is resolved.

©2024 Oracle Corporation. All rights reserved
68 of 102
¤ Tip: It is encouraged that you configure your notification settings so that you are
notified if an import is stopped.
Once your import is scheduled, it automatically runs every 15 minutes. For more
details, see scheduling an import.
The timing of the import is based on the parent import timing and success. If there is a
failure on any parent, the child import will not execute.
You can determine whether an opportunity import was successful or partially
succeeded by selecting View Report from the menu. Some links for the object
dependencies should be created for an initial successful opportunity import.
ëNote: The opportunity import report may indicate 0 links after the initial
successful import if no additional records were created.

©2024 Oracle Corporation. All rights reserved
69 of 102
Clicking Disable temporarily stops the imports. If the import is currently running and
has not yet started syncing to Oracle Eloqua (if it is in either the Retrieve from
Salesforce or Deduplicating steps), the import is canceled and disabled. If the import
has begun importing to Oracle Eloqua, the import will finish, then be disabled.
If you click Disable or Delete for an import that has dependencies, a message will
indicate those dependencies.
Before clicking Yes to disable or delete the import, determine whether you also want
to disable the linked imports (or delink the imports if you are deleting a parent import).
Creating user imports
Salesforce users can be imported into Oracle Eloqua. By importing, users can be
created and updated, they can be placed in a folder, and added to or removed from a
security group.
For example, use user imports to import your Profiler users from Salesforce to Oracle
Eloqua. You can configure the import to add these users to the Prospect Profiler
security group so that they can access Profiler. In addition, integrating Oracle Eloqua

©2024 Oracle Corporation. All rights reserved
70 of 102
with Salesforce SSO would ensure that these users can easily login to Profiler using
their Salesforce login credentials.
Imports are data transactions from Salesforce into Oracle Eloqua. The Salesforce
Integration app executes imports every 15 minutes. After an import has been
scheduled, an import schedule does not display because imports are executed so
often. If an import needs to be performed off schedule, it can be executed on demand.
An import may fail due to various reasons such as connection or data related issues.
Some of these issues will cause an entire import to fail. You can setup email
notifications to alert you when import errors occur.
Good to know
l
Map out the Salesforce users and what you want them to be able to do in Oracle Eloqua. For
example, a Profiler user will need to be added to the Active Users - Sales and the Prospect
Profiler User security groups.
l
We recommend using the email address as the unique identifier for users. Additionally, you
must map the user's first and last names, email address, user name, and display names.
l
The Oracle Eloqua user name must be in the format <first name>.<last name>.
l
If you use signature rules in Oracle Eloqua, we recommend mapping signature fields. Learn
more
l
When mapping user fields, understand the values accepted by Oracle Eloqua.
l
Boolean fields accept values of True and False.
l
For testing, use a Salesforce Object Query Language (SOQL) statement to import only one
test account. For example, filter for a specific user based on ID.

©2024 Oracle Corporation. All rights reserved
71 of 102
Prerequisites
l
Configured connection
l
A BI user report must exist in Salesforce.
To create a user import:
1. In the Salesforce Integration app, click Imports.
2. Click Add Import and select a connection for which you want to create a new import.
3. Complete the Import Details:
l
Name: Enter a name for the import.
l
Salesforce Object: Select User.
l
Eloqua Object: Select User.
l
Check Email Address Changes: Select this option to have the Salesforce Integration app check
for email address changes before running an import. The app will then update a changed email
address to the latest before running the import. To use this option, the unique identifier on the
Eloqua side must be Email Address. Use this option with caution, as it will increase the import run
as well as Salesforce API usage. Learn more about the Check Email Address Changes option.
Z Important: To use this feature, you must have history tracking enabled in your
Salesforce account.
4.
Complete the Filter Details:
l
Filter Details: Enter a Salesforce Object Query Language (SOQL) WHERE clause filter to use on the
CRM source field when querying users to import and then click the test icon to test the filter. For
details about creating SOQL filters, refer to the SOQL developer documentation.

©2024 Oracle Corporation. All rights reserved
72 of 102
¤ Tip: When you build complex SOQL queries using logical operators, include
parenthesis, otherwise you may encounter a syntax validation error. For example, the filter
FirstName = 'Example' OR LastName = 'Contact' should be (FirstName = 'Example' OR
LastName = 'Contact').
5. Complete the field mapping in the Update Eloqua Fields:
l
Map the Unique Identifier fields. We recommend using the user's email address as the unique
identifier.
l
Map the required fields. Oracle Eloqua requires the user's first and last names, email address, user
name, and display names.
l
The Oracle Eloqua user name must be in the format <first name>.<last name>.
l
Add more mappings by clicking Add Import Field Mapping.
l
Click the menu to delete the mapping or switch the field type to static text, static date, or
dynamic date. Click the menu to delete the mapping or switch the field type to static text,
static date, dynamic date, or advanced mode.
ëNote: Each import can map up to a maximum of 100 fields. Learn more

©2024 Oracle Corporation. All rights reserved
73 of 102
l
If you select Advanced Mode from the menu, you can enter multiple items to be sent to a
single Eloqua field: Salesforce Field, Static Date, or Dynamic Date. You can also type static text
into the box as needed.
If you map fields for related objects, you can select the Keep records updated option to trigger
updates to all fields of a related object when only fields from one of the objects are changed.
6. Complete the Import Rules:
l
Folder: Select an Oracle Eloqua folder where the users should be added to.
l
Deduplication type: Specify how to handle duplicate import records. For example, you can chose
the most recently updated record or import all records. Deduplication runs per import execution. If
multiple records with the same match field value are imported in a single execution, those records
will be deduplicated based on the setting specified here.

©2024 Oracle Corporation. All rights reserved
74 of 102
7. Complete the Post Processing setup:
l
Add to Or Remove From A Specific Security Group / Add to Or Remove from All Security
Groups: Specify whether after the import, users should be added to or removed from a security
group or all security groups.
l
Click Add Action to specify an action to be performed on a user after import.
8. Scroll to the top and click Save Import and then Close.
9.
From the Imports list, click next to the import to edit, enable (to schedule your import)
and disable, or view report data for an import.
l
Clicking Enable enables your import.
l
Clicking Disable temporarily stops the import. If the import is currently running and has not yet
started (it is in either the Retrieve from Salesforce or Deduplicating steps), the import is canceled
and disabled. If the import has begun importing to Oracle Eloqua, the import will finish, then be
disabled.
After you finish:
l
Once your import is enabled, it automatically runs every 15 minutes.
l
If an import is disabled, you can delete it.
l
The Last Import date indicates the last successful import.

©2024 Oracle Corporation. All rights reserved
75 of 102
l
Note that the Salesforce Integration app stops imports after 20 consecutive failures, in which
case a notification displays at the top of the dialog. The notification remains, and the import
is excluded from scheduled runs, until the import's configuration is edited and saved again.
You will also not be able to manually trigger the import until the issue is resolved.
¤ Tip: It is encouraged that you configure your notification settings so that you
are notified if an import is stopped.
Creating marketing activity exports
You can export the following Oracle Eloqua-generated marketing activities to
synchronize data with Salesforce when the activity export group is run:
l
Email send
l
Email open
l
Email click through
l
Subscribe
l
Unsubscribe
l
Bounceback
ëNote: Bounceback activities are recorded asynchronously in Oracle Eloqua, which
means the Bulk API Activity Created Date (when the bounceback occurred), may not
be immediately available to export after the bounceback occurred. Therefore, the

©2024 Oracle Corporation. All rights reserved
76 of 102
Salesforce Integration App is using the upper date limit for a filter one hour before the
time of Bulk API sync creation to ensure the bounceback activities have been recorded
and synced to Salesforce.
l
Web Visit
l
Page View
l
Form Submit
An export group is a way to combine export payloads and avoid sending duplicate
data to Salesforce. For each export group, you can specify up to ten contact fields.
Prerequisites
l
A configured connection
l
When a marketing activity is exported from Eloqua, it can be linked to the corresponding
Lead or Contact in SFDC when the associated task is created in Salesforce. This linkage will
be successful assuming the correct field mapping, that is provided by default. If there is no
SFDC Lead or Contact ID present on Eloqua Contact at activity export time, the activity
cannot be linked to a Lead or Contact in Salesforce.
To create a marketing activity export:
1. In the Salesforce Integration app, click Marketing Activities. The Marketing Activities page
is displayed.

©2024 Oracle Corporation. All rights reserved
77 of 102
2. Click Create Export.
3. Enter a unique name for the marketing activity group.
4. From the Activity Type list, select the activity that you want to export.
5. If you select Email Send, Email Open, or Email Click Through, you can leave the default
Email Send Type value of All or select other options from the list. These options are Eloqua
email channels that can filter the export based on the way the email activity data was sent.
For example, if you select Campaign, the export will only include email activities sent via the
campaign canvas. This would limit the exported data and make the export complete more
quickly than if you included all sources.

©2024 Oracle Corporation. All rights reserved
78 of 102
If you select an option other than All, the Filter Rule option is displayed, which allows you to
include or exclude multiple specified email send type.
6. In the Contact Field Availability section, enter up to 10 contact fields to be used for export
field mapping. Alternatively, you can click Browse Fields to display all contact fields you can
choose from.
Z Important: There is a maximum of 10 contact fields allowed in an activity export
definition. The addition of contact fields to activity exports will add to export time.
7. In the Filter Activities section, you can specify the criteria that must be met for an activity to
be sent to Salesforce. You can use the Eloqua contact fields you specified in the Configure
Marketing group section.

©2024 Oracle Corporation. All rights reserved
79 of 102
ëNote: The maximum number of conditions for one marketing activity is 5.
Additionally, empty values are allowed in the value field, and reports will not contain
Filtered Records if none of the records are filtered. If the filter is applied, the reports
will display how many records were filtered out of the total.
To add further conditions to your marketing activity, click Add Condition.
8. Click Next. The Create Marketing Activity page is displayed.
9. Define the following options for an export within the group.
l
Export Name: Provide a name for the export that is unique within the export group.
l
Connection Name: Choose a connection.
l
Salesforce Object: Select the target Salesforce object from the list.
l
Action Type: There are two action types: Create or Update. Create is typically used to create a new
task in Salesforce and associate it with Salesforce Contact or Lead. For Subscribe, Unsubscribe,

©2024 Oracle Corporation. All rights reserved
80 of 102
and Bounceback marketing activities, choose the Update action type to configure Salesforce Lead
or Contact email subscription status updates.
Default mappings are displayed for the export in the Update Salesforce Fields section.
10. Adjust any of the mappings between the From Eloqua and To Salesforce fields and add
any related objects that you need.

©2024 Oracle Corporation. All rights reserved
81 of 102
ëNote: The fields available for mapping in the Contact section are limited to the
fields you selected in the Contact Field Availability section.
11. Click Create Export.
You will be redirected to Marketing Export Created page. From this page, you have three
options:
l
Close: Return to the Marketing Activities page.
l
Enable: Run the every 15 minutes.
l
Create Export: Create another export. Create additional exports as needed.
After enabling your export, it runs and is then automatically started 15 minutes after
each prior export has finished.
Using the menu next to the export, you can perform the following actions:

©2024 Oracle Corporation. All rights reserved
82 of 102
l
View Reports:You can determine whether a marketing activity export was successful or
partially succeeded by expanding an export group and selecting View Report from an
individual marketing activity export's menu.
The marketing activity's report is updated even if there are no records to synchronize.
l
Disable:Clicking Disable temporarily stops the exports. If the export is currently running
and has not yet started syncing to Salesforce, the export is canceled and disabled. If the
export has begun, it will finish and then be disabled.
l
Re-run: You can choose the Re-run menu option to sync Marketing Activity records that
were not uploaded to Salesforce on a selected date because the activity export finished with
a warning status. Previously uploaded records will be excluded.

©2024 Oracle Corporation. All rights reserved
83 of 102
Z Important: This feature is currently released under our Controlled Availability
program. To request access to this feature, please log in to My Oracle Support
(https://support.oracle.com) and create a service request.
Configuring notifications
An import or action may fail due to various reasons such as connection or data related
issues. Use the Notifications page in the Salesforce Integration app to setup email
notifications to alert you of import and action errors. The notification includes your
client and import name, start and end times, and identifies the step at which the error
occurred.

©2024 Oracle Corporation. All rights reserved
84 of 102
To configure a notification:
1. In the Salesforce Integration app, click Notifications.
2. Click Add Notification.
3. Select the notification settings and recipients:
l
Name: Provide a descriptive name that will appear in the list of notifications.
l
Connection: Select a specific connection or all connections.

©2024 Oracle Corporation. All rights reserved
85 of 102
l
Event Source Type: Notifications are currently available for imports and actions.
l
Event Source: This setting defaults to either all imports or all actions.
l
Event Type: Select either Error or Stopped. Notifications are available for failed imports and
actions, as well as for instances where scheduled syncs (imports or activities) are stopped by the
Salesforce App due to too many consecutive failures.
l
Email Notification Frequency: Set the frequency with which you receive error notifications (Instant,
Hourly, or Daily).
l
Email(s): Enter recipient email addresses. You can enter multiple email addresses separated by
commas.
4. Click Save.
You can return to the notification area to create new notifications, as well as edit,
delete, and disable existing notifications.
Salesforce Integration app FAQs
For more FAQs, see here.
Q. Why are my Salesforce App converted leads not clearing the IDs?
This might be happening because your create lead action and converted lead import
have the incorrect data priority. The import needs to either have a higher priority or
the same priority as the import.
Q. What Salesforce version is required to use the Salesforce Integration app?
A. Any Salesforce version that comes with API access is supported. For more details,
see Salesforce editions with API access.

©2024 Oracle Corporation. All rights reserved
86 of 102
Q. Can we revert to our native integration if issues arise?
A. The two integrations can run side-by-side.
Q. What are the minimum required SFDC OAuth scopes?
A. At a minimum, the following scopes are required:
l
Access and manage your data (api)
l
Full access (full)
l
Perform requests on your behalf at any time (refresh_token, offline_access)
The custom_permissions scope is recommended. Determining whether it is needed
depends on your Salesforce configuration.
Q. I am having trouble creating a connection for the Salesforce Integration app.
Why won't it allow me to save the connection?
A. In the Default Field Mappings section (below the Connected App section), verify that
you have mapped the ID fields.
Q. When I try to configure the Salesforce Integration app, some Salesforce fields
are missing. What can I do?
A. Verify the Salesforce permissions for the account used to authenticate the app.
Determine whether the account has read-only access to specific Salesforce objects
and their fields, because read-only fields are not visible to Eloqua's Salesforce
Integration app.

©2024 Oracle Corporation. All rights reserved
87 of 102
Q. Do I need to refresh the app to get the latest Salesforce updates?
A. The Salesforce Integration app updates automatically. You do not need to refresh it.
Q. I do not see a configured action in any canvas. What can I do?
A. Verify that your configured action is enabled. Disabled actions are not displayed on
any canvas.
Q. Does the Salesforce Integration app require Salesforce's 18-character ID?
A. Yes, 15-character IDs are not supported. If your instance currently uses 15-character
IDs, data will either need to be removed or the IDs updated.
Q. We use an internal SSO (Single Sign-On) service to login into Salesforce, and
we run into the HTTP/302 error while trying to authenticate the SFDC App. What
can we do to resolve it?
A. You will need to specify the configuration details of your SSO service in the Web
App Setting section of the SFDC Connected App. Please contact your SFDC Admin for
further help.
Q. What is the process for switching from 15- to 18-character IDs?
A. A check box on every external call (and within auto-sync settings) to use 15- or 18-
character IDs must be changed to 18-character.

©2024 Oracle Corporation. All rights reserved
88 of 102
If data is being sent from Salesforce into Eloqua custom objects or Eloqua's
opportunity object, switching to 18-character IDs may be difficult. For custom object
imports, you can optionally delete all data from the custom object, change the auto-
sync to use 18-character IDs, then re-synchronize all data into the custom object. The
Oracle Operations team must make any Eloqua opportunity object updates.
Q. Does the app support multiple Salesforce instances?
A. The app can be configured to sync data across multiple Salesforce instances,
excluding Campaigns. Eloqua Campaigns and Campaign Responses data sync can be
done to a single Salesforce instance.
Q. Does the app support Salesforce's custom objects?
A.
l
All Salesforce objects are supported bidirectionally.
l
All Eloqua objects are supported except for accounts in actions.

©2024 Oracle Corporation. All rights reserved
89 of 102
Q. What are the differences between native integration and the app-based
integration?
A. The app-based integration offers the following key benefits:
l
Faster outbound and inbound data flow.
l
Easier to configure and use.
l
Supports multiple connections (excluding Campaign and Campaign Responses).
Q. Where can I access the SFDC Integration App?
A. Please visit the Cloud Marketplace:
https://cloudmarketplace.oracle.com/marketplace/app/AppSalesforce
Q. Does the new integration leverage Oracle Integration Cloud Service (OIC)?
A. No.
Q. Does the App require the use of SFDC 18-char ID?
A. There is a checkbox on every external call (and within auto-sync settings) to use 15
or 18 character IDs. This must be changed to 18 characters. If data is being from SFDC
into Eloqua custom objects or Eloqua's opportunity object, switching to 18 character
IDs may be a bit more laborious. For custom object imports, the worst case is to delete
all data from the custom object, change the auto-sync to use 18 character IDs, then re-
sync all data into the custom object. Eloqua's opportunity object must be updated by
the Oracle Ops Team.

©2024 Oracle Corporation. All rights reserved
90 of 102
Q: Why do I see a "Record could not be found in result set" Salesforce error?
A: Make sure that you are not using the string #N/A as a value on any Eloqua field.
The SFDC App uses this special string internally to set the Salesforce field value to null.
If used, an internal record mismatch will occur and Salesforce will return following
error: "Record could not be found in result set." This special string is case sensitive, so
any other combination such as #n/a will work just fine.
Q. How is Lead conversion handled in imports?
A. Converted leads can be imported by using a filter.
Q. What is the maximum number of field mappings in the Salesforce App
imports? How about actions?
A. Up to 100 fields can be configured on any import, including related object fields (if
applicable). There is a limit of 250 field mappings on actions.

©2024 Oracle Corporation. All rights reserved
91 of 102
Q. I configured the User import. However, I’m getting the “Unsuccessful
response from Eloqua” error message. What should I do?
A. Eloqua Login Name must be in the FirstName.LastName format. Typically,
Salesforce username does not follow this format and causes the error. To resolve it,
Salesforce app users can either match Users import on the Email Address or export
Eloqua Login Name to Salesforce and later use it as a Unique Identifier in imports.
Please note that the following fields are required on any User import: First Name, Last
Name, Full Name and Login Name. Syncing Salesforce User Id is highly recommended
as well.
Q. We are having trouble creating a Connection in Eloqua Production for the
SFDC Integration App. It won’t allow me to save the connection.
A. Please get the ID fields been mapped (just below the connected app details).
Q. How does the App compare with the Native integration?
A. The Salesforce Integration app includes:
l
All SFDC objects supported, bidirectionally.
l
All Eloqua objects supported with the exception of Accounts in Actions.
l
Closed-Loop Reporting is supported.
l
Configurable Import Frequency - min every 15 minutes.

©2024 Oracle Corporation. All rights reserved
92 of 102
l
Actions used in a Canvas.
l
Nomenclature changes:
SFDC App Native Integration
Imports Auto-syncs
Actions Internal Events/External Calls
Q. How do I transition from the Native Integration to the new App?
A. Once the App is installed and the connection to Salesforce is configured, you need
to add new Imports and Actions in the App that follow the same object and field
mapping rules as defined in existing Native Integration Assets. In addition, you need to
add any applicable Actions to a Campaign or Program Canvas.
Q. Can the Jordo's playbook be applied to the new App?
A. No, the Jordo's playbook is applicable only in SFDC Native Integration. The App can
be configured to automatically check for the Email Address Change.
Q. If I re-install or update the App, will I lose configured assets?
A. When you update the App, all existing configurations will be preserved. If you re-
install the App, you will need to configure the App from scratch.

©2024 Oracle Corporation. All rights reserved
93 of 102
Using the app in a program or campaign
The Salesforce Integration app enables you to update or create contact records within
a program or campaign. You can put actions through a test run with pre-configured
contacts.
-Example: A listener step could be configured to listen for contacts who
complete a form. Once the contact is added to the Program Canvas, you may
want to decide to create a lead for the contact, depending on the next decision,
you can configure this app to either create a contact or update an existing
contact within the CRM.
To use the Salesforce Integration app in a campaign or program:
1. Open an existing campaign or program, or create a new one.
2. Click on the Actions section to expand it, and view all available action elements, including
installed apps.

©2024 Oracle Corporation. All rights reserved
94 of 102
3. Drag the Salesforce Integration app element onto the canvas, then double-click it to open
the configure screen.
The window that opens enables you to do the following:
l
Change the name of the step to something more meaningful.
l
Configure the element.
l
Choose to route contacts that resulted in an error to another step (see: configuring campaign
elements for more information).
4. Click the Edit icon to configure the action.
a. Click the Actions list to select an existing action. If you do not see any existing actions, see
configuring actions for more information.
b. Click Save.
c. (Optional) Click Status to see the status of contact processing. The amount of contacts that have
been successfully processed, or were processed with warnings or errors will be displayed.

©2024 Oracle Corporation. All rights reserved
95 of 102
Viewing report data
The Salesforce Integration app provides reporting on the records being sent between
Oracle Eloqua and Salesforce to provide insight into how your imports and actions are
performing. Data is retained for a period of three months.
Reporting is available in the following formats:
l
A global report dashboard which displays import activity, action activity, and marketing
activity exports for the past seven days.
l
Individual reporting for imports and actions that displays activity for a specific import or
action for the current day (previous dates are selectable). A table of every import or action
execution, including details of created, updated, and failed records and time of execution.
Viewing the global report dashboard
The Salesforce Integration Reporting Dashboard provides an overview of action,
import, and export activity over the last seven days. In this report, the volume of data
flowing between Oracle Eloqua and Salesforce Integration app is shown per day,
including created, updated, and failed records. The report initially displays the most
recent seven days of data, with an option to select a specific seven day interval. Click
on the Failed portion of one of the bar's to drill down to a daily report.

©2024 Oracle Corporation. All rights reserved
96 of 102
The global report dashboard is located on the Status and Reporting tab in the
Salesforce Integration app. Data is retained for a period of three months.
To view the global report dashboard:
1. In the Salesforce Integration app, click the Status and Reporting tab. The dashboard is
displayed.
2. From the connection list, select the connection for which you want to display a dashboard.
An overview of the total amount of imports and exports over the current seven day period
that were created, updated, or failed are displayed.
You can view the amount of records created, updated, or failed over a seven day
period with an option to view the details for each specific day by mousing over the
day. Here, you can view reports for a specific seven day period in the past.

©2024 Oracle Corporation. All rights reserved
97 of 102
Viewing connection errors
The Status and Reporting screen displays errors associated with a current connection.
If you have multiple active connections, and a hidden connection reported an error,
the Salesforce Integration app will display a notification message at the top of the
Status and Reporting screen. To find out which hidden connections have errors, open
the connection drop-down.
Connections that have errors will have a warning icon beside them.
Viewing imports and exports by target
Import data is categorized and displayed in a pie chart to help visually identify how
many records are being imported into Oracle Eloqua from Salesforce by target.

©2024 Oracle Corporation. All rights reserved
98 of 102
The Exports by Target bar chart displays all records within the period so you can view
how many records were created or updated from Oracle Eloqua to Salesforce,
categorized by target.

©2024 Oracle Corporation. All rights reserved
99 of 102
Viewing report data for actions and imports
Individual reporting for Salesforce Integration app actions and imports displays
activity for a specific import or action for the current day (previous dates are
selectable). A table of every import or action execution, including details of created,
updated, and failed records and time of execution. Data is retained for a period of
three months. You can view daily report data for actions or imports via the Actions or
Imports tabs, or via the global report dashboard.
To view report data for actions or imports:

©2024 Oracle Corporation. All rights reserved
100 of 102
1. In the Salesforce Integration app, click Actions or Imports. To view reports for campaign
actions, click the Campaign Actions tab.
2. Locate the action or import for which you want to view report data, click the list, and select
View Reports.
Action report data
Action reports are available for step actions and campaign actions. These reports
provide information about the records that are flowing from Oracle Eloqua into
Salesforce.
For step actions, view how many records were created or updated, how many were
processed per hour, how long it took to complete, and whether or not it was
successful. To exclude test payloads used for test Action runs, click Hide Runs With
Test Contacts.
For campaign actions, view whether the campaigns exported from Oracle Eloqua to
CRM were successful and a daily history of your campaign exports.
For Campaign Actions, click a table row to view more details related to that campaign,
such as the data sent over by the action, the action's sent date, and any error
messages.
Import report data
Import reports provide insight into how your imports are performing by displaying a
chart of how many records are being created, updated, or have failed to import. You
can also view how many objects were imported into Oracle Eloqua campaigns from
CRM, which ones were successful, and how many failed.

©2024 Oracle Corporation. All rights reserved
101 of 102
Each report displays an import's schedule start time, how long it took to complete,
whether or not it was successful, and how many records were created, updated, or
failed. When an import is running, click the import to view the progress.
The status of the import is displayed including:
l
Import data
l
When the import started
l
How long the import took to complete
l
The number of records with their status
There are four stages to a successful import:
1. Oracle Eloqua queries Salesforce.
2. Records are retrieved from Salesforce.
3. Records are deduplicated.
4. Records are uploaded to Oracle Eloqua.
The message Retrieving from Salesforce indicates your import is successfully running.
You can manually stop an import if it is running and has not yet reached the
Uploading to Eloqua step. Once the Uploading to Eloqua step is started, the import
cannot be stopped and will continue to completion. Stopped imports cannot be
resumed. You must run the import again. Learn more about creating and scheduling
imports.

©2024 Oracle Corporation. All rights reserved
102 of 102
Report data for failed actions or imports
To see reports related to failures, you can use the View Reports option or access
reports via the global report dashboard.
To view report data for failed actions or imports via the global report dashboard:
1. In the Salesforce Integration app, navigate to the Status and Reporting tab.
2. Click on the Failed (red) section of a bar to see that day's Imports with failures and Actions
with failures.
¤ Tip: In the daily report that opens, you can toggle between the View errors by
asset and the View errors by type options. Grouping errors by type can help you more
easily identify the kinds of issues your app is having so that you can more easily
summarize and communicate them to your team.
3. Click on an import with one of the imports or actions to open its report data for that day.
