
RingCentral
for Salesforce
Admin guide
v6.29.0
RINGCENTRAL.COM

RingCentral
for Salesforce
Admin Guide
2

Introduction 4
About RingCentral for Salesforce 4
Requirements 4
About this Guide 4
Installation 6
Install RingCentral for Salesforce 6
Uninstall RingCentral for Salesforce 11
Environment Configuration 14
Start with the Install Wizard 14
Setup Call Center 15
Setup Softphone Layout 22
Enable RingCentral in the Salesforce.com Apps 25
Application Setup 42
About Admin UI 42
Salesforce Records Matching Strategy 44
Call Logging Setup 52
High Velocity Sales HVS Support 58
Salesforce Do Not Call DNC Support 59
3

Introduction
About RingCentral for Salesforce
The RingCentral for Salesforce provides seamless integration between Salesforce.com
and your RingCentral services to enable improved customer retention, greater agent
productivity, and advanced business processes.
Requirements
Salesforce Edition:
● Professional, Enterprise, Unlimited
RingCentral Subscription:
● MVP Premium and above
Hardware Requirements (for the best Salesforce experience):
● An Octane 2.0 score of 30,000 or greater
● Network latency of 150 ms or less
● Download speed of 3 Mbps or greater
● At least 8 GB of RAM, with 3 GB available for Salesforce browser tabs
Recommended Operation System and Software Requirements:
● The latest Windows or Mac OS, 32 or 64-bit
● Current 1 version of Chrome, Firefox, Edge Chromium) or Safari
● The latest RingCentral application (optional)
● The latest RingCentral Phone application (optional)
Minimum Operation System and Software Requirements:
● Windows XP SP2
● Mac OS X 10.8
● Chrome 56, Firefox 52, Safari 6.0.5
About this Guide
This guide is specifically designed for System Administrators of the Salesforce.com
application. This guide is not intended for end-users and does not provide any information
4

on how to use the application or any related information. This Administrator guide will
show you how to set up your Salesforce.com instance to enable your users to use
RingCentral for Salesforce within their Salesforce.com interface.
This Admin Guide is specifically created for RingCentral for Salesforce Lightning version
6.18.x. All previous and related guides for RingCentral for Salesforce can be accessed from
the Salesforce AppExchange.
5

Installation
Install RingCentral for Salesforce
Install the RingCentral for Salesforce package from the Salesforce AppExchange. Click
“Get It Now” to start the installation. Installation of this application requires an
administrator login to Salesforce.com.
By clicking “Get It Now”, the confirm page will appear. Click the “Visit Provider
6

The user will be navigated to the landing page. Select a Production or a Sandbox
environment to process the installation.
In this guide, we are going to install the application in a Production environment.
7

The installation process will be initiated in the Salesforce environment. Select the users
that wanted to be installed. And click the Install button.
8

The installation will continue to process. If the installation takes longer than expected,
Salesforce will send an email notification when done.
Once the installation is done, the completed page will be displayed.
9

Now the admin can find the installed package in the Salesforce Setup → Apps →
Packaging → Installed Packages.
Once the installation is completed, the admin user is able to find the RingCentral for
Lightning and RingCentral Admin for Lightning from the App Launcher.
10

Uninstall RingCentral for Salesforce
Navigate to the Salesforce Setup → Apps → Packaging → Installed Packages. All installed
packages are listed on the table.
11

RingCentral for Salesforce application is using the Package Name “rc_sf_package”. Click
the Uninstall in the Actions. The uninstallation will be initialized.
The admin can decide whether save a copy of the package data for later use, and need to
confirm the uninstall. And click the Uninstall button to continue.
The packages that are going through the uninstallation process will be listed in the
Uninstalled packages table. And the uninstallation status will be shown.
12

Once the uninstallation is completed, the package will be removed from the Installed
Packages table, and the status on the Uninstalled Packages table will be shown
Completed.
13

Environment Configuration
Start with the Install Wizard
Admins will need to create a proper configuration for the RingCentral for Salesforce
working as expected.
The Install Wizard is designed to help the administrator in configuring the Salesforce
environment for the RingCentral application.
Admin users can find the RingCentral Admin for Lightning from the App Launcher.
Click to open the app. The Install Wizard will be launched.
14

Follow the instructions step by step to complete the configuration.
Setup Call Center
About Call Center
The Call Centers is an application in Salesforce that manages Phone Call integrations.
Phone Call integration in Salesforce is called Call Center. A Call Center corresponds to a
Computerring Telephony Integration CTI in Salesforce. Any CTI should be registered to
the Call Centers to be enabled in Salesforce applications.
Create a Call Center
The admin can either create a call center automatically or manually. As long as it was
created in correct steps, it could work correctly.
Option 1: Auto generate a Call Center for RingCentral
Click the Create Call Center button
15

A confirmation message will pop up. The automatically creating call centers is only
working when there are no previous call centers created in the Salesforce org. Click the
Create button to continue.
The creation will take a few seconds, and the status will be shown.
Option 2: Manually create a Call Center for RingCentral
For any reason the automatically creating Call Center is not working, the admin can always
create a call center manually.
An XML file will be needed to create a call center. Click the Download XML Setup button,
and an XML file will be downloaded.
16

This XML file is unique for the current Salesforce environment. Do not use it for other
environments.
Then click the Manually Create Call Center button. The Call Centers setup page will be
open. Click the Import button.
Click the Choose File button, select the XML file that was downloaded, and click the
Import button.
A call center will be created.
17
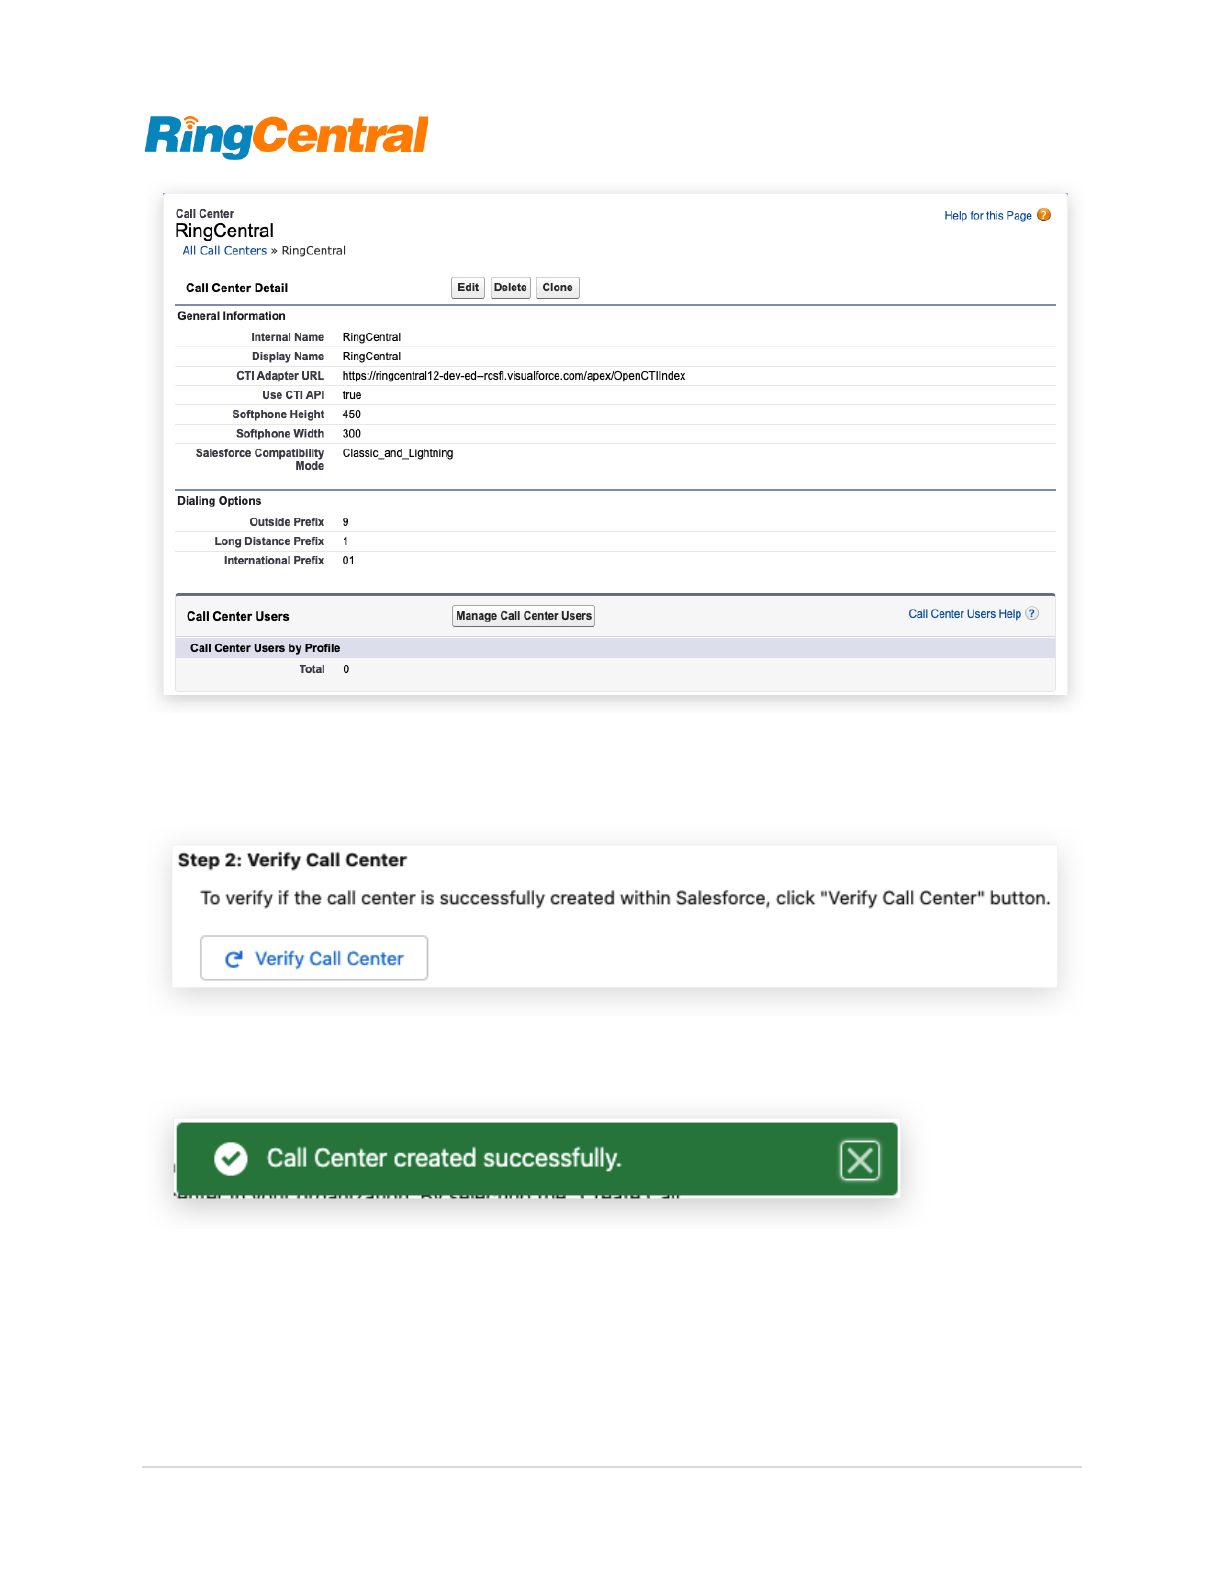
Now go back to the Install Wizard and click the Verify Call Center button.
A confirmation notification will pop up.
Assign Users to a Call Center
Click the Launch Salesforce User Assignment button and the Call Center that was created
will be opened.
18
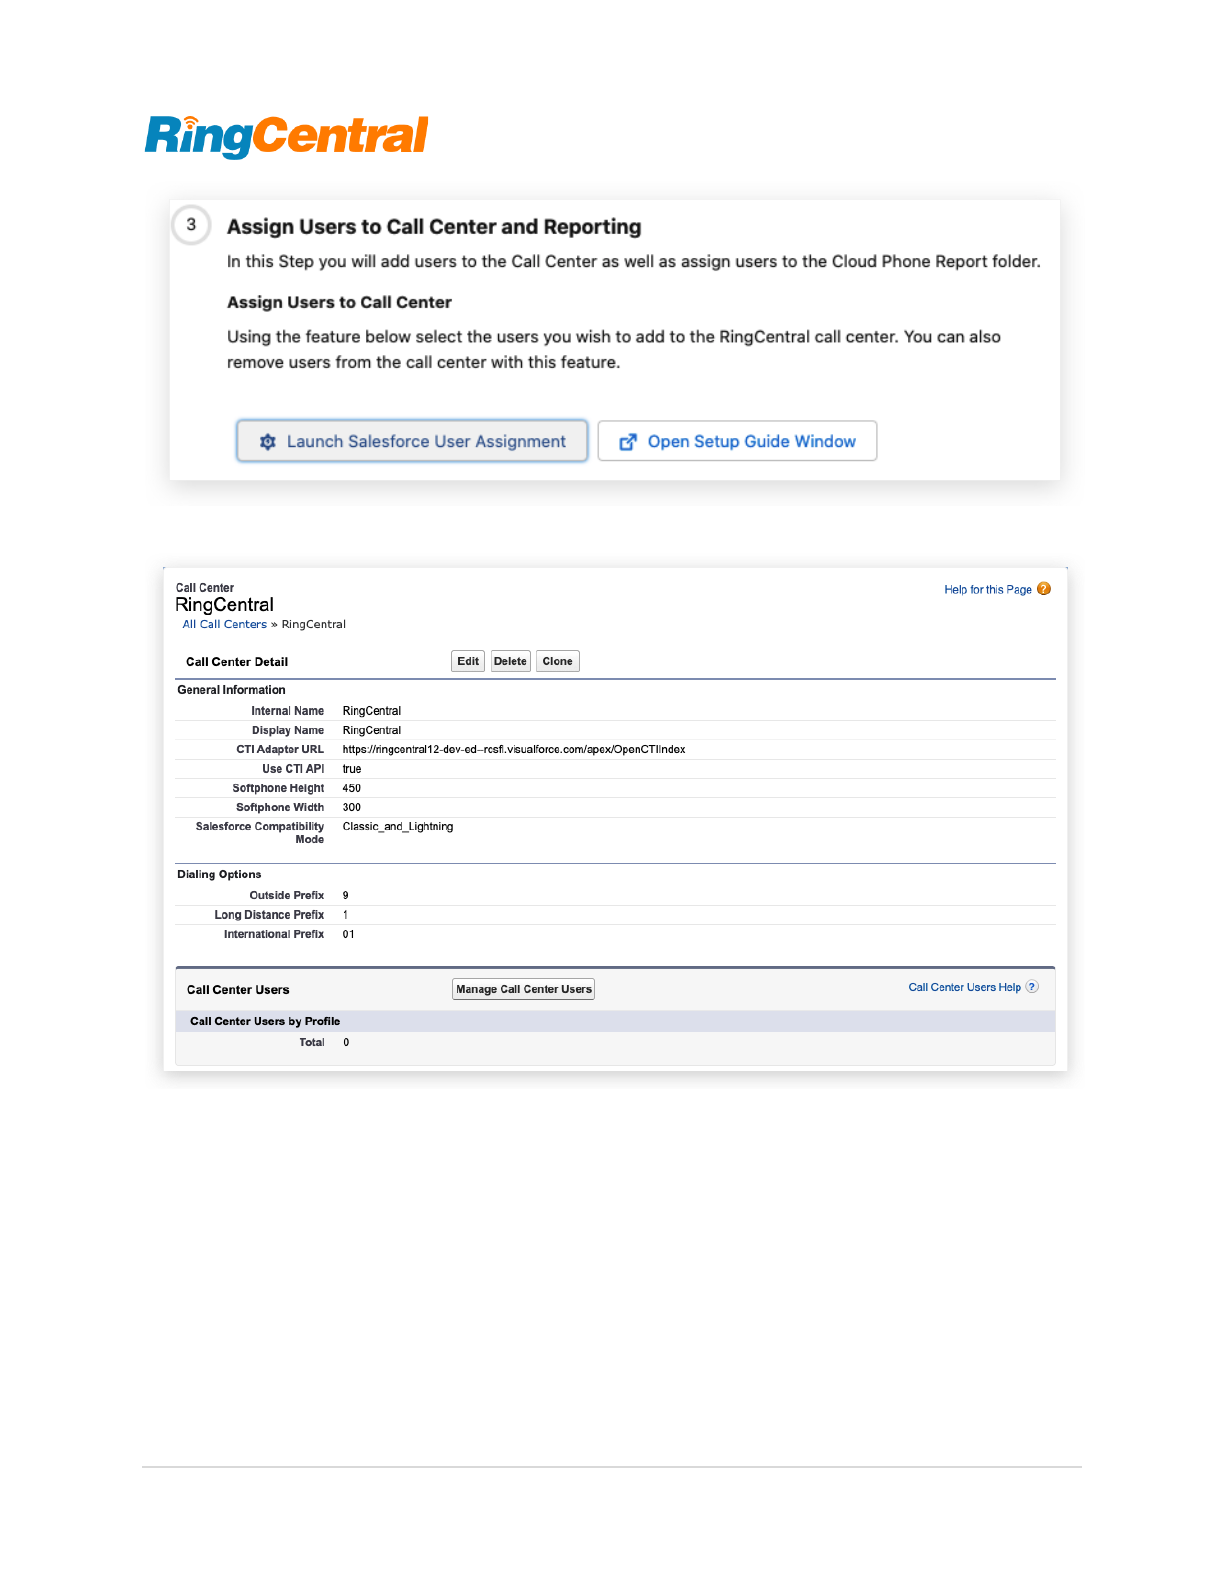
Click the Manage Call Center Users button.
19

Click the Add More Users button.
Salesforce is providing a searching tool to filter the target users. Input all needed and click
the Find button. The users that fit the criteria will be listed in the table. Select all needed
users and click the Add to Call Center button.
All users that were assigned to the call center will be listed on the table. The admin can
always remove the assignment here at any time.
20

Setup Softphone Layout
About Softphone Layout
A SoftPhone Layout is a set of CTI interaction rules in Salesforce. It’s deciding the CTI
behavior for a user.
Admins could set up multiple SoftPhone Layouts as needed. But a user can only be
assigned to one Softphone Layout.
Create a Softphone Layout
The Salesforce creates a default Softphone Layout. The Admin is allowed to use it, or
create a new one. Click the New button to create a new layout, or click the Edit button to
edit the current layout.
21

There are 2 sessions in the Softphone Layout setting. The 1st part, the Softphone Layout
setting, is for the matching strategy. See more details in setting up a matching strategy.
The 2nd part, the Screen Pop Settings, is impacting the users who are using the current
Softphone Layout. Admin can decide the behavior on different cases of matching.
22

Assign Users to a Softphone Layout
An user can only be assigned to a Softphone Layout. On the Softphone Layout homepage,
click the Softphone Layout Assignment button to continue.
The Softphone Layout is assigned by user profiles. The admin can select the Softphone
Layout to assign to any user profile. The default layout will be assigned to all the profiles if
there’s no further setup.
23
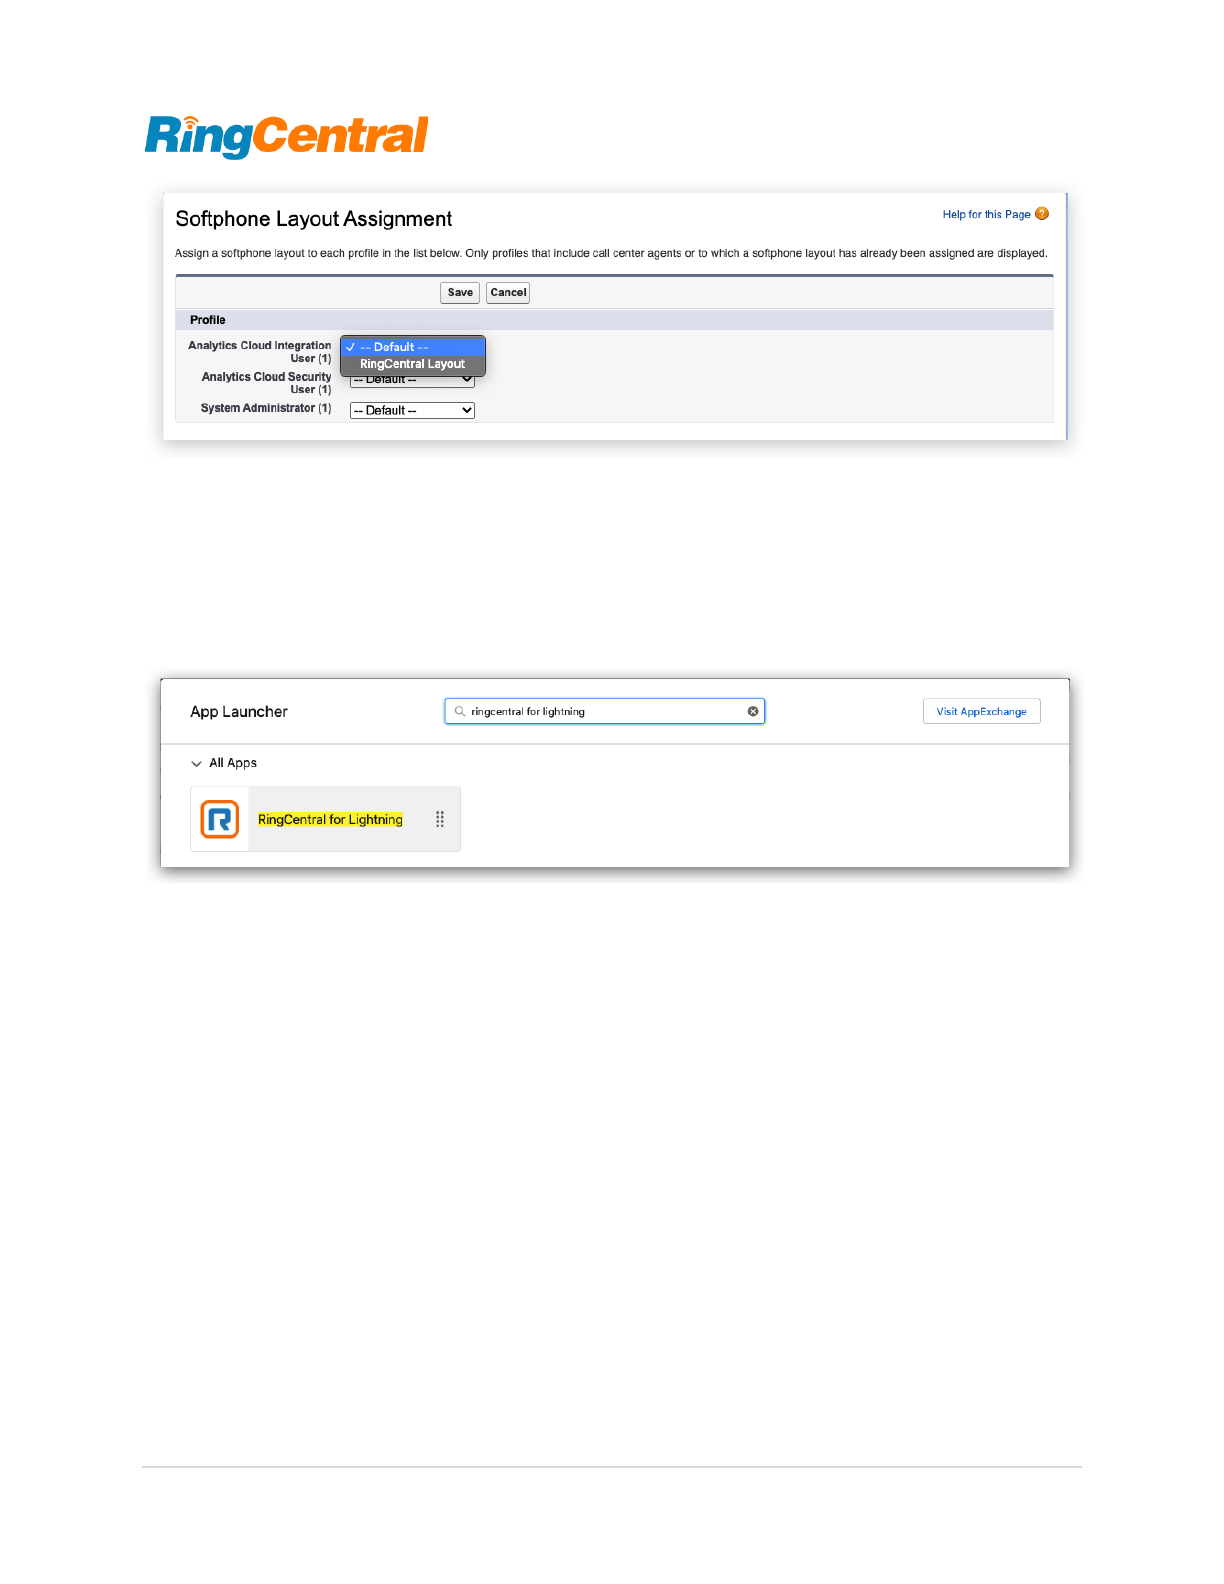
Enable RingCentral in the Salesforce.com Apps
The RingCentral for Salesforce package installs a RingCentral for Lightning application in
Salesforce.
In this App, all usually used entities are enabled. And the CTI utility is also been added.
The user could use the CTI directory in this App.
24

But there are still many other applications in Salesforce. Admin can enable the CTI by the
following steps.
Add CTI to Apps
Click the Launch Salesforce Setup button on Step 4 in the Install Wizard. Click it to open
the App Manager.
25

The Admin can also find the App Manager by the following path: Setup → Apps → App
Manager.
All the apps that were installed or created will be listed on this view.
To add the CTI to a Lightning app, click on the dropdown button and select Edit.
The App Settings tool will be opened. Navigate to the Utility Items tab Desktop Only).
26

Click the Add Utility Item button, select the Open CTI Softphone.
Edit the Label as needed, keep others as default, and Save the configuration.
27

Open the App, and the CTI will show on the utility bar.
28

Add the RingCentral Global Actions
The Global Action is a quick action entry in Salesforce. It could be configured and
assigned to a user group.
Enter the Global Actions set up by the following path: Setup → User Interface → Global
Actions → Global Actions.
29

In this view, all Global Actions are listed. Including the
● Schedule RingCentral Video meeting
● Start RingCentral Video meeting
Navigate to the Publisher Layouts, create a new layout or edit the current one.
Navigate to the Mobile & Lightning Actions configuration.
30

Drag the RingCentral actions to the place that needed. And Save the setting.
31

Assign the layout to user profiles that are needed. And users can find the RingCentral
actions in the Global action entry.
32

Enable RingCentral in the Salesforce Mobile
The RingCentral for Salesforce application provides 2 actions:
● Call with RingCentral
● SMS with RingCentral
Both of the actions require the RingCentral Mobile application. Users could install the
RingCentral mobile from Google Play Android) or App Store (iOS).
Add RingCentral Mobile Actions on the Mobile App
The admin needs to set up for each record type that needs the Call or SMS with
RingCentral actions.
The following example is adding the RingCentral actions to the Lead record. Other types
of records is following the same setup flow.
Before any configuration, the Lead record layout on mobile contains the below actions as
the attached image.
33
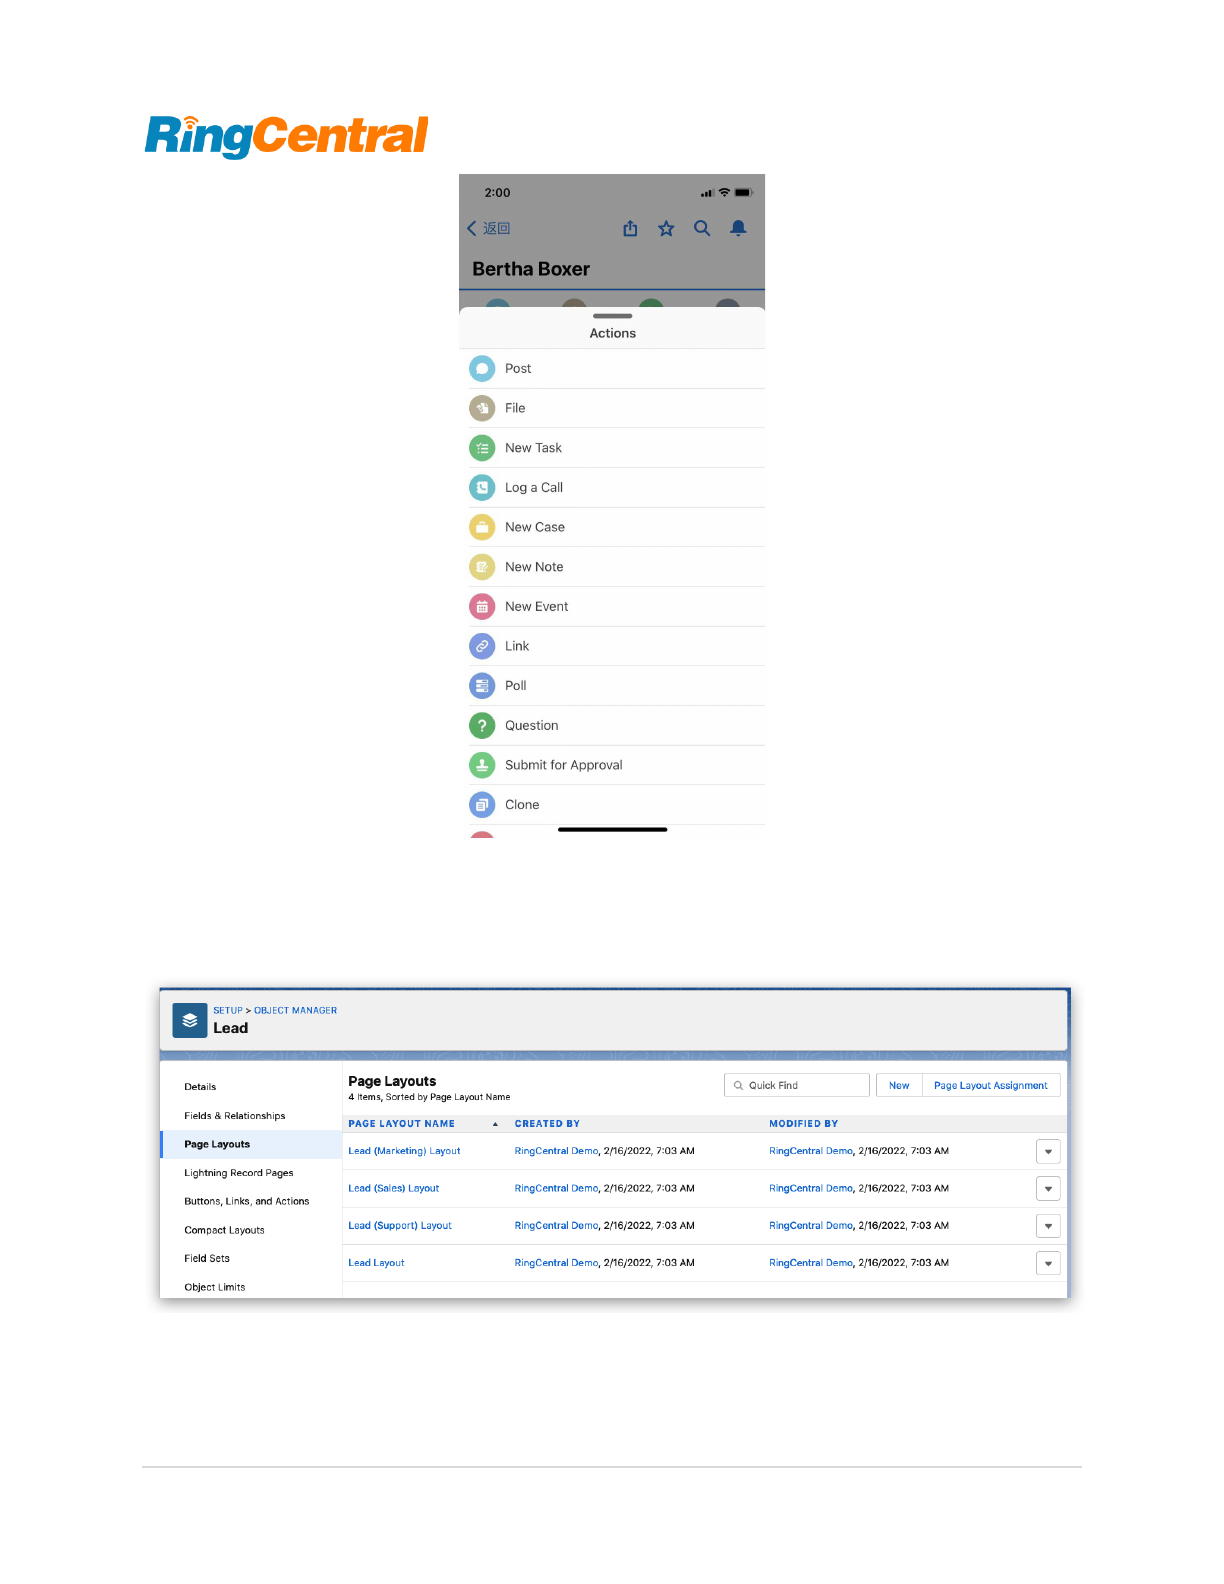
Navigate by the record’s page layout setting by Setup → Object Manager → Lead → Page
Layouts
All Layouts in this org are listed here. Select the needed one to edit.
34

Select Mobile & Lightning Actions and drag the Call_with_RingCentral and SMS with
RingCentral to the target location.
35

Save the layout. Relaunch the Salesforce Mobile app, both of the actions will be listed on
the Lead record action list.
Analysis and Reports
RingCentral for Salesforce provides native and self-defined data reports. Users could take
advantage of these reports by building their own or updating data or formulas to create
new reports as needed.
The Analytics Report provides simple access for users to have a good understanding of
the team and the individual performance.
Pre-build Salesforce Reports
Launch the RingCentral for Lightning app or any other apps that contain the Reports. Click
All Folders
36

The RingCentral package creates the Cloud Phone Report folder. To control access to this
report folder, click the dropdown and select Share.
37

enter filter conditions and click Done.
Pre-build Salesforce Dashboard
Open the Dashbaords → All Folders. The RingCentral package creates a Cloud Phone
Dashboard folder. To share the folder with more users, click the dropdown and select
Share.
38

Analytics Report
The Analytics Report is a handy dashboard that shows some key data of a team, or
individually, depending on the role of the current user in Salesforce.
For example, User A had been assigned to the Remote Sales Manager role in this org. And
User B, C, D had been assigned to the Remote Saler role in this org. Then User A can see
all data of B, C, D. And User B, C, D can only see their own data in the Analytics Report.
39

40

Application Setup
About Admin UI
The Admin UI is designed to allow admin users to control all RingCentral for Salesforce
clients behavior under an organization.
There are 2 ways to open the Admin UI.
Option 1 open from the Install Wizard.
From the Advanced Settings, click the Launch Admin Screen.
Option 2 open from Visualforce Pages.
From Setup → Custom Code → Visualforce Pages → click the hyperlink icon of the
adminUI
41

The Admin UI will be opened.
42

Salesforce Records Matching Strategy
This is the setup group that controls the matching strategy of the clients in the org.
Settings for Matching Caller Details
43

The RingCentral for Salesforce supports the Company Directory and the Personal
Contacts under the user’s RingCentral account. And supports matching the Salesforce
records.
This setting controls the matching strategy of matching RingCentral records.
Standard Match
With the standard match strategy, the app is using the following record types as record
sources:
● Account,
● Contact,
● Lead,
● Case,
● Opportunity,
● Person Account (only when the person account is enabled in the org).
All the records will need to have at least 1 phone type field to be searched as a record.
Custom Object Support
With the custom object support strategy, the app is using all record types that were
selected in the Softphone layout as record sources. Both Salesforce standard records and
custom objects are supported.
To enable this strategy, select it and click the Save button. And the Admin will need to
configure the Softphone layout for customizing record types.
Navigate to the Softphone Layout Setting.
44

Open or create a softphone layout that is assigned to a target group.
45

Select the Call Type as Inbound. To simplify the setting, the RingCentral for Salesforce is
reading only the Inbound setting as the record source. Do not need to set up the
Outbound call type setting.
46

Check the Display these salesforce.com objects session. This is the session that is
needed for the record source setup. Click the Add/Remove Objects
All available record types are listed in the Available box. Select what was needed to the
Selections box, and move Up or Down for your preferred sequence.
47

The selected record types will be listed on the following configuration list.
48
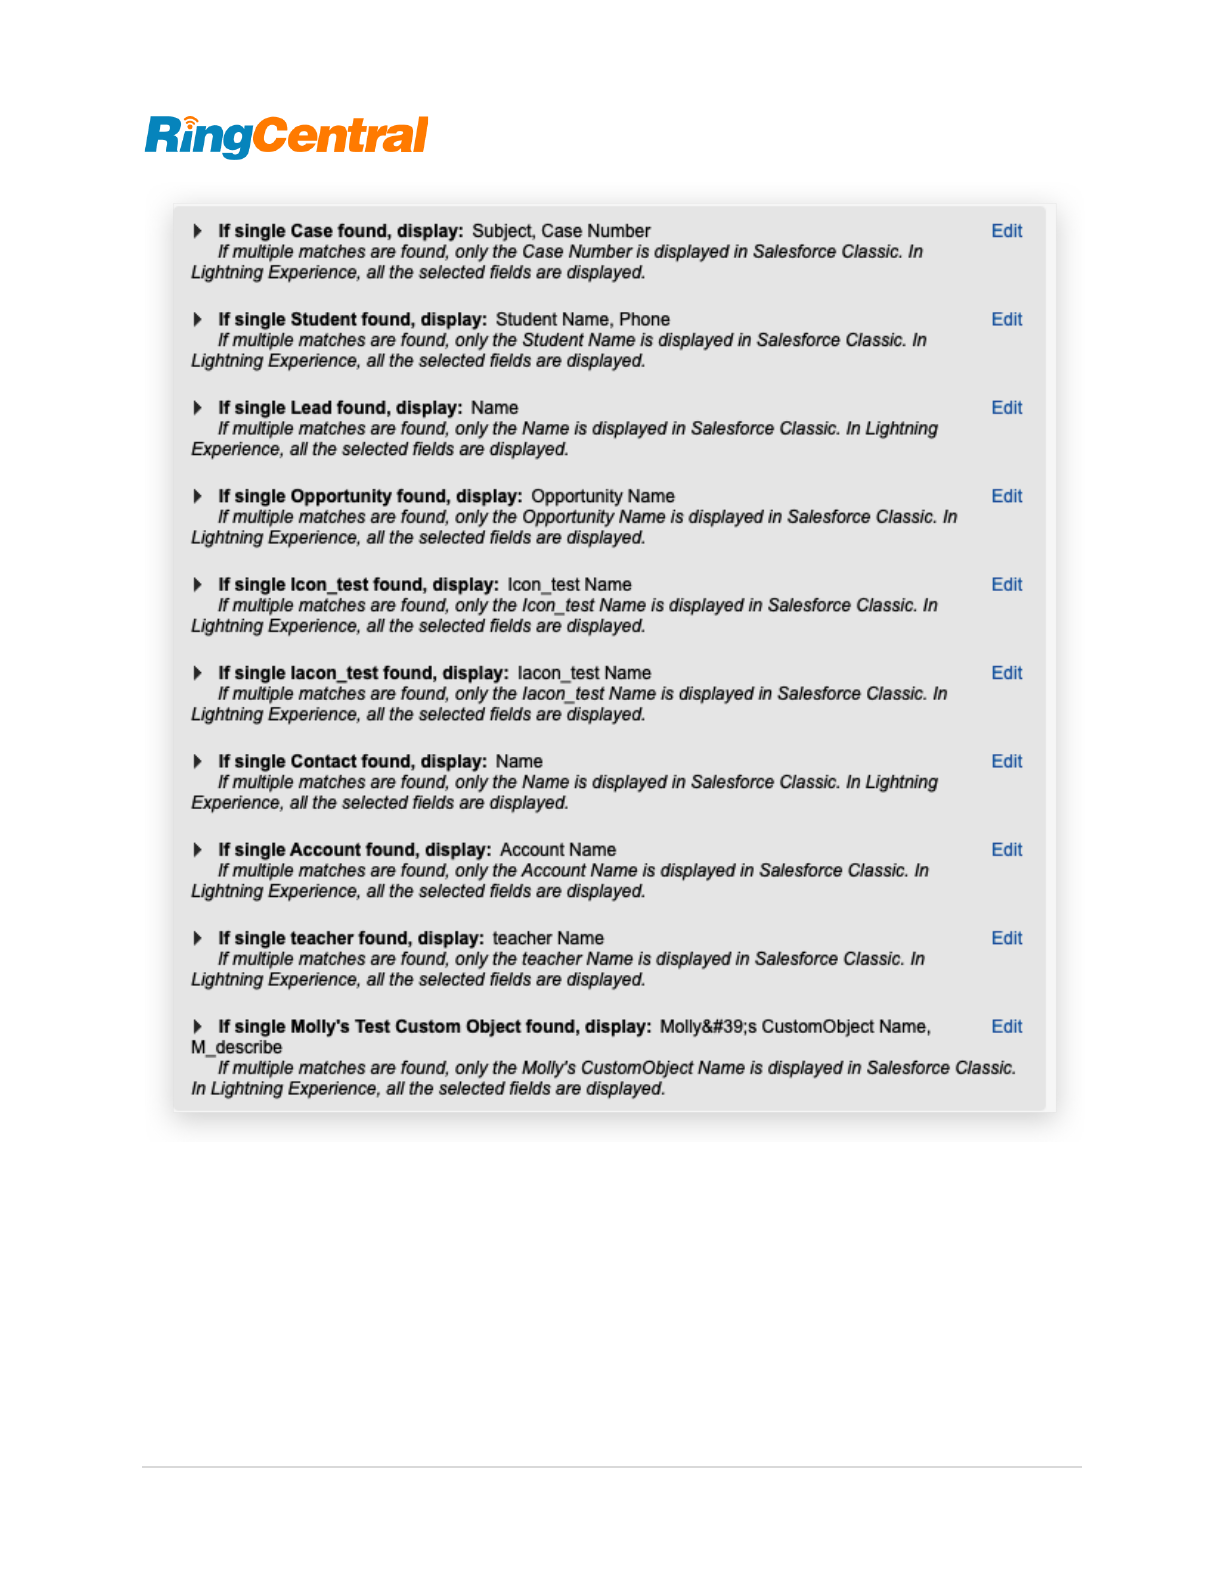
There are many fields in an object. For most of the Salesforce standard objects, the
Softphone Layout will usually automatically pick the object's "Name" related field as the
primary field to show on the search result. Admin is also allowed to selected other needed
fields as primary. But for Custom Objects, Admin will need to select carefully for the
primary field to show in the app.
The Primary field is the first field that was selected in the Selections box. The field value
will be shown when there's a match to the phone number of the record in the CTI.
49

When all is done, click the Save button.
Admin can set up multiple softphone layouts and assign them to different groups. In this
way, groups will get different Salesforce record sources in the CTI.
Associate Call/SMS Log with Person Account
The Person Account is a record type in Salesforce that can be treated as a WhoID type or
a WhatID type. That means the Person Account records could be selected in either the
Name or the Related to field.
50

This setting is to select the field that allows the Person Account records to be selected
when logging calls to Salesforce.
Autofill Related-To in Call Log for Click to Dial
When a user clicks to dial from a record’s phone number, they might expect the record to
be automatically selected in the call log.
This setting is allowing the record to be auto-selected to the call log. Including the record
types that were not selected to be supported.
Call Logging Setup
This setting group is controlling the behavior of the call logging.
Auto Save Setting
Pop matching Salesforce entity record on call
● Ringing
● Answered
This is deciding the time that the search results in Salesforce pops up.
Auto create call log on
● Ringing
51

● Answered
When this setting is ON, the clients understand this organization is automatically logging
calls when the call is ringing or answered.
When this is ON, the Auto log calls setting is turned ON and not able to be disabled.
52

Auto Create SMS log
This setting gives the admin a flexibility to enable auto log SMS feature for all the users of
their org. And if this toggle is turned ON for an org then all the end users will have the auto
log SMS toggle enabled automatically and locked so that they can’t disable it.
By default this admin setting will be turned OFF.
If this is ON, then the Auto-log SMS setting in the CTI is turned ON and disabled.
53

Call Disposition Setup
This is the example of using the Subject type as the call disposition field (many users use
it this way). If the admin wants to use another field for the purpose, they could always
build one with a similar setup.
Navigate to Setup → Object Manager → Task → Fields & Relationships → Subject
54

Salesforce had some default values for the field. The Admin can edit or add values to the
field.
The Subject field in the client will show the values that were set for pickup.
55

Log Customization
The Log Customization allows users to pick fields including custom fields for the clients.
The field types that were supported include
● Date,
● Picklist,
● Text,
● Text Area.
When the fields are selected and saved, all users in this organization will see the Call Log
layout in the client.
56

57

Adding Call Recording to more Task Record Layout
The RingCentral for Salesforce package creates a Task Layout containing all RingCentral
custom fields while installing. So that the admin user can easily assign the layout to
whoever is needed in the organization.
The custom fields include
● Call Result: Connected, Disconnected, etc.
● Call Duration: the duration of the call, in Second.
● Call Type: Direction of the call, including Inbound and Outbound.
● Call Recording: if the call was recorded, the link will automatically be attached to
this field after the call was ended
● CALL_UNIQUE_ID: the ID for the RC app to identify the call log ticket. (hidden by
default)
● CALL_UUID: the same purpose as CALL_UNIQUE_ID, used for earlier versions.
(hidden by default)
● external_whoid: this field is to identify personal account record that was linked in
Name or Related to. (hidden by default)
● RC Logging Type: RC is providing logging capability of calls and SMS. This field is
to identify the logging type of the record.
58

To add the Call Recording field to any other Task layouts, the admin can navigate to the
Task page layout setting and drag the field to the layout.
The High Velocity Sales HVS Support
The High Velocity Sales HVS is a Salesforce App that targets improving sales processes
and efficiency. The RingCentral for Salesforce supports the HVS experience. Check the
Salesforce help document for the HVS setting.
If the Salesforce environment is not enabling HVS, the Admin UI is showing notification as
below.
When the HVS is enabled in the Salesforce environment, there will be more setting options
on the Admin UI.
59

When enabling HVS mode, the admin user can select the HVS disposition field. When a
custom field is selected, the admin user will need to map the custom field values to the
HVS disposition table.
Click the High Velocity Sales Settings hyperlink. Edit the Define Call Results for Branching.
Put the value of the custom field to the table that maps the HVS Call Results and click
Save.
The Redirect incoming calls to Voicemail option will redirect all incoming calls to the user’s
voicemail when there’s already an active call on the client.
Salesforce Do Not Call DNC Support
The Do Not Call DNC is a hidden field in a person type record. That includes Contact,
Lead, Person Account. When this field is used for flagging the contacts that the users are
not supposed to contact, the admin can switch this ON.
60

The admin can decide the restriction for both Call and SMS.
61
