
C++Builder™ 6
Developer’s Guide
Author: Satya Kolachina
ISBN: 1-55622-960-7
Sample chapter from Wordware’s C++Builder
6 Developer’s Guide. This title available in June
2002.
Wordware Publishing, Inc.
2320 Los Rios Blvd., Ste. 200
Plano, Texas 75074
For more information or to order your copy, visit us online at
www.wordware.com

Chapter 5
The VCL Explored
Introduction to VCL Architecture
The Visual Component Library (VCL) is the core set of objects
C++Builder 6 offers to users on Microsoft Windows-based operating sys-
tems. This chapter describes features of the VCL framework and some
frequently used components, while the next chapter presents advanced
features and components in an attempt to enable readers to draw on the
power of VCL in their Windows-based applications. Together, the two
chapters cover most of the standard VCL functionality. However, special-
ized components like database access, Web services, and Internet
components are reserved for later chapters where they are covered in
depth. To enable developers to port their code between Windows-based
operating systems and Linux, C++Builder 6 offers a separate set of com
-
ponents, called CLX, Component Library X-platform (Cross platform),
which is the subject of another chapter.
The VCL is a library of classes that encapsulate the Microsoft Windows
application programming interface (API) using the object-oriented
approach. VCL is architected in such a way that both Delphi (Object
Pascal) and C++Builder (C++) users can use it similarly and effectively.
In addition to the visual components (as the name suggests), VCL pro
-
vides powerful non-visual classes to make itself a real rapid application
eevelopment (RAD) framework. Refer to the VCL architecture in Figure
5-1 on the following page.
1

VCL is more of a framework rather than just a component library. The fea-
tures provided and supported by this framework include the following:
n
VCL components are based on properties, methods, and events.
Properties describe the state of the object at any point of time that
can be set during design time and often at run time. Methods
operate on these properties to enable the external world to control
and manipulate the properties. The events are triggered by either
user actions or system actions. Examples of events include those
generated by Windows messages or user keystrokes.
n
VCL components can be manipulated during design time or during
execution time of the application. Windows GUI applications are
comprised of forms and components placed on the form. The state
of the components and the form at any time can be saved to a
form file (*.dfm) and restored in another programming session.
n
VCL components encapsulate the Windows API and messages in
such a way that the standard Windows message processing archi
-
tecture is not visible to the developer; rather, a more sophisticated
and object-based architecture is presented.
n
The VCL framework enables developers to implement custom com
-
ponents for specialized tasks and enhance the functionality of the
framework itself. The custom components can also be stored in a
repository for later reuse or sharing between developers.
2
n
Chapter 5
Figure 5-1

n
VCL does not interfere with the standard Windows development
architecture. Programmers who wish to use this traditional archi
-
tecture can still do so. This also means that the core Windows API
functions can be called directly, bypassing the VCL framework.
Developers can also freely make direct Windows API calls from
within a VCL-based application.
n
Having originated from Object Pascal, VCL also provides a flavor
of Delphi-based objects, in addition to providing full C++ lan
-
guage support. Thus, VCL is a framework that supports two pow
-
erful language environments, C++ and Object Pascal. The power
of VCL is almost identical between Delphi and C++Builder,
although some differences exist in order to preserve the languages’
identity and characteristics.
n
The set of VCL objects provided with C++Builder include the
complete Win32 standard graphical user interface (GUI) controls,
Windows standard dialogs, components that support database
access in different ways (BDE, ODBC, ADO, and dbExpress), com-
ponents to develop Internet-based applications, web server appli-
cations, web services using XML/SOAP architectures, Borland’s
DataSnap architecture for supporting multi-tier applications and
others. However, users should check with Borland for the specific
set of components included in each edition of the product. The
descriptions and examples in this book correspond to the richest
edition of C++Builder, which is usually the Enterprise edition.
Users of other editions of the product are automatically covered,
because features of those editions are included in the book by
default. This also implies that every example from this book may
not work with every edition of the product.
n
VCL also permits the use of ActiveX components (developed in
other development platforms like Visual Basic, Visual C++, etc.)
in VCL-based applications. This is made possible by importing an
ActiveX control into the C++Builder environment, which will
transform the ActiveX control to a VCL control. The control will
then behave like a natural VCL control.
n
VCL also permits development of ActiveX controls for use by other
development environments like Visual Basic, Visual C++, etc.
The VCL Explored
n
3
5
Chapter

VCL Objects
Before we continue discussing VCL architecture, it is necessary to keep in
mind a few VCL-specific features with respect to the C++ programming
language. In C++, a class defines the blueprint of how an object looks
and behaves in the programming world, and an object is an instance of the
class. The state of an object is represented by its instance variables, and
the object’s methods operate on the instance variables to find or change
the state of the object. When an object is created, its existence is governed
by two characteristics, its scope and memory allocation. These two charac
-
teristics are interrelated. The scope of an object is visibility (and
persistence) with respect to other programming elements. It is beyond this
book to discuss more detailed C++-language specifics.
Every object created in the program occupies memory as required by its
structure and contents. There are two types of memory chunks available
in the system, the stack and the heap. Objects created on the stack are
automatically destroyed when they go out of scope, and objects created
on the heap occupy the memory location(s) until explicitly destroyed by
the program, even after they go out of scope. Therefore, it is the responsi-
bility of the programmer to keep track of how the objects are being
created and destroyed. C++ leaves this responsibility in the hands of the
programmer, along with the power of dynamic memory management. The
following sample code helps us understand how the objects can be cre-
ated on the stack and heap, respectively, in C++.
Listing 5-1
Class Car {
private:
int Cylinders; // instance variable
public:
Car(void); // constructor
};
The following code creates an object of this class on the stack and assigns
a value to its instance variable:
Car newCar;
newCar.Cylinders = 4;
The following code creates the object on the heap and assigns a value to
the instance variable:
Car *newCar = new Car();
NewCar->Cylinders = 4;
4
n
Chapter 5

The new operator, as used above, is specific to object-oriented languages
like C++, to enable creation and destruction of objects on the heap.
Objects created using the new operator must be destroyed when you are
finished with them using the delete operator, as shown here:
delete newCar;
All the VCL objects must be created on the heap, using the new operator,
(with the exception of AnsiString, explained later in this section) and
must be destroyed using the delete operator. The size of the stack is
always limited, compared to the heap. In addition, when objects created
on the stack are passed as parameters to functions, new copies of the
objects are created on the stack, which may not always be the required
way. When objects are created on the heap and the object pointers are
passed as parameters to other objects and functions, only these pointers
are created on the stack and not the objects. Therefore, it improves per-
formance of the program when objects are created once and accessed by
other objects through the object pointers. The performance gain may not
be visible in small applications, but complex enterprise-level applications
demonstrate this performance improvement. Also, in a complex object-ori-
ented architecture like VCL, an object may not be a simple class; most of
the time, an object contains several objects within itself. This object con-
tainment may span to many levels in very complex object structures.
Therefore, using the heap for dynamic memory usage lets us use the
memory more effectively. One of the strengths of the C++ language itself
is dynamic memory management. Based on these concepts, it makes per-
fect sense that VCL mandates the objects be created on the heap.
At first, it may appear to be a difficult task to take responsibility of freeing
objects when they are done being used. However, the VCL architecture
has a built-in feature that relieves the programmer of this burden to a
great extent. All VCL components (visual and non-visual) have a property
called Owner, which is another component that takes the responsibility of
freeing the components it owns when the owner itself is destroyed. In a
VCL-based application, the form owns all components created on it during
design time. During run-time creation of components, the owner compo
-
nent pointer has to be passed as a parameter to the constructor. During
run time, there is an opportunity for the programmer to define another
component other than the form as owner. Thus, run-time creation of com
-
ponents using the new operator does not necessitate their explicit deletion
by the programmer, as their owner takes care of this task.
The VCL Explored
n
5
5
Chapter

All other VCL objects that are not components by class must be explicitly
created using the new operator and explicitly destroyed using the delete
operator.
AnsiString
Along with the Win32 String type, C++Builder provides the AnsiString
class to create string objects. AnsiString is designed to function like the
Delphi long string type. It is not required to create AnsiString objects with
the new operator. The AnsiString object grows dynamically to any size as
the string grows, and is only limited by the available memory size. The
object does not have any properties exposed; rather it has methods
(including the constructors) that provide functionality to manipulate the
string objects very efficiently.
The AnsiString can be instantiated in two ways as shown below:
AnsiString str1 // will pass by value
AnsiString *str2 = new AnsiString(); // will pass by reference
When an AnsiString object is created as shown in the first statement, it is
passed by value when passed as a parameter to a method call. When it is
created as shown in the second statement, it is passed by reference when
passed as a parameter to a method call.
The constructor of the class is overloaded with different signatures. The
example only shows the simple constructor without any arguments.
Table 5-1 displays some commonly used methods of this class.
Table 5-1
Method Description
SubString(int index, int
count)
Extracts a substring from the AnsiString objects from a
specific position to a specific number of bytes beyond
the starting point.
‘+’ and ‘+=’ operators Concatenate AnsiString objects.
‘=’ operator Assigns one AnsiString object to another.
TrimLeft( ) Trims leading spaces and control characters.
TrimRight( ) Trims trailing spaces and control characters.
Trim( ) Trims both leading and trailing spaces and control
characters.
6
n
Chapter 5

Method Description
StringOfChar(char ch, int
count)
Returns an AnsiString object of desired length
containing the same single character.
LowerCase( ) Returns the AnsiString object in all lowercase
characters.
UpperCase( ) Returns the AnsiString object in all uppercase
characters.
ToInt( ) Converts the AnsiString object to integer and returns
as an integer value.
ToDouble( ) Converts the AnsiString object to floating-point value
and returns as double value.
Insert(const AnsiString&
str, int index)
Inserts an AnsiString object into another AnsiString
object at the desired position.
Length( ) Returns the length of string in bytes as an integer
value.
IsEmpty( ) Returns a Boolean value indicating whether the string
is empty or not.
c_str( ) Returns a character pointer to a null-terminated
character array.
The value returned by the c_str() method is only a pointer to the internal
data buffer of the AnsiString object. If the character array has to be used
later, it is recommended that you create enough buffer to hold the
returned value and do string copy. An example is shown below.
AnsiString str = “New String”; // create the AnsiString object
char *buffer = new char(str.Length()+1); // create char buffer enough for the
// string
strcpy(buffer, str.c_str()); // string copy the value to the
// buffer
delete buffer; // delete the buffer after using it
Notice that the buffer size allocated is 1 character more than the length of
the string, in order to accommodate the null terminator for the C-style
char array. The value copied to the buffer can be used in all functions that
accept a character pointer.
There are other methods of the AnsiString object mentioned within the
product manuals that the reader is encouraged to investigate and practice
with.
The VCL Explored
n
7
5
Chapter

TObject
TObject is the abstract base class from which all VCL objects are derived.
This class provides fundamental behavior of an object, like construction,
destruction, runtime type information about the class itself, and message
handling. Objects that directly descend from this class cannot save their
state; they can only be created at run time, be used, and be destroyed.
Examples of objects that are very commonly used direct descendents of
this class are TException and its descendents TList, TQueue, TStack, TBits,
and TStream and its descendents, TPrinter, TRegistry, etc.
The most common situation that many programmers face during develop
-
ment is that they have to perform some task on an object based on the
class which instantiated it or the class that is one of its ancestors.
Table 5-2 displays some commonly used methods.
Table 5-2
Method Description
ClassName( ) Returns the name of the class that the object is an
instance of.
ClassNameIs(AnsiString
fClassName)
Returns Boolean value indicating whether the object is of
the type as identified by the fClassName argument or
not.
ClassParent( ) Returns a pointer to the TMetaClass definition of the
immediate ancestor class from which the object’s class is
derived.
InheritsFrom(TClass
fAncestorClass)
Returns Boolean value indicating whether the object’s
class is inherited from the class fAncestorClass or any one
of its descendent classes.
InstanceSize( ) Returns the memory (number of bytes) required to
instantiate an object of the current class.
ClassType( ) Returns a pointer to the TMetaClass definition of the
object. However, it is usually not required to directly
access the meta class definition of an object because the
methods provided by TMetaClass correspond to the
static methods of the TObject class.
Listings 5-2 and 5-3 provide examples of using some of these methods.
8
n
Chapter 5

Listing 5-2
TListBox fListBox = new TListBox(this);
ShortString fClassName = fListBox->ClassName();
In this example, fClassName contains the string value “TListBox”.
TControl is the immediate ancestor class of TWinControl, which is the
immediate ancestor class of TCustomListBox, from which TListBox is
derived.
Listing 5-3
TListBox fListBox = new TListBox(this);
bool fbool1 = fListBox->InheritsFrom(TWinControl);
bool fbool2 = fListBox->InheritsFrom(TList);
In this example, fbool1 contains the value true because of the ancestor
relationship explained earlier, and fbool2 contains the value false for the
same reason.
Notice that TMetaClass* is a typedef of TClass. Runtime type information
(RTTI) is discussed in more depth later in this chapter.
Persistence of Objects: TPersistent Class
One of the key requirements for objects in a component framework is the
ability to save their state before the object is destroyed, and to re-create
the object loading it from where it was saved earlier. The state informa
-
tion that is stored by the object is its own behavior, as identified by
properties assigned and modified during design time. Examples of proper
-
ties include Caption, Name, Top, Left, Height, and Width. This ability is
termed persistence. The TPersistent class is directly derived from TObject
and adds persistence to the objects, in addition to the basic functionality
provided by TObject. Examples of objects that are direct descendents of
TPersistent class include TGraphicsObject, TGraphic, TStrings,
TClipboard, and TCollection.
The VCL Explored
n
9
5
Chapter
Basic VCL Component — TComponent Class
In the simplest terms, a component is an object that has the ability to be
hosted in the component palette in the IDE. The TComponent class
derived from TPersistent incorporates the component behavior, which
includes:
n
The ability to be hosted in the component palette and be manipu
-
lated in the form designer
n
The ability to own (and contain) and manage other components
n
Enhanced streaming and filing capabilities
n
The ability to be converted to an ActiveX object or other COM
object
Both visual and non-visual components can co-exist in the component pal-
ette. Visual components become part of a GUI application providing visual
manipulation of data, whereas non-visual components appear on the
screen only during design time and provide functionality that does not
require visual representation of data during execution of the application.
Though TComponent is the base ancestor class for all components, only
non-visual components are directly derived from this class. The visual
components must be derived from the TWinControl or TControl class,
which are further derived classes of TComponent, depending on whether
the component has to behave as a windowed control or not. TWinControl
is derived from TControl, which is derived from TComponent.
Non-Visual Components
Some of the commonly used non-visual components include TApplication,
TScreen, TTimer, TActionList, common Window dialogs like TOpenDialog
(to select a filename to open), TSaveDialog (to select a filename to save a
file), TPrinterSetupDialog (to enable printer setup), and TPrintDialog (to
select print options). Global instances of TApplication and TScreen objects
are available in the application and are explained in detail later in the
chapter. Each of the non-visual components provides a service that does
not require visual presentation of data. For example, TTimer represents a
Windows timer object, which enables the developer to time certain events
as required in the application. TActionList maintains a list of actions used
with components and controls. It is important to note that non-visual
components also may be available in the component palette, to be
dropped onto the form during design time; this does not mean that the
10
n
Chapter 5

component may be visual. The component is available in the component
palette for the convenience of the developer, to drop it on the form during
design time; but it will not show up on the form during run time. One of
the common components designers usually create is a non-visual compo
-
nent that acts like a manager component to manage the behavior of a
group of other visual components. TActionList is similar to that.
Visual Components — TControl and TWincontrol
Classes and Their Derivatives
A control is a component that becomes visible during run time. The con
-
trol receives input focus if it is a window-based control and will not
receive focus if it is not a window-based control but just a graphic image.
Receiving focus means the user will be able to interact with the control.
Only window-based controls can interact with the users. Graphic-based
controls just display a graphic image but will not interact with the user.
The TControl class provides the basic functionality of a control and is
derived directly from the TComponent class. TControl is the base class for
all the visual components. All the visual components that do not receive
input focus should be derived from TControl class. Examples of such
classes provided by VCL are TGraphicControl class and its derivatives. The
primary purpose of most graphic controls is to display text or graphics. In
this context, TGraphicControl has a Canvas property to provide ready
access to the control’s drawing surface and a virtual Paint method is called
in response to WM_PAINT messages received by the parent control. VCL
controls that descend from TGraphicControl include TBevel, TImage,
TPaintBox, TShape, TSpeedButton, TSplitter, and TCustomLabel, from
which TDBText and TLabel are derived. TWinControl is another direct
descendent of the TControl class and provides base functionality for all
controls that need to interact with the user. In addition to being able to
receive input focus and interact with the user, the windowed controls can
act as parent controls and hence contain other components. Thus, all the
visual container objects are windowed controls. They also have a window
handle as identified by the Windows operating system. Several specialized
(custom) controls are derived from TWinControl as base classes, to pro
-
vide additional base functionality as needed for the type of control sets.
For example, TCustomEdit provides additional base functionality as
needed for all edit controls; TCustomComboBox provides additional base
functionality as needed for different types of combo boxes; and
The VCL Explored
n
11
5
Chapter
TCustomListBox provides additional base functionality as needed for dif
-
ferent types of list boxes.
If a specialized (visual) custom control needs to be developed, it must be
derived from TWinControl. If a fully functional control needs to be devel
-
oped, it must be derived from the corresponding custom control (such as
TCustomEdit, TCustomComboBox, TCustomListBox, etc.).
The Application — Global TApplication Instance
The C++Builder IDE enables the developer to create many different types
of applications. The basic types of applications that the developer usually
works with are listed below.
n
Windows GUI application
n
Windows NT/2000 service application
n
Web Server application
n
Windows Control Panel application
n
Web Snap application
n
SOAP server application
n
CLX application
n
Console application
n
Windows Dynamic Link Libraries (DLLs)
n
Borland Packages (BPLs)
For the first seven types of applications, C++ Builder IDE automatically
creates a global variable named Application. For the last three types of
applications, no such variable is created: a console application is a pro
-
gram that executes at the command mode; Windows DLLs are libraries of
functions and objects that are called by another application; and Borland
packages are Windows DLLs that are exclusively developed for users of
Borland C++Builder and Borland Delphi.
The Application variable is intended to provide information to the devel
-
oper specific to the application itself, and because of its global scope, it is
valuable throughout the application. Based on the type of application cre
-
ated through the IDE, the appropriate unit header file containing the
Application variable definition is included in the project. Table 5-3 dis
-
plays the types of applications and the corresponding class name that the
Application variable represents.
12
n
Chapter 5

Table 5-3
Application Type Application variable description
Windows GUI application The Application variable contains GUI application properties and is
defined as an instance of TApplication class as defined in the
Forms.hpp header file.
Windows NT/2000
service application
The Application variable contains properties of a service application
and is defined as an object of TServiceApplication class.
Web application The Application variable contains the properties of a web server
application and is defined as an object of one of the derived classes of
TWebApplication class, which are TISAPIApplication, TCGIApplication
and TApacheApplication. As the names suggest, each of these web
application types contains properties specific to the respective type of
web application.
Windows Control Panel
application
The Application variable contains properties for a control panel
application, and is defined as an object of the TAppletApplication class.
WebSnap application and
SOAP application
The Application variable contains the properties of one of the
TISAPIApplication, TCGIApplication, TApacheApplication, or
TApplication classes, depending on whether the web server type is
ISAPI DLL, CGI executable, Apache server module, or web application
debugger executable, respectively.
CLX application The Application variable contains the properties of TApplication class
as defined in the QForms.hpp header file.
If a Windows DLL instantiates a form object dynamically, then the Appli
-
cation variable is available and accessible even in the DLL-based form
application. This is because the Application variable is defined in the
Forms.hpp file, but the ApplicationàRun() method should not be called
from a DLL-based form application, because a DLL does not execute by
itself and only its methods will be executed from another executable pro
-
gram. It should also be noted that applications should not host their main
form from within a DLL; if such a behavior is required, it is recommended
that the developer use packages rather than DLLs.
Properties, Methods, and Events of TApplication
This section discusses the TApplication class as defined in the Forms.hpp
header file, which mainly focuses on Windows GUI applications. Other
types of application behavior is discussed in later chapters.
The properties and methods introduced in TApplication reflect the funda
-
mentals established in the Windows operating system to create, run,
The VCL Explored
n
13
5
Chapter

sustain, and destroy an application. For this purpose, TApplication encap
-
sulates the behavior providing the functionality as mentioned here:
n
Windows message processing
n
Context-sensitive online help
n
Menu accelerator and key processing
n
Exception handling
n
Managing the fundamental parts of an application such as
MainWindow, WindowClass, etc., as defined by the Windows oper
-
ating system
When a Windows GUI application is created, the IDE automatically
includes the Forms.hpp file. The application may contain more than one
form object, but the first form object that is instantiated in the main pro
-
ject cpp file will be the form that is displayed first when executed, and the
global Application variable is the one that is defined in the main form.
Therefore, in a project containing multiple forms, the developer can easily
change the main form by putting the desired form as the first form in the
sequence while instantiating the forms using syntax similar to the
following.
Listing 5-4
#include <vcl.h>
#pragma hdrstop
USERES("Project1.res");
USEFORM("Unit1.cpp", Form1);
USEFORM("Unit2.cpp", Form2);
USEFORM("Unit3.cpp", Form3);
//---------------------------------------------------------------------------
WINAPI WinMain(HINSTANCE, HINSTANCE, LPSTR, int)
{
try
{
Application->Initialize();
Application->CreateForm(__classid(TForm3), &Form3);
Application->CreateForm(__classid(TForm2), &Form2);
Application->CreateForm(__classid(TForm1), &Form1);
Application->Run();
}
catch (Exception &exception)
{
Application->ShowException(&exception);
}
}
14
n
Chapter 5

In this example Form3 will be displayed as the main form of the applica
-
tion. This is a typical example for a VCL GUI application. The first
statement is a call to the ApplicationàInitialize() method. This method
calls the InitProc procedure pointer, which is NULL by default. The pur
-
pose of having this method is to initialize any subsystems such as OLE
automation. In order to use the custom initialization, include the header
file that defines InitProc procedure pointer, create a custom initialization
procedure that assigns a value to this procedure pointer, and add a call to
this procedure to the project source code prior to the call to Initialize.
Only one instance of InitProc can be defined in an application. If more
than one header file assigns a value to InitProc, only the last assignment
will work. For projects that do not assign a value to InitProc, the call to
ApplicationàInitialize() can be safely deleted from the project source.
The ApplicationàCreateForm(__classid(TForm3), &Form3) statement
invokes the Form3’s constructor method, because this is when the form
object is instantiated. When a new form is added, by default the IDE adds
these statements to the project source. If you intend to instantiate only
the main form and not the others at this time, the other lines can be
deleted from the project source, and the other forms may be instantiated
at run time before they are used.
When the ApplicationàRun() method is executed, the program’s main
message loop begins, and it ends only when the application terminates.
This method should not be called from another place in the project.
An application is active if the form or application has focus. An applica
-
tion becomes inactive when a window from a different application is
about to become activated. This status is indicated by the property
ApplicationàActive. Table 5-4 summarizes the important properties,
methods, and events of the TApplication class.
Table 5-4
Property Description
MainForm Returns a pointer to the main form of the application (readonly).
Hndl Returns the window handle of the main form (readonly).
ExeName Returns the executable file name of the application including the path
information (readonly).
HelpFile Returns the help file name that the application uses to display help. This
can be set during design time, using Project | Options or during run
time.
The VCL Explored
n
15
5
Chapter

Property Description
CurrentHelpFile Reads CurrentHelpFile to determine the name of the help file that is
currently used by the application when it executes a help command (via
the HelpCommand method) or brings up context-sensitive help (via the
HelpContext or HelpJump method).
DialogHandle Provides a mechanism for using non-VCL dialog boxes in a C++Builder
application. Use DialogHandle when displaying a modeless dialog box
that was created using the CreateDialog Windows API function.
Assigning the handle of the modeless dialog box to DialogHandle allows
the dialog to see messages from the application’s message loop.
Method Description
HandleMessage(),
ProcessMessages()
HandleMessage() interrupts execution of the application while Windows
processes a message in the Windows message queue before returning
control to the application. If the message queue is empty, this method
generates an OnIdle event and starts the process of updating the actions
in the application. If the application goes idle, this method may take a
long time to return. Therefore, do not call this method when waiting for
something that is message based while priority actions are also being
processed. Instead, call ProcessMessages() when processing more than
just messages, to permit Windows to process the messages that are
currently in the message queue. ProcessMessages() cycles the Windows
message loop until it is empty and then returns control to the
application. ProcessMessages() does not let the application go idle.
Neglecting message processing affects only the application calling
ProcessMessages(), not other applications. In lengthy operations, calling
ProcessMessages() periodically allows the application to respond to paint
and other messages.
Terminate
()
This method calls the Windows API PostQuitMessage function to
perform an orderly shutdown of the application. Terminate() is not
immediate. Terminate() is called automatically on a WM_QUIT message
and when the main form closes.
HelpContext(THelp
Context *context)
Brings up the help topic specified by the context parameter from the file
specified in the CurrentHelpFile property. HelpContext generates an
OnHelp event.
HelpCommand(int
Command, int Data)
Provides quick access to any of the Help commands in the WinHelp API.
Use HelpCommand to send a command to WinHelp. Before sending the
help command to the Windows help engine, HelpCommand generates
an OnHelp event on the active form or on TApplication. Finally, the
command is forwarded to WinHelp if there is no OnHelp event handler
or if the OnHelp event handler indicates that WinHelp should be called.
16
n
Chapter 5

Method Description
HelpJump(AnsiString
jumpId)
Call HelpJump to bring up a topic identified by its symbolic name.
HelpJump displays the topic identified by the JumpID parameter from
the file specified in the CurrentHelpFile property. HelpJump generates
an OnHelp event either on the active form or on the Application object
itself.
Minimize() Minimizes the application to the task bar.
Restore()
Restores the application to normal status.
ShowException
(Exception* e)
Displays a message box for the exceptions that are not caught by the
rest of the application code.
Event Description
OnActivate Provides you the opportunity to perform tasks when the application first
starts up.
OnIdle Provides you the time window to perform any background tasks when
the application is not busy.
OnHelp This event is generated when the application receives a request for help.
The HelpContext, HelpCommand, and HelpJump methods generate this
event.
OnMessage Provides the opportunity to interrupt Windows messages.
OnMinimize Lets you perform tasks when the application main window is minimized.
OnRestore Lets you perform tasks when the previously minimized application
window is restored to the normal state.
Since Application is a global variable, and is not available through the IDE
as a component, it is not possible to create the event handlers directly
through the Object Inspector; for this reason, C++Builder provides a
TApplicationEvents component in the Additional page of the component
palette The location of this component on the component palette is shown
in Figure 5-2. When you add a TApplicationEvents object to a form, the
Application object forwards all events to the TApplicationEvents object.
Thus, each event of the TApplicationEvents object is the same as the event
with the same name on the Application object. Each form in an applica
-
tion can have its own TApplicationEvents object. Each application event
occurs for all the TApplicationEvents objects in the project. To change the
order in which the different TApplicationEvents objects receive events, use
the Activate() method. To prevent other TApplicationEvents objects from
receiving a specific event, use the CancelDispatch() method. This means
that in a typical application containing multiple forms, each with a differ
-
ent instance of a TApplicationEvents object, the form that is currently
The VCL Explored
n
17
5
Chapter

active can receive the Application object’s events first in sequence com
-
pared to the other forms, when the Activate() method of
TApplicationEvents object is called from the form’s OnActivate event han
-
dler method. This, however, is not going to prevent other forms from
receiving the Application object’s events; it is only going to affect the
sequence in which they receive the events. However, it is also possible to
prevent any of the forms’ TApplicationEvents object from receiving the
Application object’s events by calling CancelDispatch() method of the cor
-
responding TApplicationEvents object.
Other Global Variables — TScreen, TMouse, and
TClipboard Instances
When a Windows GUI project is created, a global variable Screen of type
TScreen is created. The Screen variable encapsulates the state of the
screen on which the application is running. Therefore, the Screen variable
is useful to capture and set run-time screen state of the application. This
variable is defined in the Forms.hpp header file. The properties provided
by the Screen variable let the programmer access the screen related sys
-
tem resources such as monitors, cursors, fonts, and resolution, and
application-level resources such as forms and data modules instantiated
by the application. Most of these are lists of read-only objects, which can
be iterated over an upper limit of number of such objects identified by the
Screen. Very few of these can be set programmatically, such as current
mouse Cursor, IconFont, and HintFont.
For example, when a client application requests data from the server, the
cursor may be changed to a different shape (such as the hourglass used by
most applications), indicating to the user that the request is being pro
-
cessed. Once the data is displayed, the cursor may be changed back to the
18
n
Chapter 5
Figure 5-2

default shape (the shape before it was changed), indicating that the
request processing is complete. This is a very useful hint that most Win
-
dows-based applications provide to the user to show that the request is in
process, the length of time that the request processing is taking, and that
the request failed due to a network related problem (in which case the
cursor takes an unusually long time to return to the default shape). This is
explained here with a code snippet.
Listing 5-5
Screen->Cursor = crHourGlass; // indicates that the request is in process.
….
….
….
Screen->Cursor = crDefault; // indicates that the processing is complete.
The first statement changes the cursor to HourGlass mode and the second
statement changes it back to default mode (whatever it was before it was
changed to the hourglass). The two statements are usually separated by
code that makes the data request, receives and displays it in visual con-
trols or does some other processing, displays any messages, etc. In reality,
the two statements are contained in different methods of the form or
application.
It is possible to allow the forms in the application to be realigned with
respect to desktop properties such as screen resolution. TForm descendent
objects have a property called Align (derived from the TControl ancestor
class), which lets them align themselves (and hence their child compo
-
nents) according to their parent’s position. Since the desktop screen is the
parent for all the forms within an application, the forms naturally align
themselves according to their Align property, whenever the parent resolu
-
tion or alignment changes. The Screen variable has two methods to
control this behavior, DisableAlign() to disable the forms from realigning
themselves and EnableAlign() to let them align themselves. These simple
methods control the behavior of the entire GUI application; because the
forms are parents for their child components, their alignment controls the
alignment of the child components. The OnActiveControlChange and
OnActiveFormChange events provided by the Screen variable let the pro
-
gram recognize when the active control or active form changes.
Another application-level variable created automatically in a Windows
GUI application is Mouse, which is an instance of the TMouse class. The
Mouse variable provides properties that expose the mouse characteristics,
or how the application can respond to mouse messages. Programs can
The VCL Explored
n
19
5
Chapter

check whether a mouse is present, whether the mouse has a wheel, the
number of lines that are scrolled with the wheel movement, and whether
the drag operation should immediately start when the left button is
pressed or after the mouse is moved a certain specified number of pixels
after pressing the left button. There are no methods that the programmer
should ever call from within an application.
Another useful global object is Clipboard, which is an instance of the
TClipboard class. However, this object is not instantiated automatically in
an application. Rather, the programmer should call the Clipboard() func
-
tion defined in the Clipbrd.hpp file, which must be included for
applications that need to access the clipboard. When the Clipboard()
method is called, an instance of the TClipboard object is returned, and
every call to this function from within the application provides access to
the same clipboard maintained by Windows. Thus, the global nature of
the Windows clipboard is retained and maintained by this method.
The properties and methods of the TClipboard object enable the program-
mer to copy data into the global Windows clipboard and retrieve it later
either in the same application or in another application. Data in different
formats can be copied into the clipboard. This is a standard feature that
the majority of commercial applications provide to their users. The meth-
ods used to copy and retrieve text data are listed below.
Listing 5-6
void __fastcall SetTextBuf(char * Buffer);
int __fastcall GetTextBuf(char * Buffer, int BufSize);
The SetTextBuf() method sets the character text into the clipboard and
GetTextBuf() retrieves the character text from the clipboard. The code to
copy a bitmap to the clipboard and retrieve the bitmap from the clipboard
to another bitmap object is described in Listings 5-7 (Unit1.cpp) and 5-8
(Unit1.h). To copy the bitmap to the clipboard, the Assign() method of the
TClipboard object is used. To copy the bitmap from the clipboard to the
bitmap object, the Assign() method of the TBitmap object is used.
Listing 5-7 (unit1.cpp)
#include <vcl.h>
#pragma hdrstop
#include "Unit1.h"
//---------------------------------------------------------------------------
#pragma package(smart_init)
20
n
Chapter 5

#pragma resource "*.dfm"
TForm1 *Form1;
//---------------------------------------------------------------------------
__fastcall TForm1::TForm1(TComponent* Owner)
: TForm(Owner)
{
}
//---------------------------------------------------------------------------
void __fastcall TForm1::Button1Click(TObject *Sender)
{
AnsiString fGraphicFileName = "Graphic1.BMP";
TFileStream* fGraphicFile = new TFileStream(fGraphicFileName, fmOpenRead);
Graphics::TBitmap *Bitmap1 = new Graphics::TBitmap();
try
{
Bitmap1->LoadFromStream(fGraphicFile);
Canvas->Draw(10,10,Bitmap1);
Clipboard()->Assign(Bitmap1);
}
catch (...)
{
MessageBeep(0);
}
delete Bitmap1;
}
//---------------------------------------------------------------------------
void __fastcall TForm1::Button2Click(TObject *Sender)
{
Graphics::TBitmap *Bitmap2 = new Graphics::TBitmap();
try
{
Bitmap2->Assign(Clipboard());
Canvas->Draw(200,200,Bitmap2);
}
catch (...)
{
MessageBeep(0);
}
delete Bitmap2;
}
//---------------------------------------------------------------------------
The VCL Explored
n
21
5
Chapter

Listing 5-8 (unit1.h)
#ifndef Unit1H
#define Unit1H
//---------------------------------------------------------------------------
#include <Classes.hpp>
#include <Controls.hpp>
#include <StdCtrls.hpp>
#include <Clipbrd.hpp>
#include <Forms.hpp>
//---------------------------------------------------------------------------
class TForm1 : public TForm
{
__published: // IDE-managed Components
TButton *Button1;
TButton *Button2;
void __fastcall Button1Click(TObject *Sender);
void __fastcall Button2Click(TObject *Sender);
private: // User declarations
public: // User declarations
__fastcall TForm1(TComponent* Owner);
};
//---------------------------------------------------------------------------
extern PACKAGE TForm1 *Form1;
//---------------------------------------------------------------------------
#endif
The project contains a form with two buttons, Button1 and Button2.
When you click Button1, an image appears at a specific location identified
by pixel position (10,10) from the top left corner of the form. At the same
time, the image is copied to the clipboard. When you click Button2, the
image is copied from the clipboard to another location identified by pixel
position (200,200).
The clipboard as provided by VCL has another interesting feature by
which the programmer can copy a component from the form to the clip
-
board, and later copy the component from the clipboard back to the form
at some other location. This is one way of creating identical copies of the
component with the same set of properties. Listings 5-9 (Unit1.cpp) and
5-10 (Unit1.h) provide an example to illustrate this feature. The applica
-
tion contains a form with GroupBox, DBGrid, Button1, and Button2
components. When you click Button1, The DBGrid component is copied to
another location in the form. When you click Button2, the component is
copied into the GroupBox. The copy can be done any number of times,
but it is important to remember that every time a new copy of the
22
n
Chapter 5

component is made, it contains the same name as the source component,
and hence it is required to change the name of the previously placed com
-
ponent to a different name, because a form cannot have two components
with the same name. If this is not done, the program will throw an excep
-
tion during run time.
Listing 5-9 (unit1.cpp)
#include <vcl.h>
#pragma hdrstop
#include "Unit1.h"
//---------------------------------------------------------------------------
#pragma package(smart_init)
#pragma resource "*.dfm"
TForm1 *Form1;
//---------------------------------------------------------------------------
__fastcall TForm1::TForm1(TComponent* Owner)
: TForm(Owner)
{
// Register the TButton class so that the clipboard can
// read and write button objects
TMetaClass *MetaClass = __classid(TDBGrid);
RegisterClass(MetaClass);
count = 1;
x=20;
y=20;
}
//---------------------------------------------------------------------------
void __fastcall TForm1::Button1Click(TObject *Sender)
{
count++;
// copy the component to the clipboard
Clipboard()->SetComponent(DBGrid1);
// It is required to change the name of the
// source component to different.
AnsiString fGridName = "DBGrid"+IntToStr(count);
DBGrid1->Name = fGridName;
// Now retrieve the component from the clipboard
// and place it in a different location
// Note that the the component copied from clipboard
// contains the name of the source component.
Clipboard()->GetComponent(this, this);
x+=10;
y+=10;
DBGrid1->Top = y;
DBGrid1->Left = x;
The VCL Explored
n
23
5
Chapter

}
//---------------------------------------------------------------------------
void __fastcall TForm1::Button2Click(TObject *Sender)
{
count++;
// copy the component to the clipboard
Clipboard()->SetComponent(DBGrid1);
// It is required to change the name of the
// source component to different.
AnsiString fGridName = "DBGrid"+IntToStr(count);
DBGrid1->Name = fGridName;
// Now retrieve the component from the clipboard
// and place it in a different location
// Note that the the component copied from clipboard
// contains the name of the source component.
Clipboard()->GetComponent(this, GroupBox1);
x+=10;
y+=10;
DBGrid1->Top = y;
DBGrid1->Left = x;
}
//---------------------------------------------------------------------------
Listing 5-10 (unit1.h)
#define Unit1H
//---------------------------------------------------------------------------
#include <Classes.hpp>
#include <Controls.hpp>
#include <StdCtrls.hpp>
#include <Forms.hpp>
#include <DBGrids.hpp>
#include <Clipbrd.hpp>
#include <Grids.hpp>
//---------------------------------------------------------------------------
class TForm1 : public TForm
{
__published: // IDE-managed Components
TGroupBox *GroupBox1;
TButton *Button1;
TDBGrid *DBGrid1;
TButton *Button2;
void __fastcall Button1Click(TObject *Sender);
void __fastcall Button2Click(TObject *Sender);
private: // User declarations
public: // User declarations
24
n
Chapter 5

__fastcall TForm1(TComponent* Owner);
int count;
int x,y;
};
//---------------------------------------------------------------------------
extern PACKAGE TForm1 *Form1;
//---------------------------------------------------------------------------
#endif
Getting the RTTI
Earlier in this chapter the TObject class was introduced and we discussed
how to make use of its methods to find out about the objects with which
we are working. That was an introduction to the runtime type information
(RTTI for short), which is the information that the compiler stores about
the objects in the application. VCL is a mature architecture in the sense
that it provides a very structured and object-oriented approach to the
majority of an enterprise’s programming needs. One of the features of a
mature architecture, in my opinion, is the ability to let the programmer
create and dynamically manage the behavior and lifetime of objects dur-
ing run time. This is provided both by the programming language
specification and the framework that implements it. Programmers should
know the object characteristics to manage the behavior of objects during
run time. VCL makes this easy, due to its strong object hierarchy design.
As most of us know, VCL was developed in Object Pascal, and ported a
seamless interface to the C++ programming world. The methods used to
obtain the runtime type information are defined in the Typinfo.pas Pascal
source file; C++ programmers can see the function definitions in the
Typinfo.hpp file. This header file must be included in the application if
additional information is required from the RTTI.
The following sections discuss some more functions as defined in the
RTTI.
Is a specific property published for the object?
If we need to know if a component has published a specific property, we
can use the IsPublishedProp() function. This function is overloaded and
defined as shown here:
bool __fastcall IsPublishedProp(System::TObject* Instance, const AnsiString
PropName);
bool __fastcall IsPublishedProp(TMetaClass* AClass, const AnsiString PropName);
The VCL Explored
n
25
5
Chapter
IsPublishedProp() takes two parameters; the first one is a pointer to the
object and the second one is the name of the property that we are inquir
-
ing about.
bool is_published = IsPublished(ListBox1, “Color”);
The above statement returns true because Color is a published property of
the TListBox component. In this example it is assumed that ListBox1 is an
object of TListBox.
What is the kind property?
TTypeKind is an enumeration that defines a list of kinds of properties that
the RTTI supports to provide information about. It is defined as shown
below:
enum TTypeKind { tkUnknown, tkInteger, tkChar, tkEnumeration, tkFloat, tkString,
tkSet, tkClass, tkMethod, tkWChar, tkLString, tkWString, tkVariant,
tkArray, tkRecord, tkInterface, tkInt64, tkDynArray };
Is a specific property in an object of a specific type?
Another useful function is PropIsType(); its (overloaded) definition is
given here:
bool __fastcall PropIsType(System::TObject* Instance, const AnsiString
PropName, TTypeKind);
bool __fastcall PropIsType(TMetaClass* AClass, const AnsiString PropName,
TTypeKind TypeKind);
This function takes three parameters; the first one is a pointer to the
object, the second one is the name of the property we are inquiring about,
and the third one is the type of property for which we are checking. It
returns a boolean value whether the property is of the specified type or
not in the object.
bool is_type = PropIsType (ListBox1, “Name”, tkSet);
The above statement returns false because the Name property of the
TListBox component is of type tkString and not tkSet. In this example it is
assumed that ListBox1 is an object of TListBox.
26
n
Chapter 5

What is the type of a specific property in an object?
PropType() is another useful function; its (overloaded) definition is given
here:
TTypeKind __fastcall PropType(System::TObject* Instance, const AnsiString
PropName);
TTypeKind __fastcall PropType(TMetaClass* AClass, const AnsiString PropName) ;
Is the property stored in the DFM file?
The method IsStoredProp() tells us if the property is stored in the form
file (.DFM). Its signature is defined as given here:
bool __fastcall IsStoredProp(System::TObject* Instance, const AnsiString
PropName);
How do you get and set property values for an object?
Now we examine what functions will help us get and set the property val-
ues for different types of properties. The method GetPropValue() retrieves
the property value as a variant and the method SetPropValue() sets the
property value from a variant. These methods are defined as given here:
Variant __fastcall GetPropValue(System::TObject* Instance, const AnsiString
PropName, bool PreferStrings);
void __fastcall SetPropValue(System::TObject* Instance, const AnsiString
PropName, const Variant &Value);
These methods take an object pointer and the property name string as the
first two parameters. The GetPropValue() method’s third parameter is a
boolean that indicates if the result is preferred as a string. For example, if
the property is of type boolean, and if the result is preferred as a string
value, the method returns true or false depending on the value; if not, it
returns the value of –1 for true and 0 for false. The SetPropValue()
method’s third parameter is the value of the property as a variant. These
methods can be used to get or set properties whose types are compatible
with the variant type.
Two similar methods that operate on variant data types are
GetVariantProp() and SetVariantProp(). The signatures of these methods
are given here:
Variant __fastcall GetVariantProp(System::TObject* Instance, const AnsiString
PropName);
void __fastcall SetVariantProp(System::TObject* Instance, const AnsiString
PropName, const Variant &Value);
The VCL Explored
n
27
5
Chapter
The GetVariantProp() method is different from GetPropValue() in that it
does not return the value as a string, whereas the latter does, as discussed
above. There is not much of a difference between the SetVariantProp()
and SetPropValue() methods.
Get and Set methods that operate on properties of specific types are given
here for reference; their usage is self-explanatory from their signatures.
Get and Set Properties of the Ordinal Type
int __fastcall GetOrdProp(System::TObject* Instance, const AnsiString PropName);
void __fastcall SetOrdProp(System::TObject* Instance, const AnsiString PropName,
int Value);
Get and Set Properties of the Enum Type
AnsiString __fastcall GetEnumProp(System::TObject* Instance, const AnsiString
PropName);
void __fastcall SetEnumProp(System::TObject* Instance, const AnsiString
PropName, const AnsiString Value);
Get and Set Properties of the Set Type
AnsiString __fastcall GetSetProp(System::TObject* Instance, const AnsiString
PropName, bool Brackets);
void __fastcall SetSetProp(System::TObject* Instance, const AnsiString
PropName, const AnsiString Value);
The value returned by the GetSetProp() function is a comma-delimited
string of the values in the set. If the Brackets parameter is set to true, the
whole string is enclosed in square brackets. The SetSetProp() function
accepts the set values in a comma-delimited string (without square brack
-
ets) and populates the set internally.
Get and Set Properties of the Object Type
System::TObject* __fastcall GetObjectProp(System::TObject* Instance, const
AnsiString PropName, TMetaClass* MinClass);
void __fastcall SetObjectProp(System::TObject* Instance, const AnsiString
PropName, System::TObject* Value);
28
n
Chapter 5

Get and Set Properties of the String Type
AnsiString __fastcall GetStrProp(System::TObject* Instance, const AnsiString
PropName);
void __fastcall SetStrProp(System::TObject* Instance, const AnsiString
PropName, const AnsiString Value);
Get and Set Properties of the Float Type
Extended __fastcall GetFloatProp(System::TObject* Instance, const AnsiString
PropName);
void __fastcall SetFloatProp(System::TObject* Instance, const AnsiString
PropName, Extended Value);
Get and Set Properties of the Int64 Type
__int64 __fastcall GetInt64Prop(System::TObject* Instance, const AnsiString
PropName);
void __fastcall SetInt64Prop(System::TObject* Instance, const AnsiString
PropName, const __int64 Value);
Get and Set Properties of the Method Type
Sysutils::TMethod __fastcall GetMethodProp(System::TObject* Instance,
PPropInfo PropInfo);
void __fastcall SetMethodProp(System::TObject* Instance, PPropInfo PropInfo,
const Sysutils::TMethod &Value);
More on the method types is explained in the chapter that discusses build
-
ing custom VCL components.
A Closer Look at Forms
Forms provide a visual interface of the Windows GUI application. Form is
the highest level of component in the visual component hierarchy. Forms
can contain any other type of visual and non-visual VCL components.
Forms can also contain ActiveX components developed in other platforms
(which is explained in a different chapter). When a form is created in the
application using the IDE, C++Builder automatically creates the form in
memory by including code in the WinMain() function. The WinMain()
function is created in the project’s main program file. Every time a new
form is added to the application, the IDE adds code to the project’s main
program and makes the form part of the application, as explained earlier
in this chapter. This is the default behavior. It also creates a global
The VCL Explored
n
29
5
Chapter

variable for every form with the same name as the form. This global vari
-
able is a pointer to an instance of the form object and is used to reference
it when the application is running. In applications containing multiple
forms, every form is accessible in every other form through this global
form variable. However, to make this possible, it is required that the
form’s header file be included in the other form’s program from where it
is to be accessed.
If the application contains more than one form, it is not always desirable
to have the forms created and kept in memory, as this may cause perfor
-
mance problems for larger applications. Therefore, in such cases, we can
create the first form automatically in the project’s main program file, and
the code that the IDE adds to create the other forms may be safely
removed from the WinMain() function. The same thing can be achieved
by choosing Project | Options | Forms, and moving the specific form from
the Auto-create forms list to the Available forms list. Later, when the other
form needs to be displayed, it can be created and displayed at that time.
The sample code given here explains how to dynamically create the form
and display it.
Listing 5-11
if (!Form2)
Form2 = new TForm2(Application);
if (Form2->Visible == false) {
Form2->Show();
}
Form2->SetFocus();
In this example, we used the global form variable Form2, which is auto
-
matically created and defined in the Form2’s header file after the TForm2
class definition. This code ensures that the Form2 object is created only if
the object does not exist. If the form is not displayed or obscured by other
forms or windows, the form’s Visible property would be false, in which
case the form is displayed using the Show() method. The form may be vis
-
ible but may not be receiving input focus, in which case the SetFocus()
method brings the form to the front and makes it receive the user’s input
focus. If additional instances of the same form must be displayed at the
same time, then additional global variables of the same form class may be
declared and instantiated using code similar to the example. The Show()
method of the form displays the form in modeless style, which means the
input focus may be shifted to other forms of the same application while
the form is displayed. However, there may be occasions when it would be
30
n
Chapter 5

desirable to show a form in the modal style, which means the input focus
cannot be shifted to other forms of the same application while this form is
displayed; to shift input focus to other forms, the modal form must be
closed. To display a form in modal style, the ShowModal() method must
be called instead of Show() method. Also, if the form is used for limited
functionality, a local variable of the form’s instance will also serve the pur
-
pose, and the default global variable does not have to be used. If a local
variable is used to create the form and the form is displayed modal, then
the form’s instance can be deleted after the form is closed.
Listing 5-12
TForm2* localForm2 = new TForm2(Application);
localForm2->ShowModal();
delete localForm2;
Creating Forms in a DLL
Real-world enterprise-level applications usually contain a main form host-
ing the main menu, and other forms serving each of the menu items in the
main menu. This is typical of many applications. In such a case, there will
be as many forms in the application as there are menu items or subitems.
There are applications hosting forms anywhere from 10 to 100 or even
more. In such a scenario, it is certainly not advisable to create and
instantiate all the forms in the main application program at one time, for
a few reasons. The first and foremost reason is the amount of memory
required to hold so many forms at one time. To hold about 100 forms
simultaneously, the client machines require a large amount of memory.
The second reason is that usually in an enterprise application serving sev
-
eral functions, the user or users do not perform all the functions in the
application. What I mean is that only a small subset of functions (from the
complete set of functions provided by the application) would be used by
an individual or a group of individuals, which is usually controlled by the
user and profile management functions of the application. Therefore, it is
also not required to make all the form objects available in the application
at one time. This prompts anyone with enough Windows development
experience to create DLLs for each individual form. That is certainly the
option we are going to discuss in this section. Windows DLLs
(dynamic-link libraries) are libraries of functions or objects that can be
called or instantiated only when required, and also share the same
address space as the main calling application. They are, therefore, not
independent applications and cannot be executed on their own, as they do
not run in their own address space.
The VCL Explored
n
31
5
Chapter

In the typical scenario discussed here, one or more forms may be com
-
piled into a single DLL (as desired by the application architect), and the
form should be instantiated from the main form of the application. An
example is presented here to help the reader understand how this can be
achieved. The example presents the main pieces of code that are required
to create and execute a form from a DLL. The process of creating a
DLL-based application is thoroughly explained in a different chapter. Cre
-
ate a Windows DLL application using the DLL wizard. The wizard creates
a program with the DllEntryPoint() function alone. I made a few additions
to the program. I added the CreateForm()function, which takes a pointer
to a component object as an input parameter, which we use in the func
-
tion to serve as the owner for the form being created by the DLL. I also
added an #include statement to include a header file FormDll.h (refer to
Listing 5-13) and created the header file. The DLL wizard does not create
a header file for the program.
Listing 5-13 (FormDll.cpp)
#include <vcl.h>
#include <windows.h>
#pragma hdrstop
//---------------------------------------------------------------------------
// Important note about DLL memory management when your DLL uses the
// static version of the RunTime Library:
//
// If your DLL exports any functions that pass String objects (or structs/
// classes containing nested Strings) as parameter or function results,
// you will need to add the library MEMMGR.LIB to both the DLL project and
// any other projects that use the DLL. You will also need to use MEMMGR.LIB
// if any other projects which use the DLL will be performing new or delete
// operations on any non-TObject-derived classes which are exported from the
// DLL. Adding MEMMGR.LIB to your project will change the DLL and its calling
// EXE's to use the BORLNDMM.DLL as their memory manager. In these cases,
// the file BORLNDMM.DLL should be deployed along with your DLL.
//
// To avoid using BORLNDMM.DLL, pass string information using "char *" or
// ShortString parameters.
//
// If your DLL uses the dynamic version of the RTL, you do not need to
// explicitly add MEMMGR.LIB as this will be done implicitly for you
//---------------------------------------------------------------------------
#include "FormDll.h"
#pragma argsused
int WINAPI DllEntryPoint(HINSTANCE hinst, unsigned long reason, void*
lpReserved)
{
return 1;
32
n
Chapter 5

}
//---------------------------------------------------------------------------
void __stdcall CreateForm(TComponent* Owner)
{
dllForm = new TDllDemoForm (Owner);
dllForm->Show();
}
//---------------------------------------------------------------------------
The header file is given in Listing 5-14.
Listing 5-14 (FormDll.h)
#ifndef DllH
#define DllH
#include "DllForm.h"
TDllDemoForm* dllForm;
extern "C" __declspec(dllexport) __stdcall void CreateForm(TComponent *Owner);
//---------------------------------------------------------------------------
#endif
The header file contains the function prototype of the CreateForm() func-
tion using the __declspec(dllexport) declaration, and also includes the
header file for the form’s class definition and creates a global variable of
the DLL form. The __declspec(dllexport) declarator statement is required
when statically linking the DLL to the main executable program.
When the DLL is compiled, the FormDll.dll and FormDll.lib files are
created.
The DLL form may be invoked from the main form in two ways: by static
linking and by dynamic linking. To link the DLL statically to the main exe
-
cutable program, follow these steps:
n
Create the main executable program project. The project file in the
example is DllStaticDemo.cpp and the main form name is
StaticMain.cpp.
n
Add the FormDll.lib file to the project.
n
In the StaticMain.cpp file, include the FormDll.h header file. This
is where the manually created DLL header file is required.
n
The StaticMain.cpp program main form contains a button to initi
-
ate the DLL calling function.
The VCL Explored
n
33
5
Chapter

n
Compile the program and execute. When the button on the main
form is clicked, the DLL form is displayed. Every click to the but
-
ton instantiates a new copy of the DLL form.
In this example, we linked the DLLs library file to the main program and
hence it is called static linking. When a DLL is statically linked, the small
footprint of the DLL (in the form of the library file) is included in the
main program and remains in memory throughout the application’s exe
-
cution. The actual DLL form is loaded when the first call is made to the
function. The application takes care of loading the DLL file into memory,
and remains in memory until the application terminates.
Listings 5-15 and 5-16 provide the cpp and header files, respectively, for
the main executable program performing the static linking of the DLL.
Listing 5-15 (StaticMain.cpp)
//---------------------------------------------------------------------------
#include <vcl.h>
#pragma hdrstop
#include "StaticMain.h"
#include "FormDll.h"
//---------------------------------------------------------------------------
#pragma package(smart_init)
#pragma resource "*.dfm"
TForm1 *Form1;
//---------------------------------------------------------------------------
__fastcall TForm1::TForm1(TComponent* Owner)
: TForm(Owner)
{
}
//---------------------------------------------------------------------------
void __fastcall TForm1::Button1Click(TObject *Sender)
{
CreateForm(this);
}
//---------------------------------------------------------------------------
Listing 5-16 (StaticMain.h)
//---------------------------------------------------------------------------
#ifndef StaticMainH
#define StaticMainH
//---------------------------------------------------------------------------
34
n
Chapter 5

#include <Classes.hpp>
#include <Controls.hpp>
#include <StdCtrls.hpp>
#include <Forms.hpp>
//---------------------------------------------------------------------------
class TForm1 : public TForm
{
__published: // IDE-managed Components
TButton *Button1;
void __fastcall Button1Click(TObject *Sender);
private: // User declarations
public: // User declarations
__fastcall TForm1(TComponent* Owner);
};
//---------------------------------------------------------------------------
extern PACKAGE TForm1 *Form1;
//---------------------------------------------------------------------------
#endif
A DLL may also be loaded dynamically into memory by using the Win-
dows LoadLibrary() function, then obtaining a pointer to the function to
be called, and calling the function dynamically using the function pointer.
The system loads the DLL into memory only when the first call to
LoadLibrary() is made for that DLL. Every call to LoadLibrary() incre-
ments a usage counter internally by the operating system. A loaded library
may be unloaded with the FreeLibrary() call to the same DLL. Every call
to FreeLibrary() decrements the usage counter of that library. When the
usage counter reaches zero, the operating system automatically unloads
the DLL from memory. Therefore, the programmer can have control over
the process of loading and unloading the DLL from the memory and hence
manage the memory more effectively. Also, there is no need to link the
import library file (.lib file) to the project; all we need is the DLL file and
signature of the function to call.
To link the DLL dynamically to the main executable program, perform the
following steps:
n
Create the main executable program project. The project file in the
example is DllDemo.cpp and the main form name is
MainForm.cpp.
n
The MainForm.cpp program’s main form contains a button to initi
-
ate the DLL calling function, and a label to display a message if
DLL loading fails.
The VCL Explored
n
35
5
Chapter

n
Compile the program and execute. When the button on the main
form is clicked, the DLL form is displayed. Every click to the but
-
ton instantiates a new copy of the DLL form.
Listings 5-17and 5-18 provide the cpp and header files, respectively, for
the main executable program performing the dynamic linking of the DLL.
Listing 5-17 (MainForm.cpp)
//---------------------------------------------------------------------------
#include <vcl.h>
#pragma hdrstop
#include "MainForm.h"
//---------------------------------------------------------------------------
#pragma package(smart_init)
#pragma resource "*.dfm"
TDLLDemoMainForm *DLLDemoMainForm;
//---------------------------------------------------------------------------
__fastcall TDLLDemoMainForm::TDLLDemoMainForm(TComponent* Owner)
: TForm(Owner)
{
Label1->Caption = ""; // set the message label to null
}
//---------------------------------------------------------------------------
void __fastcall TDLLDemoMainForm::Button1Click(TObject *Sender)
{
typedef void (*CALLEDFUNCTION) (TComponent* Owner);
CALLEDFUNCTION DllFunctionPtr;
AnsiString fDllName = "FormDll.dll";
AnsiString fFunctionName = "CreateForm";
AnsiString fMessage;
char fDllNameStr[50];
strcpy(fDllNameStr, fDllName.c_str());
HINSTANCE DLLInst = NULL;
DLLInst = LoadLibrary(fDllNameStr);
if (DLLInst) {
DllFunctionPtr = (CALLEDFUNCTION)
GetProcAddress(DLLInst,fFunctionName.c_str());
if (DllFunctionPtr) DllFunctionPtr(this);
else {
fMessage = "Could not obtain pointer for function ";
fMessage += fFunctionName;
fMessage += " in DLL ";
fMessage += fDllName;
Label1->Caption = fMessage;
}
36
n
Chapter 5

}
else {
fMessage = "Could not load DLL ";
fMessage += fDllName;
Label1->Caption = fMessage;
}
}
//---------------------------------------------------------------------------
Listing 5-18 (MainForm.h)
//---------------------------------------------------------------------------
#ifndef MainFormH
#define MainFormH
//---------------------------------------------------------------------------
#include <Classes.hpp>
#include <Controls.hpp>
#include <StdCtrls.hpp>
#include <Forms.hpp>
//---------------------------------------------------------------------------
class TDLLDemoMainForm : public TForm
{
__published: // IDE-managed Components
TButton *Button1;
TLabel *Label1;
void __fastcall Button1Click(TObject *Sender);
private: // User declarations
public: // User declarations
__fastcall TDLLDemoMainForm(TComponent* Owner);
};
//---------------------------------------------------------------------------
extern PACKAGE TDLLDemoMainForm *DLLDemoMainForm;
//---------------------------------------------------------------------------
#endif
Since the CreateForm() function calls the Show() method of the DLL form
rather than the ShowModal() method, it may be noted that the DLL form
would be displayed in modeless style. Hence, the programmer has less
direct control of when the form would be closed, and thus in the case of
dynamic linking of the DLL, the programmer should resort to other meth
-
ods (out of the scope of this book) to determine when to call the
FreeLibrary() function in order to unload the DLL programmatically. How
-
ever, if the FreeLibrary() function is not called, the system unloads the
The VCL Explored
n
37
5
Chapter
DLL automatically when the main application terminates execution. It
should be noted that an application loading forms from DLLs must con
-
tain its own main form (or have it in a package file), and that form should
not be loaded from a DLL itself.
There is one way we can ensure that the form unloads itself from the
memory: write an OnClose event handler for the form as shown below:
void __fastcall TForm1::FormClose(TObject *Sender, TCloseAction &Action)
{
Action = caFree;
}
The statement that assigns the value caFree to the Action parameter
instructs the form to unload itself from memory and free the memory allo
-
cated for it.
Characteristics of a Form
Forms are inherited from the TForm class. Every time a form is added to
the project, the IDE performs a series of tasks:
n
Creates a subclass of the TForm class, and automatically names it
TForm1, TForm2, etc., depending on the last created form index.
The form’s class definition is stored in a header file.
n
Creates a global instance variable of the form in the header file.
n
Creates a form definition file with the DFM file extension (DFM
stands for Delphi ForM file), which preserves the visual presenta
-
tion of the form as an image. However, the file’s contents may be
viewed in graphical form or as text.
n
Creates the main program file for the form with the CPP extension
with an empty constructor. This is the file where the form’s behav
-
ior is implemented as event handler.
Form is a container of components. In the hierarchy of an application’s
components, Form is the highest level of visual container in a Windows
GUI application. By default, every component that is placed on the form
by the designer is contained and owned by the form. The form has the
responsibility of destroying the component when the form itself is
destroyed; however, during run-time creation of components by the pro
-
grammer, another component may be set as owner for the new
component. The parent-child relationship of forms is different from own
-
ership of components by the form. The differences are listed below:
38
n
Chapter 5

n
While ownership is a property introduced in the VCL at the
TComponent level and relates to the responsibility of the owner
component to destroy the owned component, the parent-child
relationship is defined at the TWinControl level. The parent
always represents a windowed control of a child, which can be
windowed or non-windowed, and the parent is responsible for
saving the state of the control when the form is saved.
n
A control that can behave as a parent of another control can also
be its owner, but a component that is the owner of another compo
-
nent does not always have to be its parent.
Most of the form’s behavior is introduced at the TCustomForm. The form’s
properties, methods, and events describe and control the following behav
-
ioral aspects of its contents:
n
The type of form — whether it is a single document interface
(SDI) form, a multiple document interface (MDI) parent form,
MDI child form, etc.
n
The display characteristics of the form — such as modal, mode-
less, resizable, Windows dialog type, iconized style, normal style,
maximized to occupy the entire desktop, etc.
n
Display position of the form on the desktop when executed
n
The lifetime management of the components
n
Provides direct access to the drawing area of the form to allow
custom drawing by the programmer.
n
Lets the programmer access its components individually or collec
-
tively and change some of their properties through the Compo
-
nents array property. To access the properties defined in
TComponent class or its ancestors, the individual elements of the
Components array can be used directly. However, to properly iden
-
tify and access the properties of components derived from
TComponent, the elements of the Components array must be cast
to the appropriate component type, using the dynamic_cast
operator.
n
Ability to reorganize its controls during run time. The controls can
be rearranged at different positions or can be regrouped dynami
-
cally, creating new visual containers at run time.
n
Lets the programmer interact with the form at several stages dur
-
ing its lifetime through the event handlers. The event handlers can
The VCL Explored
n
39
5
Chapter
be assigned dynamically at run time to the methods compiled into
the code.
The individual properties, methods, and events are not discussed here, as
they are readily available to the developer in the online manuals.
Frames in the VCL
Frame is a VCL control that was introduced by Borland in Delphi 5 and
C++Builder 5. Like a form, it is a container of other components. It uses
the same ownership mechanism as forms for automatic instantiation and
destruction of the components on it, and the same parent-child relation
-
ships for synchronization of component properties. In the VCL
architecture, a frame may be considered to be an intermediate component
between forms and panels. Both forms and panels are containers; forms
are self-sufficient units whereas panels are not self-sufficient units. Frames
are self-sufficient units without independent existence.
The characteristics that make frames distinct in the VCL architecture are
listed here:
n
The frame has no independent existence in an application during
run time, but a form does. This means that a frame cannot be dis-
played on its own. It has to be contained within a form or another
frame or any hierarchy of frames, but ultimately it is displayed
only through forms. In this respect, it behaves like a customized
component.
n
The frame can be considered a self-sufficient container. This
means that the frame alone can be created in a single unit and can
contain other components. This gives the programmer the ability
to create complex component groups within the project, even
without creating and registering them to the component palette.
Once a frame is created with required components, the frame can
be included in any project and reused.
n
Frames can also be added to the component palette or object
repository for frequent reuse in multiple projects. This would
increase the productivity. With the mouse on the frame, click the
right mouse button, and from the menu of options displayed,
choose Add to Palette to add the frame to the component palette.
In this case, you are asked to enter a name to the frame compo
-
nent, choose a palette page where this component should be
40
n
Chapter 5

hosted, and change the icon if desired. If you choose Add to
Repository to add the frame component to the repository, you are
asked to provide information such as title, description, author of
the frame component, and the repository page that should host
the component.
n
Using frames to contain resources like images would reduce the
resource requirements to a great extent, particularly when the pro
-
ject contains repeated use of the same image like a company logo
or background image displayed on every form.
Using Frames in a Project
As described earlier, the use of frames in a VCL project serves multiple
purposes. For whatever purpose we use the frames, the steps involved are
the same. For demonstration purposes, we will discuss a small example of
creating a frame that contains a bitmap image as a background image in
the application.
n
Create a VCL GUI application. This will automatically add a form
to the project. Let’s name the project FrameDemo.bpr, the form
MainForm.cpp, and the form class named FrameDemoForm.
n
Add a frame unit to the project by choosing File | New | Frame.
On the frame, drop a TImage component, assign a bitmap file to
the Picture property, set the Stretch property to true and set the
Align property of the image object to AlClient so that the picture
occupies the entire client area of the frame. Save the frame unit as
FrameUnit.cpp. The frame should look similar to Figure 5-3.
The VCL Explored
n
41
5
Chapter
Figure 5-3

n
Now drop a frame object from the component palette Standard
page. Whenever we try to drop a frame object from the compo
-
nent palette to the form, the system displays a list of all the frames
(to choose from) defined in the project so far. At this time, the sys
-
tem displays Frame1. Choose Frame1 and click OK.
n
The frame object created in the earlier step would be dropped
onto the form. To set this as a background image in the project, set
the Align property of the frame to AlClient. The form appears as
shown in Figure 5-4.
n
Now open the FrameUnit and add a TLabel object. Set its Caption
property to any string, say, “Global Alliance Corporation.” Set the
font size to 20 so that the label appears in big type.
n
Notice that when the contents of the frame are changed, the
changes automatically appear in the form instantaneously. This
can be seen in Figure 5-5 at the top of the next page.
This is a property exhibited exclusively by the frames. When the
defining frame class (which is inherited from TFrame) undergoes
changes in its contents, the object instances are automatically
updated by the IDE with the new changes. In this example we
worked with only one instance of the TFrame derived class, but
the principle works with any number of instances created at the
time.
42
n
Chapter 5
Figure 5-4

n
This example also demonstrates an interesting feature relevant to
frames: only one copy of the picture resource is compiled into the
program in the FrameUnit.dfm file. The MainForm.dfm does not
contain the binary resource. Imagine how compact the program
would be with projects involving many forms, each having the
same background image. The form (.dfm) files may be examined
in text mode to notice this behavior.
Visual and Non-Visual Containers
Container is the term that applies to objects that have the ability to con
-
tain other objects. An example is the TListBox object, which contains a list
of strings displayed in a visual list box. Here, the TListBox object acts like
a container and each of the AnsiString objects is contained within the con
-
tainer. A container object may also be contained in another container
object. TList is a non-visual container that maintains a list of pointers to
any type of objects. Therefore, the TListBox object (which is a container
itself) may be contained within a TList object by storing its pointer as an
item in the TList container or TObjectList object. For a C++ programmer
who does not use a framework like the VCL, the only containers available
are through the use of STL (Standard Template Library), which is the sub
-
ject of another chapter in this book. The current chapter discusses the
container objects provided by the VCL framework. Since the subject of
The VCL Explored
n
43
5
Chapter
Figure 5-5
containers is huge with regards to the types of containers as provided in
the VCL, attention will be given to some of these classes, and the reader is
encouraged to refer to the manuals on the others.
TStrings
TStrings is a container class that maintains a collection of strings and a
collection of corresponding object pointers. This is a base class and con
-
tains pure virtual methods. Therefore, the class cannot be directly used to
instantiate an object; rather a descendent class must be used. Examples of
its descendents are TStringList (non-visual) object, which has imple
-
mented all the properties and methods of the base class or Items property
of TListBox (visual) object.
The Add method lets you add a string item to the list, and the AddObject
method lets you add an object with an associated string (e.g., object
name). The Strings property is an array of the strings, and the Objects
property is an array of object pointers. Both these arrays are accessed by
an index which varies from zero to one less than the number of items in
the list. To add an object to the list, first the object has to be created and
then the pointer is passed along as a parameter to the method call.
Signatures of these methods are given here:
int __fastcall Add(const AnsiString S);
int __fastcall AddObject(const AnsiString S, System::TObject* AObject);
Both the methods return the index of the added string (and object). When
the list is destroyed, the strings are destroyed but the associated objects
are not because the string list object does not own them. They have to be
destroyed by the developer, separately. In some programming circum
-
stances, it may even be necessary to destroy the objects before the
pointers to these objects are destroyed along with the string list (if the list
is the only place where the pointers are stored). Otherwise, the object
pointers may not be available to access the objects for the purpose of
destroying. However, if the objects assigned to the string list are owned by
another component, then the owner component takes care of destroying
the objects and the developer does not have to worry about it; this is par
-
ticularly the case with objects created at design time using the IDE.
When the objects are accessed using the Objects property, the pointer
returned references an object of type TObject. Hence, it is necessary to
typecast the object to the appropriate type before using it, as shown in
Listing 5-19.
44
n
Chapter 5

Listing 5-19
// the statements that create a string list and assign an object to it
TStringList *st = new TStringList(); // create a string list
St->AddObject(ListBox1àName, ListBox1); // assign a Listbox to the list
........
........
........
TListBox lb = (TListBox)st->Objects[I]; // to access the list box object
AnsiString lbName = st->Strings[I]; // to access the corresponding string object
Table 5-5 summarizes the most commonly used properties and methods of
the string list object.
Table 5-5
Property Description
Count Returns the number of items in the list.
CommaText Returns the string list object contents as comma separated text.
Text Returns the contents of the string list object as text, separating
individual items with a carriage return and linefeed.
Strings Contains an array of AnsiString objects.
Objects Contains an array of objects.
Names Contains an array of names if the string list contains strings of
name-value pairs.
Values Contains an array of values if the string list contains strings of
name-value pairs.
Method Description
Insert(int index, AnsiString s) Inserts a string into the string list object at the specified location.
n0 InsertObject(int index,
AnsiString s, TObject object)
Inserts a string and the associated object into the string list object
at the specified location.
Delete(int index) Deletes an item located at the specified index position from the
string list object. If an object is associated with the item in the list,
the reference of the object is also deleted from the list (the object
itself is not deleted).
Move(int currIndex, int
newIndex)
Moves the string (and the associated object, if any) located at
currIndex position to the newIndex position.
Exchange(int index1, int
index2)
Swaps the positions of strings (and any associated objects) located
in the positions index1 and index2.
The VCL Explored
n
45
5
Chapter

Method Description
IndexOf(AnsiString str) Returns the index position of the associated string. If the specified
string does not exist in the list, -1 is returned.
LoadFromFile(AnsiString file) Loads the string list object contents from the specified file. The
individual strings must be separated in the file by carriage return
and linefeed characters. Only strings are loaded from the file and
not the associated objects.
SaveToFile(AnsiString file) Saves the string list object contents to the specified file. The
individual strings are separated in the file, by carriage return and
linefeed characters. Only strings are saved to the file and not the
associated objects.
LoadFromStream(TStream
*stream)
Loads the string list object contents from the specified stream
object. The stream object is a descendent of the TStream class.
The stream object should have been created by the SaveToStream
method.
SaveToStream(TStream
*stream)
Saves the string list object contents to the specified stream object.
The stream object is a descendent of the TStream class. The
programmer has to create the stream object that is passed as an
argument to this method. After using the stream object, the
programmer has to explicitly delete it.
BeginUpdate() and
EndUpdate()
These methods help the TStrings object track when the list object
is being updated and when the update is complete, respectively.
Descendents of TStrings class may use this information to hold and
start repainting the portion of screen where the visual data is
being updated in order to avoid flicker during update process.
Another interesting feature of the TStrings object is its ability to store
name-value pairs as individual name and value lists associated with their
string. This is very useful for storing property values read from a property
file. An example is shown here:
userid=satya
password=kolachina
If strings of this type are stored as items in the list, the string
userid=satya is stored as an item in the list. The complete string can be
accessed from the Strings property, the value userid can be accessed from
the Names property, and the value satya can be accessed from the Values
property.
46
n
Chapter 5

TListView
The visual component TListView is an example of a component that con
-
tains containers within another container. The list view object is used to
display rows and columns of data, preferably in display mode, as the
name suggests (to display editable rows and columns, TStringGrid and
TDBGrid objects may be used). The individual items of a list view object
are instances of the TListItem object. The list of these objects is contained
in the TListItems object and is identified by the Items property of the list
view. The TListItems object has methods to add, delete, insert items, clear
the list, etc. The list also has the methods BeginUpdate() and
EndUpdate(), which, unlike in the case of TStrings class, themselves dis
-
able and enable screen painting of the list view object to avoid screen
flicker during update process. Each of the items in the list is a TListItem,
which in turn has a property called SubItems, an instance of TStrings, to
contain strings that appear as subitems to the main list item. It is also
important to note that the individual instances of TListItem object are
owned by the TListItems object, which in turn is owned by the TListView
instance. Because of this hierarchy of ownership, when the topmost object
is deleted, it takes the responsibility of deleting the components it owns,
and this responsibility is carried forward by the hierarchy of components
in the object. This is one of the features that makes VCL a strong architec-
ture, relieving the programmer from the task of destroying the objects.
TList and TObjectList
It was mentioned earlier that the TList object maintains a list of object
pointers. In this context, I wish to provide more detail here. The objects
stored in the TList object can be any descendents of TObject. The features
provided by TList include the following:
n
Maintains a list of object pointers
n
The number of items in the list are indicated by the Count
property.
n
The Delete(int index) method deletes the object pointer at speci
-
fied index, and Remove(void *ptr) deletes the object pointer ptr.
n
Deleting an item from the list does not destroy the original object;
only the object pointer is lost. In fact, if the list is the only location
where the pointer is stored, it is advised that you destroy the
object before deleting the item from the list. Otherwise, the
The VCL Explored
n
47
5
Chapter
programmer would lose the object pointer and cannot destroy the
object later.
n
Similarly, destroying the TList object itself does not destroy the
objects whose pointers are contained in the list.
n
The list can contain NULL pointers. To delete all the null pointers
from the list, the Pack() method must be called.
The TObjectList object descends from TList object and adds more control
to the programmer as follows:
n
Objects whose pointers are contained in the TObjectList object can
be owned by the list object, which can take the responsibility of
destroying them when they are deleted from the list or when the
list object is itself destroyed. This is controlled by the boolean
property OwnsObjects, which, when set to true, leaves the respon-
sibility of destroying the owned objects to the list object.
n
The Remove(TObject *ptr) method has been overridden in
TObjectList to accept a pointer to the TObject class rather than a
void pointer, which is the case with the TList object.
n
Call Extract(void *item) to remove an object from the list without
freeing the object itself. After an object is removed, all the objects
that follow it are moved up in index position and Count is
decremented.
Streams and Streaming
One of the best features of the VCL is the ability to save the object’s state
to a stream and retrieve it later from the stream. There are many VCL
objects that provide this feature through the functions
SaveToStream(TStream *stream) and LoadFromStream(TStream
*stream). TStream is the base class for VCL-style streams. Do not confuse
VCL streams with C++ IOStreams. The VCL functionality is always avail
-
able on top of whatever standard C++ language provides.
TStream defines all the base functionality of a stream that can read from
or write to various kinds of storage media, such as disk files, dynamic
memory, and so on. Stream objects permit applications to seek an arbi
-
trary position in the stream for either reading or writing. It is the
responsibility of the programmer to interpret the data read, by mapping
to the appropriate object’s structure or data layout. In simple terms, any
object’s contents can be saved to a stream, provided methods similar to
48
n
Chapter 5

that mentioned above are made available by the respective component
writers. The main features of streams are data access from an arbitrary
position in the stream and unified data access technique without regard to
the storage media of the stream. The descendent class that derives from
TStream takes care of the media access techniques, and hence it is the
responsibility of the component writers and not the application
programmers.
TStream also introduces methods that work in conjunction with compo
-
nents and files for loading and saving components in simple and inherited
forms. These methods are called automatically by global routines that ini
-
tiate component streaming. They can also be called directly to initiate the
streaming process. These are ReadComponent, ReadComponentRes,
WriteComponent, and WriteComponentRes.
Two important properties of the TStream object are Position and Size.
Position indicates the current location of the stream pointer (similar to file
pointer) from the beginning of the stream. Size indicates current memory
(in bytes) of the stream. Methods that load (or add) contents to the
stream set the size of the stream internally; setting this value explicitly
has no effect. When the TStream (descendent) object is created, Size is 0
and Position is 0. As data is added, the size grows, and the current pointer
location moves away from the beginning of the stream. After the data is
added and before it is read, the stream pointer has to be set to the begin-
ning (or any appropriate location in the stream) explicitly by the
programmer; otherwise, access violations occur. When data is read from
the stream from a location by a specific number of bytes, it only means
that the data is copied from the stream to another memory location by a
specified number of bytes, and the stream pointer is moved forward by
the same number of bytes; data is not removed from the stream. To read
the same set of bytes, move the stream pointer back by the same number
of bytes and do another read. To clear the contents of the stream object,
the descendent class must implement a corresponding method.
The descendents of TStream as defined in the VCL are explained below.
The purpose of these stream objects may be different based on their
design, but they all share the same streaming features explained above.
n
TFileStream — This stream object makes it easy to read from and
write to a disk file. Component writers can implement methods to
save the components’ status to disk file and rebuild the component
status back from the disk file. There is a Seek(int offset, Word ori
-
gin) method that must be used to position the stream pointer at an
appropriate location before the read or write operation begins. In
The VCL Explored
n
49
5
Chapter
fact, some of the VCL components currently support this feature
(along with some third-party vendor components).
n
TMemoryStream — This stream object makes it easy to read from
and write to a memory stream. By saving components’ status to
memory stream, application developers can develop uniform and
unique logic to save the component status and transmit across the
network to other computers, where the receiving applications can
restore the components if they know the object structure that the
stream contains. This can be used as a simple alternate method to
transfer objects across the network without bothering to learn
complex architectures like DCOM and CORBA. (This is explained
in a later chapter in more detail.) However, component writers
have to implement methods to save the object status to the mem
-
ory stream. Some of the VCL components currently support this
feature (along with some third-party vendor components).
n
TStringStream — This stream object provides file-like access to
create string objects, as opposed to more structured AnsiString
object. It is useful as an intermediary object that can hold text as
well as read it from or write it to another storage medium.
n
TWinSocketStream — This stream object provides services that
allow applications to read from or write to socket connections.
Socket connections are of two types: blocking and non-blocking.
In non-blocking socket connections, the read or write across the
socket is performed asynchronously, and hence the events are fired
only when the socket is ready for read or write and data is await
-
ing at the port. But in case of blocking connections, the read and
write occur synchronously and the client application cannot do
anything else as long as the read or write operation is in progress
or waiting. Since the reading process cannot wait indefinitely until
the socket is ready for reading with data at the port, the
TWinSocketStream object provides a waiting feature with a time
-
out mechanism; it is required to read over the blocking socket.
More on sockets is explained later in another chapter.
n
TBlobStream — This stream object is designed to enable reading
and writing BLOB field data in a database table. BLOB field in a
table is designed to hold binary large objects including pictures or
large memos. Every time BLOB field data is read from a table or
written to the table, it is necessary to create a TBlobStream object
to enable this read or write operation. There are two ways to
50
n
Chapter 5

create this stream object. Using the new operator and passing two
arguments (the BLOBField object and the stream access mode) to
the constructor creates an instance of the TBlobStream object to
operate on the specific BLOBField of the table. The second way is
to call the CreateBlobField method on the TTable object and pro
-
vide the same two parameters. In either case, the stream object is
instantiated and it is the programmer’s responsibility to delete the
object after use. It is also important to keep in mind that there is
no terminating character that identifies the end of a BLOB stream
data, and hence the parameter count (which is an integer value)
must be supplied with the exact number of bytes to be transferred.
n
TOleStream — This stream object reads and writes information
over a streaming interface that is provided by an OLE object.
Graphic Objects
Using Windows GDI (Graphical Device Interface) directly to include
graphics in their applications requires programmers themselves to manage
graphics resources directly. There is such a wide variety of display devices
and their driver software provided by different vendors that the Windows
operating system should support the graphic output display. Windows
graphics device context is designed to handle the intricacies of different
devices and provide a unique interface for the Win32 programmer. Win32
help defines a device context as a structure that defines a set of graphic
objects and their associated attributes, and the graphic modes that affect
output. The graphic objects include a pen for line drawing, a brush for
painting and filling, a bitmap for copying or scrolling parts of the screen, a
palette for defining the set of available colors, a region for clipping and
other operations, and a path for painting and drawing operations. In its
simplest definition, the device context is a block of memory containing the
data structure as defined earlier, and managed by the GDI. Before we do
any operation on drawing graphics, it is necessary to obtain a handle to
the device context from Windows. The direct Win32 function call to get a
device context is something like this:
HDC hdc = CreateDC (DriverName, DeviceName, Output, lpInitData);
The return value of this function is a handle to the device context. After
obtaining the device context, the programmer then uses its resources to
perform necessary drawing tasks. After finishing with it, the device con
-
text should be released back to Windows.
The VCL Explored
n
51
5
Chapter
VCL has made this task very simple by providing a set of objects to man
-
age these resources. By using these objects, the programmer does not
have to bother to manage the resources. The interface that VCL provides
is through the Canvas property of the specific component, which handles
the drawing tasks. The Canvas property is an instance of the TCanvas
class, which is a direct descendent of the TPersistent class.
TCanvas
TCanvas provides an abstract drawing space for objects that must render
their own images. The properties and methods of this object are exposed
to the programmer through the Canvas property of the specific compo
-
nent that the programmer is working with. It is the responsibility of the
component writers to expose the Canvas property. The TCustomControl
and TGraphicControl classes include the Canvas property in their ancestor
class, so that component writers can provide the drawing canvas to their
users. Controls derived from TCustomControl provide the Canvas property
to windowed controls (i.e., controls able to receive input focus). Controls
derived from TGraphicControl provide the Canvas property to non-win-
dowed controls (i.e., controls that do not receive input focus). Since
standard windowed controls like the button, check box and edit control
are part of Windows, they know how to draw themselves, and do not
need to descend from TCustomControl; hence, they are derived directly
from TWinControl (which is also the ancestor of TCustomControl).
The important properties of TCanvas object are Pen, Brush, and Font,
which are instances of TPen, TBrush, and TFont, respectively. They are the
graphic objects that provide different styles, colors, etc., that affect the
appearance of the drawing. Accessing the Canvas property of a VCL con
-
trol opens a channel of drawing capabilities to the programmer. There is a
chapter on programming graphics (including Microsoft’s DirectX library)
later in this book that discusses these topics in more detail.
Summary
We began the chapter with an overview of the VCL architecture and dis
-
cussed the features of the VCL framework, followed by an introduction to
the VCL objects and how the VCL’s component ownership concept helps
the programmer in destroying objects.
Then AnsiString was given a prominent place in the discussion due to its
profound use and importance in VCL-based applications. Then followed a
52
n
Chapter 5

discussion on classes that formulate the core VCL foundation for visual
and non-visual components.
A discussion of global application-level variables and components was
included due to their importance in the VCL applications; these are Appli
-
cation, Screen, Mouse, and Clipboard instances, since these are used and
required in any general VCL application, no matter the type of application
we are writing (however, there are exceptions where some of these are
not used in some type of applications).
We continued to discuss the RTTI in more detail, and observed the
method signatures that help the programmer use these methods in
retrieving runtime type information.
The discussion continued on forms and frames in more detail, with code
examples to dynamically create form instances at run time. We provided
screen shots for a Frames project, where frame inheritance was explained.
Following this was presented a discussion on VCL containers, focusing on
string lists and object lists.
VCL streams was the next topic in which we discussed the streaming con-
cept supported by VCL, and how powerful these objects are in different
aspects of the application, like file streams, memory streams, and socket
streams. The last topic of the chapter was an introduction on the graphics
support in the VCL.
Some of these topics were discussed in detail, and some were mentioned
only briefly. Some of the topics are discussed in more detail in other
chapters.
The following chapter discusses advanced VCL features.
The VCL Explored
n
53
5
Chapter

Chapter 6
Advanced VCL Features
Introduction
The previous chapter provided readers with an introduction to VCL fea-
tures to enable them to feel comfortable in writing VCL applications. This
chapter focuses on some of the advanced and additional VCL topics that
are required in typical Windows applications, including the SYSUTILS and
FILECTRL units. In the VCL architecture, these units provide very useful
routines and objects that are needed to interact with the operating
system.
Actions and Action Lists
Action objects in VCL characterize the application’s response to the most
common user inputs like clicking a mouse or a button or selecting an item
from the main menu. Programmers usually come across situations where
they have to provide the same system response to multiple user actions.
The C++Builder IDE lets us assign the same event handler to multiple
events. But there is a more structured and automated way of doing this
task in the VCL — using Action objects. Let us first identify the different
objects that VCL provides us to work with actions. Figure 6-1 describes
the basic elements that form part of the action triggering mechanism, and
the typical sequence of events that occur when Action objects are used in
the application.
55

Action Clients
The VCL controls that receive user input and initiate the linked action
objects are called action clients. These controls have the Action property,
which is a TAction object or one of its descendents. When the Action prop-
erty of the action client is assigned to a valid Action object, an action link
is established internally. An action link is an instance of TActionLink or
one of its descendents. It is this action link that connects the Action object
properties with the corresponding action client properties. The application
programmer never uses the action link class directly. The Action object
internally uses the action link. Component writers who wish to extend the
action link behavior to other controls may create descendents of
TActionLink. The VCL controls that behave like action clients include
TSpeedBtn, TMenuItem, TButton, TBitBtn, TCheckBox, TRadioButton,
and TForm.
Action Objects and the TAction Class
The TAction class represents the basic action that can be assigned to an
action client. In fact, one action can be assigned to more than one action
client. Doing so would enable all the action clients to initiate the same
TAction object, and thus to behave identically.
56
n
Chapter 6
Figure 6-1

Types of Action Objects
There are two types of action objects that can be used in conjunction with
action clients: standard actions and custom actions. Standard actions are
predefined within the VCL framework and come with built-in functional
-
ity that can be used right away in your applications. These are instances
of TAction descendent classes, such as TEditCut and TEditPaste. TEditCut
and TEditPaste are descendents of TEditAction, which is further derived
from TAction. The standard actions are grouped into categories of related
tasks, such as the Edit category, which contains the standard actions rele
-
vant to edit controls, and the Format category, which contains the
standard actions relevant to the formatting features of rich text. Table 6-1
provided at the end of this section describes the standard actions and
their categories, as available in the VCL in C++Builder 6. Custom actions
are TAction instances that are assigned to the action clients but require
the appropriate event handler to be implemented by the programmer. It is
very easy to use either standard actions or custom actions.
Action Targets
Action targets are those controls upon which the action objects act. If the
action object performs one of the edit functions, then the action targets
are descendents of TCustomEdit class, such as TEdit, TRichEdit, and
TMemo. In this case, a TEditCopy action object copies the selected text
from the target edit control and stores it in the clipboard, and a
TEditPaste action object pastes the clipboard contents at the current cur
-
sor location in the target edit control. This cycle of actions is described
pictorially in Figure 6-2.
Advanced VCL Features
n
57
6
Chapter
Figure 6-2
If we use standard action objects of the VCL, then for every category of
actions the set of action clients and the set of action targets are predeter
-
mined. For example, the standard actions in the Edit category are
designed to work with TSpeedBtn and TMenuItem, but not with TButton
and TBitBtn action clients. The corresponding action targets are the Edit
controls that are descendents of the TCustomEdit class. Similarly, if we
use the standard actions in the Window category, then the corresponding
action target must be the parent form of a multiple document interface
(MDI) application; these standard actions disable themselves if the action
target is not the parent form of an MDI application or if it does not con
-
tain MDI children.
If we use custom action objects, then we need to write OnExecute event
handlers for the action object, or for the Action List object that contains
the action object, or for the application that contains the action object.
Action List Object
The Action List object is an instance of the TActionList class. It is a con-
tainer of action objects. Action List is a non-visual VCL component that is
dropped from the Standard page of the component palette. It is one of the
two ways that C++Builder 6 supports the use of action objects. The other
method is using the Action Manager and is discussed in the next section.
It is easy to turn all the actions in an Action List object off or on by setting
the State property to asSuspended or asNormal, respectively.
Using Standard Action Objects
Let us write a sample application that uses the standard action objects.
Follow these steps:
n
Create a new Application project in the C++Builder 6 IDE.
n
From the Standard page of the component palette, drop the
ActionList component.
n
From the Win32 page of the component palette, drop an ImageList
component onto the form. Double-click the ImageList component,
add at least one image to the list, and click the OK button to close
the ImageList. The image we are going to add in the list here is
not necessarily going to be used to display the button images. We
are just making sure that the image list is not empty. Select the
ActionList component and set its Images property to the ImageList
component just created. Doing so will enable the ActionList to
58
n
Chapter 6

automatically assign default button images to the standard action
objects (only). The Images property must be set before choosing
any standard actions in the ActionList component.
n
Double-click the ActionList component on the form to display the
ActionList editor. It should look like Figure 6-3.
n
Keeping the mouse pointer on the ActionList editor, click the right
mouse button. A popup menu appears.
n
Choose New Standard Action from the menu. The Standard Action
Classes list is displayed as shown in Figure 6-4.
n
From the list, choose TEditCopy and TEditPaste from the Edit cate
-
gory and click OK.
n
The selected action objects and their category are created and dis
-
played in the Action List Editor, as shown in Figure 6-5.
Advanced VCL Features
n
59
6
Chapter
Figure 6-3
Figure 6-4

n
From the Win32 page of the component palette, drop one ToolBar
component and two RichEdit components. The ToolBar compo
-
nent automatically aligns itself to the top of the form. Manually
align both the TRichEdit components and set their width and
height both equal to 200 pixels in the Object Inspector. Dou-
ble-click the Lines property of each of the RichEdit components
and clear the values from the editor so that the components have
no initial data in the client window.
n
From the Additional page of the component palette, drop two
SpeedBtn components onto the ToolBar. In the Object Inspector,
set their Width property to 75 pixels so that the components
appear wider. Set the Action property of the first SpeedBtn compo-
nent to EditCopy1 and the second SpeedBtn component to
EditPaste1. After assigning the Action property, each of the
SpeedBtn components shows its respective Caption text, which is
obtained from the action objects.
n
At this time the form appears as shown in Figure 6-6. Save the
project and compile.
60
n
Chapter 6
Figure 6-5
Figure 6-6

n
Run the executable. It looks like a small text editor application
without much functionality other than copying the selected con
-
tent of the edit window and pasting it back in another edit win
-
dow. Initially the Copy button appears disabled. This button is
enabled only after selecting text in an edit control. Since the edit
controls are clear initially, type some text and test the Copy and
Paste functionality as in a traditional text editor. Two edit controls
are placed on the form to show you that the action objects auto
-
matically know their action target once you select the text to be
copied or identify the location to paste the contents.
How Does the Application Find the Action Target for an Action
Object?
The application follows a sequential order to find the action target. If no
action target is found suitable for the action, then nothing happens. The
sequence is as follows:
n
The active control is the first potential action target.
n
If the active control is not the right action target, then the applica-
tion looks at the ActiveForm of the Screen.
n
Finally the controls on the ActiveForm are searched, if the form
itself is not an action target.
Using Custom Action Objects
Let us write a sample application to demonstrate the use of custom action
objects. Perform the following tasks to create the sample application:
n
Create a new Application project in the C++Builder 6 IDE.
n
From the Standard page of the component palette, drop the Action
List component.
n
Double-click the dropped component on the form. The Action List
Editor is displayed and looks like Figure 6-3, as discussed in the
previous example.
n
Keeping the mouse pointer on the Action List editor, click the right
mouse button. A popup menu appears.
n
Choose New Action from the menu. A new instance of TAction
object is created in the list and displayed. Every time we choose
New Action, a new instance is created. Each of these instances
Advanced VCL Features
n
61
6
Chapter

represents a generic action object, which needs to be handled pro
-
grammatically. For this sample application, let us limit ourselves to
writing the action handler method for only one action object.
n
From the Standard page of the component palette, drop two But
-
ton components onto the form. Set the Action property of both the
Button objects to the same action object that we just created in the
previous step.
n
Double-click the OnExecute() event handler of the action object in
the Object Inspector, and write the small piece of code as shown in
Listing 6-1.
n
Compile the project and execute the application. When you click
either of the buttons, you get the same result. Figure 6-7 displays
the result screen.
Listing 6-1
void __fastcall TForm1::Action1Execute(TObject *Sender)
{
Application->MessageBox("You executed the custom action handler",
"Action Message", MB_OK);
}
The point I am trying to make here is that you can provide the same
action result through different channels. In this respect, any combination
of Action Client objects can share the same action handler. By now, you
may have also noticed that whenever the action object is assigned to the
Action property of one or more action clients, the caption of the Action
object is copied to the caption of Action Client. In fact, it is not just the
62
n
Chapter 6
Figure 6-7

Caption property alone that is copied; rather, all the corresponding prop
-
erties are copied. Since the Caption property is visible, we have noticed it;
the others happen to not be visible. This copying of properties is handled
by the Action Link object (which is an instance of TActionLink or its
descendent) as discussed earlier in this section. However, the properties
that are copied from the action objects may be overridden in the action
clients either during design time or during run time.
How Does VCL Identify the Appropriate Action Handler for
an Action?
Now let us examine the criteria that VCL follows to identify the appropri
-
ate action handler method for an action. Whether we use custom actions
or standard actions, we are free to write our own action handler method
for the Action object. When the user clicks an action client, VCL follows a
dispatching sequence to find out the correct event handler to handle the
action. An action handler method can be written at one or more of three
different levels: ActionList level, Application level, and Action object level.
The OnExecute() method at the ActionList level and Action object level,
and OnActionExecute() method at the Application level represent the
event handlers for the action object. The dispatching sequence is: Action
List object, Application object, and Action object. The following rules are
applied while executing the action handler at all these levels:
n
If an action handler is defined at only one of these levels, VCL just
executes that action handler
n
If an action handler is defined at more than one level, it tries to
execute them all in the dispatching sequence mentioned above,
provided the action handler at a previous execution level lets it
continue to the next level. By this, I mean that if we set Handled
= true at the previous execution level, the next level event han
-
dler is not executed, since we are satisfied with the previous event
handler. If we do not set Handled = true explicitly, or if we set
Handled = false explicitly, the next level event handler is executed
if we wrote that event handler. A simple example is that if we
wrote all three event handlers and we did not set Handled = true
in any of them, all the event handlers would be executed in the
dispatching sequence.
n
Another parameter to the OnExecute (or OnActionExecute)
method is a pointer to the TBasicAction object. This parameter
helps us in writing single event handlers (at Action List and
Advanced VCL Features
n
63
6
Chapter

Application levels) to handle more than one Action object by
explicitly writing blocks of code for each Action object, as shown
in Listing 6-2. This feature and the previous one together give us
ample flexibility to control the Action objects’ functionality.
n
The scope of applicability of action handler functionality includes
all the Action objects contained within the action handler level.
However, one or more contained Action objects may be explicitly
included in (or excluded from) the scope as mentioned in the pre
-
vious paragraph.
n
If we write a custom action handler at any one of the levels and an
Action object falls within the scope of this action handler, the
action handler functionality overrides any default functionality
carried by the Action object (usually when the Action object is one
of the standard actions).
Listing 6-2
void __fastcall TForm1::ActionList1Execute(TBasicAction *Action, bool &Handled)
{
if (Action == Action1)
Application->MessageBox("You executed the custom action handler",
"Action List Message", MB_OK);
Handled = true;
}
}
Table 6-1
VCL Standard Actions Available in C++Builder 6
Category Standard Actions Description and Default Action
Edit TEditCut,
TEditCopy,
TEditPaste,
TEditSelectAll,
TEditUndo,
TEditDelete
The Action objects in this category provide the
standard edit actions. They are used with edit control
targets that are derived from TCustomEdit.
TEditAction is the base class for the descendent
Action objects that override the ExecuteTarget
method.
64
n
Chapter 6
VCL Standard Actions Available in C++Builder 6
Category Standard Actions Description and Default Action
Format TRichEditBold,
TRichEditItalic,
TRichEditUnderline,
TRichEditStrikeOut,
TRichEditBullets,
TRichEditAlignLeft,
TRichEditAlignRIght,
TRichEditAlignCenter
The Action objects in this category provide the
standard text formatting features to rich text edit
objects. TRichEditAction is the base class for the
descendent Action objects that override the
ExecuteTarget and UpdateTarget methods to
implement the formatting feature.
Help THelpContents,
THelpTopicSearch,
THelpOnHelp,
THelpContextAction
The Action objects in this category provide the
standard help functionality and can be used on any
target. THelpAction is the base class for the
descendents that each override the ExecuteTarget
method to pass the command onto a help system.
Window TWindowClose,
TWindowCascade,
TWindowTileHorizontal,
TWindowTileVertical,
TWindowMinimizeAll,
TWindowArrange
The Action objects in this category provide standard
window actions. The target control for these action
objects is the parent form of an MDI application. The
actions are executed on the MDI child windows.
TWindowAction is the base class for the descendents
that each override the ExecuteTarget method to
implement the respective action.
File TFileOpen,
TFileSaveAs,
TFilePrintSetup,
TFileRun,
TFileExit
The Action objects in this category are used to
initiate the specific actions on the files, such as
initiating the respective dialog or running an
executable file (File Run action) or closing the
application (File Exit action).
Search TSearchFind,
TSearchFindNext,
TSearchFindReplace,
TSearchFindFirst
The Action objects in this category provide text
search functions on the target edit control.
TSearchAction is the base class for the descendents
that each override the ExecuteTarget method to
display a modeless dialog. This dialog enables the
user to enter search criteria as provided by the
action.
Tab TPreviousTab,
TNextTab
The Action objects in this category provide the
functionality to move the current page to the
previous or next page. The target controls for these
objects are descendents of TCustomTabControl,
such as TPageControl and TTabControl. TTabAction
is the base class for the descendents that each
override the ExecuteTarget method to perform the
necessary action.
Advanced VCL Features
n
65
6
Chapter

VCL Standard Actions Available in C++Builder 6
Category Standard Actions Description and Default Action
List TListControlCopySelection,
TListControlDeleteSelection,
TListControlSelectAll,
TListControlClearSelection,
TListControlMoveSelection,
TStaticListAction,
TVirtualListAction
The target control for the Action objects in this
category is a list control, such as ListBox, ListView,
etc. The target control is identified by the ListControl
property. Some of these Action objects require a
destination list control object, identified by the
Destination property. When a Destination list control
is also used, the source list control is identified by the
ListControl property. The functionality of these
objects is explained here. For simplicity’s sake the
TListControl prefix is omitted.
SelectAll selects all the items in the source list
control. ClearSelection deselects all the selected
items. CopySelection copies all the selected items
from the source list control to the destination list
control. MoveSelection moves all the selected items
from the source list control to the destination list
control. DeleteSelection deletes the selected items
from the target list control. The TListControlAction
is the base class for all the above descendent action
classes in this category that each override the
ExecuteTarget method to provide the respective
functionality.
StaticListAction supplies a static list of items
created at design time to the list control.
VirtualListAction supplies items dynamically to the list
control, as coded in the OnGetItem event handler.
TCustomListAction is the base class for the
TStaticListAction and TVirtualListAction objects.
Dialog TOpenPicture,
TSavePicture,
TColorSelect,
TFontEdit,
TPrintDlg
The Action objects in this category provide some
Windows common dialogs in addition to those
provided in the File category. The names of these
objects are self-explanatory as to the actions that
they support.
66
n
Chapter 6

VCL Standard Actions Available in C++Builder 6
Category Standard Actions Description and Default Action
Internet TBrowseURL,
TDownLoadURL,
TSendMail
TBrowseURL launches the default browser to open a
page at the specified URL using the URL property.
TDownLoadURL starts downloading the file at the
specified URL and periodically generates
OnDownloadProgress events so that the users can
be given feedback about the progress of the
download process. The URL property indicates the
file to be downloaded. TURL action is the base class
for these actions.
Controls linked to the TSendMail action object
cause the application to send a MAPI mail message
containing the message specified in the Text property.
Dataset TDataSetFirst,
TDataSetPrior,
TDataSetNext,
TDataSetLast,
TDataSetInsert,
TDataSetDelete,
TDataSetEdit,
TDataSetPost,
TDataSetCancel,
TDataSetRefresh
The Action objects in this category provide record
navigation features in descendents of TDataSet
component. The dataset component must be
associated to a TDataSource component and the
DataSource property of the Action objects must be
set to this TDataSource component. Each of these
Action objects provides action that corresponds to
the dataset method with a similar name. The
corresponding Action Client is disabled if a particular
action is not relevant in a situation. For example,
TDataSetFirst action object corresponds to the
First() method of the dataset component. If the
dataset is already pointing to the first record, then
this action is not relevant at this time and hence the
action client that is connected to the TDataSetFirst
action object is disabled. The same concept applies to
all the action objects. TDataSetAction is the base
class for the action objects in this category that
override the ExecuteTarget method to provide the
respective functionality.
Tools TCustomizeActionBars This action object is used in conjunction with the
ActionManager to provide run-time customization of
action objects.
Advanced VCL Features
n
67
6
Chapter
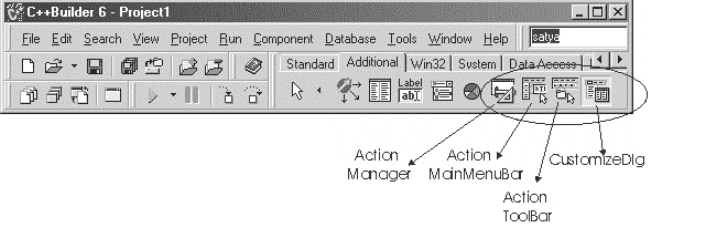
Visual Components That Render Action Objects
In C++Builder 6, new VCL components have been added to extend the
Action object functionality to visually design menus and toolbars at both
design time and run time. Figure 6-8 shows the component palette page
containing these components. These components are:
n
ActionManager
n
ActionMainMenuBar
n
ActionToolBar
n
CustomizeDlg
ActionMainMenuBar is an instance of the TActionMainMenuBar class that
contains the action client items and behaves very similarly to the
TMainMenu object. ActionToolBar is an instance of the TActionToolBar
class and renders the action client items as tool buttons. Both of these
new container objects are linked to an ActionManager object, which is an
instance of the TActionManager class. The ActionManager object houses
all the action client items that are contained in ActionMainMenuBar as
well as ActionToolBar. The action client items may be standard action
objects or custom action objects. To add an ActionMainMenuBar compo
-
nent to the ActionManager, we have to drop the component onto the form
that contains the ActionManager component. Later when we assign the
ActionManager’s Action objects to the ActionMainMenuBar, the VCL auto
-
matically creates a link from ActionMainMenuBar to ActionManager. We
can add an ActionToolBar component to the ActionManager the same way
we added the ActionMainMenuBar component, or we can add it through
the ActionManager component itself as explained in the following steps.
The following procedure demonstrates the process of building a small
Windows WordPad kind of application with a minimal amount of coding.
68
n
Chapter 6
Figure 6-8

n
Create a new Application project in the C++Builder 6 IDE. Save it
anywhere on your hard disk with project and unit names of your
choice.
n
From the Additional page of the component palette, drop an
ActionManager component and an ActionMainMenuBar compo
-
nent onto the form. The ActionMainMenuBar component automat
-
ically aligns itself to the top of the form. In the Object Inspector,
set the following properties to make sure that the menu bar dis
-
plays all four borders:
EdgeBorders->ebLeft = true;
EdgeBorders->ebTop = true;
EdgeBorders->ebRight = true;
EdgeBorders->ebBottom = true;
n
From the Win32 page of the component palette, drop an ImageList
component onto the form. Double-click the ImageList component,
add at least one image to the list, and click OK to close the
ImageList. The image we are going to add in the list here is not
necessarily going to be used to display the button images. We are
just making sure that the image list is not empty.
n
Select the ActionManager component and set its Images property
to the ImageList component created in the previous step. Doing so
will enable the ActionManager to automatically assign default but-
ton images to the standard action objects. However, if we add any
custom action objects to the ActionManager, no images are auto
-
matically set; we have to do it manually. In this example we only
use standard action objects.
n
Now double-click the ActionManager component. The
ActionManager property editor, shown in Figure 6-9, appears. The
property editor has three tab pages. Choose the Toolbars tab page,
and click the New button twice. Two ActionToolBar components
are created (named ActionToolBar1 and ActionToolBar2) on the
form and are listed in the property editor.
Advanced VCL Features
n
69
6
Chapter

n
Now select the Actions tab in the property editor.
n
In the Object Inspector, set the following properties for both
ActionToolBar components to make sure that the toolbars display
all four borders:
EdgeBorders->ebLeft = true;
EdgeBorders->ebTop = true;
EdgeBorders->ebRight = true;
EdgeBorders->ebBottom = true;
n
Keeping the mouse pointer on the ActionList editor, click the right
mouse button. A popup menu appears. Choose New Standard
Action from the menu. The Standard Action Classes list is dis
-
played as shown in Figure 6-4. This is the same list that we saw in
an earlier example.
n
From the list of standard actions, choose all the action objects
under the three categories File, Edit, and Format and the PrintDlg
item from the Dialog category. More than one item can be selected
from this list by pressing the Shift or Ctrl key and selecting the
appropriate item. The selected items are highlighted. After com
-
pleting the selection, click the OK button, which closes this list and
adds the selected items to the Actions tab page of the
ActionManager property editor.
n
Now you can browse through the action objects added to the list.
You may notice that the property editor automatically assigned the
appropriate images to the action objects; since we assigned a
70
n
Chapter 6
Figure 6-9

non-empty ImageList object to the ActionManager, we indicated to
the VCL that we wish to use default images for the action clients.
You may also notice that the default shortcut keys are assigned to
the action objects. At this time, the property editor should look
like Figure 6-10.
n
Now the fun starts. Let us fill the menu bar and toolbars we cre-
ated earlier. This can be done with a simple drag-and-drop opera-
tion. We can select action items individually or as a complete
category, depending on how we wish to place the items on the
menu bar and toolbars. In this example I place the items in a spe
-
cific order; you may choose a different order. The drag-and-drop is
achieved by selecting the desired item (action item or action cate
-
gory), holding the left mouse key, moving the mouse pointer to
the menu bar or toolbar, and releasing the left mouse key.
n
I place the File, Edit, and Format categories in the menu bar in the
same order. Then I place the PrintDlg item from the Dialog cate
-
gory as a subitem in the File menu, below the Print Setup item.
n
I place selected items from the File, Edit, and Dialog categories on
the first toolbar. I finally place selected items from the Format cat
-
egory on the second toolbar. Please refer to Figure 6-11 to check
the order.
Advanced VCL Features
n
71
6
Chapter
Figure 6-10

n
From the Win32 page, drop a RichEdit component onto the form,
and set its Align property to alClient. Using the Object Inspector,
clear the Lines property of the RichEdit component, so that the
edit window looks clean.
n
In the Object Inspector, set the following properties for the
FileOpen1 action object to make sure that we work only with text
files:
Dialog->DefaultExt = TXT;
Dialog->Filter = Text files (*.TXT)|*.TXT;
Repeat the step for the FileSaveAs1 action object.
Notice that I am not enclosing the string values in double quotes,
because I am setting these properties in the Object Inspector. How
-
ever, you have to enclose any strings with double quotes to set
string values during run time.
n
Now let us write a few event handlers to complete this project.
Since we are using standard action objects, you may immediately
question why we have to write event handlers. The Windows com
-
mon dialogs are a little more than just copy, paste, or formatting
text. Each of the dialogs that we have used in this application
needs some programming to react to the user’s choices. We have
to write event handlers to tell the VCL what to do when the user
makes choices or enters values in the dialog boxes. Also if we need
to incorporate extra functionality beyond what is provided by the
standard action objects, we have to write code. But recall that if
72
n
Chapter 6
Figure 6-11

we write action object event handlers, then we would be losing
the default action functionality provided by the VCL.
n
To keep the coding simple, we will create event handlers for just
three of the actions: FileOpen1, FileSaveAs1, and PrintDlg1. Each
of these action objects has a Dialog property, which represents the
corresponding Windows common dialog object provided by the
VCL. Each of these Windows common dialogs have an Execute()
method, which returns true if the user clicked the OK button and
false if the user clicked the Cancel button. But we are not using
these dialogs directly; rather, we are invoking them through the
action objects. The action objects provide OnAccept() and
OnCancel() event handlers corresponding to the true and false
conditions. Therefore we have to implement the OnAccept() event
handlers for the three dialogs to tell the VCL what to do in
response to user inputs. I also created a custom member method
PrintText(TCanvas* Canvas) in the main form class, which writes
text lines from the RichEdit component to the printer’s canvas,
and this method is invoked by the OnAccept() event handler of
the PrintDlg1. I am not discussing more on the code here. Please
refer to Listing 6-3 for the cpp file of the unit and Listing 6-4 for
the corresponding header file.
n
Compile the project and execute. You will wonder how we were
able to create a simple text editor with reasonable functionality so
quickly. Please note that the print function we have incorporated
here is not complete. More needs to be worked on to add features
like controlling page size, inserting page breaks, etc.
Listing 6-3 (Unit1.cpp)
//---------------------------------------------------------------------------
#include <vcl.h>
#pragma hdrstop
#include "Unit1.h"
//---------------------------------------------------------------------------
#pragma package(smart_init)
#pragma resource "*.dfm"
TForm1 *Form1;
//---------------------------------------------------------------------------
__fastcall TForm1::TForm1(TComponent* Owner)
: TForm(Owner)
{
Advanced VCL Features
n
73
6
Chapter

}
//---------------------------------------------------------------------------
void __fastcall TForm1::FileOpen1Accept(TObject *Sender)
{
AnsiString fileName = FileOpen1->Dialog->FileName;
RichEdit1->Lines->Clear();
RichEdit1->Lines->LoadFromFile(fileName);
}
//---------------------------------------------------------------------------
void __fastcall TForm1::FileSaveAs1Accept(TObject *Sender)
{
AnsiString fileName = FileSaveAs1->Dialog->FileName;
RichEdit1->Lines->SaveToFile(fileName);
}
//---------------------------------------------------------------------------
void __fastcall TForm1::PrintDlg1Accept(TObject *Sender)
{
TPrinter *APrinter = Printer();
APrinter->Copies = PrintDlg1->Dialog->Copies;
int i;
for (i=0; i < APrinter->Copies; i++) {
APrinter->BeginDoc();
PrintText(APrinter->Canvas);
APrinter->EndDoc();
}
}
//---------------------------------------------------------------------------
void __fastcall TForm1::PrintText(TCanvas *Canvas)
{
int i, x;
AnsiString S("Text String"); // sample text to determine text height
x = Canvas->TextHeight(S);
for (i=0; i < RichEdit1->Lines->Count; i++) {
S = RichEdit1->Lines->Strings[i];
Canvas->TextOut(1,x*i,S);
}
}
//---------------------------------------------------------------------------
Listing 6-4 (Unit1.h)
//---------------------------------------------------------------------------
#ifndef Unit1H
#define Unit1H
//---------------------------------------------------------------------------
#include <Classes.hpp>
74
n
Chapter 6

#include <Controls.hpp>
#include <StdCtrls.hpp>
#include <Forms.hpp>
#include <ActnCtrls.hpp>
#include <ActnList.hpp>
#include <ActnMan.hpp>
#include <ActnMenus.hpp>
#include <ToolWin.hpp>
#include <ImgList.hpp>
#include <ExtActns.hpp>
#include <StdActns.hpp>
#include <ComCtrls.hpp>
//---------------------------------------------------------------------------
class TForm1 : public TForm
{
__published: // IDE-managed Components
TActionManager *ActionManager1;
TActionMainMenuBar *ActionMainMenuBar1;
TImageList *ImageList1;
TActionToolBar *ActionToolBar1;
TActionToolBar *ActionToolBar2;
TEditCut *EditCut1;
TEditCopy *EditCopy1;
TEditPaste *EditPaste1;
TEditSelectAll *EditSelectAll1;
TEditUndo *EditUndo1;
TEditDelete *EditDelete1;
TRichEditBold *RichEditBold1;
TRichEditItalic *RichEditItalic1;
TRichEditUnderline *RichEditUnderline1;
TRichEditStrikeOut *RichEditStrikeOut1;
TRichEditBullets *RichEditBullets1;
TRichEditAlignLeft *RichEditAlignLeft1;
TRichEditAlignRight *RichEditAlignRight1;
TRichEditAlignCenter *RichEditAlignCenter1;
TFileOpen *FileOpen1;
TFileSaveAs *FileSaveAs1;
TFilePrintSetup *FilePrintSetup1;
TFileRun *FileRun1;
TFileExit *FileExit1;
TPrintDlg *PrintDlg1;
TRichEdit *RichEdit1;
void __fastcall FileOpen1Accept(TObject *Sender);
void __fastcall FileSaveAs1Accept(TObject *Sender);
void __fastcall PrintDlg1Accept(TObject *Sender);
private: // User declarations
public: // User declarations
__fastcall TForm1(TComponent* Owner);
void __fastcall PrintText(TCanvas *Canvas);
Advanced VCL Features
n
75
6
Chapter

};
//---------------------------------------------------------------------------
extern PACKAGE TForm1 *Form1;
//---------------------------------------------------------------------------
#endif
Since we have seen the ActionManager in action, now we can talk more
about it. This component stores all the necessary information to effec
-
tively re-create the action-based user interface. The contents of the
component can be saved to a stream object (such as a memory stream or
file stream) and be retrieved later to dynamically create the user inter
-
face. The benefits of object streamability should be familiar; we can create
multiple user interfaces and dynamically change them at run time, or we
can pass the user interface layout from one process to another (even
across the network) and enable a remote application to dynamically gen-
erate and display its user interface.
The last component in this set, CustomizeDlg, is an instance of
TCustomizeDlg class. When connected to an ActionManager object
through its ActionManager property, all the action objects created during
design time will be available to the user for customization. The user can-
not create new toolbars and new action items at run time, but will be able
to customize all components created during design time. This includes
making the action clients and toolbars visible or invisible, removing the
action clients from the toolbars, and changing the order of appearance of
the action clients on the toolbars.
Windows Common Dialogs
In the previous section we had the opportunity to work with some of the
Windows common dialogs. I now take the opportunity to discuss them in
detail. A dialog is a window that intercepts the application execution and
asks the user for additional input. During the normal flow of application
execution, it sometimes becomes necessary that the application stop
unless the user provides additional information, such as selecting specific
system resources. For example, when the user wants to print the active
document to the printer, and selects the corresponding menu option, the
application has to know which printer (among the installed ones) receives
the document for printing. Often dialogs are displayed modally, because
the user cannot continue with the application unless the dialog is closed.
C++Builder 6 comes with VCL objects for Windows common dialogs as
listed here.
76
n
Chapter 6

n
The TColorDialog component displays a Windows dialog box for
selecting colors. When the Execute() method is called, the dialog
is activated and appears on the screen. The user closes the dialog
by clicking OK or Cancel. The Execute() method returns true if the
user made a choice or false if no choice was made.
n
The TFindDialog component displays a modeless dialog window
that prompts the user for a search string. When the Execute()
method is called, the dialog is activated and displayed on the
screen, and a Boolean value of true is returned. When the user
clicks the Find Next button, the FindText property is set to the
search string that the user entered. The dialog remains open until
the user clicks the Cancel button. Since the dialog is modeless, the
user is able to get back to the application (usually a document)
while the dialog is displayed; this enables the user to repeatedly
execute the search function by clicking the Find Next button.
n
The TFontDialog component displays a Windows dialog box for
selecting a font (and style) from the list of fonts loaded in the sys-
tem. When the Execute() method is called, the dialog is activated
and appears on the screen. The user closes the dialog by clicking
either the OK or Cancel button. The Execute() method returns
true if the user made a choice or false if no choice was made.
n
The TOpenDialog component displays a Windows dialog box to
open a disk file. When the Execute() method is called, the dialog
is activated and appears on the screen. The user closes the dialog
by clicking either the OK or Cancel button. The Execute() method
returns true if the user made a choice or false if no choice was
made. The selected (or entered) filename is available in the File
-
Name property. The Filter property controls what type of file
-
names must be displayed in the list. The DefaultExt property sets
the default file extension if the user does not specify it.
n
The TPrintDialog component displays a Windows dialog box to
send print jobs to the printer (selected from a list). The dialog
compiles the list of printers depending on the drivers installed on
the machine. When the Execute() method is called, the dialog is
activated and appears on the screen. The user closes the dialog by
clicking either the Print or Cancel button. The Execute() method
returns true if the user clicked Print and false if the user clicked
Cancel.
Advanced VCL Features
n
77
6
Chapter
n
The TPrinterSetupDialog component displays a dialog box to
select a printer (from a list) and set its configuration options.
When the Execute() method is called, the dialog is activated and
appears on the screen. The user closes the dialog by clicking either
OK or Cancel. The Execute() method configures the printer and
returns true if the user made a choice or false if no choice was
made.
n
The TReplaceDialog is a special version of TFindDialog that
prompts the user for both a search string and a replace string. The
ReplaceText property holds the new text that replaces the old text,
and its value is set from the value entered by the user, after the
user clicks the Replace button or ReplaceAll button.
n
The TSaveDialog component displays a Windows dialog box to
save a file to disk. When the Execute() method is called, the dialog
is activated and appears on the screen. The user closes the dialog
by clicking either OK or Cancel. The Execute() method returns
true if the user made a choice or false if no choice was made. The
selected (or entered) filename is available in the FileName prop-
erty. The Filter property controls what type of filenames must be
displayed in the list. The DefaultExt property sets the default file
extension if the user does not specify it.
The TCommonDialog class encapsulates most of the functionality of the
Windows common dialogs, and the descendent classes add new properties
and methods or override methods in the base class to provide the neces
-
sary functionality.
If you wish to write your own version of a Windows common dialog, it is
recommended that you descend from TCommonDialog in order to avoid
the complexity of writing the component from scratch.
Windows Drag and Drop
Drag and drop is a very useful feature provided by the Windows operating
systems. The mouse is used as an agent to coordinate the drag-and-drop
operation between the two entities, the source and the target objects. The
source object is the one being dragged when the mouse button is held,
and the target object is the one on which the source is dropped when the
mouse button is released. The drag-and-drop operation enables the appli
-
cation user to transfer (or copy) data elements from the source to the
target without any data entry involved, thus improving user productivity
78
n
Chapter 6

and hence usability of the application. Drag and drop is considered to be
one of the most useful GUI design principles. However, it should be used
where it is appropriate to use. The properties and methods supporting
drag and drop are introduced in the TControl object and are available in
all the descendent objects.
Properties and Methods of the Source Object
For the control to act as a drag source, the following property must be set:
DragKind = dkDrag;
To enable dragging to start automatically when the mouse’s left button is
held, the DragMode property must be set to dmAutomatic. To manually
control the drag operation, the property must be set to dmManual, which
is the default value. If DragMode is set to dmManual, then the dragging
operation starts when the BeginDrag() method is called in the
OnMouseDown() event. The definitions of these methods are given here.
void __fastcall BeginDrag(bool Immediate, int Threshold);
If the Immediate parameter is true, the dragging starts immediately after
the user presses the left mouse button. If the Immediate parameter is
false, the dragging starts after the mouse is moved Threshold number of
pixels after pressing the left button.
typedef void __fastcall (__closure *TMouseEvent)(System::TObject* Sender,
TMouseButton Button, Classes::TShiftState Shift, int X, int Y);
__property TMouseEvent OnMouseDown = {read=FOnMouseDown, write=FOnMouseDown};
The Sender parameter is the drag source object. TMouseButton indicates
whether the mouse button is the left, right, or middle button. TShiftState
indicates the state of the Alt, Ctrl, and Shift keys and the mouse buttons.
X and Y are the pixel coordinates of the mouse pointer in the client area
of the Sender. In this event handler, we can access the source object, the
pressed mouse button, and the position coordinates of the mouse pointer,
and hence the contents of the source object.
Event Handlers for the Drop Target
The control that is going to accept the dropped control is called the drop
target or drag target. In the true sense of accepting a dropped control, it
means that the drop target control is willing to take the data passed by
the source control. For the drop target, there are no properties to be set or
Advanced VCL Features
n
79
6
Chapter
methods to be called; we just have to implement two event handlers,
OnDragOver and OnDragDrop.
When the mouse is moving over any control after capturing the drag
source, the OnDragOver event handler is fired for that control. If we do
not implement the OnDragOver event handler for a control, the drag
operation goes to waste automatically without dropping the object any
-
where. Therefore, we implement the OnDragOver event handler for the
drop target control. This event handler has several parameters; the Source
parameter is the control that is being dragged (if it is a simple drag) or a
custom drag object (if we implement a custom drag object), the Sender
parameter is the control for which we are implementing the event han
-
dler, X and Y are the mouse positional coordinates, and Accept is a
Boolean parameter that is true by default. If we set the parameter Accept
to true, the control acts as a drop target and accepts the dropped object. If
we set Accept to false or if we do not implement this event handler, the
control does not accept the drag source.
In the OnDragDrop event handler we write the code to unpack (obtain)
the values from the Source object, and do whatever we intended to do in
the drag-and-drop operation.
Custom Drag Objects
When the source control is dropped on a target, the source control is sent
as the Source parameter in the target event handlers that receive the
dragged object. At times we may face circumstances such as having to
implement dragging from multiple controls and dropping on a single tar
-
get, having to implement drag and drop across controls hosted in separate
DLLs or the main EXE file of the same application, or implementing cus
-
tom drag images other than the default ones provided in C++Builder 6.
The point I am trying to make here is that there may be complex
drag-and-drop situations for which the default behavior of the source con
-
trol object may not be sufficient. To accommodate such circumstances, the
VCL lets us implement custom drag objects through the TDragObject class
and its descendents. If we intend to use this object, we have to implement
the OnStartDrag event handler. Its definition is given below:
typedef void __fastcall (__closure *TStartDragEvent)(System::TObject* Sender,
TDragObject* &DragObject);
__property TStartDragEvent OnStartDrag = {read=FOnStartDrag,
write=FOnStartDrag};
80
n
Chapter 6

Notice that the TDragObject object is one of the parameters to this event
handler. If we implement this event handler, it is triggered when the user
starts the drag operation. We create an instance of TDragObject object or
one of its descendent classes (as required), and set it to the DragObject
parameter. Then the Source parameter in the target event handlers will be
this DragObject and not the control that is initiating the drag operation. If
we use the TDragObject class itself, we may be doing minimal customiz
-
ation, but we can descend a class from this base class and add more
customization. Another feature of this class is that its Instance property
returns the module handle of the executable (DLL or EXE) that contains
this object.
The TDragControlObject and TDragControlObjectEx classes are notable
descendents of the TDragObject class. They can be used to drop a control
other than the control being dragged. We can instantiate an object of
these classes by passing the control to be dropped as a parameter to the
constructor. Both of these classes provide the same functionality, but differ
in one characteristic: if we use TDragControlObject (or its descendent),
we will have to free its object after finishing with it, while if we use
TDragControlObjectEx (or its descendent), we do not have to free its
object.
Let us work through an example to demonstrate customizing drag and
drop. The following steps illustrate this:
n
Create a new VCL application. The IDE automatically creates the
project and unit files. Save the project and unit files with names of
your choice and in a directory of your choice. I named the project
CustomDragAndDrop.bpr and the unit file CustDrag.cpp.
n
On the form drop three drag source controls: one TListBox compo
-
nent, one TEdit component, and one TBitBtn component. The idea
is to demonstrate dragging data items from different source
controls.
n
For each of these objects, set the DragMode property to
dmManual. This will give us the opportunity to demonstrate
implementation of manual drag.
n
Then drop a second TListBox component, which acts like the drop
target.
n
Create a descendent of TDragControlObjectEx class. I called this
class TDerivedDragObject. Add a constructor method that accepts
a TControl pointer as parameter. Also add a member fDragItem of
type AnsiString. We create a member variable of this class in the
Advanced VCL Features
n
81
6
Chapter
form header file. Hence, this definition must appear before the
form class definition. I presume that I do not have to explicitly tell
a C++ programmer how to organize the class definition and
implementation code. For simplicity’s sake, I included this code in
the same form header file, before the form class definition:
class TDerivedDragObject : public TDragControlObjectEx {
public: // user defined memebers
__fastcall TDerivedDragObject(TControl*fControl);
AnsiString fDragItem;
};
n
In the form class definition, add a public member of type pointer
to the class TDerivedDragObject:
TDerivedDragObject* fCustomDragObject;
n
Implement the simple constructor for the class we created. Again,
for simplicity’s sake, I included this code in the form cpp file itself:
__fastcall TDerivedDragObject::TDerivedDragObject(TControl* fControl)
: TDragControlObjectEx(fControl)
{
}
n
Here I would like to mention that I implemented a very simple
descendent class just to demonstrate how it can be implemented.
You are free to extend this to include more complex data members
to pass through this object.
n
For each of the three components that we placed on the form, we
implement the OnMouseDown and OnStartDrag event handlers.
In the OnMouseDown event handler we call the BeginDrag event
handler of the component itself. In the OnStartDrag event handler
make sure that the data item you are passing is not null, and then
set this data item to the fDragItem member of the drag object.
Finally, set the custom drag object that we created to the
DragObject parameter.
n
Now implement the OnDragOver event handler for the drop target
list box. In this event handler the important parameter is the
Boolean value Accept. Set this value to true if the Source parame
-
ter is a drag object type; otherwise, set it to false. In this event
handler we are deciding whether the drop target is going to accept
the dragged object or not.
if (IsDragObject(Source))
Accept = true;
82
n
Chapter 6

else
Accept = false;
n
Finally we implement the OnDragDrop event handler for the drop
target list box. Notice that the Source parameter is the custom
drag object (that we created earlier) and not the control that is
being dragged. From the Source object, we extract the fDragItem
data member and display the value in the target list box. This pro
-
gram clearly demonstrates that by implementing custom drag
objects, we are able to package data items from different sources
and send it to the drop target.
n
The complete source code for the program is given in Listing 6-5
(CustDrag.cpp file) and Listing 6-6 (corresponding header
CustDrag.h file).
Listing 6-5 (CustDrag.cpp)
//---------------------------------------------------------------------------
#include <vcl.h>
#pragma hdrstop
#include "CustDrag.h"
//---------------------------------------------------------------------------
#pragma package(smart_init)
#pragma resource "*.dfm"
TCustDragAndDrop *CustDragAndDrop;
//---------------------------------------------------------------------------
__fastcall TDerivedDragObject::TDerivedDragObject(TControl* fControl)
: TDragControlObjectEx(fControl)
{
}
//---------------------------------------------------------------------------
__fastcall TCustDragAndDrop::TCustDragAndDrop(TComponent* Owner)
: TForm(Owner)
{
}
//---------------------------------------------------------------------------
void __fastcall TCustDragAndDrop::ListBox1MouseDown(TObject *Sender,
TMouseButton Button, TShiftState Shift, int X, int Y)
{
TListBox* lb = (TListBox*)Sender;
lb->BeginDrag(true,5);
}
//---------------------------------------------------------------------------
Advanced VCL Features
n
83
6
Chapter

void __fastcall TCustDragAndDrop::ListBox1StartDrag(TObject *Sender,
TDragObject *&DragObject)
{
// Create an instance of TDerivedDragObject object and
// pass it as the DragObject
TListBox* flb1 = (TListBox*)Sender;
// Create the custom drag object instance for list box object
fCustomDragObject = new TDerivedDragObject(flb1);
// If the list box is empty or no item is selected do nothing
if (flb1->Items->Count <=0)
return;
if (flb1->ItemIndex <0)
return;
// Set the data to be passed to the drop target
fCustomDragObject->fDragItem = flb1->Items->Strings[flb1->ItemIndex];
// Set the drag object to the custom drag object
DragObject = fCustomDragObject;
}
//---------------------------------------------------------------------------
void __fastcall TCustDragAndDrop::Edit1MouseDown(TObject *Sender,
TMouseButton Button, TShiftState Shift, int X, int Y)
{
TEdit* edit1 = (TEdit*)Sender;
edit1->BeginDrag(false,5);
}
//---------------------------------------------------------------------------
void __fastcall TCustDragAndDrop::Edit1StartDrag(TObject *Sender,
TDragObject *&DragObject)
{
// Create an instance of TDerivedDragObject object and
// pass it as the DragObject
TEdit* edit1 = (TEdit*)Sender;
// Create the custom drag object instance for the edit box object
fCustomDragObject = new TDerivedDragObject(edit1);
// If the edit box is empty, do nothing
if (edit1->Text == "")
return;
// Set the data to be passed to the drop target
fCustomDragObject->fDragItem = edit1->Text;
// Set the drag object to the custom drag object
DragObject = fCustomDragObject;
}
//---------------------------------------------------------------------------
void __fastcall TCustDragAndDrop::BitBtn1MouseDown(TObject *Sender,
84
n
Chapter 6

TMouseButton Button, TShiftState Shift, int X, int Y)
{
TBitBtn* bbtn1 = (TBitBtn*)Sender;
bbtn1->BeginDrag(true,5);
}
//---------------------------------------------------------------------------
void __fastcall TCustDragAndDrop::BitBtn1StartDrag(TObject *Sender,
TDragObject *&DragObject)
{
// Create an instance of TDerivedDragObject object and
// pass it as the DragObject
TBitBtn* bbtn1 = (TBitBtn*)Sender;
// Create the custom drag object instance for the bitbtn object
fCustomDragObject = new TDerivedDragObject(bbtn1);
// If the button caption is empty, do nothing
if (bbtn1->Caption == "")
return;
// Set the data to be passed to the drop target
fCustomDragObject->fDragItem = bbtn1->Caption;
// Set the drag object to the custom drag object
DragObject = fCustomDragObject;
}
//---------------------------------------------------------------------------
void __fastcall TCustDragAndDrop::ListBox2DragOver(TObject *Sender,
TObject *Source, int X, int Y, TDragState State, bool &Accept)
{
// If the source is an instance of TDragObjet or its descendent
// then accept the dragged item
if (IsDragObject(Source))
Accept = true;
else
Accept = false;
}
//---------------------------------------------------------------------------
void __fastcall TCustDragAndDrop::ListBox2DragDrop(TObject *Sender,
TObject *Source, int X, int Y)
{
TDerivedDragObject* fdo = (TDerivedDragObject*)Source;
AnsiString fDraggedItem = fdo->fDragItem;
TListBox* flb2 = (TListBox*)Sender;
if (flb2->Items->Count > 0)
flb2->Items->Clear();
flb2->Items->Add(fDraggedItem);
}
//---------------------------------------------------------------------------
Advanced VCL Features
n
85
6
Chapter

Listing 6-6 (CustDrag.h)
//---------------------------------------------------------------------------
#ifndef CustDragH
#define CustDragH
//---------------------------------------------------------------------------
#include <Classes.hpp>
#include <Controls.hpp>
#include <StdCtrls.hpp>
#include <Forms.hpp>
#include <Buttons.hpp>
//---------------------------------------------------------------------------
class TDerivedDragObject : public TDragControlObjectEx {
public: // user defined members
__fastcall TDerivedDragObject(TControl*fControl);
AnsiString fDragItem;
};
//---------------------------------------------------------------------------
class TCustDragAndDrop : public TForm
{
__published: // IDE-managed Components
TListBox *ListBox1;
TListBox *ListBox2;
TEdit *Edit1;
TBitBtn *BitBtn1;
void __fastcall ListBox1MouseDown(TObject *Sender,
TMouseButton Button, TShiftState Shift, int X, int Y);
void __fastcall ListBox1StartDrag(TObject *Sender,
TDragObject *&DragObject);
void __fastcall Edit1MouseDown(TObject *Sender,
TMouseButton Button, TShiftState Shift, int X, int Y);
void __fastcall Edit1StartDrag(TObject *Sender,
TDragObject *&DragObject);
void __fastcall BitBtn1MouseDown(TObject *Sender,
TMouseButton Button, TShiftState Shift, int X, int Y);
void __fastcall BitBtn1StartDrag(TObject *Sender,
TDragObject *&DragObject);
void __fastcall ListBox2DragOver(TObject *Sender, TObject *Source,
int X, int Y, TDragState State, bool &Accept);
void __fastcall ListBox2DragDrop(TObject *Sender, TObject *Source,
int X, int Y);
private: // User declarations
public: // User declarations
__fastcall TCustDragAndDrop(TComponent* Owner);
TDerivedDragObject* fCustomDragObject;
};
//---------------------------------------------------------------------------
86
n
Chapter 6

extern PACKAGE TCustDragAndDrop *CustDragAndDrop;
//---------------------------------------------------------------------------
#endif
Drag and Drop Across Modules in an Application
Another interesting aspect of custom drag and drop is the ability to imple
-
ment dragging from one module and dropping onto another module of
the same application. The following steps pertain to an application that
has a main EXE program and a DLL. The concept can be extended easily
to applications containing more than one DLL. The complete source code
for both projects is presented at the end of the discussion.
n
Create a class file (a simple unit file with a corresponding header
file) containing the definition and implementation of the
TDerivedDragObject class. For simplicity I am reusing the same
class definition as in the previous example. The only difference is
that this time I am implementing it in separate unit and header
files. The reason is that I have to include this class definition in
two projects, one for the main EXE and the other for the DLL.
Name the unit file CustomDragObject.cpp. The corresponding
header file is automatically named CustomDragObject.h by the
IDE. Listings 6-7 and 6-8, respectively, display these files.
n
Create a main application that generates an EXE program when
built. Save the files in a directory of your choice with names of
your choice. I named the project InterModuleDragExeProject.bpr
and the main form source file InterModuleExeForm.cpp. Listings
6-9 and 6-10 display the cpp and header files, respectively. Add
the CustomDragObject.cpp unit to this project and include the cor
-
responding header file in the header file of the form. You need to
also include the DLL source header file (as explained in the next
step) in the form header file. Also add a public member of type
pointer to the class TDerivedDragObject in the form class
definition:
TDerivedDragObject* fCustomDragObject;
n
Drop a TListBox component on the form to act as the drag source
object, and add a few items using the Object Inspector. Since we
are implementing custom drag, this component is used to initiate
the drag operation. Implement the OnStartDrag event handler for
this component. Also drop a TButton component on the form and
Advanced VCL Features
n
87
6
Chapter

implement its OnClick event handler with code to display the DLL
form.
n
Create a DLL application and save the files with appropriate
names, in a directory of your choice. I named the project
InterModuleDragDllProject.bp, and the source unit containing the
DLLEntryPoint function InterModuleDragDllSource.cpp. As dis
-
cussed in the chapter “VCL Explored,” I manually created a header
file for the latter program so that I can include it in the main form
header file in the EXE application. This header file contains the
definition of a function that invokes the form embedded in the
DLL. Listings 6-11 and 6-12 display the DLL source and header
files, respectively.
n
Create a form to be added to the DLL project. I named this form
InterModuleDragDllForm.cpp. Listings 6-13 and 6-14 display the
cpp and header files, respectively. On this form, add a TListBox
component to act as the drag target. Implement the OnDragOver
and OnDragDrop event handlers for the list box.
n
Build the two projects and execute the main EXE program. When
you click the button on the main form, the DLL form is displayed.
Now you can test dragging the individual items from the main
form list box to the DLL form list box.
Listing 6-7 (CustomDragObject.cpp)
//---------------------------------------------------------------------------
#pragma hdrstop
#include "CustomDragObject.h"
//---------------------------------------------------------------------------
#pragma package(smart_init)
__fastcall TDerivedDragObject::TDerivedDragObject(TControl* fControl)
: TDragControlObjectEx(fControl)
{
}
//---------------------------------------------------------------------------
Listing 6-8 (CustomDragObject.h)
//---------------------------------------------------------------------------
#ifndef CustomDragObjectH
#define CustomDragObjectH
#include <vcl.h>
#include <windows.h>
88
n
Chapter 6

//---------------------------------------------------------------------------
class TDerivedDragObject : public TDragControlObjectEx {
public: // user defined memebers
__fastcall TDerivedDragObject(TControl*fControl);
AnsiString fDragItem;
};
//---------------------------------------------------------------------------
#endif
Listing 6-9 (InterModuleExeForm.cpp)
//---------------------------------------------------------------------------
#include <vcl.h>
#pragma hdrstop
#include "InterModuleDragExeForm.h"
//---------------------------------------------------------------------------
#pragma package(smart_init)
#pragma resource "*.dfm"
TForm1 *Form1;
//---------------------------------------------------------------------------
__fastcall TForm1::TForm1(TComponent* Owner)
: TForm(Owner)
{
}
//---------------------------------------------------------------------------
void __fastcall TForm1::Button1Click(TObject *Sender)
{
CreateForm(this);
}
//---------------------------------------------------------------------------
void __fastcall TForm1::ListBox1StartDrag(TObject *Sender,
TDragObject *&DragObject)
{
// Create an instance of TDerivedDragObject object and
// pass it as the DragObject
TListBox* flb1 = (TListBox*)Sender;
// Create the custom drag object instance for list box object
fCustomDragObject = new TDerivedDragObject(flb1);
// If the list box is empty or no item is selected do nothing
if (flb1->Items->Count <=0)
return;
if (flb1->ItemIndex <0)
return;
// Set the data to be passed to the drop target
fCustomDragObject->fDragItem = flb1->Items->Strings[flb1->ItemIndex];
Advanced VCL Features
n
89
6
Chapter

// Set the drag object to the custom drag object
DragObject = fCustomDragObject;
}
//---------------------------------------------------------------------------
Listing 6-10 (InterModuleExeForm.h)
//---------------------------------------------------------------------------
#ifndef InterModuleDragExeFormH
#define InterModuleDragExeFormH
//---------------------------------------------------------------------------
#include <Classes.hpp>
#include <Controls.hpp>
#include <StdCtrls.hpp>
#include <Forms.hpp>
#include "CustomDragObject.h"
#include "InterModuleDragDllSource.h"
//---------------------------------------------------------------------------
class TForm1 : public TForm
{
__published: // IDE-managed Components
TListBox *ListBox1;
TButton *Button1;
void __fastcall Button1Click(TObject *Sender);
void __fastcall ListBox1StartDrag(TObject *Sender,
TDragObject *&DragObject);
private: // User declarations
public: // User declarations
__fastcall TForm1(TComponent* Owner);
TDerivedDragObject* fCustomDragObject;
};
//---------------------------------------------------------------------------
extern PACKAGE TForm1 *Form1;
//---------------------------------------------------------------------------
#endif
Listing 6-11 (InterModuleDragDllSource.cpp)
//---------------------------------------------------------------------------
#include <vcl.h>
#include <windows.h>
#pragma hdrstop
//---------------------------------------------------------------------------
// Important note about DLL memory management when your DLL uses the
// static version of the RunTime Library:
//
// If your DLL exports any functions that pass String objects (or structs/
90
n
Chapter 6

// classes containing nested Strings) as parameter or function results,
// you will need to add the library MEMMGR.LIB to both the DLL project and
// any other projects that use the DLL. You will also need to use MEMMGR.LIB
// if any other projects which use the DLL will be performing new or delete
// operations on any non-TObject-derived classes which are exported from the
// DLL. Adding MEMMGR.LIB to your project will change the DLL and its calling
// EXE's to use the BORLNDMM.DLL as their memory manager. In these cases,
// the file BORLNDMM.DLL should be deployed along with your DLL.
//
// To avoid using BORLNDMM.DLL, pass string information using "char *" or
// ShortString parameters.
//
// If your DLL uses the dynamic version of the RTL, you do not need to
// explicitly add MEMMGR.LIB as this will be done implicitly for you
//---------------------------------------------------------------------------
#include "InterModuleDragDllSource.h"
#pragma argsused
int WINAPI DllEntryPoint(HINSTANCE hinst, unsigned long reason, void*
lpReserved)
{
return 1;
}
//---------------------------------------------------------------------------
void __stdcall CreateForm(TComponent* Owner)
{
dllForm = new TDllForm (Owner);
dllForm->Show();
}
//---------------------------------------------------------------------------
Listing 6-12 (InterModuleDragDllSource.h)
#ifndef DllH
#define DllH
#include "InterModuleDragDllForm.h"
TDllForm* dllForm;
extern "C" __declspec(dllexport) __stdcall void CreateForm(TComponent* Owner);
//---------------------------------------------------------------------------
#endif
Advanced VCL Features
n
91
6
Chapter

Listing 6-13 (InterModuleDragDllForm.cpp)
//---------------------------------------------------------------------------
#include <vcl.h>
#pragma hdrstop
#include "InterModuleDragDllForm.h"
//---------------------------------------------------------------------------
#pragma package(smart_init)
#pragma resource "*.dfm"
TDllForm *DllForm;
//---------------------------------------------------------------------------
__fastcall TDllForm::TDllForm(TComponent* Owner)
: TForm(Owner)
{
}
//---------------------------------------------------------------------------
void __fastcall TDllForm::ListBox1DragDrop(TObject *Sender,
TObject *Source, int X, int Y)
{
TDerivedDragObject* fdo = (TDerivedDragObject*)Source;
AnsiString fDraggedItem = fdo->fDragItem;
TListBox* flb2 = (TListBox*)Sender;
if (flb2->Items->Count > 0)
flb2->Items->Clear();
flb2->Items->Add(fDraggedItem);
}
//---------------------------------------------------------------------------
void __fastcall TDllForm::ListBox1DragOver(TObject *Sender,
TObject *Source, int X, int Y, TDragState State, bool &Accept)
{
// If the source is an instance of TDragObject or its descendent
// then accept the dragged item
if (IsDragObject(Source))
Accept = true;
else
Accept = false;
}
//---------------------------------------------------------------------------
void __fastcall TDllForm::FormClose(TObject *Sender, TCloseAction &Action)
{
Action = caFree;
}
//---------------------------------------------------------------------------
92
n
Chapter 6

Listing 6-14 (InterModuleDragDllForm.h)
//---------------------------------------------------------------------------
#ifndef InterModuleDragDllFormH
#define InterModuleDragDllFormH
//---------------------------------------------------------------------------
#include <Classes.hpp>
#include <Controls.hpp>
#include <StdCtrls.hpp>
#include <Forms.hpp>
#include "CustomDragObject.h"
//---------------------------------------------------------------------------
class TDllForm : public TForm
{
__published: // IDE-managed Components
TListBox *ListBox1;
void __fastcall ListBox1DragDrop(TObject *Sender, TObject *Source,
int X, int Y);
void __fastcall ListBox1DragOver(TObject *Sender, TObject *Source,
int X, int Y, TDragState State, bool &Accept);
void __fastcall FormClose(TObject *Sender, TCloseAction &Action);
private: // User declarations
public: // User declarations
__fastcall TDllForm(TComponent* Owner);
};
//---------------------------------------------------------------------------
extern PACKAGE TDllForm *DllForm;
//---------------------------------------------------------------------------
#endif
Date/Time Management
Another useful feature that almost all the programmers are required to
work with is date and time management and timestamp management.
VCL has a powerful set of functions and the TDateTime class to handle
these features, which I discuss in this section. The date and time related
functions are defined in the SYSUTILS unit of VCL, and I am going to use
them along with the TDateTime class in my discussion. Since the
SYSUTILS unit is automatically included when we include vcl.h in our
project, there is no need to explicitly include this unit.
Advanced VCL Features
n
93
6
Chapter
TDateTime Class
The TDateTime class is provided in C++Builder to function like the
TDateTime data type in the Object Pascal language that is used in Delphi.
Similar to the AnsiString class discussed in the previous chapter, there is
no need to use the new operator to create objects of this class. Thus, you
can instantiate this object in the following two ways:
TDateTime dateTime1;
TDateTime dateTime2 = new TDateTime();
The data member that stores the date-time value is a double data type.
The reference timestamp that represents a TDateTime value of 0 is
12/30/1899 12:00 AM. When instantiated without any initial value, the
date-time value is set to this reference value. The object can be
instantiated with another date-time object, a double value, system date,
system time, or system timestamp. The following examples illustrate the
different ways to instantiate the TDateTime object:
TDateTime dateTime1 = Date(); // instantiates to the current date value
TDateTime dateTime2 = Time(); // instantiates to the current time value
TDateTime dateTime3 = Now(); // instantiates to the current date and time value
TDateTime dateTime4 = 2.25; // instantiates to 01/01/1899 06:00 AM
TDateTime dateTime5 = dateTime2; // instantiates to another date-time object
TDateTime dateTime6 = TDateTime(2001, 10, 23); // specific year, month, and day
The functions Date(), Time(), and Now() are VCL functions defined in the
SYSUTILS unit, which return the current system date, current system
time, and current timestamp as TDateTime objects. These values can also
be obtained from the methods CurrentDate(), CurrentTime(), and
CurrentDateTime(), respectively, of the TDateTime object.
TDateTime objects participate in arithmetic operations to give us flexibil
-
ity in date-based or timestamp-based computations. The operands that
participate with a TDateTime object are other date-time objects or double
values or integer values. When we add fractional values to a TDateTime
object, the integer portion of the data member indicates the number of
days past the reference date and the decimal portion indicates the propor
-
tion of time that has passed (out of 24 hours) since midnight of the
previous day.
TDateTime dateTime1;
DateTime1 += 0.25 // indicates 6:00 AM on 12/30/1899
If the result of arithmetic operations is a negative value (such as –2.25)
the interpretation is slightly different. The negative sign applies only to
the integer portion and hence to the number of days, indicating that the
94
n
Chapter 6

date is behind the reference date by the negative integer value (in this
case, –2). The decimal fraction always represents the proportion of time
that has passed since midnight of the previous day. In this example, a
value of –2.25 represents 12/28/1899 6:00 AM. Table 6-2 describes the
methods and some frequently needed operators supported by the
TDateTime object.
Table 6-2
Methods Description
CurrentDate() Returns the current system date as a TDateTime object.
CurrentDateTime() Returns the current system date and time as a TDateTime
object.
CurrentTime() Returns the current system time as a TDateTime object.
DateString() Returns the date portion of the object as an AnsiString
object.
DateTimeString() Returns the date and time value of the object as an
AnsiString object.
DayOfWeek() Returns the day of the week for the date portion of the
object as an integer. Sunday is treated as the first day of
the week and Saturday as the seventh.
DecodeDate(unsigned short* year,
unsigned short* month, unsigned
short* day)
This is a very useful method to separate the day, month,
and year of the object into individual items. Notice that the
parameters to the method are pointers to unsigned short
variables.
DecodeTime(unsigned short* hour,
unsigned short* min, unsigned short*
sec, unsigned short* msec)
This is very similar to the DecodeDate() method; it is used
to decode the time portion of the object into individual
items.
FileDate() Files stored on the disk have a timestamp associated with
them. This method is used to convert the date-time value
of the object to an integer value representing the file
timestamp.
FileDateToDateTime() Converts the file timestamp to a TDateTime object and
stores it in the current object.
FormatString(AnsiString& format) Returns the date and time value of the object as a
formatted AnsiString object. The required format is
provided as an input parameter to the method.
TimeString() Returns the time portion of the object as an AnsiString
object.
Advanced VCL Features
n
95
6
Chapter
Operators Description
AnsiString() Returns the date-time value as an AnsiString.
Usage:
TDateTime dtime = Now();
AnsiString str = AnsiString(dtime);
double() Returns the date time value as a double.
Usage:
TDateTime dtime = Now();
double dbl = double(dtime);
Apart from the TDateTime object, VCL has a wealth of functions defined
in the SYSUTILS unit that provide date and time management functional
-
ity. Most of them are conversion utilities to convert date-time value to and
from other formats. Table 6-3 lists these functions.
Table 6-3
SysUtils Function Description
Date() Returns the current system date as a TDateTime object.
DateTimeToFileDate
(System::TDateTime DateTime)
Converts the TDateTime object that is passed as a
parameter to this function to an integer value representing
the DOS file timestamp. This integer can be used in the
function FileSetDate(int Handle, int Age) to set the
timestamp of a file. Handle represents the file and Age
represents the integer value of the DOS date-timestamp.
The FileSetDate() function is part of file management
routines in the VCL. The DOS file timestamp is discussed
later in this section.
DateTimeToStr (System::TDateTime
DateTime)
Returns the TDateTime object that is passed as a
parameter to this function as an AnsiString object.
DateTimeToString (AnsiString
&Result, const AnsiString Format,
System::TDateTime DateTime)
Converts the TDateTime object that is passed as a
parameter to this function to a formatted AnsiString object
and stores it in the Result parameter. The Format
parameter provides the required format. Formatting
features are discussed later in this section.
DateTimeToSystemTime
(System::TDateTime DateTime,
_SYSTEMTIME &SystemTime)
Converts the TDateTime object that is passed as a
parameter to this function to an instance of Win32
SYSTEMTIME structure type. The SYSTEMTIME structure
and its use are discussed later in this section.
96
n
Chapter 6

SysUtils Function Description
DateTimeToTimeStamp
(System::TDateTime DateTime)
Returns the TDateTime object that is passed as a
parameter to this function as an instance of the VCL
TTimeStamp structure type. TTimeStamp stores individual
date and time values as integers. The date value represents
the number of days that have passed since the date
01/01/0001, and the time value represents the number of
seconds elapsed since midnight. This structure is intended
to give another form of representation to the current
timestamp value.
DateToStr (System::TDateTime
Date)
Returns the date portion of the TDateTime object that is
passed as a parameter to this function as a formatted
AnsiString object. The format is specified by the
ShortDateFormat global variable, which is obtained from
the operating system Control Panel à Regional Settings à
Date tab page.
DayOfWeek (System::TDateTime
Date)
Returns the day of the week for the TDateTime object
that is passed as a parameter to this function as an integer
value; 1 represents Sunday and 7 represents Saturday.
DecodeDate (System::TDateTime
Date, Word &Year, Word &Month,
Word &Day)
Converts the date portion of the TDateTime object that is
passed as a parameter to this function to individual day,
month, and year components.
DecodeTime(System::TDateTime
Time, Word &Hour, Word &Min,
Word &Sec, Word &MSec)
Converts the time portion of the TDateTime object that is
passed as a parameter to this function to individual hour,
minute, second, and millisecond components.
EncodeDate (Word Year, Word
Month, Word Day)
Returns a TDateTime object containing a date value that is
constructed from the individual components of day,
month, and year. The year must be between 1 and 9999.
The month must be between 1 and 12. The day must be
between 1 and 31 based on the month specified. If the
specified values do not yield a valid date, an EConvertError
exception is thrown.
EncodeTime (Word Hour, Word
Min, Word Sec, Word MSec)
Returns a TDateTime object containing a time value that is
constructed from the individual components of hour,
minute, second, and millisecond. Valid Hour values are 0
through 23. Valid Min and Sec values are 0 through 59.
Valid MSec values are 0 through 999. The resulting object
contains the decimal fraction value that conforms to the
TDateTime object’s time value rules. If the specified values
are not within range, an EConvertError exception is
thrown.
Advanced VCL Features
n
97
6
Chapter

SysUtils Function Description
FormatDateTime (const AnsiString
Format, System::TDateTime
DateTime)
Returns a formatted AnsiString object representing the
TDateTime object that is passed as a parameter. The
format is specified by the Format parameter.
IncMonth (const TDateTime Date,
int Months)
Returns a new TDateTime object that contains the month
value incremented by Months. If the input day of month is
greater than the last day of the resulting month, the day is
set to the last day of the resulting month. If the
incremented month value exceeds the current year (any
following years), the year value is also set to the
appropriate value.
IsLeapYear (Word Year) Returns true if the specified year is a leap year.
MSecsToTimeStamp (System::Comp
MSecs)
Returns an instance of the TTimeStamp object that is
constructed from the number of milliseconds (since
01/01/0001). The number of milliseconds is specified as a
Comp data type. Comp is a C++ struct that implements
the Object Pascal 64-bit integer data type. Comp can
represent a value in the range –2
63
+1 to 2
63
–1 (about –9.2
*10
18
to 9.2 * 10
18
). Comp values can represent 19
significant digits.
Now () Returns current timestamp as a TDateTime object.
ReplaceDate (TDateTime
&DateTime, const TDateTime
NewDate)
Replaces the date portion of the first TDateTime object
with the date portion of the second TDateTime object
without changing the time.
ReplaceTime (TDateTime
&DateTime, const TDateTime
NewTime)
Replaces the time portion of the first TDateTime object
with the time portion of the second TDateTime object
without changing the date.
0StrToDate (const AnsiString S) Returns a TDateTime object after converting the input
string value that represents a date-time value containing
the date. The string value S must consist of two or three
numbers separated by the character defined by the
DateSeparator global variable. The order for month, day,
and year is determined by the ShortDateFormat global
variable; possible combinations are m/d/y, d/m/y, and
y/m/d. If the date contains only two numbers separated by
the DateSeparator, it is interpreted as a date in the current
year. If the specified string does not represent a valid date,
an EConvertError exception is thrown.
The global variables are obtained from the operating
system Control Panel à Regional Settings à Date tab
page.
98
n
Chapter 6

SysUtils Function Description
StrToDateTime (const AnsiString S) Returns a TDateTime object after converting the input
string value that represents a date-time value containing
the date and time. The date portion of the string must
follow formatting rules specified by the DateSeparator and
ShortDateFormat global variables, and the time portion of
the string must follow formatting rules obtained from the
Control Panel à Regional Settings à Date tab page. It is
not necessary to indicate the time portion with AM or PM,
in which case the time must be specified in 24-hour
format. If the specified string does not represent a valid
date, an EConvertError exception is thrown.
StrToTime (const AnsiString S) Returns a TDateTime object after converting the input
string value that represents a date-time value containing
the time. The rules for specifying the time string are the
same as discussed for the previous function.
SystemTimeToDateTime (const
_SYSTEMTIME &SystemTime)
Returns a TDateTime object after converting the input
Win32 SYSTEMTIME struct data type.
Time() Returns current time value as a TDateTime object.
TimeStampToDateTime (const
TTimeStamp &TimeStamp)
Returns a TDateTime object after converting the input
TTimeStamp object.
TimeStampToMSecs () Returns the absolute number of milliseconds after
converting both the date and time portions of the input
TTimeStamp object. The returned value is an instance of
the Comp structure and the reference date for this value is
01/01/0001.
TimeToStr (System::TDateTime
Time)
Returns an AnsiString object after converting the input
TDateTime object containing a time value. The conversion
uses the LongTimeFormat global value.
Constants Description
DateDelta The TDateTime object uses the reference date of
12/30/1899 and the TTimeStamp object uses the reference
date of 01/01/0001. The DateDelta constant is provided to
make date value corrections. It is defined in the
SysUtils.pas file as the number of days between
01/01/0001 and 12/31/1899. Its value is 693594.
MSecsPerDay This constant represents the number of milliseconds per
day. Its value is 86400000.
SecsPerDay This constant represents the number of seconds per day.
Its value is 86400.
Advanced VCL Features
n
99
6
Chapter

DOS File Timestamp
DOS File Timestamp is also known as DOS File DateTime value. It is the
combination of two packed 16-bit values, one to store DOS File date and
the other to store DOS File time. The individual bit values that comprise
these structures are shown here, as defined in the Microsoft documenta
-
tion (MSDN).
Table 6-4 (DOS File Date)
Bits Contents
0-4 Day of the month (1-31)
5-8 Month (1= January, 2 = February, etc.)
9-15 Year offset from 1980 (add 1980 to get actual year value)
Table 6-5 (DOS File Time)
Bits Contents
0-4 Second, divided by 2
5-10 Minute (0-59)
11-15 Hour (0-23 on a 24-hour clock)
Win32 Core Date-Time Management
Now it is time to discuss some of the Win32-based date and time manage
-
ment functions which can be used in conjunction with the VCL functions
to deliver easy-to-interface systems. SYSTEMTIME is a structure data type
and is comprised of individual data members to represent day, month, and
year, etc. This structure is used by Win32 functions to store the timestamp
values. The structure definition is shown here followed by the functions
that use this structure:
typedef struct _SYSTEMTIME { // st
WORD wYear;
WORD wMonth;
WORD wDayOfWeek;
WORD wDay;
WORD wHour;
WORD wMinute;
WORD wSecond;
WORD wMilliseconds;
} SYSTEMTIME;
100
n
Chapter 6

VOID GetLocalTime(
LPSYSTEMTIME lpSystemTime // address of output system time structure
);
VOID GetSystemTime(
LPSYSTEMTIME lpSystemTime // address of output system time structure
);
BOOL SetLocalTime(
CONST SYSTEMTIME * // sets system time, using local time
);
BOOL SetSystemTime(
CONST SYSTEMTIME *lpSystemTime // sets system time, using UTC time
);
The GetLocalTime() function retrieves the current local date and time
from the clock in the computer where the operating system is loaded. The
input parameter is a pointer to the structure SYSTEMTIME, and contains
the value returned by the function call. Most of the time, applications
need to display (and use) the local time. However, there may be time-sen-
sitive global (or internationalized) applications that require using
universal time. The GetSystemTime() function retrieves the current sys-
tem date and time in terms of coordinated universal time (UTC).
Microsoft documentation (MSDN) defines the UTC as follows: “System
time is the current date and time of day. The system keeps time so that
your applications have ready access to accurate time. The system bases
system time on coordinated universal time (UTC). UTC-based time is
loosely defined as the current date and time of day in Greenwich, Eng
-
land.” The SetSystemTime() function sets the system date and time, using
the universal time value as input. The SetLocalTime() function sets the
system date and time, using the local time as input.
Both the GetLocalTime and GetSystemTime functions do not return any
value. Both the SetSystemTime and SetLocalTime functions return a
non-zero value if the function succeeds, and a zero value if the function
fails. If the function fails, check the last error code using the Win32
GetLastError() function. Executing Win32 functions from a VCL applica
-
tion is discussed in an earlier chapter.
Since VCL provides functions to convert date and time values between
VCL formats and Win32 formats, it becomes easy on the part of program
-
mers to provide systems (and components) that can interact with the
applications developed using Win32 SDK directly, or with applications
Advanced VCL Features
n
101
6
Chapter
developed by other vendors. This type of data (object or structure) con
-
version is visible in other units of VCL as well, not just SYSUTILS.
Formatting Date-Time Strings
We have seen that date-time values can be retrieved as AnsiString objects.
This is very useful for embedding date-time values in message strings or
as timestamps to display to the user. While converting the date-time value
to a string, the format of the string can be specified using the
FormatString() method. There are a number of format specifiers that VCL
supports, a few of which are shown here. C++Builder 6 online documen
-
tation provides the complete list.
n
The specifier “c” indicates that the date-time value be displayed in
the format given by the ShortDateFormat global variable:
TDateTime dt = Now();
AnsiString dts = dt.FormatString(“c”);
In this example, the string dts contains a value similar to
“12-23-2001 4:35:33 PM”. However, the actual format depends on
how Regional Settings are set up in the Control Panel on your
computer.
n
The specifier “d” indicates that the day value be displayed without
a leading zero if it is a single-digit value (such as “1-31”), as
opposed to the specifier “dd,” which indicates that the single-digit
day value be displayed with a leading zero (such as “01-31”).
n
The specifier “am/pm” indicates that the 12-hour clock be used
and the word “am” appended to the string for time values before
noon and “pm” appended to the string for time values after noon.
n
The specifier “ampm” indicates that the 12-hour clock be used and
the string be appended with the global variable TimeAMString for
time values before noon and the global variable TimePMString for
time values after noon.
n
Embedded constant string literals can be used to provide meaning
-
ful formats, as shown in the example here:
TDateTime dt = Now();
AnsiString dts = dt.FormatString(“’on’ dd-mm-yyyy ‘at’ hh:nn:ss”, dt);
AnsiString msg = “The process started ”+dts;
In this example, the string msg contains a value similar to “The
process started on 23-01-2001 at 15:20:25”.
102
n
Chapter 6

Constants Defined in SYSUTILS
Here is a list of date and time related constants defined in the SYSUTILS
unit, which may be used in conjunction with the functions discussed in
this section.
n
ShortMonthNames is an array[1..12] of the short form of month
names. The mmm format specifier in the format string uses the
value obtained from this array. The default values are retrieved
from the LOCALE_SABBREVMONTHNAME s0ystem locale entries.
n
LongMonthNames is an array[1...12] of the long form of month
names. The default values are retrieved from the
LOCALE_SMONTHNAME system locale entries.
n
ShortDayNames is an array[1..7] of the short form of day names.
The ddd format specifier in the format string uses the value
obtained from this array. The default values are retrieved from the
LOCALE_SABBREVDAYNAME system locale entries.
n
LongDayNames is an array[1..7] of the long form of day names.
The default values are retrieved from the LOCALE_SDAYNAME
system locale entries.
n
TimeAMString is the suffix string used for time values between
00:00 and 11:59 in 12-hour clock format. The initial value is
retrieved from the LOCALE_S1159 system locale entry.
n
TimePMString is the suffix string used for time values between
12:00 and 23:59 in 12-hour clock format. The initial value is
retrieved from the LOCALE_S2359 system locale entry.
n
ShortDateFormat is the format string used to convert a date value
to a short string suitable for editing. The initial value is retrieved
from the LOCALE_SSHORTDATE system locale entry.
n
LongDateFormat is the format string used to convert a date value
to an AnsiString suitable for display but not for editing. The initial
value is retrieved from the LOCALE_SLONGDATE system locale
entry.
Advanced VCL Features
n
103
6
Chapter
Directory and File Management
Another set of features provided by the SYSUTILS unit is the functions
and objects that enable access to the files and directories stored on the
disk. We explain these functions before starting our discussion. Apart from
the SYSUTILS unit, FILECTRL unit also provides some of these functions. I
will highlight these differences wherever they exist. Unlike the SYSUTILS
unit, including the vcl.h file does not automatically include the FILECTRL
unit. We have to explicitly include the filectrl.hpp file.
Working with Directories
The CreateDir() function enables us to create a directory with the given
name on the current drive. The definition of the function is given here:
bool __fastcall CreateDir(const AnsiString DirName);
The function returns true if it succeeds in creating the directory; other-
wise, it returns false. The input parameter may specify the simple name of
the directory or the directory name preceded by the full or relative path
name. If we specify just the directory name, the directory will be created
in the current directory. If we include the full or relative path name, then
each and every subdirectory in the path must exist prior to execution of
this function. If not, an exception is thrown. To avoid this situation, use
the ForceDirectories() function if we need the subdirectories to be cre-
ated, or check for existence of subdirectories using the DirectoryExists()
function before trying to create the directory (or subdirectory).
The ForceDirectories() function forces the system to create any subdirec
-
tories specified in the directory path if they do not already exist, thus
avoiding an exception condition. The definition of the function is given
here. The path specified may be the full path or a relative path.
bool __fastcall ForceDirectories(const AnsiString DirName);
The DirectoryExists() function returns true if the specified directory exists
on the drive; otherwise, it returns false. This function is provided in the
FILECTRL unit.
bool __fastcall DirectoryExists(const AnsiString DirName);
The GetCurrentDir() function returns the (fully qualified) current direc
-
tory name.
AnsiString __fastcall GetCurrentDir();
104
n
Chapter 6

The ChDir() function changes the current directory to the directory speci
-
fied in the input parameter. The definition of the function is as follows:
void __fastcall ChDir(const AnsiString DirName);
The SetCurrentDir() function sets the current working directory to the
name specified as the parameter. If the current directory is set success
-
fully, the function returns true; otherwise, it returns false. The definition
of the function is described here:
bool __fastcall SetCurrentDir(const AnsiString DirName);
The RemoveDir() function deletes the directory specified in the input
parameter. The directory must be empty before this function is called. The
definition of the function is as follows:
bool __fastcall RemoveDir(const AnsiString DirName);
The SelectDirectory() function displays a directory selection dialog box to
the user. There are two variations of this function. The first is shown
below:
bool __fastcall SelectDirectory(AnsiString &Directory, TSelectDirOpts Options,
int HelpCtx);
This variation of the function has three parameters: a directory name
string, a set of directory selection options, and a help context id. The
directory name string parameter contains the initial directory that the
user sets. When the user clicks the OK button, the dialog sets this string
parameter with the newly selected directory name, including the full path.
A sample code snippet is shown in Listing 6-15. When executed in a pro
-
gram, the dialog appears as shown in Figure 6-12.
Listing 6-15
//---------------------------------------------------------------------------
const SELDIRHELP = 10;
AnsiString Dir = "F:\\ExampleProjects";
if (SelectDirectory(Dir, TSelectDirOpts() << sdAllowCreate << sdPerformCreate
<< sdPrompt,SELDIRHELP)) {
Label1->Caption = Dir;
}
//---------------------------------------------------------------------------
Advanced VCL Features
n
105
6
Chapter

The second form of the function is:
bool __fastcall SelectDirectory(const AnsiString Caption, const WideString Root,
AnsiString &Directory);
In this form of the function, we provide a caption to the dialog box, a root
directory from where to display the subdirectory tree, and an AnsiString
variable that stores the user-selected (fully qualified) directory name. The
sample code is shown in Listing 6-16 and the corresponding dialog box is
displayed as in Figure 6-13.
Listing 6-16
//---------------------------------------------------------------------------
WideString Root = " F:\\ExampleProjects";
AnsiString Dir;
AnsiString capt = "Select Directory dialog";
if (SelectDirectory(Caption, Root, Dir)) {
Label1->Caption = Dir;
}
//---------------------------------------------------------------------------
In the first form of the function, the current directory is set to the direc
-
tory selected by the user. This is not the case with the second form. Also,
the second form is limited in functionality and does not show the drive
selection combo box, nor the files in the selected directory. We have to
choose the appropriate form of the function as needed. This function is
provided in the FILECTRL unit.
In all these functions, the directory (or subdirectory) names in the path
name must be separated by “\\” instead of “\” in order to provide for the
escape sequence.
106
n
Chapter 6
Figure 6-12

Working with Files
Now we discuss the functions that support file management. A number of
routines are provided for file management, and we categorize them based
on the subfunctions.
File Existence and Search
The FileCreate() function creates a file with the given name. If it succeeds
in creating the file, the file handle is returned; otherwise, –1 is returned.
If the filename includes the full (or relative) path, the file is created in the
directory (or subdirectory) specified. Otherwise, the file is created in the
current directory. The definition of the function is given here:
int __fastcall FileCreate(const AnsiString FileName);
The FileExists() function returns true if the specified file exists on the
disk; otherwise, it returns false. If the filename includes the full (or rela
-
tive) path, then the file search is performed in the appropriate directory
(or subdirectory). Otherwise, the search is performed in the current direc
-
tory. This function is defined as:
bool __fastcall FileExists(const AnsiString FileName);
The FileSearch() function searches the specified directory list for the spec
-
ified filename. If the file is found in the list specified, the fully qualified
path name is returned. Otherwise, it returns an empty string. The input
directory list is a single AnsiString object, with individual directory names
separated by semicolons. The definition of the function is shown below:
Advanced VCL Features
n
107
6
Chapter
Figure 6-13
AnsiString __fastcall FileSearch(const AnsiString Name, const AnsiString
DirList);
WIN32_FIND_DATA Structure
The WIN32_FIND_DATA structure describes a file found by one of the
Win32 functions FindFirstFile, FindFirstFileEx, and FindNextFile. The
structure is defined as given here:
typedef struct _WIN32_FIND_DATA {
DWORD dwFileAttributes;
FILETIME ftCreationTime;
FILETIME ftLastAccessTime;
FILETIME ftLastWriteTime;
DWORD nFileSizeHigh;
DWORD nFileSizeLow;
DWORD dwReserved0;
DWORD dwReserved1;
TCHAR cFileName[MAX_PATH];
TCHAR cAlternateFileName[14];
} WIN32_FIND_DATA, *PWIN32_FIND_DATA;
The dwFileAttributes member contains the file attributes. The next three
structure members determine the file creation time, last access time, and
the last write time respectively, as the names suggest. These times are
reported in Coordinated Universal Time (UTC), which was discussed ear-
lier. Windows stores file size in two members, nFileSizeHigh and
nFileSizeLow. The full filename is stored as a null-terminated string in the
cFileName member and the DOS8.3 format file-name is stored as a
null-terminated string in the cAlternateFileName member.
The VCL defines a structure of type TSearchRec that includes the
WIN32_FIND_DATA structure as one of its members. It also contains the
filename as an AnsiString object and the file size as a single integer (32-
bit) variable indicating number of bytes. If the size of a file is expected to
exceed the 32-bit int value, then compute the file size using the formula
(nFileSizeHigh * (MAXDWORD+1)) + nFileSizeLow), as defined in the
MSDN documentation.
The VCL provides three functions to search for files that match a set of
specific attributes. They are FindFirst(), FindNext(), and FindClose(). The
definitions of these functions are:
int __fastcall FindFirst(const AnsiString Path, int Attr, TSearchRec &F);
int __fastcall FindNext(TSearchRec &F);
void __fastcall FindClose(TSearchRec &F);
108
n
Chapter 6

FindFirst() searches the given path for files matching the required attrib
-
utes. If a file is found, its information is returned in the TSearchRec
structure. The TSearchRec structure contains the returned file informa
-
tion. FindNext() returns the next entry matching the path and attributes
specified. Hence, it must be used in conjunction with the FirstFirst()
method. Both methods return 0 if successful, and a Windows error code if
they fail. FindClose() terminates the FindFirst/FindNext sequence and
releases the memory allocated.
File Attributes
A set of file attributes characterizes a given file. For example, one attrib
-
ute may indicate if the file is hidden, and another attribute may indicate if
the file is read-only, etc. In Win32 SDK, there are 13 file attributes (and a
reserved attribute) provided to characterize files and directories. How-
ever, VCL supports a subset of the most frequently used attributes through
its functions. This subset of attributes is represented as an int data type in
VCL, each of them identified by a bit value. To combine more than one
attribute, we must use the bitwise OR operator (|). The list of Win32
attributes is displayed in Table 6-6, indicating which of them are sup-
ported by VCL functions.
Table 6-6 (Win32 file attributes)
Win32 File Attribute Description VCL
Attribute
FILE_ATTRIBUTE_ARCHIVE The file or directory is an archive file or
directory. Applications use this attribute to
mark files for backup or removal.
faArchive
FILE_ATTRIBUTE_COMPRESSED The file or directory is compressed. For a file,
this means that all of the data in the file is
compressed. For a directory, this means that
compression is the default for newly created
files and subdirectories.
FILE_ATTRIBUTE_DEVICE Reserved; do not use.
FILE_ATTRIBUTE_DIRECTORY The handle identifies a directory. faDirectory
FILE_ATTRIBUTE_ENCRYPTED The file or directory is encrypted. For a file,
this means that all data streams in the file are
encrypted. For a directory, this means that
encryption is the default for newly created
files and subdirectories.
Advanced VCL Features
n
109
6
Chapter

Win32 File Attribute Description VCL
Attribute
FILE_ATTRIBUTE_HIDDEN The file or directory is hidden. It is not
included in an ordinary directory listing.
faHidden
FILE_ATTRIBUTE_NORMAL The file or directory has no other attributes
set. This attribute is valid only if used alone.
FILE_ATTRIBUTE_NOT_
CONTENT_INDEXED
FILE_ATTRIBUTE_OFFLINE The data of the file is not immediately
available. This attribute indicates that the file
data has been physically moved to offline
storage. This attribute is used by Remote
Storage, the hierarchical storage management
software in Windows 2000. Applications
should not arbitrarily change this attribute.
FILE_ATTRIBUTE_READONLY The file or directory is read-only. Applications
can read the file but cannot write to it or
delete it. In the case of a directory,
applications cannot delete it.
faReadOnly
FILE_ATTRIBUTE_REPARSE_POI
NT
The file has an associated reparse point.
FILE_ATTRIBUTE_SPARSE_FILE The file is a sparse file.
FILE_ATTRIBUTE_SYSTEM The file or directory is part of, or is used
exclusively by, the operating system.
faSysFile
FILE_ATTRIBUTE_TEMPORARY The file is being used for temporary storage.
File systems attempt to keep all of the data in
memory for quicker access rather than
flushing the data back to mass storage. A
temporary file should be deleted by the
application as soon as it is no longer needed.
Apart from the attributes identified in the table, VCL has two additional
attributes. The attribute faVolumeID indicates the file is a volume id and
the attribute faAnyFile indicates any file on the disk. These attributes are
used in the FileGetAttr() function to find out the attributes of the file or
directory. VCL’s FileSetAttr() function internally calls the Win32
SetFileAttributes() function. The SetFileAttributes() function sets only
eight of the above 13 file attributes; the remaining five attributes must be
set using other Win32 SDK functions, as described in the following discus
-
sion. The corresponding Win32 GetFileAttributes() function, however,
retrieves all the attributes that are set on the device (file or directory).
110
n
Chapter 6

Setting Advanced Attributes
As mentioned earlier, these advanced attributes must be set using the
Win32 function calls, since the VCL does not directly support them.
FILE_ATTRIBUTE_COMPRESSED Attribute
Use the DeviceIoControl() function with the FSCTL_SET_COMPRESSION
operation as the dwIoControlCode parameter. This function sends a con
-
trol code directly to a specified device driver, causing the corresponding
device to perform the corresponding operation.
BOOL DeviceIoControl(
HANDLE hDevice, // handle to device
DWORD dwIoControlCode, // operation
LPVOID lpInBuffer, // input data buffer
DWORD nInBufferSize, // size of input data buffer
LPVOID lpOutBuffer, // output data buffer
DWORD nOutBufferSize, // size of output data buffer
LPDWORD lpBytesReturned, // byte count actually returned
LPOVERLAPPED lpOverlapped // overlapped information
);
hDevice is a handle to the directory or file whose attribute must be set as
compressed. lpInBuffer is a pointer to input data buffer. In this case it
should be NULL. nlpInBufferSize is the size of input buffer. In this case it
is 0. lpOutBufferSize is a pointer to output data buffer. In this case it
should be NULL. nlpOutBufferSize is the size of output buffer. In this case
it is 0. lpBytesReturned is a variable that receives the size, in bytes, of the
data stored into the buffer pointed to by lpOutBuffer. lpOverlapped is a
pointer to the OVERLAPPED structure, if hDevice was opened with the
FILE_FLAG_OVERLAPPED flag. In this case it must be NULL.
FILE_ATTRIBUTE_ REPARSE_POINT Attribute
Use the DeviceIoControl() function with the FSCTL_SET_REPARSE_
POINT operation. On a Windows 2000 NTFS volume, a file or directory
can contain a reparse point, which is a collection of user-defined data.
The format of this data is understood by the application, which stores the
data, and a file system filter, which you install to interpret the data and
process the file. When an application sets a reparse point, it stores this
data, plus a reparse tag, which uniquely identifies the data it is storing.
When the file system opens a file with a reparse point, it attempts to find
the file system filter associated with the data format identified by the
reparse tag. If such a file system filter is found, the filter processes the file
as directed by the reparse data. If no such file system filter is found, the
Advanced VCL Features
n
111
6
Chapter

file open operation fails. If we wish to make use of the reparse points on a
file or directory, this flag must be set on the file. If we set the reparse
point on a directory, that directory must be empty. More details about
reparse points can be obtained from the Microsoft documentation
(MSDN), and the reader is encouraged to understand the concepts of
reparse points before trying to implement them.
FILE_ATTRIBUTE_ SPARSE_FILE Attribute
Use the DeviceIoControl() function with the FSCTL_SET_SPARSE opera
-
tion. A file (typically very large) in which a lot of data is all zeros is said
to contain a sparse data set. An example is a matrix in which some or
much of the data is zeros. Applications that use sparse data sets include
image processors and high-speed databases. Windows 2000 NTFS intro
-
duces another solution, called a sparse file. When the sparse file facilities
are used, the system does not allocate hard drive space to a file except in
regions where it contains something other than zeros. The default data
value of a sparse file is zero.
FILE_ATTRIBUTE_DIRECTORY Attribute
By setting this attribute, files cannot be converted to directories. By just
using the functions to create a directory as we discussed earlier in this sec-
tion, the attribute is set.
FILE_ATTRIBUTE_ ENCRYPTED Attribute
To create an encrypted file, the file should be created with the
FILE_ATTRIBUTE_ENCRYPTED attribute in the Win32 function call
CreateFile(). When we create a file using VCL’s FileCreate() function, this
attribute is not supported, and hence after creating the file we can convert
it to an encrypted file, using the EncryptFile() Win32 function.
File Name Manipulation Functions
In this section we focus our attention on how to manipulate the parts of a
filename using the functions listed in Table 6-7.
Table 6-7
Function Description
ChangeFileExt (const
AnsiString FileName,
const AnsiString
Extension)
Changes the file extension of the input FileName string to the new
value as specified in the Extension parameter. The function does not
change the existing filename. The new filename is returned as an
AnsiString value.
112
n
Chapter 6

Function Description
DosPathToUnixPath
(const AnsiString Path)
Converts a DOS-compatible path specification from the input
parameter to a UNIX-compatible path specification. All the backslash
characters (\) are converted to forward slash characters (/). The
return value is the UNIX path specification. It is recommended that
you not include the drive letter in the input DOS path, as the function
does not discard the drive letter and in UNIX the drive letter has no
meaning.
ExcludeTrailingBackslash
(const AnsiString S)
Returns the modified path string without the trailing backslash.
Borland discourages the use of this function in new applications, which
should use the ExcludeTrailingPathDelimiter() function.
ExcludeTrailingPathDelimi
ter (const AnsiString S)
Returns the modified path string without the trailing path delimiter,
which is the “\” character. This function gives the same result as
ExcludeTrailingBackslash(). Borland recommends that new
applications should start using this function instead of the previous
one. This function is introduced in C++Builder 6.
ExpandFileName (const
AnsiString FileName)
Returns the fully qualified path name of the input filename, which
contains the relative path name.
ExpandUNCFileName
(const AnsiString
FileName)
Returns the fully qualified path name using the Universal Naming
Convention for the network filenames. The network server name and
share name replace the drive name. For local disk files this function
produces the same result as ExpandFileName().
ExtractFileDir (const
AnsiString FileName)
Returns the drive and fully qualified path names as a string for the
input filename.
ExtractFileDrive (const
AnsiString FileName)
Returns the drive name portion of the input filename string. For local
disk files, the drive letter is retrieved and for network files, the result
is in the form “\\<server name>\<share name>”.
ExtractFileExt
(constAnsiString
FileName)
Returns the file extension portion of the input filename. The resulting
string includes the period that separates the filename from the
extension. If the file has no extension, the result string is empty.
ExtractFileName (const
AnsiString FileName)
Extracts the name and extension parts of the filename and returns it
as a string. The resulting string does not contain the drive or directory
path information.
ExtractFilePath (const
AnsiString FileName)
Extracts the drive and directory parts of the filename and returns it as
a string. The returned string includes the backslash or colon that
separates the path from the filename and extension.
Advanced VCL Features
n
113
6
Chapter

Function Description
ExtractRelativePath
(const AnsiString
BaseName, const
AnsiString DestName)
Converts a fully qualified path name identified by the DestName
parameter to a relative path name with respect to the path name
identified by the BaseName parameter. The BaseName may or may
not contain the filename, but must include the final path delimiter. The
converted value is returned as an AnsiString object.
ExtractShortPathName
(const AnsiString
FileName)
Converts the path containing long filename (and directory names) to
the path containing short filename (and directory names) in DOS 8.3
format. The converted value is returned as an AnsiString object.
IncludeTrailingBackslash
(const AnsiString S)
This function ensures that the path name ends with the trailing
backslash character “\”. Borland discourages the use of this function in
new applications. Instead, use the IncludeTrailingPathDelimiter()
function.
IncludeTrailingPathDelimi
ter (const AnsiString S)
This function ensures that the path name ends with the trailing path
delimiter, which is the backslash character “\”. Borland recommends
using this function instead of IncludeTrailingBackslash(). This function
is introduced in C++Builder 6.
IsPathDelimiter (const
AnsiString S, int Index)
Checks whether the character at Index position is a path delimiter
character “\”. The index is 0-based. i.e., we should specify the index
between 0 and (string length –1). Since we use two backslash
characters in the string for the delimiter in order to provide for the
escape sequence, the function reports the second backslash as the
delimiter character and not the first one. It is important to use this
function properly.
MatchesMask (const
AnsiString StringToMatch,
const AnsiString Mask)
This is a very useful function that checks if a given string
StringToMatch matches the pattern specified by the Mask parameter.
The pattern specifies how each individual character in the string must
match the corresponding matching element in the mask. The mask
elements may be individual character literals, sets of character literals,
sets of character ranges, or the wildcard characters * and ?. Each of
the sets must enclose itself with square bracket, e.g., [a-e]. Individual
elements of a set must not be separated by a space or comma. A
single mask may contain any combination of these types. Here is an
example of a mask:
“b[a-f]*[hu]??[o-r]”. This mask indicates that the string must start
with the character “b” followed by any character between “a” and “f”
followed by any number (and combination) of characters (because of
the wildcard character *) followed by the character “h” or “u”
followed by any two characters (because of the wildcard characters
??) followed by a any single character between “o” and “r.”
114
n
Chapter 6

Function Description
MinimizeName (const
AnsiString Filename,
Graphics::
TCanvas* Canvas, int
MaxLen)
This is another very useful function that shortens a (long) filename so
that it can be drawn on a surface to fit the size specified in the
number of (length-wise) pixels. Replacing directories in the path
portion of the filename with dots until the resulting name fits the
specified number of pixels in length shortens the length of the
filename.
ProcessPath (const
AnsiString FileName,
char &Drive, AnsiString
&DirPart, AnsiString
&FilePart)
This function parses the input filename and separates the three
portions of the string: the drive portion as a character and the
directory and file portions as AnsiString objects.
UnixPathToDosPath
(const AnsiString Path)
Converts a UNIX-compatible path specification from the input
parameter to a DOS-compatible path specification. All the forward
slash characters are converted to backslash characters. The return
value is the DOS path specification.
File Content Management
In this subsection we are going to discuss the functions that operate on
the file contents. These include opening a file, file open modes, position-
ing the file pointer within a file, reading from and writing to the file, and
closing the file.
The FileOpen() function opens the specified file in the specified mode.
The access mode can be read-only or write-only, or read-write, deny-read,
deny-write, deny-none (meaning give full access to all), share-exclusive
(meaning deny read and write), etc. Internally, the VCL calls the Win32
CreateFile() method and converts the VCL access mode to the Win32
access mode value. If successful, the method returns the file handle; oth
-
erwise, it returns a value of –1. The definition of this function is as
follows:
int __fastcall FileOpen(const AnsiString FileName, int Mode);
The FileSeek() function positions the current file pointer at a requested
position in the file that is already open. Upon successful completion, it
returns the new file pointer position; otherwise, it returns –1. The defini
-
tion of the function is given here:
int __fastcall FileSeek(int Handle, int Offset, int Origin);
The file pointer usually indicates the position in the file from where the
next read or write operation can be performed. When the file is opened
initially, the pointer is at the beginning of the file. If the file is not empty
Advanced VCL Features
n
115
6
Chapter
when opened, then it is very important to position the pointer appropri
-
ately in order to have the next read operation be successful or to write
new contents without damaging existing contents of the file. The Handle
parameter represents the file handle, the Offset parameter is the number
of bytes the file pointer should be moved, and the Origin parameter indi
-
cates from where the Offset bytes should be counted. If Origin is 0, Offset
must be counted from the beginning of the file; if Origin is 1, Offset must
be counted from the current file pointer position; and if Origin is 2, Offset
must be counted from the end of the file towards the beginning (i.e.,
backward counting).
The FileRead() function reads a specified number of bytes from the speci
-
fied file and places them in a buffer. The function is defined as:
int __fastcall FileRead(int Handle, void *Buffer, int Count);
The Handle parameter represents the file handle. The Buffer of Count size
must have been created before trying to read the file. Otherwise, an
access violation error occurs. The function returns the number of bytes
actually read (which may be less than the requested number of bytes) if
the read was successful; otherwise, it returns –1.
The FileWrite() function writes the specified number of bytes from the
buffer to the specified file at the current file pointer position, and the file
pointer is advanced by the number of bytes written to the file. The defini-
tion of the function is:
int __fastcall FileWrite(int Handle, const void *Buffer, int Count);
The function returns the number of bytes actually written to the file if the
write was successful; otherwise, it returns –1.
The FileClose() function closes the file specified by the handle. The func
-
tion is defined as:
void __fastcall FileClose(int Handle);
116
n
Chapter 6

Summary
We started the chapter with an introduction to Action objects, followed by
ActionList and how the ActionList object simplifies system responses to
user input actions. We also discussed the standard action objects provided
by VCL and saw how to implement custom action objects. Then the new
feature introduced in C++Builder 6, ActionManager, was discussed and
an example showed us how to implement most of the standard features
required for a Win32-based application.
We then discussed how VCL implements the Windows common dialogs.
Afterwards, we spent considerable time discussing the VCL support for
implementing Windows drag and drop, and saw how to develop custom
drag-and-drop features in our applications. We demonstrated custom drag
and drop with a couple of very useful example applications.
Following this, we discussed how two major aspects of SYSUTILS and
FILECTRL units make our programming easier with respect to working
with date and time functions and directory and file management routines.
Though we focused our attention on VCL features, we also discussed how
some of the direct Win32 functions could be intermixed in our applica-
tions to develop applications that can be easily interfaced with
applications developed on other platforms.
Advanced VCL Features
n
117
6
Chapter
