
DEMONSTRATED PROTOCOL
10xGenomics.com
Methanol Fixation, Immunofluorescence Staining
& Imaging for Visium Spatial Protocols
Overview
The Visium Spatial Gene Expression Solution measures the
total mRNA in tissue sections and requires a Visium Spatial
slide with intact tissue sections as input. Immunostaining
tissue sections with fluorescently labeled antibodies enables
simultaneous protein detection. This protocol outlines
methanol fixation, immunofluorescence staining, and imaging
of fresh frozen tissues for use with 10x Genomics Visium
Spatial protocols. Fixed and stained tissue sections are inputs
for the downstream Visium Spatial Tissue Optimization and
Visium Spatial Gene Expression workflows.
Additional Guidance
Consult the Visium Spatial Protocols - Tissue
Preparation Guide (Document CG000240) for Tips & Best
Practices on freezing, embedding, and cryosectioning
tissue and placing sections on Visium Spatial Slides.
Consult the Visium Spatial Gene Expression Imaging
Guidelines (Document CG000241) to verify imaging
settings before starting this Demonstrated Protocol.
Perform this Demonstrated Protocol on tissue sections
placed on the correct slide.
• Use a plain glass slide if optimizing antibody
concentrations. Refer to the Antibody Optimization
section for more information.
• Use a Visium Spatial Tissue Optimization Slide if
proceeding with tissue optimization.
• Use a Visium Spatial Gene Expression Slide if
proceeding with library construction.
The Tissue Optimization workflow must
be performed before the Gene Expression
workflow to determine the optimal tissue section
permeabilization time. Permeabilization times
identified using the H&E staining protocol may not
be applicable to immunofluorescence staining.
After completing this protocol, proceed with either the
Visium Spatial Gene Expression Reagent Kits - Tissue
Optimization User Guide (CG000238) or the Visium Spatial
Gene Expression Reagent Kits User Guide (CG000239).
Visium Slide Selection
Visium Spatial Tissue Optimization Slide (PN-3000394)
• Used with Visium Spatial Gene Expression Reagent
Kits – Tissue Optimization User Guide (CG000238) to
identify optimal permeabilization time for a specific
tissue type and section thickness.
• Includes 8 Capture Areas, each covered with
oligonucleotides for mRNA capture.
• Each Capture Area is 8 x 8 mm and is surrounded by
an etched frame.
• A readable label defines the active surface of the slide.
Tissue sections are always placed on the Capture Areas
on the active surface.
Visium Spatial Gene Expression Slide (PN-2000233)
• Used with Visium Spatial Gene Expression Reagent
Kits User Guide (CG000239) to generate Visium
Spatial Gene Expression libraries.
• Includes 2 or 4 Capture Areas, each with ~5,000
unique gene expression spots.
• Each Capture Area is 6.5 x 6.5 mm and is surrounded
by a fiducial frame for a total area of 8 x 8 mm.
• A readable label with a serial number defines the
active surface of the slide. Tissue sections are always
placed on the Capture Areas on the active surface.
Label
on
Active
Surface
Capture
Areas
Etched
Frame
Capture
Areas
Label
on
Active
Surface
CG000312 • Rev F
Methanol Fixation, Immunofluorescence Staining & Imaging - Visium Spatial Protocols • Rev F

2
CG000312 • Rev F
Methanol Fixation, Immunofluorescence Staining & Imaging - Visium Spatial Protocols • Rev F
Visium Spatial Reagent Kits
Perform this Demonstrated Protocol in each step on tissue sections as listed.
Ensure that tissue sections have been placed onto the appropriate slide before
starting this Demonstrated Protocol. Consult the Visium Spatial Protocols - Tissue
Preparation Guide (CG000240) for more information.
Visium Spatial Tissue Optimization Slide Kit PN-1000191
(store at ambient temperature)
Visium
Spatial Tissue Optimization Slide Kit
Visium Spatial Tissue Optimization
Slide
3000394
*Slide Seals 3000279
Slide Cassette 3000406
Slide Gasket 3000426
*Tissue Removal Buer 2000221
*Tissue Removal Enzyme 3000387
PN
10xGenomics.com
*Not used in this protocol
Visium Spatial Gene Expression Slide Kit, 16 rxns PN-1000185
(store at ambient temperature or at –20°C according to kit label)
Visium
Spatial Gene Expression Slide Kit
PN
10xGenomics.com
*Not used in this protocol
Visium Spatial Gene Expression Slide 2000233
*Visium Slide Seals, 40-pack or 20-pack
(may come in varying configurations in dierent lots)
2000284/
3000279
Visium Slide Cassette & Gasket, 4-pack
2000282/
2000281

3
CG000312 • Rev F
Methanol Fixation, Immunofluorescence Staining & Imaging - Visium Spatial Protocols • Rev F
Visium Spatial Reagent Kits
Perform this Demonstrated Protocol in each step on tissue sections as listed.
10x Genomics
Accessories
Product Part Number (Kit) Part Number (Item)
Thermocycler Adaptor
1000194
3000380
Visium Imaging Test Slide 2000235
Slide Alignment Tool 3000433
Visium Spatial Gene Expression Slide Kit, 4 rxns PN-1000188
(store at ambient temperature or at –20°C according to kit label)
Visium
Spatial Gene Expression Slide Kit
PN
10xGenomics.com
*Not used in this protocol
Visium Spatial Gene Expression Slide 2000233
*Visium Slide Seals, 12-pack or 5-pack
(may come in varying configurations in dierent lots)
2000283
3000279
Visium Slide Cassette & Gasket, 1-pack
2000282/
2000281

4
CG000312 • Rev F
Methanol Fixation, Immunofluorescence Staining & Imaging - Visium Spatial Protocols • Rev F
Tissue Optimization
Identify optimal permeabilization time.
User Guide CG000238
Library Construction
Construct Visium Spatial Gene Expression
libraries.
User Guide CG000239
Tissue Preparation Guide
Section tissue onto slides.
Demonstrated Protocol CG000240
1st 2nd
Imaging Guidelines
Optimize imaging settings for
all Visium Spatial protocols.
Technical Note CG000241
Methanol Fixation + Immunofluorescence
Fix and stain tissue. If IF staining for the first time,
optimize antibody concentrations.
Demonstrated Protocol CG000312
Visit the 10x Genomics Support website for the most updated documentation.
Workflow Overview
5
CG000312 • Rev F
Methanol Fixation, Immunofluorescence Staining & Imaging - Visium Spatial Protocols • Rev F
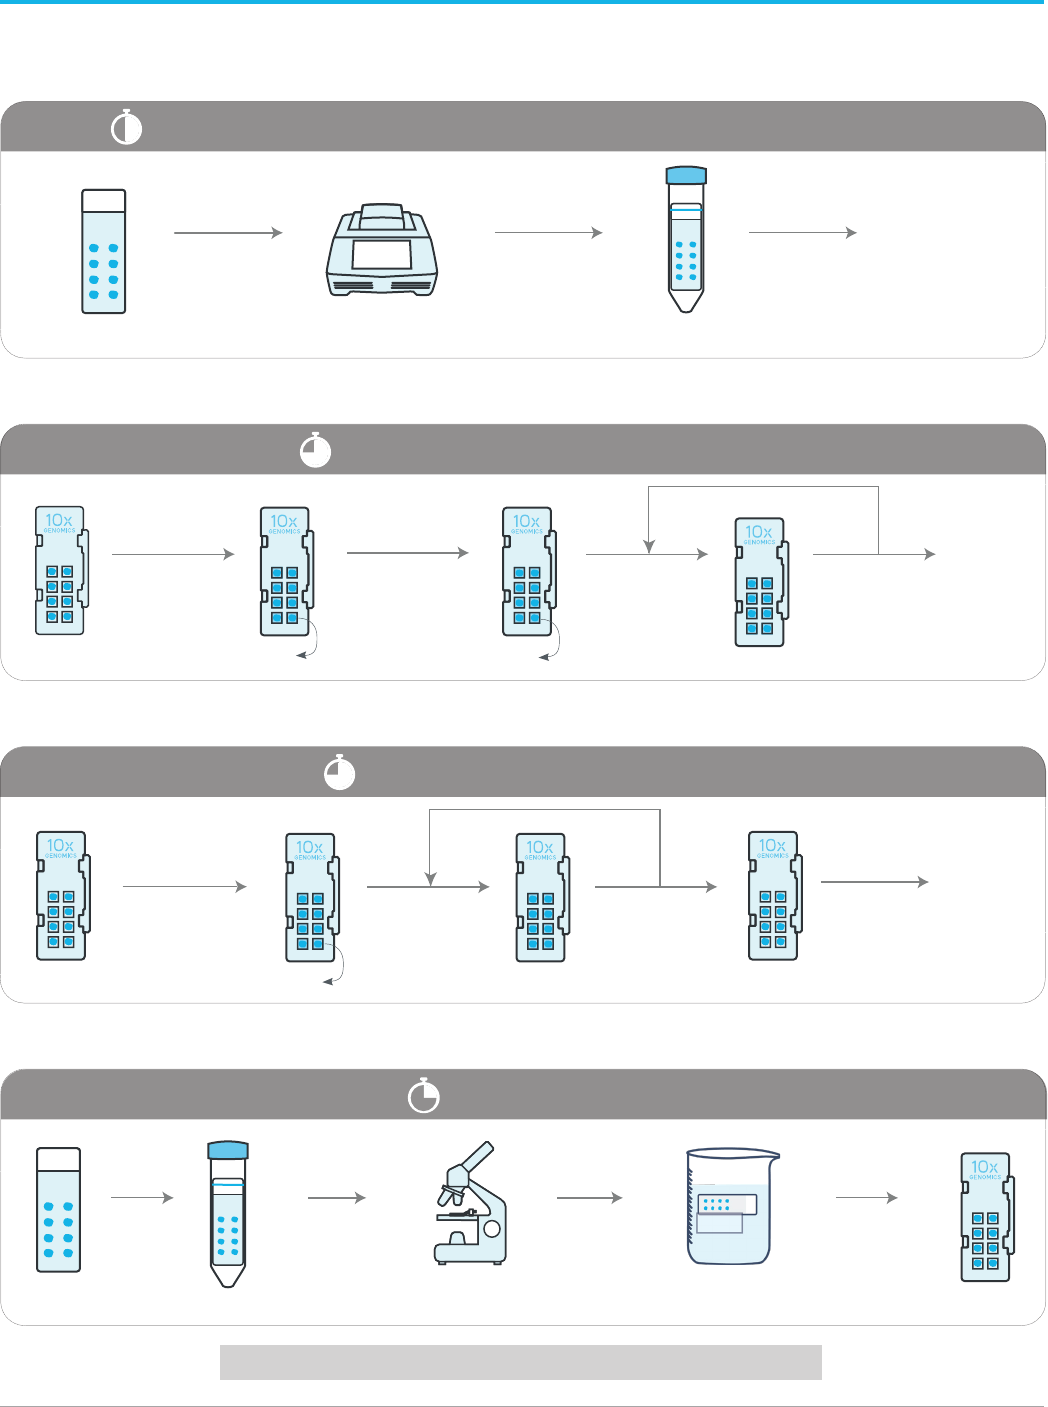
Protocol Overview
Proceed to 10x Genomics Visium Spatial Protocols
Perform this Demonstrated Protocol in each step on tissue sections as listed.
Immerse
slide 20x
Add Mounting
Medium (200 �l)
and apply coverslip
Image
Immerse until
coverslip separates
Dip in 3X SSC one
additional time
Add 1° Antibody Solution
(50 �l/well) &
incubate at room
temperature (30 min)
Add blocking buer
(70 �l/well) &
incubate at room
temperature (5 min)
Add Wash Buer
(100 �l/well)
Remove
Wash Buer
Repeat 4x
Remove
blocking buer
Remove 1°Antibody
Solution
Proceed to 2°
Antibody
Staining
Add 2° Antibody Solution
(50 �l/well) &
incubate at room
temperature (30 min)
Remove Slide
from
Visium Slide
Cassette
Remove 2°Antibody
Solution
Proceed to
Coverslipping
&
Imaging
Add Wash Buer
(100 �l/well)
Remove
Wash Buer
Repeat 4x
MeOH chilled to -20°C
Incubate 37°C
(1 min)
Immerse &
incubate -20°C
(30 min)
Place Slide in
Visium Slide
Cassette
Proceed to 1°
Antibody
Staining
*Time excludes imaging steps
3X SSC Buer
3X SSC Buer
Fixation 35 min
Primary Antibody Staining 45 min
Secondary Antibody Staining 45 min (Skip if using fluorophore conjugated primary antibodies)
Coverslipping & Fluorescent Imaging 15 min*
Assemble in Visium
Slide Cassette
Add Wash Buer
(50 �l) to each well

6
CG000312 • Rev A
Methanol Fixation, Immunofluorescence Staining & Imaging - Visium Spatial Protocols • Rev F
Tips & Best Practices
Tips & Best Practices
• Thoroughly mix reagents before use.
• Keep all enzymes, buers and Master Mixes on ice during setup and use. Promptly
move reagents back to the recommended storage.
• Follow manufacturer’s calibration and maintenance schedules.
Pipette
Calibration
General
Reagent
Handling
TIPS
Tips & Best Practices
section includes
additional guidance
!
Signifies critical step
requiring accurate
execution
Troubleshooting section
includes additional
guidance
Icons
Slide Storage • Store unused slides according to
instructions on the kit label, in original
packaging, and keep sealed. DO NOT
remove desiccant.
• After tissue placement, store slides in
a sealed container. If using an unsealed
slide mailer, store in a secondary sealed
container, such as a resealable bag.
• Store the sealed container containing
slides with tissue at −80°C for up to four
weeks.
Store Unsealed Slide Mailers in a
Secondary Sealed Container

7
CG000312 • Rev F
Methanol Fixation, Immunofluorescence Staining & Imaging - Visium Spatial Protocols • Rev F
Tips & Best Practices
Slide Handling • Always wear gloves when handling slides.
• Exercise caution when handling slide
edges to prevent injury.
• Ensure that the active surface of a slide
faces up and is never touched. The
orientation of the label on the slide defines
the active surface.
• The tissue sections should always be on
the active surface of the slide.
DO NOT touch the tissue sections.
• Minimize exposure of the slides to sources
of particles and fibers.
• When immersing slides in 3X SSC, ensure
that the tissue sections are completely
submerged.
• Keep the slide flat on a clean work surface
when adding reagents to the active surface.
• Ensure that no absorbent surface is in
contact with the reagents on the slide
during incubation.
Active Surface with Tissue Sections
Correct Incorrect
Not
immersed
Immersing Slide

8
CG000312 • Rev F
Methanol Fixation, Immunofluorescence Staining & Imaging - Visium Spatial Protocols • Rev F
Tips & Best Practices
Visium Slide
Cassette
• The Visium Slide Cassette encases the
slide and creates leakproof wells for
adding reagents.
• Place the slides in the Visium Slide
Cassette only when specified.
• The Visium Slide Cassette may be
reused once. Refer to the Visium Slide
Cassette and Visium Gasket Cleaning
section for instructions.
• An Insert Clip and four tabs at the back
of the Visium Slide Cassette are used
for holding the slide in the Visium Slide
Cassette, as shown.
• The Visium Slide Cassette includes a
reusable Visium Gasket corresponding to
the Capture Areas on the slides.
• The Visium Slide Cassette may be
assembled using the Slide Alignment
Tool or manually. Instructions for both
are provided in the following section.
• See Visium Slide Cassette Assembly &
Removal instructions for details.
• Ensure that the back of the Visium
Slide Cassette is facing the user before
assembly. The active surface of the slide
with tissue sections will face down such
that the slide label is no longer readable.
• Practice assembly with a 75 x 25 x 1 mm
plain glass slide.
Slide Alignment Tool
Ridges
Visium Slide Cassette
Visium
Gasket
Tab 2
Tab 1
BackFront
Insert
Clip
Tab 3
Tab 4
9
CG000312 • Rev F
Methanol Fixation, Immunofluorescence Staining & Imaging - Visium Spatial Protocols • Rev F
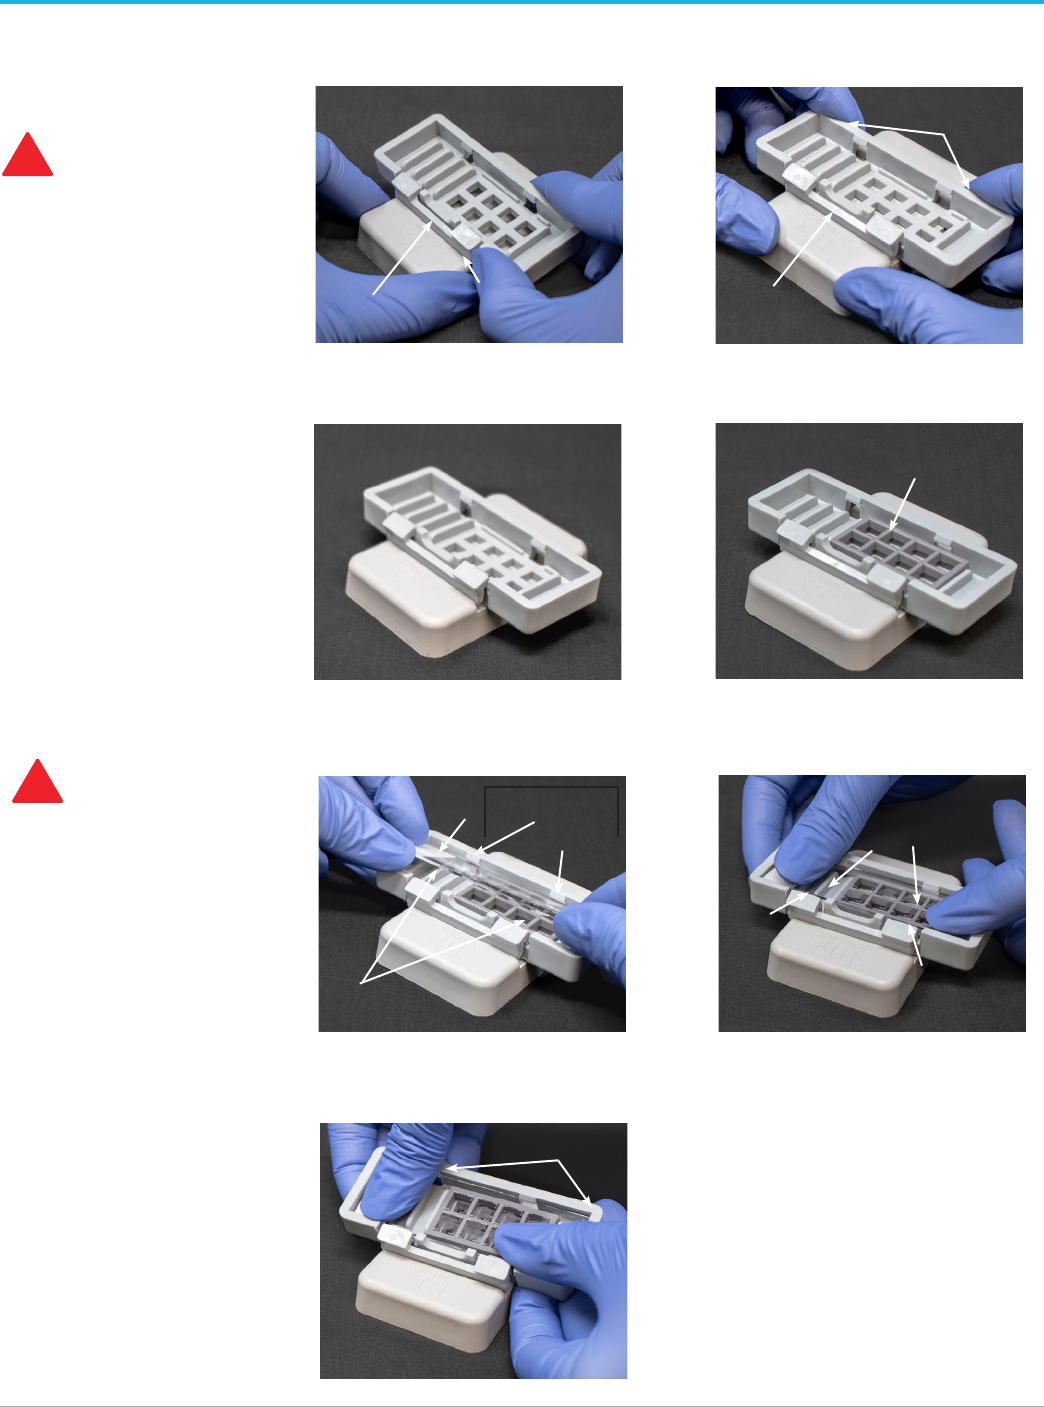
Tips & Best Practices
Visium Slide
Cassette
Assembly
Position Visium Gasket to align with
Visium Slide Cassette cutouts
Insert long edge of slide under
tabs 1 & 2; ensure slide is flush
Visium Slide Cassette secured on
alignment tool
3
4
5
Remove Visium Slide Cassette
while pressing slide against the
Visium Gasket
7
Push Insert Clip along the ridge &
press Visium Slide Cassette down
2
Insert
Clip
Visium
Gasket
Tab 2
Tab 1
Position Visium Slide Cassette
along alignment tool ridges
1
Ridge
Insert
Clip
Press slide down until it is flush
with the Visium Gasket and under
tabs 3 & 4
6
Tab 4
Tab 3
Press down
Slide insertion
may push Visium Gasket
out of alignment with
slide cutouts. Adjust if
necessary.
!
Press
down
Pull up
Slide
label
Active surface
faces Visium
Gasket
Exercise caution
when handling slide edges
to prevent injury.
!

10
CG000312 • Rev F
Methanol Fixation, Immunofluorescence Staining & Imaging - Visium Spatial Protocols • Rev F
Tips & Best Practices
Visium Slide
Cassette
Removal
Push Insert Clip along the ridge
& press down
Position Visium Slide Cassette
along alignment tool ridges
1
2
Visium Slide Cassette sits securely
on alignment tool
3
Lift slide at Visium Slide Cassette
groove
4
Groove
Ridge
Insert
Clip
Press
down

11
CG000312 • Rev F
Methanol Fixation, Immunofluorescence Staining & Imaging - Visium Spatial Protocols • Rev F
Tips & Best Practices
Manual
Visium Slide
Cassette
Assembly &
Removal
Assembly
i. Remove the Visium Gasket from the
Visium Slide Cassette and re-insert
the Visium Gasket, ensuring that
the Visium Gasket and Visium Slide
Cassette cutouts are aligned.
ii. Align the label on top of the slide to
the top of the Visium Slide Cassette,
as shown.
iii. Insert the slide under tabs 1 and 2.
Ensure that the long edge of the slide
is flush with the side of the Visium
Slide Cassette.
iv. Press the insert clip very firmly by
applying even force on the lower part
of the insert clip.
v. Place a finger in between tab 3 and
the top of the Visium Slide Cassette,
and one finger between tab 4 and the
bottom of the Visium Slide Cassette.
Press down on the slide evenly
until the slide is under each tab and
release the insert clip.
Squeeze
Insert
Clip
Label facing
down
Slide
under tabs
Visium Slide Cassette Assembly
Removal
i. Press the insert clip very firmly to
release the slide from the Visium
Slide Cassette.
ii. Lift slide at Visium Slide Cassette
groove between tabs 3 and 4 until the
slide can be removed.
Insert Clip - Press Firmly
Press
firmly
Lift
here
Insert
Clip
Visium Slide Cassette
Visium
Gasket
Tab 2
Tab 1
BackFront
Tab 3
Tab 4

12
CG000312 • Rev F
Methanol Fixation, Immunofluorescence Staining & Imaging - Visium Spatial Protocols • Rev F
Re-insert the Visium Gasket such that the
marked portion is at the top of the Visium
Slide Cassette and now faces the Visium
Slide Cassette.
Tips & Best Practices
Visium Slide
Cassette &
Visium Gasket
Cleaning
Remove slide from Visium
Slide Cassette
1
Mark the top portion of the Visium
Gasket that faced the slide with an
alcohol resistant marker
2
Remove Visium Gasket
3
3
Rinse Visium Slide Cassette
and Visium Gasket with
ultrapure water
4
Groove
4
Spray with 70% isopropanol, then
rinse with ultrapure water
4
Groove
5
Spray with 70% isopropanol a second
time, then rinse with ultrapure water
4
Groove
6
Air dry
3
7
8

13
CG000312 • Rev F
Methanol Fixation, Immunofluorescence Staining & Imaging - Visium Spatial Protocols • Rev F
Tips & Best Practices
Reagent
Addition &
Removal from
Wells
• Place the assembled slide in the Visium
Slide Cassette flat on a clean work
surface.
• Dispense and remove reagents along
the side of the wells without touching the
tissue sections and without introducing
bubbles.
• Always cover the tissue section
completely when adding reagents to the
well. A gentle tap may help spread the
reagent more evenly.
• Pipette reagent carefully so that tissue is
not disrupted or dislodged.
• Ensure that no bubbles are introduced in
the process.
!
Reagent Addition/Removal
Add/remove
along the side
of wells
DO NOT
introduce
air bubbles
Slide Incubation
Guidance
Incubation at a specified temperature
• Position a Thermocycler Adaptor on a
thermal cycler that is set at the incubation
temperature.
• Ensure that the Thermocycler Adaptor is
in contact with the thermal cycler surface
uniformly.
• When incubating a slide, position the slide
on the Thermocycler Adaptor with the
active surface facing up.
• Ensure that the entire bottom surface of
the slide is in contact with Thermocycler
Adaptor.
• When incubating a slide encased in a
Visium Slide Cassette, place the assembled
unit onthe Thermocycler Adaptor with the
wells facing up. The Visium Slide Cassette
should always be sealed when on the
Thermocycler Adaptor.
!
Place Thermocycler Adaptor
Incubate Assembled Visium Slide
Cassette
Incubate Slide

14
CG000312 • Rev F
Methanol Fixation, Immunofluorescence Staining & Imaging - Visium Spatial Protocols • Rev F
Antibody Optimization
Optimization of antibody concentration is critical for executing this Demonstrated Protocol.
• Optimal antibody concentrations for this Demonstrated Protocol may dier from other
applications due to shortened antibody incubation periods. Composition of reagents and
fixatives may dier from other immunofluorescence applications.
• To optimize antibody concentration, draw representative frames on the back of a 75 x 25
x 1 mm plain glass slide using the example slide layout.
• Place tissue sections in the frames on the front of the slide for compatibility with the
Visium Slide Cassette. Ensure that tissue sections used during optimization are similar in
size to tissue sections used for Tissue Optimization and Gene Expression Protocols
• Primary antibody: Execute the Tissue Fixation & Immunofluorescence Staining
protocol (steps 1.0-1.5) using a range of primary antibody concentrations. 10x Genomics
recommends performing an antibody dilution series with a starting concentration of 0.01
�g/�l (0.5 �g/sample). 0.01 �g/�l corresponds to the 1:50 dilution in the image below.
• Secondary antibody: Use a similar range of concentrations for secondary antibodies or
refer to the manufacturer's recommended dilution.
• Select the antibody concentration that results in the specific staining of desired cells,
while minimizing nonspecific background staining.
• Wash Visium Slide Cassette and Visium Gasket after antibody staining. See Tips & Best
Practices for more information.
• An example dilution layout is provided below. DAPI image is provided to show presence
of tissue for each antibody dilution. Dilutions are of recombinant Anti-NeuN antibody
conjugated to Alexa Fluor 488 (Abcam, PN:190195, 0.5 mg/ml). A 1:100 dilution (0.25 �g/
sample) was considered optimal in this example.
28.5 mm
3.5 mm
11.25 mm
8 mm
8 mm
1.5 mm
1.3 mm
Example fluorophore conjugated primary
antibody dilution series.
Example
Slide Layout
1:2000 1:1000
1:500 1:200
1:100 1:75
1:50
No AB

15
CG000312 • Rev F
Methanol Fixation, Immunofluorescence Staining & Imaging - Visium Spatial Protocols • Rev F
Tissue Fixation & Immunofluorescence Staining
1.0 Overview
1.1 Specific Reagents & Consumables
1.2 Tissue Fixation
1.3 Immunofluorescence Staining - Primary and Secondary Antibodies
1.4 Immunofluorescence Staining - Fluorophore Conjugated Primary Antibodies
1.5 Slide Mounting & Coverslip Application
1.0 Overview
Ensure that this protocol is performed on tissue sections on the correct slide. Refer
to the Introduction, Workflow Overview, and Antibody Optimization sections for more
information.
Methanol Fixation,
Immunofluorescence Staining &
Imaging Protocol
Ensure that microscope settings have been verified and imaging programs
have been created before starting this protocol. Consult the Visium Spatial Gene
Expression Imaging Guidelines Technical Note (CG000241) for more information.
If proceeding to Tissue Optimization, DO NOT add buers or staining reagents to
well A1, which is reserved for the positive RNA control. Addition of these reagents to
this well may prevent visualization of the positive control.
If staining using fluorophore conjugated primary antibodies, proceed directly to step
1.4 after completing step 1.2.
Visium Spatial Gene
Expression Slide
Visium Spatial Tissue
Optimization Slide
Plain Glass Slide
Tissue Fixation & Immunofluorescence Staining
!

16
CG000312 • Rev F
Methanol Fixation, Immunofluorescence Staining & Imaging - Visium Spatial Protocols • Rev F
1.1
Specific Reagents
& Consumables
The items in the table below have been validated by 10x Genomics and are highly
recommended for Visium Spatial Reagent Kits protocols. Substituting materials may
adversely aect system performance. This list does not include standard laboratory
equipment, such as water baths, centrifuges, pH meters, vortex mixers, freezers, etc.
Tissue Fixation & Immunofluorescence Staining
Ensure that tissue sections have been placed on the appropriate slide and stored at -80°C.
The slide will be retrieved in step 1.2.
Tissue Fixation
Vendor Item Part Number
Millipore Sigma Methanol, for HPLC, ≥99.9% 34860
Tissue IF Staining
Vendor Item Part Number
Corning Self-Standing Polypropylene Centrifuge Tubes, 50 ml, sterile 430921
Sigma Aldrich Triton X-100 Solution, ~10% in H
2
O 93443-100ML
Thermo Fisher
Scientific
Thermo Scientific Signature Series Cover Glasses
Shandon ColorFrost Plus Slides
(Alternatively, use any 75 x 25 x 1 mm slide)
Fisherbrand Superfrost Plus Microscope Slides
(Optional - Alternatively, use any 75 x 25 x 1 mm slide)
DAPI Solution (1 mg/ml)
RiboLock RNase Inhibitor
(Alternative to Millipore Sigma product)
Tween 20 Surfact-Amps Detergent Solution
(Alternative to Sigma Aldrich Triton X-100)
22-050-233
6776214
12-550-15
62248
EO0382
28320
Millipore Sigma SSC Buer 20x Concentration
Protector RNase Inhibitor
Albumin, Bovine Serum, 10% Aqueous Solution, Nuclease-Free
(Alternative to Miltenyi product)
S6639
3335402001
126615-25ML
Miltenyi Biotec MACS BSA Stock Solution 130-091-376
BioLegend Human TruStain FcX (Fc Receptor Blocking Solution)
(Alternatively, use any species appropriate Fc blocking solution)
TruStain FcX (anti-mouse CD16/32) Antibody (discontinued)
TruStain FcX PLUS (anti-mouse CD16/32) Antibody
422301
101309
156603
New England
Biolabs
Ribonucleoside Vanadyl Complex
RNase Inhibitor, Murine
(Alternative to Millipore Sigma product)
S1402S
M0314L
- Primary Antibodies -
- Secondary Antibodies -
Additional Materials
- Dry Ice -
- Glycerol -
- Isopropanol -
-
Ultrapure/Milli-Q water (from Milli-Q Integral Ultrapure Water
System or equivalent)
-
- Forceps -

17
CG000312 • Rev F
Methanol Fixation, Immunofluorescence Staining & Imaging - Visium Spatial Protocols • Rev F
Prepare
Methanol • Dispense 40 ml/slide in a 50-ml centrifuge tube. Chill to -20°C before use.
Ribonucleoside
Vanadyl
Complex
• Incubate sealed vial at 65°C for 10
min or until solution is reconstituted
to a dark green solution with no
visible particulates. DO NOT exceed
15 min. Aliquot into single-use tubes
(550 �l per slide including secondary
staining). Store tubes at -20°C. DO
NOT exceed 2 freeze-thaw cycles per
aliquot. If using an aliquot immediately
for step 1.3, no freezing is necessary.
Store at room temperature until use. If
precipitation is observed, incubate at
65°C for 5 min.
2X Blocking
Buer
(prepare on ice)
2X Blocking Buer
(prepare fresh on ice)
Stock Final
2X + 20%
(μl)
4X + 20%
(μl)
8X + 20%
(μl)
Nuclease-free Water 336.7 �l 673.4 �l 1,346.9 �l
SSC Buer 20X 6X 439.2 �l 878.4 �l 1,756.8 �l
BSA 10% 4% 585.6 �l 1,171.2 �l 2,342.4 �l
Triton X-100
or Tween 20
10% 0.2% 29.3 �l 58.6 �l 117.7 �l
RNase Inhibitor 40 U/�l 2 U/�l 73.2 �l 146.4 �l 292.8 �l
Tissue Fixation & Immunofluorescence Staining
Preparation - Buers
Supplier Description Part Number
Bio-Rad C1000 Touch Thermal Cycler
with 96-Deep Well Reaction
Module
1851197
Analytik Jena† Biometra TAdvanced 96 SG 846-x- 070-241
(x=2 for 230 V; 4 for 115 V; 5 for 100 V, 50-60 Hz)
Eppendorf‡ Mastercycler X50s 1000518
MasterCycler Pro
(discontinued)
North America 950030010
International 6321 000.019
Thermo Fisher
Scientific
Veriti 96-Well Thermal Cycler
(discontinued)
4375786
Recommended
Thermal Cyclers
Before
Incubation
After
Incubation
For select instruments, ramp rates should be adjusted for all steps as described below:
†Analytik Jena Biometra TAdvanced 96 SG: 2°C/sec for both heating and cooling
‡Eppendorf Mastercycler X50s: 3°C/sec heating and 2°C/sec cooling

18
CG000312 • Rev F
Methanol Fixation, Immunofluorescence Staining & Imaging - Visium Spatial Protocols • Rev F
3X SSC
Mounting
Medium
3X SSC Stock Final
550 ml
(1 slide)
SSC Buer 20X 3X 82.5 ml
Ultrapure Water - - 467.5 ml
Mounting Medium Stock Final
200 �l
(1 slide)
Glycerol 100% 85% 170 �l
RNase Inhibitor 40 U/�l 2 U/�l 10 �l
Nuclease-free Water 20 �l
Tissue Fixation & Immunofluorescence Staining
Preparation - Buers

19
CG000312 • Rev F
Methanol Fixation, Immunofluorescence Staining & Imaging - Visium Spatial Protocols • Rev F
1.2
Tissue Fixation
If using a Visium Spatial Gene Expression
Slide, note the serial number on the slide
label; will be required for downstream
analysis.
Ensure that the methanol (40 ml/slide)
dispensed in a 50-ml centrifuge tube is
chilled to -20°C.
a. Place a Thermocycler Adaptor on a
thermal cycler set at 37°C and equilibrate
for 5min. Heating the thermal cycler lid is
not required.
b. Remove slide from -80°C and place on dry
ice in a sealed container.
Delay in transferring slides to dry ice may
result in condensation, which may cause
tissue damage and/or shifting of tissue
sections on the slide.
c. Place slide on the Thermocycler Adaptor
with the active surface facing up and
incubate 1min at 37°C. DO NOT close the
thermal cycler lid. Maintain thermal cycler
at 37°C for step 1.2.
d. Remove slide from Thermocycler Adaptor
and if necessary, wipe excess liquid from
the back of the slide, without touching the
tissue sections.
e. Completely immerse the slide in the pre-
chilled methanol. Secure the tube cap to
prevent methanol loss.
f. Incubate 30 min at -20°C.
!
!
Place Thermocycler Adaptor
Incubate in Methanol for 30 min at −20°C
Incubate Slide for 1 min at 37°C
DO NOT
close lid
Tissue Fixation & Immunofluorescence Staining

20
CG000312 • Rev F
Methanol Fixation, Immunofluorescence Staining & Imaging - Visium Spatial Protocols • Rev F
20
Tissue Fixation & Immunofluorescence Staining
1.3
Immunofluorescence
Staining - Primary and
Secondary Antibodies
a. Place the slide in the Visium Slide Cassette. See Tips & Best Practices for assembly
instructions. Practice assembly with a blank slide.
b. Remove Ribonucleoside Vanadyl Complex aliquots from -20°C and place at 65°C
for 5 min until the solution is reconstituted to a dark green solution with no visible
particulates. DO NOT exceed 10 min. Allow the solution to cool to ambient temperature
before use and proceed immediately to the next step.
c. Prepare 1X Blocking Buer on ice.
1X Blocking Buer
Vortex.
1X
(μl)
2X + 15%
(μl)
4X + 15%
(μl)
8X + 15%
(μl)
2X Blocking Buer 35.0 80.5 161.0 322.0
Nuclease-free Water 26.0 59.8 119.6 239.2
Human or Mouse TruStain FcX*
2.0 4.6 9.2 18.4
Ribonucleoside Vanadyl Complex
7.0 16.1 32.2 64.4
Total 70.0 161.1 322.0 644.0
d. Prepare Wash Buer on ice.
Wash Buer
Vortex.
1X
(μl)
2X + 15%
(μl)
4X + 15%
(μl)
8X + 15%
(μl)
2X Blocking Buer 525.0 1,207.5 2,415.0 4,830
Nuclease-free Water 420.0 966.0 1,932.0 3,864
Ribonucleoside Vanadyl Complex 105.0 241.5 483.0 966
Total 1,050.0 2,415.0 4,830.0 9,660
e. Vortex 1X Blocking Buer and add 70 μl along the side of the wells to uniformly cover
the tissue sections, without introducing bubbles. Tap gently to ensure even coverage.
f. Incubate for 5 min at room temperature.
g. Prepare Primary Antibody Solution on ice. Pipette mix.
Primary Antibody Solution.
Vortex, centrifuge briefly.
1X
(μl)
2X + 10%
(μl)
4X + 10%
(μl)
8X + 10%
(μl)
2X Blocking Buer 25.00 55.00 110.00 220.00
Nuclease-free Water Variable Variable Variable Variable
Primary Antibody #1 Variable Variable Variable Variable
Primary Antibody #2 (optional) Variable Variable Variable Variable
Primary Antibody #3 (optional) Variable Variable Variable Variable
RNase Inhibitor 6.75 14.85 29.70 59.40
Total 50.00 110.00 220.00 440.00
h. Remove 1X Blocking Buer.
If using
fluorophore conjugated
primary antibodies,
proceed directly to step 1.4
!
TIPS
*Choose FC blocking reagent based on sample species.
Ensure that tissue
sections do not dry out
throughout the staining
protocol
!
Antibody volumes will depend on concentrations determined during antibody
optimization. Add an appropriate volume of nuclease-free water based on the
amount of added antibody to achieve the stated total volume.
RIbonucleoside
Vanadyl Complex stock
solution will precipitate
if left at ambient or cool
temperatures for extended
periods of time. Once
the solution has cooled,
prepare 1X Blocking
Buer and Wash Buer
immediately.
!

21
CG000312 • Rev F
Methanol Fixation, Immunofluorescence Staining & Imaging - Visium Spatial Protocols • Rev F
21
i. Add 50 μl Primary Antibody Solution along the side of each well. Tap gently to ensure
uniform coverage.
j. Incubate for 30 min at room temperature.
k. Prepare Secondary Antibody Solution on ice. Pipette mix. Avoid light exposure.
Secondary Antibody Solution.
Vortex, centrifuge briefly.
1X
(μl)
2X + 10%
(μl)
4X + 10%
(μl)
8X + 10%
(μl)
2X Blocking Buer 25.00 55.00 110.00 220.00
Nuclease-free Water Variable Variable Variable Variable
Secondary Antibody #1 Variable Variable Variable Variable
Secondary Antibody #2 (optional) Variable Variable Variable Variable
Secondary Antibody #3 (optional) Variable Variable Variable Variable
DAPI 0.17 0.38 0.75 1.50
RNase Inhibitor 6.75 14.85 29.70 59.40
Total 50.00 110.00 220.00 440.00
l. Remove the Primary Antibody Solution.
m. Add 100 μl Wash Buer along the side of each well.
n. Remove Wash Buer.
o. Repeat steps m and n four more times for a total of five washes.
p. Add 50 μl Secondary Antibody Solution along the side of each well. Tap gently to
ensure uniform coverage.
q. Incubate for 30 min at room temperature. Avoid light exposure.
r. Remove the Secondary Antibody Solution.
s. Add 100 μl Wash Buer along the side of each well.
t. Remove Wash Buer.
u. Repeat steps s and t four more times for a total of five washes. Save 50 μl Wash
Buer per sample for step 2.2.
v. Proceed immediately to step 1.5
Antibody volumes will depend on concentrations determined during antibody
optimization. Add an appropriate volume of nuclease-free water based on the amount of
added antibody to achieve the stated final volume.
Ribonucleoside
Vanadyl Complex settles
rapidly in solution. Briefly
vortex Wash Buer before
each wash.
!
Tissue Fixation & Immunofluorescence Staining

22
CG000312 • Rev F
Methanol Fixation, Immunofluorescence Staining & Imaging - Visium Spatial Protocols • Rev F
22
Tissue Fixation & Immunofluorescence Staining
1.4
Immunofluorescence
Staining - Fluorophore
Conjugated Primary
Antibodies
a. Place the slide in the Visium Slide Cassette. See Tips & Best Practices for assembly
instructions. Practice assembly with a blank slide.
b. Remove Ribonucleoside Vanadyl Complex aliquots from -20°C and place at 65°C
for 5 min until the solution is reconstituted to a dark green solution with no visible
particulates. DO NOT exceed 10 min. Allow the solution to cool to ambient temperature
before use and proceed immediately to the next step.
c. Prepare 1X Blocking Buer on ice.
1X Blocking Buer
Vortex.
1X
(μl)
2X + 15%
(μl)
4X + 15%
(μl)
8X + 15%
(μl)
2X Blocking Buer 35.0 80.5 161.0 322.0
Nuclease-free Water 26.0 59.8 119.6 239.2
Human or Mouse TruStain FcX*
2.0 4.6 9.2 18.4
Ribonucleoside Vanadyl Complex
7.0 16.1 32.2 64.4
Total 70.0 161.1 322.0 644.0
d. Prepare Wash Buer on ice.
Wash Buer
Vortex.
1X
(μl)
2X + 15%
(μl)
4X + 15%
(μl)
8X + 15%
(μl)
2X Blocking Buer 275 632.5 1,265 2,530
Nuclease-free Water 220 506.0 1,012 2,024
Ribonucleoside Vanadyl Complex 55 126.5 253 506
Total 550 1,265.0 2,530 5,060
e. Vortex 1X Blocking Buer and add 70 μl along the side of the wells to uniformly cover
the tissue sections, without introducing bubbles. Tap gently to ensure even coverage.
f. Incubate for 5 min at room temperature.
g. Prepare Primary Antibody Solution on ice. Pipette mix. Avoid light exposure.
Primary Antibody Solution.
Vortex, centrifuge briefly.
1X
(μl)
2X + 10%
(μl)
4X + 10%
(μl)
8X + 10%
(μl)
2X Blocking Buer 25.00 55.00 110.00 220.00
Nuclease-free Water Variable Variable Variable Variable
Primary Antibody #1 Variable Variable Variable Variable
Primary Antibody #2 (optional) Variable Variable Variable Variable
Primary Antibody #3 (optional) Variable Variable Variable Variable
DAPI 0.17 0.38 0.75 1.50
RNase Inhibitor 6.75 14.85 29.70 59.40
Total 50.00 110.00 220.00 440.00
TIPS
*Choose FC blocking reagent based on sample species.
Antibody volumes will depend on concentrations determined during antibody
optimization. Add an appropriate volume of nuclease-free water based on the
amount of added antibody to achieve the stated final volume.
Ensure that tissue
sections do not dry out
throughout the staining
protocol
!
RIbonucleoside
Vanadyl Complex stock
solution will precipitate
if left at ambient or cool
temperatures for extended
periods of time. Once
the solution has cooled,
prepare 1X Blocking
Buer and Wash Buer
immediately.
!

23
CG000312 • Rev F
Methanol Fixation, Immunofluorescence Staining & Imaging - Visium Spatial Protocols • Rev F
23
h. Remove 1X Blocking Buer.
i. Add 50 μl Primary Antibody Solution along the side of each well. Tap gently to ensure
even coverage.
j. Incubate for 30 min at room temperature. Avoid light exposure.
k. Remove the Primary Antibody Solution.
l. Add 100 μl Wash Buer along the side of each well.
m. Remove Wash Buer.
n. Repeat steps l and m four more times for a total of five washes. Save 50 μl Wash
Buer per sample for step 2.2.
o. Proceed immediately to step 1.5
Tissue Fixation & Immunofluorescence Staining
Ribonucleoside
Vanadyl Complex settles
rapidly in solution. Briefly
vortex Wash Buer before
each wash.
!

24
CG000312 • Rev F
Methanol Fixation, Immunofluorescence Staining & Imaging - Visium Spatial Protocols • Rev F
24
1.5
Slide Mounting &
Coverslip Application
a. Dispense the following volumes of 3X SSC
Buer.
50 ml in one 50-ml centrifuge tube/slide
500 ml in a beaker/2 slides.
b. Remove the slide from the Visium Slide
Cassette. See Tips & Best Practices for more
information.
c. Immerse the slide 20x in the 3X SSC Buer in
the 50-ml centrifuge tube.
d. Wipe excess liquid from the back of the slide
without touching the tissue section. Some
droplets may remain.
e. Add 200 μl Mounting Medium to cover the
tissue sections on the slide uniformly. If
necessary, hold the slide at an angle for
uniform coverage.
f. Apply the coverslip at an angle on one end of
the slide. Slowly lower the coverslip, pressing
down gently with forceps, without introducing
bubbles.
g. Remove excess Mounting Medium by placing
one long edge of the slide on a laboratory
wipe, and gently tilt the slide back and forth.
Repeat with the second long edge of the
slide. Repeat the process until the coverslip is
secured.
h. After the coverslip is secured, immediately
proceed with imaging.
DONOT let the attached coverslip dry.
DO NOT use Cytoseal, nail polish, or any other
permanent mounting medium for securing
the coverslip.
Cover uniformly with Mounting
Medium
Remove excess Mounting Medium
Apply coverslip
Press down
Tissue Fixation & Immunofluorescence Staining
!

25
CG000312 • Rev F
Methanol Fixation, Immunofluorescence Staining & Imaging - Visium Spatial Protocols • Rev F
2. Tissue Imaging
2.0 Imaging System Recommendations
2.1 Tissue Imaging
2.2 Coverslip Removal
2.0 Imaging System
Recommendations
The following table shows imaging systems used by 10x Genomics in the development
of this protocol. Any equivalent imaging setup can be used as an alternative. Imaging
systems should have both brightfield and fluorescence capacity. Required
fluorescence channels will depend on antibody selection. Exposure times will depend
on antibody sensitivity and fluorophores.
2.1
Tissue Imaging
Supplier Description
Nikon Nikon Eclipse Ti2
Molecular Devices
ImageXpress Nano Automated Cell Imaging System
Hamamatsu NanoZoomer S60
Keyence Keyence BZX800
BioTek Cytation 7
Thermo Fisher Scientific EVOS M7000
Leica
Leica DMi8
Versa 8
Fluorescence Recommended Configuration
Light source (or equivalent) with a wavelength range of 380-680 nm
Monochrome camera (14 bit, 2,424 x 2,424 pixel resolution)
DAPI filter cube (Excitation 392/23, Emission 447/60)
FITC/GFP filter cube (Excitation 466/40, Emission 698/70) (Optional - dependent on antibody selection)
TRITC filter cube (Excitation 542/20, Emission 620/52)
Cy5 filter cube (Excitation 618/50, Emission 698/70) (Optional - dependent on antibody selection)
2.18 �m/pixel minimum capture resolution
Exposure times 100 milli sec-2 sec
• If imaging a Visium Spatial Tissue Optimization Slide or blank slide for antibody
optimization, image all Capture Areas together at the desired magnification using
fluorescence imaging settings.
• If imaging a Visium Spatial Gene Expression Slide, image all Capture Areas
individually at the desired magnification using fluorescence imaging settings. Ensure
that fiducial frames are captured.
• Images should be saved as a multi-channel image (multi-image TIFF), merged RGB
image, or as individual single channel images (grayscale TIFF).
• Consult the Visium Spatial Gene Expression Imaging Guidelines Technical Note
(CG000241) for additional information.
• Proceed immediately to next step if continuing with the Visium Spatial Tissue
Optimization or Gene Expression workflows.
!

26
CG000312 • Rev F
Methanol Fixation, Immunofluorescence Staining & Imaging - Visium Spatial Protocols • Rev F
2.2
Coverslip Removal
a. Wash Visium Slide Cassette and Visium
Gasket. See Tips & Best Practices for more
information.
b. Immerse the slide sideways in the beaker
containing 3X SSC with the coverslipped
surface fully sideways.
c. Hold the slide in 3X SSC Buer until the
coverslip slowly separates away from the
slide.
To avoid damaging the tissue sections and
Capture Areas or causing tissue detachment, DO
NOT move the slide up and down, shake forcibly
or manually move the coverslip.
d. Remove the slide from the 3X SSC Buer and
immerse 1x in the 3X SSC Buer to ensure all
Mounting Medium is removed.
e. Wipe excess liquid from the back of the slide,
without touching the tissue sections.
f. Place slide in a clean Visium Slide Cassette.
g. Add 50 μl Wash Buer along the side of the
wells.
DO NOT add Wash Buer to well reserved for
positive RNA control if proceeding to Tissue
Optimization.
h. Proceed immediately to the Visium Spatial
Tissue Optimization User Guide (CG000238)
or the Visium Spatial Gene Expression User
Guide (CG000239).
!
Immerse in 3X SSC Buer
Hold in 3X SSC Buer
Coverslip detaches
Coverslip
facing
sideways
Tissue Imaging

27
CG000312 • Rev F
Methanol Fixation, Immunofluorescence Staining & Imaging - Visium Spatial Protocols • Rev F
Results
Performing the Methanol Fixation, Immunofluorescence Staining & Imaging protocol
will likely result in a decrease in the number of unique transcripts detected for many
tissue types, as compared to the Methanol Fixation, H&E Staining & Imaging protocol
(CG000160). However, this should not aect interpretation of experimental results.
Figure 1. Median UMI counts and % reads mapped confidently to transcriptome for mouse
brain, human brain, and human breast cancer tissue. Values indicate the average of 4
replicates per condition. UMI metrics are based on samples downsampled to 20K raw
reads per spot.
Mouse
Brain
Human
Brain
Human
Breast Cancer
Mouse
Brain
Human
Brain
Human
Breast Cancer
Median UMIs per Spot
% Reads Mapped Confidently
to Transcriptome
All Median UMIs
All % Reads Mapped Confidently to
Transcriptome
Results

28
CG000312 • Rev F
Methanol Fixation, Immunofluorescence Staining & Imaging - Visium Spatial Protocols • Rev F
Troubleshooting
© 2024 10x Genomics, Inc. (10x Genomics). All rights reserved. Duplication and/or reproduction of all or any portion of this document without the express written
consent of 10x Genomics, is strictly forbidden. Nothing contained herein shall constitute any warranty, express or implied, as to the performance of any products
described herein. Any and all warranties applicable to any products are set forth in the applicable terms and conditions of sale accompanying the purchase of such
product. 10x Genomics provides no warranty and hereby disclaims any and all warranties as to the use of any third-party products or protocols described herein. The
use of products described herein is subject to certain restrictions as set forth in the applicable terms and conditions of sale accompanying the purchase of such prod-
uct. A non-exhaustive list of 10x Genomics’ marks, many of which are registered in the United States and other countries can be viewed at: www.10xgenomics.com/
trademarks. 10x Genomics may refer to the products or services oered by other companies by their brand name or company name solely for clarity, and does not
claim any rights in those third-party marks or names. 10x Genomics products may be covered by one or more of the patents as indicated at:www.10xgenomics.com/
patents. The use of products described herein is subject to 10x Genomics Terms and Conditions of Sale, available at http://www:10xgenomics.com/legal-notices, or
such other terms that have been agreed to in writing between 10x Genomics and user. All products and services described herein are intended FOR RESEARCH USE
ONLY and NOT FOR USE IN DIAGNOSTIC PROCEDURES.
The use of 10x Genomics products in practicing the methods set forth herein has not been validated by 10x Genomics, and such non-validated use is NOT COVERED
BY 10X GENOMICS STANDARD WARRANTY, AND 10X GENOMICS HEREBY DISCLAIMS ANY AND ALL WARRANTIES FOR SUCH USE. Nothing in this document should be
construed as altering, waiving or amending in any manner 10x Genomics terms and conditions of sale for the Chromium Controller or the Chromium Single Cell Con-
troller, consumables or software, including without limitation such terms and conditions relating to certain use restrictions, limited license, warranty and limitation of
liability, and nothing in this document shall be deemed to be Documentation, as that term is set forth in such terms and conditions of sale. Nothing in this document
shall be construed as any representation by 10x Genomics that it currently or will at any time in the future oer or in any way support any application set forth herein.
Contact:
10x Genomics
6230 Stoneridge Mall Road
Pleasanton, CA 94588 USA
STEP NOTES
2.1
Weak or no signal
• Verify that samples were not exposed to light after staining with fluorescent
antibodies.
• Verify antibody dilutions. Ensure that antibody optimization is performed before
immunofluorescence staining.
• Verify that the correct fluorescent secondary antibody was used at the correct
dilution, if applicable.
• Verify imaging system filter cubes and wavelength. Ensure that fluorophores and
filter cubes match.
• Protein of interest may have low expression. Test antibodies on tissues of interest
before working with Visium Spatial slides.
2.1
High background
• Verify that samples did not dry out during the staining protocol. Ensure that
samples always remain covered in liquid.
• To prevent non-specific antibody binding, compare chosen antibody with antibodies
that target the same cell type. If possible, compare staining results to cells known
to express higher or lower levels of the target protein.
Troubleshooting
