
LIVE STREAMER AX310
User Manual
Technical Specifications 3
System Requirements 3
Hardware I/O 4
Connections 5
Next-Gen console 5
Nintendo Switch 5
Dual PC 6
Dual PC (With in-game Chat) 6
Download Creator Central App 7
Windows 7
macOS 8
Creator Central Setup 9
AVerMedia Account Setup 9
Creator Central Log in 10
User Interface (by Section) 10
Windows 10 Audio Routing Settings 11
macOS Audio Routing Settings 14
Audio Routing Table 16
Hardware Settings 18
Audio Mixer settings 20
Microphone Settings 20
Single Mix Settings 23
Dual Mix Settings 26
Control Panel Setup (Hotkeys & Widgets) 29
OBS Setup 33
OBS Websocket Plugin 34
For Windows 34
For macOS 34
SLOBS Setup 36
SLOBS Token Plugin 37
Voicemod Plugin & Setup 38
Creator Central Setup 41


Technical Specifications
Interface
USB 2.0, Type-B (Driver Required)
Mic In
XLR (Balanced) / 6.3 mm (Single-end) x1
Console In
Optical In (Toslink) x 1
Computer Inputs
Digital Tracks x 3
Headphone Out and Line Out
3.5 mm TRS, Stereo
Output Mix
Creator Mix / Audience Mix
Sampling Rate
Up to 96 kHz, 24 bits
Microphone Effect
Noise Gate, Reverb, Compressor, Equalizer
Frequency Response
10 Hz to 20 kHz
Dynamic Response
114 dB
Screen Panel
5” IPS Touch Panel
Widgets
Interactive & Customizable Grid
Rotational Encoders
6 (Physical inputs x 3 / Digital inputs x 3)
Lighting
RGB
Power Switch
Yes
Power Inputs
Standard 12V DC, Center Negative, 1.5 A
Power Consumption
< 7 W
Dimensions
Without Stand: 21.7 x 14.5 x 6.1 cm (5.7 x 8.5 x 2.4 in)
With Stand: 21.7 x 14.5 x 9.4 cm (5.7 x 8.5 x 3.7 in)
Weight
Without Stand: 0.699 kg (24.66 oz)
With Stand: 0.843 kg (29.74 oz)
Note:
-
Phantom Power +48V, switchable via Creator Central app
System Requirements
Windows: Windows 10 20H2 (64 bit) and above
Mac: macOS 10.15 and above

Hardware I/O

Connections
Next-Gen console
1
Nintendo Switch

Dual PC
Dual PC (With in-game Chat)
2
“ “

Download Creator Central App
Windows
Assist Central Download Link
Download and run Assist Central. It will detect your AX310 and allow you to
download everything you need to install the Creator Central app.
After downloading the file Select the button “Execute” and it will start
installing the software > update the firmware > Install driver. Once it’s done,
you will need to restart your system.


Creator Central Setup
AVerMedia Account Setup
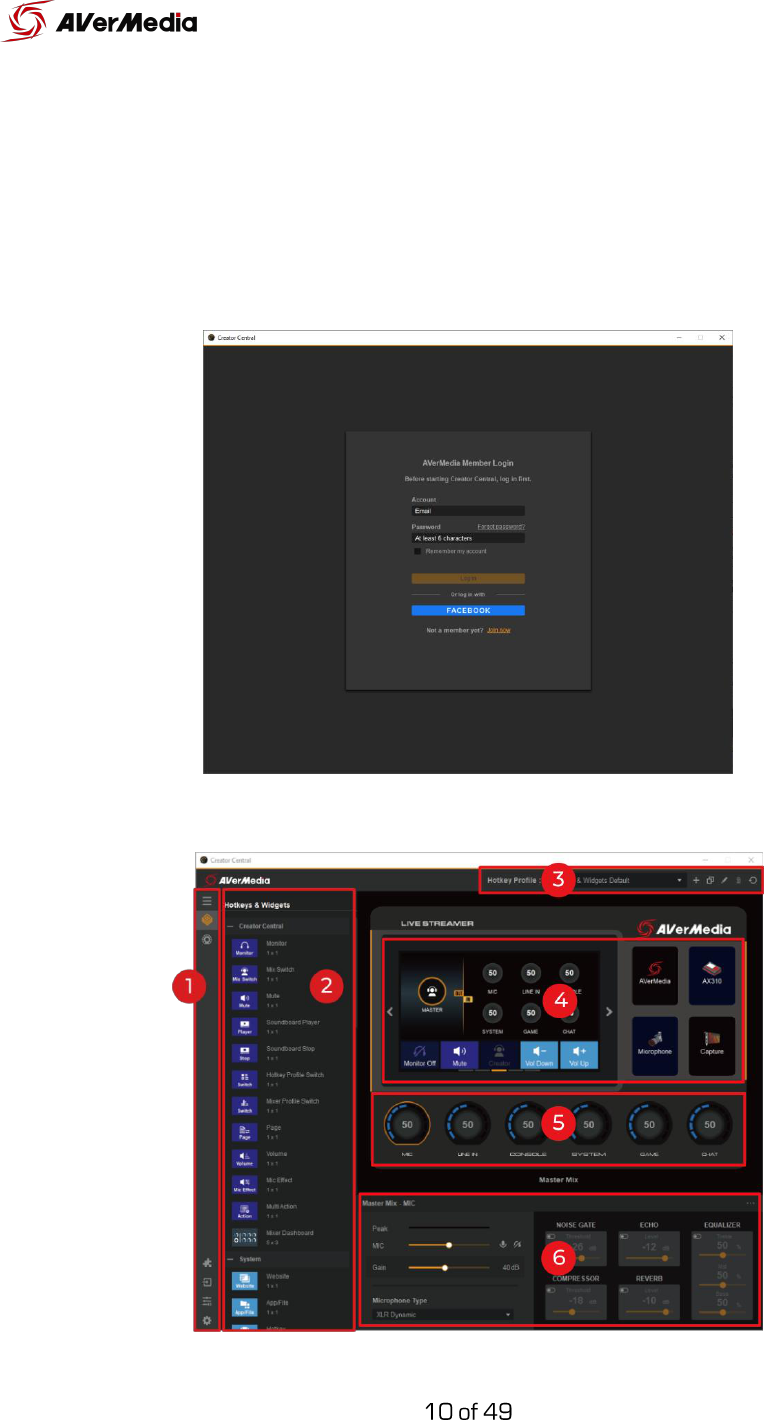
Creator Central Log in
Once you have created your account you can go ahead and sign in on the
Creator Central app. As we keep developing Creator Central, we will be
adding features that will be linked to this account. After logging in, let’s make
sure the audio settings on your PC or Mac are ready to go.
User Interface (by Section)

1. Sidebar: Quick access to functions, such as Hotkeys & Widgets, Audio
Mixer, Widget Store, Settings, etc.
2. Display section for the Hotkeys & Widgets list or Audio Mixer controls
along with Audio Routing Table.
3. Add, copy, and edit hotkey and mixer profiles.
4. Customizable control panel for hotkeys, widgets, and function buttons.
5. Audio track (6 knobs) volume level indicators.
6. Knob, hotkey, or widget configurations.
Windows 10 Audio Routing Settings
Make sure you have updated to Windows 10 20H2 version, to avoid any
hotkey mapping issues.
Once you install the drivers your audio settings should look like this. On the
“Playback” tab, you’ll need to make the “Chat” track your “Default
Communication Device”. Right-click over the chat track and select “Set as
Default Communication Device”.

On the “Recording” tab make sure that “Chat Mic” is selected as default.
If you want to route different virtual sources to the “SYSTEM”, “GAME”, or
“CHAT” channel, for example, Spotify, right-click on the audio icon on your
Windows taskbar, select “Open Sound Settings”, look for advanced audio
settings there you can select where to route each virtual source.


macOS Audio Routing Settings
Go to system preferences > Sound > Output tab, and make sure that “System
(Live Streamer AX310)” is selected. This will route all system audio to the
“System” digital track on your Creator Central.
Now, go to the Input tab and make sure that “Chat Mic (Live Streamer AX310)”
is selected.

Since macOS doesn’t have a “Default communication devices” remember to make
the changes on your voice chat software audio settings.

From your Mac/PC perspective these tracks are considered outputs:
-
System (Live Streamer AX310); controlled by the “System” Knob
-
Game (Live Streamer AX310); controlled by the “Game” Knob
-
Chat (Live Streamer AX310); controlled by the “Chat” Knob, should be used as
audio output from your voice chat software (Discord, Skype, etc.)
And these are considered inputs:
-
Chat Mic (Live Streamer AX310); is the audio track that should be used for your
voice chat software.
-
Audience Mix (Live Streamer AX310); the sum of all 6 audio tracks on the AX310,
and should be selected as the main input for your Streaming software.
When Audio Mixer is set to “Single Mix”, this mix will be the same as the
“Creator Mix”.
When Audio Mixer is set to “Dual Mix”, this mix will be an independent
one and will have different volume levels for all 6 tracks (Won’t be the
same as “Creator Mix”).
-
Creator Mix (Live Streamer AX310); The audio mix that goes to your headsets.
Audio Routing Table
Located in the Audio Mixer control section (2), this illustrated table provides
an overall, easy-to-read audio routing for all six tracks. It also includes volume
levels and quick access to Output settings.


Hardware Settings
You will find more settings by clicking on the gear icon in the top right corner
of the Creator Central app. Here you will find settings to manage your
streaming accounts, the touch panels settings and RGB lighting controls, as
well as audio output settings.

You can select which audio output is routed to the “LINE OUT” port in the
output settings.
This setting can be used if you want to separately record different mix
outputs, share to your streaming partner's headset, or route your mic to a
gaming PC if you wish to use in-game chat instead of discord.

Audio Mixer settings
Microphone Settings
Select the MIC knob and you will be able to make adjustments to your mic,
gain, noise gate, Equalizer, etc. or if you have connected an XLR condenser
microphone that requires phantom power (+48V) you will enable that there
as well.

By clicking on the different processing options you will open more settings
for each section.

If you want the process mic audio to also be routed to “Chat Mic” (the audio
going to your voice calling software) you can set it from the “Output” settings.

Single Mix Settings
The Creator Central audio mixer’s default is “Single Mix”. This means you will
have one audio mix going out to the “Headphones output port”, “Line out
port”, and to your stream (the “Audience Mix” virtual audio input for your
streaming Software).

The “MIC” knob will control mic audio going to Master Mix and chat mic.
You can control the mic monitoring (Mic playback) with the Monitor widget.
In “Single Mix” the monitor widget will enable and disable the microphone
monitoring (playback) in your headset.
Headset
Chat mic (Discord, Skype, etc)
Audience Mix (OBS, SLOBS, etc)
MIC Volume Knob
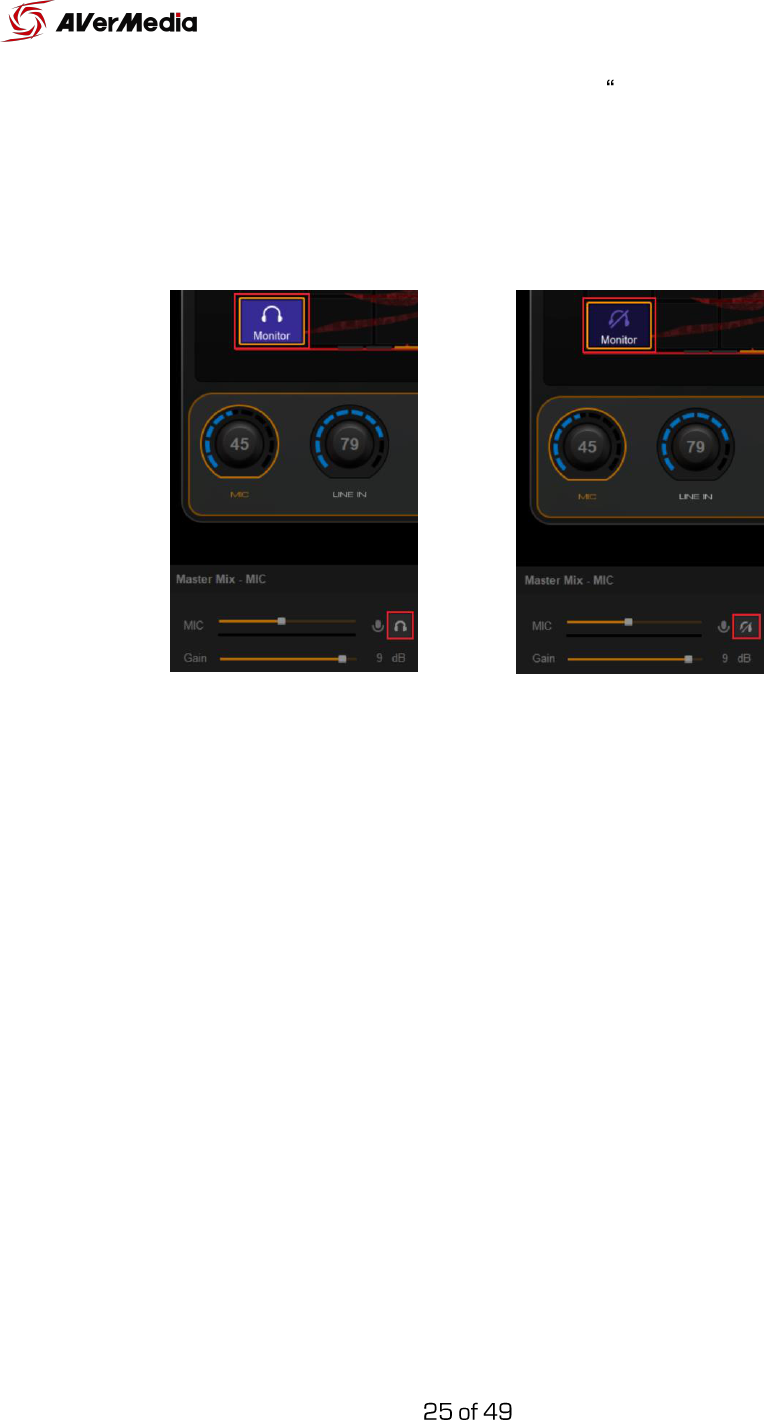
Microphone sound will always be going out to the Audience Mix” input on
your streaming software, even if you can’t hear it on your headphones.
Mic Playback ON
Mic Playback OFF

Dual Mix
3
Settings
To switch to “Dual Mix”, click “Enable Dual Mix” right under the title Audio
Mixer.
You now have two independent mixes, Creator Mix and Audience Mix, both
with different audio levels of the 6 tracks.
Creator Mix: Mix of the 6 tracks heard in the headset.
Audience Mix: Mix of the 6 tracks heard by the audience (live stream).
“ “

In “Dual Mix” the MIC” knob will control mic audio going to the “Creator Mix”
and chat mic.
When you select “Audience Mix” the “MIC” knob will control the mic audio
going to your streaming software (Audience Mix - Live Streamer AX310).
Headset
Chat mic (Discord, Skype, etc)
MIC Volume Knob
(Creator Mix)
Audience Mix (OBS, SLOBS, etc)
MIC Volume Knob
(Audience Mix)
Headset
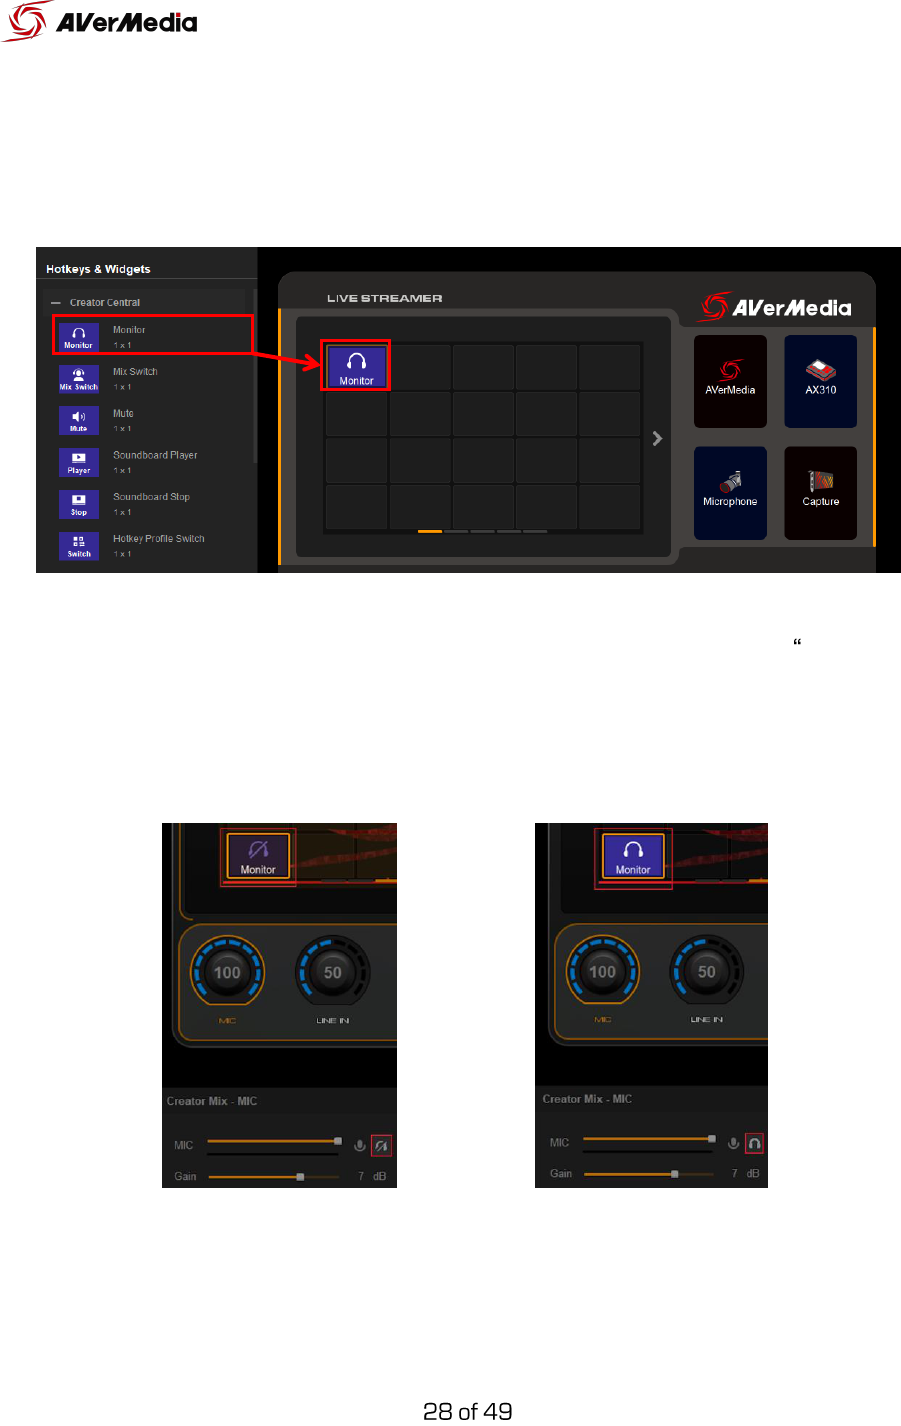
While in “Creator Mix” you can control the mic monitoring (Mic playback) with
the Monitor widget. The monitor widget will enable and disable microphone
monitoring (playback) in your headset. While in Dual Mix, mic monitoring will
only work with creator mix, Audience Mix won’t be affected.
Microphone sound will always be going out to the “Chat mic” and Audience
Mix”, even if playback is disabled.
Mic Playback OFF
Mic Playback ON

You can switch between both mixes using the “Switch Mix” widget. This will
allow you to playback the desired mix on your headset and control the
volume levels in the selected mix.
Control Panel Setup (Hotkeys & Widgets)
Creator Mix Playback
Audience Mix Playback

Overall, you have five pages for your hotkeys and widgets (4x5 canvas per
page). You can swipe left or right to move through the pages. If you want to
return to your home screen, simply swipe up.
Widgets and hotkeys can be added by dragging them over to the control
panel.
Hotkeys and widgets can be modified in the settings section below.

You can edit the text (including font style, size, color, alignment, etc.) or the
image displayed on the settings section of the widget to a hotkey. Click the
text field to change the name or click on the pencil icon and select the
image
4
you want.

If the widget or hotkey has two “statuses” you can customize the 2nd status
by selecting the second status tab of the widget/hotkey and make the
changes you want.
Status 1
Status 2

OBS Setup
The first step is to delete or mute all audio sources and disable desktop audio,
and others. All your audio sources should be routed through the AX310.
Go to OBS Settings > Audio > “Mic/Auxiliary Audio” and select “Audience Mix
(Live Streamer AX310)”

OBS Websocket Plugin
To use OBS widgets, you will need to download and install the OBS
WebSocket plugin, here is the reference link Websocket download link.
For Windows
We recommend you can use the installer
“AVerMediaOBSWebSocketServerInstaller_v1.0.1.exe” (works only with
combined 32/64-bit installations): download it, launch it and follow the
instructions.
If that doesn’t work then download and unzip the “obs-websocket-1.0.1.zip”
file. Copy the contents of the archive to the root of your OBS Studio
installation folder (either C:\Program Files\obs-studio or C:\Program Files
(x86)\obs-studio).
For macOS
Download and run AVerMediaOBSWebSocketServerInstaller_v1.0.1.pkg.

Note:
If you are not able to use OBS widgets right away make sure the “Enable authentication” is
unchecked.
If you choose to use a password with your OBS websockets, remember to add the account in
the Creator Central app settings and type in the password.

SLOBS Setup
The first step is to delete or mute all audio sources and disable desktop audio
and others. All your audio sources should be routed through the AX310.
Go to SLOBS Settings > Audio > “Mic/Auxiliary Audio” and select “Audience
Mix (Live Streamer AX310)”

SLOBS Token Plugin
To use SLOBS widgets, you will need to get your SLOBS token. Get this token
by going into SLOBS settings page > Remote Control > “Click to reveal” >
Show details; now copy the API token number.
For the next step, go to Creator Central Settings, add Streamlabs OBS and
paste the token number.

Voicemod Plugin & Setup
Creator Central now supports Voicemod with a handy plugin so streamers
can have real-time voice-changing features and sound effects right on their
fingertips using AX310. Follow the instructions below to install the Voicemod
plugin and set up your Creator Central and OBS.
Go to Creator Central > Widget Store > Voicemod, and download the
Voicemod plugin file to your computer.

Once the file is downloaded, go to Creator Central > Widget Import, select the
file, and click Open.
The installation may take several minutes, wait until you see Voicemod
hotkeys appear in Hotkey & Widgets as shown below.

Now to the Voicemod app itself. Download Voicemod from their official
website here if you haven’t already done so.
After the installation is complete, run it, and go to Settings > Audio > Input.
Then select Chat Mic (Live Streamer AX310).
Go down to Output and select Chat (Live Streamer AX310).
Note: The output here is for monitoring only. Mute this channel in the
Audience Mix of Creator Central.

Creator Central Setup
Go to Creator Central > Audio Mixer, and make sure Dual Mix is enabled.
Streaming Voicemod Sound with OBS
Go to OBS > Sources > click the “+” icon > Audio Input Capture.
Rename it to Voicemod, and click OK.

Select Microphone (Voicemod Virtual Audio Device (WDM)). This is the mic
sound output from Voicemod.
Create another Audio Input Capture called Audience.
Select Audience Mix (Live Streamer AX310) as the device.
Note: Make sure to mute the MIC channel in Creator Central’s Audience Mix.

Streaming Voicemod Sound with OBS and Other Apps (e.g.
Discord)
For Discord’s audio input, select Chat Mic (Live Streamer AX310), this will be
the XLR microphone sound.
Create or set another audio input to Voicemod (Voicemod Virtual Audio
Device (WDM)), this will be the Voicemod sound.
Audio routing table below:

Monitoring
Hear myself is to hear the microphone sound on Voicemod. The Monitor in
AX310 Creator Central means monitoring the XLR mic. When you want to
hear sounds in the Audience Mix mode, make sure to mute the MIC sound in
Audience Mix to keep the XLR microphone sound from looping in.

Hotkey & Widget Profiles
You can add various control center profiles for different situations. These
profiles will store your touch panel and function buttons' hotkey and widget
settings.
To create a new profile, click the “+” icon, type the name of this new profile
and select “OK”.
To quickly switch between profiles add a “Hotkey Profile Switch”. And at the
bottom, you will have a dropdown menu where you can choose which profile
you want to switch to.

Audio Profiles
You can add various audio profiles for different situations. These profiles will
store all your audio settings.
To create a new profile, click the “+” icon, type the name of this new profile
and select “OK”.

To quickly switch between profiles, add “Mixer Profile Switch”. And at the
bottom, you will have a dropdown menu where you can choose which profile
you want to switch to.

Feedback
If you encounter any problems or have suggestions while using Creator
Central, please go to Settings > Feedback for instant FAQ and reporting
assistance.

