
DEGREE WORKS
RESPONSIVE DASHBOARD
Faculty/Staff Instruction Guide
Table of Contents
What is Degree Works?
............................................................................................................ 3
Benefits of using Degree Works
................................................................................................ 3
Accessing Degree Works ............................................................................................................ 4
Searching for a Student ............................................................................................................. 5
Degree Audit Blocks
.................................................................................................................. 6
What-If Analysis ...................................................................................................................... 11
GPA Calculators ....................................................................................................................... 16
Using the Planner .................................................................................................................... 21

Introduction to Degree Works
What is Degree Works?
Degree Works is a web-based auditing tool that allows students and advisors to monitor
progress toward completion of program requirements. It combines Winthrop’s degree
requirements and the coursework that has been completed with easy to read worksheets.
These worksheets will show how completed courses count toward degree requirements and
show which courses and requirements still need to be completed.
Benefits of using Degree Works
• Provides a way for students and advisors to plan for future courses by determining which
requirements are still needed to complete a degree program
• Shows individual course grades, overall GPA, major and minor GPA, transfer credit
• Provides a “What If” audit that allows students to see how a change of major or minor could
impact degree progress
• Provides a “Look Ahead” ahead audit to see how planned courses would meet requirements
• Provides a Planner that allows students and advisors to map out courses by term
• Shows the progress toward the Cultural Events Requirement
• Provides a GPA calculator to determine what is needed to achieve a desired GPA

Accessing Degree Works
**NOTE: For the best results, please use Google Chrome or Mozilla Firefox.
1.
Visit https://wingspan.winthrop.edu.
2.
Log in using your Winthrop University username and password.
3.
Select the link for Degree Works under Employee Tools.

Searching for a Student
4.
You will see the Degree Works Responsive Dashboard.
5.
You may select a student by entering the Student ID (Example—W12345678) or by
using the “Advanced Search” option if you do not know the student’s ID number,
depending on your access level. If your access is limited to your advisees only, you will
see your students in a drop-down list. Press Enter after typing in the student’s ID.
6.
Choosing “Advanced Search” allows you to search for the student by name or filter by degree,
major, class, etc. When you have chosen the appropriate criteria, select Search.

7.
A list of students will appear based on your criteria. Use the check boxes to select or deselect
the students you want to view then click Select.
8.
Use the Select Student drop-down to view the list of students. Select a student from the list.
If the student you have selected is pursuing more than one degree (i.e., BA and BS, etc.), click on
the drop-down arrow on the navigation bar under “Degree” to select which degree audit you
would like to view. Double majors (BA in Psychology and BA in Sociology) will show up on the
same audit.

Degree Audit Blocks
The Degree Audit Worksheet is made up of several sections, referred to as blocks. The types and
number of blocks may vary for each student, depending on their academic program and level.
1.
The
Student Header
contains the classification, degree, major, minor, etc. If the student has not
chosen a minor, the field will not be displayed.
2.
The Degree Progress section shows the percentage of completion towards the student’s
requirements and credits as well as their Winthrop GPA. Please keep in mind that the
Requirements progress will not always equal the Credits progress. Progress will not equal
100% until all requirements have been completed. This includes Cultural Events, if required,
for Undergraduate students. A graduating senior who has completed all credits and course
requirements will reach 98% for the requirements progress until the final grades are recorded
at the end of the term.
3.
Options to
print the audit
or
contact a student
can be found in the upper right corner of the audit.
•
Click on the printer icon to print the audit
•
Click on the envelope icon to email the student
4.
The
GPA Calculator
and
Class History
are found under the ellipsis (three vertical dots).
•
The Class History displays all courses taken in chronological order
•
The GPA Calculator contains three calculators for Graduation, Term, and Advice
1
2
3
4

5.
The Legend is found at the bottom of the audit that explains the icons found within the audit.
6.
Format Selection
The default format is Student View. You can change the format of the audit by selecting the
Format drop-down.
• The Student View is the default and most frequently used format. This format
provides a detailed view of the student’s degree requirements.
• The Graduation Checklist displays which courses were used to fulfill each
requirement.
• The Registration Checklist displays outstanding (“Still needed”) requirements and
suggestions to fulfill them.
7.
In-Progress and Preregistered Classes
The audit displays the in-progress and preregistered classes and counts them toward the
student’s degree progress. Uncheck one or both boxes and select Process to view the
student’s progress without those classes.

The degree audit blocks will show the requirements and the student’s progress towards their
program. The blocks will default as expanded to display all the information. You can “collapse
all” for quick navigation through the audit, and then click on the down arrow “v” on the specific
block to expand it.
The Degree Block is the first block on the audit. It displays the number of credits required for
the program, the number of credits applied, and the catalog year. It also provides a summary of
each of the block requirements that follow (e.g., major, minor, general education, etc.) as well
as the Cultural Events requirement status for Undergraduate students.
• Completed requirements are noted by a green circle with a green checkmark.
• Incomplete or “still needed” requirements are noted by an open red circle.
• In-Progress requirements are noted by a blue, half-filled circle.
5

General Education, Major, Concentration, and Minor Blocks
Following the Degree Block, Degree Works will display a block for the student’s major(s),
concentration(s), minor(s), and any other blocks applicable to the student’s chosen program.
6
Tip: Click on the blue, still needed course to
see the course information and a list of
course offerings for the upcoming semester.

Other Blocks that may appear at the bottom of the audit will vary depending on courses taken and
academic progress.
• Fall Through block is for any course that is not used toward the program or any non-course requirements.
• In-Progress block lists any courses the student is currently registered for and displays with an “NR” grade.
• Insufficient block shows any course that was incomplete, repeated, withdrawn, or failed. Classes that have
been repeated are identified with an “R” in the Repeated column.

What-If Analysis
The What-If feature allows students to see how the coursework they have already taken would
apply to a new or additional academic program. This can be helpful when students want to
evaluate a change to their current degree, major, minor, or concentration. Students and advisors
can also use the What-If function to determine if a change in catalog year is beneficial to the
student.
1. Select What-If.
2. In-progress and Preregistered classes are selected and will be applied to the analysis. If you do
not want to include them, you can deselect the check boxes for these options.
3. Use the drop-downs to select the appropriate information for the program and areas of
study the student is considering.

4. If needed, select Additional areas of study to add another major, minor, etc.
5. Add future classes to see how individual courses might alter the student’s progress in the new major.
6. Select Process.
The What-If Analysis will appear with the alternative program’s requirements and the student’s
progress
towards the requirements.

Process Another What - If Analysis
The What-If Analysis block will collapse once the analysis is processed.
1.
Select the down arrow to expand the What-If Analysis block.
2.
Select Reset at the bottom of the block.
3.
Use the drop-downs to select the appropriate information for the program the student is
considering.
4.
Select Process.

Future Classes
The Future Classes section in the What-If Analysis has replaced the Look Ahead tool. You can create
a What-If Analysis to see if a course will meet a student’s current program requirement.
1.
Select What-If.
2.
Select the Use current curriculum check box.
3.
Enter the Subject and Number for the class. Select Add.
4.
Add as many courses as you wish to view on the audit. Select Process.

5.
The audit will appear. Scroll through the audit to see where the courses appear and if they meet
the student’s program requirements. They will show as PLANNED and in-progress on the
audit.

GPA Calculators
Degree Works contains three types of GPA Calculators: Graduation, Term, and Advice. The GPA
Calculator can provide advice about grades required in order to maintain and/or achieve a
particular GPA. The GPA calculators are estimates and are not considered official.
Please note that the GPA Calculators do not take repeats into account (i.e. if a student plans
on repeating a course in which they previously received a low or failing grade, that low or
failing grade will be calculating in this formula. Once the repeated course is completed, then
the original low or failing grade will no longer count toward the overall GPA.)
1.
Select the Ellipsis at the top right corner of the screen.
2.
Select GPA Calculator.

Graduation Calculator
The Graduation Calculator is used to estimate the average GPA the student needs to maintain in their
remaining terms to graduate with a desired GPA. This calculator can be helpful for a student who
would like to graduate with specific honors.
1.
The student’s current GPA, number of credits remaining, and number of credits required are
listed. Enter the GPA the student would like to earn upon graduation in the Desired GPA field
.
2.
Select Calculate.
3.
The average GPA the student must maintain to graduate with the desired GPA will be listed at the
top of the window.
4.
Select Recalculate if you would like to input another desired GPA.
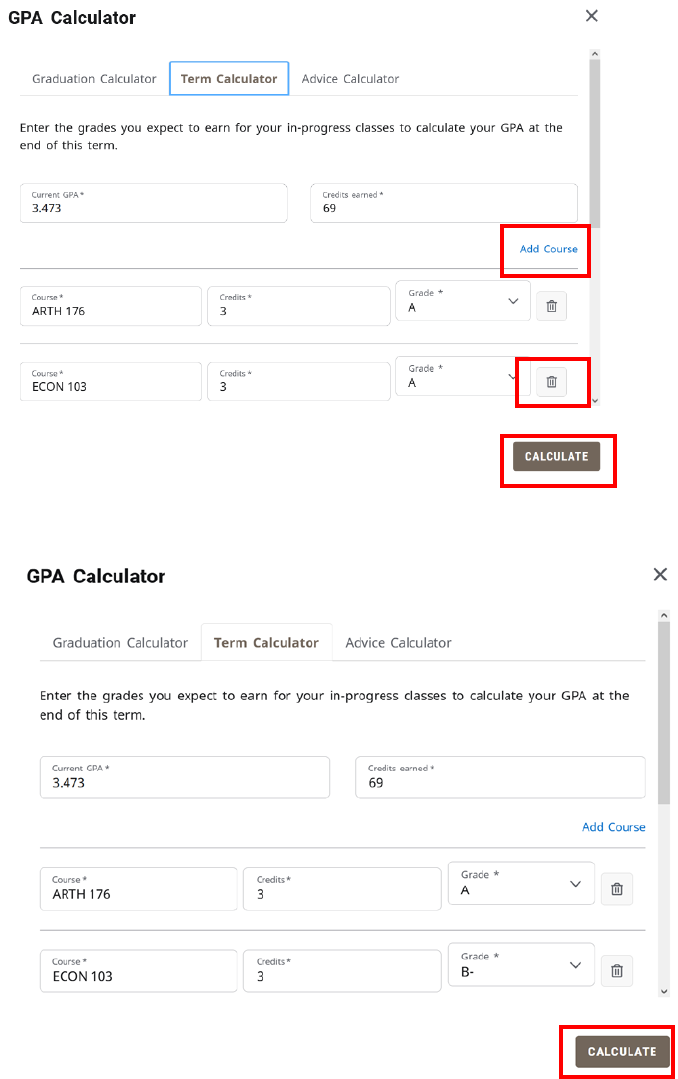
Term Calculator
The Term Calculator will estimate the student’s GPA based on anticipated grades for in-progress
courses.
1.
Select Term Calculator. The current GPA, credits earned, and in-progress courses will be listed.
2.
Use the grade drop-downs to select the anticipated grade for each course.
3.
If needed, select Add Course or select the trash icon to delete a course that is listed.
4.
Once all the courses and anticipated grades are listed, select Calculate.

5.
The student’s estimated GPA will be listed at the top of the window.
6.
Select Recalculate to modify the anticipated grades.

Advice Calculator
The advice calculator will show how many credits must be earned with certain grade averages to
achieve
a desired GPA.
1.
Select Advice Calculator.
2.
The student’s current GPA and number of credits earned are listed. Enter the student’s Desired GPA.
3.
Select Calculate.
4.
The scenarios to achieve the desired GPA are listed.
5.
Select Recalculate to enter another desired GPA.

Using the Planner
The Student Educational Planner (SEP) is an advising tool in Degree Works that students and advisors
can use to map out a clear pathway for timely degree completion. Advising plans created in SEP will
show students the required courses within their program(s) and a recommended timeline of when
they should be completed.
**NOTE: For the best results, please use Google Chrome or Mozilla Firefox.
Getting Started with Plans
*Make sure that the student’s academic goals are up-to-date before creating a plan.
1. Click the "Plans" tab at the top of the worksheet in Degree Works.
2. Once you have selected “Plans”, select “New Plan” if the student does not have a plan created.
Once you have clicked this button, the following pop-up will appear if the student has no created plans yet.
You will be prompted to create a blank plan or select a template. Click Blank Plan if you will not be using a pre-
loaded template for the student’s chosen program.
If the student already has one or more plans created, you will see the following screen.
You can edit or review each of those plans by clicking on the plan name.
* Ideally, you will want to have only one plan for the student’s program checklist or program of study that is
maintained rather than creating a plan for each advising term.

Steps to Building a Plan
1. Select the starting term for the plan
• Select from the drop-down menu then click “Submit”.
2. Name the plan
• Consider using the name of the program or major. This is helpful if a student changes majors
because they will be alerted that this is not the plan they should be following now.
3. Make sure that the student’s degree matches the plan degree.
4. Advisors have the option to mark the plan active and/or locked.
• Active plans should indicate that the plan is current. Outdated or old plans should not be marked
active.
• Locked plans do not allow students to edit the plan. Only advisors may lock or unlock a plan.
• Plans must be marked both active and locked to use the tracking feature (i.e. on-track, off-track,
warning). Only one plan should be marked both active and locked.

Add a term by clicking on the ADD TERM button at the far right.
If you need to delete a term, click on the three vertical dots to the right of the semester you want to delete
then select Delete this term.
Once you have added the semesters, requirements can be added. There are several requirement options to
choose from on the Requirements from the left sidebar options.
Once you have added the semesters, requirements can be added. There are several requirement options to
choose from on the Requirements from the left sidebar options.

Requirement Options
• Choice: Use this when there are several course options that can fulfill a requirement. For example, a
student can take MCOM 325 or 348 for the major.
• GPA: You can plan for three types of minimum GPAs for a term: Class, Major, Student System Overall
GPA.
• Non-Course: Plan for non-course items that need to be completed as part of a degree with this
requirement. Examples include a Comprehensive Exam, Oral Exam, Capstone, Graduate Portfolio, etc.
• Placeholder: These requirements are informational only and are not included in tracking. Click on the
arrow to see all the options. These can be beneficial because you can select “General Elective”, “Lab
Science”, or other options and can further specify by typing what you want the student to plan for in the
“Value” box. Placeholders do not allow for a credit count.
• Course: A single course can be planned for with this requirement. *You will likely use this requirement
option the most. A course can be entered manually or from a list of courses by prefix or from a "still
needed list".
• Test Score: Tests that need to be completed as part of a degree can be planned for with the test
requirement.

Adding a Planned Course
• After selecting "Course", select the term to add the course to from the drop-down menu.
• Type the course prefix and course number in the "Course requirement" box. Press enter or wait for the
course to appear. Select the course.
• Other course specifications: You can also specify a minimum grade that must be received in the course and
the delivery method, such as on campus or online.
• Click "Save" to save this course to the semester.

Adding a Choice
The Choice requirement option allows you to add several choices for a student to choose from in a specific
semester.
• After selecting "Choice", select the term to add the choices to from the drop-down menu. Type the course
prefix and course number in the "Choice requirement" box. Press enter or wait a moment for the course
to appear. Select the course.
• Click on "Add" to the far right. This will allow you to add an additional course choice (or several choices) to
the semester.
• Next, add the next course option(s) as you did the first.
• You can also specify the number of credits that should be taken when a student selects one of these
courses. A minimum grade may also be added to the choice.
• Click "Save" to save these course choices to the semester.
• "Add a paired course or lab" should only be used when courses must be or are best taken concurrently,
such as BIOL 150 and BIOL 151.
• The planned requirement can also be marked critical.
• Choice options in a plan will always appear below the planned courses and will have an
orange bar on the top.

Adding a Placeholder
Placeholder requirements are informational only. Advisors and students may find these beneficial because you
can select from various options and add information in the value field.
• After selecting "Placeholder", select the term to add it to from the drop-down menu.
• Select from the list of pre-built placeholder options (our example here is "Elective").
• Whatever is added in the "Value" field will display to the student in the plan.
• Click "Save" to save the placeholder to the semester.

Other Options for Adding Courses
Click on the + at the top or bottom of a specific term.
You may then add a single course or multiple courses by:
• Typing in the course subject in the "Subjects" box. This will bring up a list of course subjects.
• Select the subject that corresponds to the course prefix (i.e. Biology=BIOL). This will bring up a list of all
courses in the selected subject/prefix.
• Click the box beside any/all of the courses you want to add. You can add multiple course subjects to the
term before clicking on "Add to plan" at the bottom left. (You can easily uncheck a course or click the
"x" beside the course if you change your mind.)
• Courses will be added to the term you are working in and will be displayed in the order they are
selected.
Click on the left arrow beside "Requirements" in the sidebar to reach "Courses" or click on the arrow to the
right for a list of the “Still Needed” courses.
• Type the course title (or portion of the title) in the "Course Title" box. This will bring up list of courses
that contain that word in the title. (Example="Intro to")
• The drop-down will populate with all known active course prefixes in Banner that contain the word "Into
to" (from our example).
• Click the drop-down arrow to the right of the course prefix to see the course. Click and drag the course
to the term the course is to be planned in. (Example=ACCT 280 "Intro to Financial Accounting")

MOVING A COURSE TO ANOTHER TERM
If needed, you can drag and drop requirements to different semesters. This is beneficial as changes occur
throughout a student’s progression toward their degree. If the student did not take a course during the
specified semester, simply move it to another semester. The course (or other requirement) may also be
reassigned to a different semester via the ellipsis on the top right-hand corner of the class.
ADDING A NOTE TO A COURSE
To add a note to a requirement, click on the paper icon at the bottom right-hand corner of the class. Once the
note is saved, the small note icon will be outlined in blue.

Audit View of the Plan
This view displays the student audit in a separate browser tab. If you would like to see the plan
side-by-side with the audit, you will need to use two screens.
The Audit view can help students verify completeness of the plan. If a course has been taken,
the course will be listed on the left of the respective block (Major, Minor, etc.). If the course
has not been taken, but is found in the student plan, the course will have (IP) beside the course
number. If a course is listed as “Still needed” then it has not been taken or added to the plan.
