
Cookbook
FortiVoice 7.0.2

FORTINET DOCUMENT LIBRARY
https://docs.fortinet.com
FORTINET VIDEO LIBRARY
https://video.fortinet.com
FORTINET BLOG
https://blog.fortinet.com
CUSTOMER SERVICE & SUPPORT
https://support.fortinet.com
FORTINET TRAINING & CERTIFICATION PROGRAM
https://www.fortinet.com/training-certification
FORTINET TRAINING INSTITUTE
https://training.fortinet.com
FORTIGUARD LABS
https://www.fortiguard.com
END USER LICENSE AGREEMENT
https://www.fortinet.com/doc/legal/EULA.pdf
FEEDBACK
Email: [email protected]
March 15, 2024
FortiVoice 7.0.2 Cookbook
26-702-878565-20240315

TABLEOFCONTENTS
Change log 7
Introduction 8
Auto dialer 9
Setting up and starting an auto dialer campaign 9
Enabling the auto dialer service 9
Adding contacts 9
Configuring an audio message 10
Configuring the auto dialer campaign 10
Starting an auto dialer campaign 10
Call center 12
Call center setup 12
Creating a call queue 12
Configuring extension departments 14
Creating a department administrator profile and account 15
Skill-based routing 18
Creating skill sets 18
Configuring skill levels 18
Assigning a skill level to an extension 19
Configuring the call queue 20
Configuring call handling 21
Call features 23
Auto attendant 23
Configuring the auto attendant 23
Configuring key actions 23
Configuring advanced settings (optional) 25
Call parking 25
Configuring call parking settings 25
Configuring call parking on programmable phone keys 26
Using call parking 28
Call recording 29
Recording a phone call 29
Managing recorded phone calls 30
Managing the access to phone call recordings 31
Conference calls 37
Configuring user conferencing 37
Scheduling a user conference 38
Viewing upcoming user conferences 39
Configuring administrator conferencing 40
Recording a conference call 42
Faxes 45
Configuring FortiVoice to receive faxes 45
Configuring FortiVoice to send faxes 46
Extensions 48
Auxiliary phone and secondary account 48
FortiVoice 7.0.2 Cookbook 3
Fortinet Inc.

Adding an auxiliary phone 48
Adding a secondary account 50
Auto provisioning for FortiFone devices on different subnets 50
Downloading and editing the CSV file 51
Importing the CSV file 51
Configuring HTTP or HTTPS protocol support 52
Caller IDmodification 54
Caller ID modification hierarchy for normal calls 54
Caller ID modification hierarchy for emergency calls 57
FortiVoice Click-to-dial configuration on Google Chrome 61
Installing FortiVoice Click-to-dial 62
Configuring FortiVoice Click-to-dial 63
Using FortiVoice Click-to-dial 64
Hot desking 65
Configuring hot desking 65
Using hot desking on FortiFone 67
Viewing activity details of hot-desking extensions 67
Local IP extensions 68
Configuring extension settings 68
Configuring notification options 73
Remote extension configuration 74
Adding a remote extension 74
Testing a remote extension 74
Managing a large number of extensions 74
Maintaining phones 75
Managing extensions 75
Ring group call handling 83
Creating a ring group 83
Configuring call handling for each status 84
Configuring advanced ring group settings 85
Filtering the phone directory 85
Filtering the phone directory by department 85
Filtering the phone directory by business group 89
Filtering the phone directory for a survivability branch 93
High availability 96
Planning high availability 96
Configuring high availability on FortiVoice units 97
Configuring service-based failover 99
Synchronizing configuration and data in a FortiVoice HA group 101
Uploading license files on a FortiVoice HA group 101
Enabling high availability activity logging 102
Displaying the high availability status 103
Upgrading the firmware in an HA group 104
Workflow 104
Downloading firmware image files 105
Backing up the configuration 105
Uploading firmware image files 106
FortiVoice 7.0.2 Cookbook 4
Fortinet Inc.

Upgrading the FortiVoice FXS gateway 107
Upgrading the FortiVoice LSG firmware 107
Upgrading the FortiVoice firmware in an HA group 108
Hotelmanagement 110
Configuring PMSsettings 110
Configuring hotel management options 111
Defining minibar codes 112
Configuring room status 112
Licensing 114
Purchasing a FortiVoice product license 114
Registering a FortiVoice product and downloading the license file 114
Uploading the license file to FortiVoice 115
Managed system 117
Gateway management 117
FortiVoice units as survivable branches 117
FortiFone firmware upgrades 117
Reviewing the current FortiFone firmware 118
Uploading the FortiFone firmware to FortiVoice 118
Performing the FortiFone firmware upgrade 119
Confirming the FortiFone firmware upgrade 119
Phone system 120
Phone profiles 120
Viewing phone profiles 120
Changing the background image of a FON-x80 series phone 120
Emergency numbers 121
Creating a message group 121
Configuring the emergency number 122
Configuring an outbound dialplan for emergency calls 124
Configuring an emergency zone profile 127
Configuring the emergency caller ID 131
LDAP authentication configuration for extension users 131
Creating an LDAP profile 131
Configuring an LDAP connector 133
Applying the LDAP profile to an extension 134
Schedules – best practices 135
Creating schedules 135
Configuring call handling with schedules 143
Security 146
Detecting the security risks 146
Changing the default external access ports 148
Changing the default passwords 149
Disabling recommended features 153
Configuring additional settings 154
Monitoring and reporting 159
Softclient 162
Deployment of FortiFone softclient for mobile 162
FortiVoice 7.0.2 Cookbook 5
Fortinet Inc.

Protocols 162
Call flows 163
Topology 164
Configuring FortiFone softclient for mobile settings on FortiVoice 164
Configuring FortiGate for SIP over TLS 169
Configuring FortiGate for SIP over TCP or UDP 177
Installing and configuring the FortiFone softclient for mobile 184
Deployment of FortiFone softclient for desktop 184
Protocols 185
Call flows 185
Workflow 185
Configuring FortiFone softclient for desktop settings on FortiVoice 185
Configuring the ICE support 188
Create virtual IP addresses on FortiGate 189
Configuring a FortiGate firewall policy for port forwarding 192
Installing and configuring the FortiFone softclient for desktop 194
FortiVoice 7.0.2 Cookbook 6
Fortinet Inc.

Change log
Date Change description
2024-03-15 Initial release of the FortiVoice 7.0.2 Cookbook.
FortiVoice 7.0.2 Cookbook 7
Fortinet Inc.

Introduction
The FortiVoice Cookbook is a collection of recipes about configuring and using FortiVoice features.
A recipe focuses on a task that you can perform using the FortiVoice GUI. A few tasks described in this document use
the FortiVoice CLI or user portal, as required.
FortiVoice 7.0.2 Cookbook 8
Fortinet Inc.

Auto dialer
The FortiVoice auto dialing system can assist your organization in reaching multiple contact quickly and efficiently.
This section includes the following recipe:
l
Setting up and starting an auto dialer campaign on page 9
Setting up and starting an auto dialer campaign
An auto dialer campaign allows you to broadcast a recorded message to the dialed phone numbers.
For this recipe, perform the following tasks:
1. Enabling the auto dialer service on page 9
2. Adding contacts on page 9
3. Configuring an audio message on page 10
4. Configuring the auto dialer campaign on page 10
5. Starting an auto dialer campaign on page 10
Enabling the auto dialer service
1. Go to Auto Dialer >Setting > Setting.
2. Click Enable service.
3. Set Maximum channel to the maximum number of contacts that can be dialed at the same time.
4. Click Apply.
Adding contacts
1. Go to Auto Dialer >Contact > Contact and clickNew.
2. Enter the contact's Name and their Main number, and any other family, business, and emergency settings as
required by expanding the corresponding menus.
3. Click Create.
4. To Import (and Export) multiple contacts at once, select CSV or vCard.
FortiVoice 7.0.2 Cookbook 9
Fortinet Inc.

Auto dialer
Configuring an audio message
An audio message for an auto dialer campaign can either be uploaded or recorded.
Before you begin
Make sure to upload an audio file that meets the following requirements:
l
WAVE (.wav)in PCMformat or MP3
l
File size is 10 MB or less
To upload an audio message
1. Go to Auto Dialer >Campaign > Audio and clickNew.
2. Enter a File name for the audio message.
3. Click Upload.
4. Locate the audio file to upload and click Open.
5. Click Create.
To record a new phone message:
1. Go to Auto Dialer >Campaign > Audio.
2. Click New.
3. Click Record to record a new message by phone.
4. Set Send record call to your extension. Answer the call and record your message, then click OK. Follow the audio
prompts to complete the recording.
5. If you want to retain a copy of the WAVE file after you complete the recording, click Download.
6. Click Create.
Configuring the auto dialer campaign
1. Go to Auto Dialer >Campaign > Campaign and click New.
2. Enter a Name and a Caller ID for the campaign to be displayed on called phones.
3. Set Sound file to the audio message from Configuring an audio message on page 10.
4. Set Retry to the number of times you want the auto dialer to retry calling the client if the call is missed.
5. Under External Numbers, click in the field and select the external phone numbers to add them to the campaign.
6. Under Internal Numbers, click in the field and select any internal extensions from your local network to be added to
the campaign.
7. Click Create.
Starting an auto dialer campaign
To broadcast a recorded message to the dialed phone numbers, start an auto dialer campaign.
1. Go to Auto Dialer >Campaign > Campaign.
2. In the campaign list, select a campaign that has a status other than Completed.
FortiVoice 7.0.2 Cookbook 10
Fortinet Inc.

Auto dialer
3. Click Start.
4. Select a start and end time.
5. Click OK.
FortiVoice 7.0.2 Cookbook 11
Fortinet Inc.

Call center
This section includes the following recipes:
l
Call center setup on page 12
l
Skill-based routing on page 18
Call center setup
Callers may outnumber available agents, often forcing a caller to call back repeatedly to reach an available agent.
Thankfully, FortiVoice queues multiple incoming calls and can prioritize them.
This recipe guides you through the process of creating a call queue to handle large volumes of incoming calls and then
set up the appropriate department to handle the calls.
This recipe includes the following tasks:
l
Creating a call queue on page 12
l
Configuring extension departments on page 14
l
Creating a department administrator profile and account on page 15
Creating a call queue
Call queues establish the order in which incoming calls are placed when an agent is unavailable.
1. Go to Call Center >Call Queue >Call Queue and click New.
2. Make sure to select Enabled.
3. Enter a QueueID for the queue.
4. Enter an available extension Number for callers to dial and enter into a call queue following the extension number
pattern.
5. Enter a Display name.
6. Enter a brief Description.
7. Leave Department set to None, as you will configure one and add it to the queue later. See Configuring extension
departments on page 14.
Queue setting
1. Under Queue Setting, set Maximum queue capacity to the maximum number of callers the queue can handle.
2. Set a Maximum queuing time in minutes and Ring duration in seconds.
FortiVoice 7.0.2 Cookbook 12
Fortinet Inc.

Call center
3. Select the Music on hold audio file you want for the call queue.
Call distribution
1. Under Call distribution, determine whether calls in the call queue will be subjected to Skill Based Routing,
whereby calls are routed depending on the operator's skill. For more information, see Skill-based routing on page
18.
Note that skill-based routing can be configured along with a distribution policy, in which case the distribution policy
will only take effect when you have more than one agent with the same skill level in a queue.
2. Set Distribution policy to one of the following:
l
Ring all: Dials all available agents.
l
Round Robin: Dials all agents in order from top to bottom and then bottom to top.
l
Sequential: Dials each agent in a sequential manner.
l
Random: Dials an agent at random.
l
Least Recent: Dials the agent that least recently received a call.
l
Fewest Calls: Dials the agent that has completed the fewest calls in this queue.
l
Weight Random: Dials a random agent, but uses the agent’s penalties as a weight.
l
Priority Based: Dials agents based on the agents’ rated ability to handle calls in that call center.
Additional setting
Under Additional Setting, you can configure a variety of options, including the following:
l
Distinctive Setting for Agent: In some cases, one agent may need to handle calls from multiple queues, and
needs to be able to distinguish between queues when they receive the calls. Use this setting to define an audio
message that announces the queue name, and control how the caller's ID is displayed.
l
Business Schedule: Determine when agents are available to answer calls.
l
Announcement to Caller: Determine whether callers will be told where they are in a queue, and control how often
those announcements are made.
l
Service Level: Determine how often the FortiVoice unit checks to see whether the queue service level threshold is
reached.
l
Alert: Determine what events will trigger an alert, such as queue overflow and agent unavailability, and control how
alert notifications will be sent to the appropriate contact.
FortiVoice 7.0.2 Cookbook 13
Fortinet Inc.

Call center
l
Callback Setting: Allow callers waiting in a queue to request a callback. The system can callback automatically
when an agent becomes available or the agent can manually call the caller.
l
Survey Settings: Define how the system collects customer feedback.
l
Call classifications: Enter custom call label names, such as external, or company A, to classify calls and enable
call center agents to easily generate reports against those classifications. When an agent finishes a call, they
receive a pop-up window where they can choose and apply the classification.
Agent
1. Under Agent, set Agent type to either Dynamic or Static. Dynamic agents are required to log in to the queue,
while static agents are always connected to the queue.
2. If you have selected the Dynamic agent type, set Auto-logout time to the duration of time agents have before they
are logged out of the queue. Additionally, enable or disable Logout all agents after scheduled business hour for
dynamic agents.
3. Set Wrap up time to the duration of time in seconds needed by agents to complete a queue call. Similarly, enable
Wrap up outgoing call to apply the same time constraint for agents to make and finish any outgoing customer
calls.
4. Enable Call waiting to display caller information on the agent’s phone when a queue call comes in while the agent
is already on the phone. The agent can choose to answer the call or not. If the agent does not answer the call, after
the ring duration is due, the call is transferred to the next agent.
Call handling
1. Under Call handling, set When no logged-in agent to either Queue Caller or Do Not Queue. For example, if
there are no agents available, you may set this option to Do Not Queue, in which case any incoming calls will be
handled by your general call handling configuration, such as the auto attendant.
2. Optionally configure additional scheduled and non-scheduled business hour call handling options.
3. Click Create.
Configuring extension departments
After creating the call queue, you can configure an extension department with appropriate members, managers, and the
call queue itself. The department can be helpful for management and reporting purposes.
1. Go to Extension >Group > Department and clickNew.
2. Enter a Name for the department.
3. Under Call Center, click in the field and select the Member extensions you want to be members of the department.
FortiVoice 7.0.2 Cookbook 14
Fortinet Inc.

Call center
4. Similarly, select the Manager extensions you want to be managers of the department.
5. Select the newly created call Queue.
6. Click Create.
Creating a department administrator profile and account
After creating a department, you can also create a department FortiVoice administrator profile and account and decide
which departments you want this administrator to manage.
To create an admin profile for the department FortiVoice administrator
1.
Go to System > Administrator > Admin Profile.
2.
Click New.
3.
Enter a descriptive Profile name.
4.
In the Access Control list, go to both Call center settings and Extension and enable the Read-Write privilege.
In the FortiVoice GUI, the department FortiVoice administrator can access the Extension
>Extension and Group menus only regardless of the selected privileges in the Access
Control list.
FortiVoice 7.0.2 Cookbook 15
Fortinet Inc.

Call center
5.
Click Create.
To create a department FortiVoice administrator account
1. Go to System > Administrator > Administrator.
2. Click New.
3. Fill in the fields, as necessary. Here are details for the mandatory ones:
a. Enter a descriptive Administrator name for this account. The name can contain numbers (0-9), uppercase and
lowercase letters (A-Z, a-z), hyphens (- ), and underscores (_ ). Other special characters and spaces are not
allowed.
b. Select the Admin profile.
c. Enter the administrator's Email address.
d. Add a New password and Confirm password.
e. Enable Department only.
f. Expand the Departments section.
FortiVoice 7.0.2 Cookbook 16
Fortinet Inc.

Call center
g. Click + and then select one or more departments for the administrator to manage.
h. Click Close.
4. Click Create.
To log in to the department FortiVoice administrator account
1. Log in to the department FortiVoice administrator account using the name and password associated with the
account.
2. FortiVoice displays the Extension and Group menus that the department FortiVoice administrator account can
manage.
Here is an example:
3.
For more details about Extension and Group menus, see the Configuring extensions section in the FortiVoice
Phone System Administration Guide.
FortiVoice 7.0.2 Cookbook 17
Fortinet Inc.

Call center
Skill-based routing
When a customer dials an organization’s support line they are commonly greeted with an automated attendant that
transfers the customer’s call to a specific department based on the number the customer selects.
This recipe guides you through the process of configuring FortiVoice to transfer customer calls to the most qualified
agent.
Skill-based routing requires that you have completed the configuration of the call center, extension, and virtual number
features.
This recipe includes the following tasks:
1. Creating skill sets on page 18
2. Configuring skill levels on page 18
3. Assigning a skill level to an extension on page 19
4. Configuring the call queue on page 20
5. Configuring call handling on page 21
Creating skill sets
Establish varying skill sets for each department. For example, a skill set is created for the Sales department.
1. On FortiVoice, go to Call Center >Configuration >Skill Set and click New.
2. Enter a Name and Description for the Sales department, and click Create.
Configuring skill levels
After you have created the skill sets, define the individual skill levels.
1. Go to Call Center >Configuration >Skill Level. The FortiVoice already has a pre-defined list of skill levels,
showing varying degrees of skill-progression from junior through intermediate to senior.
2. Either create your own levels by clicking New, edit, or use the default levels.
For the purpose of this recipe, default levels will be used.
FortiVoice 7.0.2 Cookbook 18
Fortinet Inc.

Call center
Assigning a skill level to an extension
Assign a skill level to each agent.
1. Go to Extension >Extension >IPExtension.
2. Select an agent's extension and click Edit (in the example, Donna).
3. Enable Call Center. A prompt appears stating that you must save the configuration before configuring the call
center profile of the extension.
4. Click OK, edit the profile again, and click Call Center.
5. Set Agent profile to agent.
6. Under Skill Sets, click New.
FortiVoice 7.0.2 Cookbook 19
Fortinet Inc.
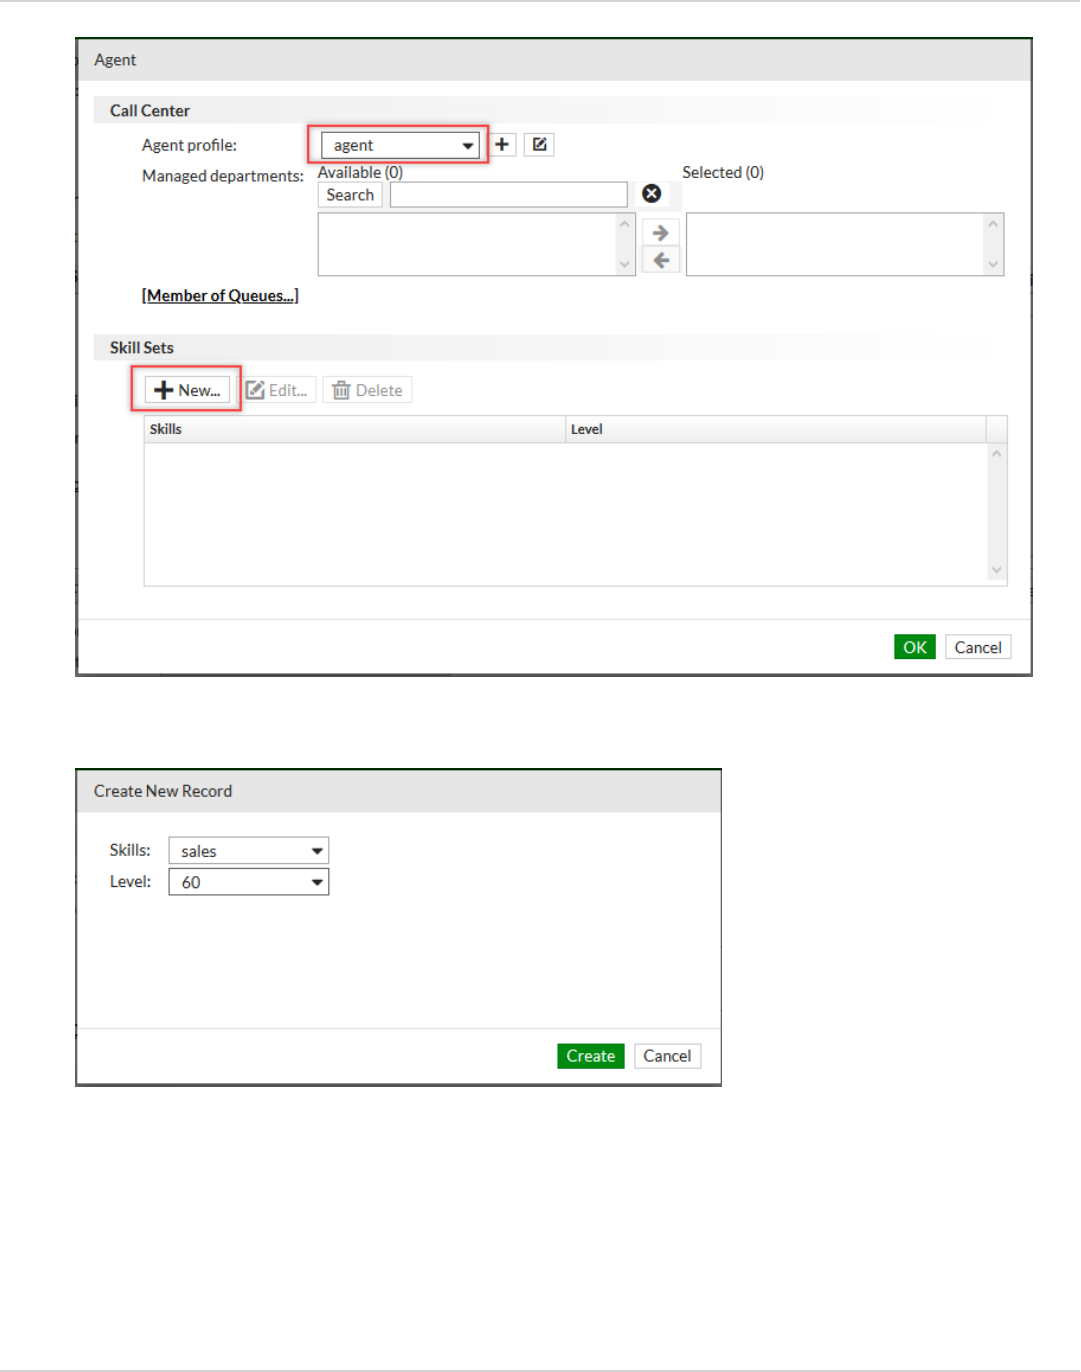
Call center
7. Set Skills to Sales, and set the Level accordingly. In this example, Donna is being assigned to the Sales skill set,
and assigned a skill level of 60; a strong intermediate level.
8. Click Create.
9. To complete the call center settings, click OK.
10. To finish configuring the agentIP extension, click OK.
11. Repeat the same steps for your other agents, assigning the appropriate skill level where applicable.
Configuring the call queue
Calls are routed to different call queues depending on the set skills.
FortiVoice 7.0.2 Cookbook 20
Fortinet Inc.

Call center
1. Go to Call Center >Call Queue >Call Queue and click New.
2. Under Call Distribution, set Skill Based Routing to one of the following:
l
Lowest Level First: The call transfers to the agent with the lowest skill level score first and then moves up
the ranks to the first available agent.
l
Highest Level First: The call transfers to the agent with the highest skill level score first and then moves
down in rank to the first available agent.
3. Set Default skill to the defined skill set (Sales), meaning only agents from the Sales department will pick up calls
from the queue.
4. Select a Distribution policy from the drop-down menu. In this example, Round Robin is selected, whereby all
agents in the queue will be equally called from the top to the bottom of the list and so on.
5. Under Agent, click Agent Members.
6. Select all agents that you want to be assigned to the call queue and click OK.
7. Click Create.
Configuring call handling
After establishing skill-based routing, configure call handling for virtual numbers. Skill-based call handling helps to
associate (tag) an incoming call with a specific skill set to distribute a call among agents with that specific skill set.
You need to define two actions:
l
An action to tag the call with a skill to process the call as a skill-based call.
l
An action to route the call to the queue where the agents with configured skill levels are assigned the appropriate
calls.
1. Go to Extension >Virtual Number >Virtual Number and click New.
2. Enter a Name and an unassigned Number.
FortiVoice 7.0.2 Cookbook 21
Fortinet Inc.

Call center
3. Under Call Handling, click New.
4. Set an appropriate Schedule, and set Action to Call Queue Skill Tag.
5. Click OK.
6. Click New again.
7. Set the Schedule, and set Action to Call Queue.
8. Assign the newly created Call queue from the drop-down menu.
9. Click OK. Your virtual number call handling should look similar to the example below.
10. Click Create.
FortiVoice 7.0.2 Cookbook 22
Fortinet Inc.

Call features
This section includes information about the following call features:
l
Auto attendant on page 23
l
Call parking on page 25
l
Conference calls on page 37
l
Call recording on page 29
l
Faxes on page 45
Auto attendant
What if you need FortiVoice to answer calls and direct users to various departments within your office? An auto attendant
can answer calls with a prerecorded message and then guide the user to the department they desire with a simple press
of a button.
This recipe guides you through the process of configuring auto attendants, exploring the user options, and establishing
how a caller navigates through the auto attendant.
This recipe includes the following tasks:
l
Configuring the auto attendant on page 23
l
Configuring key actions on page 23
l
Configuring advanced settings (optional) on page 25
Configuring the auto attendant
1. Go to Call Feature > Auto Attendant >Auto Attendant and click New.
2. Enter a Name and set the Default language.
3. Select a Greeting mode, and select the desired sound file for the Greeting.
4. Enter the amount of time that the phone will ring before being answered, and the time out and invalid input settings.
5. Before you click Create, configure the dial pad key action settings in Configuring key actions on page 23.
Configuring key actions
Configure the auto attendant keys for callers to use when navigating through the auto attendant hierarchy.
FortiVoice 7.0.2 Cookbook 23
Fortinet Inc.

Call features
1. In Call Feature > Auto Attendant >Auto Attendant, go to Dial Pad Key Action, click New.
2. Map keys with the appropriate Language and Action, and any additional settings according to the action selected.
3. Click Create.
In the following example, the Dial Pad Key Action section shows number 2 key assigned to the technical support
call queue.
Additional advanced settings can be optionally configured in Configuring advanced settings (optional) on page 25.
FortiVoice 7.0.2 Cookbook 24
Fortinet Inc.

Call features
Configuring advanced settings (optional)
1. In Call Feature > Auto Attendant >Auto Attendant, expand the Advanced tab.
2. Enable Access voicemail, if required, to allow external callers to reach their voicemail boxes by dialing their
voicemail prompt code. Dial local number should already be enabled by default, allowing external callers to dial
local extensions.
3. Disable Dial local number if you do not want callers to be able to dial extensions directly. This forces users to use
the Dial Pad Key Actions only – used in many call centers.
4. Enable Override schedule, if required, to allow an administrator with the privilege to dial a code followed by the
administrator PIN to replace the original schedule with a system schedule.
5. Enable Call bridge (DISA), if required, and select an account. This allows external users to dial into the FortiVoice
device and use the FortiVoice service like a local extension.
6. If Call bridge (DISA) is enabled, select the outbound dial plan for users to make outbound calls using FortiVoice.
7. Click Create.
Call parking
Sometimes active calls at extensions are put on hold within the FortiVoice phone system for other extensions to pick up.
This process is called parking. FortiVoice features the ability to easily park calls, unpark calls, and monitor parking slots
on FortiFone devices with programmable keys. Monitored parking slots can easily unpark calls by simply pressing the
programmable key. Calls can also be parked by using the call park feature code, which is useful for FortiFone devices
without programmable keys.
The following recipe covers specific tips to program and use call parking on FortiVoice and FortiFone devices:
l
Configuring call parking settings on page 25
l
Configuring call parking on programmable phone keys on page 26
l
Using call parking on page 28
Configuring call parking settings
First, call parking must be configured on FortiVoice. It is recommended to keep the numbering scheme separate from the
extension number scheme, keeping it unique to call parking. By default, the FortiVoice reserves 300 to 320 for call
parking. This can be broken down as follows:
FortiVoice 7.0.2 Cookbook 25
Fortinet Inc.

Call features
l
300: Number reserved to park a call in the first available slot.
l
301-320: Numbers reserved as call park slots.
For more information on how to use these number schemes, see Using call parking on page 28.
1. Go to Call Feature > Call Parking >Call Parking.
2. Set Park call number to the number used to park calls automatically to the first available call park slot.
3. Set Park line start and Park line end to define the total range of call park slots.
4. Set Parking timeout to the amount of time in seconds that the call will remain parked. After this timeout is reached,
the parked call is returned to the extension that had parked it.
5. Select the desired hold music from the Music on hold drop-down menu, and click Apply.
Configuring call parking on programmable phone keys
FortiFone devices that support programmable phone keys can be configured with one touch call parking. There are two
types of call park programmable phone keys:
l
Park: Places the call into the first available call park slot.
l
Park appearance: Monitors the selected call park slots, informing the user if there is a call parked. It may also be
used to park a call in the specified call park slot if it is not already in use.
FortiVoice 7.0.2 Cookbook 26
Fortinet Inc.

Call features
Configuring automatic parking
1. Go to Phone System >Profile > Programmable Keys.
2. Select a FortiFone profile and click Edit.
3. Go to the table and select which Option (programmable key) you want to edit. Under Mode, select Admin.
4. In Function, select Park.
5. Resource stays blank.
6. In Label, you can keep the default label (Auto park) or edit the label. The label will show beside the programmable
key on the FortiFone device.
7. Click OK.
8. FortiVoice needs to update all phones that are using this phone profile. Go to System > Maintenance > Phone
Maintenance Job to schedule a configuration update. For more details, see Maintaining phones on page 75.
FortiVoice 7.0.2 Cookbook 27
Fortinet Inc.

Call features
Configuring park appearance
1. Go to Phone System >Profile > Programmable Keys.
2. Select a FortiFone profile and click Edit.
3. Go to the table and select which Option (programmable key) you want to edit. In the example, we are editing Option
4.
4. In Mode, select Admin.
5. In Function, select Park Appearance.
6. In Resource, select the call park slot that you want to monitor.
7. In Label, you can keep the default label (in the example, Slot301) or edit the label. The label will show beside the
programmable key on the FortiFone device.
8. Click OK.
9. Repeat the steps for as many call park slots that you want to monitor.
10. FortiVoice needs to update all phones that are using this phone profile. Go to System > Maintenance > Phone
Maintenance Job to schedule a configuration update. For more details, see Maintaining phones on page 75.
Using call parking
You can park a call in the following ways:
l
Call park feature code
l
Programmable phone key with park
l
Programmable phone key with park appearance
All FortiFone models support the feature code method.
FortiVoice 7.0.2 Cookbook 28
Fortinet Inc.

Call features
Feature code
1. While on a call, dial *40.
The call is now parked. The extension will be notified of the call park slot number.
2. To retrieve the parked call from any extension, dial the call park slot number.
Programmable key with park
1. While on a call, press the Park programmable phone key on the FortiFone device.
FortiVoice will indicate the call park slot the call has been placed in (for example, 301).
2. To retrieve the parked call from any extension, dial the call park slot number.
Programmable key with park appearance
1. While on a call, press the Park appearance programmable phone key on the FortiFone device.
The call is now parked.
2. To retrieve the parked call, press the Park appearance programmable phone key again or dial the call park slot
number.
When using call park, keep in mind the following:
l
The feature code and programmable phone key park methods will place the call in the first available call park slot.
l
Programmable phone keys with park appearance will indicate if a call is parked. Press the key to retrieve the call.
l
Programmable phone keys with park appearance may be used to park calls, only if the key is not already in use.
Call recording
FortiVoice allows you to monitor and supervise incoming and outgoing calls, but you can also record calls, allowing you
to have a permanent record of particularly important phone calls.
For details about configuring call recordings and archiving recorded calls, see the FortiVoice Phone System
Administration Guide.
This section included the following recipes:
l
Recording a phone call on page 29
l
Managing recorded phone calls on page 30
l
Managing the access to phone call recordings on page 31
Recording a phone call
With FortiVoice, the following two types of phone call recordings are available:
l
Personal recording:You can access your phone call recordings from the FortiVoice user portal.
l
System recording:With the administrator privilege, you can access phone call recordings from the FortiVoice GUI.
FortiVoice 7.0.2 Cookbook 29
Fortinet Inc.

Call features
Prerequisites
l
To allow an extension to perform a call recording: Make sure to apply a user privilege with the personal
recording or system recording option enabled, as applicable, to that extension. To enable recording options, the
FortiVoice system administrator can go to Phone System > Profile > User Privilege and then
Monitor/Recording.
l
To view codes: Personal and system recording procedures in this section use the default feature codes for
recording phone calls. To view or edit those codes, the FortiVoice system administrator can go to Call Feature >
Feature Code > Mid-Call/DTMF Code.
Before recording a phone call, have the agreement of the person you are talking with or check
your local laws regarding phone recording.
For a personal recording
1. During a phone call, start the personal recording by pressing *30.
2. To pause the personal recording, press *31. To resume the recording, press *30 again.
The recording continues until you hang up.
For a system recording
1. During a phone call, start the system recording by pressing *35.
l
To pause the system recording, press *36.
l
To resume the system recording, press *37.
l
To cancel the system recording, press *38.
The recording ends when you hang up.
Managing recorded phone calls
The section explains how to listen, delete, and download personal and system recordings.
Prerequisites
l
To allow an extension to access a personal call recording from the FortiVoice user portal:Make sure to
apply a user privilege with the call recording option enabled to that extension. To enable the call recording option on
the FortiVoice user portal, the FortiVoice system administrator can go to Phone System > Profile > User
Privilege and then User Portal.
For a personal recording
1. Log in to the FortiVoice user portal.
2. Go to Call Recording.
3. Perform one of the following actions:
l
To listen to the recorded phone call, click .
l
To remove the recorded phone call, click Delete. To confirm the deletion, click Yes.
FortiVoice 7.0.2 Cookbook 30
Fortinet Inc.

Call features
l
To send the recorded phone call to another extension, click Forward. Select the extension and click OK.
When you download multiple recorded phone calls at the same time, they are saved in
the TGZ file format. To decompress and extract the recorded phone calls from this file,
use a third-party tool that supports the TGZ file format.
l
To save the recorded phone call (WAV file format), click Download. Select to save the file and click OK.
For a system recording
1. Log in to the FortiVoice GUI.
2. Select Monitor > Storage > Recorded Call.
3. Double-click a call record folder to open the archived call files.
4. Select a Recording type.
l
Conference refers to calls recorded by phone number that are conference call numbers. For information on
configuring conference call recording, see Recording a conference call on page 42.
l
System refers to all other type of calls recorded.
5. Select a recorded call and perform one of the actions:
l
To listen to the recorded phone call, click Play.
l
To search specific recorded calls, click Search, then New, enter the search values, and click Create. When the
search result status changes to Done, select the result and click View Search Result. All recorded calls are
listed. You can double-click a call recording and select to play or download it.
l
To remove the recorded phone call, click Delete. To confirm the deletion, click Delete.
When you download multiple recorded phone calls at the same time, they are saved in
the TGZ file format. To decompress and extract the recorded phone calls from this file,
use a third-party tool that supports the TGZ file format.
l
To save one or more recorded phone call (WAV file format), click Download >Selected Files or click
Download >All. Select to save the file and click OK.
Managing the access to phone call recordings
Your company has multiple departments but you want to allow department administrators or managers to access phone
call recordings associated with their department only.
This recipe includes the following tasks:
1. Creating a department on page 32
2. Assigning a department to extensions on page 32
3. Configuring a department administrator profile on page 33
4. Configuring a department administrator account on page 34
5. Creating a call recording policy on page 35
6. Verifying the recorded call storage for the department administrator account on page 36
Before you begin
In this recipe, you edit an existing extension. For more details about creating an IP extension, see Configuring extension
settings on page 68.
FortiVoice 7.0.2 Cookbook 31
Fortinet Inc.

Call features
Creating a department
Create a department that you want an administrator to manage. You will associate extensions to this department in the
next task.
1. Go to Extension > Group > Department.
2. Click New.
3. Enter a Name for this department. For example, SalesOttawa.
4. You can optionally enter any notes in Comments.
5. Click Create.
Assigning a department to extensions
Access extensions to assign them a department.
1. To edit a single extension:
a. Go to Extension >Extension >IPExtension.
b. Double-click the extension that you want to edit.
c. Under User Setting, select the Department. For example, SalesOttawa.
d. Click OK.
FortiVoice 7.0.2 Cookbook 32
Fortinet Inc.

Call features
2. To edit multiple extensions at the same time:
a. Go to Extension >Extension >IPExtension
b. Select Actions > Batch Edit.
c. Select the extensions and click Next.
d. In Management, enable Department, and select a department.
e. Click Next.
f. Review the details.
g. To confirm the changes, click Apply.
h. Click Close.
Configuring a department administrator profile
Create an administrator profile and decide which privileges related to call recordings you want to give to a department
administrator.
1.
Go to System > Administrator > Admin Profile.
2.
Click New.
3.
Enter a descriptive Profile name. For example, CallRecording.
FortiVoice 7.0.2 Cookbook 33
Fortinet Inc.

Call features
4. In the Access Control list, go to both Call recording and Storage Recorded Calls.
5. Decide the access that you want to give to the admin (Read Only or Read-Write).
6. Click Create.
Configuring a department administrator account
Configure an administrator account and decide which departments you want this administrator to manage.
To create a department FortiVoice administrator account
1. Go to System > Administrator > Administrator.
2. Click New.
3. Fill in the fields, as necessary. Here are details for the mandatory ones:
a. Enter a descriptive Administrator name for this account. The name can contain numbers (0-9), uppercase and
lowercase letters (A-Z, a-z), hyphens (- ), and underscores (_ ). Other special characters and spaces are not
allowed. For example, SalesAdminOttawa.
b. Enter the administrator's Email address.
c. Select an Associate extension.
d. Select the Admin profile.
e. Add a New password and Confirm password.
f. Enable Department only.
g. Expand the Departments section.
FortiVoice 7.0.2 Cookbook 34
Fortinet Inc.

Call features
h. Click + and then select one or more departments for the administrator to manage.
i. Click Close.
4. Click Create.
Creating a call recording policy
By creating a call recording policy, you allow the FortiVoice phone system to record all department calls matching this
policy.
1. Go to Call Feature > Call Recording > Policy.
2. Click New.
FortiVoice 7.0.2 Cookbook 35
Fortinet Inc.

Call features
3. Configure the following:
GUI field Description
Enabled Select to activate this configuration.
Name Enter a name for this configuration.
Description Select By Department.
Department Select the extension department of which you want to record the calls.
Record ratio 1. Set the record ratio at 50.
2. With a system that has no recorded calls, you are at 0% of recorded calls.
The system records the first call. With the first call recorded, the record
ratio is now at 100%.
3. To reach the 50% record ratio, the system will not record the second call.
4. With the record ratio at 50%, the system does not record the third call and
the record ratio drops below 50%.
5. With the record ratio below 50%, the system records the fourth call to
achieve the 50% ratio again.
To summarize this example scenario, the system has received 4 calls and
recorded 2 calls to achieve the recorded ratio of 50%.
The following settings can have an effect on the recorded call storage:
l
Retention duration
l
Recorded calls archive (Call Feature > Call Recording > Archive)
l
Recorded file format (Call Feature > Call Recording > Setting)
Retention duration Enter the days for which you want to keep the recordings.
File name format Select the format of the downloaded recorded call files generated under this
policy.
The file format is useful when you filter downloaded recorded call files in
Monitor > Storage.
4. Click Create.
Verifying the recorded call storage for the department administrator account
Verify that the department administrator account can access recorded calls for its department only.
1. Log in to the FortiVoice GUI using the credentials of the department administrator account.
2. Make sure that the GUI shows the Recorded Call tab and that you can access the recorded calls in the available
FortiVoice 7.0.2 Cookbook 36
Fortinet Inc.

Call features
folders.
Conference calls
FortiVoice features conference calling, allowing multiple clients to join a live group discussion.
There are three kinds of conference call instances:
l
User Conferencing: Administrators provide the ability for users to create and schedule conferences through the
FortiVoice user portal. Users can add attendees to the conference in order to get an email invite with the information
regarding the conference.
l
Static Conference: Administrators create rooms for conference that can be used based upon schedule profile
(office hours, anytime, and so on) or only available for a specific date and time. These conferences are the most
restrictive. To avoid conflicts administrators would need to create multiple rooms.
l
Dynamic Conference: Administrators create a room, and then can create unique conference events based upon
time and dates required. These events will have unique conference IDs limiting conflicts in participants. Similar to
user conferencing attendees can receive email invites with the call details for the conferences.
This section includes the following recipes:
l
Configuring user conferencing on page 37
l
Scheduling a user conference on page 38
l
Viewing upcoming user conferences on page 39
l
Configuring administrator conferencing on page 40
l
Recording a conference call on page 42
Configuring user conferencing
1. Go to Call Feature > Conferencing >User Conferencing and click Enabled.
2. Set Number to the extension number that is mapped to the external number that callers can use to dial to join the
conference call.
3. Under Users, click New to add extensions users who have the privilege to organize conference calls.
FortiVoice 7.0.2 Cookbook 37
Fortinet Inc.

Call features
4. Select the User from the drop-down list.
5. For Conference ID, enter a code or generate one by clicking Generate.
6. Select OK, and select Apply to finish the User Conferencing configuration.
Scheduling a user conference
Access the FortiVoice user portal to schedule a user conference and invite attendees.
1. Open a web browser and go to https://<IP_address_or_FQDN>/voice.
where <IP_address_or_FQDN> is the IP address or the FQDN of the FortiVoice phone system.
If the FortiVoice system administrator has changed the access port, then you must also include the port, for
example:
https://<IP_address_or_FQDN>:446/voice
2. Log in as the user that has been added to the list of extensions. Our example is using 8601.
3. After you are logged in, click on Conference.
A new window opens to a calendar view, where the user can schedule upcoming conference calls.
FortiVoice 7.0.2 Cookbook 38
Fortinet Inc.

Call features
4. Click New or the date you wish to schedule the conference for.
5. Fill in the details for this meeting.
6. Make note of the Attendee PIN. Attendees invited to the conference call will need this PIN.
7. Make note of the Organizer PIN. You will need this PIN to start the meeting.
8. In Attendee, click Add Attendee.
9. Enter the Email address of the attendee you wish to invite to the conference call, with an optional Display name.
Click Create.
10. Add any additional attendees you wish to invite.
11. To finish the scheduling of the conference call, click OK.
Upon clicking OK, all invited attendees will receive an email invitation to the conference call, with all the relevant
information they need to attend the conference call.
Viewing upcoming user conferences
As an administrator, you can view upcoming conferences.
1. Go to Call Feature > Conferencing >User Conferencing.
2. Click View Scheduled Conferences.
FortiVoice 7.0.2 Cookbook 39
Fortinet Inc.

Call features
Configuring administrator conferencing
Both Static and Dynamic administrator conferences can be configured.
Configuring a static conference call
1. Go to Call Feature > Conferencing >Admin Conferencing and click New.
2. Set Mode to Static, enter aName, and set to Enabled (if not already activated).
3. Enter an extension Number that callers can dial to join the conference call.
4. Under Setting, enter a Display name for the conference call, and an optional Description.
5. Enter a Attendee PIN, which is the password users must enter to join the conference call.
Callers need to dial the conference number and then enter their PIN.
6. Enter an Organizer PIN, which is the password an administrator must use to begin the conference call.
7. To configure a recurring frequency for this static conference call, enable Recursive Schedules and click New.
FortiVoice 7.0.2 Cookbook 40
Fortinet Inc.

Call features
8. Assign an appropriate Schedule from the drop-down list, and enter a Password. Then click Create. This recursive
schedule will make sure that users can only join the conference call during the scheduled time period by entering
the configured password.
9. Alternatively, enable One Time Schedules and click New to schedule a single conference call.
10. Click Create.
Configuring a dynamic conference call
1. Go to Call Feature > Conferencing >Admin Conferencing and click New.
2. Set Mode to Dynamic, enter aName, and set to Enabled (if not already activated).
3. Enter an extension Number that callers can dial to join the conference call.
4. Under Setting, enter a Display name for the conference call, and an optional Description.
5. Click Create.
6. Select your newly created conference call and click Edit.
7. Click View Scheduled Conferences to show the calendar view.
FortiVoice 7.0.2 Cookbook 41
Fortinet Inc.

Call features
8. To schedule conference calls, click the desired date.
Recording a conference call
You can create a policy to record a conference call based on a phone number. With this policy, all conference calls using
the phone number in the policy are recorded and will show under Monitor > Storage > Recorded Call.
FortiVoice 7.0.2 Cookbook 42
Fortinet Inc.

Call features
To configure a conference call recording policy
1. Go to Call Feature> Call Recording > Policy.
2. Click New.
GUI field Description
Recording Policy
Enabled Select to activate this configuration.
Name Enter a name for this configuration.
Description Select By Phone Number to record conference
calls based on a phone number.
Caller number pattern Leave this field empty and all calls to the conference
will be recorded.
Dialed number pattern Enter the conference call number.
The phone calls to this number will be recorded.
Record ratio 1. Set the record ratio at 50.
2. With a system that has no recorded calls, you
are at 0% of recorded calls. The system records
the first call. With the first call recorded, the
record ratio is now at 100%.
3. To reach the 50% record ratio, the system will
not record the second call.
4. With the record ratio at 50%, the system does
not record the third call and the record ratio
drops below 50%.
5. With the record ratio below 50%, the system
records the fourth call to achieve the 50% ratio
again.
FortiVoice 7.0.2 Cookbook 43
Fortinet Inc.
Call features
GUI field Description
To summarize this example scenario, the
system has received 4 calls and recorded 2
calls to achieve the recorded ratio of 50%.
The following settings can have an effect on the
recorded call storage:
l
Retention duration
l
Recorded calls archive (Call Feature > Call
Recording > Archive)
l
Recorded file format (Call Feature > Call
Recording > Setting)
Retention duration Enter the days for which you want to keep the
recordings.
File name format Select the format of the downloaded recorded call
files generated under this policy.
The file format is useful when you filter downloaded
recorded call files in Monitor > Storage >
Recorded Call.
3. Click Create.
To search your recorded calls
1. Go to Monitor > Storage > Recorded Call.
2. Click Search, then New.
3. Under Recording type, select Conference.
FortiVoice 7.0.2 Cookbook 44
Fortinet Inc.

Call features
4. Enter the search values, and click Create.
5. When the search result status changes to Done, select the result and click View Search Result.
All recorded conference calls are listed. You can double-click a call recording and select to play or download it.
Faxes
FortiVoice can send and receive faxes to the FortiVoice user portal, email, and physical fax machines. This recipe guides
you through the process of configuring the FortiVoice unit to receive and send faxes.
This section includes the following recipes:
l
Configuring FortiVoice to receive faxes on page 45
l
Configuring FortiVoice to send faxes on page 46
Configuring FortiVoice to receive faxes
1. Go to Call Feature > Fax >eFax Account and click New.
2. Under Incoming Fax Setting, make sure that Enabled is selected.
3. Enter a Name and an extension Number.
4. Enter a Display name for the extension.
5. Under External Numbers, click New.
6. Map the direct inward dialing (DID) numbers to the extension of the fax. Select the Incoming trunk used for dialing
the DID numbers, and enter the DID Numbers that you want to map to an extension.
All DID numbers assigned here will reach this extension for incoming faxes.
7. Click Create.
8. Under Select Fax Monitors, click in the field and assign the extensions that can monitor the faxes received on this
fax extension in their FortiVoice user portal. From their FortiVoice user portal, users can choose to view, delete,
resend, forward, or download the faxes. These users, who have email addresses linked to their extensions, will
receive an email notification when a fax is received.
9. Set Fax to Email to the email addresses you want to receive the faxes sent to this fax extension. These email
addresses will receive the faxes in a PDF file.
10. If required, under Relay to Fax Machine, assign the fax machines connected to the FortiVoice unit using T.38
adapters. Faxes will be relayed to the selected machines.
11. Under Archive, enable Fax archive to activate fax archiving and enter the File name format to archive, according
to the formats available from the drop-down menu.
12. Click Create.
Fax archive settings
If you have enabled Fax archive in an eFax Account, you should specify rotation and destination settings to archive
recorded calls.
1. Go to Call Feature > Fax >Archive.
2. Under Rotation Setting, set the Fax rotation size in MB and Fax rotation time in days. The FortiVoice unit starts
generating a new archive file when either one of these parameters (size or time) is reached first.
FortiVoice 7.0.2 Cookbook 45
Fortinet Inc.

Call features
3. Set Archiving options when disk quota is full to determine what the FortiVoice unit should do if it runs out of disk
space. Click Overwrite to remove the oldest archived folder to make space for new archives, or click Do Not
Overwrite to stop archiving.
4. Set a Schedule for archiving to take place. Archiving will not take place outside of the selected schedule.
5. Under Destination Setting, set Destination to either Local to use the hard drive of the FortiVoice unit or a NAS
server, or Remote to use a remoteFTP or SFTP storage server.
6. If Destination is set to Remote, configure the remote server options as necessary.
7. Click Apply.
Configuring FortiVoice to send faxes
1. Go to Call Feature > Fax >Sending Rule and click New.
2. Make sure that Enabled is selected.
3. Enter a Name.
4. Under Dialed Number Match, click New.
5. Enter a Match Pattern number. This is the extension number pattern in your dial plan that can match many different
numbers for sending faxes.
The following pattern matching syntax is supported, in order to match a wide range of potential numbers:
Syntax Description
X Matches any single digit from 0 to 9.
Z Matches any single digit from 1 to 9.
N Matches any single digit from 2 to 9.
[] Matches any digits in the brackets.
For a range of numbers, use a dash.
Example: [15-7].
In this example, the pattern matches 1, 5, 6, and 7.
. (period)
Acts as a wildcard that matches any digit and allows for any number of digits to be dialed.
Example of a pattern matching rule: XX.
In this example, the system looks for a dialed number match that has three or more digits.
! (exclamation point)
Acts as a wildcard that matches any digit (including no digits) and allows for any number of
digits to be dialed.
Example of a pattern matching rule: XX!
In this example, the system looks for a dialed number match that has two or more digits.
6. Enter any required Modification settings, such as stripping or appending prefixes or postfixes to the number
pattern, and click Create.
7. Under Call Handling, click New.
8. Set the appropriate Schedule, Action, and Outgoing trunk and/or Caller ID modification for your dial plan
requirements, to determine the call handling action for the numbers matching the configured number pattern.
9. Click Create, and Create again to finish configuring the Sending Rule.
FortiVoice 7.0.2 Cookbook 46
Fortinet Inc.

Call features
General fax settings
1. Go to Call Feature > Fax >Setting.
2. Enter a System station ID and System fax header that shows on each fax sent from the FortiVoice unit.
3. Under T.38 Fax, determine whether the FortiVoice unit will resend a T.38 invite if the remote end is unresponsive,
and whether the FortiVoice will fallback to G.711 mode if T.38 communication fails.
A T.38 fax requires significantly less bandwidth, and helps mitigate packet loss.
4. T.38 uses UDP Transport Layer (UDPTL) as its transport protocol. Enter the start and end ports.
5. Under Send Queue, set Max retry times to the maximum number of times the FortiVoice unit will attempt to resend
a fax if the fax is unable to be sent due to busy lines.
6. Set a Retry interval and Wait time for an answer to the duration of time in seconds that the FortiVoice unit will
wait between retries and the wait time for a "go-ahead" signal from the fax receiving terminal.
7. Click Apply.
FortiVoice 7.0.2 Cookbook 47
Fortinet Inc.

Extensions
This section includes the following topics:
l
Auxiliary phone and secondary account on page 48
l
Auto provisioning for FortiFone devices on different subnets on page 50
l
Caller IDmodification on page 54
l
FortiVoice Click-to-dial configuration on Google Chrome on page 61
l
Hot desking on page 65
l
Local IP extensions on page 68
l
Remote extension configuration on page 74
l
Managing a large number of extensions on page 74
l
Ring group call handling on page 83
l
Filtering the phone directory on page 85
Auxiliary phone and secondary account
You can update an IPextension to enable and configure the following settings:
l
Auxiliary phone:When you add an auxiliary phone to your extension, you have two phones with the same
extension number. The phones will ring at the same time but you can only use one phone to answer the call. This
function is useful when you want to access the same extension from two different locations.
l
Secondary account: When you add a secondary account to your extension, you can set the secondary extension
to ring at the same time as your existing extension. However, the secondary extension operates separately. For
example, extension 100 sets extension 200 to be a secondary account. When a call comes in to extension 100, both
extensions (100 and 200) will ring and you can answer one of them. In that same example, if a call comes into
extension 200, only extension 200 will ring.
Adding an auxiliary phone
1. Go to Extension >Extension >IPExtension.
2. Double-click the extension that you want to add the auxiliary phone to.
FortiVoice 7.0.2 Cookbook 48
Fortinet Inc.

Extensions
3. In Device Setting, click the Auxiliary Phone tab.
4. Click New.
5. Select the Type from the Type drop-down menu.
6.
In Device, add a new phone or select an existing phone .
7. If you select an existing phone, make sure that it is not assigned.
8. Complete the configuration.
9. To complete the addition of the auxiliary phone, click Create.
10. To save the changes to IP extension, click OK.
FortiVoice 7.0.2 Cookbook 49
Fortinet Inc.

Extensions
Adding a secondary account
The secondary account setting is available when your extension is using a FortiFone phone,
not a generic phone.
1. Enable the secondary account setting:
a. Go to System > Advanced >Auto Provisioning.
b. In Other Setting, enable Secondary account.
c. Click Apply.
2. Add a secondary account to an extension:
a. Go to Extension >Extension >IPExtension.
b. Double-click the extension that you want to add the secondary account to.
c. In Device Setting, click Advanced.
d. Expand Secondary account.
e. In Account, select the extension that you want to add as the secondary account.
f. To save changes to the advanced settings, click OK.
g. To save changes to the IP extension, click OK.
Auto provisioning for FortiFone devices on different subnets
When configuring FortiFone IP extensions on your FortiVoice system on a single LAN deployment, they will auto
discover utilizing SIP PnP, in which a multicast is sent out on the network.
For FortiFone devices on networks that use a different subnet than FortiVoice, the multicast will not make it across the
various subnets. In deployments using different subnets it is best to use HTTP or HTTPS with Option 66 configured on
your DHCP server.
FortiVoice 7.0.2 Cookbook 50
Fortinet Inc.

Extensions
The HTTP and HTTPS protocols increase the reliability of the FortiFone devices being able to auto provision across the
network. Option 66 set on the DHCP server creates an easy way to have all phones directed towards the FortiVoice in
order to auto provision.
This recipe covers the best practices for a large deployment of FortiFone devices with the FortiVoice system.
Downloading and editing the CSV file
1. On FortiVoice, go to Extension >Extension >IPExtension.
2. Under the Actions drop-down, select Export >Table Template (csv) >With User ID.
A sample file will be downloaded entitled extensions.csv.
3. Open the newly downloaded sample CSV file.
4. Replace the sample's content with the information for your extensions. Make sure to configure the following
sections: User ID, Extension, DisplayName, Phone Type, and MACAddress.
The Phone Type must be entered as “FortiFone-XXX”, where “XXX” is your model type (for example, FortiFone-570).
To see a current list of FortiFone models, go to Phone System >Profile > Phone.
The MACAddress sections must be populated as “xx:xx:xx:xx:xx:xx”. After you import the CSV file, FortiVoice
automatically formats the MAC address.
If a custom phone profile using the default settings is in use, the Phone profile section will also need to be configured.
Importing the CSV file
1. Go to Extension >Extension >IPExtension.
2. Under the Actions drop-down, select Import.
3. Navigate to and select the configured CSVfile and select OK.
A window will appear stating that large imports can take a while, with Update existing extensions enabled.
FortiVoice 7.0.2 Cookbook 51
Fortinet Inc.

Extensions
4. Select Import.
5. Review your list of pre-existing and newly imported extensions.
Configuring HTTP or HTTPS protocol support
For successful auto provisioning to occur across multiple subnets, the HTTP and HTTPS protocols must be enabled on
the FortiVoice network interface.
1. Go to System >Network > Network.
2. Select the network interface in use (in this example, port1) and select Edit.
3. Expand Advanced Setting.
4. Under Access, make sure HTTPand/or HTTPS is enabled, then select OK.
FortiVoice 7.0.2 Cookbook 52
Fortinet Inc.

Extensions
5. Go to System > Advanced >Auto Provisioning.
6. Under Auto Provisioning, select Enabled (and optionally enable Unassigned phone).
7. Set Provisioning protocol to either HTTPS or HTTP, and select Apply.
FortiVoice 7.0.2 Cookbook 53
Fortinet Inc.

Extensions
DHCP server
1. On your DHCP server, set:
a. Option 66 to the protocol in use
b. IP address of FortiVoice
c. Protocol port number
d. Provisioning folder (for example, http://192.168.1.99:80/provisioning/, or
https://192.168.1.99:443/provisioning/)
2. The protocol ports can be changed from their default values on FortiVoice by going to System > Configuration
>Option. Make note of any changes made on FortiVoice.
3. After the DHCP settings are verified, connect the FortiFone devices to the network, or reboot them if already
connected.
Caller IDmodification
For outbound calls from the FortiVoice unit, you can customize the caller ID to be any name, number, or both. As there
are multiple areas where you can modify the caller ID within the FortiVoice UI, there is a hierarchy to which the caller ID
modification takes precedence. This recipe details the caller ID modification hierarchy to help you decide how to
configure your FortiVoice caller IDs.
The hierarchy of caller ID modification options is different for a normal call or an emergency call.
This section includes the following topics:
l
Caller ID modification hierarchy for normal calls on page 54
l
Caller ID modification hierarchy for emergency calls on page 57
Caller ID modification hierarchy for normal calls
A normal call is any outbound call that is not an emergency call, as defined by the regional emergency number settings.
The following table displays the caller ID modification options available on normal calls from the highest priority (1) to the
lowest priority (6).
For example, if you configure the caller ID settings using the direct inward dialing (DID) number mapping (priority 2)and
the Caller ID modification (priority 4), the FortiVoice unit displays the caller ID configured using the DID number mapping
because this setting has a higher priority.
Priority Setting Steps
1 External caller ID 1. Go to Extension >Extension >IPExtension.
2. Edit an extension or create a new one.
3.
Go to Display name and click to expand.
4. In External caller ID, enter the caller ID such as a name and number
(example, John Doe <55551234>).
5. Click OK or Create, as applicable.
FortiVoice 7.0.2 Cookbook 54
Fortinet Inc.

Extensions
Priority Setting Steps
2 DID number
mapping
1. Go to Call Routing >Inbound >DIDMapping.
2. Edit a rule or create a new one.
3. Under Number Mapping, create a new DID number mapping or edit an
existing one.
4. In Option, enable Outbound.
5. Click OK or Create, as applicable.
3 External caller ID, 1. Go to Managed System > Survivability > Survivability Branch.
FortiVoice 7.0.2 Cookbook 55
Fortinet Inc.

Extensions
Priority Setting Steps
survivability
setting for local
survivable
gateway (LSG)
2. Edit an existing branch or create a new one.
3. Click Survivability.
4. In External caller ID, enter a caller ID such as a name and number (example,
Jim <612223>).
5. Click OK or Create, as applicable.
4 Caller ID
modification
1. Go to Call Routing >Outbound >Outbound.
2. Edit an existing rule or create a new one.
3. In Call Handling, edit an existing rule or create a new one.
FortiVoice 7.0.2 Cookbook 56
Fortinet Inc.

Extensions
Priority Setting Steps
4. In Caller ID modification, select an existing profile or create a new one.
5. Click OK or Create, as applicable.
5 Trunk display
name
1. Go to Trunk >VoIP > SIP.
2. Edit an existing trunk or create a new one.
3. In Display name, enter a name.
4. Click OK or Create, as applicable.
6 Location main
display name
1. Go to Phone System> Setting >Location.
2. In Main display name, enter the name displaying on the FortiVoice phone
system unit. Your PSTN provider assigns this name.
3. Click OK or Create, as applicable.
Caller ID modification hierarchy for emergency calls
When you place an emergency call, the hierarchy for caller ID modification changes to alert emergency services about
the correct location of the caller.
The following table displays the caller ID modification options available on emergency calls from the highest priority (1) to
the lowest (8).
FortiVoice 7.0.2 Cookbook 57
Fortinet Inc.

Extensions
For example, if you configure the caller ID settings using the Extension emergency caller ID (priority 1)and the Extension
external caller ID (priority 3), the FortiVoice unit displays the caller ID configured using the Extension emergency caller
ID because this setting has a higher priority.
Priority Setting Steps
1 Extension
emergency
caller ID
1. Go to Extension >Extension >IPExtension.
2. Edit an extension or create a new one.
3.
Go to Display name and click to expand.
4. In Emergency caller ID, enter the caller ID to display on the destination phone
when you dial the emergency number.
5. Click OK or Create, as applicable.
2 Emergency
zone caller ID
(Extension
setting)
1. Go to Extension >Extension >IPExtension.
2. Edit an extension or create a new one.
3. In Emergency zone, select a profile or create a new one.
4. In Emergency caller ID of the profile, enter the caller ID to display on the
destination phone when you dial the emergency number.
5. Click OK or Create, as applicable.
FortiVoice 7.0.2 Cookbook 58
Fortinet Inc.

Extensions
Priority Setting Steps
3 Extension
external caller
ID
1. Extension >Extension >IPExtension.
2. Edit an extension or create a new one.
3.
Go to Display name and click to expand.
4. In External caller ID, enter the caller ID such as a name and number (example,
John Doe <5551234>).
5. Click OK or Create, as applicable.
4 Caller ID
modification
1. Call Routing >Outbound >Outbound.
2. Edit an existing rule or create a new one.
3. In Call Handling, edit an existing rule or create a new one.
FortiVoice 7.0.2 Cookbook 59
Fortinet Inc.

Extensions
Priority Setting Steps
4. In Caller ID modification, select an existing profile or create a new one.
5. Click OK or Create, as applicable.
5 Trunk display
name
1. Go to Trunk >VoIP > SIP.
2. Edit an existing trunk or create a new one.
3. In Display name, enter a name.
4. Click OK or Create, as applicable.
6 Location main
display name
1. Go to Phone System> Setting >Location.
2. In Main display name, enter a name.
3. Click OK.
FortiVoice 7.0.2 Cookbook 60
Fortinet Inc.

Extensions
Priority Setting Steps
7 Extension
display name
1. Go to Extension >Extension >IPExtension.
2. Edit an extension or create a new one.
3. In Display name, enter the name to display on the destination phone calling this
extension.
4. Click OK or Create, as applicable.
8 Extension
number
1. Go to Extension >Extension >IPExtension.
2. Edit an existing extension to change its extension number or create a new
extension and enter an extension number.
3. Click OK or Create, as applicable.
FortiVoice Click-to-dial configuration on Google Chrome
FortiVoice Click-to-dial is a Google Chrome extension that allows you to click on a phone number on a website and call
them from your desk phone. This section details the steps required to install and set up the extension from the Chrome
Web Store.
This section includes the following recipes:
l
Installing FortiVoice Click-to-dial on page 62
l
Configuring FortiVoice Click-to-dial on page 63
FortiVoice 7.0.2 Cookbook 61
Fortinet Inc.

Extensions
l
Using FortiVoice Click-to-dial on page 64
Installing FortiVoice Click-to-dial
1. Start the Google Chrome web browser and go to the Chrome Web Store.
2. Search for FortiVoice.
Google Chrome displays FortiVoice Click-to-dial.
3. Select Add to Chrome.
4. In the confirmation window select Add extension.
FortiVoice 7.0.2 Cookbook 62
Fortinet Inc.

Extensions
5. After the installation is complete, the FortiVoice Click-to-dial icon appears in the search bar.
Configuring FortiVoice Click-to-dial
1. Right-click on the Click-to-dial icon and select Options.
2. Complete the following fields:
l
FortiVoice: The IP address or FQDN of the FortiVoice device. If on the same network as the FortiVoice, enter
the private IP address.
l
Port: The HTTPS port used by FortiVoice (443 by default).
l
Extension: The extension number of the user.
l
Password: The PIN code or password for that extension (the same as the voicemail PIN).
l
Outbound Prefix: (Optional) If required to dial an outbound code before the number, such as 9.
l
Enable: Turn on the extension.
FortiVoice 7.0.2 Cookbook 63
Fortinet Inc.

Extensions
Note that the following errors can appear when you attempt to enable the extension:
l
Connection error: Indicates that the IP/FQDN or Port is incorrect, or if the firewall is not routing the traffic
correctly if attempting to use externally.
l
Invalid credentials: Indicates that the wrong Password has been entered.
If the Enable toggle remains on, the configuration is correct.
Using FortiVoice Click-to-dial
After the configuration is complete, any web page that contains a phone number will be highlighted; click on the number
to initiate the call from your extension.
Alternatively, you can select the Click-to-dial icon to open the phone dialer and manually enter the phone number.
FortiVoice 7.0.2 Cookbook 64
Fortinet Inc.

Extensions
Hot desking
Hot desking, also known as free seating, enables a user to log in to an unassigned phone and take total control of that
phone by applying all of their own phone settings until logging out.
Hot desking is particularly useful in a call center or sales office environment where users need to be able to sit at any
desk and use their phone extension.
The hot-desking configuration requires two phones:
l
Registered phone: This phone has an extension and is used to log in to a hot-desking host. This extension requires
a user privilege with the hot-desking login enabled.
l
Unassigned phone: This phone is the hot-desking host which users log in to. The unassigned phone has no
extension and does not require a user privilege.
Configuring hot desking
1. Log in to the FortiVoice GUI.
2. Create a user privilege to enable hot-desking login:
a. Go to Phone System > Profile > User Privilege.
b. Click New.
The Name field does not support the following characters:
l
Space
l
Quotation mark
l
Backward slash
c. In the Name field, add a name for this user privilege.
d. Select Enable hot-desking login to allow phones associated with this user privilege to log in to other phones.
e. In the Automatic logout hours field, enter the time in hours after which the phone automatically logs out of hot
desking.
FortiVoice 7.0.2 Cookbook 65
Fortinet Inc.

Extensions
f. Click Create.
3. Associate the user privilege (example, Hot-desking-login) to the extension used for logging in to another phone:
a. Go to Extension > Extension > IP Extension.
b. Double-click on the row of the extension number (example, 1001) that wants to log in to other phones.
c. From the User privilege drop-down list, select the user privilege (example, Hot-desking-login) that you created
in step 2.
FortiVoice 7.0.2 Cookbook 66
Fortinet Inc.

Extensions
d. Click OK.
Using hot desking on FortiFone
1. On the FortiFone unit that you want to log in to, dial *11.
2. Enter your extension number (example, 1001#) and user PIN.
Depending of the phone model, the FortiFone unit may reboot.
The new extension and name display on the FortiFone screen.
3. To place a call, dial an extension (example, 3004).
The screen of the receiving FortiFone unit displays the extension number (example, 1001).
4. To log out of the FortiFone unit, dial *12.
Depending of the phone model, the FortiFone unit may reboot.
Viewing activity details of hot-desking extensions
1. Go to Monitor > Extension & Device > Hot Desking.
When an extension is used for logging in or logging out of a hot-desking host, FortiVoice populates the table. The
table includes one row for each extension, not multiple rows. If the table is empty, then none of the extensions have
used hot desking.
FortiVoice 7.0.2 Cookbook 67
Fortinet Inc.

Extensions
2. For the extension that is logged in to a phone or has logged out, you can view the following hot-desking details:
l
Status:The status of the hot-desking extension as logged in or logged out.
l
Number: The number of the hot-desking extension.
l
Display Name: The name displayed on the phone that is hosting hot desking.
l
Host Device: The MAC address of the unassigned phone. This is the phone that a hot-desking user logs into.
When the status of the hot-desking extension is "Logged out", then the host device is blank.
l
Last Login: The last login performed on the hosting phone.
l
Expiry: The expiry time (in the yyyy-mm-dd hh:mm:ss format) of the hot-desking login. The value is set in the
Automatic logout hours field of the user privilege for the hot-desking login. When the status of the hot-
desking extension is "Logged out", the expiry time is all zeros.
Local IP extensions
FortiVoice allows you to configure IP phone extensions, edit analog extensions, and determine extension preferences.
This section includes the following recipes:
l
Configuring extension settings on page 68
l
Configuring notification options on page 73
Configuring extension settings
This recipe shows how to configure an internal IP extension, a phone connected on the same LAN as the system. An
external IP extension is a phone connected outside the LAN.
FortiVoice 7.0.2 Cookbook 68
Fortinet Inc.

Extensions
1. Go to Extension >Extension >IPExtension and click New (or select and Edit an existing extension).
2. Enter an extension Number. A green check mark will appear to indicate that the number entered is Available.
FortiVoice auto-populates the User ID field.
3. Enter a Display name for the user. This is the name that appears on the phone screen when receiving a call from
this extension.
Configuring device settings
1. In the Device Setting section, you can determine whether the IP extension is assigned as either a Phone, Soft
FortiFone, or an Auxiliary Device. For this example, stay on the Phone tab, and set the Type to FortiFone from
the drop-down menu.
2. For Device, click New, where you can enter the extension's device MACaddress, Phone model, and assign a
Phone profile.
3. Assign an appropriate SIPprofile from the SIP settings drop-down.
4. Assign an Emergency zone type and Emergency zone.
5. Then click Advanced to open the phone advanced settings.
FortiVoice 7.0.2 Cookbook 69
Fortinet Inc.

Extensions
6. Enter or Generate a SIPpassword, and set Location to Internal.
Note that IPextensions that are designated as Internal are those extensions that do not traverse through NAT to
connect to the FortiVoice unit. Select External if the extension does require NAT.
7. Optionally, enable message waiting indication (MWI), Auto answer, and Direct call.
8. Click OK and then click Create.
Configuring user settings
1. In the User Setting section, under the Management tab:
a. You can assign a User privilege and a Department to the extension. If your company has multiple
departments and you want phone users to view directory entries for their own department only, see Filtering the
phone directory by department on page 85.
b. You can assign a Survival branch profile. For more details about adding a survivability branch, see the
FortiVoice Local Survivable Gateway Deployment Guide.
c. For information about configuring Voicemail settings, see Configuring voicemail on page 71.
2. Under the Web Access tab, set Authentication type to Local and enter or Generate a User password.
3. A warning may appear indicating that the system password policy is disabled. If this is the case, click Password
policy is disabled to enable Password/PINPolicy, and configure the minimum requirements for passwords as
appropriate.
4. Under the Phone Access tab, enter or Generate a Voicemail PIN and Personal code. These are used by the
FortiVoice 7.0.2 Cookbook 70
Fortinet Inc.

Extensions
extension user to access their voicemail and the FortiVoice user portal, and to make restricted calls, respectively.
Configuring voicemail
1. In the User Setting section, under the Management tab, click Voicemail.
2. Set Main Voicemail to the extension's own voicemail or that of another extension as the voicemail of this extension.
Typically, you will use the default voicemail.
3. To allow other users or groups to receive a notification when the extension receives a voicemail, perform the
following steps:
a. For Users (s) and/or Groups(s), click +.
b. Select one or more entries.
c. Click Close.
4. Click OK.
Configuring call center
If you have purchased a call center license and uploaded that license on FortiVoice, then you can enable the call center
option.
FortiVoice 7.0.2 Cookbook 71
Fortinet Inc.

Extensions
1. When you have completed the configuration of the various IP extension settings, scroll to the bottom of the IP
Extension dialog and enable Call Center. Call center profiles can only be configured after the IP extension
configuration has been saved.
2. Click Create.
3. Select the newly created IP extension from the list and click Edit.
4. Scroll to the bottom of the IP Extension dialog and and click Call Center.
5. Under Call Center, assign an Agent profile from the drop-down menu. For example, you can designate the
extension as either a call center agent or manager.
6. An agent, or especially a manager, may need to monitor call queues in certain departments. Click the Managed
departments table and assign those departments you wish to be monitored.
7. Click Member of Queues.
8. Set Main/Outgoing queue to the primary queue for collecting the outgoing calls from all queues by this agent.
9. From the Queues table, assign the queues you want the extension to be a member of.
10. Click OK when finished.
11. Under Skill Sets, click New.
12. Assign the appropriate skill and skill level for the agent from the drop-down menu. For more information on agent
skill and skill-based routing, see Skill-based routing on page 18.
FortiVoice 7.0.2 Cookbook 72
Fortinet Inc.

Extensions
13. Click Create, and OK to complete configuring the Call Center, and OK again to complete configuring the
IPExtension.
Configuring notification options
You can set up the options to receive an email when you receive a voicemail or fax and miss a phone call.
1. Go to Extension >Extension >IPExtension.
2. Double-click on an extension.
3. Click Edit Preference.
4. In Notification Options, update the Voicemail and Fax settings, as applicable.
5. If you want to be notified when you miss an incoming phone call, enable Missed call.
6. Enter the email address to send the notification to.
7. Click OK.
FortiVoice 7.0.2 Cookbook 73
Fortinet Inc.

Extensions
Remote extension configuration
Callers can connect to remote extensions through auto attendants or through call cascade transfers. A remote extension
reaches an external phone by automatically selecting a line from a trunk and dialing the phone number. For example, a
remote extension could reach an employee’s cell phone or home phone, or a phone at a branch office.
This recipe guides you through the process of configuring a remote extension. It is assumed that an auto attendant is
already established.
Remote extensions are designed to operate with most major telephone service providers. Unfortunately, phone numbers
and mobile phones roaming internationally may not support remote extensions.
This section includes the following topics:
l
Adding a remote extension on page 74
l
Testing a remote extension on page 74
Adding a remote extension
1. Go to Extension >Extension >RemoteExtension and click New.
2. Set Number to the local extension number from which calls are transferred to a remote extension.
3. Enter the Remote number. Calls to the local extension are transferred to this remote number.
4. Click Enable.
5. Enter a Display name, and expand to modify the caller ID.
6. Under User Setting, in the Management tab, apply a User privilege rule and a Department, if required.
7. Click Voicemail to assign a voice mailbox, and optionally allow other users and/or groups to access the same voice
mailbox. For example, you may want others to access the mailbox when you are away.
8. In the Web Access tab, select the appropriate Authentication type.
9. Enter the User password, for local authentication extensions.
10. In the Phone Access tab, set Voicemail PIN to the PIN for the user to access voicemail.
11. Click Create.
Testing a remote extension
1. Call the auto attendant associated with the FortiVoice unit, which dials the local extension.
2. When the extension's user is not available to answer the call, the call is transferred to the configured remote
extension. For example, the user's cell phone number.
3. The user will receive the call through their remote extension.
Managing a large number of extensions
The FortiVoice unit provides ways to manage a large number of extensions efficiently.
This section groups all of the FortiVoice features that offer global extension management functions, including:
FortiVoice 7.0.2 Cookbook 74
Fortinet Inc.

Extensions
l
Maintaining phones on page 75
l
Managing extensions on page 75
Maintaining phones
You can update phone configurations and upgrade phone firmwares for all or selected devices.
1. Go to System > Maintenance > Phone Maintenance Job.
2. Click New and select to do a configuration update or firmware upgrade.
3. Configure the maintenance job.
4. For Extension Selection, enable All related devices if you want to update the phone configuration or upgrade the
phone firmware for all devices.
If you want to update phone configurations or upgrade phone firmwares for selected devices, then disable All
related devices.
Managing extensions
You can select to edit a group of extensions at the same time, save a copy of the extension list or download as a sample
list, or upload a copy of the extension list saved elsewhere.
This section includes:
l
Allocating FortiFone softclient licenses to extensions on page 76
l
Editing extension management settings on page 77
l
Editing extension caller IDs on page 77
l
Editing extension authentication information on page 78
l
Editing extension main device settings on page 79
l
Editing extension preferences on page 80
l
Editing extension notifications on page 81
FortiVoice 7.0.2 Cookbook 75
Fortinet Inc.

Extensions
l
Exporting an extension list on page 82
l
Importing an extension list on page 83
If you only edited some of the extension settings in the list above and want to activate the
extensions to put them into service, on the Batch Edit page, go to Management and select
Status > Enabled. If you select Status > Disabled, all extensions will be deactivated and will
not be in service. If you leave Status deselected, the extensions' current status will not
change.
Allocating FortiFone softclient licenses to extensions
If you want to allocate the same number of FortiFone softclient licenses to all or some of the extensions, do the following:
1. Go to Extension > Extension > IP Extension.
2. Under Actions, click Batch Edit.
3. Search or filter the extensions you want to edit, if required. If nothing is done, all extensions are selected by default.
4. Click Next.
5. On the Batch Edit page, go to License and do the following:
l
License allocation: Enable and select up to 5 FortiFone softclient licenses for use on the extensions.
l
Android/iOS: Enable if the softclient is on an Android phone or iPhone and select a SIP profile for it.
l
Windows/macOS: Enable if the softclient is on a Windows or Mac device and select a SIP profile for it.
6. Click Next to review the edited license allocation values to be applied to the extensions.
7. Click Apply.
FortiVoice 7.0.2 Cookbook 76
Fortinet Inc.

Extensions
Editing extension management settings
If you want to edit the extension management settings, do the following:
1. Go to Extension > Extension > IP Extension.
2. Under Actions, click Batch Edit.
3. Search or filter the extensions you want to edit, if required. If nothing is done, all extensions are selected by default.
4. Click Next.
5. On the Batch Edit page, go to Management and do the following:
l
Status: If you want to activate the extensions to put them into service, select Status > Enabled. If you select
Status > Disabled, all extensions will be deactivated and will not be in service. If you leave Status deselected,
the extensions' current status will not change.
l
User privilege: Enable and select the services for the extensions.
l
Department: Enable and select the department that the extensions belong to.
l
Survival branch: Select the local survival branch FortiVoice unit for the extensions if the extensions are in a
local survivability network.
6. Click Next to review the edited values to be applied to the extensions.
7. Click Apply.
Editing extension caller IDs
If you do not enter the caller IDs, your organization's main number will be used. If you add both IDs, the emergency ID
will only be used when making emergency calls. All other calls will use the external caller ID.
If you want to edit extension caller IDs, do the following:
FortiVoice 7.0.2 Cookbook 77
Fortinet Inc.

Extensions
1. Go to Extension > Extension > IP Extension.
2. Under Actions, click Batch Edit.
3. Search or filter the extensions you want to edit, if required. If nothing is done, all extensions are selected by default.
4. Click Next.
5. On the Batch Edit page, go to Caller ID and do the following:
l
External caller ID: Enter the ID that displays on a called phone when you make a call. Use the name<phone_
number> format, such as HR<222134>.
l
Emergency caller ID: Enter the emergency caller ID. Use the name <phone_number> format, such as
HR<222134>.
6. Click Next to review the edited caller ID values to be applied to the extensions.
7. Click Apply.
Editing extension authentication information
If you want to edit the extension authentication information, do the following:
1. Go to Extension > Extension > IP Extension.
2. Under Actions, click Batch Edit.
3. Search or filter the extensions you want to edit, if required. If nothing is done, all extensions are selected by default.
4. Click Next.
5. On the Batch Edit page, go to Authentication and do the following:
l
Authentication type: Select the extensions' authentication type: Local or LDAP.
l
LDAP profile: If you select LDAP for Authentication type, select an LDAP profile to apply to the extensions.
FortiVoice 7.0.2 Cookbook 78
Fortinet Inc.

Extensions
l
User password: Enter the password for user portal access. You can let the system generate a password, use
the system default password (Extension#321), or select Specific to manually enter a password.
l
Personal code:Enter the extension account code that can be used to restrict calls. This code is needed to
make some restricted calls. You can let the system generate a code, use the system default code (voice#321),
or select Specific to manually enter a code.
l
Voicemail PIN: Enter the password for the extension user to access voicemail. You can let the system
generate a PIN, use the system default PIN (123123), or select Specific to manually enter a PIN. Selection of
using personal password or voicemail PIN to access user portal is set when configuring phone system
capacity.
If you selected Auto generate for User password, Personal code, and Voicemail PIN
and want to view them, after applying the edited settings, go to Extension > Extension >
IP Extension and double-click an extension number that is included in the batch-editing to
open the IP Extension page:
l
To view the User password, go to User Setting > Web Access and click the eye
icon after User password. You may click Generate to get a new password or enter
one manually if required.
l
To view the Personal code, go to Device Setting > Phone > Advanced and click
the eye icon after SIP password. You may click Generate to get a new code or enter
one manually if required.
l
To view the Voicemail PIN, go to User Setting > Phone Access and click the eye
icon after Voicemail PIN. You may click Generate to get a new PIN or enter one
manually if required.
6. Click Next to review the edited authentication values to be applied to the extensions.
7. Click Apply.
Editing extension main device settings
Main extension SIP devices include desk phones and soft phones.
If you want to edit the extension main device settings, do the following:
FortiVoice 7.0.2 Cookbook 79
Fortinet Inc.

Extensions
1. Go to Extension > Extension > IP Extension.
2. Under Actions, click Batch Edit.
3. Search or filter the extensions you want to edit, if required. If nothing is done, all extensions are selected by default.
4. Click Next.
5. On the Batch Edit page, go to Main Device and do the following:
l
SIP settings: Select the SIP profile for the extensions.
l
Emergency zone type: Select Static or Dynamic. If you select Dynamic, you allow the FortiVoice phone
system to look up the emergency zone of an extension when the user makes an emergency call. If the
extension is not using the correct emergency zone profile, the FortiVoice phone system assigns the correct
available profile to that extension. This function is particularly important when users make an emergency phone
call after moving their desk phones to a new location in another subnet. If you select Dynamic, update the
Dynamic Network Match in Configuring an emergency zone profile on page 127.
l
Emergency zone: If you selected Static for the Emergency zone type, then select the emergency zone
profile for the extensions.
l
Location: Select Internal if the extension devices do not traverse through Network Address Translation (NAT)
to connect to the FortiVoice unit, and External if the devices do. These are system defined locations.
l
SIP password: Enter the password used for configuring your SIP phones from the phones or the Web. You
can let the system generate a password, use the system default password (voice#321), or select Specific to
manually enter a password.
l
Type:Select the phone type.
6. Click Next to review the edited device values to be applied to the extensions.
7. Click Apply.
Editing extension preferences
If you want to edit the extension preferences, do the following:
1. Go to Extension > Extension > IP Extension.
2. Under Actions, click Batch Edit.
3. Search or filter the extensions you want to edit, if required. If nothing is done, all extensions are selected by default.
FortiVoice 7.0.2 Cookbook 80
Fortinet Inc.

Extensions
4. Click Next.
5. On the Batch Edit page, go to Preference and do the following:
l
Phone language: Select the prompt language for the extensions. The default is English.
l
Web language: Select the language for the FortiVoice user portal.
l
Time zone: Select the time zone for the FortiVoice user portal.
l
Ring duration: Enter the phone ringing duration in seconds before an incoming call goes to voicemail.
6. Click Next to review the edited preference values to be applied to the extensions.
7. Click Apply.
Editing extension notifications
If you want to edit the extension notifications, do the following:
1. Go to Extension > Extension > IP Extension.
2. Under Actions, click Batch Edit.
3. Search or filter the extensions you want to edit, if required. If nothing is done, all extensions are selected by default.
4. Click Next.
5. On the Batch Edit page, go to Notifications and do the following:
l
Missed call: Select Enabled if you want to receive an email notification when an incoming call is missed.
l
Voicemail: Select the type of email notification when a voicemail is left on the extensions:
l
None: Do not send any notification.
l
Simple: Send an email notification.
l
With attachment: Send an email notification with the voicemail attached.
l
Fax: Select the type of email notification when a fax is sent to the extensions:
l
None: Do not send any notification.
l
Simple: Send an email notification.
l
With attachment: Send an email notification with the fax attached.
FortiVoice 7.0.2 Cookbook 81
Fortinet Inc.

Extensions
Each extension notification email address is set when configuring extension
preferences. This email address cannot be edited globally.
6. Click Next to review the edited notification values to be applied to the extensions.
7. Click Apply.
Exporting an extension list
If you want to back up an extension list, do the following:
1. Go to Extension > Extension > IP Extension.
2. Under Actions, click Export.
3. Select an option:
l
Search or filter the extensions you want to export.
l
Export all extensions in CSV format.
l
Download all extensions as a sample list with or without user ID in CSV format.
FortiVoice 7.0.2 Cookbook 82
Fortinet Inc.

Extensions
Importing an extension list
If you want to upload an extension list, do the following:
1. Go to Extension > Extension > IP Extension.
2. Under Actions, click Import.
3. Browse for the extension list file.
Ring group call handling
What if individuals are calling a particular department in your company and there is no one around to answer the call
because everyone went for lunch? Using FortiVoice, you can establish a ring group and add a call handling rule that dials
a particular phone number, such as an employee’s cell phone number, after attempting to dial the ring group for a
specified period of time.
This recipe guides you through the process of creating a ring group and establishing the call handling action to take for
each call status.
l
Creating a ring group on page 83
l
Configuring call handling for each status on page 84
l
Configuring advanced ring group settings on page 85
Creating a ring group
First, you need to create a ring group. A ring group is a collection of local extensions and external numbers that you can
contact using one number. If you have an existing ring group, you can skip this step and proceed to Configuring call
handling for each status on page 84.
To create a ring group
1. Go to Extension > Group >Ring Group.
2. Click New.
3. Make sure that Enabled is selected.
4. Enter a Name for this ring group.
5. Enter a Number for this ring group. Phone users will dial this number to ring all selected extensions and external
numbers (is applicable) in the ring group.
FortiVoice 7.0.2 Cookbook 83
Fortinet Inc.

Extensions
6. In Ring mode, select how FortiVoice will call local extensions and external numbers.
l
All:After the caller dials the ring group number, all extensions and external numbers (is applicable) in the ring
group will ring.
l
Sequential:Each extension in the group is called one at a time in the order in which you added them to the
group.
7. In Department, you can select or edit an existing department or create a new one.
8. In Members, click in the field and select the extensions and user groups, as applicable.
9. In External numbers, enter an external phone number to the ring group. For example, you can add the phone
number of a remote employee to a ring group. To add another number, click +.
10. Click Create.
Configuring call handling for each status
With a ring group created, you can now configure the call handling to establish the call process for every available call
status:
l
No answer
l
Busy
l
Phone not connected
To configure call handling where there is no answer
1. Go to Extension > Group >Ring Group.
2. Select an existing ring group to edit.
3. Click Edit.
4. Click Normal Call Handling.
5. In the No answer tab, enable User defined.
6. Click New.
7. Select a desired Schedule.
8. In Action, select Forward.
9. In Number, enter the phone number that you want to forward the call to.
10. Click Create and then click OK.
To configure call handling when the phone is busy
1. Go to Extension > Group >Ring Group.
2. Select an existing ring group to edit.
3. Click Edit.
4. Click Normal Call Handling.
5. In the Busy tab, enable User defined.
6. Click New.
7. Select a desired Schedule.
8. In Action, select Forward.
9. In Number, enter the phone number that you want to forward the call to.
10. Click Create and then click OK.
To configure call handling when the phone is not connected
1. Go to Extension > Group >Ring Group.
2. Select an existing ring group to edit.
FortiVoice 7.0.2 Cookbook 84
Fortinet Inc.

Extensions
3. Click Edit.
4. Click Normal Call Handling.
5. In the Phone not connected tab, enable User defined.
6. Click New.
7. Select a desired Schedule.
8. In Action, select Forward.
9. In Number, enter the phone number that you want to forward the call to.
10. Click Create and then click OK.
Configuring advanced ring group settings
Specify the time period for the ring duration.
1. Go to Extension > Group >Ring Group.
2. Select an existing ring group to edit.
3. Click Edit.
4. Expand Advanced Setting.
5. In Ring duration, enter the amount of time in seconds to allow extensions to ring before FortiVoice forwards the call
to the specified phone number.
6. Click OK.
Filtering the phone directory
FortiVoice allows you to filter your organization's phone directory by department, business group, or survivability branch.
This section includes the following recipes:
l
Filtering the phone directory by department on page 85
l
Filtering the phone directory by business group on page 89
l
Filtering the phone directory for a survivability branch on page 93
Filtering the phone directory by department
FortiVoice allows you to filter the phone directory by department. When users in your organization access the phone
directory, they will see entries for their own department only.
This recipe includes the following tasks:
1.
Creating a department on page 86
2.
Filtering phone directory contacts by department on page 86
3.
Defining a department user privilege on page 86
4.
Assigning the user privilege and department to an extension on page 87
5.
Verifying the phone directory in the FortiVoice user portal on page 88
FortiVoice 7.0.2 Cookbook 85
Fortinet Inc.

Extensions
The FVE-20E2 and FVE-50E6 models do not support this recipe.
Prerequisite
In this recipe, you edit an existing extension. For more details about creating an IP extension, see Configuring extension
settings on page 68.
Creating a department
1. Go to Extension >Group > Department.
2. Click New.
3. Enter a Name for this department. For example, Marketing.
4. Click Create.
Filtering phone directory contacts by department
1. Go to Phone System >Setting > Miscellaneous.
2. Under Directory, go to Include subdirectory and enable Department.
3. Click Apply.
Defining a department user privilege
1. Go to Phone System >Profile > User Privilege.
2. Click New.
FortiVoice 7.0.2 Cookbook 86
Fortinet Inc.

Extensions
3. Enter a Name for this user privilege. For example, Department.
4. Under Directory, go to Directory/subdirectory and select Department.
5. Click Create.
Assigning the user privilege and department to an extension
1. Go to Extension >Extension >IPExtension.
2. Double-click the extension that you want to edit.
FortiVoice 7.0.2 Cookbook 87
Fortinet Inc.

Extensions
3. Under User Setting, update the following fields:
a. Select the User privilege. For example, Department.
b. Select the Department. For example, Marketing.
4. Click OK.
5. To edit additional extensions, repeat steps 2 to 4.
6. If you want to edit multiple extensions at the same time, see the Editing extension management settings section in
Managing extensions on page 75.
Verifying the phone directory in the FortiVoice user portal
Access the FortiVoice user portal to verify that the phone directory is showing extensions included in the specific
department, in this case, Marketing.
1. Using the extension from the previous section, log in to the FortiVoice User Portal.
2. Click Contact.
3. Select Directory.
4. Make sure that the list shows the extensions that you selected for the assignment of the user privilege and
department.
5. Go to the Department column.
6. Make sure that this column shows the configured department only.
FortiVoice 7.0.2 Cookbook 88
Fortinet Inc.

Extensions
Filtering the phone directory by business group
FortiVoice allows you to filter the phone directory by business group. When users in your organization access the phone
directory, they will see entries for their own business group only.
This recipe includes the following tasks:
1. Creating a business group on page 89
2. Filtering phone directory contacts by business group on page 90
3. Defining a business group user privilege on page 90
4. Assigning the user privilege to an extension on page 91
5. Verifying the phone directory in the FortiVoice user portal on page 92
The business group option is available when you are using the following models and settings
only:
l
FVE-500E, FVE-500F, FVE-1000E, and larger models only
l
Under Phone System > Setting > Miscellaneous, go to Business Group and select
Automatic, and click Apply.
Business groups introduce an abbreviated extension number dialing for phone users in the same logical group. As an
example, lets use an organization where employees are located in three different offices (locations 1, 2, and 3). Each
location uses a different prefix code (11, 12, 13) but the same numbering pattern (XXX). Therefore, extensions in
location 1 can be 11801, 11802, 11803, and so on. Extensions in location 2 can be 12801, 12802, 12803 and so on.
Extensions in location 3 can be 13801, 13802, 13803, and so on.
When phone users in location 1 want to reach an extension in the same business group (location 1), they can dial the
abbreviated extension (such as XXX) instead of the full extension number (11XXX).
When phone users in location 1 want to reach an extension in another business group (such as location 2), they dial the
full extension number (such as 12XXX).
Creating a business group
1. Go to Extension >Group > Business Group.
2. Click New.
3. Enter a Name for the group. For example, Sales.
4. Enter the Abbreviated prefix code for the group. You can select digits from 0 to 9. The allowed length is from 2 to
8 digits. For example, 11.
5. For Abbreviated dialing pattern, enter the pattern by following the extension number pattern. For example, XXXX
matches any four-digit number.
6.
To enter notes for this group, go to Description and click .
7. Click Create.
FortiVoice 7.0.2 Cookbook 89
Fortinet Inc.

Extensions
Filtering phone directory contacts by business group
1. Go to Phone System >Setting > Miscellaneous.
2. Under Directory, go to Include subdirectory and enable Business Group.
3. Click Apply.
Defining a business group user privilege
1. Go to Phone System >Profile > User Privilege.
2. Click New.
3. Enter a Name for this user privilege. For example, BusinessGroup.
FortiVoice 7.0.2 Cookbook 90
Fortinet Inc.

Extensions
4. Under Directory, go to Directory/subdirectory and select Business group.
5. Click Create.
Assigning the user privilege to an extension
1. Go to Extension >Extension >IPExtension.
2. Double-click the extension that you want to edit. Using our example, you would select an extension with a 11XXXX
pattern.
FortiVoice 7.0.2 Cookbook 91
Fortinet Inc.

Extensions
3. Under User Setting, select the User privilege. For example, BusinessGroup.
4. Click OK.
5. To edit additional extensions, repeat steps 2 to 4.
6. If you want to edit multiple extensions at the same time, see the Editing extension management settings section in
Managing extensions on page 75.
Verifying the phone directory in the FortiVoice user portal
Access the FortiVoice user portal to verify that the phone directory is showing extensions included in the specified
business group only.
1. Using an extension from the business group, log in to the FortiVoice user portal.
2. Click Contact.
3. Select Directory.
4. Make sure that the list shows the extensions that you selected for the assignment of the user privilege and business
group.
FortiVoice 7.0.2 Cookbook 92
Fortinet Inc.

Extensions
Filtering the phone directory for a survivability branch
You can configure a phone directory to show contacts for a particular survivability branch only. Let's use a school board
as an example. A FortiVoice phone system in a main office (in this case, the school board) manages one or more
FortiVoice LSG units (survivability branches). Each school is a survivability branch that includes a FortiVoice local
survivable gateway (LSG) unit with local extensions.
When extension users at a particular school access the phone directory, they will see contact entries for their school
only.
To filter directory contacts for a survivability branch, complete the following tasks:
1. Filtering phone directory contacts by survivability branch on page 93
2. Defining a survivability branch user privilege on page 94
3. Assigning the user privilege to an extension on page 94
4. Verifying the phone directory in the FortiVoice user portal on page 95
Prerequisite
Prior to starting the tasks for this recipe, make sure to complete the LSGconfiguration. For details, see the FortiVoice
Local Survivable Gateway Deployment Guide.
Filtering phone directory contacts by survivability branch
1. Go to Phone System >Setting > Miscellaneous.
2. Under Directory, go to Include subdirectory and enable Survivability Branch.
3. Click Apply.
FortiVoice 7.0.2 Cookbook 93
Fortinet Inc.

Extensions
Defining a survivability branch user privilege
1. Go to Phone System >Profile > User Privilege.
2. Click New.
3. Enter a Name for this user privilege. For example, CF-High-School-LSG.
4. Under Directory, go to Directory/subdirectory and select Survivability Branch.
5. Click Create.
Assigning the user privilege to an extension
1. Go to Extension >Extension >IPExtension.
2. Double-click the extension that you want to edit.
3. Under User Setting, select the User privilege. For example, CF-High-School-LSG
FortiVoice 7.0.2 Cookbook 94
Fortinet Inc.
Extensions
4. Make sure that the the Survival branch is the correct one.
5. Click OK.
6. To edit additional extensions, repeat steps 2 to 4.
7. If you want to edit multiple extensions at the same time, see the Editing extension management settings section in
Managing extensions on page 75.
Verifying the phone directory in the FortiVoice user portal
Access the FortiVoice user portal to verify that the phone directory is showing extensions included in the specified
survivability branch only.
1. Using an extension from the LSG branch, log in to the FortiVoice user portal.
2. Click Contact.
3. Select Directory.
4. Make sure that the list shows the extensions that you selected for the assignment of the user privilege and
survivability branch.
FortiVoice 7.0.2 Cookbook 95
Fortinet Inc.

High availability
With FortiVoice high availability (HA), you set up redundancy between two FortiVoice units in case of a system failure.
FortiVoice HA uses an active-passive mode which means that you have a primary (active) unit and a secondary
(passive) unit. These two units make up an HA group. The secondary unit is not used until a failure occurs on the primary
unit and triggers the secondary unit to assume the responsibilities of the primary unit.
FortiVoice HA units use a heartbeat link to communicate. This heartbeat link lets the secondary unit know that the
primary unit is up and running, and allows the primary unit to copy configuration and data information to the secondary
unit whenever the primary configuration changes. If a failure occurs on the primary unit, the loss of the heartbeat triggers
the secondary unit to take over as the primary and be a copy of that primary unit.
This section includes the following recipes:
l
Planning high availability on page 96
l
Configuring high availability on FortiVoice units on page 97
l
Configuring service-based failover on page 99
l
Synchronizing configuration and data in a FortiVoice HA group on page 101
l
Uploading license files on a FortiVoice HA group on page 101
l
Enabling high availability activity logging on page 102
l
Displaying the high availability status on page 103
l
Upgrading the firmware in an HA group on page 104
Planning high availability
For FortiVoice HA, apply the following planning guidelines:
l
Make sure that both FortiVoice units in the HA group are the same model and have the same firmware version. If
you are using VM instances, you require two VM licenses.
l
For both primary and secondary FortiVoice units:
l
Connect port 1 to the network switch.
l
Connect port 2 or a secondary port (3, 4, or 5, depending on the model) to the network switch. This port takes
on the role of the primary heartbeat interface.
l
Plan which interface ports to use for your voice traffic and heartbeat links:
l
Decide which port you want to use for your voice traffic, for example port 1.
l
Make sure to assign the secondary heartbeat status to port 1.
l
Make sure to assign the primary heartbeat status to port 2 (3, 4, or 5, depending on the model).
l
FortiVoice HA uses a secondary IP address on the interface ports. This secondary IP address is called a virtual IP
address. You configure the primary and secondary units to use this virtual IP address but only the acting primary
unit will use it to communicate. Any network traffic that is to be forwarded to the FortiVoice unit can be forwarded to
this virtual IP address. If a failover occurs, the secondary unit assumes the role of primary and starts to use the
virtual IP address. Your system is then able to continue operating as normal without having to change your port
forwarding. For example, the primary unit has an IP address of 192.168.1.200 and the secondary unit has an IP
address of 192.168.1.202. The virtual IPaddress is 192.168.1.210. Both primary and secondary units share this
virtual IP address which is also used to receive all port forwarding to the FortiVoice unit.
FortiVoice 7.0.2 Cookbook 96
Fortinet Inc.

High availability
l
Take note of the IP address of each interface port on both FortiVoice units. You will need this information to set up
the heartbeat link.
When you are ready to configure HA, go to Configuring high availability on FortiVoice units on page 97.
If a failover occurs and you are using FortiVoice 200F8 or FortiVoice 300E-T, remember to
swap the physical FXO and PRI connections to the secondary unit.
Configuring high availability on FortiVoice units
Perform this procedure on both primary and secondary FortiVoice units.
1. Go to System >High Availability > Configuration.
2. In HA configuration, configure the following settings:
a. Set Mode of operation.
If the FortiVoice unit is the primary unit, set the Mode of operation to Master.
If the FortiVoice unit is the secondary unit, set the Mode of operation to Slave.
b. Set the On failure behavior to one of the following choices:
i. Switch Off:As part of the HA group, the failed unit will not become a primary unit again until you manually
restore the configured operating mode on the Status tab.
ii. Wait for Recovery then Restore Original Role: After the unit recovers from failure, it will go back to its
programmed Mode of operation. For example, if unit 1 (primary) encounters a failure and unit 2
(secondary) effectively becomes the primary, then when unit 1 recovers from failure, unit 1 will be restored
as the primary and unit 2 will return to operating as the secondary unit.
iii. Wait for Recovery then Restore Slave Role: After the unit recovers from failure, this unit will operate in
secondary mode. For example, if unit 1 (primary) encounters a failure and unit 2 (secondary) effectively
becomes the primary, then when unit 1 recovers from failure, it will then assume the secondary mode and
unit 2 will continue to operate in primary mode.
c. Set Shared password. Make sure to use the same password for both primary and secondary units.
Example of HA Configuration settings for primary unit
3. In Advanced Options, configure the following port and heartbeat settings:
a. The HA base port is used for the heartbeat signal as well as data and configuration synchronization. The
default and recommended port is 20000.
b. The Heartbeat lost threshold setting is the amount of time that must pass with no heartbeat link between the
primary and secondary units before the system triggers a failover. The heartbeat signal is sent once per second
to ensure that the unit is responding. To prevent a premature failover due to the system being under a heavy
load, it is recommended to set this setting at 3 seconds or higher.
c. As an added fail-safe, you can enable Remote services as heartbeat. After you enable this setting, you can
configure the HTTP and SIP UDP settings in the Service Monitor section to act as an additional HA heartbeat
FortiVoice 7.0.2 Cookbook 97
Fortinet Inc.

High availability
(details are included in Configuring service-based failover on page 99). If both primary and secondary
heartbeat links fail but the remote service detects that the primary unit is still available, no failover will occur.
Note that this feature is only an additional heartbeat and does not provide any synchronization of files from
primary to secondary units. Therefore, Fortinet does not recommend relying on remote services alone.
Configure at least one HA heartbeat on an interface port.
d. With Call recording sync, you enable or disable the synchronization of recorded calls from the primary to the
secondary units. This setting is optional because there can be many recorded calls on the system that can take
up quite a bit of memory. Copying these files during synchronization can take a long time and use up network
bandwidth.
e. Click Apply.
4. In Interface, you configure the port behavior. When setting up the ports, make sure that you mirror the primary unit
settings on the secondary unit, except for the Peer IP address and Peer IPv6 address settings.
Make sure to apply the following settings:
l
Set port 1 with the secondary heartbeat status.
l
Set port 2 (or 3 or 4) with the primary heartbeat status.
Select a port and click Edit.
a. Port monitor enabled: When you enable this setting, the unit performs an internal port check to make sure
that this port is responsive. If the port becomes unresponsive, the system triggers a failover. This setting has its
timing intervals configured by using the Service monitor, Interface monitor section which you can set later in
Configuring service-based failover on page 99.
b. Heartbeat status: Configure the heartbeat link and system synchronization. The following three choices are
available:
i. Disable:There is no heartbeat link or synchronization on this port.
ii. Primary: Make sure to set port 2 (or 3 or 4) as primary. This port provides a heartbeat link and system
synchronization from the primary to the secondary.
iii. Secondary: Make sure to set port 1 as secondary. A secondary heartbeat link is used as a backup in case
the primary one fails. A failover does not occur unless both primary and secondary heartbeat links are
down.
c. Peer IP address and Peer IPv6 address: Specify the IPaddress of the port at the opposite side for the
heartbeat link to communicate on. For example, if you are configuring the primary unit, then enter the IP
address for port 2 of the secondary unit here. If you are configuring the secondary unit, then enter the IP
address of port 2 of the primary unit here.
d. Virtual IP action: When configuring the virtual IP address, set the Virtual IP action to Use.
e. Virtual IP address and IPv6 address: Make sure that the primary and secondary units share the same virtual
IPaddress on each port. Also, make sure that all port forwarding for voice traffic on your router is forwarded to
the virtual IPaddress.
f. Click OK.
Example of Interface settings
FortiVoice 7.0.2 Cookbook 98
Fortinet Inc.

High availability
5. Service Monitor offers another way of detecting whether or not there is a system failure. For configuration details,
see Configuring service-based failover on page 99.
6. When you have completed the configuration on both FortiVoice units in the HA group, go to Synchronizing
configuration and data in a FortiVoice HA group on page 101.
Configuring service-based failover
The Service Monitor section offers another way of detecting whether or not there is a system failure.
The system uses Remote HTTP and SIPUDP settings as a heartbeat link to confirm that the secondary unit can
connect to the primary unit using HTTP or SIP. If the secondary unit cannot connect to the primary unit, then the system
triggers a failover and the secondary unit becomes the primary. In addition to enabling the Remote HTTP and SIPUDP
settings here, make sure that you have enabled Remote services as heartbeat in the Advanced Options section of
Configuring high availability on FortiVoice units on page 97.
The Interface monitor and Local hard drives settings are locally monitored. If the system detects a failure on one of its
interface ports or hard drives, then the system triggers a failover. To enable which ports the unit will monitor for failure,
select Port monitor enabled in the Interface section of Configuring high availability on FortiVoice units on page 97.
Perform the following steps on both the primary FortiVoice unit and secondary FortiVoice unit.
FortiVoice 7.0.2 Cookbook 99
Fortinet Inc.

High availability
1. Go to System >High Availability > Configuration.
2. In Service Monitor, click one of the following services:
l
Remote HTTP
l
SIP UDP
l
Interface monitor
l
Local hard drives
3. Click Edit.
4. For Remote HTTP and SIP UDP, click Enable, and configure the following settings:
l
Remote IP: Enter the peer IP address.
l
Port: Enter the port number of the peer service.
l
Timeout: Enter the timeout period (in seconds) for one connection test.
l
Interval: Enter the frequency (in seconds)of the tests.
l
Retries: Enter the number of consecutive tests that are allowed before the primary unit is deemed
unresponsive and a failover occurs.
For Interface monitor and Local hard drives, configure the following settings:
l
Enabled: Select to enable local hard drive monitoring.
For interface monitoring, select Port monitor enabled in the Interface section of Configuring high availability
on FortiVoice units on page 97.
l
Interval: Enter the frequency (in seconds) of the test.
l
Retries: Enter the number of consecutive tests that are allowed before the local interface or local hard drive is
deemed unresponsive and a failover occurs.
5. Click OK.
Example of Service Monitor settings
FortiVoice 7.0.2 Cookbook 100
Fortinet Inc.

High availability
6. Go to Synchronizing configuration and data in a FortiVoice HA group on page 101.
Synchronizing configuration and data in a FortiVoice HA group
Use this procedure to synchronize configuration and data from the primary FortiVoice unit to the secondary FortiVoice
unit.
The synchronization does not copy the following data:
l
Host name
l
Static routes
l
Interface configuration
l
Main HA configuration
l
HA service monitoring settings
l
System appearance
Procedure steps
1. Go to System >High Availability > Status.
2. Click the link Click HERE to Start a Configuration/Data Sync.
3. To confirm, click OK.
Uploading license files on a FortiVoice HA group
For the Call Center, Hotel Management, FortiFone softclient, and third-party phone features, the primary and secondary
FortiVoice units share the license file that includes the serial number of both units. However, you must install the same
license file separately on both primary and secondary FortiVoice units.
For the Unified Communications Services, you have two different license files meaning that each primary and secondary
FortiVoice units has its own license file. You must upload a license file on each primary and secondary FortiVoice units.
Before you begin
Download the license (.lic) file from your Fortinet Support account and know where you save the file or files on your
computer. For more details, see Licensing on page 114.
To upload the license on the primary FortiVoice unit
1. Log in to the primary FortiVoice unit.
2. Go to Dashboard > Status.
FortiVoice 7.0.2 Cookbook 101
Fortinet Inc.

High availability
3. In the License Information widget, click Update License.
4. Locate the license file that you previously downloaded to your computer and click Open.
5. To confirm the upload, click Yes.
To upload the license on the secondary FortiVoice unit
1. Log in to the secondary FortiVoice unit.
2. Go to System >High Availability > Status.
3. Check the Effective Operation Mode and wait until it displays out of sync.
You can install the license file on the secondary unit only when the file is out of synchronization with the license file
on the primary unit.
4. When the Effective Operation Mode on the secondary unit displays out of sync, then go to Dashboard > Status.
5. In the License Information widget, click Update License.
6. Locate the license file that you previously downloaded to your computer and click Open.
7. To confirm the upload, click Yes.
8. After successfully uploading the license file, go to System >High Availability > Status.
9. Click the link Click HERE to restart the HA system.
Enabling high availability activity logging
Use this procedure to enable the high availability (HA) activity logging. This logging is disabled by default.
1. Go to Log &Report > Log Setting >Local.
2. Under Logging Policy Configuration, expand System and enable HA.
3. Click Apply.
FortiVoice 7.0.2 Cookbook 102
Fortinet Inc.

High availability
Displaying the high availability status
Use this procedure to display the high availability (HA) status of a FortiVoice unit.
1. Go to System >High Availability > Status.
2. You can review the following settings:
l
Refresh section lets you set a timer for how often you want this page to check for a status update
automatically. To manually refresh this page, click Refresh.
l
Mode Status lets you know what the configured mode is and the mode that it is currently using.
l
Configured Operating Mode is the mode that you have programmed the unit to act as with the
Configuration tab (either as primary or secondary).
l
Effective Operating Mode can display one of the following modes:
l
Master shows that the unit is acting as the primary.
l
Slave shows that the unit is acting as the secondary.
l
Failed shows that the service or network interface monitoring has detected a failure and the
diagnostic connection is currently determining whether the problem has been corrected or a failover is
required.
l
Off is a mode used by both units. For a primary unit, this mode indicates that the service or interface
monitoring has detected a failure, taken the primary unit offline, and triggered a failover. For a
secondary unit, this mode indicates that the synchronization has failed once; a subsequent failure will
trigger a failover.
l
Daemon status is only available on the secondary unit. The following updates are available:
l
Monitor shows when the secondary unit will check the primary unit to make sure that it is still active. If
the system detects any errors, this section will show how many errors were detected.
l
Configuration shows the last time the configuration was updated from the primary unit to the
secondary unit.
l
Data shows the last time the data was synchronized between the primary and secondary units. The
Configuration and Data section may display different times. This is normal. Synchronizing data can
take longer to complete.
l
Database shows the database status such as Checking Status, Stopped, Running (in sync), and
Syncing Data.
l
Actions
l
Click HERE to Start a Configuration/Data Sync:For details about this action, see Synchronizing
configuration and data in a FortiVoice HA group on page 101.
l
Click HERE to Restore Configured Operating Mode: If a failover is triggered and the issue has
been resolved, you can click this link to tell the unit that it can resume the mode it was originally
configured to be.
l
Click HERE to Switch to SLAVE Mode:This action is available on the primary unit only. If you want
to change the mode of operation of the primary unit to secondary, click the link.
l
Click HERE to Switch to MASTERMode:This action is available on the secondary unit only. If you
want to change the mode of operation of the secondary unit to primary, click the link.
FortiVoice 7.0.2 Cookbook 103
Fortinet Inc.

High availability
Upgrading the firmware in an HA group
This recipe describes the required tasks to perform a firmware upgrade of the FortiVoice solution that includes FortiVoice
units in an active-passive HAgroup and the following products, as applicable:
l
FortiVoice local survivable gateway (LSG)
l
FortiVoice foreign exchange subscriber (FXS) gateway - FortiVoice Gateway GS16
In a firmware upgrade of an active-passive HA group, the following behaviors apply:
l
When you perform a firmware upgrade on the secondary FortiVoice unit, the normal call processing is
uninterrupted.
l
When you perform a firmware upgrade on the primary FortiVoice unit, the normal call processing is temporarily
interrupted.
l
Before starting the firmware installation, the primary unit signals the secondary unit that a firmware upgrade is
taking place. This signaling causes the HAdaemon of the secondary unit to pause its monitoring of the primary unit
for a short period. When the firmware installation is complete, the primary unit signals the secondary unit to resume
its HA heartbeat monitoring. If the secondary unit does not receive this signal after a few minutes, then the
secondary unit resumes its HA heartbeat monitoring anyway. If the primary unit fails during the firmware installation,
the HAgroup fails over to the secondary unit which then becomes the new primary unit.
Workflow
To upgrade the firmware in an HA group, perform the tasks described in the following workflow:
Upgrade task
sequence
Description Procedure
Task 1
Make sure to use a supported upgrade path specified in the FortiVoice Phone
System Release Notes.
Task 2 Download firmware image files from the Fortinet
Support website.
Downloading firmware image files on page
105
Task 3 Back up the configuration of the primary and
secondary FortiVoice units.
Backing up the configuration on page 105
Task 4 Upload firmware image files to the FortiVoice
primary unit.
Uploading firmware image files on page 106
Task 5 Upgrade the FortiVoice FXS gateway located at the
branch office.
Upgrading the FortiVoice FXS gateway on
page 107
Task 6 Upgrade the FortiVoice LSG firmware located at
the branch office.
Upgrading the FortiVoice LSG firmware on
page 107
Task 7 Upgrade the firmware on the secondary and
primary FortiVoice units located at the main office.
Upgrading the FortiVoice firmware in an HA
group on page 108
FortiVoice 7.0.2 Cookbook 104
Fortinet Inc.

High availability
Upgrade task
sequence
Description Procedure
Task 8 Upgrade your desk phones. FortiFone firmware upgrades on page 117
Task 9 Upgrade your softclients. For Android, see the Updating the FortiFone
softclient for Android section in the FortiFone
Softclient for Android User Guide.
For iOS, see the Updating the FortiFone
softclient section in the FortiFone Softclient
for iOS User Guide.
For the desktop, see the Updating the
FortiFone softclient for desktop section in the
FortiFone Sofclient for Desktop User Guide.
Downloading firmware image files
Use this procedure to access the Fortinet Support website and download the firmware image files for the products that
you want to upgrade in your FortiVoice solution.
1. Go to Fortinet Support website.
2. Log in to your existing account or register for an account.
3. Select Download > Firmware Images.
4. In Select Product, select FortiVoice.
5. In the Download tab, click the v7.00 folder.
6. Locate the firmware image files that you need to download for the FortiVoice units, FortiVoice LSG, and FortiVoice
Gateway GS16, as applicable.
7. To download the firmware image file, go to the end of the row and click the HTTPS link.
8. Click OK.
9. Take note of where you save the firmware image files on your computer.
Backing up the configuration
Use this procedure to backup the configuration of both the primary and secondary FortiVoice units.
If your deployment includes a FortiVoice FXS gateway or FortiVoice LSG unit, or both, a
configuration backup of those units is not necessary because the primary FortiVoice unit
already has this configuration.
1. Log in to the GUI of the primary FortiVoice unit.
2. Go to Dashboard > Status.
3. In the System Information widget, go to the System configuration row.
FortiVoice 7.0.2 Cookbook 105
Fortinet Inc.

High availability
4. Click Backup.
5. To save the file on your management computer, click OK.
6. Take note of the location where you save the file. Backup files let you revert to your previous configuration, if the
new configuration does not function correctly.
7. Log in to the GUI of the secondary FortiVoice unit.
8. Repeat steps 2 to 6.
Uploading firmware image files
Use this procedure to upload the firmware image files to the primary and secondary FortiVoice units. You have already
downloaded the firmware image files from the Fortinet Support website.
1. Log in to the GUI of the primary FortiVoice unit.
2. Go to Managed System > Firmware >FortiVoice Firmware.
3. Click Upload.
4. Click Select.
5. Select the file to upload and click Open.
6. When the upload is complete, click OK.
7. To upload another firmware image file, repeat steps 3 to 6.
8. Log in to the GUI of the secondary FortiVoice unit.
9. Repeat steps 2 to 7.
FortiVoice 7.0.2 Cookbook 106
Fortinet Inc.
High availability
Upgrading the FortiVoice FXS gateway
1. Log in to the GUI of the primary FortiVoice unit.
2. Go to Managed System >Firmware > FortiVoice Firmware.
3. In the list, click the firmware file that you want to use to upgrade the FortiVoice FXS gateway units.
4. To perform the upgrade now:
a. Select the Upgrade drop-down menu and then select Now.
A warning appears with information about the firmware type and version, and the
following message:All devices with the same type will be upgraded.
b. To continue with the upgrade, click OK.
5. To schedule the upgrade:
a. Select the Upgrade drop-down menu and then select Now.
A warning appears with information about the firmware type and version, and the
following message:All devices with the same type will be upgraded.
b. To continue with the upgrade, click OK.
c. Select a date and time, and click OK.
6. Verify that the FortiVoice FXS gateway firmware is successfully installed:
a. Go to Managed System > Gateway > FXS Gateway.
b. Locate the row for the upgraded FortiVoice FXS gateway.
c. In the Version column, make sure that the FortiVoice FXS gateway firmware version is the one that you
upgraded to.
Upgrading the FortiVoice LSG firmware
1. Log in to the GUI of the primary FortiVoice unit.
2. Go to Managed System >Firmware > FortiVoice Firmware.
3. In the list, click once on the firmware that you want to use to upgrade the FortiVoice LSG units.
4. To perform the upgrade now:
a. Select the Upgrade drop-down menu and then select Now.
A warning appears with information about the firmware type and version, and the
following message:All devices with the same type will be upgraded.
b. To continue with the upgrade, click OK.
FortiVoice 7.0.2 Cookbook 107
Fortinet Inc.

High availability
5. To schedule the upgrade:
a. Select Upgrade > Custom Time.
A warning appears with information about the firmware type and version, and the
following message:All devices with the same type will be upgraded.
b. To continue with the upgrade, click OK.
c. Select a date and time, and click OK.
6. Verify that the FortiVoice LSG firmware is successfully installed:
a. Go to Managed System > Survivability > Survivability Branch.
b. Locate the row for the upgraded FortiVoice LSG unit.
c. In the Version column, make sure that the FortiVoice LSG firmware version is the one that you upgraded to.
Upgrading the FortiVoice firmware in an HA group
Make sure to upgrade the firmware on the secondary unit before upgrading the firmware on
the primary unit.
1. Upgrade the firmware on the secondary FortiVoice unit:
a. Log in to the GUI of the secondary FortiVoice unit.
b. Go to Dashboard > Status.
c. In the System Information widget, go to the Firmware version row.
d. Click Update.
e. Locate the firmware file and then upload that file.
Your web browser uploads the firmware file to the unit.
f. To confirm the upgrade, click Yes.
The unit installs the firmware and restarts.
FortiVoice 7.0.2 Cookbook 108
Fortinet Inc.

High availability
g. To make sure that the FortiVoice GUI reloads correctly and displays all changes, clear the cache of your web
browser and restart it.
2. Verify that the firmware is successfully installed on the secondary FortiVoice unit:
a. Go to Dashboard > Status.
b. In the System Information widget, go to the Firmware version row.
c. Make sure that the FortiVoice firmware version is the one that you upgraded to.
Fortinet recommends that you upgrade the primary unit during your maintenance window
without manually forcing a failover.
Manually forcing a failover to the secondary unit before upgrading the primary unit would
cause some unnecessary data synchronization.
3. Upgrade the firmware on the primary FortiVoice unit:
a. Log in to the GUI of the primary FortiVoice unit.
b. Go to Dashboard > Status.
c. In the System Information widget, go to the Firmware version row.
d. Click Update.
e. Locate the firmware file and then upload that file.
Your web browser uploads the firmware file to the unit.
f. To confirm the upgrade, click Yes.
The unit installs the firmware and restarts.
g. To make sure that the FortiVoice GUI reloads correctly and displays all changes, clear the cache of your web
browser and restart it.
4. Verify that the firmware is successfully installed on the primary FortiVoice unit:
a. Go to Dashboard > Status.
b. In the System Information widget, go to the Firmware version row.
c. Make sure that the FortiVoice firmware version is the one that you upgraded to.
5. Verify the traffic flow on the primary FortiVoice unit.
FortiVoice 7.0.2 Cookbook 109
Fortinet Inc.

Hotelmanagement
You can use a property management system (PMS) to manage your hotel services. The PMS can be connected to a
PBX such as the FortiVoice unit to configure a customer’s room phone by displaying the customer’s name on the phone,
emptying voicemails when a new customer checks in, logging phone calls, setting wake-up calls, and other services.
You can also set the room condition codes for room maids to record the room cleaning status using the room phone.
All PMSs that support the Mitel protocol work seamlessly with FortiVoice. However, in the hospitality industry, there are
many PMSs using their own proprietary implementation that do not support the Mitel protocol.
Thankfully, FortiVoice supports the Comtrol’s Lodging Link solution, which works as a middle-ware that translates
commands between a third-party PMS and a guest service system such as FortiVoice.
The following recipe guides you through the process of configuring FortiVoice to work with a PMSby using the FortiVoice
comtrol interface.
After configuring FortiVoice, configure and connect your own PMS to FortiVoice. For more details, see your PMS
manual.
Hotel management is only available if you have purchased the hotel management license and
uploaded that license to the FortiVoice phone system.
This section includes the following recipes:
l
Configuring PMSsettings on page 110
l
Configuring hotel management options on page 111
l
Defining minibar codes on page 112
l
Configuring room status on page 112
Configuring PMSsettings
Configure PMS settings to allow FortiVoice to connect to your PMS.
1. Go to Hotel Management >Setting >PMS.
2. Click Enabled.
3. Set Protocol to FortiVoice, and enter the port number used to connect to the PMS (by default, 15374).
4. Under Network Setting, enter the IP address and netmask of the PMS.
If you have multiple property management systems, you can enter multiple trusted hosts.
FortiVoice 7.0.2 Cookbook 110
Fortinet Inc.

Hotelmanagement
5. Click Apply.
Configuring hotel management options
You can select the appropriate guest information to make a room check-in or check-out ready.
1. Go to Hotel Management >Setting >Option.
2. Under Check In Action, select the appropriate guest information to make a room check-in ready:
l
Privilege: Enable phone call restrictions and user privileges for the room extension.
l
Guest name: Display either the room number or guest name on the extension in the room. This is configured in
the Name field as %%NUMBER%% to display the room number or %%NAME%% to display the guest name.
l
Room condition: Clear any condition set for the room.
3. Under Check Out Action, select the appropriate guest information to make a room check-out ready. In addition to
the options available for check-in, check-out options also include the following:
l
Voicemail: Clear all voicemails for the room extension.
l
Wake-up call: Clear all wake-up call setups for the room extension.
4. Under Advanced, set First dial minibar item to either Code or Number, to determine how guests place an order
from the front desk. For example, if Code is selected, and the guest wants two waters (code 1), the guest would
enter 1*2. If Number is selected, and the guest wants the same order, they would instead enter 2*1.
FortiVoice 7.0.2 Cookbook 111
Fortinet Inc.

Hotelmanagement
5. Click Apply.
Defining minibar codes
In the previous step, an example was given of the guest entering a number code of 1 for water. The Minibar Code tab is
where codes are associated with minibar items. Codes assigned to minibar items must be configured to allow guests to
place minibar orders using the key pad.
1. Go to Hotel Management >Setting >Minibar Code and click New.
2. To create the water code used in the previous step, set Name to water and Code to 1, and click OK.
3. Create other minibar codes for other minibar items as necessary.
In this example, water, beer, and chips have been assigned codes 1, 2, and 3 respectively. If the guest wants two
waters, two beers, and one order of chips, and assuming First dial minibar item under Hotel Management
>Setting >Option is set to Code, the guest would enter 1*2*2*2*3*1.
Configuring room status
After connecting the PMS and the FortiVoice phone system, you can configure the hotel room statuses.
FortiVoice 7.0.2 Cookbook 112
Fortinet Inc.

Hotelmanagement
1. Go to Hotel Management >Room Status >Room Status and click Server Info.
A green dot indicates that the FortiVoice device is connected with the PMS.
2. Select the Room you wish to edit and click Edit.
3. Enable Guest phone to make the room a guest room. Guest Setting will appear.
4. If the guest is checked-out, set the appropriate Room condition from the drop-down menu. If the guest is checked-
in, enable Checked-in, set the appropriate Room condition, Guest name, and Privilege option.
5. Additionally, enable VIPsetting if the guest should receive special treatment, and enable DND if the guest does not
want to be disturbed.
FortiVoice 7.0.2 Cookbook 113
Fortinet Inc.

Licensing
This section includes the following recipes:
l
Purchasing a FortiVoice product license on page 114
l
Registering a FortiVoice product and downloading the license file on page 114
l
Uploading the license file to FortiVoice on page 115
See also Uploading license files on a FortiVoice HA group on page 101.
Purchasing a FortiVoice product license
Before you begin
l
Make sure to know the order information (such as stock keeping unit (SKU) code) of the FortiVoice product that you
want to order. For details, see the FortiVoice Phone Systems Data Sheet or FortiFone IP Telephones Data Sheet.
l
Make sure to know how to contact a Fortinet partner to place your order. If you do not have a partner, you can visit
To purchase a FortiVoice product license
1.
Contact a Fortinet-authorized reseller in your region.
2.
Place your order.
3.
After your order is processed, Fortinet sends you an email that includes the support contracts and registration codes
for the FortiVoice or FortiFone licenses.
4.
Download the files to a convenient location on your computer or network.
5.
Know how to access and copy the registration codes. You will need those codes during the registration process.
6.
To continue with the registration process, go to Registering a FortiVoice product and downloading the license file on
page 114.
Registering a FortiVoice product and downloading the license file
Before you begin
Make sure that you have the license registration code for the product that you want to register (see Purchasing a
FortiVoice product license on page 114).
To register a FortiVoice product and download the license file
FortiVoice 7.0.2 Cookbook 114
Fortinet Inc.

Licensing
1. Log in to your FortiCloud account or register for an account.
2. To start the registration process, click Register Now.
3. In Registration Code, enter your product serial number, service contract registration code or license certificate
number.
4. In End User Type, choose the type of user as either government or non-government.
5. To continue the product registration, click Next.
6. Provide registration details and click Next.
7. Read and accept the terms and conditions of the product registration agreement, and click Next.
8. On the Verification page, review and accept the product entitlement, and click Confirm.
9. When the registration is complete, download the license file file (.lic) to your computer:
a. Go to Products > Product List.
b. Click the Serial Number for your product.
c. In Product Information, go to License File and click License File Download.
d. Take note of the location where you save the license file.
Uploading the license file to FortiVoice
Before you begin
l
You know where the license file is stored on your computer. For more details, see Registering a FortiVoice product
and downloading the license file on page 114.
l
If you have a FortiVoice HA group, go to Uploading license files on a FortiVoice HA group on page 101 instead of
performing the steps below.
To upload the license file to FortiVoice
FortiVoice 7.0.2 Cookbook 115
Fortinet Inc.

Licensing
1. Go to Dashboard >Status.
2. In the License Information widget, click Update License.
3. In the File Upload dialog box, locate the license (.lic) file, select the file, and click Open.
4. To confirm the upload, click Yes.
FortiVoice 7.0.2 Cookbook 116
Fortinet Inc.

Managed system
This section contains information about configuring system management settings including gateways, survivability, and
FortiVoice and FortiFone firmware.
This section includes the following topics:
l
Gateway management on page 117
l
FortiVoice units as survivable branches on page 117
l
FortiFone firmware upgrades on page 117
Gateway management
FortiVoice can manage the following three types of gateways:
l
FortiVoice foreign exchange office (FXO) gateway - This gateway works in conjunction with the FortiVoice
phone system, an IP private branch exchange (IP PBX), to expand resources and support additional analog phone
lines. With the FortiVoice FXO gateway, you connect your analog phone lines to your FortiVoice phone system. For
details about deploying an FXO gateway, see the FortiVoice FXO Gateway Deployment Guide.
l
FortiVoice foreign exchange subscriber (FXS) gateway - This gateway works in conjunction with the FortiVoice
phone system to expand resources and support additional analog phone extensions. With the FXS gateway, you
can connect your traditional analog phones and fax machines to a FortiVoice phone system. For details about
deploying an FXS gateway, see the FortiVoice FXS Gateway Deployment Guide.
l
FortiVoice primary rate interface (PRI) gateway - This gateway works in conjunction with your FortiVoice phone
system to expand resources and support additional phone lines. With a PRI gateway, you connect your legacy
telephony infrastructure composed of PRI (T1 or E1) digital lines to a FortiVoice phone system. For details about
deploying a PRI gateway, see the FortiVoice PRI Gateway Deployment Guide.
FortiVoice units as survivable branches
In a centralized multi-site network deployment, a FortiVoice local survivability solution provides resiliency with
survivability branches. A survivability branch is a FortiVoice local survivable gateway (LSG) unit with local extensions. A
FortiVoice LSG unit is located in a branch office. A FortiVoice phone system in a main office manages one or more
FortiVoice LSG units (survivability branches).
Local survivability provides centralized management and branch office resiliency.
For details about deploying a FortiVoice LSG unit, see the FortiVoice Local Survivable Gateway Deployment Guide.
FortiFone firmware upgrades
This recipe guides you through the process of upgrading the FortiFone desk phone firmware.
FortiVoice 7.0.2 Cookbook 117
Fortinet Inc.

Managed system
This section includes the following tasks:
l
Reviewing the current FortiFone firmware on page 118
l
Uploading the FortiFone firmware to FortiVoice on page 118
l
Performing the FortiFone firmware upgrade on page 119
l
Confirming the FortiFone firmware upgrade on page 119
Reviewing the current FortiFone firmware
Before updating the FortiFone firmware, you can review the firmware currently installed on all FortiFone devices
connected to the network.
1. From the FortiVoice UI, navigate to Managed System > Firmware > FortiFone Firmware and click Statistics.
The Firmware Upgrade Status window opens listing the phone model and firmware version details of phones
currently connected to the network. The Phone Count column provides the number of phones in each particular
grouping.
2. When you are finished reviewing the status of the phones, click Close.
Uploading the FortiFone firmware to FortiVoice
Before you begin
l
Verify that the network connectivity is available between the target FortiFone devices and the FortiVoice unit.
l
Download the latest FortiFone firmware files from the Fortinet Support website.
Procedure steps
1. Go to Managed System > Firmware.
2. From the FortiFone Firmware tab, click Upload.
The FortiFone Firmware Upload window opens.
3. For Phone model, select the phone type that will be the target of the firmware upgrade.
4. For Firmware file, click Select. Select the firmware file for the selected FortiFone model and click Open.
The firmware file uploads to FortiVoice.
5. In the Comments field, provide a comment if necessary.
6. For FortiFone-380, 480, and 580, there is a Forced option. If necessary, enable this option to force a new build onto
the phone regardless of the firmware version already on the phone.
7. Click OK.
The uploaded firmware file appears in the list of FortiFone Firmware files.
FortiVoice 7.0.2 Cookbook 118
Fortinet Inc.

Managed system
Performing the FortiFone firmware upgrade
You can perform an immediate or scheduled FortiFone firmware upgrade.
1. Go to Managed System > Firmware.
2. In the FortiFone Firmware tab, select an uploaded firmware file from the list.
3. Go to Action >Activate.
4. Enter a Name for this firmware schedule.
5. If you want to upgrade the firmware on all devices, leave All related devices enabled.
6. To perform an immediate upgrade:
a. Click Now.
b. Click Create.
FortiVoice starts the phone firmware upgrade.
7.
To perform the upgrade at a scheduled date and time:
a. In Schedule, click At.
b. In Start time, select a date and time.
c. In End time, select a date and time.
d. To save changes, click Create.
The firmware upgrade is scheduled to run.
Confirming the FortiFone firmware upgrade
Confirm that the firmware has been successfully installed on targeted FortiFone devices.
1. Go to Managed System > Firmware.
2. From the FortiFone Firmware tab, click Statistics.
The Firmware Upgrade Status window opens. Review the firmware version of applicable phone models to confirm
that the new firmware is installed.
3. If necessary, click Refresh to view updates.
4. Click Close.
FortiVoice 7.0.2 Cookbook 119
Fortinet Inc.

Phone system
This section includes information about configuring the following system features:
l
Phone profiles on page 120
l
Emergency numbers on page 121
l
LDAP authentication configuration for extension users on page 131
l
Schedules – best practices on page 135
Phone profiles
This section includes the following tasks:
l
Viewing phone profiles on page 120
l
Changing the background image of a FON-x80 series phone on page 120
Viewing phone profiles
Each supported phone model has a phone profile.
1. Go to Phone System >Profile > Phone.
2. The table lists all the phone profiles for the supported phone models. The first section includes the current models.
The More Phones section includes older phone models.
Changing the background image of a FON-x80 series phone
You can customize the background image of a FortiFone FON-x80 series phone.
Make sure that the background image meets the following requirements:
l
File format: jpg
l
File sizes (width x height):
l
FON-280B: 320 x 240 pixels
l
FON-380/380B: 480 x 320 pixels
l
FON-480/480B: 480 x 272 pixels
l
FON-580:480 x 272 pixels
1. Go to Phone System >Profile > Phone.
2. Double-click a the profile that you want to edit.
3. Under Phone Image Setting, go to Background image and click Change.
4. Locate and select the image that you want to upload.
5. Click Open.
FortiVoice 7.0.2 Cookbook 120
Fortinet Inc.

Phone system
6. To save the updated phone profile, click OK.
7. All phones using this profile need to be updated. To complete the update, go to System > Maintenance > Phone
Maintenance Job.
8. Click New >Configuration update.
9. Enter a Name for this update.
10. Select a Schedule.
11. Click Create.
Emergency numbers
This recipe guides you through the process of establishing an emergency contact number on FortiVoice for your
company or organization.
An emergency call, such as 911 in North America, is first routed to a Public Safety Answering Point (PSAP). The PSAP
will look up the Automatic Number Identification (ANI), or calling number, from the Automatic Location Information
Database (ALI database) to determine the caller’s physical address. The PSTN service provider updates the ALI
database when a customer subscribes to its trunk service. A record in the ALI database is a mapping between a phone
number (or trunk) and its physical address.
For each emergency call, FortiVoice is responsible for setting the correct ANI for the PSAP.
This recipe includes the following topics:
l
Creating a message group on page 121
l
Configuring the emergency number on page 122
l
Configuring an outbound dialplan for emergency calls on page 124
l
Configuring an emergency zone profile on page 127
l
Configuring the emergency caller ID on page 131
Creating a message group
If an extension user dials the emergency number such as 911, FortiVoice can notify a group of users (message group)
by sending a popup text message or an audio message to extension users.
If you want an emergency zone profile to include an emergency message group number, perform the following steps:
1. Go to Extension >Group > Message Group.
2. Click New.
FortiVoice 7.0.2 Cookbook 121
Fortinet Inc.

Phone system
1. In Name, enter a unique name for the group.
2. In Number, enter the message group number. This is the number that, once dialed, will send a text or audio
message to all the extensions in the group.
3. In Display Name, enter the name displaying on the phone extensions of the group, such as HR.
4. In Message type, select to send a a Text or an Audio message. Fill in the fields, as required and click OK.
Here is an example of a text message displayed on a phone screen:
5. Click Create.
Configuring the emergency number
Configure the emergency number and contact details on FortiVoice for your company or organization.
1. Go to Phone System> Setting >Location.
2. Select the appropriate Country/Region (in this example, United States of America).
3. Select a Country/Region. With this selection, the following fields automatically update. You can edit any of them, if
required.
l
Emergency number
l
Long-distance prefix
FortiVoice 7.0.2 Cookbook 122
Fortinet Inc.

Phone system
l
International prefix
Take note of the Outside line prefix. Internal callers need to append this prefix to the
configured emergency number (in this example, 9 911).
l
Outside line prefix
4. Check with your PSTN service provider and update the Area code.
5. Configure the remaining settings, as required.
6. Expand Contact Information and enter contact details to associate with the emergency number.
7. Expand Emergency Setting, select Send Alert Email and enter Emergency contact emails as necessary.
The email addresses specified here will receive an alert email any time an emergency call is made, including the
location of the caller and the time of the call.
8. Enter an Emergency barge number, if you want FortiVoice to call that number and conference in that extension on
the emergency call.
9. Select an Emergency message group number, if you want FortiVoice to call that number and send a text or audio
message, as configured. We are using 91100 (Emergency) as an example. For details about message groups, see
Creating a message group on page 121.
FortiVoice 7.0.2 Cookbook 123
Fortinet Inc.

Phone system
10.
To save the changes, click Apply.
Configuring an outbound dialplan for emergency calls
Configure an outbound dialplan to set up how to route emergency calls.
Before you begin
Configure one or more trunks that you want a 911 call to use:
a. Go to Trunk >VoIP > SIP.
b. Update the fields. If you needs more details, see the Setting up VoIP trunks section in the FortiVoice Phone System
Administration Guide.
Procedure steps
1. Go to Call Routing >Outbound >Outbound.
There is a default emergency dial plan available. This dialplan ensures that the FortiVoice unit bypasses privilege
checks and grants the highest priority to all emergency calls.
FortiVoice 7.0.2 Cookbook 124
Fortinet Inc.

Phone system
2. To edit the emergency dial plan, double-click the emergency row.
3. Make sure that Emergency Call is enabled.
4. Leave Caller ID Match and Dialed Number Match unchanged, as you do not want to impose any kind of
restrictions to who can make an emergency call.
5. Under Call Handling, click New.
6. You can select and schedule the type of trunk that you want a 911 call to use. To assist you with the call handling
configuration, here are two examples (using pri1 and line1 trunks):
a.
Example1: Create two call handling schedules. During business hours, set the dialplan to use the pri1 trunk
and off-business hours, use the line1 trunk.
FortiVoice 7.0.2 Cookbook 125
Fortinet Inc.

Phone system
b.
Example2: Create two call handling schedules. Both pri1 and line1 trunks can be used anytime. If for some
reason, the pri1 trunk is unavailable, then the 911 call can use the line1 trunk.
FortiVoice 7.0.2 Cookbook 126
Fortinet Inc.

Phone system
Configuring an emergency zone profile
Configure an emergency zone profile to assign the same emergency settings (including the caller ID) to multiple user
extensions located in one office building.
If an office location has a few extension users only or an extension user is at a remote location (such as working from
home), then assign an emergency caller ID instead of using an emergency zone (see Configuring the emergency caller
ID on page 131).
This section includes the following tasks:
l
To configure an emergency zone profile on page 128
l
To assign an emergency zone profile to an extension on page 130
l
To assign an emergency zone profile to multiple extensions on page 130
FortiVoice 7.0.2 Cookbook 127
Fortinet Inc.

Phone system
To configure an emergency zone profile
1. Go to Phone System >Profile > Emergency Zone.
2. Click New.
3. Enter a Name for this profile.
4. Enter a Primary Caller ID to display on the destination phone when the extension user dials the emergency
number, such as 911. FortiVoice relays this caller ID to the PSAP, 911 emergency services.
5. Enter a Secondary Caller ID to display on the destination phone when the extension user dials the emergency
number, such as 911. FortiVoice can relay this caller ID to the PSAP when there are simultaneous emergency calls
from the same emergency zone. For example, extensions A and B dial 911 at the same time or a few seconds apart.
On the destination phone, the primary and secondary caller IDs show for extensions A and B, respectively.
6. Select a DID callback type to handle how to route the inbound callback from an emergency operator.
a. None: FortiVoice follows the inbound DID mapping.
b. Default Extension: FortiVoice calls the extension that you specify in Default DID extension.
c. Emergency Caller: FortiVoice calls the extension of the emergency caller. FortiVoice keeps this extension in
memory for the time period specified in DID callback hold time (see Phone System > Setting > Location,
FortiVoice 7.0.2 Cookbook 128
Fortinet Inc.

Phone system
Emergency Setting). If the emergency operator calls back after the DID callback hold time has expired,
FortiVoice uses the inbound DID mapping to route the call.
7. Optionally, enter a Description for this profile.
8. Expand and update the Emergency Setting section:
a. Do Nothing:If you do not want FortiVoice to send an alert email when an emergency call is made, select this
option.
b. Send an alert email: If you want FortiVoice to send an alert email when an emergency call is made, select this
option and enter one or more Emergency contact emails. To add more addresses, click +.
c. Enter an Emergency barge number. This is the extension number of an authorized user. When an ongoing
emergency call is in progress, the phone of the authorized user also rings. This user can listen to the call and
talk, if necessary.
d. If you have previously created a message group, then select it in Emergency message group number. When
extension users of this emergency zone profile dial this number to make an emergency call, FortiVoice will
notify all users in the group. For details about the message group creation, see Creating a message group on
page 121.
9.
In Contact Information, enter the contact details to associate with this profile.
Make sure to use the same physical address that you have shared with your carrier.
FortiVoice includes this contact information in email alerts. However, FortiVoice does not
send this contact information to the PSAP or the carrier.
10. When you enable Dynamic Network Match, you allow FortiVoice to identify where the phone of the emergency
caller is on the network. When a phone user calls an emergency number, FortiVoice checks where the calling phone
is and assigns a matching emergency zone profile to the phone. This assignment is useful when phone users move
their phones to different places on the network.
When you enable Dynamic Network Match, make sure to complete the following requirements:
l
Fill in the Network location match settings. See a. to d. below.
l
Set the Emergency zone type as Dynamic in To assign an emergency zone profile to an extension on page
130.
a. Network location match:Select either IP mask or IP range.
b. IP/Netmask:If you selected IP mask as the Network location match, enter the IP address and netmask.
FortiVoice 7.0.2 Cookbook 129
Fortinet Inc.

Phone system
c. Start IP:If you selected IP range as the Network location match, enter the start IP address.
d. End IP:If you selected IP range as the Network location match, enter the end IP address.
11. Click Create.
To assign an emergency zone profile to an extension
1. Go to Extension >Extension >IPExtension.
2. Double-click the extension that you want to edit.
3. Under Device Setting, make the following choices:
a.
If you enabled Dynamic Network Match in the Emergency Zone Profile, then select Dynamic as the
Emergency zone type.
b. Select the Emergency zone.
4. Click OK.
To assign an emergency zone profile to multiple extensions
For details about performing a batch edit to assign an emergency zone profile to multiple extensions, see Editing
extension main device settings on page 79.
FortiVoice 7.0.2 Cookbook 130
Fortinet Inc.

Phone system
Configuring the emergency caller ID
If an office location has a few extension users only or an extension user is at a remote location (such as working from
home), then assign an emergency caller ID instead of using an emergency zone.
When the extension user makes a 911 call, the destination phone displays the emergency caller ID.
For more details about the caller ID hierarchy, see Caller ID modification hierarchy for emergency calls on page 57.
1. Go to Extension >Extension >IPExtension.
2. Edit an extension or create a new one.
3.
Go to Display name and click to expand.
4. In Emergency caller ID, enter the caller ID to display on the destination phone when the extension user dials the
emergency number.
5. Click OK or Create, as applicable.
LDAP authentication configuration for extension users
The FortiVoice unit works with an LDAP server (such as MS Active Directory or OpenLDAP) to authenticate extension
users accessing the unit. This recipe guides you through the process of configuring LDAP authentication on the
FortiVoice unit for extension users.
This recipe includes the following tasks:
l
Creating an LDAP profile on page 131
l
Configuring an LDAP connector on page 133
l
Applying the LDAP profile to an extension on page 134
Creating an LDAP profile
1. Go to Phone System >LDAP > LDAP Profile and click New.
2. Enter a Profile name.
3. Set Server name/IP to the FQDN or IPaddress of the LDAPserver.
4. Set Port to the port that theLDAP server will use to communicate with the FortiVoice unit.
FortiVoice 7.0.2 Cookbook 131
Fortinet Inc.

Phone system
The default port number varies by your selection in Use secure connection. Port 389 is typically used for non-
secure connections and port 636 is typically used for SSL-secured connections.
5. Optionally, set a Fallback server name /IP and Port. Enter the fully qualified domain name (FQDN) or IP address
of an alternate LDAP server that the FortiVoice unit can query if the primary LDAP server is unreachable.
The default port number varies by your selection in Use secure connection. Port 389 is typically used for non-
secure connections and port 636 is typically used for SSL-secured connections.
6. Set Use secure connection to None or SSL.
7. Set BaseDN to the distinguished name (DN) of the LDAP directory tree within which the FortiVoice unit will search
for user objects, such as ou=People,dc=example,dc=com.
8. Set the Bind DN of an LDAP user account who has permissions to query the base DN, such as
cn=FortiVoice,dc=example,dc=com.
This field may be optional if your LDAP server does not require the FortiVoice unit to authenticate when performing
queries.
9. Enter the Bind password of the Bind DN, if applicable.
10. Under User Authentication Options, enable one of the following:
l
Try Common Name with Base DN as Bind DN: Enable to form the user’s bind DN by prepending a common
name to the base DN. Also enter the name of the user objects’ common name attribute, such as cn or uid into
the field.
l
Search User and Try Bind DN: Select to form the user’s bind DN by using the DN retrieved for that user.
l
To automatically populate the LDAP user query field, select a Schema other than User Defined.
l
In Scope, select which level of depth to query.
l
In Derefer, select the method to use, if any, when dereferencing attributes whose values are references.
For more information about configuring the LDAP query filter and schema required for this option, see the
Configuring authentication options section in the FortiVoice Phone System Administration Guide.
11. Under Advanced Options, enter a Timeout in seconds that the FortiVoice unit will wait for query responses from
the LDAP server.
12. Set Protocol version to the protocol used by the LDAP server.
13. To cache LDAPquery results, click Enable cache.
14. Set TTL to the number of minutes that the FortiVoice unit will cache query results. After the TTL has elapsed,
cached results expire, and any subsequent request for that information causes the FortiVoice unit to query the
LDAP server, refreshing the cache.
If caching is enabled, but queries are not being cached, review the value entered for TTL. Setting a TTL of 0
effectively disables caching.
15. Click Create or OK.
FortiVoice 7.0.2 Cookbook 132
Fortinet Inc.

Phone system
Configuring an LDAP connector
If your LDAP server has contact or extension information, you can configure an LDAPconnector to retrieve this
information and add it to the contact and extension lists on the FortiVoice unit.
Prerequisite
Before starting to configure an LDAPconnector, make sure to complete the steps in Creating an LDAP profile on page
131.
Procedure steps
1. Go to Phone System > LDAP > LDAP Connector.
2. Click New >Extension Connector or Contact Connector.
3. Enter a Name for the LDAPconnector.
4. Select an LDAP profile. This action auto-populates the fields.
5. Select a Schema that defines the rules to govern the types of data that the LDAP server can hold. This option
appears after you select the LDAP profile. If you select Active directory or Open LDAP, the fields under Search
Criteria and Mapping are populated. However, you can change them as needed.
6. In the Search Criteria section, you can use the auto-populated search attributes or enter your own search
attributes for the data that you want the FortiVoice unit to retrieve from the LDAPserver:
l
Search base:Enter or browse for the location in the LDAP directory tree where the search for contacts or
extensions begins.
FortiVoice 7.0.2 Cookbook 133
Fortinet Inc.

Phone system
l
Search filter:Enter the complete query filters.
l
Scope: Select the LDAP search scope indicating the set of entries at or below the Base DN that may be
considered potential matches for a SearchRequest.
l
Max results: Enter the maximum number of contacts or extensions that you want to allow the LDAP connector
to get. If you leave the value as 0, then the search will include an unlimited number of contacts or extensions,
as applicable.
7. The Mapping section enables the FortiVoice unit to convert the data retrieved from the LDAP server in to the
FortiVoice extension or contact list, as applicable. If you want to choose an attribute from your LDAP server, click
the Retrieve LDAPattribute icon ( )beside each field.
8. In the More section, you can use the auto-populated attribute data or enter the attributes used by your LDAPserver.
If you want to choose an attribute from your LDAP server, click the Retrieve LDAPattribute icon ( )beside each
field.
l
Time zone: This field is visible when you create an extension connector, not a contact connector.
l
Add entry: Use this option to configure the new time zone attribute retrieved from the LDAPserver.
l
Fixed: Select the time zone from the list. This value does not update when the FortiVoice unit
synchronizes with the LDAPserver.
l
Sync: The current time zone value will be updated when the FortiVoice unit synchronizes with the
LDAPserver.
l
Update entry: Use this option to configure the existing time zone attribute on your FortiVoice unit.
l
Skip: The current time zone is ignored and will not be updated when the FortiVoice unit synchronizes
with the LDAPserver.
l
Sync: The current time zone value will be updated when the FortiVoice unit synchronizes with the
LDAPserver.
l
Voicemail PIN: This field is visible when you create an extension connector, not a contact connector.
l
Add entry:Use this option to configure the new voicemail attribute retrieved from the LDAPserver.
l
Fixed: Enter a voicemail PIN. This value will not be updated when the FortiVoice unit synchronizes
with the LDAPserver.
l
Sync: The voicemail PIN will be updated when the FortiVoice unit synchronizes with the LDAPserver.
l
Generate: Select to let the system generate a voicemail PIN. This value will not be updated when the
FortiVoice unit synchronizes with the LDAPserver.
l
Update entry: Use this option to configure the existing voicemail PIN attribute on your FortiVoice unit.
l
Skip: The current voicemail PIN is ignored and will not be updated when the FortiVoice unit
synchronizes with the LDAPserver.
l
Sync: The current voicemail PIN value will be updated when the FortiVoice unit synchronizes with the
LDAPserver.
9. In Schedule, you can specify when you want the FortiVoice unit and your LDAP server to synchronize.
10. Click Create.
11. To view the contact list of the LDAP contact connector, go to Phone System > LDAP > LDAP Contact.
12. To view the extension list of the LDAP extension connector:
a. Go to Extension >Extension >IPExtension.
b. Select Filter >Source > LDAP.
Applying the LDAP profile to an extension
You can configure an extension with LDAP as the authentication type used to access the user portal and softclient for
mobile or desktop devices.
Prerequisite
FortiVoice 7.0.2 Cookbook 134
Fortinet Inc.

Phone system
Before applying the LDAP profile to an extension, make sure to complete the steps in Creating an LDAP profile on page
131.
Procedure steps
1. Go to Extension >Extension >IPExtension and click New, or edit an existing extension.
2. Under User Setting, in the Web Access tab, set Authentication type to LDAP.
3. Select an LDAP profile to apply to this extension.
4. During the creation of the LDAP profile, you selected an user authentication option. The choice you made dictates
how to fill in the Authentication ID field:
l
If you selected Try Common Name with Base DN as Bind DN, then update the Authentication ID field to
match the common name attribute (example, uid) that you entered in the Common name ID field of the LDAP
profile. Example: jdoe.
l
If you selected Search User and Try Bind DN, then leave the Authentication ID field empty.
5. Click Create or OK.
Schedules – best practices
Each schedule you create can be used within the call handling of the FortiVoice to direct calls during various times of the
day, such as your business hours, after hours and holidays. Schedules can easily be edited to change hours, include
specific days with modified hours, or even add new holidays.
Schedules are used for handling calls in the following features:
l
Inbound call handling
l
Outbound call handling
l
Extension call handling
l
Ring groups call handling
l
Virtual number call handling
As schedules for these features are all added in the same way, this best practice covers an efficient way to create three
schedules and how to edit them that works for most businesses.
This section includes the following recipes:
l
Creating schedules on page 135
l
Configuring call handling with schedules on page 143
Creating schedules
FortiVoice has two methods for creating a schedule, Calendar and Standard, both of which are used to create the
schedules outlined within this recipe. FortiVoice contains three example schedules (business_hours, after_hours, and
holiday) and a schedule called any_time which can be used to handle calls for any time that is not configured within a
separate schedule. As a best practice, the following is recommended:
l
Create a Standard schedule to handle your holidays.
l
Create a Calendar based schedule for your business hours.
l
Use the any_time schedule to handle time outside of business hours.
FortiVoice 7.0.2 Cookbook 135
Fortinet Inc.

Phone system
A holiday schedule should use the Standard based schedule, which allows for the quick addition of holidays. The
holiday schedule will run for the entire day so no time ranges are required.
By default, FortiVoice uses a schedule called any_time to handle hours that have not already been configured within a
schedule. For example, if you have a business hours schedule for 10 AM to 6 PM but no other schedule created, the
hours outside that schedule (6 PM to 9 AM the next day) will be handled by the any_time schedule.
To add holiday dates in a Standard based schedule:
1. Go to Phone System >Profile > Schedule and click New.
2. Enter a Name (in this example, Custom_holiday), set Mode to Standard, and click Create.
3. After creating the schedule, select it the list and click Edit.
4. Expand Holiday and click New.
FortiVoice 7.0.2 Cookbook 136
Fortinet Inc.

Phone system
5. Select the Date and enter a Description, and click Create.
The new holiday is added to the list.
6. Click OK.
FortiVoice 7.0.2 Cookbook 137
Fortinet Inc.

Phone system
To create a Calendar based schedule for your business hours:
1. Go to Phone System >Profile > Schedule and click New.
2. Enter a Name (in this example, Custom_business), set Mode to Calendar, and click Create.
3. After creating the schedule, select it from the list and click Edit.
4. You will be presented with the calendar view. Click New.
5. Enter a Title, a Start time, and an End time. These are your business operation hours (in this example, 10 AM to 6
PM). Then click None next to Recurrence to configure a recurrent frequency.
FortiVoice 7.0.2 Cookbook 138
Fortinet Inc.

Phone system
6. Set the following Recurrence Setting. In this example, an indefinite weekday-only schedule that occurs every
week.
7. Click OK, and then Create.
The calendar view shows the business hours schedule automatically populated for each day that was selected.
FortiVoice 7.0.2 Cookbook 139
Fortinet Inc.

Phone system
To define different hours for the weekend:
In this example, weekends will be defined as reduced-hour workdays.
1. Within your existing business calendar, click New.
2. Enter a Title, a Start time, and an End time. This is your reduced operation hours (in this example, 10 AM to 2 PM).
Note that the date shown here is today/the day you are creating this schedule, and happens to be a weekday. Leave
this as it is. Then click None next to Recurrence to configure a recurrent frequency.
FortiVoice 7.0.2 Cookbook 140
Fortinet Inc.

Phone system
3. Set the following Recurrence Setting. In this example, an indefinite weekend-only schedule that occurs every
week. Note that Recurring start is greyed-out, and is again set to today. This does not matter, as only the days
specified in the Recurring on fields will be affected by this schedule.
Click OK, and then Create.
The calendar view shows the newly created weekend hours automatically populated alongside the regular business
hours.
FortiVoice 7.0.2 Cookbook 141
Fortinet Inc.

Phone system
To define unique hours for a specific date:
The benefit to using calendar-based schedules is that they are perpetual schedules that can be easily edited. For
example, you may want to edit your business hours for one specific date.
1. Go to Phone System >Profile > Schedule and edit your existing calendar-based business schedule.
2. Click the calendar event on the date that you would like to edit (for example, this coming Friday, October 11th).
Be sure to click the event itself and not the area surrounding the event, otherwise a new event will be created
instead.
3. Change the hours as necessary, and click OK. In this example, the End time has been reduced from 6 PM to 2 PM.
FortiVoice 7.0.2 Cookbook 142
Fortinet Inc.

Phone system
4. Before the new time can take effect, set Select Event Range to Current event only, meaning that only this
specific day will be affected. Click OK.
Configuring call handling with schedules
When you have schedules ready to use, they can be added to the call handling of any of the FortiVoice features. As the
configuration for adding a schedule is the same for all features, one call handling example will be used for inbound calls.
In this example the schedules will be put in a specific order as the FortiVoice checks schedules in the list from first to last.
The order of the schedules will be:
l
Custom_holiday: Checked first to see if the calls are coming in during a scheduled holiday.
l
Custom_business: Checked second to ensure the call is coming in during scheduled business hours.
l
Any_time: Checked last to handle any calls that fall outside of the business hours.
To configure inbound call handling with a schedule:
1. Go to Call Routing >Inbound >Inbound.
2. Select your inbound call routing rule and click Edit.
FortiVoice 7.0.2 Cookbook 143
Fortinet Inc.

Phone system
3. Under Call Handling click New.
4. Set Schedule to the holiday schedule, and set an appropriate Action to perform on holidays. Click Create.
5. Click New to create a second Call Handling action.
6. Set Schedule to the business schedule, and set an appropriate Action to perform during business hours. Click
Create.
FortiVoice 7.0.2 Cookbook 144
Fortinet Inc.

Phone system
7. Click New to create a third Call Handling action.
8. Set Schedule to the default any_time schedule, and set an appropriate Action to perform outside of business
hours. Click Create.
9. Click OK to finish the inbound dial plan configuration.
FortiVoice 7.0.2 Cookbook 145
Fortinet Inc.

Security
This section contains information about establishing and maintaining a secure phone system.
When developing a secure network topology for your FortiVoice phone system, make sure to:
l
Include a FortiGate next-generation firewall.
l
Verify that your FortiVoice phone system has the latest software to take advantage of the latest features and
enhancements that are available to you. For details about installing the latest firmware, see the Installing firmware
section in the FortiVoice Phone System Administration Guide.
This section includes the following recipes:
l
Detecting the security risks on page 146
l
Changing the default external access ports on page 148
l
Changing the default passwords on page 149
l
Disabling recommended features on page 153
l
Configuring additional settings on page 154
l
Monitoring and reporting on page 159
Detecting the security risks
This section describes how to detect the security risks and take actions to secure the FortiVoice phone system.
Monitor > Log > Voice provides the window to investigate the security risks. It displays the phone call activities
between your FortiVoice unit and other PBXes. The "sip authentication fails" messages shows the IP addresses that
have failed to obtain the authentication from your FortiVoice unit and some of these IP addresses might be security risks.
Depending on the configured threshold, the FortiVoice unit will block the IP addresses if their number of attempted logins
have reached the set threshold. Meanwhile, the alert email is sent out. See Setting the authentication failure parameters
on page 147.
Voice log example:
To send alert emails, enter the email address in Log & Report >Alert > Configuration and enable the Massive SIP
authentication failure option in Log & Report >Alert > Category.
FortiVoice 7.0.2 Cookbook 146
Fortinet Inc.

Security
You may take actions after receiving an alert email. See Reviewing blocked SIP device IP addresses on page 147.
Alert email example
Setting the authentication failure parameters
You can use the CLI to set the authentication failure parameters.
config security sip-authentication-failure
set threshold
set interval
set max-notification
end
CLI command Description
config security sip-authentication-
failure
Use this command to configure SIP authentication failure parameters.
set threshold Set the threshold for blocking IP addresses from logging in to the FortiVoice
Phone System and sending an alert email. The default is 50 attempted logins per
minute.
set interval Set the time interval to check the phone call activities.
The default is 60 seconds.
set max-notification Set the maximum notification emails to send after the threshold is reached.
The default is 100.
Reviewing blocked SIP device IP addresses
The FortiVoice unit automatically blocks IP addresses of the SIP devices that initiate the attacks against any extensions
based on the thresholds and parameters set.
For blocked IP addresses, you may select an IP address to delete it, add it to the exempt list if it is wrongly blocked, and
view its blocked history.
FortiVoice 7.0.2 Cookbook 147
Fortinet Inc.

Security
For auto exempt IP addresses, you may select an IP address to delete it if you find it suspicious.
To view the blocked IP addresses, go to Monitor > Security > Blocked IP.
To view the exempted IP addresses, go to Monitor > Security > Auto Exempt IP.
Changing the default external access ports
SIP communication commonly uses TCP or UDP port 5060 and/or 5061. Port 5060 is used for nonencrypted SIP
signaling sessions and port 5061 is typically used for SIP sessions encrypted with Transport Layer Security (TLS).
Avoid changing any of the protocol ports to four digit numbers, such as 5065 or 5070, as those
are used by other brands and are commonly scanned port numbers.
1. Go to System > Advanced >External Access.
2. You have the option to change the following SIP transport protocol ports:
l
UDP: This is the default signaling port used for external extensions, VoIP trunking, and office peers. Choose a
five digit number.
l
TCP: This is the default signaling port used for the FortiFone softclient. Choose a five digit number.
l
TLS: This is the default port for SIP sessions encrypted with Transport Layer Security (TLS). Choose a five digit
number.
l
WSS: WebSocket Secure is used to support the FortiFone desktop application. Choose a five digit number.
3. Additionally, you can configure the service external ports. Click Apply when finished.
FortiVoice 7.0.2 Cookbook 148
Fortinet Inc.

Security
Changing the default passwords
Many of the default passwords are too simple and are therefore more susceptible to compromise. It is recommended to
take the time to change the default passwords to more secure passwords.
Administrator password
Establish a more secure administrator password on the system.
1. Go to System >Administrator > Administrator.
2. Select the admin account and click Edit.
FortiVoice 7.0.2 Cookbook 149
Fortinet Inc.

Security
3. Click Change Password, enter and confirm a new password, and click OK.
Administrator PIN
The administrator PIN allows the owner of the PIN to change extension assignments and modes from any phone or auto
attendant.
1. Go to Phone System >Setting > Miscellaneous.
2. Under PBXSetting, enter a new Administrator PIN, and click Apply.
FortiVoice 7.0.2 Cookbook 150
Fortinet Inc.

Security
Call Bridge (DISA) account code
The Call Bridge Direct Inward System Access (DISA) feature allows callers to make outgoing calls from the auto
attendant. If enabled, configure this feature to use an account code.
1. Go to Call Feature > Auto Attendant >Auto Attendant.
2. Select an auto attendant and click Edit.
3. Under Advanced, enable Call bridge (DISA) and select the appropriate Account code, or create a new one.
4. Click OK.
User voicemail PIN
The default user voicemail PINis 123123. It is highly recommended to change this default PIN.
1. Go to Phone System >Setting > Option.
2. Under Default Setting, enter a new Default Voicemail PIN. Select either Specified and enter your own PIN or
Generated to generate a random PIN, and click Apply.
Password and PIN policy
Set a secure password policy that requires upper and lower case characters and alpha numerical characters for
administrator passwords and SIP passwords.
1. Go to Security >Password Policy > Password/PINPolicy.
2. Enable Password/PINPolicy and configure the settings as required. Make sure to apply the password policy to the
appropriate users.
FortiVoice 7.0.2 Cookbook 151
Fortinet Inc.

Security
3. Enabling PIN special allows the use of the * and # special characters.
4. Click Apply.
Office peers
Authentication can be configured for inbound and outbound calls on office peer trunks.
1. Go to Trunk >Office Peer >Office Peer.
2. Select an existing office peer or create a new one.
3. Under Peer Configuration, expand Authentication and select one of the following options from the drop-down
menu:
l
Symmetric: Both PBX devices will use the following information to form the office peer trunk and authenticate
each other. The defined User name and Password must be the same on both PBX devices forming the office
peer trunk.
l
Asymmetric: Used to authenticate incoming and outgoing calls. Enter the Inbound user name, Outbound
user name, and Password. These settings must be the same on both PBX devices forming the office peer
trunk.
FortiVoice 7.0.2 Cookbook 152
Fortinet Inc.
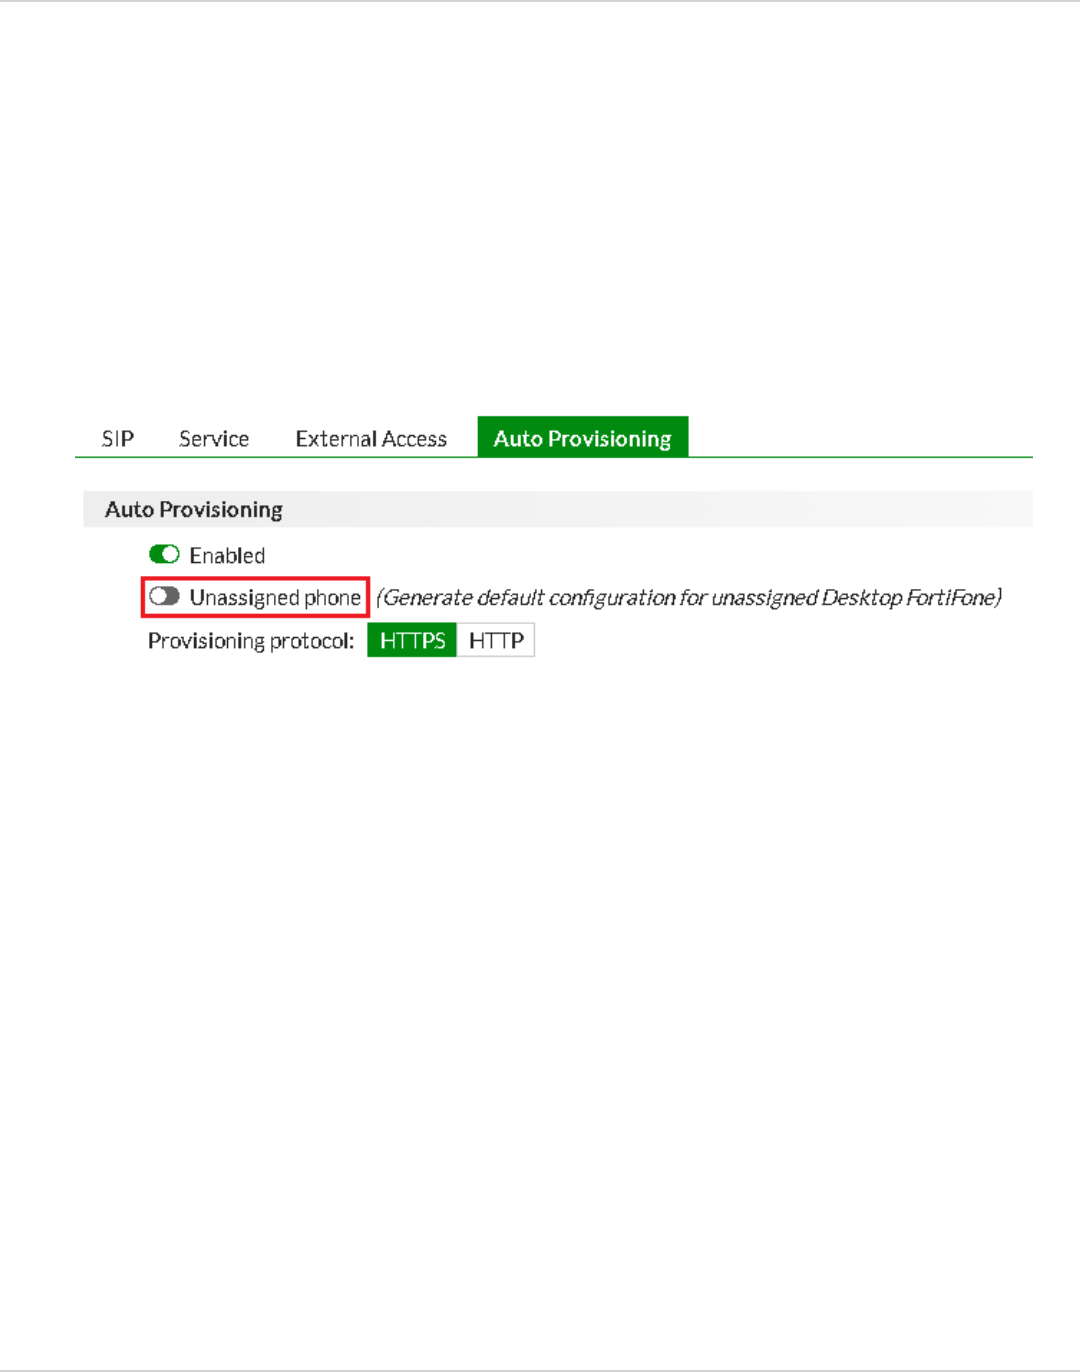
Security
Disabling recommended features
Many features are enabled by default to assist with the initial setup. After setup, however, we recommend disabling any
features that you feel are unnecessary.
Default configuration generation
After the initial setup, disable the Unassigned phone option. When you disable this feature, FortiVoice does not
automatically create a default configuration file when it receives a request from an unassigned phone.
1. Go to System > Advanced >Auto Provisioning.
2. Under Auto Provisioning, disable Unassigned phone. Automatic default configurations for unassigned phones
will no longer be generated.
3. Click Apply.
TFTP service
Go to System >Advanced > Service, disable TFTP since it is not a secure protocal.
Vertical service codes
Disable any service codes that you do not use.
1. Go to Call Feature > Feature Code >Vertical Service Code.
2. Disable the codes that you will not be requiring, such as the following:
l
**: Call bridge (DISA).
l
*15: Reset the phone to be "unassigned" by admin.
l
*16: Reset the phone to be "unassigned" by user.
l
*17: Configure the phone to an extension by admin.
l
*18: Configure the phone to an extension by user.
FortiVoice 7.0.2 Cookbook 153
Fortinet Inc.
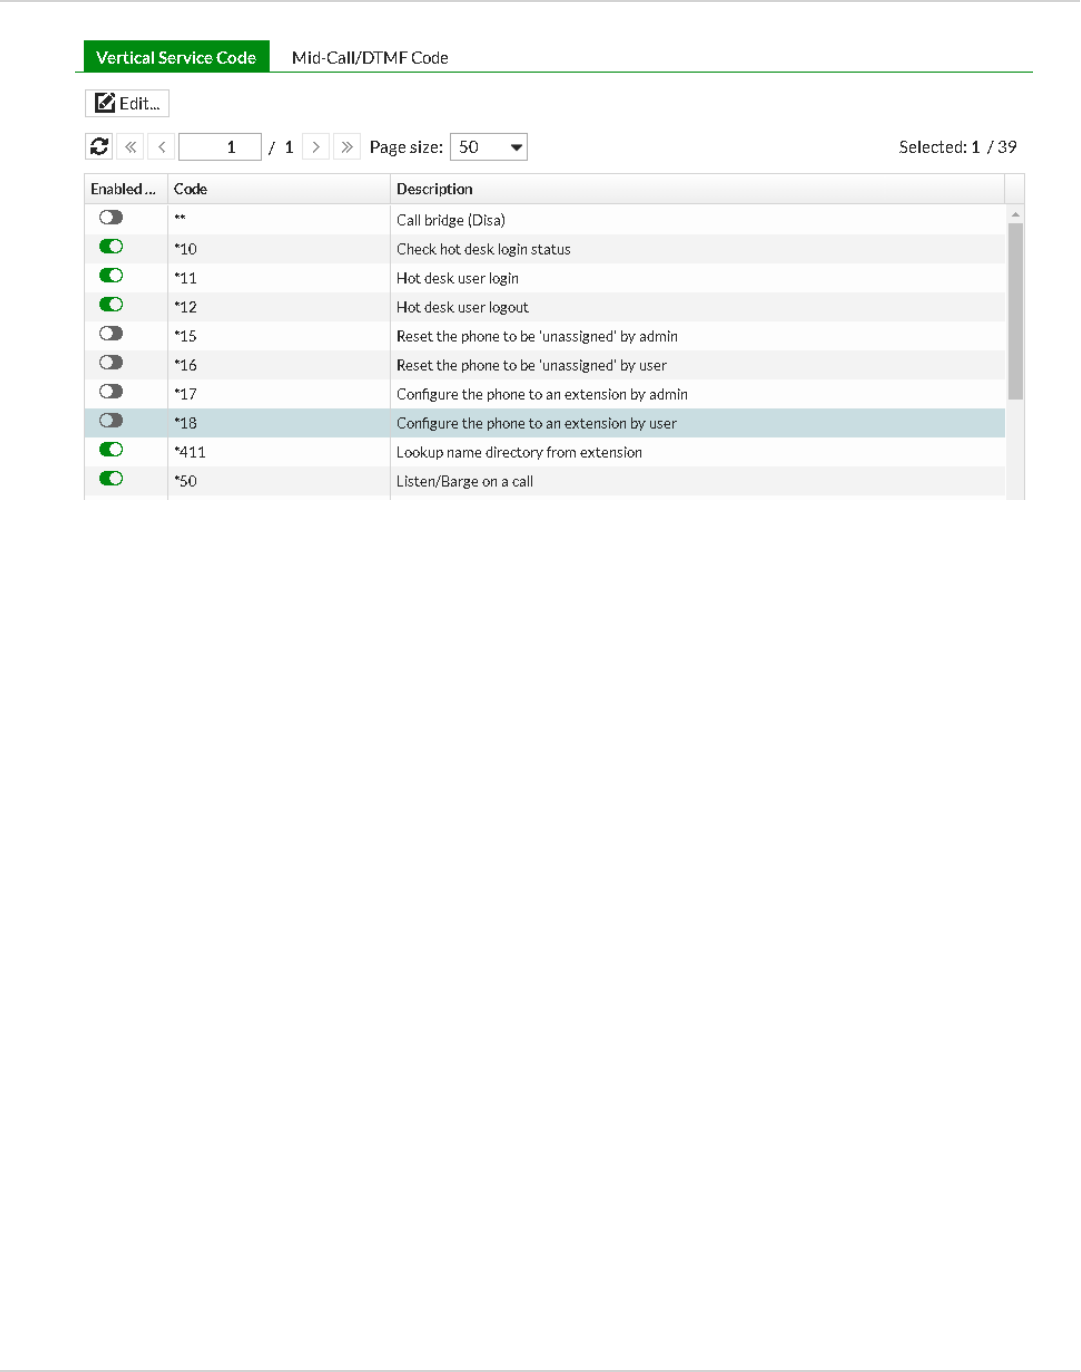
Security
Configuring additional settings
In order to provide another level of protection beyond external abuse, there are a number of settings that you can enable
to protect the FortiVoice phone system from internal abuse.
This recipe includes the following settings:
l
Call restrictions and common phones on page 154
l
Interface access on page 155
l
Guest provision protocol on page 156
l
Prohibited prefixes on page 156
l
Trusted hosts for administrators on page 157
l
Trusted hosts for extensions on page 157
l
Unused administrators on page 158
l
Unused extensions on page 158
l
Verify SIPuser agent on page 158
l
Blocking numbers on page 159
l
Unassigned phones on page 159
Call restrictions and common phones
Restrictions can be put in place based on call types, such as blocking international or toll calls.
1. Go to Security >User Privilege > User Privilege.
2. Select a user privilege and click Edit.
FortiVoice 7.0.2 Cookbook 154
Fortinet Inc.

Security
3. Expand Call Restriction and configure the settings accordingly.
Extensions that are placed in common areas, such as store floors and kitchens, should have the highest restriction
levels, which include a PIN code to make calls.
4. Set the appropriate call restriction to Allowed with Account Code, Allowed with Personal Code, or Allowed
with Account and Personal Code.
Interface access
Any access methods that are not being used on the FortiVoice device should be disabled.
1. Go to System >Network > Network.
2. Select an interface and click Edit.
3. Under Advanced Setting, disable any unused Access protocols.
FortiVoice 7.0.2 Cookbook 155
Fortinet Inc.

Security
Guest provision protocol
Using HTTPS to provision FortiFone devices with FortiVoice is recommended.
1. Go to System > Advanced >Auto Provisioning.
2. Under Auto Provisioning, set Provisioning protocol to HTTPS.
Prohibited prefixes
You may want to outright block certain phone number prefixes, such as 900 (blocked by default) which is commonly
used for premium-rate calls, or phone calls with area codes originating from certain regions.
1. Go to Phone System >Setting > Option.
2. Under Number Management, add all undesirable prefixes to the System prohibited prefix section.
FortiVoice 7.0.2 Cookbook 156
Fortinet Inc.

Security
Trusted hosts for administrators
Certain IPsubnets can be designated as allowed or trusted for administrators to log into FortiVoice. This configuration
can allow local networks to access the system but restrict remote access to the system and restrict remote access to the
system.
1. Go to System >Administrator > Administrator.
2. Select the administrator and click Edit.
3. Set Trusted hosts type to the local trusted IPsubnet (define as many as required) or RFC 1918 predefine.
Trusted hosts for extensions
Certain IPsubnets can also be designated as trusted for extensions to register to FortiVoice. This configuration can
allow local networks to access the system but restrict remote access to the system and restrict remote access to the
system.
1. Go to Phone System >Profile > User Privilege.
2. Select a user privilege and click Edit.
FortiVoice 7.0.2 Cookbook 157
Fortinet Inc.

Security
3. Expand Advanced Setting, and set Trusted hosts to the local trusted IP subnet (define as many as required).
Unused administrators
Remove administrator profiles that are not in use.
1. Go to System >Administrator > Administrator.
2. Select the administrators that are not active and click Delete.
Unused extensions
To avoid the unintentional use of unused extensions, remove those extensions.
1. Go to Extension >Extension >IPExtension.
2. Disable the extensions that are not active.
Verify SIPuser agent
Restrict phone registration so only phone requests that match the system configured phone type are allowed.
FortiVoice 7.0.2 Cookbook 158
Fortinet Inc.

Security
1. Go to Dashboard > Console and click inside the window to connect to the CLIconsole.
2. Enter the following commands:
config system sip-setting
set verify-user-agent enable
end
Blocking numbers
If you find any extension has been suffering from attacks by other devices, you may block it to stop the attacks.
1. Go to Security > Blocked Number.
2. Click New.
3. Enter the extension you want to block.
4. Click Create.
5. To unblock a number, select it in the list and click Delete.
Unassigned phones
If you find the number of phones that are auto discovered but have not been assigned extensions are abnormally high, it
may mean the FortiVoice unit is under MAC address flooding attack and its performance will be compromised. You can
remove the phones.
1. Go to Dashboard > Status.
2. At the bottom of System Information, find Phones not assigned.
3. Click the Remove all not assigned phones icon to delete the phones as required.
Monitoring and reporting
There are many tools within FortiVoice to help manage your security settings and help protect your system.
This section includes the following topics:
l
Administrator alerts on page 159
l
Call detail reports on page 160
l
SIP password auditor on page 161
l
Intrusion detection on page 161
Administrator alerts
Administrators can be notified by email of system alerts when FortiVoice detects suspicious activity, such as a SIP
attack.
1. Go to Log &Report > Alert >Configuration and click New.
2. Enter the administrator's email address and click Create.
FortiVoice 7.0.2 Cookbook 159
Fortinet Inc.

Security
3. Go to Log &Report > Alert >Category.
4. Under Alert Email Setting, enable Massive SIP authentication failure, and click Apply.
Call detail reports
Reports can be generated and downloaded for greater call inspection, such as for looking into details concerning
blocked or denied calls.
1. Go to Log &Report > Call Report > Call Report.
2. Select the appropriate call report and click Generate.
3. A dialog window appears letting you know that the report has been started. Click OK.
4. Click View Report, where you are redirected to Monitor >Call Report > Report.
5. Expand the report generated to view the various components of the report. Select the whole report and click
FortiVoice 7.0.2 Cookbook 160
Fortinet Inc.

Security
Download and either Download PDF, Download HTML, or Download CSV.
SIP password auditor
Frequently review the SIP password audits to make sure that SIPpasswords for extensions are secure. Make sure that
Password/PINPolicy is enabled under Security >Password Policy > Password/PINPolicy, and that the password
policy is applied to SIPusers.
1. Go to Security >Password Policy > Password Auditor.
2. Review the list of extensions to see whether their password and PINstrengths meet the password policy
requirements.
Intrusion detection
Intrusion detection lets you manually add IPs to be exempted from being blocked, remove system added exempt IPs if
you find them suspicious, and configure intrusion detection settings.
1. Go to Security >Intrusion Detection > Setting and set Status to Enable.
FortiVoice 7.0.2 Cookbook 161
Fortinet Inc.

Softclient
With the FortiFone softclient, you stay connected to the office, never missing an important call. You transform your
mobile device into an extension connected to the FortiVoice phone system. The Fortinet business communications
solution enables you to manage calls, check voicemail messages, and quickly view the company directory.
This section includes the following configuration topics:
l
Deployment of FortiFone softclient for mobile on page 162
l
Deployment of FortiFone softclient for desktop on page 184
Deployment procedures use FortiGate as an example firewall. If your deployment does not
use FortiGate, then follow the instructions provided by the firewall manufacturer.
Deployment of FortiFone softclient for mobile
Topics in this section apply to the FortiFone softclient for mobile, not for desktop.
With the FortiFone softclient for mobile, you stay connected to the office, never missing an important call. You transform
your mobile device into an extension connected to the FortiVoice phone system. Fortinet’s business communications
solution enables you to manage calls, check voicemail messages and quickly view the company directory.
In a typical deployment scenario, the FortiVoice phone system is located behind an internet facing firewall. If a customer
has deployed a FortiFone softclient, this softclient is usually behind another firewall when the customer’s cell phone is
using the data service of a cellular network or the Wi-Fi of a home network. Signaling and two-way audio through a
firewall requires the network address translation (NAT) traversal for the session initiation protocol (SIP). When the
deployment is using either SIP over the transmission control protocol (TCP) or the user datagram protocol (UDP), the
SIP application layer gateway (ALG) with hosted NAT traversal enabled on FortiGate can translate the internal IP
address of a session description protocol (SDP) payload properly to allow media flow. If the deployment is using SIP
over transport layer security (TLS), the SIP traffic is encrypted end-to-end. With this encryption, FortiGate is unable to
translate the internal IP address in the SDP payload, which then causes a one-way audio or no audio at all. Fortunately,
FortiGate supports SSL inspection and is able to decrypt the encrypted SIP traffic and translate the SDP address to
resolve the NAT-traversal issue.
This section describes how to configure the FortiVoice phone system and FortiGate to use the FortiFone softclient as a
remote SIPclient, and install and configure the FortiFone softclient.
Protocols
The communication between the FortiFone softclient and FortiVoice uses the following protocols and server:
FortiVoice 7.0.2 Cookbook 162
Fortinet Inc.

Softclient
l
HTTPS for softclient login, auto-provisioning, download of contacts, call logs, and voicemails
l
SIP for signaling
l
RTP or secure RTP (SRTP) for audio
l
Android and iOS push server for outbound calls
Call flows
The inbound call flow includes the following steps:
1. A caller dials an extension to connect to the FortiFone softclient.
2. FortiVoice sends the push request to the Android or iOS push server which relays the request to the mobile client
(cellular phone).
3. If the mobile client is in sleep mode, the request wakes up the mobile client.
4. The FortiFone softclient registers with FortiVoice and then receives the inbound call.
5. After the signaling is complete, FortiVoice sends the audio to the mobile client using RTP or SRTP.
The outbound call flow includes the following steps:
1. The user initiates an outbound call using the mobile client.
2. The FortiFone softclient sends a SIP invite directly to FortiVoice.
3. After the signaling is complete, FortiVoice sends the audio to the destination phone using RTP or SRTP.
FortiVoice 7.0.2 Cookbook 163
Fortinet Inc.

Softclient
Topology
Configuring FortiFone softclient for mobile settings on FortiVoice
Perform the following procedures to configure FortiFone softclient for mobile settings on the FortiVoice phone system:
Prior to starting the configuration, make sure to complete the recipes in Licensing on page
114.
Unless otherwise specified, steps in this FortiFone softclient section apply to SIP over TCP,
UDP, and TLS.
FortiVoice 7.0.2 Cookbook 164
Fortinet Inc.

Softclient
l
Configure external access settings on page 165
l
Configure a SIPprofile on page 166
l
Assign the FortiFone softclient to a FortiVoice extension on page 167
l
Export the FortiVoice server certificate for SIP over TLS on page 168
Configure external access settings
1. On FortiVoice, go to System > Advanced >External Access.
2. Set SIPserver external hostname/IP addressto the IP address or FQDN of the FortiVoice device and configure
the following external access ports.
3. Go to System > Advanced >SIP.
4. Under Advanced Setting, make sure that SIPsession helper is disabled.
FortiVoice 7.0.2 Cookbook 165
Fortinet Inc.

Softclient
Configure a SIPprofile
FortiVoice includes a default SIP profile (sip_mobile_fortifone_default). If your deployment uses SIP over TCP, then you
can use this default profile, and skip this procedure.
If your deployment requires SIP over UDP or TLS, then you can create a new SIP profile.
1. On FortiVoice, go to Phone System > Profile > SIP.
2. Click New > Mobile.
3. In Name, enter a name for this SIPprofile.
4. Select a DTMF setting.
5. Enable NAT.
6. In Transport, select the protocol. If you select TLS, then enable Secure RTP.
7. Click Create.
Example for configuring a SIP profile for UDP:
FortiVoice 7.0.2 Cookbook 166
Fortinet Inc.

Softclient
Example for configuring a SIPprofile for TLS:
Assign the FortiFone softclient to a FortiVoice extension
1. On FortiVoice, go to Extension >Extension >IPExtension and click New.
2. Enter a Number.
3. Under Device Setting, click the Soft FortiPhone tab.
4. In License allocation, specify the value to configure.
5. In Android/iOS, leave the default profile (sip_mobile_fortifone_default) or select the profile that you configured in
Configure a SIPprofile on page 166.
FortiVoice 7.0.2 Cookbook 167
Fortinet Inc.

Softclient
6. Click Create.
7. If your deployment uses SIP over TLS, go to Export the FortiVoice server certificate for SIP over TLS on page 168.
If your deployment uses SIP over TCP or UDP, go to Configuring FortiGate for SIP over TCP or UDP on page 177.
Export the FortiVoice server certificate for SIP over TLS
1. On FortiVoice, go to System > Certificate > Local Certificate.
2. In the list, select FortiVoiceSIPServer. This is the default certificate for the SIP service. If you are using a custom
certificate, select that one instead of the default.
FortiVoice 7.0.2 Cookbook 168
Fortinet Inc.

Softclient
3. Click Download and select Download PKCS12 File.
The PKCS12 Certificate Download dialog opens.
4. In Password and Confirm password, enter a password to encrypt the key.
5. To download the file, click OK.
6. To save the file locally, click OK.
7. Take note of the location where you save the file.
8. Go to Configuring FortiGate for SIP over TLS on page 169.
Configuring FortiGate for SIP over TLS
After Configuring FortiFone softclient for mobile settings on FortiVoice on page 164, perform the following procedures to
configure a FortiGate device for SIPover TLS:
l
Import the downloaded FortiVoice server certificate for SIP over TLS on page 169
l
Configure system settings for SIP over TLS on page 171
l
Create virtual IP addresses for SIP over TLS on page 171
l
Configure VoIP profile and NATtraversal settings for SIP over TLS on page 174
l
Create an inbound firewall policy for SIP over TLS on page 175
l
Create an outbound firewall policy for FortiVoice to access the Android or iOS push server on page 176
If your FortiVoice deployment is using SIP over TCP or UDP instead, go to Configuring FortiGate for SIP over TCP or
UDP on page 177.
Import the downloaded FortiVoice server certificate for SIP over TLS
Perform the following steps to import the downloaded FortiVoice server certificate. The downloaded certificate is from
Export the FortiVoice server certificate for SIP over TLS on page 168.
FortiVoice 7.0.2 Cookbook 169
Fortinet Inc.

Softclient
1. On FortiGate, go to System > Certificates.
2. Click Import and select Local Certificate.
3. Update the following fields in the Import Certificate dialog:
a. In Type, click PKCS #12 Certificate.
b. In Certificate with key file, click Upload.
c. Locate the FortiVoice server certificate. This is the file from Export the FortiVoice server certificate for SIP over
TLS on page 168.
d. Click Open.
e. In Password, enter the password associated with the FortiVoice server certificate.
f. Click OK.
FortiVoice 7.0.2 Cookbook 170
Fortinet Inc.

Softclient
4. Verify that the list of certificates now includes the newly imported FortiVoice server certificate.
Configure system settings for SIP over TLS
1. On FortiGate, go to System >Feature Visibility.
2. Under Additional Features, enable Multiple Security Profiles and VoIP.
3. Click Apply.
Create virtual IP addresses for SIP over TLS
1. On FortiGate, go to Policy &Objects > Virtual IPs.
2. ClickCreate New and select Virtual IP.
3. Create virtual IPs for the following services that map to the IP address of the FortiVoice:
l
External SIP TLS port of FortiVoice
l
External HTTPS port of FortiVoice. The HTTPS port is used for the softclient login, call logs, and contacts
download from the FortiVoice phone system.
FortiVoice 7.0.2 Cookbook 171
Fortinet Inc.

Softclient
FortiVoice 7.0.2 Cookbook 172
Fortinet Inc.

Softclient
4. To create a virtualIP group, clickCreate New and select Virtual IP Group.
5. Add the two newly created virtualIPs.
FortiVoice 7.0.2 Cookbook 173
Fortinet Inc.

Softclient
Configure VoIP profile and NATtraversal settings for SIP over TLS
1. On FortiGate, open the CLIConsole from the GUIbanner.
2. Create a VoIP protection profile and enable hosted NAT traversal (HNT) and restricted HNT source address. If the
FortiVoice softclient is behind a non-SIP-aware firewall, HNT addresses the SDP local address problem. Enable
SSL full inspection and refer to the imported FortiVoice server certificate for example, FortiVoiceSIPServer.
This VoIP protection policy with hosted NAT traversal enabled will be added to the inbound firewall policy to prevent
potential one way audio issues caused by NAT.
VoIP profile command example for SIP over TLS
config voip profile
edit "SIP_IN"
config sip
set hosted-nat-traversal enable
set ssl-mode full
set ssl-server-certificate "FortiVoiceSIPServer"
end
next
end
3. For SIP over TLS, the recommendation is to use the default SSL port for SIP (TCP 5061). Enter the following
commands:
config system settings
set sip-tcp-port 5061
end
4. Edit the FortiGate interface connecting to the internet and set it to external. The SIPapplication layer gateway (ALG)
with hosted NATtraversal requires an external port to work. Enter the following commands:
config system interface
edit wan1
set external enable
FortiVoice 7.0.2 Cookbook 174
Fortinet Inc.

Softclient
next
end
Create an inbound firewall policy for SIP over TLS
1. On FortiGate, go to Policy &Objects > Firewall Policy and click Create New.
2. Set Incoming Interface to the internet-facing interface.
3. Set Outgoing Interface to the internal/LAN interface.
4. Set Source to all.
5. Set Destination to the virtualIPgroup created in Create virtual IP addresses for SIP over TLS on page 171.
6. Set Schedule to always.
7. Set Service to ALL.
8. Disable NAT.
9. Enable VoIP and select the VoIP profile created in Configure VoIP profile and NATtraversal settings for SIP over
TLS on page 174.
FortiVoice 7.0.2 Cookbook 175
Fortinet Inc.

Softclient
Create an outbound firewall policy for FortiVoice to access the Android or iOS push
server
FortiVoice requires outbound access to the Android and iOS push servers.
FortiVoice 7.0.2 Cookbook 176
Fortinet Inc.

Softclient
If FortiGate has an outbound firewall policy that allows FortiVoice to access everything on the internet, then you do not
need to create an additional firewall policy. You have completed the FortiGate configuration for SIP over TLS. Go to
Installing and configuring the FortiFone softclient for mobile on page 184.
If FortiGate does not have an outbound firewall policy that allows FortiVoice to access everything on the internet,
perform the steps to create the FQDN addresses and the specific outbound firewall policies to allow FortiVoice to access
the Android and iOS push servers.
To create FQDN addresses for Android and iOS push servers
1. On FortiGate, go to Policy &Objects > Addresses and click Create New.
2. In Name, enter a name for the Android push server address.
3. In Type, select FQDN.
4. In FQDN, enter fcm.googleapis.com.
5. Click OK.
6. Click Create New.
7. In Name, enter a name for the iOS push server address.
8. In Type, select FQDN.
9. In FQDN, enter gateway.push.apple.com.
10. Click OK.
To use the Android and iOS push server addresses in an outbound firewall policy
1. On FortiGate, go to Policy &Objects > Firewall Policy and click Create New.
2. In Incoming interface, enter the port connected to FortiVoice.
3. In Outgoing interface, enter the WAN port.
4. In Source, select all.
5. In Destination, select the FQDN addresses that you created for the Android and iOS push servers.
6. Configure the rest of the policy, as needed.
7. Click OK.
You have completed the configuration of FortiGate for SIP over TLS.
8. Go to Installing and configuring the FortiFone softclient for mobile on page 184.
Configuring FortiGate for SIP over TCP or UDP
After Configuring FortiFone softclient for mobile settings on FortiVoice on page 164, perform the following procedures to
configure a FortiGate device for SIPover TCP or UDP:
l
Configure system settings for SIP over TCP or UDP on page 177
l
Create virtual IP addresses for SIP over TCP or UDP on page 178
l
Configure VoIP profile and NATtraversal settings for SIP over TCP or UDP on page 181
l
Create an inbound firewall policy for SIP over TCP or UDP on page 182
l
Create an outbound firewall policy for FortiVoice to access the Android or iOS push server on page 183
If your FortiVoice deployment is using SIP over TLS instead, go to Configuring FortiGate for SIP over TLS on page 169.
Configure system settings for SIP over TCP or UDP
1. On FortiGate, go to System >Feature Visibility.
2. Under Additional Features, enable Multiple Security Profiles and VoIP.
FortiVoice 7.0.2 Cookbook 177
Fortinet Inc.

Softclient
3. Click Apply.
Create virtual IP addresses for SIP over TCP or UDP
1. On FortiGate, go to Policy &Objects > Virtual IPs.
2. ClickCreate New and select Virtual IP.
3. Create virtual IPs for the following services that map to the IP address of the FortiVoice:
l
External SIP TCP port of FortiVoice. If the sip_mobile_default profile has been modified to use UDP instead,
configure the VIP for the external SIP UDP port.
l
External HTTPS port of FortiVoice. The HTTPS port is used for the softclient login, call logs, and contacts
download from the FortiVoice phone system.
FortiVoice 7.0.2 Cookbook 178
Fortinet Inc.

Softclient
FortiVoice 7.0.2 Cookbook 179
Fortinet Inc.

Softclient
4. To create a virtualIP group, clickCreate New and select Virtual IP Group.
5. Add the two newly created virtualIPs.
FortiVoice 7.0.2 Cookbook 180
Fortinet Inc.

Softclient
Configure VoIP profile and NATtraversal settings for SIP over TCP or UDP
1. On FortiGate, open the CLIConsole from the GUIbanner.
2. Create a VoIP protection profile and enable hosted NAT traversal (HNT) and restricted HNT source address. If the
FortiVoice softclient is behind a non-SIP-aware firewall, HNT addresses the SDP local address problem.
This VoIP protection profile will be added to the inbound firewall policy to prevent potential one-way audio issues
caused by NAT.
VoIP profile command example for SIP over TCP or UDP
config voip profile
edit "SIP_IN"
config sip
set hosted-nat-traversal enable
end
next
end
3. If you are using a non-standard external port, update the system settings by entering the following commands. Both
command examples use port 5566.
External port setting example for TCP
config system settings
set sip-tcp-port 5566
end
External port setting example for UDP
config system settings
set sip-udp-port 5566
end
4. Set the internet facing interface as external. HNT requires an external port to work. The command example uses
port2 as the internet facing interface.
config system interface
edit "wan1"
set external enable
next
FortiVoice 7.0.2 Cookbook 181
Fortinet Inc.

Softclient
end
Create an inbound firewall policy for SIP over TCP or UDP
1. On FortiGate, go to Policy &Objects > Firewall Policy.
2. Click Create New.
3. Set Incoming Interface to the internet-facing interface and Outgoing Interface to the internal/LAN interface.
4. Set Source to all.
5. Set Destination to the virtualIPgroup created in Create virtual IP addresses for SIP over TCP or UDP on page 178.
6. Set Schedule to always.
7. Set Service to ALL.
8. Set Inspection Mode to Proxy-based.
9. Disable NAT.
10. Enable VoIP and select the VoIP profile created in Configure VoIP profile and NATtraversal settings for SIP over
TCP or UDP on page 181.
FortiVoice 7.0.2 Cookbook 182
Fortinet Inc.

Softclient
Create an outbound firewall policy for FortiVoice to access the Android or iOS push
server
FortiVoice requires outbound access to the Android and iOS push servers.
FortiVoice 7.0.2 Cookbook 183
Fortinet Inc.

Softclient
If FortiGate has an outbound firewall policy that allows FortiVoice to access everything on the internet, then you do not
need to create an additional firewall policy. You have completed the FortiGate configuration for SIP over TLS. Go to
Installing and configuring the FortiFone softclient for mobile on page 184.
If FortiGate does not have an outbound firewall policy that allows FortiVoice to access everything on the internet,
perform the steps to create the FQDN addresses and the specific outbound firewall policies to allow FortiVoice to access
the Android and iOS push servers.
To create FQDN addresses for Android and iOS push servers
1. On FortiGate, go to Policy &Objects > Addresses and click Create New.
2. In Name, enter a name for the Android push server address.
3. In Type, select FQDN.
4. In FQDN, enter fcm.googleapis.com.
5. Click OK.
6. Click Create New.
7. In Name, enter a name for the iOS push server address.
8. In Type, select FQDN.
9. In FQDN, enter gateway.push.apple.com.
10. Click OK.
To use the Android and iOS push server addresses in an outbound firewall policy
1. On FortiGate, go to Policy &Objects > Firewall Policy and click Create New.
2. In Incoming interface, enter the port connected to FortiVoice.
3. In Outgoing interface, enter the WAN port.
4. In Source, select all.
5. In Destination, select the FQDN addresses that you created for the Android and iOS push servers.
6. Configure the rest of the policy, as needed.
7. Click OK.
You have completed the configuration of FortiGate for SIP over TCP or UDP.
8. Go to Installing and configuring the FortiFone softclient for mobile on page 184.
Installing and configuring the FortiFone softclient for mobile
For details about installing, configuring, and using the FortiFone softclient for mobile, see one of the following user
guides, as applicable:
l
FortiFone Softclient for Android User Guide
l
FortiFone Softclient for iOS User Guide
Deployment of FortiFone softclient for desktop
The FortiFone softclient for desktop is a secure application designed to transform your computer into an extension on the
FortiVoice phone system. Through the intuitive interface, you can conveniently take control of your calls without shifting
focus away from your screen. Using the FortiFone softclient for desktop in conjunction with a desk phone allows you to
manage calls, check voicemail, and quickly view the company directory.
FortiVoice 7.0.2 Cookbook 184
Fortinet Inc.

Softclient
This section describes how to configure the FortiVoice phone system to use the FortiFone softclient for desktop, and
install and configure the FortiFone softclient.
Protocols
The communication between the FortiFone softclient for desktop and the FortiVoice phone system uses the following
protocols:
l
WSS (TCP) for signaling
l
DTLS (UDP) for audio
Call flows
The inbound call flow includes the following steps:
1. The FortiFone softclient for desktop logs in and registers with FortiVoice.
2. A caller dials an extension to connect to the FortiFone softclient for desktop.
3. FortiVoice sends an Invite message to the FortiFone softclient for desktop to initiate the call.
4. When the user of the FortiFone softclient for desktop accepts the call, the signaling will be complete and FortiVoice
transmits the audio using DTLS.
The outbound call flow includes the following steps:
1. The user initiates an outbound call using the FortiFone softclient for desktop.
2. The FortiFone softclient for desktop sends an Invite message to FortiVoice. FortiVoice attempts to make the
outbound call.
3. After the signaling is complete and the call is established, the audio is transmitted between FortiVoice and the
FortiFone softclient for desktop using DTLS.
Workflow
For a deployment with FortiFone softclient for desktop, perform the following tasks:
1. Configuring FortiFone softclient for desktop settings on FortiVoice on page 185
2. Configuring the ICE support on page 188
3. Create virtual IP addresses on FortiGate on page 189
4. Configuring a FortiGate firewall policy for port forwarding on page 192
5. Installing and configuring the FortiFone softclient for desktop on page 194
Configuring FortiFone softclient for desktop settings on FortiVoice
Perform the following procedures to configure FortiFone softclient for desktop settings on the FortiVoice phone system:
Prior to starting the configuration, make sure to complete the recipes in Licensing on page 114
to purchase, register, and upload a softclient license.
FortiVoice 7.0.2 Cookbook 185
Fortinet Inc.

Softclient
l
Configure external access settings on page 186
l
Configure a SIPprofile on page 186
l
Assign the FortiFone softclient for desktop to a FortiVoice extension on page 187
Configure external access settings
1. On FortiVoice, go to System > Advanced >External Access.
2. Set SIPserver external hostname/IP addressto the IP address or FQDN of the FortiVoice device.
3. Configure the WSS and HTTPS external access ports.
4. Click Apply.
Configure a SIPprofile
Fortinet recommends that you use the default SIP profile (sip_desktop_default).
However, if you want to create your own SIP profile, then perform the following steps to set the parameters for your
deployment:
1. On FortiVoice, go to Phone System > Profile > SIP.
2. Click New > Desktop.
3. In Name, enter a name for this SIPprofile.
4. In DTMF, select RFC2833.
5. In Keep alive, select 0.
FortiVoice 7.0.2 Cookbook 186
Fortinet Inc.

Softclient
6. Enable NAT.
7. In Codec, make sure that opus is in the list.
8. Click Create.
Assign the FortiFone softclient for desktop to a FortiVoice extension
1. On FortiVoice, go to Extension >Extension >IPExtension and click New.
2. Enter a Number for the extension.
3. Under Device Setting, click the Soft FortiFone tab.
FortiVoice 7.0.2 Cookbook 187
Fortinet Inc.

Softclient
4. In License allocation, specify the value to configure. In this example, the value is 2. One license allocation is for
the desktop (Windows/macOS) and the other is for the mobile (Android/iOS) that you can deploy later.
After you complete the installation of the FortiFone softclient, the Soft FortiFone tab lists the device. From this tab,
you can also revoke a license occupied by an inactive or unused device, if applicable.
5. In Windows/macOS, keep the default profile or select the profile that you configured in Configure a SIPprofile on
page 186.
6. Click Create.
Configuring the ICE support
When the FortiFone softclient is located behind a Network Address Translator (NAT) or FortiFone softclients are on
different networks (without internetwork routing), configure the interactive connectivity establishment (ICE) support to
allow the FortiVoice phone system to establish a valid audio path with the FortiFone softclient.
To configure the ICE support, you have the following two options:
l
Static mapping: Uses the internal and external IPaddresses of the FortiVoice phone system.
l
STUN server: Uses the IP address of a Session Traversal Utilities for NAT (STUN) server.
Decide which option you want to configure for ICE support.
To configure the static mapping for ICE support
1. To connect to the FortiVoice CLI, go to Dashboard > Console and click inside the window.
2. Enter the following commands and replace xxx.xxx.xxx.xxx with the internal and external FortiVoice IP addresses
used in your deployment:
config system sip-setting
set ice-support static-mapping
config ice-ip-mapping
edit 1
set status enable
set internal-ipaddr xxx.xxx.xxx.xxx
FortiVoice 7.0.2 Cookbook 188
Fortinet Inc.

Softclient
set external-ipaddr xxx.xxx.xxx.xxx
next
end
3. Reload the configuration by entering the following command:
execute reload voiced
To configure the STUN server for ICE support
1. To connect to the FortiVoice CLI, go to Dashboard > Console and click inside the window.
2. Enter the following commands and replace xxx.xxx.xxx.xxx with the IP address or host name of a Fortinet or third-
party STUN server:
config system sip-setting
set ice-support stun-server
set stun-server xxx.xxx.xxx.xxx
end
3. Reload the configuration by entering the following command:
execute reload voiced
Create virtual IP addresses on FortiGate
Create virtual IP addresses to be used for the following port forwarding:
l
WSS port
l
RTP port
l
HTTPS port
To create a virtual IP address for the WSS port (using the TCP protocol)
1. On FortiGate, go to Policy & Objects > Virtual IPs.
2. Click Create New > Virtual IP.
3. Enter a Name to identify this virtual IP address.
4. Configure the settings.
Here are example settings:
l
Interface: wan1
l
External IP address/range: 0.0.0.0
l
Mapped IP address/range: IP address of the FortiVoice unit
l
Enable Port Forwarding.
l
Protocol:TCP
l
External port service:8089
FortiVoice 7.0.2 Cookbook 189
Fortinet Inc.

Softclient
l
Map to port: 8089
5. To save the changes, click OK.
To create a virtual IP address for the RTP port (encrypted using DTLS and running over UDP)
7. Click Create New > Virtual IP.
8. Enter a Name to identify this virtual IP address.
9. Configure the settings.
Here are example settings:
l
Interface: wan1
l
External IP address/range: 0.0.0.0
l
Mapped IP address/range: IP address of the FortiVoice unit
l
Enable Port Forwarding.
l
Protocol:UDP
l
External port service:10000 - 30000
l
Note:For the range of the External port service, make sure to use the same values as the RTP
Setting available in System > Advanced > SIP.
FortiVoice 7.0.2 Cookbook 190
Fortinet Inc.

Softclient
l
Map to port: 10000
10. To save the changes, click OK.
To create a virtual IP address for the HTTPS port
The HTTPS port is used for logging in and downloading call detail records and voicemail messages.
11. Click Create New > Virtual IP.
12. Enter a Name to identify this virtual IP address.
13. Configure the settings.
Here are example settings:
l
Interface: wan1
l
External IP address/range: 0.0.0.0
l
Mapped IP address/range: IP address of the FortiVoice unit
l
Enable Port Forwarding.
l
Protocol: TCP
l
External port service:10443
FortiVoice 7.0.2 Cookbook 191
Fortinet Inc.
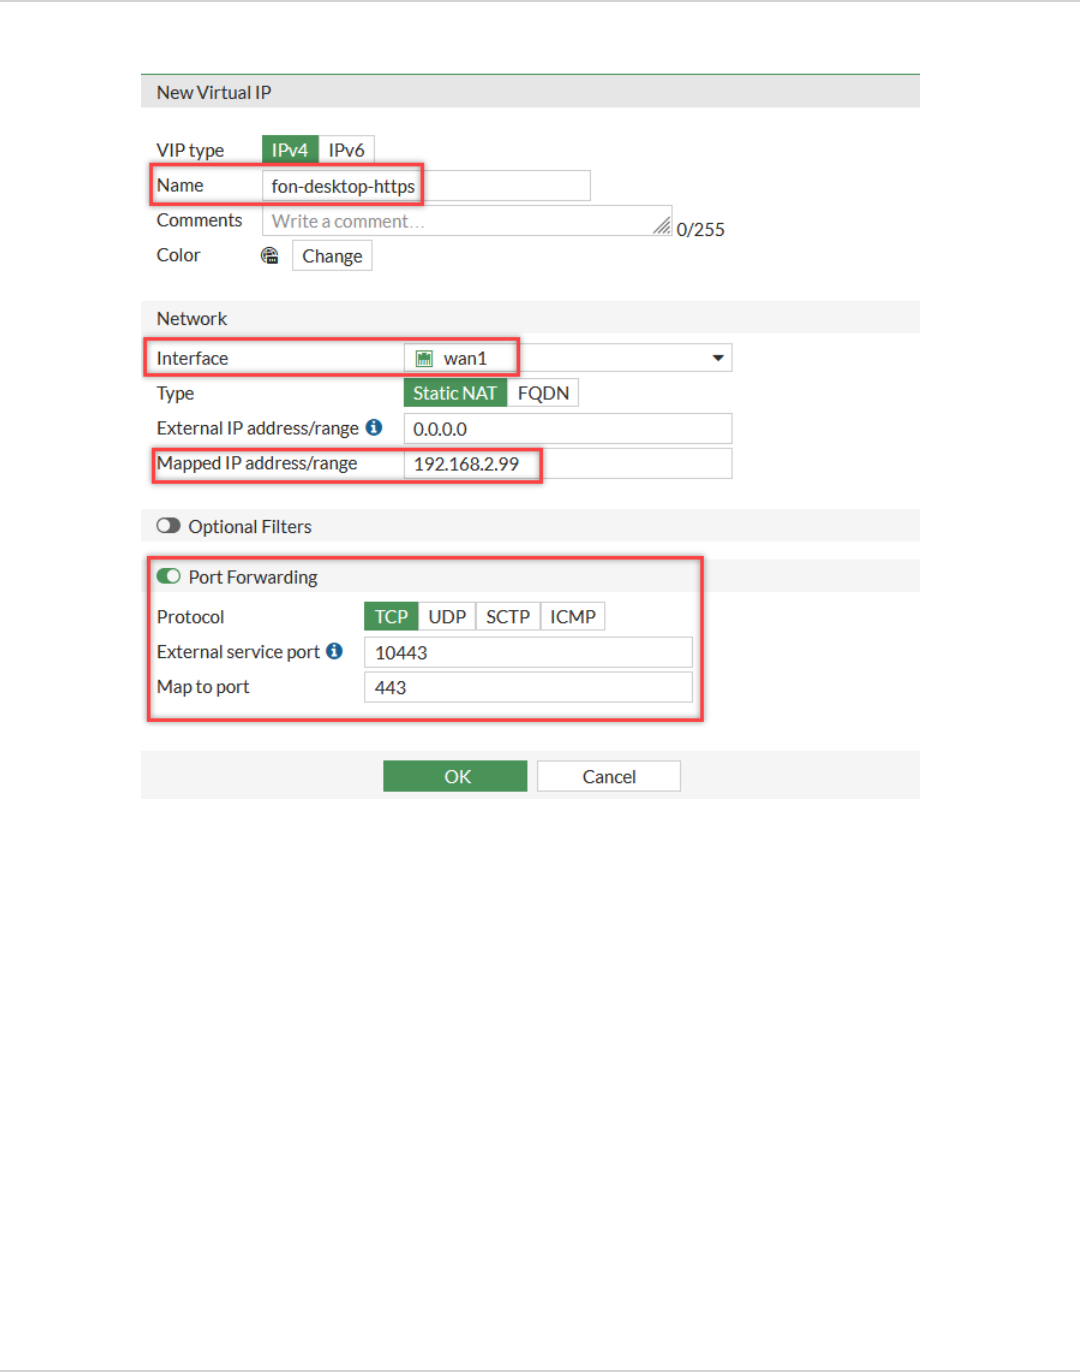
Softclient
l
Map to port: 443
14. To save the changes, click OK.
Configuring a FortiGate firewall policy for port forwarding
On FortiGate, configure a firewall policy to manage the port forwarding for the FortiFone softclient for desktop on the
FortiVoice phone system.
Procedure steps
1. On FortiGate, go to Policy & Objects > Firewall Policy.
2. Click Create New.
3. Add a Name to identify this policy.
4. For a basic setup example, you can configure the following settings:
l
Incoming interface: wan1
l
Outgoing interface: LAN
l
Source: All
l
Destination: Select the virtual IP addresses that you created in Create virtual IP addresses on FortiGate on
page 189.
FortiVoice 7.0.2 Cookbook 192
Fortinet Inc.

Softclient
l
Service: All
FortiVoice 7.0.2 Cookbook 193
Fortinet Inc.

Softclient
5. To save the new firewall policy, click OK.
Installing and configuring the FortiFone softclient for desktop
For details about installing, configuring, and using the FortiFone softclient for desktop, see the FortiFone Softclient for
Desktop User Guide.
FortiVoice 7.0.2 Cookbook 194
Fortinet Inc.

www.fortinet.com
Copyright© 2024 Fortinet, Inc. All rights reserved. Fortinet®, FortiGate®, FortiCare® and FortiGuard®, and certain other marks are registered trademarks of Fortinet, Inc., and other Fortinet names herein
may also be registered and/or common law trademarks of Fortinet. All other product or company names may be trademarks of their respective owners. Performance and other metrics contained herein were
attained in internal lab tests under ideal conditions, and actual performance and other results may vary. Network variables, different network environments and other conditions may affect performance
results. Nothing herein represents any binding commitment by Fortinet, and Fortinet disclaims all warranties, whether express or implied, except to the extent Fortinet enters a binding written contract,
signed by Fortinet’s Chief Legal Officer, with a purchaser that expressly warrants that the identified product will perform according to certain expressly-identified performance metrics and, in such event, only
the specific performance metrics expressly identified in such binding written contract shall be binding on Fortinet. For absolute clarity, any such warranty will be limited to performance in the same ideal
conditions as in Fortinet’s internal lab tests. Fortinet disclaims in full any covenants, representations, and guarantees pursuant hereto, whether express or implied. Fortinet reserves the right to change,
modify, transfer, or otherwise revise this publication without notice, and the most current version of the publication shall be applicable.
