
USER GUIDE
MADCAP FLARE 2024
Project Creation
Copyright © 2024 MadCap Software.All rights reserved.
Information in this document is subject to change without notice. The software described in this document is furnished
under a license agreement or nondisclosure agreement. The software may be used or copied only in accordance with the
terms of those agreements. No part of this publication may be reproduced, stored in a retrieval system, or transmitted in
any form or any means electronic or mechanical, including photocopying and recording for any purpose other than the
purchaser's personal use without the written permission of MadCap Software.
MadCap Software
9171 Towne Center Drive, Suite 335
San Diego, California 92122
858-320-0387
www.madcapsoftware.com
THIS PDF WAS CREATED USING MADCAP FLARE.

CONTENTS
CHAPTER 1
Step 1: Starting Projects 5
Creating a Project 6
Importing a Project From Source Control 10
Importing Word Files 11
Importing Excel Files 38
Importing HTML Files 47
Importing Markdown Files 51
Importing Confluence Files 65
Importing FrameMaker Files 77
Importing a RoboHelp Project 93
Importing a Doc-To-Help Project 94
Importing CHM Files 102
Importing an HTML Help Project 103
Importing DITA Files 104
Converting Author-it Files 109
CHAPTER 2
Merging Projects 112
Runtime Merging Flare Projects Using Targets 114
Runtime Merging Output From HTML Help Projects
(CHM Files) 118
Runtime Merging Server-Based HTML5 Output 125
CONTENTS
iii

CHAPTER 3
Exporting Projects 134
Adding an Export Project File 135
Exporting Projects 136
Exporting Projects Using the Command Line 152
CHAPTER 4
Other Activities for Projects 157
Opening a Project 158
Closing Projects 159
Deleting Projects 159
Zipping Projects 161
APPENDIX
PDFs 162
Tutorials 162
Cheat Sheets 163
User Guides 164
CONTENTS
iv

CHAPTER 1
Step 1: Starting Projects
The first step in developing a project after you launch Flare is to start a project.
This chapter discusses the following:
Creating a Project 6
Importing a Project From Source Control 10
Importing Word Files 11
Importing Excel Files 38
Importing HTML Files 47
Importing Markdown Files 51
Importing Confluence Files 65
Importing FrameMaker Files 77
Importing a RoboHelp Project 93
Importing a Doc-To-Help Project 94
Importing CHM Files 102
Importing an HTML Help Project 103
Importing DITA Files 104
Converting Author-it Files 109
CHAPTER 1
5

Creating a Project
Following are the steps for creating a new Flare project using the Start New Project Wizard.
How to Create a Project
1. On the Start Page click New Project. Alternatively, you can select File > New Project.
2. Complete the fields on the first page of the wizard and click Next.
n
Project name Enter a name for the project.
n
Project folder Keep the default location for the project, or click to select another.
n
Language Select the primary language for the project.
n
(Optional) Bind to Source Control Select this if you want to integrate the new Flare
project with a source control application (such as Microsoft Team FoundationServer).
3. (Optional) If you selected the "Bind to Source Control" option, click Bind Project. In the Bind
Project dialog, complete the fields, depending on the source control application being used.
When you are finished, click Next.
4. Select a template using one of the three options—(1) new from template, (2) new from
existing, (3) new from import—and click Next.
CHAPTER 1
6
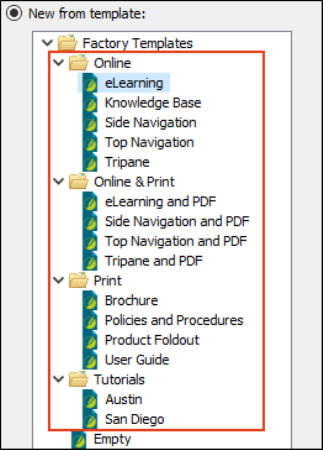
NEW FROM TEMPLATE
Choose either a factory template file or one of your own custom template files as a starting
point. The new file will take on all of the settings contained in the template. If you want to use
the factory template provided by Flare, expand the Factory Templates folder and click on a
template file. If you want to use your own custom template file, expand the appropriate folder
and click on a file. For more information about templates, see the online Help.
Flare's factory templates are organized into the following folders:
n
Online These templates were designed for online output only (although you can always
add print-based outputs later).
n
Online & Print These templates were designed to generate both online and print-based
outputs from the same content.
n
Print These templates were designed for print-based output only (although you can
always add online outputs later).
n
Tutorials This folder contains templates intended to be used with various Flare
Tutorials.
CHAPTER 1
7

NEW FROM EXISTING
You can use this option if you already have a Flare project that you want to use as the basis
for your new project. Click , use the Open File dialog to find a Flare project file (FLPRJ), and
double-click it.
NEW FROM IMPORT
You can choose legacy files (e.g., Word, Excel, FrameMaker, HTML, DITA, HTML Help,
RoboHelp) to import. If you select this option and click Next, a list of import options is
displayed. You can select the file type, click Next again, and complete the options in the new
wizard that opens, instead of completing the rest of the Start New Project Wizard.
5. (Optional) Depending on the template selected, choose branding colors, a font family, logo,
and hero image to apply to your project. This will give your project a custom look and feel
from the start. These options can be changed later in the Branding Editor. Click Next.
CHAPTER 1
8

NOTE If you use a factory template or a custom preview project template, the
branding page displays. If you select files from a New from existing or a New from
import source, the branding screen will be bypassed.
NOTE The field selection for the branding screen in the wizard might change slightly
depending on the factory template chosen.
6. Select the primary target for your project and click Finish. The targets listed in the drop-down
are limited to the those found in the template you selected.
CHAPTER 1
9

Importing a Project From Source
Control
One way to start a project is to import an existing Flare project from source control. You might use
this method, for example, if you are working on a multi-author project and another member of the
team has placed the Flare project in source control. For more information and steps, see the online
Help.
CHAPTER 1
10

Importing Word Files
You can import Microsoft Word files into a new project or an existing one.
How to Import Word Documents
The following steps describe how to import Word files using the Import Word Wizard. However, you
also have the option of adding a Word import file and then using the Word Import Editor.
1. Select Project > Import > MS Word Documents.
2. In the wizard, choose either Import into a new project (and complete the fields below) or
Import into this project. However, if you do not have a project currently open, the file(s) will
automatically be imported into a new project.
n
Project name Type a name for the new Flare project that will be created after you
perform the import.
n
Project folder Accept the default location for the new project or click to find and
select a folder.
n
Output type Select the primary target for your project.
3. Click Add file to choose Word documents. You can also select other options as necessary.
This removes the selected file(s) from the list.
This moves the selected file or folder lower in the list (if you
have more than one to import).
This moves the selected file or folder higher in the list (if you
have more than one to import). The file at the top is used for
the name of the Flare TOC that is created as a result of the
import. Also, the order determines how the imported files are
arranged in the TOC as topics.
This opens the file that is selected in the list.
CHAPTER 1
11

NOTE DOCX is Microsoft Word's platform-independent, open XML format. You must
have Microsoft Word 2007 or later installed in order to import this file type. You also
must have Word installed on your computer, as opposed to using the feature on the
Options dialog (File > Options) to import without Microsoft Office.
4. (Optional) On the left, select Styles. You can use this page for various style settings.
ASSOCIATE A STYLESHEET
This is purely optional. You can choose an existing stylesheet by clicking . After doing this,
styles from that stylesheet become available in the mapping drop-down fields below, so that
you can map Word styles to those from the stylesheet you chose.
CHAPTER 1
12

STYLE MAPPING
n
Discard MSWord styles By default, styles from the Word documents are mapped in
such a way that their names are retained and appended to Flare styles. However, you
can click this button, which will map to the Flare style but not keep the Word style name
or its formatting.
n
Restore defaults If you change your mind, you can click this button, which will once
again retain the Word style names.
EXAMPLE In your Word document, second-level headings use the “Heading 2”
style. But in Flare, it is named “h2.” So when the Word style is mapped to the
Flare style, the resulting name will be “h2.Heading2.”
CHAPTER 1
13

If you click Discard MS Word styles, the mapping remains in place, but now the
resulting name will be “h2” and any formatting from Word for that style is not
retained.
CHAPTER 1
14

If you click Restore defaults, the mapping will once again result in the name
“h2.Heading2” and its formatting will be retained.
CHAPTER 1
15

n
Paragraph/Character You can expand these sections to see the styles found in the
Word document(s).
CHAPTER 1
16

In these sections, you can map a paragraph or character style from the Word document
(s) to another style. Click the drop-down in a cell to select a style. Flare styles are listed
in the top part of the drop-down menu, while Word styles are listed on the bottom.
CHAPTER 1
17

If you want to specify that new topics should start with certain paragraph styles, simply
click the check box next to that style. The h1 style is selected by default (most authors
start new topics on heading styles), but you can choose any paragraph-level styles that
you like.
CHAPTER 1
18

PREVIEW
When you select a style row in either the Paragraph or Character section, a preview is shown
at the bottom so you can see how it looks. The design of the original Word style is shown on
the left, and the look of the mapped style is shown on the right.
CHAPTER 1
19
5. (Optional) On the left, select Advanced Options. You can use this page to set various options.
STYLES
n
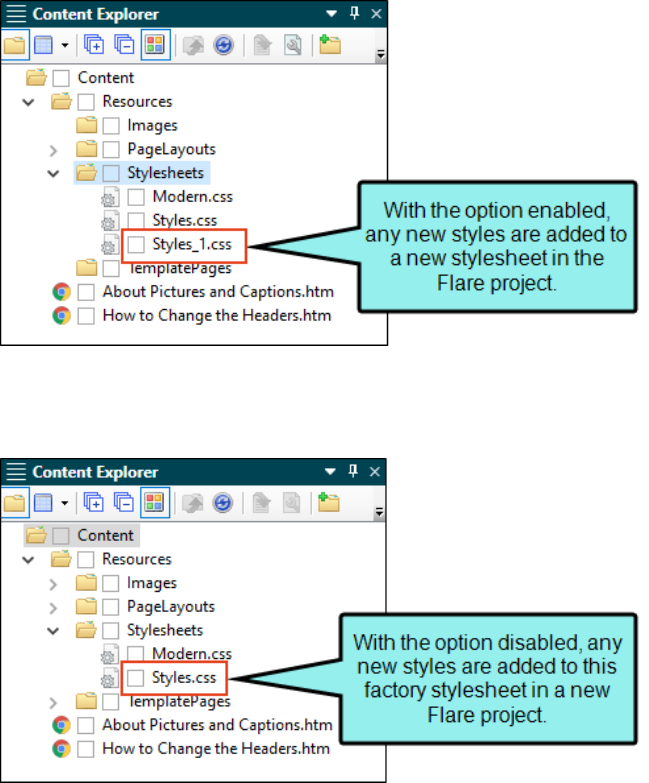
Create new stylesheet This creates a new stylesheet based on the settings you choose.
If you disable this option, the styles resulting from the import will be added to the
project’s primary stylesheet.
CHAPTER 1
20

NOTE If you choose to create a stylesheet when importing Word documents
into a new project, that stylesheet will be automatically selected in the project
properties. If you then open the Word Import Editor, deselect the option to
create a new stylesheet, and reimport the documents, that stylesheet will
continue to exist in the project.
n
[Inline formatting]
l
Keep inline formatting This retains inline formatting found in the Word documents.
CHAPTER 1
21

l
Convert inline formatting to CSS styles This converts inline styles found in the Word
documents to styles in the Flare project.
l
Remove inline formatting This removes any inline formatting found in the Word
documents, displaying it as regular text instead.
CHAPTER 1
22
TOPICS
n
Automatically set topic title If this option is enabled, the properties setting for the topic
title automatically uses the first heading in the topic. Therefore, if you change the
heading text in the future, the topic title changes automatically as well. If this option is
disabled, the properties setting for the topic title explicitly uses the first topic heading
text found during the import, and it remains so unless you manually change it later.
n
Avoid empty topics threshold Select this option if you want to ensure that new topics
are not created when large sections are found in the Word documents without any
content. Enter the maximum number of empty character spaces allowed in a topic. If
this number is exceeded, Flare will not create a new topic from that empty space.
n
Split long topics threshold Select this option if you have long sections in your source
documents and want to make sure that they are converted to multiple topics (rather
than one very long topic). Enter the maximum number of characters to be converted to
a topic before a new topic is created. Flare will break the topic at the nearest paragraph
to the threshold value. That way, a new topic will not start in the middle of a sentence
or word, but at the beginning of a paragraph.
n
Add continued links Select this option to place a "Topic Continued" link at the bottom of
pages when a long topic has been split into multiple ones.
n
Add continued from links Select this option to place a "Topic Continued From" link at
the top of continued pages when a long topic has been split into multiple ones.
l
(continued in/from {title}) Use these fields to specify the format for the "(continued
in)" and "(continued from)" links. Flare provides a cross-reference format for you—
(continued in {title}) or (continued from {title}). With this cross-reference format, the
link contains the words "continued in" or "continued from" within parentheses,
followed by the text of the first paragraph in the connected topic. If you do not want
the link to use that particular text, you have a couple of options. First, in Flare, you
could manually enter a heading in each topic that is connected to another topic
included in the split. That text will be used in the link instead (after you update the
cross-references in Flare). Another option is to modify the format by clicking the Edit
button.
n
Approximate filename length Enter the maximum number of characters to use for
naming topic files. The default is 24.
CHAPTER 1
23

TABLES
n
Convert all tables to "auto-fit to contents" Select this option if you want to automatically
set tables to "Auto-Fit to Contents" when they are imported into Flare. This ensures that
column widths are not specified on the imported tables.
n
Set first row of each table as a header row Select this option if you want Flare to
convert the first row of every table into a header row. This makes styling tables more
efficient. If you do not select this option, only tables that already have header rows in
the Word document will become header rows in Flare. Tables without header rows will
be imported just as they are.
EXAMPLE You have a Word document with two tables.
In the first table, the first row has been set to repeat as a header row.
In the second table, the first row has not been set to repeat as a header row.
CHAPTER 1
24

First, you import the Word document but you do not enable the option to set the
first row of each table as a header row. As a result, the first row in the first table
continues to be a header row, just as it was in the Word document. And the first
row in the second table continues to be a regular row, just as it was in the Word
document.
CHAPTER 1
25

Next, you import the Word document but you do enable the option to set the
first row of each table as a header row. As a result, the first row of each table is
now a header row.
CHAPTER 1
26

n
[Table styles]
l
Create CSS table styles as regular stylesheet This finds table formatting in the Word
documents and creates styles accordingly in the regular stylesheet in Flare.
l
Convert table styles to Flare table styles This finds table formatting in the Word
documents and creates a special table stylesheets accordingly in Flare.
CHAPTER 1
27

NOTE To use this feature, the table must have been created in Microsoft
Word 2007 or later. Also, open the Options dialog (File > Options), select the
General tab, and make sure that Import/Export Word Files without MS Office
is disabled.
l
Apply a selected table stylesheet to all imported tables This lets you select an
existing Flare table stylesheet and apply it to all imported tables.
l
Remove all table styles This removes styling from all tables found in the Word
documents. You can keep them as plain tables in Flare or apply styles to them later.
CHAPTER 1
28

LISTS
Use standard list style type This will use standard bullets (e.g., square, disc) and numbering
(e.g., decimal), whether they were used in the Word documents or not.
If this is not enabled, lists are imported with the characters or symbols used for the lists in
the Word documents. However, these are contained within span tags in the Flare topics. This
allows you to keep special elements, (e.g., Wingdings) that you might have used in Word for
custom lists.
EXAMPLE You have a Word document with lists, and it looks like this:
CHAPTER 1
29

If the option to use standard list style types is enabled, the topic in Flare will look like
this:
CHAPTER 1
30

If the option is disabled, the topic will look like this:
EQUATIONS
Convert equations to MathML When importing Microsoft Word files that contain equations,
you can convert them from Office Math Markup Language (the format used in Word) to
MathML (the web standard and Flare format). If you disable this option, equations from Word
are converted to images.
NOTE To use this feature, the equation must have been created in Microsoft Word
2007 or later. Also, open the Options dialog (File > Options), select the General tab,
and make sure that Import/Export Word Files without MS Office is disabled.
CHAPTER 1
31

PAGE LAYOUTS
Create a page layout for each section header/footer Select this option if you want Flare to
create new page layouts when you import Word documents that have section breaks, along
with headers or footers. For each new section in the Word document that has a different
header or footer than the previous section, Flare creates a unique page layout. After the
import is finished, you can open and edit the page layouts if necessary. You can then create
chapter breaks for your print-based output and assign these page layouts to the different
topics in the output.
PAGE BREAKS
n
Preserve and create new topics on page breaks This keeps any page breaks found in
the Word documents.
n
Preserve and convert to MadCap page breaks This keeps any page breaks found in the
Word documents, but it will convert them to the special page break tags
(MadCap|pageBreak) used by Flare. This page break element displays as a gray bar in
the XML Editor, but it is not shown in the output; a page break simply occurs at that
spot.
n
Ignore page breaks This will not keep any page breaks found in the Word documents.
CHAPTER 1
32
REIMPORT
n
Link generated files to source files Enable this if you want to continue editing in Word
and reimport as needed. Deselect it if you want to edit the imported files in Flare going
forward, severing the connection to the source files.
n
Auto-reimport before generate output If you selected “Link generated files to source
files,” you will likely make future content changes in the source files. When you make
such changes, the source files need to be reimported into the project so that they can
be included in the output. You have the option of reimporting the files manually.
However, you can use this option instead and let Flare reimport the files automatically
when you attempt to build output.
6. Click Finish, then Accept.
CHAPTER 1
33

Word Import Editor—Import and Re-Import
If you add a Word import file or if you have previously imported Word files using the wizard, a file is
added to the Imports folder in the Project Organizer.
When you double-click this file, it opens in the Word Import Editor. This editor contains most of the
same fields and options as the Import Word Wizard.
CHAPTER 1
34

After completing or changing any of these fields, you can click Reimport in the toolbar.
CHAPTER 1
35

How Word Features are Treated When Imported
The following table shows some Word features how what happens to them when you import
documents into Flare.
Word Feature Result After Import
Artwork and
Special Effects
If you apply certain special effects or artwork (e.g., arrows) to images in
Word and then import them into Flare, those effects will not be retained. For
example, a rotated image will return to its straight, original state. However,
there are some workarounds that may allow you to keep the effects or
artwork. One solution is to apply another effect such as a shadow or 3-D to
the image in Word (e.g., add a shadow to a rotated image that you want to
keep). This forces Word to save the image as an entirely new image with the
effects. Another possible solution is to save the Word document as a web
page, manually copy that HTM file into the Flare folder, and then open it
within Flare. As for text floating around images, this effect is not supported
in Flare. When you import from Word, the text is added below the image.
File Names Image file names are treated in the following ways for linked and embedded
images:
n
Linked Images If you have inserted a picture as a linked image in a
Word document, the file name for the image is preserved when
imported into Flare. The image file is stored by default at the root of
the Resources > Images subfolder in the Content Explorer.
n
Embedded Images If you have inserted a picture as an embedded
image in a Word document, the file name for the image is based on
the topic name when imported into Flare. The image file is stored by
default in the Resources > Images > [Word Document Name]
subfolder in the Content Explorer.
CHAPTER 1
36

Word Feature Result After Import
Image Alt Text
and Description
If you have an image in a Word document that contains alt text or a
description, both are brought in to Flare. After the Word document is
imported, you can open the topic containing the image, right-click on the
image, and select Image Properties. In the Image Properties dialog, the
description for the image is shown in the Screen Tip field, and the alt text is
shown in the Alternate Text field.
Linked Images When you insert an image in Word, one of the options is to insert it as a
linked image.
NOTE If you received a Word document with linked images from
another person—rather than creating the document yourself—you
need to also get the images themselves from that individual. Then
you need to re-link the images in the document. Otherwise, Word
(and therefore also Flare) will not be able to find them.
Videos If you import a Word document that contains a direct link to a video, it is
brought into the Flare project.
This only works for direct video links. For example, if you have Word 2013,
you can look for and insert videos from Bing or YouTube. These are direct
link videos that are supported. But those from video embed codes are not
supported.
NOTE Flare supports Microsoft Word 2003 and newer versions.
CHAPTER 1
37

Importing Excel Files
You can import Microsoft Excel files into Flare projects. They can be imported into existing projects
or when creating a new project. The spreadsheet content will be added to tables in Flare when the
import is finished.
CHAPTER 1
38

How to Import Excel Files
1. Select Project > Import > MS Excel Workbooks.
2. In the wizard, choose either Import into a new project (and complete the fields below) or
Import into this project. However, if you do not have a project currently open, the file(s) will
automatically be imported into a new project.
n
Project name Type a name for the new Flare project that will be created after you
perform the import.
n
Project folder Accept the default location for the new project or click to find and
select a folder.
n
Output type Select the primary target for your project.
3. Click Next.
4.
Click to choose Excel files. You can select XLS, XLSX, or CSV files. When finished, click
Next. (You can also select other options as necessary.)
CHAPTER 1
39
This opens the file that is selected in the list.
Link
Generated
Files to
Source Files
This creates a connection between the original files and the files that are
created as a result of the import. This is useful if you want to continue
editing the content outside of Flare, instead of editing in the Flare project.
Flare recognizes when changes have been made to the source
documents and reminds you to reimport the documents to ensure the
Flare project also reflects the changes. If you use this option, a link icon
is added to the top of a linked file in the Flare interface. This lets you
know that you need to edit the source file, rather than editing this file. If
you remove the connection to the source file, this icon no longer displays
on the file. Please note that if you have bound the project to source
control, the icons used for source control take precedence over the link
icon.
This removes the selected file(s) from the list.
This moves the selected file higher in the list (if you have more than one
file to import). The file at the top is used for the name of the content
folder holding the imported topics in Flare. Also, the order determines
how the imported files are arranged in the Flare TOC that is created as a
result.
This moves the selected file lower in the list (if you have more than one
file to import).
CHAPTER 1
40
5. Select from various options as necessary, then click Next.
n
Import Worksheets as Select the type of Flare file where you want your spreadsheets
to be imported.
l
Topics Flare will convert your content and place worksheets into topics. Title text on
a worksheet tab will become a heading in the Flare topic.
l
Snippets Flare will convert your content and place each worksheet into a separate
snippet.
If you selected “Snippets” above, you can also choose from the following options:
l
Include tab titles as headings Any title text on your worksheet tabs will become
headings in the Flare snippets.
l
Create a topic with snippets Flare will create a topic and place the snippets within it.
Otherwise, only the snippets will be created.
n
Organize worksheets into different folders per workbook Select this option if you are
importing multiple workbooks and want the resulting files to be stored in separate
folders in Flare. If you do not select this option when importing multiple workbooks, the
files will all be placed in the same folder in Flare.
n
Import hidden rows/columns This includes any hidden rows and columns in the import.
Otherwise, they will not be part of the imported content.
n
Use first row as column header Select this option if you want Flare to convert the first
row of every spreadsheet into column headers in the Flare tables. If you do not select
this option, the first row will be treated like all the other rows.
CHAPTER 1
41

n
Import equations based on settings When importing Excel files that contain equations,
you can select this option to convert them to MathML (the web standard) or images. If
you disable this option, equations from Excel are not converted to Flare.
NOTE The conversion of equations to MathML versus images depends on
whether you have Excel installed:
l
If Excel is Installed Equations will be imported as MathML.
l
If Excel is not Installed Equations will be imported as PNG images.
NOTE There is an option in Excel that must be enabled in order for equations
to be imported into Flare. In Excel, select an equation that you’ve inserted, open
the Design ribbon, and in the Tools section, click the small option in the lower-
right. Then in the dialog, select Copy MathML to the clipboard as plain text.
NOTE If you choose to convert equations to MathML, they are automatically
stored in snippets in Flare. Otherwise, equations will be converted to images. A
snippet or image displaying an equation is automatically placed below the
worksheet (in the topic or snippet where the worksheet was converted to a
table).
NOTE To use this feature, the equation must have been created in Microsoft
Excel 2010 or newer.
n
Import charts as Any charts in your spreadsheets will be imported as images. Use this
field to select the type of image format to be used.
NOTE An image displaying an imported chart is automatically placed below
the worksheet (in the topic or snippet where the worksheet was converted to a
table).
CHAPTER 1
42

n
Split topics or snippets by maximum rows You can select this option if you have
spreadsheets with a lot of rows and want to divide them into multiple topics or snippets
(rather than one very long topic or snippet). After enabling this option, enter the number
of rows that you want to allow in each topic or snippet before a new topic or snippet is
created.
n
Auto-reimport before 'Generate Output' If you selected “Link Generated Files to Source
Files” earlier in the wizard, you will likely make future content changes in the source
files. When you make such changes, the source files need to be reimported into the
project so that they can be included in the output. You have the option of reimporting
the files manually. However, you can also tell Flare to do this for you automatically, so
that you do not have to. Select this option if you want Flare to automatically reimport
files when you attempt to build output.
6. Use the next page to specify how you want the formatting of the Excel files to be treated upon
import. Choose whether the imported files should retain their look and feel from Excel, or if
you want to associate them with a table stylesheet that you’ve already created in Flare. When
finished, click Next.
n
Preserve MS Excel Styles This retains any formatting from your spreadsheets so that
you can continue to use that look and feel in Flare.
If you have Excel installed, all styles (factory and custom) and local formatting are
retained in Flare. If you do not have Excel installed, only custom styles and local
formatting are preserved; factory styles are not retained. Also, if you are using more
than one table style in a worksheet, only one of them will be retained in Flare.
n
Don't Preserve MS Excel Styles This does not keep the formatting used in the Excel
spreadsheets. You can click in the field below this if you want to associate the
imported spreadsheets with a table stylesheet that you’ve already created in Flare. If
you do not choose a table stylesheet, the files will be imported with plain text.
7. You can use this page to exclude certain worksheets, or even specific rows and columns,
from the import. By default, all workbooks, worksheets, rows, and columns are selected for
import. You can click the corresponding check boxes to remove check marks, which excludes
items from the import. If you click on a particular worksheet, the area to the right displays the
rows and columns within it. You can then remove check marks for any rows or columns that
you want to exclude.
CHAPTER 1
43

NOTE If your worksheets have any hidden rows or columns that you did not include
in the import, you may see that those rows or columns are skipped on this page. For
example, you might see columns A, B, C, and E (where D is hidden).
8. Click Finish. The Accept Imported Documents dialog opens. The files that will be created as a
result of the import are listed on the left. A preview of each file can be seen to the right when
you click the file.
9. When you are finished previewing the files to be created, click Accept.
CHAPTER 1
44

Excel Import Editor—Import and Re-Import
If you add an Excel import file or if you have previously imported Excel files using the wizard, a file is
added to the Imports folder in the Project Organizer.
When you double-click this file, it opens in the Excel Import Editor. This editor contains most of the
same fields and options as the Import Microsoft Excel Wizard.
CHAPTER 1
45

After completing or changing any of these fields, you can click Reimport in the toolbar.
What’s Noteworthy?
NOTE There is a limit of 256 columns per worksheet that can be imported from Excel into
Flare.
NOTE Flare supports Microsoft Excel 2010 and newer versions. However, if you have an
older version of Excel, you can open the Options dialog (File > Options), select the General
tab, and choose Import Excel Files Without MS Office.
NOTE A link icon displays on tabs in the XML Editor next to file names that are imported
from and linked to another file or Flare project. However, if you are also using the built-in
source control technology, the source control icons have a higher precedence and will
therefore be displayed instead.
CHAPTER 1
46

Importing HTML Files
You can import XHTML and HTML files (automatically converting them to XHTML).
How to Import HTMLFiles
1. Select Project > Import > HTML File Set.
2. In the wizard, choose either Import into a new project (and complete the fields below) or
Import into this project. However, if you do not have a project currently open, the file(s) will
automatically be imported into a new project.
n
Project name Type a name for the new Flare project that will be created after you
perform the import.
n
Project folder Accept the default location for the new project or click to find and
select a folder.
n
Output type Select the primary target for your project.
3. Click Next.
4.
Click to choose HTML files. You can also click to find and select a folder containing
HTML files you want to import. When you select a folder to import, the wizard imports all files
within that folder that have an .htm, .html, or .xhtml extension. If you later reimport
HTMLfiles into the project, Flare checks to see if any of the files in the source folder have
changed. It also determines whether files have been deleted or added, and it updates the
source files list accordingly. When you are finished, click Open.
CHAPTER 1
47

5. (Optional) You can use the other options on the page if necessary.
This opens the file that is selected in the list.
This opens the HTML to XHTML Conversion dialog, which lets you see
how the selected file looks in HTML and how it will look after its
conversion to XHTML.
Link
Generated
Files to
Source Files
This creates a connection between the original files and the files that are
created as a result of the import. This is useful if you want to continue
editing the content outside of Flare, instead of editing in the Flare project.
Flare recognizes when changes have been made to the source
documents and reminds you to reimport the documents to ensure the
Flare project also reflects the changes. If you use this option, a link icon
is added to the top of a linked file in the Flare interface. This lets you
know that you need to edit the source file, rather than editing this file. If
you remove the connection to the source file, this icon no longer displays
on the file. Please note that if you have bound the project to source
control, the icons used for source control take precedence over the link
icon.
This removes the selected file(s) from the list.
This moves the selected file higher in the list (if you have more than one
file to import). The file at the top is used for the name of the content
folder holding the imported topics in Flare. Also, the order determines
how the imported files are arranged in the Flare TOC that is created as a
result.
This moves the selected file lower in the list (if you have more than one
file to import).
6. Click Next.
CHAPTER 1
48
7. (Optional) You can use more import options as necessary.
n
Import linked HTML files Select this option if you want to automatically bring in other
files that are linked to those you selected on the previous page. For example, if you
import Doc1.htm, which contains a hyperlink to Doc2.htm, this option imports
Doc2.htm as well.
n
Import resources Select this option if you want to include any supporting resource files
(e.g., stylesheets, images, multimedia files) in the import. Then select one of the
following:
l
Keep existing structure The supporting resources files will be copied into folders
with the same names and hierarchy as those used in the source.
l
To project resources folder The supporting files will be placed in the Resources
folder in your Flare project.
n
Auto-reimport before 'Generate Output' If you selected “Link Generated Files to Source
Files” earlier in the wizard, you will likely make future content changes in the source
files. When you make such changes, the source files need to be reimported into the
project so that they can be included in the output. You have the option of reimporting
the files manually. However, you can also tell Flare to do this for you automatically, so
that you do not have to. Select this option if you want Flare to automatically reimport
files when you attempt to build output.
8. Click Finish. The Accept Imported Documents dialog opens. The files that will be created as a
result of the import are listed on the left. A preview of each file can be seen to the right when
you click the file.
9. When you are finished previewing the files to be created, click Accept.
CHAPTER 1
49
Import Editor—Import and Re-Import
If you add an HTML import file or if you have previously imported HTML files using the wizard, a file
is added to the Imports folder in the Project Organizer.
When you double-click this file, it opens in the Import Editor. This editor contains most of the same
fields and options as the Import HTML Files Wizard.
After completing or changing any of these fields, you can click Reimport in the toolbar.
CHAPTER 1
50

Importing Markdown Files
Markdown is a markup language using plain formatting syntax. You can import Markdown (.md)
files into Flare projects. This might be necessary, for example, if software developers or subject
matter experts write content in Markdown and you want to include that information in your Flare
project.
Flavors
There are multiple variations, or "flavors," of Markdown.
n
CommonMark This is a standardized syntax of Markdown, and Flare supports this flavor
entirely.
n
Other Flavors A variety of other Markdown implementations have been created over the years
to support additional features beyond the most common HTML elements. Flare may import
extra markup from those flavors, but some might not be fully supported.
CHAPTER 1
51

Markdown Syntax and Flare Results
Depending on the Markdown flavor, various syntax and tags will be converted in Flare in different
ways. The following resources are helpful to understand Markdown's basic and extended syntax:
n
Basic Syntax
https://www.markdownguide.org/basic-syntax/
n
Extended Syntax
https://www.markdownguide.org/extended-syntax/
Usually the conversion is straightforward because there is an obvious HTML counterpart.
EXAMPLES
Markdown Syntax HTML Result in Flare
## My Second-Level Heading <h2>My Second-Level Heading</h2>
I am **really** serious! <p>I am <strong>really</strong>
serious!</p>
- First thing
- Second thing
- Third thing
<ul>
<li>First thing</li>
<li>Second thing</li>
<li>Third thing</li>
</ul>
CHAPTER 1
52

NOTE If you add regular HTML into Markdown files, it will be imported properly into Flare
as HTML.
Custom Tags
Flare is able to import custom tags that you add to Markdown files.
EXAMPLE A person writes the following in a Markdown document.
After this document is imported into Flare, it will look as follows. Notice the structure bar at
the top indicates the custom code tag name when you click inside the content below.
CHAPTER 1
53

NOTE At this time, MadCap-specific tags (e.g., markup for a drop-down effect) cannot be
imported from Markdown into Flare.
How to Import Markdown Documents
The following steps describe how to import Markdown files using the Import Markdown Wizard.
However, you also have the option of adding a Markdown import file and then using the Markdown
Import Editor (see "Markdown Import Editor—Import and Re-Import" on page 63).
1. Select Project > Import > Markdown Documents.
2. In the wizard, choose either Import into a new project (and complete the fields below) or
Import into this project. However, if you do not have a project currently open, the file(s) will
automatically be imported into a new project.
n
Project name Type a name for the new Flare project that will be created after you
perform the import.
n
Project folder Click to find and select a folder.
n
Output type Select the primary target for your project.
3. Click Add file to choose Markdown documents. You can also select other options as
necessary.
This removes the selected file(s) from the list.
This lets you choose a folder, so that all files in that folder are
added for the import.
This moves the selected file or folder lower in the list (if you
have more than one to import).
CHAPTER 1
54

This moves the selected file or folder higher in the list (if you
have more than one to import). The file at the top is used for
the name of the Flare TOC that is created as a result of the
import. Also, the order determines how the imported files are
arranged in the TOC as topics.
This opens the file that is selected in the list.
4. (Optional) On the left, select Styles. You can use this page for various style settings.
ASSOCIATE A STYLESHEET
This is purely optional. You can choose an existing stylesheet (such as one in the Flare
project you are importing files into) by clicking . After doing this, styles from that stylesheet
become available in the mapping drop-down fields below, so that you can map Markdown
tags to those from the stylesheet you chose.
CHAPTER 1
55

STYLE MAPPING
n
Restore defaults If you make mapping selections in the fields below but then change
your mind, you can click this button, which will return the default settings.
n
[Drop-Downs] You can expand these sections to see the styles found in the Markdown
document(s).
l
Block These are styles that take up the entire space in a line (e.g., paragraphs,
headings)
l
List These are styles that are used to create bulleted and numbered lists.
l
Definition List These are styles that are used to create definition lists, which are
typically groups of terms and definitions.
l
Inline These are character-level styles that are applied only to certain words within a
block (e.g., hyperlinks, bold text).
CHAPTER 1
56

SELECTING STYLES
In these drop-down sections, you can map a style from the Markdown document(s) to
another style.
Flare automatically populates the "Map to" column with the recommended style. For
example, if Heading 1 is found in the Markdown document, the recommended style to
map to is h1 in Flare. Therefore, you often don't need to choose a different style.
However, sometimes you might want something different. If you want to map the style
to something other than what is recommended, click the drop-down in a cell to select a
style.
EXAMPLE — Code Blocks
You have a code block in the Markdown document, Flare initially maps it to the
MadCap:codeSnippet style.
CHAPTER 1
57

If you leave this setting, the content will be brought in to Flare like this:
However, you might want to map code blocks to the "pre" style instead.
CHAPTER 1
58

In that case, the content will be imported like this:
SPECIFYING NEW TOPICS
If you want to specify that new topics should start with certain styles, expand the Block
section and click the check box next to that style. The h1 style is selected by default
(most authors start new topics on heading styles), but you can choose any block styles
that you like.
CHAPTER 1
59

PREVIEW
When you select a style row, a preview is shown at the bottom so you can see how it looks.
5. (Optional) On the left, select Advanced Options. You can use this page to set various options.
STYLES
n
Create new stylesheet This creates a new stylesheet based on the settings you choose.
If you disable this option, the styles resulting from the import will be added to the
project’s primary stylesheet.
NOTE If you choose to create a stylesheet when importing Markdown
documents into a new project, that stylesheet will be automatically selected in
the project properties. If you then open the Markdown Import Editor, deselect
the option to create a new stylesheet, and reimport the documents, that
stylesheet will continue to exist in the project.
CHAPTER 1
60

TOPICS
n
Convert all simple lists to paragraph lists If you leave this option disabled, bulleted and
numbered lists will be imported so that each item in the list just has an <li> tag. If you
enable this option, <p> tags will be added within each <li> tag. However, you can add
<p> tags later manually for list items where you want them. The benefit of having <p>
tags within list items is that you can easily add paragraphs or other content within that
item before the next bullet or number is shown.
NOTE Markdown supports both simple and paragraph lists. Although you can
import simple lists as paragraph lists using this option, the reverse is not true.
If you have paragraph lists in Markdown, they will not be converted to simple
lists if you deselect the option. Those will just be imported as paragraph lists
regardless of the option setting.
n
Convert all definition lists to definition paragraph lists If you leave this option disabled,
definition lists will be imported so that each item in the list just has a <dd> or <dt> tag.
If you enable this option, <p> tags will be added within each <dd> or <dt> tag. However,
you can add <p> tags later manually for definition or term items where you want them.
Most authors tend to create definition lists without <p> tags, but you can add them if
you want.
n
Approximate filename length Enter the maximum number of characters to use for
naming topic files. The default is 24.
CHAPTER 1
61
RESOURCES
n
Resources If the Markdown files have links to other files, such as images, you can
select this option to include those files in the import. However, the files need to be
located on your computer in order to be imported.
l
To project resources folder Select this to automatically import any extra files to the
Resources folder in your project.
l
To folder Select this if you want to import the extra files into a specific folder, such
as a subfolder under Resources, or even in a different folder in the Content Explorer.
Then use the field below to choose the folder.
TABLES
n
Leave table styles as is This imports tables in a plain format with no styling.
n
Apply a selected table stylesheet to all imported tables This lets you select an existing
Flare table stylesheet and apply it to all imported tables. That way, the imported tables
will automatically have the look and feel associated with that table stylesheet.
REIMPORT
n
Link generated files to source files Enable this if you want to continue editing in
Markdown and reimport as needed. Deselect it if you want to edit the imported files in
Flare going forward, severing the connection to the source files.
n
Auto-reimport before generate output If you selected “Link generated files to source
files,” you will likely make future content changes in the source files. When you make
such changes, the source files need to be reimported into the project so that they can
be included in the output. You have the option of reimporting the files manually.
However, you can use this option instead and let Flare reimport the files automatically
when you attempt to build output.
6. Click Finish, then Accept.
CHAPTER 1
62

Markdown Import Editor—Import and Re-Import
If you add a Markdown import file or if you have previously imported Markdown files using the
wizard, a file is added to the Imports folder in the Project Organizer.
When you double-click this file, it opens in the Markdown Import Editor. This editor contains most
of the same fields and options as the Import Markdown Wizard.
CHAPTER 1
63

After completing or changing any of these fields, you can click Reimport in the toolbar.
CHAPTER 1
64

Importing Confluence Files
If you have an Atlassian Confluence account, you can import pages (HTM and resource files) into
Flare projects. You can import these files into a new Flare project or an existing one. Flare supports
both the cloud and local versions of Confluence.
How to Import Confluence Pages
1. Select Project > Import > Confluence Pages.
2. In the wizard, choose either Import into a new project (and complete the fields below) or
Import into this project. However, if you do not have a project currently open, the file(s) will
automatically be imported into a new project.
PROJECT FIELDS
n
Project name Type a name for the new Flare project that will be created after you
perform the import.
n
Project folder Accept the default location for the new project or click to find and
select a folder.
n
Output type Select the primary target for your project.
3. Complete the Confluence Server, Username, and Password fields. Then click Submit. The
Workspace Selection page should open automatically.
4. From the drop-down, select the space from which you want to import.
CHAPTER 1
65

5. In the tree, select the pages to be imported. If you click on an item, a preview for it displays to
the right.
6. (Optional) On the left, select Advanced Options and choose options as necessary.
TOPICS
n
Import linked pages Select this if you want to automatically bring in other files that are
linked to those you selected from the tree. For example, if you choose to import a page
called “Beer,” which contains a link to a page called “Food,” this option imports both
pages.
n
Remove inline formatting Select this if you do not want to keep any inline formatting in
the pages. If you do not select this option, the formatting will be retained. However,
keep in mind that styles, rather than inline (local) formatting, is recommended in Flare
projects.
n
Remove style classes Select this if you want to remove any style classes that
Confluence might have added to elements (such as tables and images). Otherwise, you
might have some undefined styles after the pages are imported into Flare.
CHAPTER 1
66
RESOURCES
n
Import resources Select this option if you want to include any supporting resource files
(e.g., images, multimedia) in the import. In Flare, these will be added to the Resources
folder in the Content Explorer, and they will link to the appropriate topics.
REIMPORT
n
Link generated files to source files Select this option if you want to continue editing in
Confluence and reimport as needed. Deselect it if you want to edit the imported files in
Flare going forward.
7. Click Finish and Accept.
CHAPTER 1
67

Confluence Import Editor—Import and Re-Import
If you add a Confluence import file or if you have previously imported Confluence files using the
wizard, a file is added to the Imports folder in the Project Organizer.
CHAPTER 1
68

When you double-click this file, it opens in the Confluence Import Editor. This editor contains most
of the same fields and options as the Import Confluence Wizard.
After completing or changing any of these fields, you can click Import or Reimport in the toolbar.
CHAPTER 1
69

How Elements are Converted From Confluence
to Flare
Certain elements from Confluence are converted to their closest counterparts in Flare. The
following table describes this.
Confluence Flare
Paragraph Styles
Article title H1
Heading 1 through Heading 6 H1 through H6
Preformatted Text surrounded by <pre> tags
Quote Text surrounded by <blockquote> tags
Character Styles
Bold Text surrounded by <strong> tags
Font color Text surrounded by <span> tags
Italic Text surrounded by <em> tags
Monospace Text surrounded by <code> tags
Strikethrough Text surrounded by <s> tags
Subscript Text surrounded by <sub> tags
CHAPTER 1
70

Confluence Flare
Superscript Text surrounded by <sup> tags
Underline Text surrounded by <u> tags
Lists
Bulleted list Bullet list
Numbered list Numbered list
Task list Bullet list
Alignment
Center Center
Left Left
Indent Indent
Outdent Outdent
Right Right
Content
Date Text
CHAPTER 1
71

Confluence Flare
Emoticon SVG image
Gallery Table containing images
Horizontal rule Horizontal rule
Info Text surrounded by <div> tags
Link Link
Markup Text
Status Text surrounded by <div> tags
Symbol Symbol
Table of contents Links in bulleted list
Task list Bulleted list
User mention Link
Other Macros
Blog post Text surrounded by <div> tags
Change history Links in table
CHAPTER 1
72

Confluence Flare
Content by label Text surrounded by <div> tags
Content by user Links in table
Content report table Text in table
Contributor Link
Contributor summary Text and links in table
Create from template Link
Except include Text
Favorite pages Text and links
Include pages Text
Labels list Links
Microsoft Office Excel File added to Content Explorer
Microsoft Office PowerPoint File added to Content Explorer
Microsoft Office Word File added to Content Explorer
Multimedia Multimedia file with image as placeholder
CHAPTER 1
73

Confluence Flare
PDF File added to Content Explorer
Popular labels Links in bulleted list
Recently updated Links and text
Recently updated dashboard Links
Related labels Text
Space attachments Links and text in table
Space details Text
Spaces list Links in table
Status Text
Task report Text and links in table
User profile Links
Formatting
Code block Text surrounded by <div> tags
Column Text surrounded by <div> tags
CHAPTER 1
74

Confluence Flare
Expand Text surrounded by <div> tags
Info Text surrounded by <div> tags
No format Text surrounded by <div> tags
Note Text surrounded by <div> tags
Panel Text surrounded by <div> tags
Section Text surrounded by <div> tags
Tip Text surrounded by <div> tags
Warning Text surrounded by <div> tags
Navigation
Children display Link
Livesearch Search bar in output
Page index Link in table
Search results Text and links
Table of content zone Text
CHAPTER 1
75

Confluence Flare
Table of contents Links
Reporting
Global reports Links and text in table
Page properties Text
Page properties report Text in table
Popular labels Links
What’s Noteworthy?
NOTE If you import a GIF image using the GIPHYintegration in Confluence, the file will be
imported without an extension and will resemble a folder in the Content Explorer.
CHAPTER 1
76

Importing FrameMaker Files
You can import Adobe FrameMaker files into a Flare project.
TIP Before diving in to the import process, it is recommended that you first download and
review the Transition from FrameMaker Guide. This guide provides tips for making sure the
FrameMaker import process goes as smoothly as possible. See "PDFs" on page 162.
NOTE You must have FrameMaker installed on your computer in order to import
FrameMaker files.
CHAPTER 1
77

How to Import FrameMaker Files
1. Select Project > Import > FrameMaker Documents.
2. Select Import into a new project or Import into this project (if you already have a project
open). If it is a new project, enter a project name, and select a folder location (if different from
the default) and primary output type. Then click Next.
3.
Click .
4. Find and select the files you want to import. You can hold the SHIFT key to select a range, or
you can hold the CTRL key to select individual items. When you are finished, click Open.
You can select BOOK, FM, or MIF files.
TIP When possible, it is recommended that you select a Adobe FrameMaker BOOK
file for import and let Flare locate and import all the associated document files within
the Adobe FrameMaker book.
5. (Optional) Use other options on the page as necessary. Then click Next.
This opens the file that is selected in the list.
Link
Generated
Files to
Source Files
This creates a connection between the original files and the files that are
created as a result of the import. This is useful if you want to continue
editing the content outside of Flare, instead of editing in the Flare project.
Flare recognizes when changes have been made to the source
documents and reminds you to reimport the documents to ensure the
Flare project also reflects the changes. If you use this option, a link icon
is added to the top of a linked file in the Flare interface. This lets you
know that you need to edit the source file, rather than editing this file. If
you remove the connection to the source file, this icon no longer displays
on the file. Please note that if you have bound the project to source
control, the icons used for source control take precedence over the link
icon.
CHAPTER 1
78
This removes the selected file(s) from the list.
This moves the selected file higher in the list (if you have more than one
file to import). The file at the top is used for the name of the content
folder holding the imported topics in Flare. Also, the order determines
how the imported files are arranged in the Flare TOC that is created as a
result.
This moves the selected file lower in the list (if you have more than one
file to import).
6. (Optional) Split the FrameMaker documents into smaller topics during the import based on
styles. Double-click any of the styles on the left, moving them to the right. Then Click Next.
EXAMPLE If you have a style called "Heading 2" in your FrameMaker documents, you
might want new topics to be created whenever Flare finds a Heading 2 style in a
document. So you would double-click Heading 2 and move it to the right side of the
page.
7. (Optional) Use any options to further customize the import. Then click Next.
n
Add "Topic Continued" links when appropriate Select this option to place a "Topic
Continued" link at the bottom of pages when a long topic has been split into multiple
ones.
n
Add "Topic Continued From" links when appropriate Select this option to place a "Topic
Continued From" link at the top of continued pages when a long topic has been split
into multiple ones.
n
Cross-Reference Format Use this field to specify the format for the "Topic Continued"
and "Topic Continued From" links. Flare provides a cross-reference format for you—
(continued in {title}) or (continued from {title}). With this cross-reference format, the link
contains the words "continued in" or "continued from" within parentheses, followed by
the text of the first paragraph in the connected topic. If you do not want the link to use
that particular text, you have a couple of options. First, in Flare, you could manually
enter a heading in each topic that is connected to another topic included in the split.
That text will be used in the link instead (after you update the cross-references in Flare).
CHAPTER 1
79
Another option is to modify the format by clicking the Edit button.
l
Edit If you want to modify the cross-reference format provided, click this button,
which opens the Cross-Reference Format dialog.
n
Split Long Topics Select this option if you have long sections in your source
documents and want to make sure that they are converted to multiple topics (rather
than one very long topic).
l
Threshold Enter the maximum number of characters to be converted to a topic
before a new topic is created. Flare will break the topic at the nearest paragraph to
the threshold value. That way, a new topic will not start in the middle of a sentence
or word, but at the beginning of a paragraph.
n
Avoid Creating 'Empty' Topics Select this option if you want to ensure that new topics
are not created when large sections are found in the FrameMaker documents without
any content.
l
Threshold Enter the maximum number of empty character spaces allowed in a
topic. If this number is exceeded, Flare will not create a new topic from that empty
space.
n
Anchored Frames With Images You can use this area to specify how Flare should
handle anchored frames that contain images as well as other content (e.g., text
callouts).
l
Generate Images Without Callouts If the anchored frame contains an image along
with callout text, the original image is imported without the callout text. You might
select this option if you have resized the image in FrameMaker. With this option, the
imported image is likely to be of a higher quality than it would be otherwise. You can
then add a callout to the image once it is inside Flare.
l
Generate Images With Callouts If the anchored frame contains an image along with
callout text, Flare creates a PROPS (i.e., properties) file along with the image file
when that document is imported. This means that you can open those image files in
MadCap Capture to edit those callouts after the import process is completed.
CHAPTER 1
80

EXAMPLE If you import anchored frame images and tell Flare not to
include the callouts, your imported image files will look something like this
in Windows Explorer.
On the other hand, if you import the same images and tell Flare to include
the callouts, it will look something like this in Windows Explorer.
NOTE Some FrameMaker elements—such as arcs and nested frames—are
not supported with this option.
l
Generate Flattened Images If the anchored frame contains an image along with
callout text, a new flattened image will be created as a result. The callout is included,
but you cannot edit it.
CHAPTER 1
81
n
Preserve Image Size This option affects how the size of imported images are handled.
l
Option Selected The original image is imported. However, the <img> tag is modified
in the imported file to closely reflect the height and width of the image in the
FrameMaker document. This is done regardless of whether you are importing linked
or embedded images from FrameMaker documents.
l
Option NOT Selected The <img> tag is not modified in the imported file. Instead, the
image is referenced at 100% of its original value.
n
Auto-reimport before 'Generate Output' If you selected “Link Generated Files to Source
Files” earlier in the wizard, you will likely make future content changes in the source
files. When you make such changes, the source files need to be reimported into the
project so that they can be included in the output. You have the option of reimporting
the files manually. However, you can also tell Flare to do this for you automatically, so
that you do not have to. Select this option if you want Flare to automatically reimport
files when you attempt to build output.
n
Approximate Filename Length Enter the maximum number of characters to use for
naming new topic files that are automatically created after splitting a long topic. The
default is 24.
n
Enable 'Passthrough' Markers Select this check box to include a check mark if you have
created passthrough markers in your FrameMaker source documents.A passthrough
marker is a special marker that you can insert into your FrameMaker source content
when you have information or code that you plan to import to Flare and want left alone
(or "passed through," leaving it exactly as you have authored it, rather than processing
it). A passthrough marker can be just about anything, as long as supports it in the
XHTML code.You can specify how the marker content should be treated when the
FrameMaker document is imported. The first option is that you can import the marker
content as regular text (which is the default setting). The second option is that you can
import the marker content as an XML fragment (e.g., the first part of a bold tag—<b>—
but not the second part). The third option is that you can import the marker content as
a complete XML tag. You might use a passthrough marker for various reasons, such
as for importing a marker as XHTML or JavaScript code.
CHAPTER 1
82

EXAMPLE You plan to import some FrameMaker documents to Flare and you
have locations in those documents where you want to link to CHM files. The
problem is that FrameMaker does not allow you to create links to CHM files in
such a way that those links can then be imported into another software
application.
Therefore, you create a passthrough marker in the FrameMaker document,
providing the beginning "href" tag and path to the CHM file. Like this:
Then you create a second passthrough marker, providing the end tag for the
link. Like this:
When you import the FrameMaker document(s), you can specify that the
passthrough markers should be imported as XML fragments. In Flare, the link
to the CHM file will look and work as it should.
CHAPTER 1
83
n
Passthrough Marker Format After you enable passthrough markers, click the down
arrow in this field and select the type of format that you want to use for the import.
l
text The marker content will be imported as regular text (default setting).
l
fragment The marker content is imported as an XML fragment (e.g., the first part of
a bold tag—<b>—but not the second part). If you select this option, you will probably
need a second marker in the FrameMaker document to complete the XML tag.
l
xml The marker content is imported as a complete XML tag.
n
Convert equations to MathML Select this option to convert MathFullForm equations
(the FrameMaker-specific format) to MathML (the web standard and Flare format). If
you disable this option, equations from FrameMaker are converted to images.
n
Convert Table Styles If you have tables in your FrameMaker documents that you have
formatted in a certain way, select this check box if you want to create matching table
styles as a result of the import. In the Flare project, the new table styles will be named
after the format named applied to the table in FrameMaker (e.g., "Format_A.css,"
"Format_B.css," and so on). You can rename these table stylesheets in Flare after the
import finishes. Even if you do not use this mapping feature, the table formatting still
comes across when you import the documents. The only difference is that table
stylesheets make it easier to maintain the formatting of your tables within Flare.
n
Reimport Table Styles This option displays only if you are working in the Import Editor,
rather than the wizard. This option is useful after you have already imported
FrameMaker documents and converted the formatting in your tables into at least one
table stylesheet in Flare. You can use this option to determine whether tables should be
imported again as table styles when you reimport. You might want to keep this check
box selected for some reimports, but other times you might want to deselect it when
reimporting.
CHAPTER 1
84

EXAMPLE You want the formatted tables in your FrameMaker documents to
be converted to table styles when you perform the initial import into a Flare
project. Therefore, in the import wizard, you turn on the "Convert Table Styles"
option. As a result, let's say that Flare creates a new table style and calls it
"FormatA.css."
After the initial import, you realize you want the tables to look a little different.
Therefore, in the Flare project, you modify the properties of the FormatA.css
table stylesheet.
Awhile later, let's say you want to reimport the FrameMaker documents. The
problem is that you've already changed the table stylesheet in Flare. You
probably want to keep the tweaked table style so that you don’t have to modify
it again after the import.
This is where the new "reimport" option comes into play. It determines whether
or not a second new table stylesheet will be created, based on the old look
from the tables in the FrameMaker documents.
Here's one scenario. Let's say that before you reimported the FrameMaker
documents, you selected the "Reimport Table Styles" option in the Frame
Import Editor. And during the import when you were prompted, you selected
not to overwrite the existing FormatA.css table stylesheet. In that case, Flare
keeps your tweaked stylesheet in the project, but it also creates another table
stylesheet called "FormatA1.css" that has the old look and feel. All of the
reimported content now links to the FormatA1.css stylesheet instead of
FormatA.css.
Here's a different scenario. Let's say that you perform the same steps
described above, except this time you deselected the "Reimport Table Styles"
option in the Frame Import Editor. In that case, the second FormatA1.css file is
not created. The imported content is linked to the FormatA.css table stylesheet
that you previously modified, since it already exists in the project.
CHAPTER 1
85
8. (Optional) Specify whether the imported topics should be associated with a stylesheet and/or
styles from your FrameMaker files. Then click Next.
n
Stylesheet If you already have a CSS file that you want to associate with the imported
files, click the Stylesheet button. Then navigate to the stylesheet and select it.
n
Preserve FrameMaker Styles This retains any style formatting from your FrameMaker
documents so that you can continue to use that look and feel in Flare. For example, if
you use a style called "Heading 1" in your source documents and that style is blue, it
remains blue after you finish the import to Flare and the new style is created. Also,
selecting this option affects which mapping styles are available as you continue to
make your import selections. If you select this option, you can map the FrameMaker
styles to new Flare styles that keep the name of the FrameMaker style (e.g., Heading 1
becomes h1.Heading 1 in Flare).
n
Don't Preserve FrameMaker Styles This does not keep the style formatting used in the
FrameMaker documents. For example, if you use a style called "Heading 1" in your
source documents and that style is blue, that color (and any other settings for that
style) are not kept after you finish the import to Flare. You will still have styles
associated with your content, but it will not look like it did in the source documents.
Also, selecting this option affects which mapping styles are available as you continue
to make your import selections. If you select this option, you can map the FrameMaker
styles to new Flare styles that either keep the name of the FrameMaker style (e.g.,
Heading 1 becomes h1.Heading 1 in Flare) or do not (e.g., Heading 1 becomes h1 in
Flare).
CHAPTER 1
86

n
Conversion Styles This opens the Import Styles Editor, which lets you specify how to
convert each property of the FrameMaker styles. If you do not enter a property value,
the value from the FrameMaker document is used. If you enter a property value, it
overrides the value from the FrameMaker document. This button is used only if you
have selected "Preserve FrameMaker Styles."
EXAMPLE You might use this button, for example, if you need to change a
cross-reference format coming from FrameMaker into something more
meaningful in Flare. There are some cross-reference building blocks in
FrameMaker that do not have an equivalent in Flare. In cases such as these,
the formats are preserved after conversion to Flare. However, the formats may
therefore appear to be broken, but they are preserved to let you know that there
was some formatting in a cross-reference style that Flare did not understand;
you can then make changes to the cross-reference style in the stylesheet.
Therefore, if you already know ahead of time that you have a cross-reference
style that will need to be modified for use in Flare, you can use the Conversion
Styles button and change the cross-reference format to something that Flare
understands.
9. (Optional) Map paragraph styles from the FrameMaker documents to Flare's paragraph
styles. Then click Next.
Your FrameMaker style will adopt the name of that style. To map a style, click the style in the
FrameMaker Styles column on the left, click a style in the Flare Styles section on the far right,
and then click the Map button. If you previously elected not to preserve the FrameMaker
styles, it is recommended that you map to a standard CSS parent style—e.g., map your first-
level heading style to h1, not to h1.(FrameMaker Style).
The style is added to the Flare Styles column. When you are finished importing the
documents and the new Flare project is loaded, the content that had been associated with
the style in the FrameMaker document will now be associated with a new style that you
mapped it to.
CHAPTER 1
87

EXAMPLE — Preserve Styles
Let's say you have a style in your FrameMaker source document called "Heading1"
that is using Arial 14 pt and is red, like this.
Hello
During the process of importing your FrameMaker document using the Import
FrameMaker Wizard, you select the option to preserve your FrameMaker styles.
The next page of the wizard looks something like this:
CHAPTER 1
88

When you finish importing, the content that was associated with Heading1 in the
source document is still using Arial 14 pt and is red, just like it was before in
FrameMaker. However, the style is now called "h1.Heading1." In the world of
cascading style sheets (CSS)—which is what Flare uses for controlling the look of
content—you've created a class of the h1 style (h1 is the standard style for first-level
headings). But because you wanted to keep the look of the FrameMaker style, Flare
added it as a child under its parent, h1.
If you make any future changes in Flare to the h1 style, they will trickle down to the
h1.Heading1 child (unless the child style has explicit settings that conflict with the
parent). You can also apply style properties directly to the h1.Heading1 child. So
while it is generally a good idea to use standard CSS parent styles (such as h1) when
possible in Flare, the mapping performed in this import process—and the subsequent
creation of a child style—lets you keep the Arial 14 pt red look.
CHAPTER 1
89

EXAMPLE — Do Not Preserve Styles
Let's say you have a style in your FrameMaker source document called "Heading1"
that is using Arial 14 pt and is red, like this.
Hello
During the process of importing your FrameMaker document using the Import
FrameMaker Wizard, you select the option to not preserve your FrameMaker styles.
The next page of the wizard looks something like this.
CHAPTER 1
90

When you finish importing, the content that was associated with Heading1 in the
source document is no longer using Arial 14 pt, red. Instead, it looks something like
this.
Hello
Also, the style is now called "h1." (Keep in mind that, even if you had mapped the style
to "h1.(FrameMaker Style) in this case, the formatting would still be removed.)
So although the formatting was not retained, you were able to map to the standard
CSS style for first-level headings—h1 .
10. (Optional) Map character styles from the source documents to Flare's character styles. Then
click Next.
Your FrameMaker style will adopt the name of that style. This works the same as the feature
for mapping paragraph styles, except it has to do with character-level styles. To map a style,
click the style in the Framemaker Style column, click a style in the Flare Styles section, and
then click the Map button.
The style is added to the Flare Styles column. When you are finished importing the
documents and the new Flare project is loaded, the content that had been associated with
the style in the FrameMaker document will now be associated with a new style that you
mapped it to.
CHAPTER 1
91

11. (Optional) Map cross-reference (x-ref) styles from the FrameMaker documents to Flare's
cross-reference styles. Then click Finish.
In this way, you can have your FrameMaker style take on the appearance of the Flare style
that you map it to. To map a style, click the style in the FrameMaker Style column on the left,
click a style in the Flare Styles section on the far right, and then click the Map button.
The style is added to the Flare Style column. When you are finished importing the documents
and the new Flare project is loaded, the content that had been associated with the
FrameMaker style in the FrameMaker document will now be associated with a new style that
has the appearance of the style that you mapped it to.
What happens if you do not map a style? In the case of cross-reference styles, they are
automatically added as style classes under the MadCap|xref style. For example, let's say you
import a style called "PageOnly" from your source document and do not map it to anything. In
that case, it will be called "MadCap|xref.PageOnly" in the resulting project.
12. When you are finished previewing the files to be created, click Accept.
NOTE For each template page used in your FrameMaker documents, a corresponding
page layout is automatically created in your Flare project. You can use the page layouts to
configure pages for print-based output. You can then create chapter breaks for your print-
based output and assign these page layouts to the different topics in the output.
NOTE Flare supports FrameMaker 7.0 and newer versions.
NOTE A link icon displays on tabs in the XML Editor next to file names that are imported
from and linked to another file or Flare project. However, if you are also using the built-in
source control technology, the source control icons have a higher precedence and will
therefore be displayed instead.
CHAPTER 1
92

Importing a RoboHelp Project
You can create a project by importing a RoboHelp project.
How to Import a RoboHelp Project
1. Select File > New Project > RoboHelp Project.
2. In the dialog that opens, browse for and double-click the RoboHelp project file (MPJ or XPJ
file) to be imported. The Import Project Wizard opens.
3. In the Project name field, type a name for the new Flare project that will be created after you
import the RoboHelp project.
4. In the Project folder field, either accept the default location for the new project or click to
browse for and select a folder.
5. Click Next.
6. (Optional) Select Convert all topics at once if you want Flare to immediately convert all of
your topic files to XHTML.
If you remove the check mark from the box, Flare imports the topic files as they are. When
you try to open an imported topic in Flare, a message asks if you want to convert it to XML.
Also, if this option is not selected, Flare will not import index keywords from the source files.
7. (Optional) Select Convert inline formatting to CSS styles if you want Flare to create new styles
based on any "local" formatting that exists in the RoboHelp project files.
EXAMPLE If you have applied bold and italic formatting to some text (without using
a style), Flare will create a new style based on that formatting.
8. Click Next.
9. Select a language for the project.
10. Click Finish. A message tells you that the project was converted successfully and will be
opened.
11. Click OK.
CHAPTER 1
93

Importing a Doc-To-Help Project
You can create a project by importing a Doc-To-Help project.
Before You Begin
Here are some important things to keep in mind when importing Doc-To-Help projects:
n
You will need to build a target in your Doc-To-Help project before importing to Flare to ensure
that all links have been updated. Flare's import process uses the Doc-To-Help database,
which only updates links when Doc-To-Help projects are built.
n
Flare will only convert HTML5 source documents from Doc-To-Help. Therefore, you will need
to use the Doc-To-Help converter to convert all Word source documents. This includes any
rich content variables authored in Word. See the online documentation for Doc-To-Help.
NOTE Keep in mind that once all documents in the project have been converted to
HTML5, the project has to be managed directly within the Doc-To-Help application
(C:\Program Files (x86)\MadCap Software\DocToHelp\DocToHelp.exe).
n
If a Doc-To-Help source document is a multiple topic type, upon import it will be split into
Flare topics by heading levels h1 through h5. All documents converted from Word to HTML5
are multiple topic types. The splitting is used to preserve the look of the online output with
each heading level showing as a new page in the online TOC. To avoid this behavior, you can
convert your multiple topics into single topics in Doc-To-Help before importing into Flare.
n
Auto-generated TOCs are not in the database when they are imported. The TOC must be
modified in order to be imported from Doc-To-Help to Flare. Even a simple change (e.g.
moving a TOC topic up and then down to the same position) is considered a customization.
This customization of the TOC will ensure that is imported from Doc-To-Help to Flare.
CHAPTER 1
94

How to Import a Doc-To-Help Project
1. Select File > New Project > Doc-To-Help Project.
2. In the dialog that opens, browse for and double-click the Doc-To-Help project file (D2H file) to
be imported. The Import Project Wizard opens.
3. Click Next.
NOTE If you want to import Doc-To-Help projects to a 64-bit version of Flare, you will
need to download Microsoft Access Database Engine 2010 x64 edition. If you do not
already have this add-in, Flare will prompt you to install it from the Microsoft
Download Center.
4. In the Project name field, type a name for the new Flare project that will be created after you
import the Doc-To-Help project.
5. In the Project folder field, either accept the default location for the new project or click to
browse for and select a folder.
6. Click Next.
7. If you convert Word source documents to HTML5 source files in Doc-To-Help, and then build
a target, stylesheets are created as a result and saved in the output folder. You can save
those stylesheets in a different folder and then use this page of the wizard to point to them,
bringing them into Flare in one merged CSS file.
TO SAVE DOC-TO-HELP STYLESHEETS AND SELECT THEM WHEN IMPORTING
TO FLARE
a. Make a backup copy of your Doc-To-Help project.
b. Open your Doc-To-Help project that contains Word source files.
c. Select or create a NetHelp target and build the output.
CHAPTER 1
95

d. Open the project output folder and browse to [Project Name]\NetHelp\LinksExt.
NOTE The LinksExt folder might contain several stylesheets (separate ones for
each topic), because each time a Word topic uses a style not already used in a
previous topic, Doc-To-Help creates a new stylesheet to account for it. It might
look something like this:
e. Move the LinksExt folder to a new location outside of the NetHelp parent folder,
because this folder will be overwritten when you generate output again. Then rename
the folder to whatever you want your imported stylesheet to be named.
f. In your Doc-To-Help project, click Convert Multiple Documents to HTML5 and proceed
with the wizard to convert all files.
g. Word closes the project when there are no DOC or DOCX files in the project. Therefore,
in Windows navigate to your Program Files\MadCap Software\DocToHelp folder and
double-click the DocToHelp EXE file. Then build a target to update links.
h. In Flare, import your Doc-To-Help project, and on the "Select CSS folders…" page of the
wizard, click .
i. In the dialog that opens, locate and select the folder that you moved and renamed
earlier in this process. Then finish importing the project. If the folder contains multiple
stylesheets, Flare merges them into one CSS file.
8. Click Next.
9. Select an option for how to import links. You can import links as cross-references or as
hyperlinks.
10. Select a language for the project.
11. Click Finish.
CHAPTER 1
96

Doc-To-Help Features and Flare Equivalents
The following table shows many of the Doc-To-Help features and their equivalents in Flare. For a
few of these features, the settings are not imported from Doc-To-Help to Flare.
Doc-To-Help
Feature Flare Feature Notes/Limitations
Attributes Conditions Doc-To-Help allows conditions on platforms (e.g.,
all Word targets). However, Flare does not support
that feature; therefore conditions on platforms are
not imported.
Bookmarks Bookmarks
Carousel Widgets Slideshows
CodeHighlighter
Widgets
Div Tags
Collapsible
Sections
Togglers
Comments Annotations
CSS Stylesheet
Gallery Widgets Slideshows
CHAPTER 1
97

Doc-To-Help
Feature Flare Feature Notes/Limitations
Glossaries Glossaries and
Proxies
Glossary terms are added to a Flare glossary file.
Glossary topics are changed to include Flare's
Glossary proxy.
Flare does not support images and text formatting
in glossaries, so those elements are not included in
the import.
Groups Concepts and
Concept Links (A-
links)
Groups are similar to Flare's concepts, which can
be used for a couple of things, including the
creation of concept links (also called "See Also
links" or "A-links"). When you import a Doc-To-Help
project, groups are converted to concepts in a
couple of different ways, depending on how they
are created in Doc-To-Help:
n
If you insert a group in Doc-To-Help by
dragging the topic from the Topics pane to
the Groups pane, Flare converts the group to
a concept and adds it at the very top of the
topic.
n
If you insert a group in Doc-To-Help from the
ribbon, you are adding it inline, as well as
adding it to the Groups pane. Flare converts
the group to a concept and adds it inline as
well as at the very top of the topic. This
means that when you have an A-link, that
group might be listed twice in the output.
Therefore, you may need to clean up your
topics, removing the excess concepts.
If you already have a group link in Doc-To-Help, it is
imported as a concept link in Flare.
CHAPTER 1
98

Doc-To-Help
Feature Flare Feature Notes/Limitations
Inline Text:
Expanded, Drop
down, Pop Up
Expanding Text
Drop-Down Text
Text Popups
Keywords Index Keywords Keywords are similar to Flare's index keywords,
which can be used for a couple of things, including
the creation of keyword links (also called "K-links").
When you import a Doc-To-Help project, keywords
are converted to index keywords in a couple of
different ways, depending on how they are created
in Doc-To-Help:
n
If you insert a keyword in Doc-To-Help by
dragging the topic from the Topics pane to
the Index pane, Flare converts the keyword to
an index keyword and adds it at the very top
of the topic.
n
If you insert a keyword in Doc-To-Help from
the ribbon, you are adding it inline, as well as
adding it to the Index pane. Flare converts the
keyword to an index keyword and adds it
inline as well as at the very top of the topic.
This means that when you have a K-link, that
index keyword might be listed twice in the
output. Therefore, you may need to clean up
your topics, removing the excess index
keywords.
If you already have an index link in Doc-To-Help, it is
imported as a keyword link in Flare.
Lightbox Widgets Slideshows
CHAPTER 1
99

Doc-To-Help
Feature Flare Feature Notes/Limitations
Link Tags Bookmarks
Note Widgets Div Tags
Plain Text
Variables
Variables Flare does not support conditioned multiple
variable definitions. Those definitions are imported
as multiple variable definitions.
Related Topics Related Topics
Links
Rich Content
Variables
Snippets
Tabs Widgets Div Tags
Targets Targets Flare does not import any target settings.
Themes Skins Flare does not import any theme settings to skins.
TOCs TOCs If a TOC is not customized, it is not imported. An
auto-generated TOC is not in the database when
you import, so it is not considered customized.
However, you can make a simple change in a TOC
(e.g., move a TOC topic up and then down, not
actually changing it). The TOC will then be
considered customized and will import correctly.
CHAPTER 1
100

Doc-To-Help
Feature Flare Feature Notes/Limitations
Topic Contents
Widgets
Mini-TOC Proxies Although topic contents widgets in Doc-To-Help are
similar to Flare's mini-TOC proxies, they are not
identical. Therefore, you may see some
discrepancies after the import conversion.
CHAPTER 1
101

Importing CHM Files
You can create a project by importing an HTML Help (CHM) file.
How to Import an HTMLHelp (CHM) File
1. Select File > New Project > HTML Help File (CHM).
2. In the dialog that opens, browse for and double-click the CHM file to be imported, then click
Next.
3. In the Project name field, type a name for the new Flare project that will be created after you
import the CHM file.
4. In the Project folder field, either accept the default location for the new project or click to
find and select a folder. Then click Next.
5. (Optional) Select Convert all topics at once if you want Flare to immediately convert all of
your topic files to XHTML.
If you remove the check mark from the box, Flare imports the topic files as they are. When
you try to open an imported topic in Flare, a message asks if you want to convert it to XHTML.
Also, if this option is not selected, Flare will not import index keywords from the source files.
6. (Optional) Select Convert inline formatting to CSS styles if you want Flare to create new styles
based on any "local" formatting that exists in the HTML Help file. Then click Next.
EXAMPLE If you have applied bold and italic formatting to some text (without using
a style), Flare will create a new style based on that formatting.
NOTE This may result in dozens of new style classes being generated in your
project.
7. Select a language for the project.
8. Click Finish.
9. Click OK.
CHAPTER 1
102

Importing an HTML Help Project
You can create a project by importing an HTML Help project (HHP file).
How to Import an HTML Help Project
1. Select File > New Project > HTML Help Project (HHP).
2. In the dialog that opens, browse for and double-click the HTML Help file (HHP file) to be
imported. The Import Project Wizard opens.
3. In the Project name field, type a name for the new Flare project that will be created after you
import the HTML Help project.
4. In the Project folder field, either accept the default location for the new project or click to
browse for and select a folder.
5. Click Next.
6. (Optional) Select Convert all topics at once if you want Flare to immediately convert all of
your topic files to XHTML.
If you remove the check mark from the box, Flare imports the topic files as they are. When
you try to open an imported topic in Flare, a message asks if you want to convert it to XHTML.
Also, if this option is not selected, Flare will not import index keywords from the source files.
7. (Optional) Select Convert inline formatting to CSS styles if you want Flare to create new styles
based on any "local" formatting that exists in the HTML Help project files.
EXAMPLE If you have applied bold and italic formatting to some text (without using
a style), Flare will create a new style based on that formatting.
8. Click Next.
9. Select a language for the project.
10. Click Finish. A message tells you that the project was converted successfully and will be
opened.
11. Click OK.
CHAPTER 1
103

Importing DITA Files
Darwin Information Typing Architecture (DITA) file content is supported in Flare. DITA is an XML-
based markup language with its own schema for authoring, producing, and delivering technical
information. It is a standard of the Organization for the Advancement of Structured Information
Standards (OASIS), and it consists of a set of design principles for creating "information-typed"
modules at a topic level and for using that content in various delivery modes.
You can import DITA files in the a few ways.
How to Import DITA Files
1. Do the following, depending on how you are importing your files:
TO IMPORT INTO A NEW PROJECT
a. Select Project > Import > DITA Document Set.
The Import DITA Wizard opens.
b. Select Import into a new project.
c. In the Project name field, type a name for the new Flare project that will be created after
you perform the import.
d. In the Project folder field, either accept the default location for the new project or click
to find and select a folder.
e. From the Output Type field, select the primary target for your project.
TO IMPORT INTO AN EXISTING PROJECT (WIZARD)
a. Select Project > Import > DITA Document Set.
The Import DITA Wizard opens.
b. Select Import into this project.
CHAPTER 1
104

TO IMPORT INTO AN EXISTING PROJECT (IMPORT EDITOR)
Do one of the following:
IF YOU DO NOT YET HAVE A DITA IMPORT FILE
a. Complete the steps for adding an import file.
b. Open the file in the DITA Import Editor.
IF YOU ALREADY HAVE A DITA IMPORT FILE
a. In the Project Organizer, expand the Imports subfolder.
b. Double-click the appropriate import file. The file opens in the DITA Import Editor to the
right.
2. Do one of the following, depending on the part of the interface you are using:
n
Wizard Click Next.
n
Import Editor Select the Source Files tab.
3.
Click .
4. Find and select the files you want to import. You can hold the SHIFT key to select a range, or
you can hold the CTRL key to select individual items. When you are finished, click Open.
You can select DITA or DITAMAP files.
NOTE You cannot select multiple DITAMAP files from different folders during the
same import process. You must first import the DITAMAP file(s) from one folder.
Then in the project that is created as a result, you can import the DITAMAP file(s)
from a second folder.
CHAPTER 1
105

5. You can use the following options as necessary.
This opens the file that is selected in the list.
Link
Generated
Files to
Source Files
This creates a connection between the original files and the files that are
created as a result of the import. This is useful if you want to continue
editing the content outside of Flare, instead of editing in the Flare project.
Flare recognizes when changes have been made to the source
documents and reminds you to reimport the documents to ensure the
Flare project also reflects the changes. If you use this option, a link icon
is added to the top of a linked file in the Flare interface. This lets you
know that you need to edit the source file, rather than editing this file. If
you remove the connection to the source file, this icon no longer displays
on the file. Please note that if you have bound the project to source
control, the icons used for source control take precedence over the link
icon.
This removes the selected file(s) from the list.
This moves the selected file higher in the list (if you have more than one
file to import). The file at the top is used for the name of the content
folder holding the imported topics in Flare. Also, the order determines
how the imported files are arranged in the Flare TOC that is created as a
result.
This moves the selected file lower in the list (if you have more than one
file to import).
6. Do one of the following, depending on the part of the interface you are using:
n
Wizard Click Next.
n
Import Editor Select the Options tab.
CHAPTER 1
106

7. You can use the following options as necessary.
n
Import all Content files to one folder Select this option if you want all of the imported
DITA file content to be placed in just one folder in the Content Explorer.
n
Auto-reimport before 'Generate Output' If you selected “Link Generated Files to Source
Files” earlier in the wizard, you will likely make future content changes in the source
files. When you make such changes, the source files need to be reimported into the
project so that they can be included in the output. You have the option of reimporting
the files manually. However, you can also tell Flare to do this for you automatically, so
that you do not have to. Select this option if you want Flare to automatically reimport
files when you attempt to build output.
n
Preserve ID attributes for elements Every element inside a DITA file has an ID. This ID is
not needed in Flare. However, if you intend to send your output back out to DITA at any
point, you can select this option to make sure the ID is preserved.
8. Do one of the following, depending on the part of the interface you are using:
n
Wizard Click Next.
n
Import Editor Select the Stylesheet tab.
9. Use this page to specify whether the imported topics should be associated with a stylesheet
and/or styles from your DITA files.
n
Conversion Styles This opens the DITA Import Styles Editor, which lets you specify how
to convert each property of the DITA elements. If you do not enter a property value, the
value from the DITA file is used. If you enter a property value, it overrides the value from
the DITA file. You can also use the dialog to import and export styles.
NOTE When you import content from DITA files, there is a one-to-one
conversion that occurs. For each DITA element in your file, a style class is
created in Flare. For example, let's say you have a paragraph-level DITA
element called "topictitle," after you import the file, a style class called
"h1.topictitle" might be created in Flare. Or if you have a character-level DITA
element called "cmdname," after you import the file, a style class called
"span.cmdname" might be created as a result in Flare. If necessary, you can
later edit those style classes in Flare. If you generate DITA output from your
project, the style classes are converted back to DITA elements.
n
Stylesheet If you already have a CSS file that you want to associate with the imported
files, click the Stylesheet button. Then navigate to the stylesheet and select it.
CHAPTER 1
107
10. Do one of the following, depending on the part of the interface you are using:
n
Wizard Click Finish. The Accept Imported Documents dialog opens. The files that will
be created as a result of the import are listed on the left. A preview of each file can be
seen to the right when you click the file.
n
Import Editor In the local toolbar click Import (if this is the first time importing files) or
Reimport (if files have been imported previously). The Accept Imported Documents
dialog opens. The files that will be created as a result of the import are listed on the left.
A preview of each file can be seen to the right when you click the file.
11. When you are finished previewing the files to be created, click Accept.
CHAPTER 1
108

Converting Author-it Files
MadCap Software has an Author-it
®
Converter, which lets you create a new Flare project based on
Author-it Files. This utility uses the published XML output from Author-it and converts it to a Flare
project, while maintaining all project and source files.
System Requirements
n
MadCap Flare 10 or newer
n
Microsoft .Net 4.5.1 (installed with the software if needed)
n
Microsoft Visual C++ Redistributables (installed with the software if needed)
n
Minimum 2048 MB memory (RAM)
n
Minimum 150 MB available hard drive space (additional space depending on size of XML files
to be converted)
n
Microsoft Windows 7 or newer, 32- or 64-bit, including all required updates
How to Download and Install the Author-it
Converter
1. Click the following to download and save the installation file locally:
Download Author-it Converter Utility
2. Unzip the archive:
a. Right-click AuthorItConverterSetup.exe and choose Properties.
b. Verify the EXE file is not being blocked (located on the General tab). This often happens
with network and Windows security.
n
If the option to unblock the EXE is available, check the option and click OK.
n
If no option to unblock exists, the above steps are not needed.
3. Run AuthorItConverterSetup.exe with elevated privileges (Run as Administrator).
4. Follow the prompts to install the utility.
CHAPTER 1
109

How to Use the Author-it Converter
1. From the MadCap Software program group, launch Author-it to Flare Converter.
2. Select the location and the Author-it XML file by clicking the browse button […].
3. Select a location where the Flare project should be saved by clicking the browse button […].
4. Select Content Path Options and choose one of the following:
n
Author-it Keeps the existing folder structure outlined in the XML
n
Flat Puts all topics at the root level under the Content folder
n
Condensed Removes all empty folders from the XML structure; maintains only folders
with topics in the Content Explorer
5. Click Convert. The utility begins. A log report will be sent to the Flare project folder for
troubleshooting purposes.
6. When the conversion process is complete, click Yes to open the folder.
7. Double-click the project.flprj file to open the project in Flare.
How Elements are Converted From Author-it to
Flare
Certain elements from Author-it are converted to their closest counterparts in Flare. The following
table describes this.
Author-it Element Flare Element Notes
Context IDs Context IDs Context IDs and values are
converted to alias and header
files.
Embedded topics Converted to snippets These are placed in
Resources folder in Flare.
Glossaries Glossaries
CHAPTER 1
110

Author-it Element Flare Element Notes
Images Images These are placed in
Resources folder in Flare.
Index keywords Index keywords
Styles Styles Stylesheets are placed in
Resources folder in Flare.
Table of contents of Author-it
books
Converted to topics
Variables Variables Variables and all
permutations are converted.
Variables embedded in
variables are not supported in
Flare at this time. In this case,
each definition is added as a
permutation of the variable.
What’s Noteworthy?
NOTE The XML files from Author-it are from the Publish option in the Author-it software.
NOTE Topics without headings will be named "Topic####.htm" where the # is the Object ID
of the topic in the XML.
CHAPTER 1
111

CHAPTER 2
Merging Projects
Supported In:
NOTE This is supported in HTML5 Tripane output, but not in HTML5 Side Navigation, Top
Navigation, or skinless output.
To merge output means to connect multiple projects in such a way that the source files are
combined into a single online output. The merging is based on the table of contents (or browse
sequence) in one parent project, where links point to one or more child projects.
CHAPTER 2
112


Runtime Merging Flare Projects Using
Targets
Use this merging method if you have access to all of the Flare project files to be merged. You can
merge projects together by linking targets with the same output type (e.g., linking Microsoft HTML
Help to Microsoft HTML Help, linking WebHelp to WebHelp).
How to Use Targets to Merge Multiple Flare
Projects at Runtime
1. Open the TOC in the Flare project that will serve as the parent project.
NOTE You can also merge projects by linking them from a browse sequence, as well
as from a TOC. If you want to do this, simply follow these same steps after opening
your browse sequence.
2. In the TOC Editor, select the TOC entry or book where you want to link the output from
another Flare project. (The TOC of the linked project will be inserted at that spot in the parent
TOC.)
3.
In the local toolbar of the TOC Editor, click . The Properties dialog opens.
4. Select the General tab.
5. Click Select Flare Project and Target. The Link to Flare Project and Target dialog opens.
6. Do one of the following:
n
Click Browse for Project. Then click Project File and find/select a Flare project to which
you want to link.
OR
n
Click Select Recent Project. Then select a recently opened Flare project from the list on
the right.
7. From the Select Target field, choose a specific target in the Flare project. Make sure you
select a target that uses the same output type (e.g., Microsoft HTML Help or WebHelp) as the
target that you will build in the current project.
CHAPTER 2
114

8. Click OK.
9. (Optional) If you want the merged TOC to replace the entry that you selected, do the
following.
a. Select the Advanced tab.
b. Click the check box labeled When merging, replace node with merged TOC.
For example, you might have a TOC in your parent project that looks like this:
If you select the option in this step to replace the node, the merged TOC would look like this in
the output:
CHAPTER 2
115

And if you do not select this option, your merged TOC would look like this:
10. In the Properties dialog, click OK.
11. Build the output for the target in your parent project. The output files for the projects are
merged. When you open the TOC in the output, you will see the integrated TOC from the
linked project.
NOTE There are occasions when projects cannot be merged because the file name is the
same in two or more of the linked projects (e.g., multiple WebHelp projects all named
"MyWebProject.mcwebhelp" or multiple Microsoft HTML Help projects all named
"MyHtmlHelp.chm"). The way to solve this dilemma is to make sure each linked project has
a different output file name. To do this: (1) open the target, (2) select the General tab in the
Target Editor, and (3) enter a unique name in the Output File field.
NOTE If you are working with HTML Help and import a RoboHelp project that has been
merged with other CHM files, the linked CHM files are placed in a special subfolder in the
Content Explorer (Resources > CHMSupport).
CHAPTER 2
116

NOTE If you have previously merged Flare projects with WebHelp outputs and then decide
to generate WebHelp Plus output from the parent project instead, you must make sure that
the child projects linked to the parent contain at least one WebHelp Plus target each. Even
if you keep the link from the parent project to a WebHelp target in the child, the child project
must also have a WebHelp Plus target.
NOTE If you merge projects, synonym files will remain separate in each project. For
example, if you create synonyms in Project A but not in project B, only the topics from
Project A will use the synonyms when users perform searches in the output.
NOTE You can merge HTML Help so that the navigation (table of contents, index, search)
for each CHM file is displayed, regardless of which CHM file you open (parent or child). This
can be done in a couple of ways, depending on whether you have access to all of the Flare
projects or to the CHM files only. See "Displaying Merged Navigation in HTML Help Child
Outputs" on page 123.
CHAPTER 2
117

Runtime Merging Output From HTML
Help Projects (CHM Files)
Use this merging method if you are developing Microsoft HTML Help (a CHM file) and you want to
merge your output with another CHM file. This method is useful, for example, if another author is
working on the external Microsoft HTML Help project to which you are linking and you only have
access to the other CHM file (not the project files).
You can merge your output with another CHM file that you have already brought into your project
(perhaps via the external resources feature), or you can select a CHM file located elsewhere, in
which case a copy of it is added to your project.
How to Merge Output From HTML Help Projects
1. Open the TOC in the Flare project that will serve as the parent project.
NOTE You can also merge projects by linking them from a browse sequence, as well
as from a TOC. If you want to do this, simply follow these same steps after opening
your browse sequence.
2. Do one of the following:
n
In the TOC Editor, select the TOC entry or book where you want to link the output from
the child HTML Help project. (The TOC of the linked CHM file will be inserted at that
spot in the parent TOC.)
OR
n
If the CHM file already exists somewhere in your project, you can open the Content
Explorer and drag the CHM file to the location in the parent TOC where you want to
place it. If you use this method, the link will not point to any particular topic in the CHM
file. Also, if you use this method, you do not need to complete the rest of the steps
below.
3.
In the local toolbar of the TOC Editor, click . The Properties dialog opens.
4. On the General tab, click Select HTML Help. The Link to HTML Help dialog opens.
CHAPTER 2
118

5. Do one of the following:
n
If the child CHM file is already in your project Select Project Files and then use the area
below to navigate to the file that you want to link to and select it. By using the buttons
in the local toolbar, you can view all files in a list, view files in their folder structure, and
use other options.
Shows or hides the folders that the files are stored in.
Shows or hides the files. If you click this button when the Show Folders
button is selected, the area splits into two. The folder is shown on
the left side, and the files and subfolders within it are shown on the right.
n
If the child CHM file is not yet in your project Select Import Existing. In the dialog that
opens, find and double-click the child CHM file. Then from the drop-down—which
displays "(root folder)" by default, you can select a specific content folder in your
project to place the child CHM file.
6. (Optional) If you want to point to a specific topic in the child CHM file, in the Topic field click
. In the dialog that opens, find and double-click the topic that you want to link to.
If you use this option, only the specified topic will be included in the TOC, as opposed to the
entire TOC of the child CHM. However, even though just one topic will be included in the
merged TOC, the other topics in it will still be included in the output and you can get to them
through other means (e.g., clicking hyperlinks).
7. Click OK in the Link to HTML Help dialog.
8. If you imported a child CHM file, the Copy to Project dialog opens. You can select Keep file
synchronized (create mapping). This creates a link (map) between the original file and the
copy being added to your project. Then click OK in the Copy to Project dialog.
9. (Optional) If you want the merged TOC to replace the entry that you selected, do the
following.
a. Select the Advanced tab.
b. Click the check box labeled When merging, replace node with merged TOC.
CHAPTER 2
119

For example, you might have a TOC in your parent project that looks like this:
If you select the option in this step to replace the node, the merged TOC would look like this in
the output:
And if you do not select this option, your merged TOC would look like this:
10. In the Properties dialog, click OK.
NOTE There are occasions when projects cannot be merged because the file name is the
same in two or more of the linked projects (e.g., multiple WebHelp projects all named
"MyWebProject.mcwebhelp" or multiple Microsoft HTML Help projects all named
"MyHtmlHelp.chm"). The way to solve this dilemma is to make sure each linked project has
a different output file name. To do this: (1) open the target, (2) select the General tab in the
Target Editor, and (3) enter a unique name in the Output File field.
CHAPTER 2
120

NOTE If you are working with HTML Help and import a RoboHelp project that has been
merged with other CHM files, the linked CHM files are placed in a special subfolder in the
Content Explorer (Resources > CHMSupport).
NOTE You can also link to CHM files from the TOC in all web-based outputs (HTML5,
WebHelp, WebHelp Plus). However, linking to a specific topic within the CHM is not
supported in these outputs. See "Linking to CHM Files" on the next page.
NOTE You can merge HTML Help so that the navigation (table of contents, index, search)
for each CHM file is displayed, regardless of which CHM file you open (parent or child). This
can be done in a couple of ways, depending on whether you have access to all of the Flare
projects or to the CHM files only. See "Displaying Merged Navigation in HTML Help Child
Outputs" on page 123.
CHAPTER 2
121

Linking to CHM Files
You can include a CHM file in the TOC in your project so that it can be opened in your output.
If you do this when generating Microsoft HTML Help, the linked CHM will be merged with the TOC in
the project.
If you do this when generating one of the web-based outputs (HTML5, WebHelp, WebHelp Plus), the
user will be able to download the CHM.
Regardless of the type of online output you are generating, you can find the steps for linking to a
CHM file in the following topic: "Runtime Merging Output From HTML Help Projects (CHM Files)" on
page 118.
NOTE Links to CHM files can be configured in two ways. First, links can point to the CHM
file in general. Second, they can point to a specific topic within the CHM. The first method is
supported in all of the online outputs mentioned above. The second method is supported
only in Microsoft HTML Help output.
CHAPTER 2
122

Displaying Merged Navigation in HTML Help
Child Outputs
You can merge HTML Help so that the navigation (table of contents, index, search) for each CHM
file is displayed, regardless of which CHM file you open (parent or child). This can be done in a
couple of ways, depending on whether you have access to all of the Flare projects or to the CHM
files only.
How to Display Merged Navigation in HTML Help—
Access to All Flare Projects
1. Open the target to be used as the parent CHM.
2. On the Advanced tab of the Target Editor, select Display merged navigation in HTML Help.
3.
Click to save your work.
4. Follow the steps for merging based on HTML Help targets. See "Runtime Merging Flare
Projects Using Targets" on page 114.
5. Generate the parent HTML Help target.
The parent CHM file and all child CHM files are located in the same output folder, and when
you open any of those CHM files, you can see the navigation for any of the other outputs.
CHAPTER 2
123

How to Display Merged Navigation in HTML Help—
Access to CHM Files Only
Use this method if you do not have access to all of the Flare projects, but you do know the names of
the other CHM files that will be created. This method is more of a manual setup and is useful if you
are part of a team where different authors have access to different Flare projects that need to be
merged. This method also lets you add or remove child CHM files without needing to recompile the
parent project.
1. The author for each project (parent and child) places a simple TXT file named merge.txt in the
same folder where the Flare project file (.flprj) is located. This TXT file can be created with
Notepad and should simply list the names of all CHM files to be included in the merged
output (one on each line), with the name of the parent CHM appearing first.
EXAMPLE
MyParent.chm
MyFirstChild.chm
MySecondChild.chm
MyThirdChild.chm
2. The author for each child project generates his output and provides the author of the parent
project with the CHM file(s).
3. The author for the parent project brings the child CHM files into the parent project and
follows the steps for merging based on CHM files. See "Runtime Merging Output From HTML
Help Projects (CHM Files)" on page 118.
4. The author for the parent project generates the main HTML Help target.
The parent CHM file and all child CHM files are located in the same output folder, and when
you open any of those CHM files, you can see the navigation for any of the other outputs.
CHAPTER 2
124

Runtime Merging Server-Based
HTML5 Output
This is an easy way to merge the output from multiple HTML5 Flare targets into one Help system.
These targets can be originated from the same Flare project or from different Flare projects. You
simply place the output files in the correct location on the server (i.e., within your parent project's
AutoMerge folder). Flare then automatically merges the output from all of the targets when users
access the Help. From the end user's perspective, the results are seamless, appearing as one large
Help system. All of the TOCs, browse sequences, indexes, glossaries, and search capabilities for
the projects are merged.
NOTE Flare's HTML5 Side and Top Navigation skins do not support runtime project
merging.
The following information is necessary only for server-based output. If you do not require server-
based HTML5 output, see "Runtime Merging Flare Projects Using Targets" on page 114 instead.
CHAPTER 2
125
Process
1. Enable HTML5 Server-Based Output If you want to take advantage of the advanced server-
side features of HTML5 (i.e., automatic runtime project merging, server-side search,
searching of non-XHTML files), you must enable HTML5 server-based output. This includes
performing the following tasks: (1) installing Microsoft Internet Information Services (IIS) and
ASP.NET, (2) setting up the HTML5 target and generating/publishing, (3) configuring IIS on
the production server, (4) starting Microsoft Indexing Service or Microsoft Windows Search
(depending on the operating system), and (5) enabling HTML5 search.For more information
see the online Help.
2. Determine Parent Output Decide which of your project outputs will serve as the parent. This is
the main output that users will open. All other outputs will be accessed from that output,
although it will appear as one large Help system to end users.
3. (Optional) Specify TOC and/or Browse Sequence Locations for Automerge By default, the
TOCs and browse sequences from the child outputs will be appended at the end of the parent
output's TOC and browse sequence. However, if you want them to be appended somewhere
within the parent output's TOC or browse sequence, you can specify the exact location.See
"Specifying the Automerge Location in a TOC for HTML5" on page 130 and "Specifying the
Automerge Location in a Browse Sequence for HTML5" on page 128.
4. (Optional) Specify Order of Merged Outputs When you automerge HTML5 outputs, the
secondary outputs are merged to the parent project's table of contents (TOC) and/or browse
sequence in alphabetical order. However, you can override this default configuration and
merge the secondary outputs in any order that you like.See "Specifying the Order of
Automerged HTML5 Outputs" on page 132.
5. Generate Outputs Build the output for each of the targets to be included in the automerge.
You must use HTML5 for all of the targets.
CHAPTER 2
126

NOTE If you are testing HTML5 server-based output on your local machine, you need view
the output at least one time. When you view HTML5 output on your local computer, you
need to create a special folder called "MCPreview" within your "C:\Inetpub\wwwroot" folder.
Place a copy of your HTML5 output files in it. This enables you to test the advanced
features of HTML5 on your local machine. When testing the automerge feature on your
computer, you need to place the secondary ("child") outputs in the AutoMerge subfolder at
this location (as opposed to the output folder that was generated where your Flare project
is located).
NOTE If you are testing HTML5 server-based output on your local machine, you may need
to wait a few minutes after viewing the output for the Indexing Service to fully scan your
files. Otherwise, you may not immediately see the effects of the scan (e.g., searches of
non-XHTML files, incorporation of merged output files) in the output. If you avoid
performing other tasks during this period, the scanning of the files will be completed more
quickly.
NOTE If you want to test HTML5 server-based output on your local computer, the
advanced search features of HTML5 are not operable.
CHAPTER 2
127

Specifying the Automerge Location in a Browse
Sequence for HTML5
You can determine where other Flare project outputs are merged relative to your parent project's
browse sequence if you are generating HTML5 server-based output and you are publishing the files
to a web server running Microsoft IIS.
By default, the other HTML5 server-based outputs will be merged at the end of your parent project's
browse sequence. However, you can use the following steps to select one of the available options
to override this placement.
How to Specify the Automerge Location in a Browse
Sequence
1. Open the browse sequence in the Flare project that will serve as the parent project.
2. Do one of the following:
n
If you want to merge the other outputs in relation to one of the existing entries in the
browse sequence (e.g., before it, after it), select that entry (whether it is an individual
item or a book).
OR
n
If you want to merge the other outputs at the location of an entry that is not linked to
any other file, and you want to provide a label to indicate the location of the merge,
create a new browse sequence item. To do this:
a. Place your cursor in the browse sequence where you want to add the new item.
b.
Click .
c. Press F2.
d. Replace the default text with new text.
e. Press ENTER.
f. If necessary, use the arrow buttons in the local toolbar to position the new entry
in the browse sequence.
3.
In the local toolbar of the Browse Sequence Editor, click . The Properties dialog opens.
4. Select the Advanced tab.
CHAPTER 2
128

5. In the Server-based Automerge field, select one of the following:
n
Before The automerge will occur immediately before the selected browse sequence
entry.
n
After The automerge will occur immediately after the selected browse sequence entry.
n
First Child The automerge will occur at the first location directly after the selected
browse sequence book (i.e., before any other entries within the book). If you use this
option on a simple browse sequence entry instead of a book, the entry will
automatically become a book once the outputs are automerged.
n
Last Child The automerge will occur at the last location after the selected browse
sequence book (after the last entry within the book). If you use this option on a simple
browse sequence entry instead of a book, the entry will automatically become a book
once the outputs are automerged.
n
Replace The automerge will occur at the location of the browse sequence entry where
you have specified this option. It would replace any links that might otherwise be
applied to that entry. You might use this option, for example, if you want to create a
new entry in the parent browse sequence so that you can add a label at the point where
the automerge occurs.
6. In the Properties dialog, click OK.
7.
Click to save your work.
CHAPTER 2
129

Specifying the Automerge Location in a TOC for
HTML5
You can determine where other Flare project outputs are merged relative to your parent project's
TOC if you are generating HTML5 server-based output and you are publishing the files to a web
server running Microsoft IIS.
By default, the other HTML5 server-based outputs will be merged at the end of your parent project's
TOC. However, you can use the following steps to select one of the available options to override
this placement.
How to Specify the Automerge Location in a TOC
1. Open the TOC in the Flare project that will serve as the parent project.
2. Do one of the following:
n
If you want to merge the other outputs in relation to one of the existing entries in the
TOC (e.g., before it, after it), select that entry (whether it is an individual item or a book).
OR
n
If you want to merge the other outputs at the location of an entry that is not linked to
any other file, and you want to provide a label to indicate the location of the merge,
create a new TOC item. To do this:
a. Place your cursor in the TOC where you want to add the new item.
b.
Click .
c. Press F2.
d. Replace the default text with new text.
e. Press ENTER.
f. If necessary, use the arrow buttons in the local toolbar to position the new entry
in the TOC.
3.
In the local toolbar of the TOC Editor, click . The Properties dialog opens.
4. Select the Advanced tab.
CHAPTER 2
130

5. In the Server-based Automerge field, select one of the following:
n
Before The automerge will occur immediately before the selected TOC entry.
n
After The automerge will occur immediately after the selected TOC entry.
n
First Child The automerge will occur at the first location directly after the selected TOC
book (i.e., before any other entries within the book). If you use this option on a simple
TOC entry instead of a book, the entry will automatically become a book once the
outputs are automerged.
n
Last Child The automerge will occur at the last location after the selected TOC book
(after the last entry within the book). If you use this option on a simple TOC entry
instead of a book, the entry will automatically become a book once the outputs are
automerged.
n
Replace The automerge will occur at the location of the TOC entry where you have
specified this option. It would replace any links that might otherwise be applied to that
entry. You might use this option, for example, if you want to create a new entry in the
parent TOC so that you can add a label at the point where the automerge occurs.
6. In the Properties dialog, click OK.
7.
Click to save your work.
CHAPTER 2
131

Specifying the Order of Automerged HTML5
Outputs
When you automerge HTML5 outputs, the secondary outputs are merged to the parent project's
table of contents (TOC) and/or browse sequence in alphabetical order. However, you can override
this default configuration and merge the secondary outputs in any order that you like. See "Runtime
Merging Server-Based HTML5 Output" on page 125.
EXAMPLE You have a parent project with a target named "Main" and three smaller projects
with targets named "First Child," "Second Child," and "Third Child," respectively. If you place
the three smaller project outputs in the AutoMerge subfolder where "Main" is published,
their TOCs will be appended to the parent project's TOC in the following order:
1. First Child
2. Second Child
3. Third Child
But what if you want "Third Child" to be appended first? You can use the steps in this topic
to position it above the other targets. Therefore, the result would be:
1. Third Child
2. First Child
3. Second Child
Now let's say that you add two more targets (called "Final Child" and "Another Child") to the
AutoMerge folder. If you do not adjust your custom order, Flare will automerge these
outputs in alphabetical order at the end of your custom order. Therefore, the final result
would be:
1. Third Child
2. First Child
3. Second Child
4. Another Child
5. Final Child
CHAPTER 2
132
How to Specify the Order of Automerged Outputs
1. Create an XML file and name it SortOrder.xml. You can do this by opening an editor such as
Notepad. When you save the file, type the xml file extension at the end of the name.
2. Enter the following code into the blank file.
<?xml version="1.0" encoding="utf-8"?>
<SortOrder>
<Item>ProjectA</Item>
<Item>ProjectB</Item>
<Item>ProjectC</Item>
</SortOrder>
3. Replace "ProjectA," "ProjectB," and "ProjectC" with the names of your own child targets. You
can add or remove line items as necessary.
If you were to use the example at the top of this topic, you would enter the following.
<?xml version="1.0" encoding="utf-8"?>
<SortOrder>
<Item>Third Child</Item>
<Item>First Child</Item>
<Item>Second Child</Item>
</SortOrder>
4. Save the file.
5. Copy and paste the SortOrder.xml file into the AutoMerge directory of your published HTML5
output. This file sits beside the child output folders that you are using for the automerge.
CHAPTER 2
133


Adding an Export Project File
The following steps show you how to add an export project file, which is used to export projects.
How to Add an Export Project File
1. Select Project > New > Add Export Project File. The Add File dialog opens.
2. In the File Type field at the top, make sure Export Project File is selected.
3. In the Source area, choose to create the new file based on a template or an existing file.
n
New From Template Choose either a factory template file or one of your own custom
template files as a starting point. The new file will take on all of the settings contained
in the template. If you want to use the factory template provided by Flare, expand the
Factory Templates folder and click on a template file. If you want to use your own
custom template file, expand the appropriate folder and click on a file. For more
information about templates, see the online Help.
n
New From Existing Choose an existing file of the same type as a starting point for your
new file. As with template files, your new file will take on all of the settings contained in
the file you select. To use this option, click , use the Open File dialog to find a file, and
double-click it.
4. In the File Name field, type a new name for the export file.
5. (Optional) If you want to apply condition tags to the file, expand the Attributes section at the
bottom of the dialog. Next to the Condition Tags field, click and select the conditions you
want to apply. Click OK.
6. (Optional) If you want to apply file tags, expand the Attributes section at the bottom of the
dialog. Next to the File Tags field, click and select the file tags you want to apply. Click OK.
7. Click Add. The export file is added to the Exports folder in the Project Organizer. The Export
Project File Editor opens to the right.
CHAPTER 3
135

Exporting Projects
You can export an entire Flare project, or parts of one, to another location. One reason you might
want to use this feature is to quickly and easily make a copy of projects and archive them,
especially if you have an extremely large Flare project and need to archive only parts of it. Another
use for this feature is translation. If you only need a portion of a parent project to be translated, you
don't want to send the translator all of the files, but rather a smaller version of the project
containing only the files requiring translation.
You can export a project using the Export Project Wizard to guide you. Alternatively, you can add an
export file to your project and use the Export Project File Editor (see the online Help).
CHAPTER 3
136

How to Export a Project via the Export Project
Wizard
1. Open a project.
2. Select Project > Export Project. The Export Project Wizard opens.
3. In the New Project Name field, enter a name for the exported project.
4. (Optional) The New Project Path field is automatically populated with the default location
(Documents\My Project Exports). If you want to export the project to a different location,
click and select the folder you want.
NOTE If you select Project Template below in step 6, this area is grayed out because
the project files will automatically be placed in your templates folder.
5. In the Export From drop-down, select one of the options.
n
Entire Project This option makes a copy of the entire project, including all folders,
subfolders, and files.
n
Using Target This option uses the same workflow as that used for generating a target.
When you select a particular target, the same files and content that would be included
in generated output are included in the exported project.
n
Using Conditions This option exports only files and content affected by condition tags
that you tell Flare to include or exclude.
n
Using File Tags This option exports only files affected by file tags that you tell Flare to
include or exclude. This method can be especially useful for translation purposes,
exporting only files that are marked with a certain file tag status (e.g., Ready for
Translation).
n
Select Files This option exports only specific files that you select. You can choose any
files stored in the source project's Content Explorer and Project Organizer.
CHAPTER 3
137

If you have a primary TOC, page layout, or stylesheet set in the Project Properties dialog and
include those files in an export, the settings in the Project Properties dialog will be preserved.
If you do not include those files in an export, default files are added to the exported project to
allow it to work, and the settings in the Project Properties dialog are set to default.
NOTE If Flare detects any missing files (e.g., stylesheet, template page, target) that
are necessary in order to properly open the exported project, default files are added.
For example, if no target file is added directly as a result of your selection, an HTML5
target is added by default.
6. In the Output drop-down, select one of the options.
n
Zip File This option packages the project files into a single zip file with an .flprjzip
extension and places it in a location that you select. The default location is
Documents\My Project Exports.
n
Project Files This option simply exports the project files to a location that you select.
The default location is Documents\My Project Exports.
n
Project Template This option exports the project files to your templates folder (e.g.,
Documents\My Templates\Projects). By being placed in this location, the project files
become available as a template selection when you create a new project.
CHAPTER 3
138

7. (Optional) Select Save settings if you want to retain your settings for future re-exports. The
export project file (.flexp) is stored in the Exports folder in the Project Organizer. When you
open this export file, the Export Project File Editor opens. This editor lets you change any of
your settings (if necessary) and export the project again (see the set of steps below for
exporting a project using the Export Project File Editor).
8. Click Next.
9. If you are exporting based on a target, click in the Target drop-down field and select the
appropriate target from the source project.
10. (Optional) You can select one or both of the following:
n
Convert variables to text Select this option if you want all relevant variables to be
converted to text.
n
Convert snippets to text Select this option if you want all relevant snippets to be
converted to text.
11. If you are exporting an entire project or using a target, you can skip to step 12. Otherwise, if
you made another selection in step 5, click Next and complete the options as necessary.
IF USING CONDITIONS
Use either the Basic or Advanced section to tell Flare which condition tags to include and
which to exclude from the export.
By default when you open this page, the Basic option is selected. You can click Advanced to
switch to that mode if you are experienced at writing expressions by hand.While the Basic
section is easier for most people to use, it is also more limited in the type of expressions it
can create.
With the Basic method, all of your work is done in the top half of the user interface, by just
selecting options. On the other hand, with the Advanced method, most of your work is done in
the bottom portion of the user interface.
For details and examples on using each of these methods, see the online Help.
NOTE In order for this method to work, make sure you have already applied the
appropriate condition tags to files and content in the project.
CHAPTER 3
139

NOTE If you are an experienced user and want to use the Advanced mode, you might
find it helpful to begin with the Basic mode to create the initial expression and then
switch to Advanced when you are ready.
NOTE The Finish button is not enabled until you create at least one condition
expression on this page.
IF USING FILE TAGS
a. In the Tag Type field, you can select a specific file tag set or choose to display all file
tags to the right.
b. Use either the Basic or Advanced section to tell Flare which file tags to include (e.g.,
Ready for Translation) and which to exclude from the export.
By default when you open this page, the Basic option is selected. You can click
Advanced to switch to that mode if you are experienced at writing expressions by
hand.While the Basic section is easier for most people to use, it is also more limited in
the type of expressions it can create.
With the Basic method, all of your work is done in the top half of the user interface, by
just selecting options. On the other hand, with the Advanced method, most of your work
is done in the bottom portion of the user interface.
The process for creating file tag expressions is essentially the same as that for
condition tag expressions.
NOTE In order for this method to work, make sure you have already associated
the appropriate file tags with files in the project.
NOTE If you are an experienced user and want to use the Advanced mode, you
might find it helpful to begin with the Basic mode to create the initial
expression and then switch to Advanced when you are ready.
CHAPTER 3
140

NOTE The Finish button is not enabled until you create at least one file tag
expression on this page.
IF SELECT FILES
a. Make sure a check mark is next to each content folder or file that you want to include in
the exported project. By default, all of the boxes are checked, but you can click in any of
the boxes to remove the check marks if necessary. You can expand folders and
subfolders to see files within them.
b. Click Next.
CHAPTER 3
141

c. Make sure a check mark is next to each project folder or file that you want to include in
the exported project. By default, all of the boxes are checked, but you can click in any of
the boxes to remove the check marks if necessary. You can expand folders and
subfolders to see files within them.
CHAPTER 3
142
12. If you are exporting project files or zip files (step 6), click Finish. The project is exported, and
Windows opens to the location, showing you the project or zip files. However, if you are
exporting to a template, continue with the wizard and complete the remaining options.
IF PROJECT TEMPLATE
a. Click Next.
b. On the next page of the template, select the template folder where you want to export
the files. You can click Manage Templates if you need to add or change template
folders.
c. In the Template Name field, enter a new name for the template.
d. Click Finish. The project is exported, and Windows opens to the location, showing you
the files.
CHAPTER 3
143

EXAMPLE — Archive Using Conditions
You have a large Flare project, from which you create single-sourced output for four
products. Furthermore, let's say that the documentation for each of those products
consists of several targets in the Flare project (e.g., some online, some print-based
outputs).
CHAPTER 3
144

In order to keep the output separate and organized throughout the Flare project, you use
condition tags, both on content and on the files themselves (e.g., topics, images,
stylesheet).
CHAPTER 3
145

Your manager says that each time you finish documentation for a particular product, you
must save just those files in a repository. So let's say one day you finish the documentation
for Product 1, which you've designed to produce output from three targets (one output for
the Web, and two outputs for PDFs).
Your large Flare project holds the finished documentation for Product 1, but it also holds
the documentation for Products 2, 3, and 4, which are in different stages of progress. You
want to archive only the documentation that is specific to Product 1, so you decide to
export the relevant files from the large Flare project to a smaller one.
But how do you do this? One option is to export to a smaller project based on condition
tags, which you have used to organize all of the content and files in the project.
CHAPTER 3
146

So from the Project ribbon you click Export Project. On the first page of the wizard, you click
in the Export From drop-down and select Using Conditions.
CHAPTER 3
147

You can then tell Flare which conditions to include and which to exclude. In this case, you
tell Flare to include all of the condition tags that have to do with Product 1 and its targets,
and you exclude all of the condition tags that have to do exclusively with the other products
and their targets.
After clicking Finish, the relevant files and content are exported to a new, smaller Flare
project.
CHAPTER 3
148

EXAMPLE You have a Flare project with seven targets, and you need to translate the
content associated one of those targets from English to French. You could send the entire
Flare project to the translator, but that would mean the translator would be getting files
associated with all seven targets, not just the one requiring translation. So you decide to
export only the portion of the Flare project that needs to be translated.
First, from the Project ribbon you click Export Project. On the first page of the wizard, you
click in the Export From drop-down and select Using Target.
CHAPTER 3
149

On the next page of the wizard, you select the target whose files you want to export. In this
case, let's say the target in question is named "Product1_Web Output." In addition, you tell
Flare to convert variables and snippets to text so that they become part of the topics, rather
than separate files.
After clicking Finish, the relevant files and content are exported to a new, smaller Flare
project, which you send to the translator. Only the files and content necessary to produce
the Product1_Web Output target are included in the export. Therefore, the translator
receives only the files requiring translation.
CHAPTER 3
150

What’s Noteworthy?
NOTE As an alternative to exporting projects in the Flare user interface, you can use
madbuild to export projects from the command line. Using this method, you do not need to
have Flare open, and you can schedule exports for specific days and times. See "Exporting
Projects Using the Command Line" on the next page.
NOTE There is also a less robust, but quicker feature for zipping projects. See "Zipping
Projects" on page 161.
CHAPTER 3
151

Exporting Projects Using the
Command Line
As an alternative to exporting projects in the Flare user interface, you can use madbuild to export
projects from the command line. Using this method, you do not need to have Flare open, and you
can schedule exports for specific days and times.
How to Use the Command Line to Export a
Project
1. Add an export project file in the Project Organizer. It will be placed in an Exports folder. See
"Adding an Export Project File" on page 135.
2. Complete the fields in the Export Project File Editor. You need to do this so that Flare knows
where to export the project, which parts of it to export, and so on. These fields need to be
completed only once. After that, you can export the project anytime you want and these same
rules will be used. For more information on each field and option in the Export Project File
Editor, see "Exporting Projects" on page 136.
3. Do one of the following, depending on whether you want to create a batch file for later use or
to export immediately using the command line.
n
To Create a Batch File (Recommended) Open Notepad. For example, in Windows 7, you
can open it by clicking the Start button and selecting All Programs > Accessories >
Notepad.
OR
n
To Generate Immediately From the Command Line Open your command prompt. For
example, in Windows 7, you can open it by clicking the Start button and then selecting
All Programs > Accessories > Command Prompt.
CHAPTER 3
152

4. Type the path to the Flare.app folder where you installed Flare, and press ENTER.
EXAMPLE If you installed Flare at C:\Program Files (this is just an example; your
files might be installed in a different folder, such as Program Files x86), you might
type the following and press ENTER on your keyboard:
cd\Program Files\MadCap Software\MadCap Flare 20\Flare.app
NOTE Alternatively, you can use cd c:\Program Files\[rest of the path] instead of
cd\Program Files\[rest of the path].
5. Type the following and press ENTER on your keyboard (entering the path to your project, and
the export file within it, in place of the section in angle brackets):
madbuild -export [project path] -settings [export project file name]
Make sure you add the .flexp file extension at the end of the export project file name.
TIP If you are using the command prompt (as opposed to a Notepad file) and you
have an operating system that supports dragging, you can drag a file from the
Windows location to the Command Prompt window. This will add the path of the file
within quotation marks for you.
NOTE If there are spaces anywhere in your path or project name, you need to use
quotation marks around it.
EXAMPLE — No Spaces
You have a Flare project called "FictionSoftPro" that you have stored in a folder of the
same name at the root level of the C: drive. Within that project you've created an
export file named "MyExportFile." In that case, you can type this:
madbuild -export c:\FictionSoftPro\FictionSoftPro.flprj -
settings MyExportFile.flexp
CHAPTER 3
153

EXAMPLE — Spaces
You have a project called "FictionSoftPro" that you have stored in a folder named "My
Projects" (with a space) at the root level of the C: drive. Within that project you've
created an export file named "My Export File" (with spaces). In that case, you can type
this:
madbuild -export "c:\My
Projects\FictionSoftPro\FictionSoftPro.flprj" -settings "My
Export File.flexp"
If you are using the command prompt window, the project is exported immediately.
If you are creating a batch file in Notepad, it might look something like this:
CHAPTER 3
154
Batch Files and Task Scheduler
If you are creating a batch file, save the Notepad file to any location you like on your computer.
When you do this, type .bat as the extension at the end of the file name (e.g., MyBatchFile.bat). At
any time you like, you can export the project simply by double-clicking the batch file. You can also
use a tool to schedule the batch file to run.
For example, complete the following steps if using the Windows 10 Task Scheduler utility.
1. In the Windows search field, type Task Scheduler and press ENTER.
2. Click Action > Create Basic Task.
3. In the Create Basic Task Wizard, give the task a name and click Next.
4. Using the next couple of pages of the wizard, choose when you wan the batch to run (e.g.,
daily, starting at 2 a.m.). Click Next until you get to the Action page.
5. Click Start a program, and click Next.
6. Click Browse. Then find and double-click the batch file you created.
7. Click Next.
8. Click Finish.
CHAPTER 3
155
Error Codes
If you export a project using the command line, the following error codes may be seen if problems
occur during an export process:
n
3001 The entered export project file does not exist.
n
3002 There was an error parsing the entered export project file.
n
3003 Export failed.
n
3004 Export destination name not set in the export file
n
3005 Export destination path not set in the export file
n
3006 Template name not set in the export file
n
3007 Template path not set in the export file
n
3008 Target path not set in export file (when exporting using target)
n
3009 Target path not found (when exporting using target)
n
3010 Conditional expression not set (when exporting using conditional expression)
n
3011 File Tag expression not set (when exporting using file tag expression)
n
3012 No files selected (when exporting using manual selection)
CHAPTER 3
156


Opening a Project
You can open an existing project by using interface options or dragging files from Windows
Explorer.
How to Open a Project Using Interface Options
Do one of the following, depending on the part of the user interface you are using:
n
Start Page On the right side of the Start Page, click Open. You can also click a recently
opened project on the left side. If you do not see the Start Page, select View > Start Page.
n
Ribbon Select File > Open.
n
Keyboard Shortcut Press CTRL+O.
How to Open a Project by Dragging
1. Launch Flare.
2. Open Windows and navigate to a folder containing a project (FLPRJ) file.
3. Drag the project file from Windows to the application window and drop it on the title bar in
Flare.
CHAPTER 4
158

Closing Projects
When you are finished working on a project, you can either close the project or close Flare
altogether. If you close just the project, Flare remains open, which lets you start another project if
you want. Select File > Close > Close Project.
Deleting Projects
To delete a project completely, you must use Windows Explorer. This operation cannot be done
from Flare.
You can also remove projects from displaying as recent projects in Flare. This does not delete the
project, but simply removes it from those shortcut locations.
How to Delete a Project Through Windows
1. In Windows Explorer, browse to the location where you have stored the project (e.g.,
C:\Users\[username]\Documents\My Projects).
2. Delete the folder holding the project files.
How to Remove a Project From Recent Projects
in Flare
1. Select File > Manage Recent Projects. The Recent Projects dialog opens.
2. Highlight the project and click Remove.
3. Click OK.
CHAPTER 4
159

What’s Noteworthy?
NOTE Projects that you have pinned in the Start Page are not removed from it when you
manage your recent projects, removing them all. If you want to remove a pinned project
from the Start Page, you need to unpin it in order for it to be removed. Just click the pin
button to the right of the project.
CHAPTER 4
160

Zipping Projects
If you want to send your project to another location or person, you can package (zip) the project
into a single file that is much smaller than the entire project in its normal state. The zipped project
can then be easily unzipped by anyone who also uses Flare, retuning the project to its normal state
so that it can be edited. Zipping a project is also a great way to create and store a backup of your
project.
There are two methods you can use—(1) zipping only or (2) zipping and emailing. The first method
lets you zip the project and place the compressed file where you want on your computer. The
second method lets you zip the project and immediately attach it to an email so that you can send it
to someone. This topic deals with the first method.
How to Zip a Project
1. Open a project.
2. Select Project > Zip Project. The Create Package dialog opens.
3. (Optional) You can click in the Package File field and rename the zipped file at the end of the
path. By default, the zipped file is named after your project.
4. (Optional) You can click the Browse button and navigate to another folder to store the zipped
file. By default, Flare specifies that the zipped file should be placed in your "Documents"
folder, but you can use the Browse button to change that.
5. Click Create. Flare compresses the project and places it into a single file with an .flprjzip
extension.
CHAPTER 4
161

APPENDIX
PDFs
The following PDFs are available for download from the online Help.
Tutorials
Getting Started Tutorial
Autonumbers Tutorial
Back-to-Top Button Tutorial
Context-Sensitive Help Tutorial
Custom Toolbar Tutorial
eLearning Tutorial—Basic
eLearning Tutorial—Advanced
Image Tooltips Tutorial
Lists Tutorial
Meta Tags Tutorial
Micro Content Tutorial—Basic
Micro Content Tutorial—Advanced
Responsive Output Tutorial
Single-Sourcing Tutorial
Snippet Conditions Tutorial
Styles Tutorials
Tables Tutorial
Word Import Tutorial
APPENDIX
162

Cheat Sheets
Context-Sensitive Help Cheat Sheet
Folders and Files Cheat Sheet
Learning & Development Cheat Sheet
Lists Cheat Sheet
Micro Content Cheat Sheet
Print-Based Output Cheat Sheet
Search Cheat Sheet
Shortcuts Cheat Sheet
Structure Bars Cheat Sheet
Styles Cheat Sheet
APPENDIX
163

User Guides
Accessibility Guide
Analysis and Reports Guide
Architecture Guide
Autonumbers Guide
Branding Guide
Condition Tags Guide
Context-Sensitive Help Guide
Eclipse Help Guide
eLearning Guide
Getting Started Guide
Global Project Linking Guide
HTML5 Guide
Images Guide
Import Guide
Indexing Guide
Key Features Guide
Lists Guide
MadCap Central Integration
Guide
Meta Tags Guide
Micro Content Guide
Navigation Links Guide
Plug-In API Guide
Print-Based Output Guide
Project Creation Guide
QR Codes Guide
Reviews & Contributions With
Contributor Guide
Scripting Guide
Search Guide
SharePoint Guide
Skins Guide
Snippets Guide
Source Control Guide: Git
Source Control Guide:
Perforce Helix Core
Source Control Guide:
Subversion
Source Control Guide: Team
Foundation Server
Styles Guide
Tables Guide
Tables of Contents Guide
Targets Guide
Template Pages Guide
Templates Guide
Topics Guide
Touring the Workspace Guide
Transition From FrameMaker
Guide
Translation and Localization
Guide
Variables Guide
Videos Guide
What's New Guide
APPENDIX
164
