
Privileged Remote Access 24.2
Access Console User Guide
©2003-2024 BeyondTrust Corporation. All Rights Reserved. Other trademarks identified on this page are owned by their respective owners. BeyondTrust is not a chartered bank or trust company, or
depository institution. It is not authorized to accept deposits or trust accounts and is not licensed or regulated by any state or federal banking authority.
TC:7/8/2024

Table of Contents
BeyondTrust Access Console 6
Install the Access Console 7
Log in to the PRA Access Console 8
Use Passwordless Login 8
Infrastructure Access Mode 8
Use Kerberos Server 9
Access Console User Interface 11
Change settings and preferences in the Access Console 12
Changing settings 12
Global Settings 12
Alerts 13
Access Sessions 14
External Tools 15
Use the CLI for the Access Console 17
Entering Commands 17
Initiate a Session 17
Executing onExternalToolClicked() Callback 17
Use Session Specific Subcommands 18
SSH 18
RDP 18
DB 18
Protocol tunnel 19
Use Other Subcommands 19
List 19
Close 19
Use Infrastructure Access Mode 20
Jump interface: use Jump items to access remote systems 22
Copy Jump items 22
Jump to a Jump item 22
Default Credentials for Jump Items 24
Start multiple Jump sessions 24
SALES: www.beyondtrust.com/contact
SUPPORT: www.beyondtrust.com/support
DOCUMENTATION: www.beyondtrust.com/docs
2
©2003-2024 BeyondTrust Corporation. All Rights Reserved. Other trademarks identified on this page are owned by their respective owners. BeyondTrust is not a chartered bank or trust company, or
depository institution. It is not authorized to accept deposits or trust accounts and is not licensed or regulated by any state or federal banking authority.
TC: 7/8/2024
PRIVILEGED REMOTE ACCESS 24.2
ACCESS CONSOLE USER GUIDE
This page needed for table of
contents. Do not delete.

Schedule 24
Notification 24
Ticket ID 24
Authorization 25
Revoke an Access Approval Request 26
Use Jump Clients to Access Remote Endpoints 28
Use a Jump Client 28
Sort Jump Clients 28
Search for a Jump Client 28
Jump Client Details Pane 28
Wake-On-Lan (WOL) 29
Copy Jump Items 30
Jump Client Properties 30
Use Remote Jump for Unattended Access to Computers on a Separate Network 32
Create a Remote Jump Shortcut 32
Use a Remote Jump Shortcut 33
Use Local Jump for Unattended Access to Computers on Your Local Network 34
Create a Local Jump Shortcut 34
Use a Local Jump Shortcut 34
Use RDP to Access a Remote Windows Endpoint 36
Create an RDP Shortcut 36
Inject Credentials 37
Use an RDP Shortcut 39
Use VNC to Access a Remote Windows Endpoint 40
Create a VNC Shortcut 40
Use a VNC Shortcut 41
Use a Protocol Tunnel Jump to Make a TCP Connection to a Remote System 42
Create a Protocol Tunnel Jump shortcut 42
Create TCP Tunnel 43
Create SQL Server Tunnel 44
Create Kubernetes Cluster Tunnel 45
Use a Protocol Tunnel Jump Shortcut 45
Stipulations to Correct Functioning 47
SALES: www.beyondtrust.com/contact
SUPPORT: www.beyondtrust.com/support
DOCUMENTATION: www.beyondtrust.com/docs
3
©2003-2024 BeyondTrust Corporation. All Rights Reserved. Other trademarks identified on this page are owned by their respective owners. BeyondTrust is not a chartered bank or trust company, or
depository institution. It is not authorized to accept deposits or trust accounts and is not licensed or regulated by any state or federal banking authority.
TC: 7/8/2024
PRIVILEGED REMOTE ACCESS 24.2
ACCESS CONSOLE USER GUIDE
This page needed for table of
contents. Do not delete.

TCP and SQL Server Tunnel Restricitons 47
Kubernetes Tunnel Restrictions 47
Use Shell Jump to Access a Remote Network Device 48
Create a Shell Jump Shortcut 48
Use a Shell Jump Shortcut 50
Configure Shell Prompt Filtering: 50
Configure Command Filtering: 50
Use Credential Injection with SUDO on a Linux Endpoint 51
Use a Web Jump to Access Web Services 52
Create a Web Jump Shortcut 52
Use a Web Jump Shortcut 54
Upload and Download Files using a Web Jump Shortcut 55
Use Credential Injection 55
Access Toolset 57
Access Session Overview and Tools 57
Session Tools 58
Log Into Remote Systems Using Credential Injection from the Access Console 59
Install and Configure the Endpoint Credential Manager 60
System Requirements 60
Configure a Connection to Your Credential Store 62
Use Credential Injection to Access Remote Systems 63
Choose from Favorite Credentials for Injection 63
Check Out and Check In Vault Credentials 63
Control the Remote Endpoint with Screen Sharing 65
Screen Sharing Options 65
Screen Sharing Tools 66
Use Annotations to Draw on the Remote Screen of the Endpoint 68
Enabling Annotations 68
View Multiple Monitors on the Remote Endpoint 70
Using the Display Icon 71
RDP Session Multi-Monitor Support 71
Using the Displays Tab 71
File Transfer to and from the Remote Endpoint 73
SALES: www.beyondtrust.com/contact
SUPPORT: www.beyondtrust.com/support
DOCUMENTATION: www.beyondtrust.com/docs
4
©2003-2024 BeyondTrust Corporation. All Rights Reserved. Other trademarks identified on this page are owned by their respective owners. BeyondTrust is not a chartered bank or trust company, or
depository institution. It is not authorized to accept deposits or trust accounts and is not licensed or regulated by any state or federal banking authority.
TC: 7/8/2024
PRIVILEGED REMOTE ACCESS 24.2
ACCESS CONSOLE USER GUIDE
This page needed for table of
contents. Do not delete.

File Transfer Tools 73
Open the Command Shell on the Remote Endpoint Using the Access Console 75
Command Shell Tools 75
View System Information on the Remote Endpoint 77
System Information Tools 78
Access the Registry Editor on the Remote Endpoint 79
Registry Editor Tools 79
Session Management and Team Collaboration 81
View Active Access Sessions 81
Use the Dashboard to Administer Team Members 82
Chat with Other Users 83
Share your Screen with Another User 84
Share My Screen Tools 84
Sharing User 84
Viewing User 85
Share a Session with Other Users 86
Chat with Other Users During a Shared Session 87
Use Extended Availability to Remain Accessible when Not Logged In 88
Email Notification & Invitation 88
Invite External Users to Join an Access Session 89
Ports and Firewalls 90
SALES: www.beyondtrust.com/contact
SUPPORT: www.beyondtrust.com/support
DOCUMENTATION: www.beyondtrust.com/docs
5
©2003-2024 BeyondTrust Corporation. All Rights Reserved. Other trademarks identified on this page are owned by their respective owners. BeyondTrust is not a chartered bank or trust company, or
depository institution. It is not authorized to accept deposits or trust accounts and is not licensed or regulated by any state or federal banking authority.
TC: 7/8/2024
PRIVILEGED REMOTE ACCESS 24.2
ACCESS CONSOLE USER GUIDE
This page needed for table of
contents. Do not delete.

BeyondTrust Access Console
This guide is designed to help you install the BeyondTrust access console onto your computer and understand the features of the solution.
BeyondTrust Privileged Remote Access enables you to access remote endpoints by connecting to them through the BeyondTrust
Appliance B Series.
Use this guide only after an administrator has performed the initial setup and configuration of the B Series Appliance as detailed in the
BeyondTrust Appliance B Series Hardware Installation Guide. Once BeyondTrust is properly installed, you can begin accessing your
endpoints immediately. Should you need any assistance, please contact BeyondTrust Technical Support at
www.beyondtrust.com/support.
SALES: www.beyondtrust.com/contact
SUPPORT: www.beyondtrust.com/support
DOCUMENTATION: www.beyondtrust.com/docs
6
©2003-2024 BeyondTrust Corporation. All Rights Reserved. Other trademarks identified on this page are owned by their respective owners. BeyondTrust is not a chartered bank or trust company, or
depository institution. It is not authorized to accept deposits or trust accounts and is not licensed or regulated by any state or federal banking authority.
TC: 7/8/2024
PRIVILEGED REMOTE ACCESS 24.2
ACCESS CONSOLE USER GUIDE

Install the Access Console
In any web browser, go to the URL of your B Series Appliance followed by /login and enter the username and password set by your
administrator. You may be prompted to change your password the first time you log in.
From the My Account page, download and install the BeyondTrust access console. The option defaults to the appropriate installer for
your operating system.
Note: On a Linux system, you must save the file to your computer and then open it from its downloaded location. Do not use
the Open link that appears after downloading a file from some browsers.
When the installation wizard appears, follow the instructions to install the software. After installing the access console, you can choose
Run BeyondTrust Access Console Now and/or Run at Startup. Then click Finish.
Note: If you choose Run BeyondTrust Access Console Now during installation, a login prompt appears on your screen.
SALES: www.beyondtrust.com/contact
SUPPORT: www.beyondtrust.com/support
DOCUMENTATION: www.beyondtrust.com/docs
7
©2003-2024 BeyondTrust Corporation. All Rights Reserved. Other trademarks identified on this page are owned by their respective owners. BeyondTrust is not a chartered bank or trust company, or
depository institution. It is not authorized to accept deposits or trust accounts and is not licensed or regulated by any state or federal banking authority.
TC: 7/8/2024
PRIVILEGED REMOTE ACCESS 24.2
ACCESS CONSOLE USER GUIDE

Log in to the PRA Access Console
After installing the BeyondTrust console, launch the access console from its
directory location as defined during installation.
Note: By default, in Windows, you can access the console from
Start Menu > All Programs > Bomgar >
access.example.com, where access.example.com is the
hostname of the site from which you downloaded the console.
If the Login Agreement has been enabled, you must click Accept to
proceed.
At the prompt, enter your username and password.
Use Passwordless Login
FIDO2-certified authenticators can be used to securely log in to the desktop access console, privileged web access console, and the /login
administrative interface without entering your password. You can register up to 10 authenticators.
If passwordless login has been enabled, Authenticate Using may default to Passwordless FIDO2, or it can be selected. The exact
process for passwordless login depends on the type of device and manufacturer.
You can enable passwordless login and set the default authentication after logging into the /login administrative interface, by navigating to
Management > Security, and then registering passwordless authenticators at My Account > Security. Administrators can view and
manage passwordless login registration and usage at Users & Security > Users > Passwordless Authenticators
Note: Passwordless login for the desktop access console on macOS or Linux systems is supported only for roaming
authenticators (such as the YubiKey hardware security keys). Platform or integrated authenticators (such as Face ID and
fingerprint scanners) are not supported for the desktop access console login when using macOS or Linux systems.
Infrastructure Access Mode
Advanced users might prefer to use Infrastructure Access Mode. This is primarily for quick access to protocol and database tunneling, and
BYOT sessions. If desired, check Launch Infrastructure Access Mode. Infrastructure Access Mode is not available on Linux systems.
Note: If more than one language is enabled for your site, select the language you want to use from the dropdown menu.
If two-factor authentication is enabled for your account, enter the code from the authenticator app.
SALES: www.beyondtrust.com/contact
SUPPORT: www.beyondtrust.com/support
DOCUMENTATION: www.beyondtrust.com/docs
8
©2003-2024 BeyondTrust Corporation. All Rights Reserved. Other trademarks identified on this page are owned by their respective owners. BeyondTrust is not a chartered bank or trust company, or
depository institution. It is not authorized to accept deposits or trust accounts and is not licensed or regulated by any state or federal banking authority.
TC: 7/8/2024
PRIVILEGED REMOTE ACCESS 24.2
ACCESS CONSOLE USER GUIDE

Use Kerberos Server
Alternatively, if your administrator has configured a Kerberos server to
enable single sign-on, you can log into the console without entering your
credentials. The access console remembers the last used login
mechanism, whether it used local credentials, Kerberos, or another security
provider.
Invited users can also enter a session key to join a shared session on a
one-time basis.
Check Enable Saved Logins to have the console save your username and
password. This option can be enabled or disabled from /login >
Management > Security.
Once you log in, the console opens, and a BeyondTrust icon appears in your computer's system tray.
Note: Your administrator might require you to be on an allowed network to log in to the console. This network restriction might
apply the first time you log in or every time. This restriction does not apply to access invites.
Note: If you forget your password, go to /login and click the
Forgot Your Password? link. This is an option that is set by your
administrator. If you do not have this option, please contact your
administrator.
If you lose your connection, the access console attempts to reconnect for
60 seconds. If your connection is restored within this time, your access
console reopens, restoring all of your open sessions. If the connection
cannot be restored within this time, you are prompted to retry login or quit.
If you are logged into the access console in one location and then log in
from another, your open sessions are maintained.
Note: To log in with an account already in use and forcibly close the connection on the other system, the setting Terminate
Session If Account Is In Use must be checked on the /login > Management > Security page.
After an upgrade or at first launch of the desktop access console, a What's New dialog appears automatically upon login for all non-
invited users. This dialog may be viewed at any time through the Help menu (Help > What's New) and shows new release information for
current and past releases. This is a roaming preference per account, so the dialog appears just once regardless where a user signs in
from.
SALES: www.beyondtrust.com/contact
SUPPORT: www.beyondtrust.com/support
DOCUMENTATION: www.beyondtrust.com/docs
9
©2003-2024 BeyondTrust Corporation. All Rights Reserved. Other trademarks identified on this page are owned by their respective owners. BeyondTrust is not a chartered bank or trust company, or
depository institution. It is not authorized to accept deposits or trust accounts and is not licensed or regulated by any state or federal banking authority.
TC: 7/8/2024
PRIVILEGED REMOTE ACCESS 24.2
ACCESS CONSOLE USER GUIDE

For more information, please see the following:
l
On setting up the login agreement, please see Site Configuration: Set HTTP Ports, Enable Prerequisite Login
Agreement at https://www.beyondtrust.com/docs/privileged-remote-access/getting-started/admin/site-
configuration.htm
l
On invited users, "Invite External Users to Join an Access Session" on page 89
l
On using Infrastructure Access Mode, "Use Infrastructure Access Mode" on page 20
SALES: www.beyondtrust.com/contact
SUPPORT: www.beyondtrust.com/support
DOCUMENTATION: www.beyondtrust.com/docs
10
©2003-2024 BeyondTrust Corporation. All Rights Reserved. Other trademarks identified on this page are owned by their respective owners. BeyondTrust is not a chartered bank or trust company, or
depository institution. It is not authorized to accept deposits or trust accounts and is not licensed or regulated by any state or federal banking authority.
TC: 7/8/2024
PRIVILEGED REMOTE ACCESS 24.2
ACCESS CONSOLE USER GUIDE

Access Console User Interface
The access console contains several panels, providing tools and information about sessions.
Sessions: Manage multiple remote sessions at the same time.
Queues: Queues list sessions currently running as well as requests to share sessions with any member of a team. Details about the
remote system being accessed appear in this section.
Dashboard: Privileged users can view and monitor ongoing sessions and teammates of a lower role, providing administrative oversight to
help manage staff.
Jump Item Interface: Installed Jump Clients and Jump shortcuts appear here, grouped according to who can access them.
You can filter the list of Jump Items and search within specific fields. You can also save filters. Once a filter has been created and applied,
click Save to enter a name for the filter and keep it for future use. Saved filters appear in a list under the Add Filter button. To apply a
saved filter, double-click the filter name in the list, or right-click the filter name and click Apply. To delete a saved filter, right-click the filter
name and click Remove.
Chat: Chat with other logged in users. You also can share your screen with a team member without requiring a session.
SALES: www.beyondtrust.com/contact
SUPPORT: www.beyondtrust.com/support
DOCUMENTATION: www.beyondtrust.com/docs
11
©2003-2024 BeyondTrust Corporation. All Rights Reserved. Other trademarks identified on this page are owned by their respective owners. BeyondTrust is not a chartered bank or trust company, or
depository institution. It is not authorized to accept deposits or trust accounts and is not licensed or regulated by any state or federal banking authority.
TC: 7/8/2024
PRIVILEGED REMOTE ACCESS 24.2
ACCESS CONSOLE USER GUIDE

Change settings and preferences in the Access Console
Click File > Settings in the upper-left corner of the console to configure your preferences.
In general, you can configure the console settings according to your preferences. However,
your BeyondTrust administrator might choose to manage your settings, enforcing those
managed settings if desired.
If your BeyondTrust administrator has changed and applied the default settings, then you will
see a Settings Changed alert the next time you log into your console. Click View Settings
to open your settings window to view the changes, or click OK to acknowledge the changes.
Changing settings
Note: These instructions assume you are allowed to choose the settings used in your console. Settings enforced by your
administrator appear marked with an asterisk and are grayed out, and they are not locally configurable. Please see your
administrator or Manage Access Console Settings at https://www.beyondtrust.com/docs/privileged-remote-access/getting-
started/admin/access-console-settings.htm for more information.
The Access Console Settings window includes a Restore Defaults
button in the lower-left corner of the window. This button returns all of your
settings to the BeyondTrust default settings or to the default settings
applied by your administrator if any have been set. An alert dialog asks you
to confirm that you wish to change to the defaults. Click Cancel if you wish
to return to your locally saved preferences.
Note: If any of the defaults are forced by your administrator, you are unable to configure them.
Global Settings
From the Global Settings section, you can choose to enable or disable spell check for chat. Currently, spell check is available for US
English only.
Choose if you want the session menu icon to display, if the sidebar can be detached, and if the widgets on the session sidebar can be
rearranged and resized.
SALES: www.beyondtrust.com/contact
SUPPORT: www.beyondtrust.com/support
DOCUMENTATION: www.beyondtrust.com/docs
12
©2003-2024 BeyondTrust Corporation. All Rights Reserved. Other trademarks identified on this page are owned by their respective owners. BeyondTrust is not a chartered bank or trust company, or
depository institution. It is not authorized to accept deposits or trust accounts and is not licensed or regulated by any state or federal banking authority.
TC: 7/8/2024
PRIVILEGED REMOTE ACCESS 24.2
ACCESS CONSOLE USER GUIDE

You can choose to change your display mode. Options include OS Setting
(default), Light Mode, and Dark Mode.
Note: The Dark Mode option applies to Windows and macOS
only.
In addition to switching the display mode within the access
console, users can change it in OS Settings by selecting
Themes and related settings > Color > Choose your color.
The CLI section indicates if a Command Line Interface tool is installed for
this installation of the Access Console. If it is not installed, you can choose
to install it by clicking Install.
Alerts
Choose your alert settings for chat messages. When you receive a chat
message, you can choose to hear a sound and to see the application icon
flash.
If you would like to upload a custom sound for chat messages, click the […]
button and select a WAV file on your computer. The file can be no larger
than 1MB.
Choose if the team chat should include status messages, such as users
logging in and out, or only chats sent between team members.
Choose if you want to receive pop-up notifications for messages received in
a team chat and/or in a session chat.
Choose if you want to hear an audible alert when another user requests to
share a session with you. If you would like to upload a custom sound for
shared sessions, click the […] button and select a WAV file on your
computer. The file can be no larger than 1MB.
You also can choose to receive pop-up notifications for certain events.
These notifications will appear independent of your console and on top of
other windows. Set where you wish to see pop-ups and how long they
should display.
SALES: www.beyondtrust.com/contact
SUPPORT: www.beyondtrust.com/support
DOCUMENTATION: www.beyondtrust.com/docs
13
©2003-2024 BeyondTrust Corporation. All Rights Reserved. Other trademarks identified on this page are owned by their respective owners. BeyondTrust is not a chartered bank or trust company, or
depository institution. It is not authorized to accept deposits or trust accounts and is not licensed or regulated by any state or federal banking authority.
TC: 7/8/2024
PRIVILEGED REMOTE ACCESS 24.2
ACCESS CONSOLE USER GUIDE

Access Sessions
Choose if you want to automatically start screen sharing when you begin a
session.
You can choose to open sessions as tabs in the console or to automatically
detach sessions into new windows.
Set the default quality and size for a screen sharing session. When screen
sharing starts, you can automatically enter full screen mode, which in turn
can automatically collapse the chat bar.
Additionally, when screen sharing starts, the remote system can
automatically have its display, mouse, and keyboard input restricted,
providing a privacy screen.
Select the default RDP display size for all RDP sessions.
An option allows you to open a PRA connection expanded across all the
monitors on the client computer regardless of the client monitor
configuration. With this feature, you can fully utilize all the monitors
connected to the client computer, therefore being able to adjust screen
sizing and scaling during an RDP session across multiple monitors.
For easier access to screenshots you capture from the console, set the
default directory where you wish to save your console-captured remote
screenshots.
For easier file transferring, set the default directory from which you wish to
start browsing your local file system.
SALES: www.beyondtrust.com/contact
SUPPORT: www.beyondtrust.com/support
DOCUMENTATION: www.beyondtrust.com/docs
14
©2003-2024 BeyondTrust Corporation. All Rights Reserved. Other trademarks identified on this page are owned by their respective owners. BeyondTrust is not a chartered bank or trust company, or
depository institution. It is not authorized to accept deposits or trust accounts and is not licensed or regulated by any state or federal banking authority.
TC: 7/8/2024
PRIVILEGED REMOTE ACCESS 24.2
ACCESS CONSOLE USER GUIDE

Set the number of lines to save in the command shell history.
You can change the command shell display by selecting the font type, font
size, text color, and background color.
Several options for the default shell are available, including Windows
Command Prompt, PowerShell, Zsh, Bash, sh, fish, and tcsh. To set the
shell preference order, select each shell and use the arrow buttons beside
the list to move the selected shell up or down. Sessions start using the first
available shell for the session.
External Tools
To set the External Tool order, select each tool and use the arrow buttons
beside the list to move the selected tool up or down. This affects the order
of external tools in the dropdown list of tools for the Open Client button
when starting a session.
If you want to use your own RDP tool, check Open remote RDP Sessions
with an External Tool.
Tip: When using this feature with Windows Remote Desktop as
the external tool, you can log in into browsers and apps on the
remote computer using FIDO2 authentication from a FIDO2
hardware key on the local user's machine.
The local user's computer and the remote computer must use one
of the following operating systems:
l
Windows 11 single or multi-session with the 2022-10
Cumulative Updates for Windows 11 (KB5018418) or
later.
l
Windows 10 single or multi-session, versions 20H2 or
later with the 2022-10 Cumulative Updates for Windows
10 (KB5018410) or later.
l
Windows Server 2022 with the 2022-10 Cumulative
Update for Microsoft server operating system
(KB5018421) or later installed.
This is known to work with Chrome browser version 126 or better
and Edge browser version 126 or better.
If you want to use your own SSH tool, check Open Shell Jump Sessions with an External Tool. This setting applies to both command
shell and Shell Jump.
SALES: www.beyondtrust.com/contact
SUPPORT: www.beyondtrust.com/support
DOCUMENTATION: www.beyondtrust.com/docs
15
©2003-2024 BeyondTrust Corporation. All Rights Reserved. Other trademarks identified on this page are owned by their respective owners. BeyondTrust is not a chartered bank or trust company, or
depository institution. It is not authorized to accept deposits or trust accounts and is not licensed or regulated by any state or federal banking authority.
TC: 7/8/2024
PRIVILEGED REMOTE ACCESS 24.2
ACCESS CONSOLE USER GUIDE

Note: The Open Shell Jump Sessions with an External Tool
setting has limitations when used with the command shell. The
proxy is for the shell only; it is not a full SSH tunnel. File transfers,
for example, must still use the existing tools on the Jump Client.
IMPORTANT!
In order to use your own tool, you must enable Protocol Tunnel Jump in /login > Users & Security > Users > Access
Permissions > Jump Technology > Protocol Tunnel Jump. This may need to be enabled by a group policy.
External tools are added and configured in the /login administrative interface. Availability of external tools depends on user permissions
and group policies.
For more information, please see the following:
"Use the CLI for the Access Console" on page 17.
Access Console: Access Sessions - Additional External Tools at https://www.beyondtrust.com/docs/privileged-remote-
access/documents/user/pra-admin.pdf.
SALES: www.beyondtrust.com/contact
SUPPORT: www.beyondtrust.com/support
DOCUMENTATION: www.beyondtrust.com/docs
16
©2003-2024 BeyondTrust Corporation. All Rights Reserved. Other trademarks identified on this page are owned by their respective owners. BeyondTrust is not a chartered bank or trust company, or
depository institution. It is not authorized to accept deposits or trust accounts and is not licensed or regulated by any state or federal banking authority.
TC: 7/8/2024
PRIVILEGED REMOTE ACCESS 24.2
ACCESS CONSOLE USER GUIDE

Use the CLI for the Access Console
The Command Line Interface (CLI) tool allows you to initiate and manage remote sessions directly from the command line. This is
available if an admin has checked Allow the Access Console CLI tool under Access Console at /login > Management > Security.
To use the CLI tool, you must be logged in to the access console, and the CLI tool must be installed. It is installed from Global Settings.
During installation, you might receive instructions to add the installation location to the PATH, or it may be added to the PATH by the
installation process.
Once installed, enter commands in a terminal or run dialog to interact with the logged-in rep instance.
Note: You must be logged in to the access console for commands to work.
Entering Commands
Enter a single CLI command with sub-commands.
Example:
bt ssh <user>@<host>
Subcommands take the form:
bt <command>
Initiate a Session
Search for a Vault account by name (for types that can inject) and a Jump Item by name. Jump Item searches are restricted to the type
represented by the command. For example, bt ssh searches only Shell Jump Items.
If only one of each searched name is found, the session starts with that Jump Item and credential. If more than one result is found, you are
prompted to choose the correct account and/or Jump Item.
A flag can be set flag to output the tunnel information in a format for use by another process or script, so that session calls can be piped to
other functions or included in automated tasks such as VS code tasks. If this flag is set, the tunnel information prints, but the connection
and external tool do not open.
Executing onExternalToolClicked() Callback
For all types except SSH, the representative can attempt to execute the onExternalToolClicked() callback for the given type before
returning control to the CLI tool, rather than transferring that logic to the CLI tool itself.
For SSH, the SSH session replaces the CLI tool process.
SALES: www.beyondtrust.com/contact
SUPPORT: www.beyondtrust.com/support
DOCUMENTATION: www.beyondtrust.com/docs
17
©2003-2024 BeyondTrust Corporation. All Rights Reserved. Other trademarks identified on this page are owned by their respective owners. BeyondTrust is not a chartered bank or trust company, or
depository institution. It is not authorized to accept deposits or trust accounts and is not licensed or regulated by any state or federal banking authority.
TC: 7/8/2024
PRIVILEGED REMOTE ACCESS 24.2
ACCESS CONSOLE USER GUIDE

Use Session Specific Subcommands
SSH
SSH subcommands take the form:
ssh <account>@<host>
Once the session is established, it directly spawns the SSH process to connect to the local tunnel and exits.
Example: Create an SSH session:
bt ssh <user>@<host>
RDP
RDP subcommands take the form:
rdp <account>@<host>
Once the session is established, it
l
spawns the default RDP client.
l
prints the tunnel information to the CLI for informational purposes.
l
exits.
Example: To open the RDP tool, enter:
bt rdp <user>@<host>
DB
DB subcommands take the form:
db <account>@<host>
Once the session is established, it:
l
spawns the DB client for the selected DB type, if possible. Part of the return value must be DB type and/or command to try.
l
prints the DB connection information.
SALES: www.beyondtrust.com/contact
SUPPORT: www.beyondtrust.com/support
DOCUMENTATION: www.beyondtrust.com/docs
18
©2003-2024 BeyondTrust Corporation. All Rights Reserved. Other trademarks identified on this page are owned by their respective owners. BeyondTrust is not a chartered bank or trust company, or
depository institution. It is not authorized to accept deposits or trust accounts and is not licensed or regulated by any state or federal banking authority.
TC: 7/8/2024
PRIVILEGED REMOTE ACCESS 24.2
ACCESS CONSOLE USER GUIDE

l
exits.
Protocol tunnel
Protocol tunnel subcommands take the form:
pt <host>
There is no credential injection for protocol tunnels.
Once the session Is established, it prints the tunnel definitions and exits.
Because the tunnel is generic, it cannot spawn a specific tool.
Use Other Subcommands
List
List subcommands take the form:
list
The list subcommand shows connected sessions by Jump Item name.
Close
Close subcommands take the form:
close <session>
The close subcommand closes the tunnel for the given session.
SALES: www.beyondtrust.com/contact
SUPPORT: www.beyondtrust.com/support
DOCUMENTATION: www.beyondtrust.com/docs
19
©2003-2024 BeyondTrust Corporation. All Rights Reserved. Other trademarks identified on this page are owned by their respective owners. BeyondTrust is not a chartered bank or trust company, or
depository institution. It is not authorized to accept deposits or trust accounts and is not licensed or regulated by any state or federal banking authority.
TC: 7/8/2024
PRIVILEGED REMOTE ACCESS 24.2
ACCESS CONSOLE USER GUIDE

Use Infrastructure Access Mode
Advanced users, such as developers, can select Infrastructure Access Mode when logging in to the console. This provides a simpler
console, available from the system tray or menu bar. This is convenient for protocol and database tunneling, and BYOT sessions, but
other session types are also supported.
Note: Infrastructure Access Mode is not available on Linux systems.
To start Infrastructure Access Mode, check Launch Infrastructure
Access Mode on the console authentication screen. If you have previously
enabled Infrastructure Access Mode, the option is checked by default.
Once logged in, the Infrastructure Access Console (IAC) task bar widget
displays, and an icon appears in the system tray (Windows) or menu bar
(macOS). The IAC widget has two tabs, Jump Items and Active Sessions.
Jump Items:
l
Shows a list of existing jump items.
l
These items can be searched and sorted using the menu in the
upper left.
SALES: www.beyondtrust.com/contact
SUPPORT: www.beyondtrust.com/support
DOCUMENTATION: www.beyondtrust.com/docs
20
©2003-2024 BeyondTrust Corporation. All Rights Reserved. Other trademarks identified on this page are owned by their respective owners. BeyondTrust is not a chartered bank or trust company, or
depository institution. It is not authorized to accept deposits or trust accounts and is not licensed or regulated by any state or federal banking authority.
TC: 7/8/2024
PRIVILEGED REMOTE ACCESS 24.2
ACCESS CONSOLE USER GUIDE

Hover over any item for more information about the item.
Click any item to initiate a session. The widget shows the attempt in
progress, with an option to cancel.
Click Show Full Console to view the access console. The full console is
required to begin a chat session or accept a session invite, and for some
session types. You can close the full access console when it is no longer
required and continue using the console in Infrastructure Access Mode.
Active Sessions:
l
Shows any active sessions, and the session type.
l
Click the dropdown arrow for options such as Show Session or
End Session.
Click the gear icon in the upper right to view What's New, About, and Quit
the Access Console.
SALES: www.beyondtrust.com/contact
SUPPORT: www.beyondtrust.com/support
DOCUMENTATION: www.beyondtrust.com/docs
21
©2003-2024 BeyondTrust Corporation. All Rights Reserved. Other trademarks identified on this page are owned by their respective owners. BeyondTrust is not a chartered bank or trust company, or
depository institution. It is not authorized to accept deposits or trust accounts and is not licensed or regulated by any state or federal banking authority.
TC: 7/8/2024
PRIVILEGED REMOTE ACCESS 24.2
ACCESS CONSOLE USER GUIDE

Jump interface: use Jump items to access remote systems
The Jump interface appears in the bottom half of the access console, listing the Jump Items available to you. The list may contain Jump
Clients, as well as Jump shortcuts for Remote Jumps, Local Jumps, RDP sessions, VNC sessions, Protocol Tunnel Jumps, Shell Jumps,
and Web Jumps. Jump Item availability, including whether or not the Jump Item is in use, is listed in the Status column.
Jump Items are listed in Jump Groups. If you are assigned to one or more Jump Groups, you can access the Jump Items in those groups,
with the permissions assigned by your admin. Selecting a Jump Group and then clicking Create auto-selects that Jump Group in the Jump
Item configuration window.
Your personal list of Jump Items is primarily for your individual use, although your team leads, team managers, and users with permission
to see all Jump Items may have access to your personal list of Jump Items. Similarly, if you are a team manager or lead with appropriate
permissions, you may see team members' personal lists of Jump Items. Additionally, you may have permission to access Jump Items in
Jump Groups you do not belong to and personal Jump Items for non-team members.
Copy Jump items
Jump Items can be copied and can belong to multiple Jump Groups. This includes Jump Client items, providing administrators with the
ability to set separate policies and group permissions without requiring an additional Jump Client installation on the target endpoint. Users
with the appropriate permissions see the option to Copy Jump Items in the Access Console by right-clicking the item. Users can perform
this function on multiple Jump Items as well.
This feature enables admins and users to effectively manage different policies for Jump Items and Jump Clients without the need to create
a new Jump Item. This functionality enables users to limit the number of clients necessary to enable Jump Client sessions, and limits
manual administrative tasks when defining access pathways for users.
Jump to a Jump item
Browse through groups for the computer you wish to access. To facilitate
browsing the Jump Items list, you may drag the columns into any order you
wish, and then sort a column by clicking the column header. The access
console remembers the column order and the sort order the next time the
access console is launched.
In addition to browsing for Jump Items, you can search based on multiple
fields. Enter a string in the search field and then press Enter. To change the
SALES: www.beyondtrust.com/contact
SUPPORT: www.beyondtrust.com/support
DOCUMENTATION: www.beyondtrust.com/docs
22
©2003-2024 BeyondTrust Corporation. All Rights Reserved. Other trademarks identified on this page are owned by their respective owners. BeyondTrust is not a chartered bank or trust company, or
depository institution. It is not authorized to accept deposits or trust accounts and is not licensed or regulated by any state or federal banking authority.
TC: 7/8/2024
PRIVILEGED REMOTE ACCESS 24.2
ACCESS CONSOLE USER GUIDE

fields you are searching, click on the magnifying glass and check or uncheck any of the available fields. Searchable fields include
Comments, Console User, Domain, FQDN, Group, Hostname/IP, Jump Method, Last Accessed, Name, Private IP, Public IP,
Status, Tag, and Workgroup.
Once you have found the computer you wish to access, double-click the entry, or select the entry and click the Jump button. This attempts
to start a session with the remote computer.
You may programmatically connect to a Jump Item directly from your systems management or ticketing tool. If your search results in only
one Jump Item, the session starts immediately. If multiple Jump Items are returned, select one of the Jump Items listed in the selection
window and click OK.
Note: For details about scripting, see Access Console Scripting and Client Scripting API at
www.beyondtrust.com/docs/privileged-remote-access/how-to/integrations/api/client-script.
SALES: www.beyondtrust.com/contact
SUPPORT: www.beyondtrust.com/support
DOCUMENTATION: www.beyondtrust.com/docs
23
©2003-2024 BeyondTrust Corporation. All Rights Reserved. Other trademarks identified on this page are owned by their respective owners. BeyondTrust is not a chartered bank or trust company, or
depository institution. It is not authorized to accept deposits or trust accounts and is not licensed or regulated by any state or federal banking authority.
TC: 7/8/2024
PRIVILEGED REMOTE ACCESS 24.2
ACCESS CONSOLE USER GUIDE

Default Credentials for Jump Items
When starting a Jump session that requires credentials, after selecting the credentials, you can check Remember as my default. Once a
credential is selected as a default, it displays with other Jump item details, and subsequent sessions start without requesting credentials.
When a default credential is set, the Jump item details (accessed by right-clicking the Jump Item) include a button for Jump (Change
Credentials). This opens the credential selection window, and you can either change default credential, select a different credential for
this session, or clear the saved default credential.
If a default credential is no longer available to the user for that Jump item, the next time they start a session with that Jump item there is a
warning that the requested credentials for starting the session were not found, and the option to continue. If you continue, the credential
selection window opens and you can select a credential as usual.
Start multiple Jump sessions
You can select up to ten Jump items and start them with a single click. The jump items must either have saved default credentials, or not
require credentials. Any Jump items that require credentials and do not have default credentials do not start.
Schedule
If a Jump Policy is applied to the Jump Item, that policy affects how and/or
when a Jump Item may be accessed.
If a Jump Policy enforces a schedule for this Jump Item, an attempt to
access the Jump Item outside of its permitted schedule prevents the Jump
from occurring. A prompt informs you of the policy restrictions and provides
the date and time when this Jump Item is next available for access.
Notification
If a Jump Policy is configured to send a notification on session start or end, then an attempt to access a Jump Item alerts you that an email
will be sent. You can choose to proceed with the Jump and send a notification, or you can cancel the Jump.
Ticket ID
If a Jump Policy requires entry of a ticket ID from your external ITSM or ticket ID system before the Jump can be performed, a dialog
opens. In the dialog, enter the ticket ID you need, authorizing access to this Jump Item.
SALES: www.beyondtrust.com/contact
SUPPORT: www.beyondtrust.com/support
DOCUMENTATION: www.beyondtrust.com/docs
24
©2003-2024 BeyondTrust Corporation. All Rights Reserved. Other trademarks identified on this page are owned by their respective owners. BeyondTrust is not a chartered bank or trust company, or
depository institution. It is not authorized to accept deposits or trust accounts and is not licensed or regulated by any state or federal banking authority.
TC: 7/8/2024
PRIVILEGED REMOTE ACCESS 24.2
ACCESS CONSOLE USER GUIDE

Authorization
If a Jump Policy requires authorization before the Jump can be performed,
a dialog opens. In the dialog, enter the reason you need to access this
Jump Item. Then enter the date and time at which you wish authorization to
begin, as well as how long you require access to the Jump Item. Both the
request reason and the request time are visible to the approver and help
them decide whether to approve or deny access.
When you click OK, an email is sent to the addresses defined as approvers for this policy. This email contains a URL where an approver
can see the request, add comments, and either approve or deny the request.
If a request was approved by one person, a second can access the URL to override approval and deny the request. If a request was
denied, then any other approvers accessing the site can see the details but cannot override the denied status. If a user has already joined
an approved session, that access cannot be denied. Although other approvers can see the email address of the person who approved or
denied the request, the requestor cannot.Based on the Jump Policy settings, an approved request grants access either to any user who
can see and request access to that Jump Client or only to the user who requested access.
In the Jump interface, the Jump Item's details pane displays the status of any authorization requests as either pending, approved,
approved only for a different user, or denied. When an approver responds to a request, a pop-up notification appears on the requestor's
screen alerting them that access has been either approved or denied. If the requestor has a configured email address, an email
notification is also sent to the requestor.
When a user Jumps to a Jump Item which has been approved for access, a notification alerts the user to any comments left by the
approver.
When approval has been granted to a Jump Item, that Jump Item becomes available either to any user who can see and request access to
that Jump Item or only to the user who requested access. This is determined by the Jump Policy.
SALES: www.beyondtrust.com/contact
SUPPORT: www.beyondtrust.com/support
DOCUMENTATION: www.beyondtrust.com/docs
25
©2003-2024 BeyondTrust Corporation. All Rights Reserved. Other trademarks identified on this page are owned by their respective owners. BeyondTrust is not a chartered bank or trust company, or
depository institution. It is not authorized to accept deposits or trust accounts and is not licensed or regulated by any state or federal banking authority.
TC: 7/8/2024
PRIVILEGED REMOTE ACCESS 24.2
ACCESS CONSOLE USER GUIDE

Note: Multiple requests may be sent for different times. The requested access times can overlap if the Jump approval request
is for the Requestor Only. Access time cannot overlap if the approval is for Anyone Permitted to Request. If a request is
denied, then a second request may be sent for the same time.
Revoke an Access Approval Request
Permission to revoke approved access requests is controlled by Jump
Policy. Any user who can approve requests on the Jump Policy can cancel
requests, subject to the approval type. In the /login web management
interface, go to Jump > Jump Policies. Under Jump Approval you have
two options:
l
Anyone Permitted to Request
l
Requestor Only
If the Jump Policy is set to requestor Only, and an Access Request is
presently approved for User A, User B is asked to create a new Access
Request if they attempt to Jump to the Jump Item, since that request does
not apply to them. Additionally, if User B attempts to cancel the Access
Approval Request, the option is grayed out. The only user who can cancel
the approved request is User A, because they are the approved user for the
request.
SALES: www.beyondtrust.com/contact
SUPPORT: www.beyondtrust.com/support
DOCUMENTATION: www.beyondtrust.com/docs
26
©2003-2024 BeyondTrust Corporation. All Rights Reserved. Other trademarks identified on this page are owned by their respective owners. BeyondTrust is not a chartered bank or trust company, or
depository institution. It is not authorized to accept deposits or trust accounts and is not licensed or regulated by any state or federal banking authority.
TC: 7/8/2024
PRIVILEGED REMOTE ACCESS 24.2
ACCESS CONSOLE USER GUIDE

However, if the Jump Policy is set to Anyone Permitted to Request, and
an Access Request is presently approved for User A, User B is allowed to
start a new session with the Jump Item if they attempt to Jump to it. In
addition, anyone with permission to access the Jump Item is allowed to
cancel / revoke the request.
SALES: www.beyondtrust.com/contact
SUPPORT: www.beyondtrust.com/support
DOCUMENTATION: www.beyondtrust.com/docs
27
©2003-2024 BeyondTrust Corporation. All Rights Reserved. Other trademarks identified on this page are owned by their respective owners. BeyondTrust is not a chartered bank or trust company, or
depository institution. It is not authorized to accept deposits or trust accounts and is not licensed or regulated by any state or federal banking authority.
TC: 7/8/2024
PRIVILEGED REMOTE ACCESS 24.2
ACCESS CONSOLE USER GUIDE

Use Jump Clients to Access Remote Endpoints
To access an individual Windows, Mac, or Linux computer that is not on an accessible network, install a Jump Client on that system from
the /login > Jump > Jump Clients page. Jump Clients appear in the Jump interface along with Jump Item shortcuts.
Use a Jump Client
To use a Jump Client to start a session, select the Jump Client from the Jump interface and click the Jump button.
Note: Jump Items can be set to allow multiple users to simultaneously access the same Jump Item. If set to Join Existing
Session, other users are able to join a session already underway. The original owner of the session receives a note indicating
another user has joined the session, but is not allowed to deny them access. For more information on simultaneous Jumps,
please see Jump Item Settings at www.beyondtrust.com/docs/privileged-remote-access/getting-started/admin/jump-
items.htm.
Sort Jump Clients
Browse through groups for the computer you wish to access. To facilitate
browsing the Jump Items list, you may drag the columns into any order you
wish, and then sort a column by clicking the column header. The access
console remembers the column order and the sort order the next time the
access console is launched.
Search for a Jump Client
In addition to browsing for Jump Items, you can search based on multiple fields. Enter a string in the search field and then press Enter. To
change the fields you are searching, click on the magnifying glass and check or uncheck any of the available fields. Searchable fields
include Comments, Console User, Domain, FQDN, Group, Hostname/IP, Jump Method, Last Accessed, Name, Private IP, Public
IP, Status, Tag, and Workgroup.
Jump Client Details Pane
When you select a Jump Client, a details pane appears to the right of the Jump interface. Which details are shown here is determined by
the Jump Client Statistics setting in the /login interface as well as by the remote operating system.
If a Jump Client goes offline and does not reconnect to the B Series Appliance for the number of days set by the Jump Client Settings in
the /login interface, it is labeled as lost. No specific action is taken on the Jump Client. It is labeled as lost only for identification purposes,
so that an administrator can diagnose the reason for the lost connection and take action to correct the situation. In the details pane, the
scheduled deletion date appears should the Jump Client not come back online.
After a software update, Jump Clients update automatically. The number of concurrent Jump Client upgrades is determined by settings on
the /login > Jump > Jump Clients page. If a Jump Client has not yet been updated, it is labeled as Upgrade Pending, and its version
and revision number appear in the details pane. You can modify and Jump to an outdated Jump Client.
SALES: www.beyondtrust.com/contact
SUPPORT: www.beyondtrust.com/support
DOCUMENTATION: www.beyondtrust.com/docs
28
©2003-2024 BeyondTrust Corporation. All Rights Reserved. Other trademarks identified on this page are owned by their respective owners. BeyondTrust is not a chartered bank or trust company, or
depository institution. It is not authorized to accept deposits or trust accounts and is not licensed or regulated by any state or federal banking authority.
TC: 7/8/2024
PRIVILEGED REMOTE ACCESS 24.2
ACCESS CONSOLE USER GUIDE

Wake-On-Lan (WOL)
Wake-On-Lan (WOL) allows you to remotely turn on or wake up machines configured for WOL from BeyondTrust. In a configured
environment, customers can power off their machine but still receive BeyondTrust support, if needed.
Note: WOL is not a BeyondTrust technology. The BeyondTrust software integrates with existing WOL systems. To use WOL
through BeyondTrust, the system must have WOL enabled, and the network must allow WOL packets to be sent.
To enable support for WOL in BeyondTrust, turn on the WOL setting in the administrative /login interface under Jump > Jump Clients.
When enabling the WOL option, keep the following items in mind:
l
WOL does not work for wireless clients. A wired network connection is required.
l
WOL is supported by the underlying system hardware, which is independent of the installed OS.
l
WOL is supported only by active Jump Clients. Jumpoints and Local Jump from representative consoles do not support WOL.
To wake an active Jump Client using WOL, right-click an existing Jump Client from within the rep console. Attempt to wake the system by
clicking the Attempt to wake up Jump Client option.
The wake option is only available when selecting a single Jump Client. It is not available when multiple Jump Clients are selected.
WOL packets are sent from other Jump Clients residing on the same network as the target machine. When an active Jump Client is
installed or checks-in, it registers its network information with the B Series Appliance, and the B Series Appliance uses this information to
determine which Jump Clients are on the same network.
Once attempting to wake up a selected Jump Client, the WOL option greys out for 30 seconds before it can attempt to send another wake
up request. If no other Jump Clients are available on that same network to send WOL packets to the target machine, the rep receives a
message indicating that no other Jump Clients are available on the network. When sending a WOL packet, the rep has an advanced
option to provide a password for WOL environments requiring a secure WOL password. A WOL packet is a one-way packet, and no
confirmation of success is given to the rep besides seeing the client come online in the rep console.
SALES: www.beyondtrust.com/contact
SUPPORT: www.beyondtrust.com/support
DOCUMENTATION: www.beyondtrust.com/docs
29
©2003-2024 BeyondTrust Corporation. All Rights Reserved. Other trademarks identified on this page are owned by their respective owners. BeyondTrust is not a chartered bank or trust company, or
depository institution. It is not authorized to accept deposits or trust accounts and is not licensed or regulated by any state or federal banking authority.
TC: 7/8/2024
PRIVILEGED REMOTE ACCESS 24.2
ACCESS CONSOLE USER GUIDE

Copy Jump Items
Jump Items can be copied and can belong to multiple Jump Groups. This includes Jump Client items, providing administrators with the
ability to set separate policies and group permissions without requiring an additional Jump Client installation on the target endpoint. Users
with the appropriate permissions see the option to Copy Jump Items in the Access Console by right-clicking the item. Users can perform
this function on multiple Jump Items as well.
This feature enables admins and users to effectively manage different policies for Jump Items and Jump Clients without the need to create
a new Jump Item. This functionality enables users to limit the number of clients necessary to enable Jump Client sessions, and limits
manual administrative tasks when defining access pathways for users.
Jump Client Properties
Organize and manage existing Jump Items by selecting one or more Jump
Items and clicking Properties.
Note: To view the properties of multiple Jump Items, the items selected must be the same type (all Jump Clients, all Remote
Jumps, etc.).
Enter a Name for the Jump Item. This name identifies the item in the session tabs. This string has a maximum of 128 characters.
Note: This feature is available only to customers who own an on-premises B Series Appliance. BeyondTrust Cloud customers
do not have access to this feature.
Based on the options your administrator sets, these statistics may include the remote computer's logged-in console user, operating
system, uptime, CPU, disk usage, and a screen shot from the last update.
Move Jump Items from one Jump Group to another using the Jump Group dropdown. The ability to move Jump Items to or from different
Jump Groups depends upon your account permissions.
Further organize Jump Items by entering the name of a new or existing Tag. Even though the selected Jump Items are grouped together
under the tag, they are still listed under the Jump Group in which each Jump Item is pinned. To move a Jump Item back into its top-level
Jump Group, leave this field blank.
Jump Items include a Comments field for a name or description, which makes sorting, searching, and identifying Jump Items faster and
easier.
SALES: www.beyondtrust.com/contact
SUPPORT: www.beyondtrust.com/support
DOCUMENTATION: www.beyondtrust.com/docs
30
©2003-2024 BeyondTrust Corporation. All Rights Reserved. Other trademarks identified on this page are owned by their respective owners. BeyondTrust is not a chartered bank or trust company, or
depository institution. It is not authorized to accept deposits or trust accounts and is not licensed or regulated by any state or federal banking authority.
TC: 7/8/2024
PRIVILEGED REMOTE ACCESS 24.2
ACCESS CONSOLE USER GUIDE

To set when users are allowed to access this Jump Item, if a notification of access should be sent, or if permission or a ticket ID from your
external ticketing system is required to use this Jump Item, choose a Jump Policy. These policies are configured by your administrator in
the /login interface.
Choose a Session Policy to assign to this Jump Item. The session policy assigned to this Jump Item has the highest priority when setting
session permissions. The ability to set a session policy depends on your account permissions.
Choose an Endpoint Agreement to assign to this Jump Item. Depending on what is selected, an endpoint agreement is displayed. If
there is no response, the agreement is automatically accepted or rejected.
If you no longer need access to a remote system, select the Jump Item and click Remove, or right-click on the Jump Item and select
Remove from the menu. You may select multiple Jump Items to remove them all at the same time.
Note: If the remote user manually uninstalls a Jump Client, the deleted item is either marked as uninstalled or completely
removed from the Jump Items list in the access console. If the Jump Client cannot contact the B Series Appliance at the time it
is uninstalled, the affected item remains in its offline state. This setting is available at /login > Jump > Jump Clients. If a
Jump Client goes offline and does not reconnect to the B Series Appliance for 180 days, it is automatically uninstalled from the
target computer and is removed from the Jump interface.
SALES: www.beyondtrust.com/contact
SUPPORT: www.beyondtrust.com/support
DOCUMENTATION: www.beyondtrust.com/docs
31
©2003-2024 BeyondTrust Corporation. All Rights Reserved. Other trademarks identified on this page are owned by their respective owners. BeyondTrust is not a chartered bank or trust company, or
depository institution. It is not authorized to accept deposits or trust accounts and is not licensed or regulated by any state or federal banking authority.
TC: 7/8/2024
PRIVILEGED REMOTE ACCESS 24.2
ACCESS CONSOLE USER GUIDE

Use Remote Jump for Unattended Access to Computers on a
Separate Network
Remote Jump enables a privileged user to connect to an unattended remote computer on a network outside of their own network. Remote
Jump depends on a Jumpoint.
A Jumpoint acts as a conduit for unattended access to Windows and Linux computers on a known remote network. A single Jumpoint
installed on a computer within a local area network is used to access multiple systems, eliminating the need to pre-install software on
every computer you may need to access.
Note: Jumpoint is available for Windows and Linux systems. Jump Clients are needed for remote access to Mac computers.
To Jump to a Windows computer without a Jump Client, that computer must have Remote Registry Service enabled (disabled
by default in Vista) and must be on a domain. You cannot Jump to a mobile device, though Jump Technology is available from
mobile BeyondTrust consoles.
Create a Remote Jump Shortcut
To create a Remote Jump shortcut, click the Create button in the Jump interface. From the dropdown, select Remote Jump. Remote
Jump shortcuts appear in the Jump interface, as well as Jump Clients and other types of Jump Item shortcuts.
Enter a Name for the Jump Item. This name identifies the item in the
session tabs. This string has a maximum of 128 characters.
From the Jumpoint dropdown, select the network that hosts the computer
you wish to access. The access console remembers your Jumpoint choice
the next time you create this type of Jump Item.
Enter the Hostname / IP of the system you wish to access.
Move Jump Items from one Jump Group to another using the Jump Group
dropdown. The ability to move Jump Items to or from different Jump Groups
depends upon your account permissions.
Further organize Jump Items by entering the name of a new or existing
Tag. Even though the selected Jump Items are grouped together under the
tag, they are still listed under the Jump Group in which each Jump Item is
pinned. To move a Jump Item back into its top-level Jump Group, leave this
field blank.
Jump Items include a Comments field for a name or description, which makes sorting, searching, and identifying Jump Items faster and
easier.
To set when users are allowed to access this Jump Item, if a notification of access should be sent, or if permission or a ticket ID from your
external ticketing system is required to use this Jump Item, choose a Jump Policy. These policies are configured by your administrator in
the /login interface.
Choose a Session Policy to assign to this Jump Item. The session policy assigned to this Jump Item has the highest priority when setting
session permissions. The ability to set a session policy depends on your account permissions.
Choose an Endpoint Agreement to assign to this Jump Item. Depending on what is selected, an endpoint agreement is displayed. If
there is no response, the agreement is automatically accepted or rejected.
SALES: www.beyondtrust.com/contact
SUPPORT: www.beyondtrust.com/support
DOCUMENTATION: www.beyondtrust.com/docs
32
©2003-2024 BeyondTrust Corporation. All Rights Reserved. Other trademarks identified on this page are owned by their respective owners. BeyondTrust is not a chartered bank or trust company, or
depository institution. It is not authorized to accept deposits or trust accounts and is not licensed or regulated by any state or federal banking authority.
TC: 7/8/2024
PRIVILEGED REMOTE ACCESS 24.2
ACCESS CONSOLE USER GUIDE

Use a Remote Jump Shortcut
To use a Jump shortcut to start a session, select the shortcut from the Jump interface and click the Jump button.
A dialog box opens for you to enter administrative credentials to the remote computer in order to complete the Jump. The administrative
rights must be either a local administrator on the remote system or a domain administrator.
The client files are pushed to the remote system, and a session attempts to start.
Note: Because a Remote Jump attempts to connect directly back through the appliance, the end machine must be able to
communicate with the appliance as well. If this is not the case, you can use the Jump Zone Proxy feature to proxy the traffic
through the Jumpoint.
Note: Jump Items can be set to allow multiple users to simultaneously access the same Jump Item. If set to Join Existing
Session, other users are able to join a session already underway. The original owner of the session receives a note indicating
another user has joined the session, but is not allowed to deny them access. For more information on simultaneous Jumps,
please see Jump Item Settings at www.beyondtrust.com/docs/privileged-remote-access/getting-started/admin/jump-
items.htm.
SALES: www.beyondtrust.com/contact
SUPPORT: www.beyondtrust.com/support
DOCUMENTATION: www.beyondtrust.com/docs
33
©2003-2024 BeyondTrust Corporation. All Rights Reserved. Other trademarks identified on this page are owned by their respective owners. BeyondTrust is not a chartered bank or trust company, or
depository institution. It is not authorized to accept deposits or trust accounts and is not licensed or regulated by any state or federal banking authority.
TC: 7/8/2024
PRIVILEGED REMOTE ACCESS 24.2
ACCESS CONSOLE USER GUIDE

Use Local Jump for Unattended Access to Computers on Your
Local Network
Local Jump enables a privileged user to connect to an unattended remote computer on their local network. Within the local area network,
the BeyondTrust user's computer can initiate a session to a Windows system directly without using a Jumpoint, if appropriate user
permissions are enabled. A Jumpoint is needed only when the BeyondTrust user's computer cannot access the target computer directly.
Note: Local Jump is only available for Windows systems. Jump Clients are needed for remote access to Mac computers. To
Jump to a Windows computer without a Jump Client, that computer must have Remote Registry Service enabled (disabled by
default in Vista) and must be on a domain.
Create a Local Jump Shortcut
To create a Local Jump shortcut, click the Create button in the Jump interface. From the dropdown, select Local
Jump. Local Jump shortcuts appear in the Jump interface along with Jump Clients and other types of Jump Item
shortcuts.
Enter a Name for the Jump Item. This name identifies the item in the
session tabs. This string has a maximum of 128 characters.
Enter the Hostname / IP of the system you wish to access.
Move Jump Items from one Jump Group to another using the Jump Group
dropdown. The ability to move Jump Items to or from different Jump Groups
depends upon your account permissions.
Further organize Jump Items by entering the name of a new or existing
Tag. Even though the selected Jump Items are grouped together under the
tag, they are still listed under the Jump Group in which each Jump Item is
pinned. To move a Jump Item back into its top-level Jump Group, leave this
field blank.
Jump Items include a Comments field for a name or description, which
makes sorting, searching, and identifying Jump Items faster and easier.
To set when users are allowed to access this Jump Item, if a notification of access should be sent, or if permission or a ticket ID from your
external ticketing system is required to use this Jump Item, choose a Jump Policy. These policies are configured by your administrator in
the /login interface.
Choose a Session Policy to assign to this Jump Item. The session policy assigned to this Jump Item has the highest priority when setting
session permissions. The ability to set a session policy depends on your account permissions.
Choose an Endpoint Agreement to assign to this Jump Item. Depending on what is selected, an endpoint agreement is displayed. If
there is no response, the agreement is automatically accepted or rejected.
Use a Local Jump Shortcut
To use a Jump shortcut to start a session, select the shortcut from the Jump interface and click the Jump button.
A dialog box opens for you to enter administrative credentials to the remote computer in order to complete the Jump. The administrative
rights must be either a local administrator on the remote system or a domain administrator.
SALES: www.beyondtrust.com/contact
SUPPORT: www.beyondtrust.com/support
DOCUMENTATION: www.beyondtrust.com/docs
34
©2003-2024 BeyondTrust Corporation. All Rights Reserved. Other trademarks identified on this page are owned by their respective owners. BeyondTrust is not a chartered bank or trust company, or
depository institution. It is not authorized to accept deposits or trust accounts and is not licensed or regulated by any state or federal banking authority.
TC: 7/8/2024
PRIVILEGED REMOTE ACCESS 24.2
ACCESS CONSOLE USER GUIDE

The client files are pushed to the remote system, and a session attempts to start.
Note: Jump Items can be set to allow multiple users to simultaneously access the same Jump Item. If set to Join Existing
Session, other users are able to join a session already underway. The original owner of the session receives a note indicating
another user has joined the session, but is not allowed to deny them access. For more information on simultaneous Jumps,
please see Jump Item Settings at www.beyondtrust.com/docs/privileged-remote-access/getting-started/admin/jump-
items.htm.
SALES: www.beyondtrust.com/contact
SUPPORT: www.beyondtrust.com/support
DOCUMENTATION: www.beyondtrust.com/docs
35
©2003-2024 BeyondTrust Corporation. All Rights Reserved. Other trademarks identified on this page are owned by their respective owners. BeyondTrust is not a chartered bank or trust company, or
depository institution. It is not authorized to accept deposits or trust accounts and is not licensed or regulated by any state or federal banking authority.
TC: 7/8/2024
PRIVILEGED REMOTE ACCESS 24.2
ACCESS CONSOLE USER GUIDE

Use RDP to Access a Remote Windows Endpoint
Use BeyondTrust to start a Remote Desktop Protocol (RDP) session with remote Windows and Linux systems. Because RDP sessions
are proxied through a Jumpoint and converted to BeyondTrust sessions, users can share or transfer sessions, and sessions can be
automatically audited and recorded as your administrator has defined for your site. To use RDP through BeyondTrust, you must have
access to a Jumpoint and must have the user account permission Allowed Jump Methods: RDP via a Jumpoint.
Note: You can use your own RDP tool for remote RDP sessions. For more information, please see "Change settings and
preferences in the Access Console" on page 12.
IMPORTANT!
In order to use your own tool, you must enable Protocol Tunnel Jump in /login > Users & Security > Users > Access
Permissions > Jump Technology > Protocol Tunnel Jump. This may need to be enabled by a group policy.
Create an RDP Shortcut
To create a Microsoft Remote Desktop Protocol shortcut, click the Create button in the Jump interface. From the dropdown, select
Remote RDP. RDP shortcuts appear in the Jump interface with Jump Clients and other types of Jump Item shortcuts.
Enter a Name for the Jump Item. This name identifies the item in the
session tabs. This string has a maximum of 128 characters.
From the Jumpoint dropdown, select the network that hosts the computer
you wish to access. The access console remembers your Jumpoint choice
the next time you create this type of Jump Item.
Enter the Hostname / IP of the system you wish to access.
Note: By default, the RDP server listens on port 3389, which is
therefore the default port BeyondTrust attempts. If the remote
RDP server is configured to use a different port, add it after the
hostname or IP address in the form of <hostname>:<port> or
<ipaddress>:<port> (for example, 10.10.24.127:40000).
Provide the Username to sign in as, along with the Domain.
Select the Quality at which to view the remote screen. This cannot be
changed during the remote desktop protocol (RDP) session. Select the
color optimization mode to view the remote screen. If you are going to be
primarily sharing video, select Video Optimized; otherwise, select Black
and White (uses less bandwidth), Few Colors, More Colors, or Full
Color (uses more bandwidth). Both Video Optimized and Full Color
modes allow you to view the actual desktop wallpaper.
To start a console session rather than a new session, check the Console Session box.
If the server's certificate cannot be verified, you receive a certificate warning. Checking Ignore Untrusted Certificate allows you to
connect to the remote system without seeing this message.
SALES: www.beyondtrust.com/contact
SUPPORT: www.beyondtrust.com/support
DOCUMENTATION: www.beyondtrust.com/docs
36
©2003-2024 BeyondTrust Corporation. All Rights Reserved. Other trademarks identified on this page are owned by their respective owners. BeyondTrust is not a chartered bank or trust company, or
depository institution. It is not authorized to accept deposits or trust accounts and is not licensed or regulated by any state or federal banking authority.
TC: 7/8/2024
PRIVILEGED REMOTE ACCESS 24.2
ACCESS CONSOLE USER GUIDE

Note: When RemoteApp or BeyondTrust Remote Desktop Agent is selected in the SecureApp section, the Console
Session checkbox is unchecked. Remote applications cannot run in a console session on a RDP server.
To get more detailed information on the RDP session, check Session Forensics. For this feature to work, you must select an
RDP Service Account for the Jumpoint being used. When checking this setting, the following reminder displays:
Enabling this feature requires the RDP server to be configured to receive the monitoring agent and an RDP Service Account to be
configured with this Jumpoint. If these requirements are not met, all attempts to start a session will fail.
Note: In typical installations, the RDP service account requires privileges including access to create and control remote
services and write access to remote file systems. We recommend that you create an Entra ID account and use Entra ID group
policy settings to configure the permissions, however the exact permissions required depend on your Entra ID configuration.
When Session Forensics is checked, the following additional details are logged:
l
Focused window changed event
l
Mouse click event
l
Menu opened event
l
New window opened event
To start a session with a remote application, configure the SecureApp section. The following dropdown options are available:
l
None: When accessing a Remote RDP Jump Item, no application is launched.
l
RemoteApp:The user can configure an application profile or command argument, which executes and opens an application on a
remote server. To configure, select the RemoteApp option and enter the following information:
o
Remote App Name: Enter the name of the application you wish to connect to.
o
Remote App Parameters: Enter the profile details or command line arguments needed to open the application.
l
BeyondTrust Remote Desktop Agent: This option facilitates passing parameters through an agent in order to launch
applications on a remote host. To configure, select the BeyondTrust Remote Desktop Agent option and enter the following
information:
o
Executable Path: Enter the path of the application the agent will connect to.
o
Parameters: Enter any parameters that you could normally type from a command line when launching the app on the
remote system.
For more information on Session Forensics and RDP service account, please see Jumpoint: Set Up Unattended Access to a
Network > RDP Service Account at https://www.beyondtrust.com/docs/privileged-remote-access/getting-
started/admin/jumpoint.htm.
Inject Credentials
The option to Inject Credentials is made available when the BeyondTrust Remote Desktop Agent type is selected. This option
facilitates passing parameters as well as credentials through an agent in order to launch applications on a remote host. The first set of
credentials is in the Jump definition. These are the credentials for the user account you'll use to log into the remote system. There is a
secondary prompt for additional credentials, either manually provided or from a password vault. These secondary credentials are made
SALES: www.beyondtrust.com/contact
SUPPORT: www.beyondtrust.com/support
DOCUMENTATION: www.beyondtrust.com/docs
37
©2003-2024 BeyondTrust Corporation. All Rights Reserved. Other trademarks identified on this page are owned by their respective owners. BeyondTrust is not a chartered bank or trust company, or
depository institution. It is not authorized to accept deposits or trust accounts and is not licensed or regulated by any state or federal banking authority.
TC: 7/8/2024
PRIVILEGED REMOTE ACCESS 24.2
ACCESS CONSOLE USER GUIDE

available to the command line you define through the %USERNAME% and %PASSWORD% macros (additional macros shown below).
This allows you to pass additional credentials to the application you are launching (e.g., SQL Server Management Studio). To configure,
select the BeyondTrust Remote Desktop Agent: option and enter the following information:
l
Enter the Executable Path and Parameters as described above.
l
Target System: Enter the name of the system running the application.
l
Credential Type: Enter the credential type as defined by the credential management system (e.g., SQL).
Macro Name Result
%USERNAME% username
%USERPRINCIPLENAME% username@domain
%DOWNLEVELLOGONNAME% domain\username
%DOMAIN% domain
%PASSWORD% password
%PASSWORDRAW% password (without any attempt to escape special characters)
%TARGETSYSTEM% supplied target system value; in the case of SQL Server, this would be the SQL
Server name.
%APPLICATIONNAME% optional application name; in the case of SQL Server, this can be hard-coded to
"SQL Server" or something similar.
Note: The BeyondTrust Remote Desktop Agent option requires a BeyondTrust Remote Desktop Agent to be
preconfigured on the target system. This agent can be downloaded from the My Account page in the /login interface. It is
neither version nor site-specific, and thus the same agent can be used for as many applications as the admin wishes to
support. Once the agent is installed, you can then use BeyondTrust to create RDP Jump Items that are configured to use the
BeyondTrust Remote Desktop Agent option to launch any application installed on the remote system.
Note: RemoteApp relies on publishing applications using Microsoft RDS RemoteApps. Please refer to the Microsoft
documentation for publishing applications.
Move Jump Items from one Jump Group to another using the Jump Group dropdown. The ability to move Jump Items to or from different
Jump Groups depends upon your account permissions.
Further organize Jump Items by entering the name of a new or existing Tag. Even though the selected Jump Items are grouped together
under the tag, they are still listed under the Jump Group in which each Jump Item is pinned. To move a Jump Item back into its top-level
Jump Group, leave this field blank.
Jump Items include a Comments field for a name or description, which makes sorting, searching, and identifying Jump Items faster and
easier.
To set when users are allowed to access this Jump Item, if a notification of access should be sent, or if permission or a ticket ID from your
external ticketing system is required to use this Jump Item, choose a Jump Policy. These policies are configured by your administrator in
the /login interface.
For more information about contained database users, please see Contained Database Users - Making Your Database
Portable at docs.microsoft.com/en-us/sql/relational-databases/security/contained-database-users-making-your-database-
portable.
SALES: www.beyondtrust.com/contact
SUPPORT: www.beyondtrust.com/support
DOCUMENTATION: www.beyondtrust.com/docs
38
©2003-2024 BeyondTrust Corporation. All Rights Reserved. Other trademarks identified on this page are owned by their respective owners. BeyondTrust is not a chartered bank or trust company, or
depository institution. It is not authorized to accept deposits or trust accounts and is not licensed or regulated by any state or federal banking authority.
TC: 7/8/2024
PRIVILEGED REMOTE ACCESS 24.2
ACCESS CONSOLE USER GUIDE

Use an RDP Shortcut
To use a Jump shortcut to start a session, select the shortcut from the Jump interface and click the Jump button.
You are prompted to enter the password for the username you specified
earlier.
Your RDP session now begins.
Note: When starting an RDP session, the RDP keyboard automatically matches the language you have set in the access
console. This functionality is available for Windows-based access consoles only.
Begin screen sharing to view the remote desktop. You can send the Ctrl-Alt-Del command, capture a screenshot of the remote desktop,
share clipboard contents, use Alt and Shift commands, and perform key injection. You also can share the RDP session with other logged-
in BeyondTrust users, following the normal rules of your user account settings.
Note: Jump Items can be set to allow multiple users to simultaneously access the same Jump Item. If set to Start New
Session, then a new independent session starts for each user who Jumps to a specific RDP Jump Item. The RDP
configuration on the endpoint controls any further behavior regarding simultaneous RDP connections. For more information on
simultaneous Jumps, please see Jump Item Settings at www.beyondtrust.com/docs/privileged-remote-access/getting-
started/admin/jump-items.htm.
SALES: www.beyondtrust.com/contact
SUPPORT: www.beyondtrust.com/support
DOCUMENTATION: www.beyondtrust.com/docs
39
©2003-2024 BeyondTrust Corporation. All Rights Reserved. Other trademarks identified on this page are owned by their respective owners. BeyondTrust is not a chartered bank or trust company, or
depository institution. It is not authorized to accept deposits or trust accounts and is not licensed or regulated by any state or federal banking authority.
TC: 7/8/2024
PRIVILEGED REMOTE ACCESS 24.2
ACCESS CONSOLE USER GUIDE

Use VNC to Access a Remote Windows Endpoint
Use BeyondTrust to start a VNC session with a remote Windows or Linux system. Because VNC sessions are proxied through a Jumpoint
and converted to BeyondTrust sessions, users can share or transfer sessions, and sessions can be automatically audited and recorded as
your administrator has defined for your site. To use VNC through BeyondTrust, you must have access to a Jumpoint and have the user
account permission Allowed Jump Methods: Remote VNC via a Jumpoint.
Create a VNC Shortcut
To create a VNC shortcut, click the Create button in the Jump interface. From the dropdown, select Remote VNC. VNC shortcuts appear
in the Jump interface along with Jump Clients and other types of Jump Item shortcuts.
Enter a Name for the Jump Item. This name identifies the item in the
session tabs. This string has a maximum of 128 characters.
From the Jumpoint dropdown, select the network that hosts the computer
you wish to access. The access console remembers your Jumpoint choice
the next time you create this type of Jump Item.
Enter the Hostname / IP of the system you wish to access.
Note: By default, the VNC server listens on port 5900, which is,
therefore, the default port BeyondTrust attempts. If the remote
VNC server is configured to use a different port, add it after the
hostname or IP address in the form of <hostname>:<port> or
<ipaddress>:<port> (e.g., 10.10.24.127:40000).
Move Jump Items from one Jump Group to another using the Jump Group dropdown. The ability to move Jump Items to or from different
Jump Groups depends upon your account permissions.
Further organize Jump Items by entering the name of a new or existing Tag. Even though the selected Jump Items are grouped together
under the tag, they are still listed under the Jump Group in which each Jump Item is pinned. To move a Jump Item back into its top-level
Jump Group, leave this field blank.
Jump Items include a Comments field for a name or description, which makes sorting, searching, and identifying Jump Items faster and
easier.
To set when users are allowed to access this Jump Item, if a notification of access should be sent, or if permission or a ticket ID from your
external ticketing system is required to use this Jump Item, choose a Jump Policy. These policies are configured by your administrator in
the /login interface.
SALES: www.beyondtrust.com/contact
SUPPORT: www.beyondtrust.com/support
DOCUMENTATION: www.beyondtrust.com/docs
40
©2003-2024 BeyondTrust Corporation. All Rights Reserved. Other trademarks identified on this page are owned by their respective owners. BeyondTrust is not a chartered bank or trust company, or
depository institution. It is not authorized to accept deposits or trust accounts and is not licensed or regulated by any state or federal banking authority.
TC: 7/8/2024
PRIVILEGED REMOTE ACCESS 24.2
ACCESS CONSOLE USER GUIDE

Use a VNC Shortcut
To use a Jump shortcut to start a session, select the shortcut from the Jump interface and click the Jump button.
When establishing the connection to the VNC server, the system prompts you to enter the user name and password.
Your VNC session now begins. Begin screen sharing to view the remote desktop. You can send the Ctrl-Alt-Del command, capture a
screenshot of the remote desktop, and share clipboard text contents. You also can share, transfer or record the VNC session, following
the normal rules of your user account settings.
Note: Jump Items can be set to allow multiple users to simultaneously access the same Jump Item. If set to Join Existing
Session, other users are able to join a session already underway. The original owner of the session receives a note indicating
another user has joined the session, but is not allowed to deny them access. For more information on simultaneous Jumps,
please see Jump Item Settings at www.beyondtrust.com/docs/privileged-remote-access/getting-started/admin/jump-
items.htm.
SALES: www.beyondtrust.com/contact
SUPPORT: www.beyondtrust.com/support
DOCUMENTATION: www.beyondtrust.com/docs
41
©2003-2024 BeyondTrust Corporation. All Rights Reserved. Other trademarks identified on this page are owned by their respective owners. BeyondTrust is not a chartered bank or trust company, or
depository institution. It is not authorized to accept deposits or trust accounts and is not licensed or regulated by any state or federal banking authority.
TC: 7/8/2024
PRIVILEGED REMOTE ACCESS 24.2
ACCESS CONSOLE USER GUIDE

Use a Protocol Tunnel Jump to Make a TCP Connection to a
Remote System
Using a Protocol Tunnel Jump, make a connection from your system to an endpoint on a remote network. Because the connection occurs
through a Jumpoint, the administrator can control which users have access, when they have access, and if the sessions are recorded.
Create a Protocol Tunnel Jump shortcut
Note: Protocol Tunnel Jump shortcuts are available only if their Jumpoint is configured for the Protocol Tunnel Jump method
on the /login > Jump > Jumpoint page.
To create a Protocol Tunnel Jump Shortcut, click the Create button in the Jump interface. From
the dropdown, under Protocol Tunnel Jump, select the desired type of Protocol Tunnel Jump:
l
TCP Tunnel
l
SQL Server Tunnel: This tunnel uses the Microsoft SQL Server Protocol as a
database proxy, enabling credential injection for users and improved auditing.
Authentication is supported using Windows authentication and SQL login.
l
Kubernetes Cluster Tunnel: This tunnel uses the open source Kubernetes system,
also known as K8s, to manage connections. To use this tunnel, the Jumpoint must be
hosted on a Linux system. The necessary configuration file is created in a local cache,
and deleted when the session is closed. Users are able to natively use the kubectl
command line tool over this tunnel and have all commands and traffic fully proxied,
logged, and auditable.
l
Network Tunnel: This network layer tunnel enables port tunneling of any TCP and non-
TCP protocol (e.g. UDP) traffic to a network. See Network Tunnel Jump shortcuts for
more information.
Protocol Tunnel Jump shortcuts appear in the Jump interface along with Jump Clients and other types of Jump Item shortcuts.
SALES: www.beyondtrust.com/contact
SUPPORT: www.beyondtrust.com/support
DOCUMENTATION: www.beyondtrust.com/docs
42
©2003-2024 BeyondTrust Corporation. All Rights Reserved. Other trademarks identified on this page are owned by their respective owners. BeyondTrust is not a chartered bank or trust company, or
depository institution. It is not authorized to accept deposits or trust accounts and is not licensed or regulated by any state or federal banking authority.
TC: 7/8/2024
PRIVILEGED REMOTE ACCESS 24.2
ACCESS CONSOLE USER GUIDE

Create TCP Tunnel
Enter a Name for the Jump Item. This name identifies the item in the
session tabs. This string has a maximum of 128 characters.
From the Jumpoint dropdown, select the network that hosts the computer
you wish to access. The access console remembers your Jumpoint choice
the next time you create this type of Jump Item.
Enter the Hostname / IP of the system you wish to access.
Specify a Local Address. The default address is 127.0.0.1. If you need to
connect to multiple systems on the same remote port at the same time, you
can enable that connection by changing each Protocol Tunnel Jump
Shortcut's address to a different address within the 127.x.x.x subrange.
In Local Port, specify the port that will listen on the user's local system. If
you leave this as automatic, the access console allocates a free port.
In Remote Port, specify the port to connect to on the remote system. This
is dictated by the type of server you are connecting to.
You can define multiple pairs of TCP Tunnels as necessary for your setup.
Added tunnels can be removed but not edited.
Move Jump Items from one Jump Group to another using the Jump Group
dropdown. The ability to move Jump Items to or from different Jump Groups
depends upon your account permissions.
Further organize Jump Items by entering the name of a new or existing
Tag. Even though the selected Jump Items are grouped together under the
tag, they are still listed under the Jump Group in which each Jump Item is
pinned. To move a Jump Item back into its top-level Jump Group, leave this field blank.
Jump Items include a Comments field for a name or description, which makes sorting, searching, and identifying Jump Items faster and
easier.
To set when users are allowed to access this Jump Item, if a notification of access should be sent, or if permission or a ticket ID from your
external ticketing system is required to use this Jump Item, choose a Jump Policy. These policies are configured by your administrator in
the /login interface.
Choose a Session Policy to assign to this Jump Item. The session policy assigned to this Jump Item has the highest priority when setting
session permissions. The ability to set a session policy depends on your account permissions.
SALES: www.beyondtrust.com/contact
SUPPORT: www.beyondtrust.com/support
DOCUMENTATION: www.beyondtrust.com/docs
43
©2003-2024 BeyondTrust Corporation. All Rights Reserved. Other trademarks identified on this page are owned by their respective owners. BeyondTrust is not a chartered bank or trust company, or
depository institution. It is not authorized to accept deposits or trust accounts and is not licensed or regulated by any state or federal banking authority.
TC: 7/8/2024
PRIVILEGED REMOTE ACCESS 24.2
ACCESS CONSOLE USER GUIDE

Create SQL Server Tunnel
Enter a Name for the Jump Item. This name identifies the item in the
session tabs. This string has a maximum of 128 characters.
From the Jumpoint dropdown, select the network that hosts the computer
you wish to access. The access console remembers your Jumpoint choice
the next time you create this type of Jump Item.
Enter the Hostname / IP of the system you wish to access.
Specify a Local Address. The default address is 127.0.0.1. If you need to
connect to multiple systems on the same remote port at the same time, you
can enable that connection by changing each Protocol Tunnel Jump
Shortcut's address to a different address within the 127.x.x.x subrange.
Enter the applicable Username and Database.
Move Jump Items from one Jump Group to another using the Jump Group
dropdown. The ability to move Jump Items to or from different Jump Groups
depends upon your account permissions.
Further organize Jump Items by entering the name of a new or existing
Tag. Even though the selected Jump Items are grouped together under the
tag, they are still listed under the Jump Group in which each Jump Item is
pinned. To move a Jump Item back into its top-level Jump Group, leave this field blank.
Jump Items include a Comments field for a name or description, which makes sorting, searching, and identifying Jump Items faster and
easier.
To set when users are allowed to access this Jump Item, if a notification of access should be sent, or if permission or a ticket ID from your
external ticketing system is required to use this Jump Item, choose a Jump Policy. These policies are configured by your administrator in
the /login interface.
Choose a Session Policy to assign to this Jump Item. The session policy assigned to this Jump Item has the highest priority when setting
session permissions. The ability to set a session policy depends on your account permissions.
SALES: www.beyondtrust.com/contact
SUPPORT: www.beyondtrust.com/support
DOCUMENTATION: www.beyondtrust.com/docs
44
©2003-2024 BeyondTrust Corporation. All Rights Reserved. Other trademarks identified on this page are owned by their respective owners. BeyondTrust is not a chartered bank or trust company, or
depository institution. It is not authorized to accept deposits or trust accounts and is not licensed or regulated by any state or federal banking authority.
TC: 7/8/2024
PRIVILEGED REMOTE ACCESS 24.2
ACCESS CONSOLE USER GUIDE

Create Kubernetes Cluster Tunnel
Enter a Name for the Jump Item. This name identifies the item in the
session tabs. This string has a maximum of 128 characters.
From the Jumpoint dropdown, select the network that hosts the computer
you wish to access. The access console remembers your Jumpoint choice
the next time you create this type of Jump Item.
Specify a Local Address. The default address is 127.0.0.1. If you need to
connect to multiple systems on the same remote port at the same time, you
can enable that connection by changing each Protocol Tunnel Jump
Shortcut's address to a different address within the 127.x.x.x subrange.
Enter the base URL for the Kubernetes cluster, beginning with https://
For the CA Certificates, copy and paste a PEM-formatted certificate or
chain of certificates used to validate the cluster URL. When using a chain of
certificates, the typical order is domain, intermediate, and root.
Tip: You may be able to obtain your certificate with the following
command: kubectl get configmap kube-root-ca.crt -o jsonpath="
{['data']['ca\.crt']}"
Move Jump Items from one Jump Group to another using the Jump Group
dropdown. The ability to move Jump Items to or from different Jump Groups
depends upon your account permissions.
Further organize Jump Items by entering the name of a new or existing Tag. Even though the selected Jump Items are grouped together
under the tag, they are still listed under the Jump Group in which each Jump Item is pinned. To move a Jump Item back into its top-level
Jump Group, leave this field blank.
Jump Items include a Comments field for a name or description, which makes sorting, searching, and identifying Jump Items faster and
easier.
To set when users are allowed to access this Jump Item, if a notification of access should be sent, or if permission or a ticket ID from your
external ticketing system is required to use this Jump Item, choose a Jump Policy. These policies are configured by your administrator in
the /login interface.
Choose a Session Policy to assign to this Jump Item. The session policy assigned to this Jump Item has the highest priority when setting
session permissions. The ability to set a session policy depends on your account permissions.
Use a Protocol Tunnel Jump Shortcut
To use a Protocol Tunnel Jump shortcut to start a session, simply select the shortcut from the Jump interface and click the Jump button.
SALES: www.beyondtrust.com/contact
SUPPORT: www.beyondtrust.com/support
DOCUMENTATION: www.beyondtrust.com/docs
45
©2003-2024 BeyondTrust Corporation. All Rights Reserved. Other trademarks identified on this page are owned by their respective owners. BeyondTrust is not a chartered bank or trust company, or
depository institution. It is not authorized to accept deposits or trust accounts and is not licensed or regulated by any state or federal banking authority.
TC: 7/8/2024
PRIVILEGED REMOTE ACCESS 24.2
ACCESS CONSOLE USER GUIDE

A session appears in your access console. Click the Protocol Tunneling
button to establish the connection.
If screen recording is enabled, a prompt appears, informing you that your desktop will be recorded. Click OK to continue. If you click
Cancel, the Protocol Tunnel will not be created.
If screen recording is enabled, an indicator appears at the top of your
session screen.
The Current Tunnels section displays current connections and their
statuses. You also can view brief Network Statistics.
You can now open a third-party client to perform tasks on the remote
system. Use the ports indicated to connect through the Jumpoint.
SALES: www.beyondtrust.com/contact
SUPPORT: www.beyondtrust.com/support
DOCUMENTATION: www.beyondtrust.com/docs
46
©2003-2024 BeyondTrust Corporation. All Rights Reserved. Other trademarks identified on this page are owned by their respective owners. BeyondTrust is not a chartered bank or trust company, or
depository institution. It is not authorized to accept deposits or trust accounts and is not licensed or regulated by any state or federal banking authority.
TC: 7/8/2024
PRIVILEGED REMOTE ACCESS 24.2
ACCESS CONSOLE USER GUIDE

Stipulations to Correct Functioning
The Protocol Tunneling feature tunnels network traffic in a way that places some restrictions on how communication must occur between
the user's system and the endpoint.
TCP and SQL Server Tunnel Restricitons
l
All traffic must be TCP.
l
No more than 256 simultaneous connections can be handled.
l
All TCP connections must originate from the endpoint and must be accepted by the listening user's system. The application's
protocol cannot require that the user's system make a separate connection back to the endpoint.
l
Any TCP connections that the endpoint is to make back to the user's system must be made over tunnels already defined within the
Protocol Tunnel Jump Item properties.
l
Operating systems typically disallow non-elevated processes from listening on ports less than 1024. Therefore, the local port must
generally be greater than 1024. The endpoint software connects to the server by connecting to the local port on which the access
console (a non-elevated process) is listening.
l
The endpoint software cannot make connections to any system on the remote network other than the one specified in the Protocol
Tunnel Jump Item properties.
l
The protocol must be agnostic toward the hostname that the endpoint used to connect to the server. Otherwise, other means must
be made to satisfy the protocol's requirements, such as mapping a hostname to 127.0.0.1 in the hosts file or applying special
configuration to the endpoint client.
l
If the tunnel definition has a local port that is different than the remote port (namely, when the local port must be greater than 1024
because the server's port is less than 1024), the protocol must be agnostic toward the port that the endpoint client used to connect
to the server.
l
Any protocol which goes beyond the case of making a single TCP connection from the endpoint client to the user's system
requires the administrator's understanding their specific protocol and the stipulations listed above.
Kubernetes Tunnel Restrictions
l
No more than 256 simultaneous connections can be handled.
l
All connections must originate from the endpoint and must be accepted by the listening user's system. The application's protocol
cannot require that the user's system make a separate connection back to the endpoint.
SALES: www.beyondtrust.com/contact
SUPPORT: www.beyondtrust.com/support
DOCUMENTATION: www.beyondtrust.com/docs
47
©2003-2024 BeyondTrust Corporation. All Rights Reserved. Other trademarks identified on this page are owned by their respective owners. BeyondTrust is not a chartered bank or trust company, or
depository institution. It is not authorized to accept deposits or trust accounts and is not licensed or regulated by any state or federal banking authority.
TC: 7/8/2024
PRIVILEGED REMOTE ACCESS 24.2
ACCESS CONSOLE USER GUIDE

Use Shell Jump to Access a Remote Network Device
With Shell Jump, quickly connect to an SSH-enabled or Telnet-enabled network device to use the command line feature on that remote
system. For example, run a standardized script across multiple systems to install a needed patch or troubleshoot a network issue.
Administrators can enable command filtering to help prevent users from inadvertently using harmful commands on SSH-connected
endpoints.
Note: You can use your own SSH tool for the SSH protocol. For more information, please see "Change settings and
preferences in the Access Console" on page 12.
IMPORTANT!
In order to use your own tool, you must enable Protocol Tunnel Jump in /login > Users & Security > Users > Access
Permissions > Jump Technology > Protocol Tunnel Jump. This may need to be enabled by a group policy.
Create a Shell Jump Shortcut
To create a Shell Jump shortcut, click the Create button in the Jump interface. From the dropdown, select Shell Jump. Shell Jump
shortcuts appear in the Jump interface, as well as Jump Clients and other types of Jump Item shortcuts.
Note: Shell Jump shortcuts are enabled only if their Jumpoint is configured for open or limited Shell Jump access.
Enter a Name for the Jump Item. This name identifies the item in the
session tabs. This string has a maximum of 128 characters.
From the Jumpoint dropdown, select the network that hosts the computer
you wish to access. The access console remembers your Jumpoint choice
the next time you create this type of Jump Item.
Enter the Hostname / IP of the system you wish to access.
Choose the Protocol to use, either SSH or Telnet.
Port automatically switches to the default port for the selected protocol but
can be modified to fit your network settings.
Enter the Username to sign in as.
Select the Terminal Type, either xterm or VT100.
You can also select to Send Keep-Alive Packets to keep idle sessions
from ending. Enter the number of seconds to wait between each packet
send.
Move Jump Items from one Jump Group to another using the Jump Group
dropdown. The ability to move Jump Items to or from different Jump Groups
depends upon your account permissions.
SALES: www.beyondtrust.com/contact
SUPPORT: www.beyondtrust.com/support
DOCUMENTATION: www.beyondtrust.com/docs
48
©2003-2024 BeyondTrust Corporation. All Rights Reserved. Other trademarks identified on this page are owned by their respective owners. BeyondTrust is not a chartered bank or trust company, or
depository institution. It is not authorized to accept deposits or trust accounts and is not licensed or regulated by any state or federal banking authority.
TC: 7/8/2024
PRIVILEGED REMOTE ACCESS 24.2
ACCESS CONSOLE USER GUIDE

Further organize Jump Items by entering the name of a new or existing Tag. Even though the selected Jump Items are grouped together
under the tag, they are still listed under the Jump Group in which each Jump Item is pinned. To move a Jump Item back into its top-level
Jump Group, leave this field blank.
Jump Items include a Comments field for a name or description, which makes sorting, searching, and identifying Jump Items faster and
easier.
To set when users are allowed to access this Jump Item, if a notification of access should be sent, or if permission or a ticket ID from your
external ticketing system is required to use this Jump Item, choose a Jump Policy. These policies are configured by your administrator in
the /login interface.
Choose a Session Policy to assign to this Jump Item. The session policy assigned to this Jump Item has the highest priority when setting
session permissions. The ability to set a session policy depends on your account permissions.
SALES: www.beyondtrust.com/contact
SUPPORT: www.beyondtrust.com/support
DOCUMENTATION: www.beyondtrust.com/docs
49
©2003-2024 BeyondTrust Corporation. All Rights Reserved. Other trademarks identified on this page are owned by their respective owners. BeyondTrust is not a chartered bank or trust company, or
depository institution. It is not authorized to accept deposits or trust accounts and is not licensed or regulated by any state or federal banking authority.
TC: 7/8/2024
PRIVILEGED REMOTE ACCESS 24.2
ACCESS CONSOLE USER GUIDE

Use a Shell Jump Shortcut
To use a Shell Jump shortcut to start a session, select the shortcut from the Jump interface and click the Jump button.
If attempting to Shell Jump to an SSH device without a cached host key, you receive an alert that the server's host key is not cached and
that there is no guarantee that the server is the computer you think it is.
If you choose Save Key and Connect, then the key is cached on the Jumpoint's host system so that future attempts to Shell Jump to this
system do not result in this prompt. Connect Only starts the session without caching the key, and Abort ends the Shell Jump session.
When you Shell Jump to a remote device, a command shell session immediately starts with that device. If you Shell Jump to a provisioned
SSH device with an unencrypted key or with an encrypted key whose password has been cached, you are not prompted for a password.
Otherwise, you are required to enter a password. You can then send commands to the remote system.
If you Shell Jump to an SSH device with keyboard interactive MFA enabled, there is a secondary prompt for input.
Administrators can configure command filtering on Shell Jump items to block some commands and allow others in an effort to prevent the
user from inadvertently using a command that may cause undesireable results. In the event a user attempts to use a command that
matches an expression that is not allowed, they receive a prompt and are not allowed to execute the command.
Note: BeyondTrust's command filter uses extended regular expressions, which are not to be confused with egrep. For more
information, please see Regular expressions (C++) at docs.microsoft.com/en-us/cpp/standard-library/regular-expressions-
cpp.
Configure Shell Prompt Filtering:
1. Log into the /login interface as a user with permissions to configure Jump Items and session policies.
2. Browse to Jump > Jump Items and scroll down to the Shell Jump Filtering section.
3. In the Recognized Shell Prompts text box, enter regexes to match the command shell prompts found on your endpoint systems,
one per line.
Note: Line breaks, or newlines, are not allowed within the command prompt patterns entered. If an endpoint system uses a
multi-line prompt, enter an expression that matches only the final line of the prompt in the text box.
4. Click Save.
Note: Once you have entered the regexes you wish to use, you can test a shell prompt to determine if it matches any of the
regexes in the list. This allows you to test your regexes without starting a session. Enter the expression in the Shell Prompt
text box and click the Check button. A notice displays whether or not the shell prompt you entered matches one of the regexes
in the list.
Configure Command Filtering:
1. Browse to Users & Security > Session Policies and either create a new policy or edit an existing one.
Note: You can also configure this for users and/or group policies.
SALES: www.beyondtrust.com/contact
SUPPORT: www.beyondtrust.com/support
DOCUMENTATION: www.beyondtrust.com/docs
50
©2003-2024 BeyondTrust Corporation. All Rights Reserved. Other trademarks identified on this page are owned by their respective owners. BeyondTrust is not a chartered bank or trust company, or
depository institution. It is not authorized to accept deposits or trust accounts and is not licensed or regulated by any state or federal banking authority.
TC: 7/8/2024
PRIVILEGED REMOTE ACCESS 24.2
ACCESS CONSOLE USER GUIDE

2. Locate the Command Shell settings in the Permissions section.
3. Because you will use command filtering with Shell Jump items, select the Allow radio button to allow the use of the command
shell.
4. Choose from Allow all commands, Allow the command patterns below, or Deny the command patterns below and specify
in the text box which regex patterns you wish to allow or block.
Note: Once you have entered the command patterns you wish to allow or block, you can test commands in the Command
Tester text box. A notice displays whether or not the command entered would be allowed to run on the remote system based
on the regexes specified in the list.
The two possible messages are:
l
"The entered command shall be allowed based on your selections."
l
"The entered command shall not be allowed based on your selections."
Use Credential Injection with SUDO on a Linux Endpoint
To use credential injection with SUDO, an administrator must configure one or more functional accounts on each Linux endpoint to be
accessed via Shell Jump. As the process for configuring the sudoers file is complex and varies by platform, please refer to your platform's
documentation for details on completing this process. Each functional account must:
l
Allow authenticating via SSH (password or SSH key).
l
Have the account credentials stored in the Endpoint Credential Manager (ECM).
l
Have one or more entries in /etc/sudoers granting the functional account access to one or more commands to be executed as
root without requiring a password (NOPASSWD).
An administrator must create a Shell Jump Item for the endpoint.
Next, an administrator must configure the ECM and/or password vault to grant users access to the appropriate functional accounts for that
Jump Item.
When a user Jumps to the Shell Jump Item, they can choose from the list of functional accounts available for that endpoint. Each
functional account has its own set of commands that can be executed using SUDO, as configured by the administrator on the endpoint.
The credentials for the account are passed from the ECM to the endpoint.
Note: Jump Items can be set to allow multiple users to simultaneously access the same Jump Item. If set to Join Existing
Session, other users are able to join a session already underway. The original owner of the session receives a note indicating
another user has joined the session, but is not allowed to deny them access. For more information on simultaneous Jumps,
please see Jump Item Settings at www.beyondtrust.com/docs/privileged-remote-access/getting-started/admin/jump-
items.htm.
SALES: www.beyondtrust.com/contact
SUPPORT: www.beyondtrust.com/support
DOCUMENTATION: www.beyondtrust.com/docs
51
©2003-2024 BeyondTrust Corporation. All Rights Reserved. Other trademarks identified on this page are owned by their respective owners. BeyondTrust is not a chartered bank or trust company, or
depository institution. It is not authorized to accept deposits or trust accounts and is not licensed or regulated by any state or federal banking authority.
TC: 7/8/2024
PRIVILEGED REMOTE ACCESS 24.2
ACCESS CONSOLE USER GUIDE

Use a Web Jump to Access Web Services
With the proliferation of infrastructure components that have moved to web-based interfaces for configuration, IT administrators are faced
with an increasingly complex security management situation. With privileged access to web-based resources, it is a challenge to control,
audit, and enforce proper authentication without negatively affecting business productivity. IT administrators need a way to effectively
control and audit resources managed via web interfaces, including:
l
Externally hosted Infrastructure as a Service (IaaS) servers such as Amazon AWS, Microsoft Azure, IBM SoftLayer, and
Rackspace
l
Internally hosted servers managed by hypervisor software such as VMware vSphere, Citrix XenServer, and Microsoft Hyper-V
l
Modern core network infrastructure that leverages web-based configuration interfaces
The identity and access management capabilities vary significantly between IaaS, hypervisor providers, and core infrastructure systems,
and many do not offer native multifactor authentication support, thereby missing that additional layer of security. These inconsistencies
across systems create opportunities for business vulnerabilities, such as misuse of accounts and access, leading to leaks of sensitive
data. BeyondTrust Web Jump is the extra layer of security for authenticating to these systems.
IMPORTANT!
Web Jump does not support Flash. Be sure to consult your hypervisor documentation and update it to a version that supports HTML5.
Note: The Web Jump Item is an add-on for Privileged Remote Access, and requires additional purchase.
Create a Web Jump Shortcut
Note: Before creating Web Jump shortcuts, ensure that your user account has the ability to access Web Jumps. This
permission is set on your user account in the /login interface under Access Permissions > Jump Technology.
To create a Web Jump shortcut, click the Create button in the Jump interface. From the dropdown, select Web
Jump. Web Jump shortcuts appear in the Jump interface with Jump Clients and other types of Jump Item
shortcuts.
SALES: www.beyondtrust.com/contact
SUPPORT: www.beyondtrust.com/support
DOCUMENTATION: www.beyondtrust.com/docs
52
©2003-2024 BeyondTrust Corporation. All Rights Reserved. Other trademarks identified on this page are owned by their respective owners. BeyondTrust is not a chartered bank or trust company, or
depository institution. It is not authorized to accept deposits or trust accounts and is not licensed or regulated by any state or federal banking authority.
TC: 7/8/2024
PRIVILEGED REMOTE ACCESS 24.2
ACCESS CONSOLE USER GUIDE

Enter a Name for the Jump Item. This name identifies the item in the
session tabs. This string has a maximum of 128 characters.
From the Jumpoint dropdown, select the Windows or Linux Jumpoint that
hosts the computer you wish to access.
Note: Copy/Paste functionality is not supported for Linux
Jumpoints.
Type the URL for the web site you wish to access.
Check Verify Certificate if you want the site certificate to be validated
before the connection is made. If this box is checked and issues are found
with the certificate, the session does not start.
IMPORTANT!
You should uncheck Verify Certificate only if you are Jumping to a
site that you trust but that uses a self-signed certificate.
If you want to use credential injection, first select the Username Format:
l
Default: This is the default value for new and existing Web Jump Items. The username is not modified before injection into the web
page and is used in the stored format. For the Endpoint Credential Manager (ECM), the credential may be in either UPN or DLLN
format. For Vault, the username is always in UPN format.
l
Username Only: Independently of the format stored in either Vault or ECM (username@domain or domain\username), the
domain is removed and only the username is used.
Under Login Form Detection, the recommended practice is to leave the three fields empty, and allow the system to auto-detect and use
the information already stored for login. If auto-detection fails, the injection fails and a message states that the Username Field,
Password Field, and/or Submit Button could not be found.
If entering the names of the input elements, enter the HTML id, HTML name, or CSS selector for each element on the login page.
Example: This shows HTML ids with input fields and a submit button, as they might appear on the code view of a login page.
The HTML ids here are user, pwd, and button.
<form action="/action_page.php">
Username: <input type="text" id="user"><br>
Password: <input type="password" id="pwd"><br>
<input type="submit" value="Submit" id="button">
</form>
Move Jump Items from one Jump Group to another using the Jump Group dropdown. The ability to move Jump Items to or from different
Jump Groups depends upon your account permissions.
Further organize Jump Items by entering the name of a new or existing Tag. Even though the selected Jump Items are grouped together
under the tag, they are still listed under the Jump Group in which each Jump Item is pinned. To move a Jump Item back into its top-level
Jump Group, leave this field blank.
SALES: www.beyondtrust.com/contact
SUPPORT: www.beyondtrust.com/support
DOCUMENTATION: www.beyondtrust.com/docs
53
©2003-2024 BeyondTrust Corporation. All Rights Reserved. Other trademarks identified on this page are owned by their respective owners. BeyondTrust is not a chartered bank or trust company, or
depository institution. It is not authorized to accept deposits or trust accounts and is not licensed or regulated by any state or federal banking authority.
TC: 7/8/2024
PRIVILEGED REMOTE ACCESS 24.2
ACCESS CONSOLE USER GUIDE

Jump Items include a Comments field for a name or description, which makes sorting, searching, and identifying Jump Items faster and
easier.
To set when users are allowed to access this Jump Item, if a notification of access should be sent, or if permission or a ticket ID from your
external ticketing system is required to use this Jump Item, choose a Jump Policy. These policies are configured by your administrator in
the /login interface.
Choose a Session Policy to assign to this Jump Item. The session policy assigned to this Jump Item has the highest priority when setting
session permissions. The ability to set a session policy depends on your account permissions.
For more information about identifying HTML form fields, please see online resources such as this page explaining the use of
CSS selectors at https://developer.mozilla.org/en-US/docs/Web/CSS/CSS_Selectors.
Use a Web Jump Shortcut
To use a Jump shortcut to start a session, select the shortcut from the Jump interface and click the Jump button.
Once a connection is made to the web site, click the screen sharing button. The web site's login interface becomes available.
Note: If you want to open a new tab in Windows or Linux, hold down the CTRL key and click the mouse button. For iOS, hold
down the Command key and click the mouse button.
SALES: www.beyondtrust.com/contact
SUPPORT: www.beyondtrust.com/support
DOCUMENTATION: www.beyondtrust.com/docs
54
©2003-2024 BeyondTrust Corporation. All Rights Reserved. Other trademarks identified on this page are owned by their respective owners. BeyondTrust is not a chartered bank or trust company, or
depository institution. It is not authorized to accept deposits or trust accounts and is not licensed or regulated by any state or federal banking authority.
TC: 7/8/2024
PRIVILEGED REMOTE ACCESS 24.2
ACCESS CONSOLE USER GUIDE

Tip: You can copy and paste text to and from the website by using the copy/paste controls of your operating system.
Upload and Download Files using a Web Jump Shortcut
If you click a link to download a file from the web site, a prompt appears in your chat window asking you to accept or decline the download.
If you accept, a window opens on your computer allowing you to choose a download location.
Uploading files to the web site works similarly, opening a window to allow you to choose which file to upload.
Note: The privileged web access console does not support uploading or downloading of files to a web page via a Web Jump.
File upload to, or downloaded from, a web page via Web Jump is supported only by the desktop access console.
Use Credential Injection
IMPORTANT!
Credential injection is not supported for non-secure sites (non-HTTPS).
Note: This feature is not supported for ARM-based Windows systems.
When integrating BeyondTrust PRA with a password vault system, you can seamlessly access your web site accounts without viewing the
login screen or entering any credentials using credential injection.
Note: Web Jump supports multi-step authentication, in which the username and password are not requested on the same
browser page. Web Jump also supports scenarios in which a user connects to an unauthenticated portion of a website, but
then attempts to enter an area using basic authentication. Furthermore, Web Jump supports sites that contain CAPTCHAs, by
allowing the users to complete the CAPTCHA without ending the credential injection process. Once interaction with a
CAPTCHA is complete, the user clicks the key icon in the access console to complete credential injection.
Note: For seamless credential injection on a VMware console, some configuration is required.
1. Go to the computer hosting the Jumpoint.
2. Download and install the VMware Client Integration Plugin.
3. Using admin permissions, open Windows services (services.msc) on the Jumpoint host.
4. Right-click the BeyondTrust Jumpoint and select Properties.
5. On the Log On tab under Local System account, check Allow service to interact with desktop.
6. Click OK.
7. On the user's local system, on which the access console is installed, start a Web Jump with the VMware URL specified
above.
8. Select Use Windows Credentials.
SALES: www.beyondtrust.com/contact
SUPPORT: www.beyondtrust.com/support
DOCUMENTATION: www.beyondtrust.com/docs
55
©2003-2024 BeyondTrust Corporation. All Rights Reserved. Other trademarks identified on this page are owned by their respective owners. BeyondTrust is not a chartered bank or trust company, or
depository institution. It is not authorized to accept deposits or trust accounts and is not licensed or regulated by any state or federal banking authority.
TC: 7/8/2024
PRIVILEGED REMOTE ACCESS 24.2
ACCESS CONSOLE USER GUIDE

9. This causes a prompt on the Jumpoint host system to allow services to interact with an external program. Give the
service permission.
10. A VMware credential injection prompt is displayed. Uncheck the box asking if you want the prompt to be displayed
whenever the program is called. Click Accept.
11. You can now start Web Jumps to the VMware console using Windows credentials without a prompt.
For more information on downloading the appropriate VMware Client Integration Plugin, please see Upgrading VMware Client
Integration Plug-in to the latest version at https://kb.vmware.com/s/article/2145066.
SALES: www.beyondtrust.com/contact
SUPPORT: www.beyondtrust.com/support
DOCUMENTATION: www.beyondtrust.com/docs
56
©2003-2024 BeyondTrust Corporation. All Rights Reserved. Other trademarks identified on this page are owned by their respective owners. BeyondTrust is not a chartered bank or trust company, or
depository institution. It is not authorized to accept deposits or trust accounts and is not licensed or regulated by any state or federal banking authority.
TC: 7/8/2024
PRIVILEGED REMOTE ACCESS 24.2
ACCESS CONSOLE USER GUIDE

Access Toolset
Access Session Overview and Tools
SALES: www.beyondtrust.com/contact
SUPPORT: www.beyondtrust.com/support
DOCUMENTATION: www.beyondtrust.com/docs
57
©2003-2024 BeyondTrust Corporation. All Rights Reserved. Other trademarks identified on this page are owned by their respective owners. BeyondTrust is not a chartered bank or trust company, or
depository institution. It is not authorized to accept deposits or trust accounts and is not licensed or regulated by any state or federal banking authority.
TC: 7/8/2024
PRIVILEGED REMOTE ACCESS 24.2
ACCESS CONSOLE USER GUIDE

Session Tools
Click the menu icon at the top left of the session window to open session controls for your session. You can
also right-click the session tab to see session controls. From the menu, select Detach Session Tab to
separate the session from the console, or click the session tab and drag it away from the main window. The
menu icon remains with your session even if you detach the session tab, allowing you to position the session
tab anywhere, such as on a separate monitor, and retain session tool access. Reattach the session using the
Attach Session Tab selection in the menu or by clicking the X to close the detached window. Additionally,
from the menu, select Locate Sidebar to find the sidebar for the session, which can be helpful if you have
several detached session sidebars (see below) scattered on your screen. You can also rename the session or
revert the name to the default from the menu.
Collapse the sidebar to maximize your session workspace. To pin the sidebar again, hover over the collapsed
sidebar arrow and click the Pin Sidebar icon.
Click this icon to detach the sidebar. Once detached, the sidebar can be positioned anywhere on your desktop
or placed on a separate monitor. The sidebar also can be resized according to your needs, or resize the panes
in the sidebar for more viewing space. Click on the Attach Sidebar icon to reattach the sidebar. When the
sidebar is detached, the Home icon is enabled (see below).
This Home icon is enabled whenever the sidebar is detached. In the case where you might have several
sessions going on at the same time and several detached sidebars on your screen, clicking on a sidebar's
Home icon brings up the associated session, saving time and avoiding confusion when trying to identify which
sidebar goes with which session.
It is possible to reposition the different widget sections displayed on the sidebar, like the chat window, the
session info pane, etc. When hovering over the title bar of a section, the cursor turns into a closed hand,
allowing you to drag and reposition that section on the sidebar.
Invite another user to participate in a shared session. You maintain ownership of the session but can receive
input from one or more teammates or an external user.
The session owner can remove another user from a shared session.
Open a web browser on your computer to any sites defined by your administrator. This button can be
configured to include detailed information about the session, the endpoint, and/or the BeyondTrust user who is
opening the custom link. If, for instance, the external key matches the unique identifier of a case in your
customer relationship management system, clicking this button could pull up the associated case in the
external system.
Close your session tab entirely. You can close the session from the sidebar, the session menu, or the session
tab.
At the bottom right of the session window is information about the remote system. Also, if your administrator has enabled the XML API,
you may designate an external key for use in session reports. Any custom session attributes enabled by your administrator will appear in a
Custom Info tab. Click Copy to copy all information to your clipboard.
Another option that your administrator may choose to enable is the ability to log out the Windows user automatically or lock the remote
computer when the session closes. When you have been working on an unattended system, for example, locking the computer is
recommended to prevent unauthorized users from viewing private information. Set the action to take from the dropdown at the bottom of
the pane.
SALES: www.beyondtrust.com/contact
SUPPORT: www.beyondtrust.com/support
DOCUMENTATION: www.beyondtrust.com/docs
58
©2003-2024 BeyondTrust Corporation. All Rights Reserved. Other trademarks identified on this page are owned by their respective owners. BeyondTrust is not a chartered bank or trust company, or
depository institution. It is not authorized to accept deposits or trust accounts and is not licensed or regulated by any state or federal banking authority.
TC: 7/8/2024
PRIVILEGED REMOTE ACCESS 24.2
ACCESS CONSOLE USER GUIDE

Log Into Remote Systems Using Credential Injection from the
Access Console
When accessing a Windows-based Jump Item via the access console, you can use credentials from a credential store to log into the
endpoint or to run applications as an admin.
Before using credential injection, make sure that you have a credential store or password vault available to connect to BeyondTrust
Privileged Remote Access.
Note: Credential injection is not available for Mac or Linux Jump Clients.
Note: This feature is not supported for ARM-based Windows systems.
SALES: www.beyondtrust.com/contact
SUPPORT: www.beyondtrust.com/support
DOCUMENTATION: www.beyondtrust.com/docs
59
©2003-2024 BeyondTrust Corporation. All Rights Reserved. Other trademarks identified on this page are owned by their respective owners. BeyondTrust is not a chartered bank or trust company, or
depository institution. It is not authorized to accept deposits or trust accounts and is not licensed or regulated by any state or federal banking authority.
TC: 7/8/2024
PRIVILEGED REMOTE ACCESS 24.2
ACCESS CONSOLE USER GUIDE

Install and Configure the Endpoint Credential Manager
Before you can begin accessing Jump Items using credential injection, you must download, install, and configure the BeyondTrust
Endpoint Credential Manager (ECM). The BeyondTrust ECM allows you to quickly configure your connection to a credential store, such as
a password vault.
Note: The ECM must be installed on your system to enable the BeyondTrust ECM Service and to use credential injection in
BeyondTrust Privileged Remote Access.
System Requirements
l
Windows Vista or newer, 64-bit only
l
.NET 4.5 or newer
1. To begin, download the BeyondTrust Endpoint Credential Manager (ECM) from BeyondTrust Support at beyondtrustcorp.service-
now.com/csm.
2. Start the BeyondTrust Endpoint Credential Manager Setup Wizard.
3. Agree to the EULA terms and conditions. Mark the checkbox if you
agree, and then click Install.
If you need to modify the ECM installation path, click the Options
button to customize the installation location.
Note: You are not allowed to proceed with the installation unless
you agree to the EULA.
4. Click Next on the Welcome screen.
SALES: www.beyondtrust.com/contact
SUPPORT: www.beyondtrust.com/support
DOCUMENTATION: www.beyondtrust.com/docs
60
©2003-2024 BeyondTrust Corporation. All Rights Reserved. Other trademarks identified on this page are owned by their respective owners. BeyondTrust is not a chartered bank or trust company, or
depository institution. It is not authorized to accept deposits or trust accounts and is not licensed or regulated by any state or federal banking authority.
TC: 7/8/2024
PRIVILEGED REMOTE ACCESS 24.2
ACCESS CONSOLE USER GUIDE

5. Choose a location for the credential manager, and then click Next.
6. On the next screen, you can begin the installation or review any
previous step.
7. Click Install when you are ready to begin.
8. The installation takes a few moments. On the screen, click Finish.
SALES: www.beyondtrust.com/contact
SUPPORT: www.beyondtrust.com/support
DOCUMENTATION: www.beyondtrust.com/docs
61
©2003-2024 BeyondTrust Corporation. All Rights Reserved. Other trademarks identified on this page are owned by their respective owners. BeyondTrust is not a chartered bank or trust company, or
depository institution. It is not authorized to accept deposits or trust accounts and is not licensed or regulated by any state or federal banking authority.
TC: 7/8/2024
PRIVILEGED REMOTE ACCESS 24.2
ACCESS CONSOLE USER GUIDE

Note: To ensure optimal up-time, administrators can install up to three ECMs on different Windows machines to communicate
with the same credential store. A list of the ECMs connected to the appliance site can be found at /login > Status >
Information > ECM Clients.
Note: When ECMs are connected in a high availability configuration, the BeyondTrust Appliance B Seriesroutes requests to
the ECM in the ECM Group that has been connected to the appliance the longest.
Note: If you get a Windows plugin error during installation, locate and unblock BeyondTrustVaultRestPlugin.dll.
Configure a Connection to Your Credential Store
Using the ECM Configurator, set up a connection to your credential store.
1. Locate the BeyondTrust ECM Configurator you just installed using
the Windows Search entry field or by viewing your Start menu
programs list.
2. Run the program to begin establishing a connection.
3. When the ECM Configurator opens, complete the fields. All fields
are required.
Field Label Value
Client ID The ID for your credential store.
Client Secret The secret key for your credential store.
Site The URL for your credential store instance.
Port The server port through which the ECM connects to your site.
Plugin Click the Choose Plugin... button to locate the plugin.
Enter the following values:
4. When you click the Choose Plugin... button, the ECM location
folder opens.
5. Paste your plugin files into the folder.
6. Open the plugin file to begin loading.
Note: If you are connecting to a password vault, more configuration at the plugin level may be needed. Plugin requirements
vary based on the credential store that is being connected.
SALES: www.beyondtrust.com/contact
SUPPORT: www.beyondtrust.com/support
DOCUMENTATION: www.beyondtrust.com/docs
62
©2003-2024 BeyondTrust Corporation. All Rights Reserved. Other trademarks identified on this page are owned by their respective owners. BeyondTrust is not a chartered bank or trust company, or
depository institution. It is not authorized to accept deposits or trust accounts and is not licensed or regulated by any state or federal banking authority.
TC: 7/8/2024
PRIVILEGED REMOTE ACCESS 24.2
ACCESS CONSOLE USER GUIDE

IMPORTANT!
To apply new settings in the configuration, restart the ECM service.
Use Credential Injection to Access Remote Systems
After the credential store has been configured and a connection established, the access console can begin using credentials in the
credential store to log into remote systems.
1. Log into the access console.
2. Jump to a remote system with a Jump Item installed as an elevated service on a Windows machine.
3. Click the Play button to begin screen sharing with the remote system. If the remote system is at the Windows login screen, the
Inject Credentials button is highlighted.
4. Click the Inject Credentials button. A pop-up credential selection dialog appears, listing the credentials available from the ECM.
5. Select the appropriate credentials to use from the ECM. The system
retrieves the credentials from the ECM and injects them into the
Windows login screen.
6. The representative is logged into the remote system.
Choose from Favorite Credentials for Injection
After you have used a set of credentials to log into an endpoint, the system stores your preferred credentials for the endpoint and the
context in which they were used (to log in, to perform a special action, to elevate, or to push) in the B Series Appliance database. The next
time you use a credential to access the same endpoint, the credential injection menu makes a recommendation for which credentials to
use. The credentials are displayed at the top of the credentials list, under Recommended Accounts, followed by any remaining
credentials. If no credential history exists for an endpoint, the B Series Appliance displays all possible credentials, grouped by accounts
that are associated with the Jump Item and not associated with the Jump Item. Jump Item associations for accounts and account groups
are configured in /login.
The credential list recommends no more than five credentials.
Check Out and Check In Vault Credentials
You can easily access the Privileged Remote Access Vault directly from the access console. This allows
you to check out and check in credentials when needed, either during a session or on your local machine.
SALES: www.beyondtrust.com/contact
SUPPORT: www.beyondtrust.com/support
DOCUMENTATION: www.beyondtrust.com/docs
63
©2003-2024 BeyondTrust Corporation. All Rights Reserved. Other trademarks identified on this page are owned by their respective owners. BeyondTrust is not a chartered bank or trust company, or
depository institution. It is not authorized to accept deposits or trust accounts and is not licensed or regulated by any state or federal banking authority.
TC: 7/8/2024
PRIVILEGED REMOTE ACCESS 24.2
ACCESS CONSOLE USER GUIDE

Select the Vault Accounts tab to see a list of available credentials and
associated information.
SALES: www.beyondtrust.com/contact
SUPPORT: www.beyondtrust.com/support
DOCUMENTATION: www.beyondtrust.com/docs
64
©2003-2024 BeyondTrust Corporation. All Rights Reserved. Other trademarks identified on this page are owned by their respective owners. BeyondTrust is not a chartered bank or trust company, or
depository institution. It is not authorized to accept deposits or trust accounts and is not licensed or regulated by any state or federal banking authority.
TC: 7/8/2024
PRIVILEGED REMOTE ACCESS 24.2
ACCESS CONSOLE USER GUIDE

Control the Remote Endpoint with Screen Sharing
From the session window, click the Screen Sharing button to request
control of the remote computer if screen sharing does not automatically
start. Options may be available below the button depending on your
account settings. Click the gear button to view options.
Once you have started a session, the access console immediately starts
screen sharing with the endpoint. Depending on the system, you may have
full control or view only privileges while screen sharing with the system.
Screen Sharing Options
l
Leaving all options unchecked requests full screen sharing, which grants view and control of the remote system's entire desktop
and all applications.
l
If you check View Only, you may see but not control the remote screen.
l
Privacy Screen starts the session with remote view and control of the endpoint disabled. Privacy screen is not available when
supporting Windows 8.
SALES: www.beyondtrust.com/contact
SUPPORT: www.beyondtrust.com/support
DOCUMENTATION: www.beyondtrust.com/docs
65
©2003-2024 BeyondTrust Corporation. All Rights Reserved. Other trademarks identified on this page are owned by their respective owners. BeyondTrust is not a chartered bank or trust company, or
depository institution. It is not authorized to accept deposits or trust accounts and is not licensed or regulated by any state or federal banking authority.
TC: 7/8/2024
PRIVILEGED REMOTE ACCESS 24.2
ACCESS CONSOLE USER GUIDE

Screen Sharing Tools
Stop screen sharing.
While viewing the remote computer, start or stop control of the remote keyboard and mouse.
Representatives using a macOS system can send CTRL+Left-Click through the connected screen sharing session to
the remote system by using CTRL+CMD+Left-Click.
If your permissions allow, you can disable the remote user's screen view and mouse and keyboard input. The end user's
view of the privacy screen clearly explains that the BeyondTrust user has disabled the end user's view. The end user can
regain control at any time by pressing Ctrl+Alt+Del.
Alternatively, disable the end user's mouse and keyboard input while still allowing them to view the screen. When input is
restricted, an orange border appears around the end user's monitors, and a message indicates that the BeyondTrust
user has mouse and keyboard control. The end user can regain control at any time by pressing Ctrl+Alt+Del.
Restricted endpoint interaction is available only when accessing macOS or Windows computers. Restricted customer
interaction is available only when supporting Windows computers. In Windows Vista and above, the endpoint client must
be elevated. On Windows 8, this feature is limited to disabling the mouse and keyboard.
Annotation tools allow easier collaboration during shared sessions. A number of tools are available, including shapes
and free drawing.
Reboot the remote system in either normal or safe mode with networking, or shut down the remote system.
Send a Ctrl-Alt-Del command to the remote computer.
Perform a special action on the remote system. Based on remote operating system and configuration, available tasks will
vary. Canned scripts available to the user appear in a fly-out menu. With the Run As special action on a Windows®
system, you may select credentials from an Endpoint Credential Manager. Use of the Endpoint Credential Manager
requires a separate services agreement with BeyondTrust. Once a services agreement is in place, you may download
the required middleware from the BeyondTrust Support Portal.
Access a dropdown of available smart card readers on your local system. Use the virtual smart card to perform
administrative actions, running programs in another user context or even logging in as another user. The appropriate
virtual smart card drivers must be installed on both your local system and the remote system, with their services running.
To restart iOS device screen sharing. For details, see Supporting Apple iOS Devices at
www.beyondtrust.com/docs/privileged-remote-access/getting-started/access-console/apple-ios/index.htm. When
supporting an Apple OS X 10.10+ system attached to an Apple iOS 8.0.1+ mobile device, click this button to begin or end
view-only screen sharing on the attached iOS device. Note that this button is not visible unless you are in a standard
screen sharing access session with an Apple OS X Yosemite system, and that the button is not enabled unless an Apple
iOS 8.0.1+ device is connected to the OS X Yosemite system being supported.
SALES: www.beyondtrust.com/contact
SUPPORT: www.beyondtrust.com/support
DOCUMENTATION: www.beyondtrust.com/docs
66
©2003-2024 BeyondTrust Corporation. All Rights Reserved. Other trademarks identified on this page are owned by their respective owners. BeyondTrust is not a chartered bank or trust company, or
depository institution. It is not authorized to accept deposits or trust accounts and is not licensed or regulated by any state or federal banking authority.
TC: 7/8/2024
PRIVILEGED REMOTE ACCESS 24.2
ACCESS CONSOLE USER GUIDE

Log into the endpoint using credentials provided by an external credential store. Use of the Endpoint Credential Manager
requires a separate services agreement with BeyondTrust. Once a services agreement is in place, you may download
the required middleware from the BeyondTrust Support Portal. Prior to 15.2, this feature is available only in sessions
started from an elevated Jump Client on Windows®. Starting with 15.2, you also may use an Endpoint Credential
Manager in Remote Jump sessions, Microsoft® Remote Desktop Protocol sessions, VNC sessions, and Shell Jump
sessions.
While screen sharing, capture a screenshot of the remote screen or screens at their full resolution, saved in png format.
Save the image file to your local system or to your clipboard. The capture action is recorded in the chat log with a link to a
locally saved image. The link remains active even after the customer has left the session, but it does not persist in the
BeyondTrust session report. You can adjust the directory where screenshots are saved by going to the File > Settings >
Tools menu in the access console. This feature works on Mac, Windows, and Linux.
Manually send the contents of your clipboard to the remote computer. This tool icon is not visible if you are permitted to
automatically send the contents of your clipboard or if you are disallowed to send clipboard information to the remote
system.
Manually receive the contents of your clipboard from the remote computer. This tool icon is not visible if you are permitted
to automatically receive the contents of your clipboard or if you are disallowed to receive clipboard information from the
remote system.
Select an alternate remote monitor to display. The primary monitor is designated by a P.
View the remote screen at actual or scaled size.
Select the color optimization mode to view the remote screen. If you are going to be primarily sharing video, select Video
Optimized; otherwise select between Black and White (uses less bandwidth), Few Colors, More Colors, or Full
Color (uses more bandwidth). Both Video Optimized and Full Color modes allow you to view the actual desktop
wallpaper.
View the remote desktop in full screen mode or return to the interface view.
l
When in full screen mode, special keys are passed through to the remote system. This includes but is not limited
to modifier keys, function keys, and the Windows Start key.
l
When not in full screen mode, you can pass special keys to the remote system by placing the mouse pointer over
the screen sharing window.
l
This does not apply to the Ctrl-Alt-Del command, which is sent with the toolbar button noted above.
SALES: www.beyondtrust.com/contact
SUPPORT: www.beyondtrust.com/support
DOCUMENTATION: www.beyondtrust.com/docs
67
©2003-2024 BeyondTrust Corporation. All Rights Reserved. Other trademarks identified on this page are owned by their respective owners. BeyondTrust is not a chartered bank or trust company, or
depository institution. It is not authorized to accept deposits or trust accounts and is not licensed or regulated by any state or federal banking authority.
TC: 7/8/2024
PRIVILEGED REMOTE ACCESS 24.2
ACCESS CONSOLE USER GUIDE

Use Annotations to Draw on the Remote Screen of the
Endpoint
Use annotation tools to collaborate with other users during shared sessions. Annotations provide an interactive way of communicating
visually, reducing potentially frustrating situations and speeding processes.
While in annotation mode you can still use your mouse to move or control items on the remote desktop. Holding down the Shift key
temporarily suspends annotation mode.
Enabling Annotations
To start using Annotations, click on its icon.
Clicking on any of the dropdown menu items turns the Annotations mode
on. The following tools and functions are available:
l
Virtual Pointer
l
Pen
l
Rectangle drawing tool
l
Ellipse drawing tool
l
Eraser
l
Undo
l
Clear
l
Red, Black, or White colors
l
Thin, Medium, or Thick line
SALES: www.beyondtrust.com/contact
SUPPORT: www.beyondtrust.com/support
DOCUMENTATION: www.beyondtrust.com/docs
68
©2003-2024 BeyondTrust Corporation. All Rights Reserved. Other trademarks identified on this page are owned by their respective owners. BeyondTrust is not a chartered bank or trust company, or
depository institution. It is not authorized to accept deposits or trust accounts and is not licensed or regulated by any state or federal banking authority.
TC: 7/8/2024
PRIVILEGED REMOTE ACCESS 24.2
ACCESS CONSOLE USER GUIDE

You can select your tool from the Annotations dropdown menu or by right-
clicking inside the remote screen area. If you click on the areas outside of
the remote screen, the dropdown menu does not display.
Annotations appear on the remote screen to draw attention to specific
points of interest or highlight areas as needed.
To turn off Annotations, select No Tool from the dropdown menu, or click
Esc.
All annotations are deleted from the customer's screen when the session
terminates.
SALES: www.beyondtrust.com/contact
SUPPORT: www.beyondtrust.com/support
DOCUMENTATION: www.beyondtrust.com/docs
69
©2003-2024 BeyondTrust Corporation. All Rights Reserved. Other trademarks identified on this page are owned by their respective owners. BeyondTrust is not a chartered bank or trust company, or
depository institution. It is not authorized to accept deposits or trust accounts and is not licensed or regulated by any state or federal banking authority.
TC: 7/8/2024
PRIVILEGED REMOTE ACCESS 24.2
ACCESS CONSOLE USER GUIDE

View Multiple Monitors on the Remote Endpoint
BeyondTrust supports remote desktops configured to use multiple monitors. When you first connect to a remote desktop, you will see the
primary monitor in the Screen Sharing tab. If additional monitors are configured, a Display icon will appear active in the Screen Sharing
toolbar, and a Displays tab will appear in the bottom right corner of the console.
SALES: www.beyondtrust.com/contact
SUPPORT: www.beyondtrust.com/support
DOCUMENTATION: www.beyondtrust.com/docs
70
©2003-2024 BeyondTrust Corporation. All Rights Reserved. Other trademarks identified on this page are owned by their respective owners. BeyondTrust is not a chartered bank or trust company, or
depository institution. It is not authorized to accept deposits or trust accounts and is not licensed or regulated by any state or federal banking authority.
TC: 7/8/2024
PRIVILEGED REMOTE ACCESS 24.2
ACCESS CONSOLE USER GUIDE

Using the Display Icon
Select the Display icon to see all the displays attached to the remote computer. In
this view, the remote monitors are represented by rectangles rather than thumbnail
images. The position of each rectangle corresponds to the position configured for
each monitor on the remote desktop.
The primary monitor appears in the Screen Sharing window by default. To change
your view, click on the rectangle that represents the monitor you wish to see. You
can also select View All to show all the displays attached to the remote computer in
the Screen Sharing window.
If the remote computer has no additional monitors attached, the Display icon will be inactive.
RDP Session Multi-Monitor Support
An option allows you to open a PRA connection expanded across all the
monitors on the client computer regardless of the client monitor
configuration. With this feature, you can fully utilize all the monitors
connected to the client computer, therefore being able to adjust screen
sizing and scaling during an RDP session across multiple monitors.
Note: If you are using full screen view while using this feature, the
remote system is displayed across all of your monitors.
Using the Displays Tab
Select the Displays tab to see thumbnail images of all the displays
attached to the remote computer. The position of each thumbnail image
corresponds to the position configured for each display on the remote
desktop.
The monitor currently displayed in the Screen Sharing tab will be
highlighted.
SALES: www.beyondtrust.com/contact
SUPPORT: www.beyondtrust.com/support
DOCUMENTATION: www.beyondtrust.com/docs
71
©2003-2024 BeyondTrust Corporation. All Rights Reserved. Other trademarks identified on this page are owned by their respective owners. BeyondTrust is not a chartered bank or trust company, or
depository institution. It is not authorized to accept deposits or trust accounts and is not licensed or regulated by any state or federal banking authority.
TC: 7/8/2024
PRIVILEGED REMOTE ACCESS 24.2
ACCESS CONSOLE USER GUIDE

The primary monitor appears in the Screen Sharing window by default. To
change your view, click on the thumbnail of the monitor you wish to see.
You can also select View All to show all the displays attached to the remote
computer in the Screen Sharing window.
If the session is in grayscale mode, the remote monitors are represented by
rectangles rather than thumbnail images. The position of each rectangle
corresponds to the position configured for each monitor on the remote
desktop.
Note: The refresh cycle of the thumbnail image is about three
seconds in ideal conditions but can lag depending on connection
speed and data transfer.
SALES: www.beyondtrust.com/contact
SUPPORT: www.beyondtrust.com/support
DOCUMENTATION: www.beyondtrust.com/docs
72
©2003-2024 BeyondTrust Corporation. All Rights Reserved. Other trademarks identified on this page are owned by their respective owners. BeyondTrust is not a chartered bank or trust company, or
depository institution. It is not authorized to accept deposits or trust accounts and is not licensed or regulated by any state or federal banking authority.
TC: 7/8/2024
PRIVILEGED REMOTE ACCESS 24.2
ACCESS CONSOLE USER GUIDE
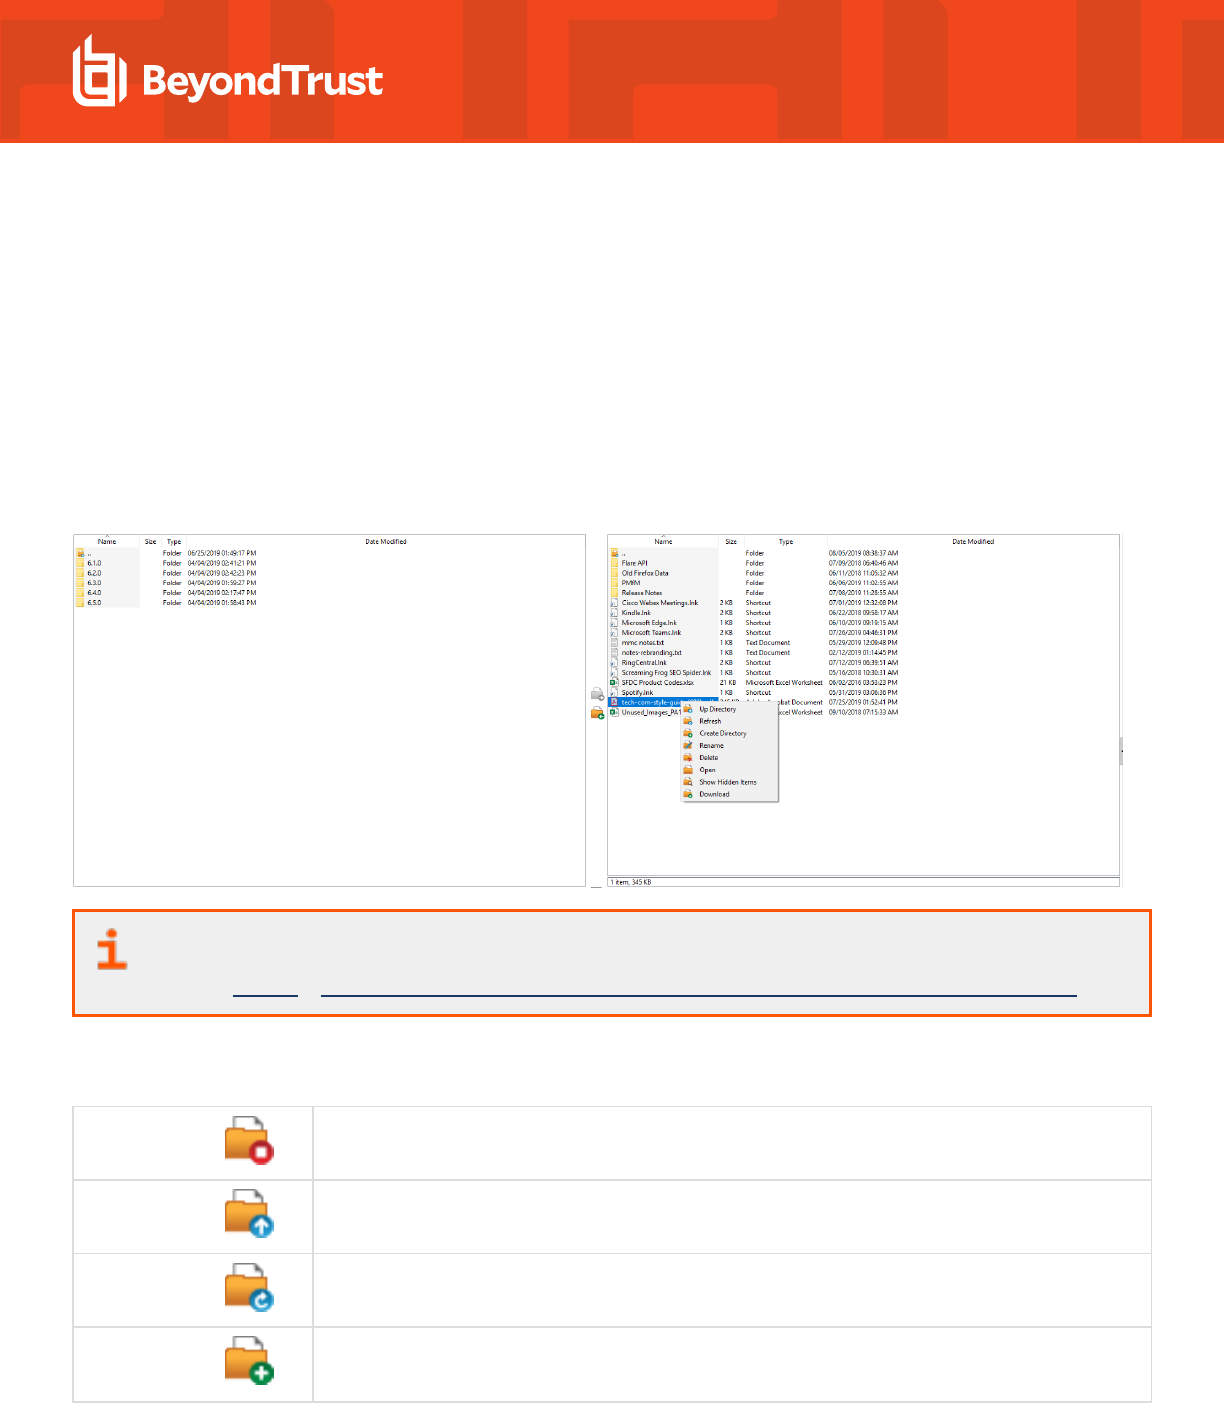
File Transfer to and from the Remote Endpoint
During a session, privileged users can transfer, delete or rename files and even entire directories both to and from the remote computer,
or from the remote device and to or from the device SD card. You do not have to have full control of the remote computer in order to
transfer files.
Depending upon the permissions your administrator has set for your account, you may be allowed only to upload files to the remote
system or to download files to your local computer. File system access may also be restricted to certain paths on the remote or local
system, thereby enforcing that uploads or downloads occur only in certain directories.
Transfer files by using the upload and download buttons or by dragging and dropping files. Right clicking on a file brings up a context
sensitive menu from where you can, among other things, create a new directory; rename, open, or delete the file; or download it directly to
your machine.
If an ICAP server is enabled, the file shows as "Scanning" until the transfer ends. During or after a file transfer, the results of
the scan appear in the File Transfer Log. If malware is detected in the file, it is not transferred. To enable an ICAP server,
please see Security at https://www.beyondtrust.com/docs/privileged-remote-access/getting-started/admin/security.htm.
File Transfer Tools
Stop access to the remote device's file system when it is no longer needed.
Go up a directory in the selected file system.
Refresh your view of the selected file system.
Create a new directory.
SALES: www.beyondtrust.com/contact
SUPPORT: www.beyondtrust.com/support
DOCUMENTATION: www.beyondtrust.com/docs
73
©2003-2024 BeyondTrust Corporation. All Rights Reserved. Other trademarks identified on this page are owned by their respective owners. BeyondTrust is not a chartered bank or trust company, or
depository institution. It is not authorized to accept deposits or trust accounts and is not licensed or regulated by any state or federal banking authority.
TC: 7/8/2024
PRIVILEGED REMOTE ACCESS 24.2
ACCESS CONSOLE USER GUIDE

Rename a directory or file.
Delete a directory or file. Note that deleting a file or folder permanently deletes it. It is not sent to the
recycle bin.
Show hidden files.
Select one or more files or directories and then click the appropriate button to upload the files to the
remote system or download to your local system. You can also drag and drop files to transfer.
If a file of the same name already exists in the location to which you are attempting to transfer a file,
choose whether to respond by automatically overwriting the existing file, canceling the transfer, or
prompting for each file of identical name. Note that if the content of the files is identical, the upload will
be skipped and will result in a warning message.
Preserving file information will keep the file's original timestamp. If this option is disabled, the file's
timestamp will reflect the date and time when it was transferred.
If automatic file transfer is enabled, transfers will begin as soon as the upload or download button is
clicked or a file is dragged from one file system to the other.
If automatic file transfer is not enabled, select from the transfer manager the files you wish to transfer
and then click the Start button to begin the transfer.
From the transfer manager, select a file and then click the Details button to view information such as
the date and time of the transfer, the origin and destination of the files, and the number of bytes
transferred.
Select one or more files from the transfer manager and then click Cancel to stop the transfer from
completing.
Clear all information from the transfer manager.
SALES: www.beyondtrust.com/contact
SUPPORT: www.beyondtrust.com/support
DOCUMENTATION: www.beyondtrust.com/docs
74
©2003-2024 BeyondTrust Corporation. All Rights Reserved. Other trademarks identified on this page are owned by their respective owners. BeyondTrust is not a chartered bank or trust company, or
depository institution. It is not authorized to accept deposits or trust accounts and is not licensed or regulated by any state or federal banking authority.
TC: 7/8/2024
PRIVILEGED REMOTE ACCESS 24.2
ACCESS CONSOLE USER GUIDE

Open the Command Shell on the Remote Endpoint Using the
Access Console
Remote command shell enables privileged users to open a virtual command line interface on remote computers. Users can then type
locally but have the commands executed on the remote system. You can work from multiple shells. Note that scripts available to the user
may also be executed on the remote computer from the screen sharing interface.
Your administrator can also enable remote shell recording so that a video of each shell instance can be viewed from the session report. If
shell recording is enabled, a transcript of the command shell is also available.
Command Shell Tools
Stop command prompt access when it is no longer needed.
Open a new shell to run multiple instances of command prompt, or close individual shells without
relinquishing command prompt access. Shells are tabulated at the bottom of the screen.
If permitted, access a dropdown of previously written scripts. When you select a script to run, you will see a
prompt with a brief description of the script. When you click Yes, the script will run in the active command
shell.
SALES: www.beyondtrust.com/contact
SUPPORT: www.beyondtrust.com/support
DOCUMENTATION: www.beyondtrust.com/docs
75
©2003-2024 BeyondTrust Corporation. All Rights Reserved. Other trademarks identified on this page are owned by their respective owners. BeyondTrust is not a chartered bank or trust company, or
depository institution. It is not authorized to accept deposits or trust accounts and is not licensed or regulated by any state or federal banking authority.
TC: 7/8/2024
PRIVILEGED REMOTE ACCESS 24.2
ACCESS CONSOLE USER GUIDE

Access tools to use within the command prompt. Paste the contents of your clipboard either by selecting it
from the menu or by right-clicking in the terminal window. Copy a log of the current shell to your clipboard or
save it to your computer. To copy a portion of the text, select it. Clear any lines not currently in sight, or clear
all content from the terminal. Tools can also be accessed by pressing Ctrl+right-click within the terminal
window.
Select the size at which to view the display. Choose from 80x50, 80x25, or any size.
SALES: www.beyondtrust.com/contact
SUPPORT: www.beyondtrust.com/support
DOCUMENTATION: www.beyondtrust.com/docs
76
©2003-2024 BeyondTrust Corporation. All Rights Reserved. Other trademarks identified on this page are owned by their respective owners. BeyondTrust is not a chartered bank or trust company, or
depository institution. It is not authorized to accept deposits or trust accounts and is not licensed or regulated by any state or federal banking authority.
TC: 7/8/2024
PRIVILEGED REMOTE ACCESS 24.2
ACCESS CONSOLE USER GUIDE

View System Information on the Remote Endpoint
Privileged users may view a complete snapshot of the remote device's or computer's system information to reduce the time needed to
diagnose and resolve the issue. The system information available varies depending on the remote operating system and configuration.
Users with appropriate permissions may also kill processes; may start, stop, pause, resume, and restart services; and may uninstall
programs.
Because the large amount of data that can be pulled may result in slow
transmission times, you can choose to start your view with only the
Overview tab or to pull data for all tabs. If you choose to start with
Overview Only, you can gather data from the other tabs by going to the
section you need to view and clicking the Refresh button at the top of that
section.
SALES: www.beyondtrust.com/contact
SUPPORT: www.beyondtrust.com/support
DOCUMENTATION: www.beyondtrust.com/docs
77
©2003-2024 BeyondTrust Corporation. All Rights Reserved. Other trademarks identified on this page are owned by their respective owners. BeyondTrust is not a chartered bank or trust company, or
depository institution. It is not authorized to accept deposits or trust accounts and is not licensed or regulated by any state or federal banking authority.
TC: 7/8/2024
PRIVILEGED REMOTE ACCESS 24.2
ACCESS CONSOLE USER GUIDE
System Information Tools
Stop pulling information about the remote system. Stopping will leave the last updated information available to view but
will not pull current data.
Refresh your view of system information or pull information for tabs to which you did not initially request access. Refresh
can take place for individual sections or for all sections of the selected tab.
Auto-refresh a category of system information.
Copy the information to your clipboard. Copy individual sections or all sections of the selected tab.
Save a text file of the system information to your local computer. You can save individual sections or all sections of the
selected tab.
End a running process on the remote system.
Uninstall an app on the remote system.
Start a stopped service on the remote system.
Resume a paused service on the remote system.
Pause a running service on the remote system.
Stop a running service on the remote system.
Restart a running service on the remote system.
SALES: www.beyondtrust.com/contact
SUPPORT: www.beyondtrust.com/support
DOCUMENTATION: www.beyondtrust.com/docs
78
©2003-2024 BeyondTrust Corporation. All Rights Reserved. Other trademarks identified on this page are owned by their respective owners. BeyondTrust is not a chartered bank or trust company, or
depository institution. It is not authorized to accept deposits or trust accounts and is not licensed or regulated by any state or federal banking authority.
TC: 7/8/2024
PRIVILEGED REMOTE ACCESS 24.2
ACCESS CONSOLE USER GUIDE

Access the Registry Editor on the Remote Endpoint
Access a remote Windows registry without requiring screen sharing. While in the virtual registry editor, you can add new keys, delete keys,
edit keys, search, and import or export keys.
Registry Editor Tools
Refresh the registry.
Import registry entries from a file.
Export registry entries to a file.
Create a new registry key.
SALES: www.beyondtrust.com/contact
SUPPORT: www.beyondtrust.com/support
DOCUMENTATION: www.beyondtrust.com/docs
79
©2003-2024 BeyondTrust Corporation. All Rights Reserved. Other trademarks identified on this page are owned by their respective owners. BeyondTrust is not a chartered bank or trust company, or
depository institution. It is not authorized to accept deposits or trust accounts and is not licensed or regulated by any state or federal banking authority.
TC: 7/8/2024
PRIVILEGED REMOTE ACCESS 24.2
ACCESS CONSOLE USER GUIDE

Create a new registry value.
Modify the selected registry value.
Rename the selected registry entry.
Delete the selected registry entry.
Search the registry.
Find next.
SALES: www.beyondtrust.com/contact
SUPPORT: www.beyondtrust.com/support
DOCUMENTATION: www.beyondtrust.com/docs
80
©2003-2024 BeyondTrust Corporation. All Rights Reserved. Other trademarks identified on this page are owned by their respective owners. BeyondTrust is not a chartered bank or trust company, or
depository institution. It is not authorized to accept deposits or trust accounts and is not licensed or regulated by any state or federal banking authority.
TC: 7/8/2024
PRIVILEGED REMOTE ACCESS 24.2
ACCESS CONSOLE USER GUIDE

Session Management and Team Collaboration
View Active Access Sessions
Session queues provide information about and access to currently running sessions. The Personal queue contains sessions you are
currently running, as well as invitations for you to join a shared session.
You also have queues for any teams of which you are a member. If another user requests any member of a team to join a session, that
invitation appears in the team queue. When no specific team is selected, team managers and leads can also see which team members
have sessions running.
Click the star to the left of a team name to mark that queue as a favorite. If a team chat message is sent, an orange chat bubble appears in
place of the star.
Sort your queues by several criteria, including the length of time the session has been running, the computer name, external key, etc. You
can also search for an active session. Click on an item in queue to view its details. Click it again to close the details pane. The access
console remembers the column order and the sort order of the session queue the next time the access console is launched.
You can run multiple sessions simultaneously. At the top of the access console, a tab exists for each session you have open.
SALES: www.beyondtrust.com/contact
SUPPORT: www.beyondtrust.com/support
DOCUMENTATION: www.beyondtrust.com/docs
81
©2003-2024 BeyondTrust Corporation. All Rights Reserved. Other trademarks identified on this page are owned by their respective owners. BeyondTrust is not a chartered bank or trust company, or
depository institution. It is not authorized to accept deposits or trust accounts and is not licensed or regulated by any state or federal banking authority.
TC: 7/8/2024
PRIVILEGED REMOTE ACCESS 24.2
ACCESS CONSOLE USER GUIDE

Use the Dashboard to Administer Team Members
The dashboard feature enables privileged users to view and monitor
ongoing sessions, enabling administrative oversight to help manage staff.
Based on roles assigned from the Teams page of the administrative
interface, team leads can monitor team members of a given team, and team
managers can monitor both team leads and team members of that team.
If a user is a team manager or team lead of one or more teams, selecting
one of those queues causes the dashboard pane to appear beneath the
queue selection pane on the Home tab of the console. In this pane appear
any logged-in team members of a lower role for the selected team.
Select a user from the dashboard pane to view any sessions they may be running. A team manager or team lead can take over a session
from another user of that team by selecting the appropriate session from the queue and clicking the Take Over button. This transfers
ownership of that session to the team manager or team lead, with the original user remaining in the session as a participant.
It is also possible for a team manager to join a session in progress by clicking the Join button. The behavior is similar to joining a session
via session invitation, except that no invitation is required.
Note: The team lead can join or take over a team member's session only if the team lead has start session access to the Jump
Item that was used to create the session, or the dashboard setting to allow join or take over without start session access is
checked.
If configured in the /login interface, a team manager or team lead can
monitor team members of a lower role even if there are no ongoing
sessions, as long as those users are logged into the console.
An icon is displayed in the corner of the user's desktop to indicate that monitoring is taking place.
When the user moves the cursor near this icon, the icon moves to another corner to prevent
obscuring the screen. Select the user whose screen you wish to view and then click the Monitor
button. This opens a new tab in your console, displaying the user's console.
To gain control of the user's computer, click the Enable Mouse/Keyboard Control button.
Within a team, a user can administer only others with roles lower than their own. Note, however, that
roles apply strictly on a team-by-team basis, so that a user may be able to administer another user in
one team but not be able to administer that same user in another team.
SALES: www.beyondtrust.com/contact
SUPPORT: www.beyondtrust.com/support
DOCUMENTATION: www.beyondtrust.com/docs
82
©2003-2024 BeyondTrust Corporation. All Rights Reserved. Other trademarks identified on this page are owned by their respective owners. BeyondTrust is not a chartered bank or trust company, or
depository institution. It is not authorized to accept deposits or trust accounts and is not licensed or regulated by any state or federal banking authority.
TC: 7/8/2024
PRIVILEGED REMOTE ACCESS 24.2
ACCESS CONSOLE USER GUIDE

Chat with Other Users
From the Home tab of the console, you can chat with other logged-in users. If
you are a member of one or more teams, select whichever team you would like
to chat with from the list of queues at the left of the Home tab. You can chat with
all members of that team or chat with just that one.
Click the arrow icon at the top left of the sidebar to collapse the sliding sidebar.
If the sidebar is collapsed, hover over the arrow by the hidden window to reveal
it. Click the pin icon that replaced the arrow icon at the top left of the sidebar to
re-pin the sliding sidebar.
When typing, misspelled words will be underlined in red. Right-click to view
spelling suggestions or to ignore that spelling for the current console login.
In the settings, you can choose if the team chat should include status
messages, such as users logging in and out, or only chats sent between team
members.
SALES: www.beyondtrust.com/contact
SUPPORT: www.beyondtrust.com/support
DOCUMENTATION: www.beyondtrust.com/docs
83
©2003-2024 BeyondTrust Corporation. All Rights Reserved. Other trademarks identified on this page are owned by their respective owners. BeyondTrust is not a chartered bank or trust company, or
depository institution. It is not authorized to accept deposits or trust accounts and is not licensed or regulated by any state or federal banking authority.
TC: 7/8/2024
PRIVILEGED REMOTE ACCESS 24.2
ACCESS CONSOLE USER GUIDE

Share your Screen with Another User
If your administrator has enabled this permission, you can share your
screen with another user without the receiving user having to join a session.
This option is available even if you are not in a session.
From a team queue, select a user, and click Show Screen. If working with
more than one monitor, you can select which one to share or which apps
will be visible to the other user. Once you have made your selection, the
receiving user will get a notification with the option to accept or decline the
invitation.
A Show Screen window appears, showing the name of the user that is now viewing your
screen. This window contains a chat box and the options to stop screen sharing, grant the
receiving user control, and select which monitor and which apps to share. You can stop
sharing your screen but keep this window open, or you can close the sharing session
completely. If you leave the Show Screen window open, you can restart sharing your screen.
Share My Screen Tools
Sharing User
Temporarily stop sharing your screen with another user. This pauses screen sharing but does not close the Show
Screen window, allowing you to restart screen sharing.
(Re)start screen sharing.
SALES: www.beyondtrust.com/contact
SUPPORT: www.beyondtrust.com/support
DOCUMENTATION: www.beyondtrust.com/docs
84
©2003-2024 BeyondTrust Corporation. All Rights Reserved. Other trademarks identified on this page are owned by their respective owners. BeyondTrust is not a chartered bank or trust company, or
depository institution. It is not authorized to accept deposits or trust accounts and is not licensed or regulated by any state or federal banking authority.
TC: 7/8/2024
PRIVILEGED REMOTE ACCESS 24.2
ACCESS CONSOLE USER GUIDE

Grant mouse and keyboard control to the user viewing your screen.
Select the monitor to share with another user. The primary monitor will be designated by a P.
Select which apps to share with the user viewing your screen.
End the screen sharing session. This closes the user screen sharing interface.
Viewing User
The user sharing their screen with you has granted you keyboard and mouse control.
Turn on a virtual pointer, visible on the sharing user's screen.
Capture a screenshot of the sharing user's screen at its full resolution.
View the remote screen at actual or scaled size.
View the remote desktop in full screen mode or return to the interface view.
End screen sharing session. This closes the user screen sharing interface.
SALES: www.beyondtrust.com/contact
SUPPORT: www.beyondtrust.com/support
DOCUMENTATION: www.beyondtrust.com/docs
85
©2003-2024 BeyondTrust Corporation. All Rights Reserved. Other trademarks identified on this page are owned by their respective owners. BeyondTrust is not a chartered bank or trust company, or
depository institution. It is not authorized to accept deposits or trust accounts and is not licensed or regulated by any state or federal banking authority.
TC: 7/8/2024
PRIVILEGED REMOTE ACCESS 24.2
ACCESS CONSOLE USER GUIDE

Share a Session with Other Users
Invite another user to join a session by clicking the Share button in the
session tools. By default, only teams to which you belong will be listed.
You can select a user listed in the teams displayed to invite them to join the
session.
If you select Any User, the invitation is sent to the team queue so that any
single user in the selected team can join the session. You can send multiple
invitations if you want more users from the team to join your session.
Users are listed here only if they are logged into the console or have
extended availability enabled.
If you are permitted to share sessions with users who are not members of
your teams, additional teams are displayed, provided that they contain at
least one member logged in or with extended availability enabled.
When you invite a user with extended availability enabled, they receive an email notification.
If you have sent an invitation and it is still active, you may revoke the invitation by selecting it from the Cancel Invitation menu. Only the
session owner can send invitations. Invitations do not time out as long as you remain the session owner. Multiple active invitations cannot
exist for the same user to join the same session.
An invitation is made inactive when one of the following events occurs:
l
The inviting user cancels the invitation
l
The session ends
l
The invited user accepts the invitation
l
The invited user declines the invitation
When an additional user joins a shared session, they are able to see the entire chat history.
SALES: www.beyondtrust.com/contact
SUPPORT: www.beyondtrust.com/support
DOCUMENTATION: www.beyondtrust.com/docs
86
©2003-2024 BeyondTrust Corporation. All Rights Reserved. Other trademarks identified on this page are owned by their respective owners. BeyondTrust is not a chartered bank or trust company, or
depository institution. It is not authorized to accept deposits or trust accounts and is not licensed or regulated by any state or federal banking authority.
TC: 7/8/2024
PRIVILEGED REMOTE ACCESS 24.2
ACCESS CONSOLE USER GUIDE

Chat with Other Users During a Shared Session
The session chat window serves as a running log of everything that
happens throughout the session, including files transferred and tools used.
If one or more users are sharing the session, you can chat with the other
users. When an additional user joins a shared session, they are able to see
the entire chat history.
Click the arrow icon at the top left of the sidebar to collapse the sliding
sidebar. If the sidebar is collapsed, hover over the arrow by the hidden
window to reveal it. Click the pin icon that replaced the arrow icon at the top
left of the sidebar to re-pin the sliding sidebar.
When typing, misspelled words will be underlined in red. Right-click to view
spelling suggestions or to ignore that spelling for the current console login.
Messages appear as plain text in the chat input area. You can add or edit
BBCode tags within a message to add text formatting. Formatting will be
applied once the message has been sent.
Note: It is possible to reposition the different widget sections displayed on the sidebar, like the chat window, the session info
pane, etc. When hovering over the title bar of a section, the cursor turns into a closed hand, allowing you to drag and reposition
that section on the sidebar.
SALES: www.beyondtrust.com/contact
SUPPORT: www.beyondtrust.com/support
DOCUMENTATION: www.beyondtrust.com/docs
87
©2003-2024 BeyondTrust Corporation. All Rights Reserved. Other trademarks identified on this page are owned by their respective owners. BeyondTrust is not a chartered bank or trust company, or
depository institution. It is not authorized to accept deposits or trust accounts and is not licensed or regulated by any state or federal banking authority.
TC: 7/8/2024
PRIVILEGED REMOTE ACCESS 24.2
ACCESS CONSOLE USER GUIDE

Use Extended Availability to Remain Accessible when Not
Logged In
With extended availability, privileged users can receive email invitations to share sessions,
even if they are not logged into the console. When sending an invitation, you may invite fellow
team members. If permitted, you may also invite users from teams to which you do not belong.
If your account is configured for extended availability, you can enable or disable the
functionality from the File menu of the access console.
If you have extended availability enabled, you will see a notification when you log into the
console. From this dialog, you can easily disable extended availability to avoid distraction
while in a session, for example.
Email Notification & Invitation
Each time you enable extended availability mode, the B Series Appliance
will notify you via the email address configured for your user account.
Note: BeyondTrust does not pull email addresses from external LDAP directory stores. The email address must be configured
in BeyondTrust in one of two ways:
1. An administrator can add an email address to a user account by going to /login > Users & Security > Users and
editing the account.
2. The user can set their own email address by going to the /login > My Account page.
The notification includes the URL of the site as well as a link to quickly disable extended availability mode.
The B Series Appliance also sends an email notification when you are
invited to a session. This allows you to join a session even if you are not
currently logged into the console. The email notification includes links to
accept or decline the invitation, as well as to decline the invitation while
disabling extended availability mode.
SALES: www.beyondtrust.com/contact
SUPPORT: www.beyondtrust.com/support
DOCUMENTATION: www.beyondtrust.com/docs
88
©2003-2024 BeyondTrust Corporation. All Rights Reserved. Other trademarks identified on this page are owned by their respective owners. BeyondTrust is not a chartered bank or trust company, or
depository institution. It is not authorized to accept deposits or trust accounts and is not licensed or regulated by any state or federal banking authority.
TC: 7/8/2024
PRIVILEGED REMOTE ACCESS 24.2
ACCESS CONSOLE USER GUIDE

Invite External Users to Join an Access Session
Within a session, a user with the appropriate permission can request external users
to participate in a session, for the duration of that session only.
The inviting user should click on the Share Session button and then select Invite
External User.
A dialog opens asking the user to select a session policy. These policies
are created in the administrative interface and determine the level of
permission the external user will have. When you select a policy, the full
description displays below.
Enter the name or names for the invited users, and the email addresses for
invitations by email. Names appear in the chat window and reports. Click
Add User to add additional users.
Next, enter comments about the external invitation.
Click Send Local Email for invitations by email, if available.
Otherwise, click Create Invitation, and a new dialog containing the direct
URL and email option, if available, appears.
Depending on the options selected by your administrator, you may be able
to send the invitation from your local email or from a server side email. You
also can copy and paste the direct URL to the external user.
The external user must download and run the access console installer,
which is an abbreviated process from the full access console installation.
The external users have access only to the session tab and have a limited set of privileges. An external user can never be the session
owner. When the inviting user leaves the session, the external users are logged out.
Note: Each external user invited allocates a BeyondTrust license.
SALES: www.beyondtrust.com/contact
SUPPORT: www.beyondtrust.com/support
DOCUMENTATION: www.beyondtrust.com/docs
89
©2003-2024 BeyondTrust Corporation. All Rights Reserved. Other trademarks identified on this page are owned by their respective owners. BeyondTrust is not a chartered bank or trust company, or
depository institution. It is not authorized to accept deposits or trust accounts and is not licensed or regulated by any state or federal banking authority.
TC: 7/8/2024
PRIVILEGED REMOTE ACCESS 24.2
ACCESS CONSOLE USER GUIDE

Ports and Firewalls
BeyondTrust solutions are designed to work transparently through firewalls, enabling a connection with any computer with internet
connectivity, anywhere in the world. However, with certain highly secured networks, some configuration may be necessary.
l
Ports 80 and 443 must be open for outbound TCP traffic on the remote system's and local user's firewalls. More ports may be
available depending on your build. The diagram shows a typical network setup; more details can be found in the BeyondTrust
Appliance B Series Hardware Installation Guide at https://www.beyondtrust.com/docs/privileged-remote-access/getting-
started/deployment/hardware-sra/index.htm.
l
Internet security software such as software firewalls must not block BeyondTrust executable files from downloading. Some
examples of software firewalls include McAfee Security, Norton Security, and Zone Alarm. If you do have a software firewall, you
may experience some connection issues. To avoid such issues, configure your firewall settings to allow the following executables,
wherein {uid} is a unique identifier consisting of letter and numbers:
o
bomgar-scc-{uid}.exe
o
bomgar-scc.exe
o
bomgar-pac-{uid}.exe
o
bomgar-pac.exe
o
bomgar-pec-{uid}.exe
o
bomgar-pec.exe
For assistance with your firewall configuration, please contact the manufacturer of your firewall software.
l
Example firewall rules based on B Series Appliance location can be found at www.beyondtrust.com/docs/privileged-remote-
access/getting-started/deployment/dmz/firewall-rules.htm.
If you should still have difficulty making a connection, contact BeyondTrust Technical Support at www.beyondtrust.com/support.
SALES: www.beyondtrust.com/contact
SUPPORT: www.beyondtrust.com/support
DOCUMENTATION: www.beyondtrust.com/docs
90
©2003-2024 BeyondTrust Corporation. All Rights Reserved. Other trademarks identified on this page are owned by their respective owners. BeyondTrust is not a chartered bank or trust company, or
depository institution. It is not authorized to accept deposits or trust accounts and is not licensed or regulated by any state or federal banking authority.
TC: 7/8/2024
PRIVILEGED REMOTE ACCESS 24.2
ACCESS CONSOLE USER GUIDE
