
PAX A80 Configuration and installation
Copyright©2023PayFactoInc. Page 1of17
PAX A80
Installation and Configuration Guide
December, 2023

PAX A80 Configuration and installation
Copyright©2023PayFactoInc. Page 2of17
PAX A80............................................................................................................. 1
Installation and Configuration Guide ...................................................................... 1
.............................................................................................................................. 1
Introduction ...................................................................................................... 3
Terminal Overview ............................................................................................ 4
A80 Terminal Overview .......................................................................................... 4
Terminal Hardware................................................................................................. 4
A80 Communication Ports ...................................................................................... 5
Terminal Setup and Configuration...................................................................... 6
Installing the Printer Paper ..................................................................................... 6
Connect the Terminal Cables .................................................................................. 7
Configuring the Terminal Display Language............................................................. 7
Configuring the Terminal Network Connections...................................................... 8
Configuring the Terminal Wi-Fi Connection............................................................. 8
Configuring the Terminal Wi-Fi Connection............................................................. 9
Terminal Activation ......................................................................................... 11
Terminal Activation .............................................................................................. 11
Overview ...........................................................................................................................11
Activate Terminal ................................................................................................. 11
Set Passwords ...................................................................................................... 14
Working with the Terminal .............................................................................. 15
Powering the Terminal On or Off .......................................................................... 15
Terminal Input Options......................................................................................... 15
Replacing the Printer Paper .................................................................................. 15
Card Payment Options.......................................................................................... 16

PAX A80 Configuration and installation
Copyright©2023PayFactoInc. Page 3of17
•
•
•
•
◦
◦
◦
◦
◦
◦
•
◦
◦
◦
•
◦
◦
◦
◦
Introduction
The PAX A80 countertop payment terminal is perfect for retail and bar/restaurant applications. This setup guide
describes the following topics:
A80 Terminal Overview
Terminal Hardware
A80 Communication Ports
Initial terminal configuration
Connect the Terminal Cables
Installing the Printer Paper
Configuring the Terminal Display Language
Configuring the Terminal Network Connections
Configuring the Terminal Ethernet Connection
Configuring the Terminal Wi-Fi Connection
Activating the terminal
Terminal Activation
Activate Terminal
Set Passwords
Working with the terminal
Powering the Terminal On or Off
Terminal Input Options
Card Payment Options
Replacing the Printer Paper

PAX A80 Configuration and installation
Copyright©2023PayFactoInc. Page 4of17
Terminal Overview
A80 Terminal Overview
This document will introduce you to your payment terminal as well as guide you through the process of preparing and
configuring it in order to quickly begin processing payments.
Your PAX A80 payment processing terminal comes with the following:
* The RJ-11 cable is not used for terminal communication and may not be included with your terminal.
Terminal Hardware
The following illustrations show the location of the main terminal features and hardware:
Payment terminal
1.
AC power adapter and terminal power
cord (2 pieces)
2.
RJ-11 (telephone) cable *
3.
Roll of printer paper
4.

PAX A80 Configuration and installation
Copyright©2023PayFactoInc. Page 5of17
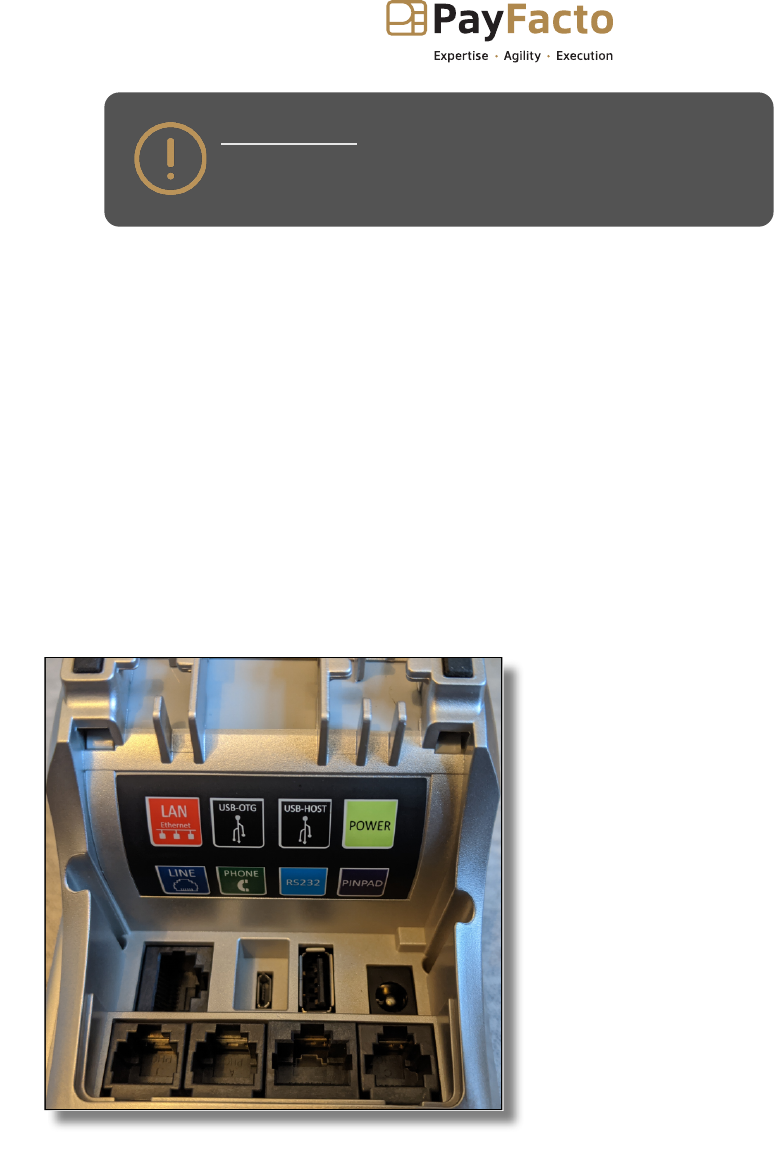
A80 Communication Ports
There are multiple communication ports on the back of the terminal with cable guides. The diagram on the back of the
terminal shows where to connect the communication cables, in addition to AC power.
Contactless payment reader
1.
Color touchscreen
2.
Magnetic stripe reader
3.
Physical keypad
4.
Chip card reader
5.
Cable guides
1.
Ports diagram
2.
Ethernet port
3.
Power port
4.

PAX A80 Configuration and installation
Copyright©2023PayFactoInc. Page 6of17
1.
2.
Terminal Setup and Configuration
Installing the Printer Paper
If the supplied roll of printer paper was not already installed in the terminal when you received it, you will need to
install it before you can print any transaction receipts.
TIP: This procedure also applies to replacing a roll of printer
paper.
To install the printer paper:
On the back of the terminal at the top, lift the lever with the contactless logo to unlock and
open the printer cover.
NOTE: The printer cover opens on a hinge, it does not come
off the terminal.
Place the roll of printer paper in the paper tray, leaving about 2 inches (5 cm) of paper beyond
theprinter'scutterasshowninthefollowingexample:
PAX A80 Configuration and installation
Copyright©2023PayFactoInc. Page 7of17
3.
IMPORTANT! Make sure the paper unrolls from the back of
the roll, otherwise the printer will be unable to print the
transaction receipt.
Close the printer cover until it snaps into place and remove any excess paper.
Connect the Terminal Cables
There are multiple connection ports on the back of the terminal. Countertop terminals generally require AC power and
Ethernet connections.
Your configuration may also include a connection to a POS system or an additional PIN pad.
Use the diagram on the back of the terminal to determine where to connect the cables that apply to your configuration.
The terminal’s connection ports are shown below:
Configuring the Terminal Display Language
By default, the terminal displays all information in English. This procedure explains how to change the terminal’s
display language if necessary.

PAX A80 Configuration and installation
Copyright©2023PayFactoInc. Page 8of17
1.
2.
3.
4.
5.
6.
7.
•
•
IMPORTANT! Selecting a different language changes all text
that appears on the terminal.
To change the terminal display language:
Ontheterminal’smainscreen,touchtheSettings icon.
On the Settings screen, touch the Please Input Password field and use the keypad to type the
password: either 9876 or pax9876@@.
TouchthecheckmarkicononthekeypadwhenyouaredoneandtouchOK.
Scroll to the Personal section and touch Language & input.
Touch Language.
Scroll to and touch the desired language.
Touch the Back icon twice to return to the main screen.
Configuring the Terminal Network Connections
The terminal requires a network connection to communicate with the payment processor server to
process transactions.
The PAX A80 is a countertop payment terminal that can connect to wired (Ethernet) and wireless (Wi-
Fi)networks.
Configuring the Terminal Ethernet Connection
Configuring the Terminal Wi-Fi Connection
Configuring the Terminal Wi-Fi Connection
This section explains how to enable Ethernet and connect to your network.
To connect to your Ethernet (wired) network:

PAX A80 Configuration and installation
Copyright©2023PayFactoInc. Page 9of17
1.
2.
3.
4.
5.
6.
7.
8.
9.
1.
2.
Ensure your network cable is connected in the appropriate connector located on the back of the
terminal and make sure the other end of the network cable is connected to a network jack or
hub.
Ontheterminal’smainscreen,touchtheSettings icon.
On the Settings screen, touch the Please Input Password field and use the keypad to type the
password: either 9876 or pax9876@@.
TouchthecheckmarkicononthekeypadwhenyouaredoneandtouchOK.
In the Wireless & networks section, touch Ethernet.
If Ethernet is Off,touchthetoggletoturniton.
After you toggle Ethernet to On(orifEthernet is already on), the connected network settings
appear.
If necessary, you can change the network connection parameters manually by scrolling to the
bottom and touching Ethernet Configuration to select and configure the Connection Type.
IMPORTANT! Changing the network connection parameters
incorrectly will prevent the terminal from communicating
with the payment processing server.
Touch the Back icon twice to return to the main screen.
Configuring the Terminal Wi-Fi Connection
This section explains how to turn Wi-Fi on and connect to your network.
To connect to your wireless network:
Ontheterminal’smainscreen,touchtheSettings icon.
On the Settings screen, touch the Please Input Password field and use the keypad to type the
password: either 9876 or pax9876@@.

PAX A80 Configuration and installation
Copyright©2023PayFactoInc. Page 10of17
3.
4.
5.
6.
7.
8.
9.
TouchthecheckmarkicononthekeypadwhenyouaredoneandtouchOK.
In the Wireless & networks section, touch Wi-Fi.
If Wi-Fi is Off, touch the toggle to turn it on. If Wi-Fi is already on, a list of available networks
appears.
From the list of available networks, touch the name of the network you want to connect to.
Enter the password for the selected network and touch CONNECT.
TIP: You can touch Show password before typing to ensure
you are entering the password correctly.
After the terminal displays Connected for the selected network, touch the Back icon to return to
the Settings screen.
Touch the Back icon again to return to the main screen.

PAX A80 Configuration and installation
Copyright©2023PayFactoInc. Page 11of17
Terminal Activation
Terminal Activation
PayFacto uses a self-service terminal activation procedure designed to save time while also providing better security.
The new activation procedure applies only to countertop and mobile PAX payment terminals using the Android
operating system. The new procedure applies to:
Overview
After you configure the terminal's network connection(s) and power on the terminal, the procedure comprises of 2
parts:
NOTE: If you have multiple new payment terminals, you need to
perform the activation procedure on each terminal individually.
Activate Terminal
After configuring the terminal’s network connection, you need to start the PayFacto payment application to complete
the remaining steps. Terminal activation requires you to input a One Time Passcode (OTP) that PayFacto sends to the
email address or telephone number registered to your account.
IMPORTANT! To receive the OTP on your phone, your
registered phone number must be able to receive text messages
(SMS). If you cannot receive text messages, select the email
option to get the OTP.
To activate the payment terminal:
All new merchants activating their terminals for the first time
•
Any existing merchants adding new payment terminals
•
Any existing merchants receiving replacement terminals
•
Activate the terminal with a One Time Passcode (OTP)
•
Set the Administrator and Merchant passwords
•

PAX A80 Configuration and installation
Copyright©2023PayFactoInc. Page 12of17
1.
2.
3.
4.
5.
Touch the PAYMENT icon on the main screen. The Welcome To Your Payment Terminal screen
appears.
NOTE: The terminal may need to download host and
security parameters; this can take a few moments.
In the top right corner of the screen, your terminal ID (TID) appears; confirm that the number on
the screen matches the TID on the label on the back of your terminal. The TID will not appear on
your terminal screen after you complete the activation process.
IMPORTANT! If the TID does not match, call PayFacto
immediately.
Touch anywhere on the screen to begin the activation process.
Touch the desired option to receive the OTP.
Email
Phone Number
Touch the Send Code button.

PAX A80 Configuration and installation
Copyright©2023PayFactoInc. Page 13of17
6.
7.
IMPORTANT! The OTP code is valid for 15 minutes after
you receive it. If you wait more than 15 minutes to enter the
OTP, the terminal will display an error and you will have to
request a new OTP.
If you select Email, look for a message from noreply@payfacto.com.
After you receive the 6-digit activation code, use the on-screen keypad to enter the code on the
terminalscreen.

PAX A80 Configuration and installation
Copyright©2023PayFactoInc. Page 14of17
8.
9.
10.
1.
2.
3.
4.
If you enter the code incorrectly, a red exclamation appears to indicate that the code is
incorrect.
Re-enter the code, or touch Resend Code to obtain a new OTP.
After you enter the OTP correctly, the payment application displays the Set Administrative
Password screen to configure your terminal passwords.
Set Passwords
Topreventunauthorizedindividualsfromchangingtheterminal’sconfiguration,youneedtosetthe
Administrator and Merchant passwords. These passwords restrict access to certain functions on the
terminal.
When setting your passwords, you must respect the following parameters:
To set your Administrator and Merchant passwords:
On the Set Administrative Password screen, use the on-screen keypad to enter a 6-digit
passwordintheAdmin Password field and touch the Next icon on the keypad.
On the Confirm Administrative Password screen, re-enter the password in the Admin Password
field and touch the Next icon on the keypad.
On the Set Merchant Passwordscreen,usetheon-screenkeypadtoentera6-digitpasswordin
the Merchant Password field and touch the Next icon on the keypad.
On the Confirm Merchant Password screen, re-enter the password in the Merchant Password
field and touch the Next icon on the keypad.
Your payment terminal is now ready for use.
Passwords must be 6 characters long
•
The Administrator and Merchant passwords cannot be the same (can’t match)
•
You cannot use the same digit 6 times consecutively (for example: 111111 or 777777)
•
You cannot use 6 consecutive numbers, either ascending or descending (for example: 123456 or 987654)
•

PAX A80 Configuration and installation
Copyright©2023PayFactoInc. Page 15of17
Working with the Terminal
Powering the Terminal On or Off
To power the terminal on or off, press and hold the red X key on the physical keypad.
IMPORTANT! Disconnecting the AC power immediately powers
off the terminal and any transaction that was in progress is
cancelled.
Terminal Input Options
The PAX A80 terminal offers an on-screen keypad as well as a physical keypad to enter transaction amounts. Your
terminal operators and customers enter information and respond to prompts using either the terminal’s touch screen or
physical keypad.
There are three (3) colored function keys on the physical keypad that you can use to confirm, correct, or cancel an
operation:
Replacing the Printer Paper
Theterminaluses2¼”or58mmthermalpaperrollstoprinttransactionreceipts.
To replace the printer paper:
To confirm an entry, touch OK on the screen or press the green O key
•
To correct an entry, touch BACK on the screen or press the yellow < key
•
To cancel a function, touch CLEAR on the screen or press the red X key
•

PAX A80 Configuration and installation
Copyright©2023PayFactoInc. Page 16of17
1.
2.
3.
On the back of the terminal at the top, lift the lever with the contactless logo to unlock and
open the printer cover.
NOTE: The printer cover opens on a hinge, it does not come
off the terminal.
Place the roll of printer paper in the paper tray, leaving about 2 inches (5 cm) of paper beyond
theprinter'scutterasshowninthefollowingexample:
IMPORTANT! Make sure the paper unrolls from the back of
the roll, otherwise the printer will be unable to print the
transaction receipt.
Close the printer cover until it snaps into place and remove any excess paper.
Card Payment Options
There are three (3) ways for a customer to use their payment card with the terminal:

PAX A80 Configuration and installation
Copyright©2023PayFactoInc. Page 17of17
Insert the chip card and enter a
PIN
Swipethecard’smagneticstrip
Tap the card for contactless
payment
