
Word - Basics
Course Description
Word is a powerful word processing software package that will increase the productivity of any
individual or corporation. It is ranked as one of the best word processors.
This course will introduce you to many of the most commonly used features of Word. Most of
the commands can be executed using the mouse and the keyboard. This course will
emphasize the mouse, but will show keyboard shortcuts when it is appropriate. All of the
commands and capabilities which Word has to offer cannot be fully covered in the class time
allotted, but the most useful commands are covered in this session.
Objectives • Getting Started
• Editing a Document
• Proofing a Document
• Formatting Characters
• Formatting Paragraphs
Word – Basics 2007 Page 1

Word Features
Word Processing Concepts
Word incorporates standard word processing functions along with unique features. Some of
these unique features are:
• Integrates data from different sources
• Multiple documents can be opened
• WYSIWYG - What You See Is What You Get
• AutoCorrect Feature
• Wizards & Templates
• Shortcut Menu - right mouse button
Word documents can be complex or simple, powerful or easy. Whatever your needs are,
Word will handle them. Creating a document is as easy as typing the text in the document
window on the screen.
In Word, the software automatically starts text on the next line; you do not need to press the
Enter key after each line. The only time you should press the Enter key is at the end of a short
line, the end of a paragraph, or when you want to create blank lines. Based on your margin
setting, Word will also insert page breaks for you.
Views
When Word starts up, it will show the document in the Print Layout view but there are a few
other views available. Choose from Full Screen Reading (use to be Reading Layout), Web
Layout (see the document as it would appear on the website), Outline (an outline view of the
document) or Draft (use to be the Normal View).
Page 2 Word – Introduction 2007

Microsoft Office Button
• Holds the options that were available in the previous version of Word as the File menu.
• Any documents which have been opened recently will show on the right side in the Recent
Documents list up to the limit given in Word Options.
• New – create a document using a blank format or a template.
• Open – locate and open a document from the network or some other storage device.
• Convert – convert a document from a previous version of Word to Word 2007 and only
shows for a Word 2003 document.
• Save – Save As –
Type Extension
Word document .docx
Word template .dotx
Macro-enabled document .docm
Macro-enabled Word template .dotm
By default the extension of the saved file does not show but can be shown:
Show file
extensions
1. Open up My Computer.
2. Click Tools.
3. Choose Folder Options.
4. Select the View tab.
5. Uncheck the box next to Hide extensions for known file types.
6. Click OK to close the dialog box.
7. Close the My Computer dialog box.
PDF (same as using PDF maker) or XPS (electronic file format and viewed on-line).
• Print – preview how the document will print or initiate the quick print option to send the file
directly to the default printer.
• Prepare – prepare a document for distribution and for final review.
• Send – E-mail as attachment, PDF, XPS.
• Publish – options which are not being used at current time.
• Close – close the document.
• Other Set-Up Options – can be found under the Word Options button.
Word – Basics 2007 Page 3

Ribbon
• Double click the tab that is active to minimize or maximize the Ribbon.
• Temporarily display the Ribbon when it has been minimized by clicking on it once.
• Organized into 7 task-specific tabs (Home, Insert, Page Layout, References, Mailings,
Review and View) and each tab has groups of related commands.
• A Developer tab can be added which gives access to macros and more programming
functions.
Add
Developer
Tab
1. Click the Microsoft Office Button.
2. Choose Word Options.
3. Select Popular.
4. Check the box next to Show Developer tab in the Ribbon.
5. Click OK.
• Program tabs appear only when a particular view or mode is selected – Print Preview tab
for example.
• The Add-Ins tab may also be on the Ribbon to access other add-in programs.
• Contextual tabs appear when the element they control is active.
Table Tools ( Design tabs)
Picture Tools (Format tab)
Drawing Tools (Format tab)
SmartArt Tools (Design and Format tabs)
Chart Tools (Design, Layout and
Format tabs)
Header and Footer Tools (Design tab)
Equation (Design tab)
• When the window is minimized or the computer’s resolution is set really low many of the
groups will condense and only the group name will be visible.
• Some groups have a Dialog Box launcher – under these are the less common
commands.
• Arrow buttons are not all the same – part of the icon versus not part of the icon.
• Most formatting items will give a “Live Preview” (hovering over the item will show an on
screen display of what it would look like if applied but does not get applied until it is
selected).
Page 4 Word – Introduction 2007

Quick Access Toolbar
• Contains Save, Undo, Repeat (Redo) but functions can be added to this toolbar and they
can be set to show in all documents or just the current open one.
• Right click on any icon and choose Add to Quick Access Toolbar to add it quickly to the
toolbar.
• If the Quick Access Toolbar becomes too full to see it on the top row, click the down arrow
and choose Show Below the Ribbon.
Getting Help
Word provides an on-line help system that allows you to get help anytime in the program.
When you need help, use your help system first, if you still need additional assistance consult
the Help Desk at #1522
• Hovering over an icon will give a Screen Tip which shows the name and description of the
item.
• Click the icon to enter a subject or question to get help Microsoft both online and off.
Creating a New Document
Here we talk about how to create a new blank document. Similar steps can be followed to
open up one of your templates or go online to access some of Microsoft’s templates.
Creating a New
Document
1. Click the Microsoft Office Button.
2. Choose New.
3. Select Blank document from the Blank and recent section of the New
Document box.
4. Click the Create button.
Word – Basics 2007 Page 5

Saving Files
It is a good rule of thumb to save a document every 10 to 15 minutes, or after the document is
completed. Therefore, if the computer loses power, the information has been retained. It is a
good habit to save a document before it is printed or when a major change is made also.
Saving a File
Save as is used to save a file for the first time or to save it with a different
name or to a different location.
1. Click the Microsoft Office Button.
2. Hover over Save As.
3. Choose which version to save the file as.
4. In the File Name text box, type in the desired filename.
5. Press Enter or click Save.
Save is used to save a file using its current name and replace the existing
file. This command is used to update a file.
1. Click the Microsoft Office Button.
2. Select Save.
- or -
1. Click on the save icon on the Quick Access Toolbar
Auto Recovery
You can set the system up to save your document every so many minutes so that if your
system crashes or goes down for some reason, you will be able to pull the document up later.
This is not a guarantee because your most recent changes may not be retrieved so you will
still want to save often.
Set up Auto
Recovery
1. Click the Microsoft Office Button.
2. Select Word Options.
3. Choose the Save button.
4. Check the box next to Save Auto Recovery information every:
5. Set the number of minutes.
6. Click OK.
Page 6 Word – Introduction 2007

Closing and Opening Documents
Even though you can open several documents at the same time, this practice takes up
valuable memory on your PC. It is a good practice to close documents when you are finished
working with them
Closing a File
1. Click the Microsoft Office Button.
2. Select Close.
3. If the file has been changed since the last time it was saved, a
dialog box appears.
• To save the file:
Click Yes.
Type the name of the file, if necessary.
Press Enter or click Save.
• To close the file without saving:
Click No.
• To return to the file without closing it:
Click Cancel.
Opening
Existing Files
1. From the Microsoft Office Button.
2. Select Open.
3. If the file is not in the default directory, use one of the following
options to change the drive or directory.
Directories: Choose another directory from the drive.
Drives: Choose a different drive on the system.
4. Select the file.
5. Click Open or double-click the filename.
)
Type the first letter of a filename to jump to that part of the list.
Word – Basics 2007 Page 7

Navigating in a Document
You can move your insertion point in the document either with your mouse or with your
keyboard. Listed below are the keystrokes you may use.
Moving the
Insertion Point
Press
Right Arrow Î
Left Arrow Í
Down Arrow Ð
Up Arrow Ï
Ctrl+Right Arrow
Ctrl+Left Arrow
Ctrl+Down Arrow
Ctrl+Up Arrow
Home
End
Ctrl+Home
Ctrl+End
F5
Page Up
Page Down
Ctrl+Page Up
Ctrl+Page Down
Scroll Bars
Show Ruler
To move the insertion point
right one character
left one character
down one line
up one line
right one word
left one word
down one paragraph
up one paragraph
beginning of the line
end of the line
beginning of the document
end of the document
Go to a specific Page #
Previous Screen
Next Screen
Beginning of Previous Page
Beginning of Next Page
On the window of the application
Display ruler – applied from the window
above the scroll bar
Page 8 Word – Introduction 2007

Selecting Text
Editing more than a few characters at a time can be accomplished easier by first selecting the
text and then editing it.
Selecting Text
1. Position the insertion point to the right of the text to be selected
2. Press and hold the left mouse button and drag the insertion point over
the text to be selected
- or –
T
o Select Press
A Word Double-click on a word.
A Sentence Press and hold the Ctrl key then click anywhere in the sentence.
A Line Click in the selection bar – drag in the selection bar to select multiple
lines.
A Paragraph Triple-click in the paragraph.
Whole Document Press and hold the Ctrl + A.
Nonadjacent Text Select the first block of text, hold the Ctrl key and select the next
block of text.
Adjacent Text Select the first block of text, hold the Shift key and the arrow keys to
select adjacent word, lines, or paragraphs.
)Deselect information by clicking in the area outside the selected text or press an arrow key.
Word – Basics 2007 Page 9

Inserting or Deleting Text
Inserting Text
1. Position the insertion point where you want to insert the text.
2. Type the text.
)
The existing text moves to accommodate the new text.
To correct mistakes as you type, the Backspace key is used to delete the character(s) to the
left of the insertion point and the Delete key is used to delete the character(s) to the right of the
insertion point.
Deleting Text
1. Position the insertion point to the right of the character to be deleted.
2. Press the Backspace key.
- or -
1. Position the insertion point to the left of the character to be deleted.
2. Press the Delete key.
Undo and Redo
As you are working it is helpful to keep in mind the Undo and Repeat (Redo) commands. If a
mistake is made while editing, you can easily reverse it back using the Undo command. Word
remembers up to the last 1000 editing changes made to a document.
Undoing a
Command
1. From the Quick Access Toolbar.
2. Select Undo.
Redoing (Repeat)
a Command
1. From the Quick Access Toolbar.
2. Select Redo (Repeat).
Page 10 Word – Introduction 2007

Word – Basics 2007 Page
11
Copying and Moving Text
Copying Text
1. Select the text to be copied.
2. From the Home tab, in the Clipboard group, select Copy.
3. Position the insertion point where the copied text is to appear.
4. From the Home tab, in the Clipboard group, select Paste.
Moving Text
1. Select the text to be moved.
2. From the Home tab, in the Clipboard group, select Cut.
3. Position the insertion point where the cut text is to appear.
4. From the Home tab, in the Clipboard group, select Paste.
When you copy or cut information from your document, the piece that you picked up, goes
into a holding box called the Office Clipboard. You can access the Office Clipboard Task
Pane by clicking the Dialog Box Launcher from the Clipboard group on the Home tab.
To insert items
from the Office
Clipboard Task
Pane
1. Place your cursor where you want the item to be inserted.
2.
Select the item you want to insert from the Office Clipboard Task
Pane.
Also, when you paste something into your document, you will get a Clipboard Icon beside
the information. From this icon you can choose to apply one of the options from the drop
down arrow. The options will change based on the type of information that you will paste
into the new location.
Set up Options
for the Clipboard
1. Click the Dialog Box Launcher from the Clipboard group on the
Home tab.
2. Select Options at the bottom of the Clipboard Pane.
3. Choose one of the following set up options.
• Show Office Clipboard Automatically.
• Show Office Clipboard When Ctrl + C Pressed Twice.
• Collect Without Showing Office Clipboard.
• Show Office Clipboard on Taskbar.
• Show Status Near Taskbar When Copying.

Dragging and Dropping Text
Text can be moved around a Word document without using items from the Ribbon. Here are
some of those options, if you do not like this feature, it can be turned off.
Dragging and
Dropping Text
(Moving Text)
1. Select the text to be moved.
2. Position the mouse pointer within the selected text.
3. Press and hold the left mouse button.
4. Drag and position the gray bar in the new location.
5. Release the left mouse button.
Dragging and
Dropping Text
(Copying Text)
1. Select the text to be copied.
2. Position the mouse pointer within the selected text.
3. Press and hold the Ctrl key.
4. Press and hold the left mouse button. (You will see a small + sign
to the right of the arrow).
5. Drag and position the gray bar in the new location.
6. Release the left mouse button and then release the Ctrl key.
Turning off the
Drag and Drop
Option
1. From the Microsoft Office Button.
2. Select Word Options.
3. Click the Advanced button.
4. Under the Editing options section uncheck the Allow text to be
dragged and dropped check box.
5. Click OK.
Page 12 Word – Introduction 2007

Word – Basics 2007 Page
13
AutoCorrect Feature
The AutoCorrect feature in Word automatically corrects errors as you are typing. The following
errors are just some that are corrected automatically, if the options have been “turned on”:
• Change “Straight quotes” to “smart quotes”
• Correct TWo INitial CApitals
• Capitalize first letter in a sentence
• Capitalize first letter of table cells
• Capitalize the names of days
• Replace text as you type
To use the
AutoCorrect
feature
1. Select the Microsoft Office Button.
2. Choose Word Options.
3. Click the Proofing button.
4. Select the AutoCorrect Options button.
5. Choose the options you want to use – you may have to look under more
than one tab.
6. Click OK twice to close the dialog boxes and apply the change(s).
To add entries
to replace as
you type
1. Select the Microsoft Office Button.
2. Choose Word Options.
3. Click the Proofing button.
4. Select the AutoCorrect Options button.
5. Type the entry to be corrected in the Replace box.
6. Type the correction in the With box.
7. Choose Add.
8. Click OK twice to close the dialog boxes and apply the change(s) .
To delete an
item
1. Select the Microsoft Office Button.
2. Choose Word Options.
3. Click the Proofing button.
4. Select the AutoCorrect Options button.
5. Select the item to be deleted.
6. Click Delete.
7. Click OK twice to close the dialog boxes and apply the change(s).

Font and Font Sizes
A Font is a style of text. Changing the font names and sizes will enhance your documents.
)A point is equal to about 1/72 of an inch
Changing Font
Names
1. Select the text to be changed.
2. From the Home tab, click the down arrow in the Font box from the Font
group.
3. Select the name of the font to apply.
Changing Font
Size
1. Select the text to be changed.
2. From the Home tab, click the down arrow in the Font Size box from the Font
group.
3. Select the desired size.
Changing Font
Name and Size
with the Menu
1. Select the text to be changed.
2. From the Home tab, select the Dialog Box Launcher from the Font group.
3. Choose the desired font.
4. Click OK.
) There are some character enhancements that are available only through the Dialog Box
Launcher.
Page 14 Word – Introduction 2007
Formatting Characters
Characters are the letters, punctuation marks, numbers and symbols that you type as text.
Character formatting determines how the characters or text will appear on the screen as well
as on your printed copy.
Changing
Character
(Text)
Formatting
1. Select the text to be changed.
2. From the Home tab, select the Dialog Box Launcher from the Font group.
3. Choose the desired formats.
4. Click OK.
- or -
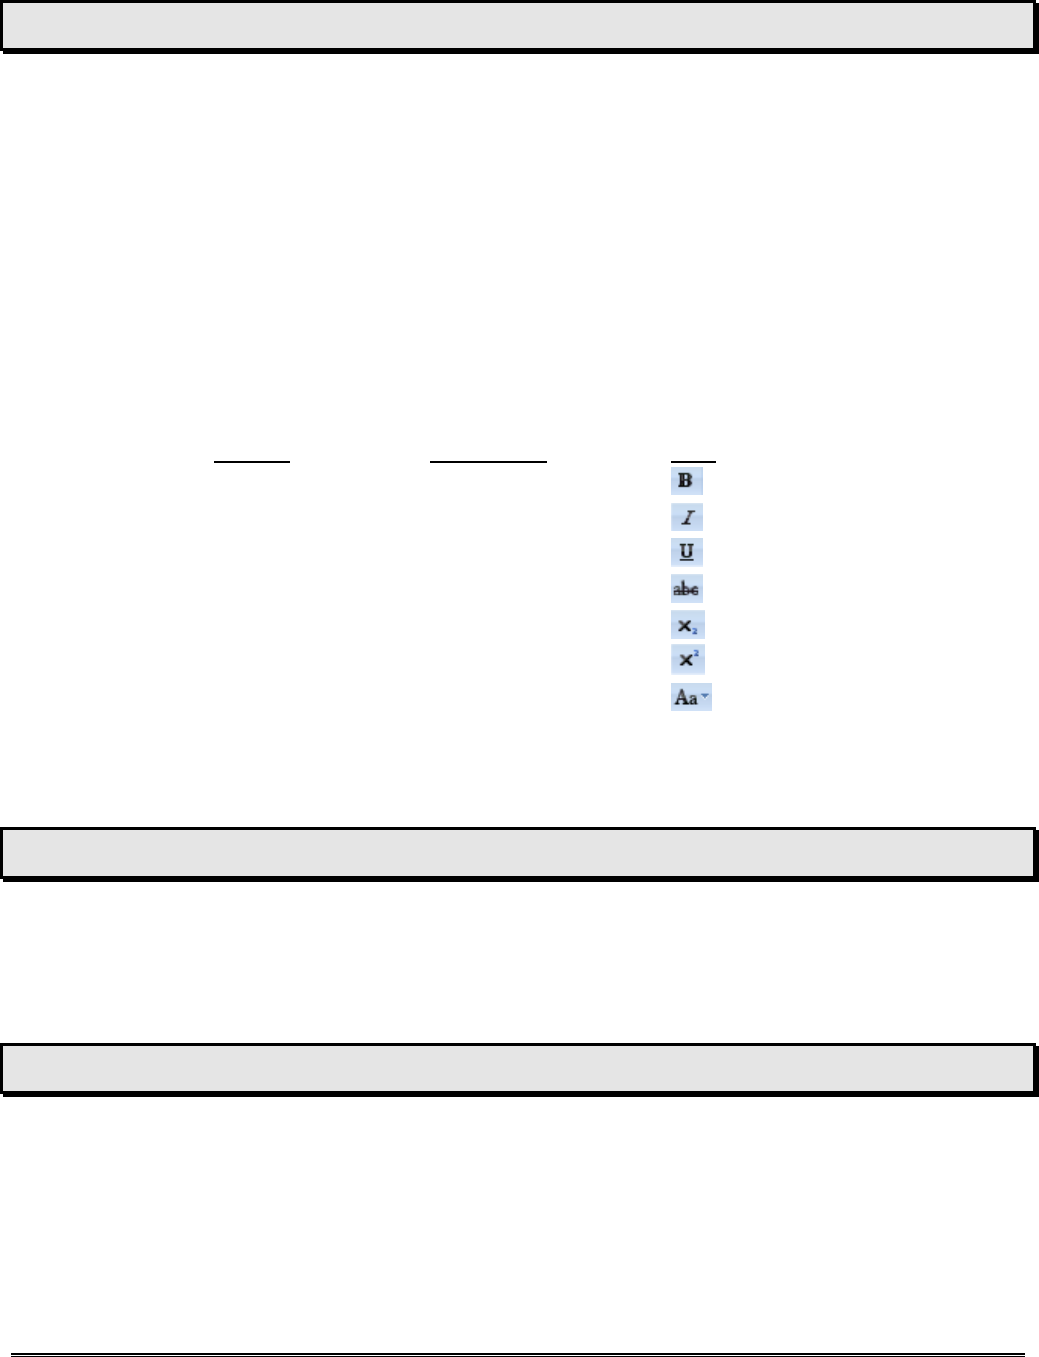
Format Speed Key Icon
Bold Ctrl+b
Italics Ctrl+i
Underline Ctrl+u
Strikethrough
Subscript Ctrl+=
Superscript Ctrl+Shift++
Change Case
)When chosen or a right click is applied to text, an extra toolbar called the Mini Toolbar pops
up which contains many options to change the style of the text.
Removing Character Formats
Once character formats have been applied, they can be removed. You use the same basic
procedure to remove all character formats as you do to apply them. For example, to bold a
word, you would select it and click the Bold icon on the toolbar. To remove the bold style,
select the word and click the
Bold icon.
Character Spacing
Changing
Character
Spacing
1. Select the text to be changed.
2. From the Home tab, select the Dialog Box Launcher from the Font group.
3. Click the Character Spacing tab.
4. Choose the desired spacing.
5. Click OK.
Word – Basics 2007 Page
15

Aligning Paragraphs
When you change the alignment of a paragraph, you specify where you want the lines of text
to line up horizontally. For example, do you want the text to line up on the left, center, right, or
justified (both left and right). When you select justified, the document adjusts the spacing
between words so that the text will have a crisp left and right edge, like you see in
newspapers. However, the extra spacing may make the text hard to read.
Paragraph
Alignment
1. Position the insertion point anywhere within the paragraph to be aligned.
2. Choose a paragraph alignment icon from the Paragraph group on the
Home tab.
• Left
• Center
• Right
• Justified
Indenting Paragraphs
There will be times you will need a paragraph indented. Choose to indent the entire left side of
the paragraph, only the first line of the paragraph, or maybe have a hanging indent.
Indenting
Paragraphs
Using the Ruler
1. Position the insertion point anywhere within the paragraph.
2. Drag the appropriate indent marker to the desired location.
• First Line
• Rest of Paragraph
• Left Indent
• Right Indent
Indenting
Paragraphs
Using
shortcuts
1. Position the insertion point anywhere within the paragraph.
2. Set the indent levels using one of the shortcuts listed below
Type of Indent Speed Keys Toolbar Icon
First Line Tab
Left Indent Ctrl+m
Unindent left Ctrl+Shift+m
)Don’t forget the Dialog Box Launcher
Page 16 Word – Introduction 2007

Word – Basics 2007 Page
17
Setting Tabs
Default tab stops are spaced ½ inch apart. When custom tab stops are set, Word
automatically clears all default tab stops to the left. The default tab stops to the right of the
custom tab stops remain.
Setting Tab
Stops
1. Click the Tab Button at the far left of the horizontal ruler until it
changes to the type of tab you want. Left, Right, Center or
Decimal Tab.
2. Click on the ruler where you want to set the tab stop.
3. Hit the Tab key on keyboard to position cursor to start typing.
- or -
1. From the Home tab in the Paragraph group click the Dialog
Box Launcher.
2. Choose the Tabs button.
3. Specify the Tab stop position, Alignment and Leader Style.
4. Repeat steps in dialog box until all tabs are set.
5. Click OK.
Moving Tab
Stops
1. Place the mouse pointer on the desired tab on the ruler.
2. Press and hold the left mouse button and drag the tab stop to
the desired location.
Removing
Tab Stops
1. Place the mouse pointer on the desired tab to remove.
2. Press and hold the left mouse button and drag the tab stop
into the text area and release the mouse button.

Creating Numbered and Bullet Lists
Using the Bullets and Numbering commands, you can turn a series of paragraphs into a
bulleted list or a numbered list. For numbered lists, you can change the numeric formats and
separator characters.
Creating a
Numbered List
1. Type the information that is to be in the numbered list (Do not type in the
numbers).
2. Select the information to be in the numbered list.
3. Click the Numbering icon from the Home tab in the Paragraph group.
Changing a
Numbered List
1. Select the list to be changed.
2. Click the down arrow next to the Numbering icon from the Home tab in
the Paragraph group.
3. Choose one of the formats listed.
)Choose Set Numbering Value to choose to start at a specific number.
Creating a
Bullet List
1. Type the information that is to be in the bulleted list.
2. Select the information to be in the bullet list.
3. Click the Bullets icon from the Home tab in the Paragraph group.
Changing a
Bullet
1. Select the list to be changed.
2. Click the down arrow next to the Bullets icon from the Home tab in the
Paragraph group.
3. Choose one of the formats listed.
)Choose Define New Bullet to set up a new bullet style
List Styles
1. From the Home tab under the Paragraph group click the Multilevel List
icon.
2. Select one of the styles given.
)Choose Define New List Style to create a new style.
Page 18 Word – Introduction 2007

Word – Basics 2007 Page
19
Page Numbers
Adding automatic page numbers to the top or bottom of each page is easy in Word! The page
numbers can be at the left, center or right edge of the page.
Adding Page
Numbers
1. Choose the Insert tab.
2. Click Page Number from the Header & Footer group.
3. Hover over either Bottom of Page or Top of Page.
4. Select a format from the list.
To change the
style of the
Page Number
1. Choose the Insert tab.
2. Click Page Number.
3. Select Format Page Numbers.
4. Choose other relevant formatting options.
5. Click OK.
Page Setup
From the Page Layout tab under the Page Setup group you can change the margins, paper
orientation, and paper size. These may be set for the entire document, the current section or
from a specific point forward.
Margins
1. From the Page Layout tab in the Page Setup group, click the Margins
button.
2. Choose one of the choices or select Custom Margins.
3. Type in a new value or click the arrows next to the box to increase or
decrease the margin size.
4. Click on OK.
Paper
Orientation
1. From the Page Layout tab in the Page Setup group, click the Orientation
button.
2. Select Portrait or Landscape.
)
You may also change these settings when you are in Print Preview.

White Space Between
When in Print Layout view, you control whether there is space between your pages on the
screen. When you place your pointer between the pages, you should get a Show White Space
or Hide White Space pointer, double-click and Word toggles between each option.
Spell Check
Word has automatic Spell Check! Word spell checks your document as you are typing. If
Word detects a spelling error, a red wavy line will appear under the incorrect word. You may
correct the error now or you may wait until you have completed the document.
To correct an incorrect word, place your mouse pointer on the incorrect word and click with
your right mouse button, a shortcut menu will display choices for you. You may correct the
spelling of the word, ignore the spelling (it may be right, however the word is not in Word’s
dictionary), or you may add the word to Word’s dictionary.
If your document is lengthy, you may wish to use Spell Checker to check spelling of the entire
document rather than one word at a time.
With either method of spell checking, it still does not eliminate the need for proofreading! Spell
check only finds misspelled words not words used incorrectly.
Spell Checking
a Document
1. Position the insertion point at the beginning of the document.
2. From the Review tab, click the Spelling & Grammar button on the
Proofing group.
Printing a Document
Documents can either be sent directly to the printer or previewed before they are printed. It is
a good idea to preview your documents before printing them. This allows you to "eye-ball" the
document before it is printed which will save you time, ink and paper.
Print Preview
1. Click the Microsoft Office Button.
2. Hover over Print.
3. Select Print Preview.
Print
1. Click the Microsoft Office Button.
2. Select Print.
)
If you choose Quick Print to print your document, the printout will go directly to the printer,
no questions asked.
Page 20 Word – Introduction 2007

Word – Basics 2007 Page
21
Notes:
