


1 Overview ............................................................................................................................... 1
1.1 History of SOS Inventory ................................................................................... 1
1.2 Workflow ........................................................................................................ 2
1.2.1 QuickBooks Online to SOS ...................................................................... 3
1.2.2 SOS to QuickBooks Online....................................................................... 3
1.3 Comparison of Pricing Plans .............................................................................. 3
1.4 QuickBooks Online Integration ......................................................................... 4
2 What’s New: User Guide Notes .......................................................................................... 5
3 Starting SOS Inventory ........................................................................................................ 9
3.1 Connection to QuickBooks Online ..................................................................... 9
3.1.1 Considerations Before Connecting ......................................................... 9
Converting from QuickBooks Desktop, Premier, or Enterprise to
QuickBooks Online ................................................................. 10
3.1.2 Creating the Connection ....................................................................... 10
3.1.3 First Sync ............................................................................................ 11
3.1.4 Sync Menu .......................................................................................... 12
3.2 Inventory Tracking in QuickBooks Online ......................................................... 12
3.3 Signing In/Out ................................................................................................ 13
3.4 Graphic User Interface (GUI) ............................................................................ 14
3.5 Navigation ..................................................................................................... 16
3.5.1 Lists ................................................................................................... 16
Display Message ..................................................................... 16
Page Navigation ...................................................................... 17
Actions Menu ......................................................................... 18
Batch Actions ......................................................................... 18

Change Filter .......................................................................... 19
Quick Search .......................................................................... 19
Add New ............................................................................... 20
Column Chooser .................................................................... 20
Excel Export ........................................................................... 22
Stars ...................................................................................... 22
3.5.2 Edit Pages ........................................................................................... 23
3.6 User Information ............................................................................................ 23
3.6.1 User Profile ......................................................................................... 23
3.6.2 User Settings ....................................................................................... 23
3.6.3 Tasks ..................................................................................................24
3.7 Switching Between SOS and QuickBooks Online .................................................24
3.8 Switching Between SOS Company Accounts ...................................................... 25
3.9 Smart Search .................................................................................................. 25
3.10 Getting Help ................................................................................................... 25
3.11 Printing ......................................................................................................... 27
4 Set Up/Configuration ......................................................................................................... 28
4.1 Company Settings ........................................................................................... 28
4.2 System Settings (Purchasing/Inventory/ Sales) .................................................. 30
4.2.1 Purchasing Settings ............................................................................. 30
4.2.2 Inventory Settings ............................................................................... 33
4.2.3 Sales Settings ...................................................................................... 37
General .................................................................................. 37
Sales Orders ........................................................................... 39
Estimates .............................................................................. 40
Invoices ................................................................................ 40

Sales Receipts ......................................................................... 41
Shipments ............................................................................. 41
RMAs ..................................................................................... 42
Returns .................................................................................. 43
Pick Tickets ............................................................................ 43
Rentals .................................................................................. 44
Rental Returns ....................................................................... 44
4.3 Barcode Settings ............................................................................................ 44
4.4 QuickBooks Setup ........................................................................................... 45
4.5 Default Accounts ........................................................................................... 46
5 Inventory .............................................................................................................................. 48
5.1 Items ............................................................................................................ 48
5.1.1 Setting Up an Item .............................................................................. 48
Item Field Descriptions ........................................................... 48
Accounts Needed According to Item Type .................................. 54
5.1.2 Items List ............................................................................................ 55
Add New ................................................................................ 55
Quick Search for Items ............................................................ 55
Filters for Items ...................................................................... 56
Actions and Batch Actions Available for Items ........................... 56
Items List Column Options ...................................................... 57
5.1.3 Creating and Using Categories .............................................................. 58
5.1.4 Item Variants ...................................................................................... 58
Creating and Editing Item Variants ........................................... 58
Converting a Variant to a Stand-alone Item ............................. 60
5.1.5 Investigating Inventory and Cost Basis Errors with Transaction History ... 61

5.2 Cost Basis ....................................................................................................... 61
5.3 Adjustments to Inventory ................................................................................ 61
5.3.1 Quantity ..............................................................................................62
5.3.2 Cost ....................................................................................................62
5.3.3 Cycle Counting .................................................................................... 63
5.3.4 Physical Inventory Worksheet............................................................... 63
5.3.5 Adjustment Account ............................................................................ 63
5.3.6 Adjusting By Units of Measure .............................................................. 63
5.4 Locations ...................................................................................................... 64
5.4.1 Adding a Location ............................................................................... 64
5.5 Transfers ....................................................................................................... 64
5.5.1 Generating Inventory Transfers from the Reorder Report ........................ 65
5.6 Serial Inventory .............................................................................................. 65
5.6.1 Using Warranties with Serial Items ...................................................... 66
Creating a Warranty in SOS Inventory ....................................... 67
5.7 Lots ...............................................................................................................67
5.8 Consignment Inventory .................................................................................. 69
5.8.1 Account and Item Setup for Consignees ................................................ 69
5.8.2 Consignment Location Setup for Consignor .......................................... 69
5.9 Barcoding ...................................................................................................... 70
5.9.1 Entering Barcode Data ......................................................................... 70
5.9.2 Printing Barcode Labels ....................................................................... 70
5.9.3 Scanning ............................................................................................. 71
5.10 Bins ............................................................................................................... 72
5.10.1 Assigning Different Default Bins to an Item at Multiple Locations ............ 73
5.11 Units of Measure .............................................................................................74
5.12 Kits (Item Groups) ........................................................................................... 75
5.13 Cost of Goods Sold (COGS) ...............................................................................76
5.14 Inventory Value ..............................................................................................76
5.15 Negative Inventory .........................................................................................76
5.16 Inventory Reports ...........................................................................................77
6 Purchasing ........................................................................................................................... 78
6.1 Vendors .........................................................................................................78
6.1.1 Defining the Vendor Name ...................................................................78
6.1.2 Vendor-Item Catalog .......................................................................... 79
Rules for Working with Vendor-Item Catalog Entries ................. 79
6.1.3 Vendor Messages ................................................................................ 80
6.2 Purchase Orders ............................................................................................. 80
6.2.1 Creating a Purchase Order ................................................................... 80
Purchase Order Transaction Fields .......................................... 80
6.2.2 Purchase Order Actions Menu Options ................................................... 83
6.2.3 Approvals ........................................................................................... 84
6.2.4 Shipping Methods ............................................................................... 84
6.2.5 Blanket POs ........................................................................................ 84
6.2.6 Payment Terms .................................................................................. 84
6.2.7 Drop Shipping ..................................................................................... 85
6.2.8 Purchase Order Prepayments ............................................................... 86
6.3 Item Receipts .................................................................................................87
6.3.1 Item Receipt Field Descriptions .............................................................88
Standard Item Receipt Fields (All Plans) .................................... 88
Other Costs Fields (Pro Plan Only) ........................................... 90
6.3.2 Partial Receiving ................................................................................. 90

6.3.3 Landed Costs ....................................................................................... 91
6.3.4 Generating Bills ................................................................................... 91
6.3.5 Variances ............................................................................................ 91
6.4 Purchasing and Receiving Workflow .................................................................92
6.5 Returns to Vendors ......................................................................................... 93
6.6 Reordering ..................................................................................................... 93
6.6.1 Reorder Points .................................................................................... 94
6.6.2 Automatic Reorder Points .................................................................... 94
6.6.3 Max Stock Level ................................................................................... 95
6.6.4 Reorder List ......................................................................................... 95
6.6.5 Reorder Report ................................................................................... 96
Running a Reorder Report at a Single Location for a Company with
Multiple Locations .................................................................. 97
6.6.6 Generating POs from the Reorder Report .............................................. 97
7 Sales ..................................................................................................................................... 99
7.1 Customer Management .................................................................................. 99
7.1.1 Creating and Editing Customers ........................................................... 99
7.1.2 Actions and Batch Actions Available for Customers ............................... 100
7.1.3 Defining the Customer Name .............................................................. 101
7.1.4 Sub-Customers vs Addresses for Customers with Multiple Shipping
Locations .......................................................................................... 101
Adding Sub-Customers ......................................................... 102
Using Addresses for Customers with Multiple Locations........... 102
7.1.5 Adding and Using Customer Types ...................................................... 102
7.2 Relieving Inventory ....................................................................................... 103
7.3 Using Sales Forms ......................................................................................... 103
7.4 Available for Sale .......................................................................................... 104

7.5 Sales Workflow ............................................................................................. 104
7.5.1 The Standard Sales Workflow in SOS Inventory ..................................... 105
7.6 Estimates ..................................................................................................... 106
7.7 Sales Orders ................................................................................................. 106
7.7.1 Sales Order (SO) Field Descriptions ...................................................... 107
7.7.2 Sales Order Actions Menu Options ....................................................... 109
7.7.3 Due Dates ........................................................................................... 111
7.7.4 Items on Sales Order ........................................................................... 111
7.7.5 Backorders ......................................................................................... 111
7.8 Invoices ........................................................................................................ 111
7.8.1 Creating Invoices ................................................................................ 112
7.8.2 Ready to Invoice Report ....................................................................... 112
7.9 Sales Receipts ................................................................................................ 112
7.10 Payments ...................................................................................................... 113
7.11 Price Tiers ..................................................................................................... 113
7.12 Sales Representatives and Sales Commissions .................................................. 114
7.12.1 Adding, Editing, and Syncing Sales Representatives ............................... 115
7.12.2 Running Sales Commission Reports ..................................................... 115
7.13 Discounts ...................................................................................................... 116
7.14 Deposits ........................................................................................................ 116
7.15 Comments .................................................................................................... 116
7.16 Terms ........................................................................................................... 116
7.17 Sales Tax ....................................................................................................... 117
7.18 Taxes for International (Non-US) Accounts ...................................................... 117
7.19 Customer Messages ........................................................................................ 117
8 Fulfillment .......................................................................................................................... 118

8.1 Pick Tickets ................................................................................................... 118
8.2 Shipments..................................................................................................... 118
8.2.1 Creating Shipments ............................................................................ 118
8.2.2 Ready to Pick/Ship .............................................................................. 119
8.2.3 Packing Slip ........................................................................................ 119
8.2.4 Automatic Shipments from QuickBooks Online Transactions ................. 119
9 Manufacturing (Production) ............................................................................................ 120
9.1 Assemblies, Builds, and the Builds List ........................................................... 120
9.1.1 Assemblies vs Processes ..................................................................... 120
9.1.2 Assemblies vs Kits (Item Groups) ......................................................... 121
9.1.3 Builds List .......................................................................................... 121
9.1.4 Building an Assembly .......................................................................... 121
Creating an Assembly Item and Its Components ...................... 122
Adding a Bill of Materials (BOM) .............................................123
Adding a Build Transaction .....................................................123
9.1.5 Using an Inventory Item as a Build Output ........................................... 124
9.1.6 Using the Expanded BOM Report in Production Planning ....................... 124
9.1.7 Using Shipments to Auto-generate Builds ........................................... 126
9.1.8 Disassembling an Assembly ................................................................ 126
9.2 Processes and Processes List .......................................................................... 127
9.2.1 Processes List .................................................................................... 127
9.2.2 Creating a Process .............................................................................. 127
Creating Process Output, Waste, and Input Items .................... 128
Creating a Process Template .................................................. 129
9.2.3 Methods for Creating a Process Transaction ......................................... 129
Add a Process Transaction Manually ....................................... 129

Add a Process Transaction with a Build's Disassemble Action ... 130
Create a Process Transaction from a Work Order .......................132
9.2.4 Waste Product and Yield Percentage .................................................... 132
9.3 Build and Process Transaction Field Descriptions ............................................. 132
9.4 Jobs ............................................................................................................. 136
9.4.1 Jobs List ............................................................................................ 136
9.4.2 Adding and Editing Jobs ...................................................................... 136
9.4.3 Job Field Descriptions ......................................................................... 137
9.4.4 Job Dashboard ................................................................................... 138
9.4.5 Job Costing (Profit/Loss) ..................................................................... 138
9.5 Work Orders ................................................................................................. 138
9.5.1 Work Orders List ................................................................................ 138
9.5.2 Adding and Editing Work Orders ......................................................... 139
9.5.3 Generating a Build or Process Transaction from a Work Order ................ 139
9.5.4 Work order field descriptions .............................................................. 140
9.6 Work In Progress (WIP) and Work Centers ....................................................... 142
9.6.1 Methods for Tracking Work in Progress (WIP) ....................................... 142
Tracking Work in Progress on the Pro Plan .............................. 142
Alternative Methods for Tracking Work in Progress (WIP) for
Companion and Plus Plan Subscribers .................................... 143
9.6.2 Work Centers .................................................................................... 144
Creating Work Centers and Assigning Stages........................... 144
Moving and Tracking a Build from One Work Center Stage to
Another ............................................................................... 145
9.7 Workers and Labor ........................................................................................ 145
9.7.1 Creating labor items .......................................................................... 146
Handling differences in labor types and rates .......................... 146

9.7.2 Enabling worker tracking ................................................................... 146
9.7.3 Adding workers ................................................................................. 146
9.8 Manufacturing Workflow ............................................................................... 147
9.9 Contract Manufacturing ................................................................................ 148
9.9.1 Contract Manufacturing Workflow ...................................................... 148
9.10 Tracking overhead costs ................................................................................. 151
10 More Transactions ............................................................................................................ 153
10.1 RMAs ............................................................................................................ 153
10.2 Returns ......................................................................................................... 153
10.2.1 Methods of Creating a Customer Return ................................................ 153
10.2.2 Customer Credit (Credit Memo) .......................................................... 154
10.2.3 Restocking ........................................................................................ 154
10.3 Rentals and Rental Returns ............................................................................. 155
11 Custom Fields ................................................................................................................... 156
11.1 Adding a Custom Field ................................................................................... 156
11.2 Custom Field Rules ........................................................................................ 157
12 Automated Order Processing (AOP) ............................................................................. 159
13 Customer Portal ................................................................................................................ 162
13.1 Customer Portal Setup ................................................................................... 163
14 Tracking Email Config ...................................................................................................... 164
15 Reports ............................................................................................................................... 166
16 Data Utilities ...................................................................................................................... 168
16.1 Updating historical costs ............................................................................... 168
16.1.1 Reconciling accounts after updating historical costs ............................. 169
16.2 Retrieving Data from QuickBooks Online ........................................................ 169
16.3 Clearing the item cache ................................................................................. 170

17 Data Export/Import .......................................................................................................... 171
17.1 Exporting Data ............................................................................................... 171
17.1.1 Data Types Available for Export ............................................................ 171
17.1.2 How to Export Data ............................................................................ 172
17.2 Editing and Importing Data ............................................................................ 173
17.2.1 Editing Guidelines ............................................................................. 173
17.2.2 Editing Items ..................................................................................... 174
Item Field Definitions for Data Export/Import ......................... 175
17.3 Importing Data ............................................................................................. 179
17.3.1 Importing Sales Orders and Sales Receipts ........................................... 180
17.3.2 Importing Bills of Materials (BOMs) .................................................... 180
17.3.3 Importing Price Tiers .......................................................................... 181
18 More on QuickBooks ....................................................................................................... 182
18.1 Syncing ........................................................................................................ 182
18.1.1 Automatic Sync ................................................................................. 182
18.1.2 Transaction Data Exchange ................................................................. 182
QuickBooks Online to SOS ..................................................... 183
SOS to QuickBooks Online ..................................................... 183
18.2 Item Type Exchange ...................................................................................... 185
18.3 Troubleshooting Sync Errors .......................................................................... 185
18.3.1 Preview Sync ..................................................................................... 186
18.3.2 Sync Errors ........................................................................................ 186
18.3.3 Sync Column on Lists ......................................................................... 186
18.4 Class Tracking .............................................................................................. 187
18.5 Department Tracking .................................................................................... 187
18.6 Other QuickBooks Online Data ....................................................................... 187

19 Third-Party Integrations and Connectors ...................................................................... 189
19.1 Standard and Billable Connections ................................................................. 189
19.2 PayPal Integration......................................................................................... 189
19.3 Shopify Integration ....................................................................................... 190
19.3.1 Item Matching .................................................................................... 191
19.3.2 Updating Inventory Levels in Shopify .................................................. 192
Updating Inventory Levels with Multiple Shopify Locations ..... 192
19.3.3 Shopify “Custom App” Cart Connection Checklist (with SKU/SKU Matching
to Support Updating Inventory Levels)................................................. 193
19.3.4 Checklist for Updating and Connecting a “Private App” in Shopify ........ 195
Updating items ..................................................................... 195
Creating a connection between SOS Inventory and a Shopify
private app ........................................................................... 196
19.3.5 Shopify Restrictions in Syncing Customer Data to SOS Inventory ........... 197
19.4 BigCommerce Integration .............................................................................. 197
19.4.1 Item Matching ................................................................................... 198
19.4.2 Updating Inventory Levels in BigCommerce ......................................... 198
19.4.3 Steps to Make Connection (with SKU/SKU Matching to Support Updating
Inventory Levels) ............................................................................... 198
19.5 FTP .............................................................................................................. 199
19.6 Cart and FTP Field Descriptions ...................................................................... 199
19.7 United Parcel Service (UPS) Integration .......................................................... 201
19.8 ShipStation Integration ................................................................................. 202
19.9 EDI Integration ............................................................................................. 202
19.10 Zapier Connector App .................................................................................... 203
20 Administration .................................................................................................................. 204
20.1 User Management ......................................................................................... 204

20.1.1 Adding Users ..................................................................................... 204
20.1.2 User Privileges ................................................................................... 204
20.1.3 Restoring Inactive Users ..................................................................... 205
20.1.4 Unlocking Users ................................................................................ 205
20.1.5 Changing the Master Administrator .................................................... 205
20.2 Account Management.................................................................................... 206
20.3 Activity Log .................................................................................................. 207
20.4 Changing Plans ............................................................................................. 207
21 Form Templates ................................................................................................................ 208
21.1 Editing a Form Template................................................................................ 208
21.2 Form Template Fields .................................................................................... 209
21.3 Using a Form Template .................................................................................. 210
22 Miscellaneous ................................................................................................................... 211
22.1 Quick Links ................................................................................................... 211
22.2 Files (Documents) .......................................................................................... 211
22.3 Alerts ........................................................................................................... 212
22.4 Notification System ...................................................................................... 214
22.5 Order Stages ................................................................................................. 215
22.6 Priorities ...................................................................................................... 215
22.7 Task List (To-Do List) .................................................................................... 215
22.8 Multi-Currency............................................................................................. 216
22.8.1 Processing Multi-Currency Transactions ............................................. 216
22.8.2 Currencies Supported by SOS .............................................................. 217
22.9 Templating ................................................................................................... 218
22.10 Channels ...................................................................................................... 219
22.11 Archive/Unarchive ........................................................................................ 219

22.12 Cash Accounting ........................................................................................... 219
22.13 Beta Features ................................................................................................ 220
22.14 Mobile Use and iOS App ................................................................................. 221
23 Steps for Successful Setup of QuickBooks Online and SOS ...................................... 222
23.1 Setup Checklist for New QuickBooks Online and SOS Accounts ......................... 222
23.2 Setup Checklist for Adding a New SOS Account to an Existing QuickBooks Online
Account........................................................................................................ 226
24 API ...................................................................................................................................... 231
25 Reconciliation Process ..................................................................................................... 232
25.1 Why Reconcile? ............................................................................................. 232
25.2 Summary of Reconciliation Process ................................................................ 232
25.3 SOS Inventory and QuickBooks Interaction ..................................................... 233
25.3.1 Purchasing Interaction ....................................................................... 233
25.3.2 Sales Interaction ................................................................................ 235
25.3.3 Adjustment Interactions .................................................................... 236
25.3.4 Assembly Build Interactions ............................................................... 240
25.3.5 Process Transaction Interaction .......................................................... 240
25.3.6 Transactions with No Effect on SOS Inventory Quantity/Value and No Effect
on QuickBooks Accounts..................................................................... 241
25.4 Reconciliation Tools ...................................................................................... 241
25.4.1 Overview ........................................................................................... 241
25.4.2 Inventory Value Report ....................................................................... 242
25.4.3 Work in Progress (WIP) Report ............................................................ 243
25.4.4 Bills (Vendor Invoice) List ................................................................... 243
25.4.5 Purchase Expense List ........................................................................ 244
25.4.6 Reconcile Item Receipts Report ........................................................... 245
25.4.7 Reconcile Vendor Credits Report ......................................................... 246

25.4.8 Reconcile Journal Entries Report ......................................................... 247
25.5 Other Factors Causing an SOS Inventory/QuickBooks Mismatch ........................ 248
25.5.1 Archived and Deleted Items ................................................................ 248
25.5.2 Transactions Deleted or Changed in QuickBooks after SOS Inventory
Created Them .................................................................................... 249
25.5.3 Unintended Journal Entries Related to Inventory Starting Value............. 249
25.5.4 Adjustments with an Incorrect Adjustment Account ............................. 249
25.5.5 Duplicate Journal Entry Posts for the Same SOS Inventory Transaction ... 250
25.5.6 Incorrect Use of “Other Cost” Items .................................................... 251
25.5.7 Transactions Added in QuickBooks that Increase/Decrease Accounts But Do
Not Affect SOS Inventory .................................................................... 251
26 Frequently Asked Questions .......................................................................................... 252
27 Glossary ............................................................................................................................. 259
28 Appendix ........................................................................................................................... 263
28.1 Report Descriptions ...................................................................................... 263
28.1.1 Accounting Reports ............................................................................ 263
28.1.2 Fulfillment Reports ............................................................................ 263
28.1.3 Inventory Reports .............................................................................. 264
28.1.4 Miscellaneous Reports ....................................................................... 265
28.1.5
Purchasing Reports ............................................................................ 265
28.1.6 Production Reports ............................................................................ 267
28.1.7 Rental Reports ................................................................................... 267
28.1.8
Sales Reports ..................................................................................... 268

This document serves as a user guide for SOS Inventory. In addition to this guide, help is also
available within the app or via the SOS Inventory website at https://www.sosinventory.com.
Please send any questions, comments, or suggestions to support@sosinventory.com.
This guide is written in a very informal, conversational style. We hope you find it more
readable and useful than your traditional, formal user manual. We update the guide frequently,
so be sure that you always grab the most recent version.
We have a section for release notes near the end of the guide for your reference as to what is
new in this manual.
SOS Inventory is the #1 inventory and manufacturing add-on for QuickBooks Online. If you are
using QuickBooks Online and do any manufacturing or anything more than basic inventory
management, you need SOS Inventory.
In April 2009, Saddle Oak Software released a new add-on product called OE Companion for
what was then called QuickBooks Online Edition. OE Companion added purchase orders,
inventory management, assemblies, document management, PayPal integration, and a few
other features to QuickBooks Online. Over time, the inventory and manufacturing features
became the most-heavily used parts of the software. In 2011, Intuit launched the Intuit App
Center and Intuit Partner Platform as a new method of connecting to QuickBooks. In July 2011,
Saddle Oak Software launched OE Companion v2, which was renamed SOS Inventory to
highlight the increased focus on inventory management and manufacturing. SOS Inventory v3
was launched in February 2012 with the move to the Intuit Anywhere platform. In March 2013,
SOS Inventory v4 was released furthering the capabilities of the platform to provide more
extensive manufacturing and inventory control. By February of 2015, SOS Inventory’s user
interface was redesigned for version 5 to more closely follow the changes that Intuit was taking
with QuickBooks Online and to make daily tasks more seamless between the environments.

In January of 2017, version 6 was released to update all pages to a newer and more enhanced
version of the edit pages for consistent processing throughout the software package. It also
added streamlined navigation, ease of use, units of measure on all transactions, custom fields,
and increased speed. SOS Inventory version 7, released in October 2017, introduced automated
order processing, added reporting capability, order staging and prioritization, in app
notification system and expanded alert system, a customer portal, and new third-party
integrations.
In the January 2019 release of version 8, SOS Inventory upgrades included a new reporting
engine and migration to a new server infrastructure.
Fullsteam, LLC, purchased SOS Inventory from Saddle Oak Software in January 2019. With that
acquisition, Fullsteam adopted our software name as the company name for the new Fullsteam
subsidiary: SOS Inventory, LLC.
This guide will showcase the features and functions that users have come to rely on, as well as
acquaint them with some new ones.
The workflow that you will use in SOS Inventory depends ultimately on your company’s
business processes. The software is flexible enough to handle a wide variety of different
scenarios. With that said, here is a general sequence that most companies will follow:
1. Order raw materials or products from vendors by creating purchase orders. (Purchasing
menu)
2. Receive the goods into inventory by creating item receipts. (Purchasing menu)
3. Turn raw materials into finished goods using builds or process transactions.
(Production menu)
4. Take sales orders from customers. (Sales menu)
5. Ship goods to customers by creating shipments. (Fulfillment menu)
6. Invoice the customer for goods shipped. (Sales Menu)
One question that we get a lot is about whether the user should use SOS Inventory or
QuickBooks Online to enter orders or other data. The answer is that either will work, and the

optimal workflow really depends on the specific needs of your company. With the automated
order processing feature, the user has even more options to make decisions on how best to
design and utilize SOS to the fullest.
For companies that are already QuickBooks Online customers, and who perhaps have users
who are very comfortable with QuickBooks Online, SOS reads transactions directly from
QuickBooks Online so that QuickBooks Online can be used as the primary place for users to
work. SOS will read new invoices, sales receipts, etc., from QuickBooks Online and generate
shipments, sales orders, reorder alerts, or other transactions automatically, as specified in the
SOS settings.
Most companies using SOS Inventory use SOS for all their day-to-day operations (purchasing,
shipping, manufacturing, etc.). In this model, information is entered into SOS and then
synchronizes to QuickBooks Online as appropriate, so that all financial data are kept up to
date. Users retrieve their inventory data and run inventory reports from SOS Inventory. The
workflow most commonly begins with a sales order as the driver of other transactions,
although this is not required.
SOS Inventory offers three different pricing plans: Companion, Plus, and Pro. A brief
description of the plans is below. A complete description and feature-by-feature comparison is
on the Pricing page of our website at https://www.sosinventory.com/pricing.
•
Companion.
The Companion plan is useful for companies who want to use QuickBooks
Online as their primary system but need just a little more functionality than
QuickBooks Online can provide. The Companion plan adds to QuickBooks Online the
capabilities of sales orders, assemblies, partial shipping/receiving, kits, and backorder
tracking, among other things. The Companion plan includes support by email only.
Email support hours are 7 a.m. – 8 p.m. Central, Monday through Friday, as well as 12-
4 p.m. on Saturday and Sunday.

•
Plus.
The Plus plan is our most popular plan. It is useful both for companies who want
to use QuickBooks Online as a primary or SOS as a primary. The Plus plan includes all
the features of the Companion plan plus price tiers, multiple warehouses, RMAs, bins,
pick tickets, barcoding, serial numbers, lot numbers, units of measure, and rental
inventory, among other things. The Plus plan includes email and phone support. Email
support hours are 7 a.m. – 8 p.m. Central, Monday through Friday, as well as 12-4 p.m.
on Saturday and Sunday. The SOS Support team is available by phone from 9 a.m. – 6
p.m. Central, Monday through Friday.
•
Pro.
The Pro plan is our most sophisticated plan. It is most often useful for companies
needing advanced inventory and manufacturing metrics, as well as companies using
SOS Inventory for all their day-to-day operations. In addition to all the features of the
Plus plan, the Pro plan supports landed costs, work orders, job costing, multiple work
centers, work-in-progress (WIP), labor, overhead, basic MRP functionality, and a
customer portal, among other things. The Pro plan includes email and
priority
phone
support. Email support hours are 7 a.m. – 8 p.m. Central, Monday through Friday, as
well as 12-4 p.m. on Saturday and Sunday. The SOS Support team is available by phone
from 9 a.m. to 6 p.m. Central time, Monday through Friday.
SOS Inventory was designed to work with QuickBooks Online from the ground up. SOS
Inventory integrates tightly with QuickBooks Online to produce a world-class experience for
the user. The integration works via a two-way synchronization process in which data are
exchanged server to server. You can see more on the integration later in this user guide.

March 15, 2024
• Added three general sales setting descriptions—
Enable Line-Item Discounts on Sales
Forms
,
Show Cost/Markup on Sales Forms
, and
Markup on Actual Cost
—to Section
4.2.3.1, General.
• Added an invoice setting and description for
Use Shipping Cost from Shipment
, to
Section 4.2.3.4, Invoices.
• Updated Section 5.1.1.1, Item Field Descriptions, adding a definition for
Markup
and
revising the definition for
Sales Price
.
• Revised point 7 under Section 6.1.2.1, Rules for Working with Vendor-Item Catalog
Entries.
• Corrected points 5bi and 5bii under Option 2 of Section 6.2.8, Purchase Order
Prepayments. The correct value in the Qty column should be entered as
1
(a
positive
number), while the deposit amount entered in the Unit Price column should be entered
as a
negative
number.
• Revised Section 6.3.3, Landed Costs.
• Corrected Section 7.8, Invoices, so that the QuickBooks Online setting referenced in
points 1a and 1c is
Custom Transaction Numbers
.
• All of Chapter 9, Manufacturing (Production), has been rewritten to provide greater
detail and clarity.
• Updated Section 11.2, Custom Field Rules, to clarify the number of custom fields that
can sync with QuickBooks Online.
• Added a new subsection: Section 19.3.2.1, Updating Inventory Levels with Multiple
Shopify Locations.
• Added a new subsection: Section 19.3.5, Shopify Restrictions in Syncing Customer Data
to SOS Inventory.
• Corrected spelling of
ShipStation
in Section 19.8, ShipStation Integration.
• Under Section 25.3.5, Process Transaction Interaction, changed all notes that referred
to a
build
to state
process
.

• In Section 25.4.3, Work in Progress (WIP) Report, corrected the last sentence.
• Under Chapter 26, Frequently Asked Questions, revised the steps for the following FAQ:
When processing a sales order to shipment to invoice, the customer purchase order
number does not come across from SOS to QuickBooks Online. I am currently having to
enter it separately in QuickBooks Online. What might be causing that?
December 15, 2023
• Section 3.2, Inventory Tracking in QuickBooks Online, has been rewritten for clarity.
• Section 5.1.5, Investigating Inventory and Cost Basis Errors with Transaction History,
has been rewritten for clarity.
• Section 25.4.2, Inventory Value Report, has been rewritten to correct and clarify the
content.
October 6, 2023
• In Section 7.11 Price Tiers, deleted an incorrect phrase that said quantity buys could not
be edited using the Export Data/Import Data (bulk edit) features.
• Under Section 9.2.2 Bills of Materials (BOMs), corrected the breadcrumb navigation
listed for the Expanded BOM Report.
• Updated point 6c under Section 19.3.3, Shopify “Customer App” Cart Connection
Checklist (with SKU/SKU Matching to Support Updating Inventory Levels).
August 4, 2023
• Corrected point 1b under Section 3.1.2, Creating the Connection.
• Updated Section 3.1.3, First Sync, so that it specifies that the Retrieve from QuickBooks
function is the specific data utility to use if more than the most recent 1000
transactions need to be imported into SOS Inventory.
• Corrected Section 9.10.1, Contract Manufacturing Workflow, to state that an
expense
item should be created to represent the service fee of a contract manufacturer.
• Inserted new content, Chapter 16, Data Utilities.

• Added a note to Section 17.3, Importing Data, to clarify that the As Of date should not
be specified in SOS Inventory when a data import includes quantities and values as of
the current date.
May 30, 2023
• Corrected how to save categories in Section 5.1.3, Creating and Using Categories.
• Updated the list of QuickBooks data available under the Sync Menu in Section 17.6,
Other QuickBooks Online Data.
• Revised the information in Section 22.1, Setup Checklist for New QuickBooks Online
and SOS Accounts, and Section 22.2, Setup Checklist for Adding a New SOS Account to
an Existing QuickBooks Online Account.
March 7, 2023
• Revised how purchase orders in SOS Inventory are sent to QuickBooks in Section
17.1.1.1, SOS to QuickBooks Online.
• Corrected the hours during which email support is available where mentioned in the
user guide.
November 22, 2022
• Updated Section 1.1, History of SOS Inventory.
• Updated Section 3.1.1, Considerations Before Connecting, and Section 5.12, Kits (Item
Groups). Added information about the incompatibility of QuickBooks Online’s bundles
with SOS Inventory.
• Changed logo on user guide cover.
• Moved “What’s New: User Guide Notes”—formerly Chapter 26, it is now Chapter 2.
October 18, 2022
• Added a new subsection—5.1.2.1, Rules for Working with Vendor-Item Catalog Entries.
• Revised a sentence in Section 5.2.1.1, Purchase Order Transaction Fields. The Contract
Manufacturing field description was revised to clarify that it is used only as an internal
note.
• Revised a phrase in Section 5.6.5, Reorder Report. Changed the second sentence in the
first paragraph to state that the report shows all items in which the Available for Sale

quantity “is at or below” the reorder point. (Previously, the user guide said only
“below.”)
• Changed Chapter 26 title from “What’s New: Release Notes” to “What’s New: User
Guide Notes.” The content of the chapter has been revised, focusing on all changes
within the user guide rather than just those pertaining to software updates. (Revisions
to the software continue to be listed under the Help menu of SOS Inventory. Select
“What’s New” for release notes.)

Now that you know what plan you would like to use, you can start SOS Inventory. This should
be carefully thought out before beginning. You need to decide how you want to connect and
understand what happens when the connection is made. Towards the end of the guide is a
step-by-step checklist of what you would need to do to accomplish the setup of SOS Inventory
and the connection with QuickBooks Online. Please read this section first before using the
checklist.
SOS Inventory communicates with QuickBooks Online via a “connection,” which is simply an
authorization that you provide, giving permission for SOS to communicate with QuickBooks
Online on your behalf. If a connection is not active, the sync functions will not be available to
you.
Before you connect SOS Inventory to QuickBooks Online, you should understand possible
situations that may need to be corrected first.
• If you are connecting a brand-new account, you should be good to go for creating the
connection.
• If you are connecting SOS to an existing QuickBooks Online company account, ensure
that all data is ready to sync (charts of accounts, tax center, vendors, customers,
products and service). Note the following:
o Bundles. The bundle feature in QuickBooks Online is comparable to SOS
Inventory’s item groups (also known as kits), but bundles are not compatible
with SOS Inventory and will cause a sync error when QuickBooks attempts to
send bundled items or a transaction with bundled items to SOS Inventory.
If you have existing active bundles in QuickBooks Online, please either
inactivate the bundles or contact support@sosinventory.com to obtain
assistance in recreating these as items compatible with SOS Inventory.

o Inventory tracking. Another consideration is if you are tracking inventory in a
QuickBooks Online Plus account. For SOS Inventory to be your inventory
management solution, you MUST turn off QuickBooks Online’s Track Inventory
Quantity on Hand in your account settings.
In either case, please contact SOS Support to discuss at [email protected].
If you are moving from QuickBooks Desktop, QuickBooks Premier, or QuickBooks Enterprise to
a QuickBooks Online account, please contact QuickBooks Online Technical Support for more
details on that process.
When you follow this path knowing you will connect to SOS Inventory after the conversion into
QuickBooks Online, the recommended steps are:
1.
Create a QuickBooks Online account.
Make sure that Track Inventory Quantity on Hand
is turned OFF by going to the gear icon in the upper right, selecting Account & Settings,
selecting the Sales tab on the left, and the option is under Product and Services.
2.
Import your QuickBooks Online account into QuickBooks (QuickBooks Online Support
can answer questions).
When asked in a pop-up message during the import if you want
to track inventory, answer No. This will save you time later.
3.
Proceed to section 2.1.2, Creating the Connection.
You can create the connection in one of two methods:
1.
From SOS Inventory.
At https://www.sosinventory.com, select the Free Trial logo in
the upper right corner. Alternatively, you can go to the SOS Inventory login page,
https://live.sosinventory.com and click on I need an account. Either way, you just need
to provide your email address (which should also be an administrator in the
QuickBooks Online account), your display name, and select the plan level you want to
start. This will create your new SOS account.
a. For security, you should set your user profile password before continuing.
b. Now you need to connect to QuickBooks Online by clicking on the Settings
Menu (gear icon) and then QuickBooks Setup. Clicking on the Connect to
QuickBooks button will open a pop-up window that will walk you through

authorizing your QuickBooks Online Company to connect to SOS. Again, you
must be an administrator on QuickBooks Online to accomplish the connection.
SOS finds your QuickBooks Online Company by using your email address, so
make sure it matches in QuickBooks Online. See QuickBooks Setup later in this
guide for more on the automated sync.
2.
From QuickBooks Online.
In QuickBooks Online, go to the Apps option in the left-hand
menu. You should find SOS Inventory listed in the All Apps list. Click on Get App Now
to connect and answer the questions to complete the process as in the other method.
Using this method, it connects the products for you so you do not have to authorize the
connection separately.
No matter which method you use, as the person creating the connection you should now see an
icon in your My Apps list in QuickBooks Online for SOS inventory. Only the person making the
connection will have this option.
When you first make a connection from SOS to QuickBooks Online, SOS will begin
synchronizing your data by retrieving the relevant data in your QuickBooks Online account. All
customers, vendors, and items that are in QuickBooks Online will sync to SOS Inventory. But
only 1,000 most recent of
each
transaction type
will be synchronized to SOS.
This initial synchronization between QuickBooks Online and SOS Inventory typically takes
much longer than subsequent synchronizations. The first sync generally takes 15 minutes to an
hour to complete, depending on the volume of data in your account. You should not use SOS
Inventory while it is synchronizing. Wait until the process completes. When the sync
completes, you will get an email at the address used for your login letting you know.
If you need to sync more transactions than allowed for the initial sync, use the Retrieve from
QuickBooks data utility (Company Menu > Data Tools > Data Utilities) to obtain the additional
transactions. If you have defined Automated Order Processing (AOP) Rules (Company
Menu > Miscellaneous > AOP Rules) or have turned on Auto functions in the Sales Settings
(Settings > Sales Settings), the system will display a message stating that you must disable
these features before using the Retrieve from QuickBooks function. Once you are finished
retrieving transactions, you can enable those options again.
NOTE: If you need to sync additional transactions using Retrieve from QuickBooks, the
synchronization should be completed before executing an item conversion. An item
conversion is needed if inventory tracking was enabled in QuickBooks Online before you
connected to SOS. Please contact our Support desk if this condition exists. If sales orders,
invoices, and purchase orders are synced after an item conversion, transactions will include
the extension (deleted) at the end of each item listed on the transaction and reports in SOS will
not report historical data accurately for those items.
Click the Sync Menu in SOS to synchronize with QuickBooks Online at any time. Just click on
Sync Now to start the sync process. The Sync Menu can always be found on the top Task Bar
(See image in Graphic User Interface).
QuickBooks Online Plus includes an inventory tracking setting called Track Inventory Quantity
on Hand that allows you to keep track of your quantity on hand and cost of goods sold. If you
decide to use SOS Inventory because the inventory functionality in QuickBooks Online is
insufficient for your business needs, you do not want to manage inventory in both SOS and
QuickBooks Online. Use SOS Inventory only. For that reason, SOS customers should turn off
inventory tracking in QuickBooks Online.
If you are having duplicate cost of goods sold entries showing up in QuickBooks Online, the
cause is that inventory tracking has been enabled for some items in QuickBooks.
Consequently, both QuickBooks Online and SOS are posting to cost of goods sold—resulting in
duplicate entries.
If you have questions, please contact SOS Support to discuss at suppor[email protected].

Pictured to the right is SOS Inventory’s login page.
There are two methods of signing into SOS
Inventory. You can sign in using your SOS Inventory
username and password, or you can sign in using
your QuickBooks Online username and password. In
both cases, your SOS administrator must have set
up an SOS Inventory account for you.
The two methods in more detail are:
1.
Signing in with SOS Inventory.
To sign in
directly via SOS Inventory, go to https://www.sosinventory.com and click on the
Login to SOS link in the top right corner of the screen. Alternatively, you can go
directly to https://live.sosinventory.com . On that page, enter your SOS Inventory
username (email) and password. This might be different than your QuickBooks
username and password. If you don’t know your password, click the I forgot my
password link on the bottom left of the login page and follow the instructions.
2.
Signing in with Intuit (QuickBooks Online).
To sign in using your QuickBooks Online
credentials, go to https://www.sosinventory.com and click on the Login button in
the top right corner of the screen. Alternatively, you can go directly to
https://live.sosinventory.com. On that page, click the button labeled Intuit Sign in.
If you are already logged in to QuickBooks, SOS Inventory will log you in
automatically at that point. Otherwise, enter your Intuit username and password to
login. As a reminder, to use this option your email address must match exactly
within both SOS and QuickBooks Online.
In addition to the above sign-in methods, in QuickBooks Online, simply select Apps from the
left menu and go to the My Apps tab and select the SOS Inventory app. Note that QuickBooks
only makes this option available to one user per account, which is the person that actually
connected QuickBooks Online to SOS last.
To sign out of SOS Inventory, go to the User Menu (see next section) and click the Logout
option.

SOS Inventory’s GUI (see image) has been designed to be easy to use and visually coincide with
the look and feel of QuickBooks Online.
When you first login to SOS Inventory you will see the Home Screen. This is your starting point
to navigate through the system. It provides a message area where you’ll find messages from
the SOS team for you the user. Information provided will include important dates such as the
latest release, links to upcoming beta versions for you to test and get a preview of the
functionality, and reminders such as a link to the Support team.
The interface has three main areas of interest. Each area combines functionality to make SOS
Inventory easy to learn and use.
1. Task Bar
•
Company Menu.
This shows your company name and allows for company and
plan settings, data tools, and many functional lists for enhancing your SOS
operations and experience.

•
User Menu.
This shows your display name and provides user specific
functions such as settings and profile, task list, and an option for the user to
logout.
•
Notifications.
Allows a user to see if any notifications have been sent to him
and provides access to viewing past notifications or add new ones.
•
Search.
Allows for extended search of objects throughout SOS.
•
Add Menu.
One-stop menu to add any new transaction, items, etc.
•
Sync Menu.
Allows a user full control over synchronization between SOS and
QuickBooks Online.
•
Print.
Provides a facility to print the current display area.
•
Settings Menu.
One-stop menu for all settings used within SOS Inventory to
include transactional, operational, sync, portal, and integrations.
•
Help Menu.
Provides a wealth of resources for use SOS.
2. Operations Menu
This is the main list area for all existing transaction and reports for daily operations.
•
Dashboard.
Fast link to main information page.
•
Calendar.
Configurable calendar to see important information on
transactions such as overdue invoices and tasks.
•
Purchasing.
Contains vendors, purchase orders, item receipts, and returns to
vendors.
•
Production.
Contains builds, processes, jobs, and work orders.
•
Inventory.
Contains items, adjustments, transfers, serialized inventory, and
lots.
•
Sales.
Contains customers, estimates, sales orders, invoices, and sales
receipts.
•
Fulfillment.
Contains pick tickets and shipments.
•
More Transactions.
Contains RMAs, returns, rentals, and rental returns.
•
Reports.
One-stop page for all reports available in SOS Inventory.
•
Quick Links.
Configurable shortcut list for common actions.
3. Page Display Area
This is the main section of the screen for displaying pages throughout the software.
This area can be increased by clicking on the double left arrow icon at the bottom of the

Operations Menu, which reduces the menu to just icons. Click the double right arrow
icon to expand the menu to show icons with their titles.
The menus and operations available are dependent on the user’s privileges. These areas will be
discussed in more detail as you get further into the user’s guide.
To access sub-menus, simply click on one of the main menus in the Operations Menu or
buttons on the Task Bar.
This guide refers to actions using a tiered structure in a drill-down usage. For example,
Company Menu > Company Settings tells you to go to the Company Menu and choose the
Company Settings option under the Admin section.
The heart of SOS Inventory is its lists, e.g., Items list, Purchase Orders list, Sales Orders list,
etc. The lists provide a summary view of the data in SOS Inventory and allow the user to drill
down for further information if desired. Let’s look at the anatomy of a list page.

In the blue bar at the top of the list, the Display Message shows you a summary of the current
settings for the page, such as “Showing 25 unarchived items.” This message is set in the
Change Filter.
The Page Navigation icons are located at the top and bottom of a list page. This feature is
shown as chevrons (« and ») with numbers between them. Click on a number to go to that
page of the list or click on either of the chevrons to go to the first or last page. The number of
items on a page is set in the Change Filter.
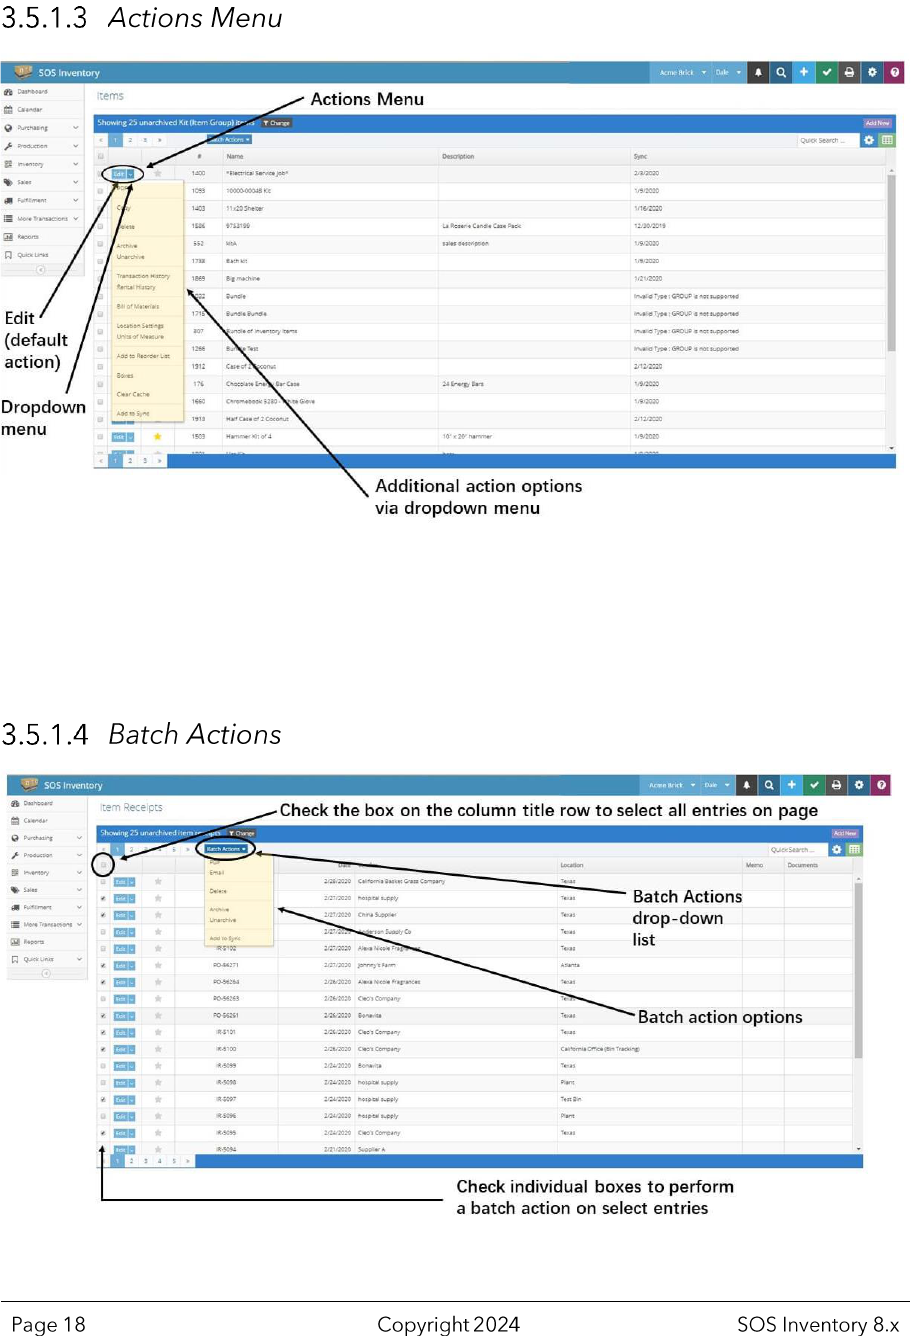
The Actions Menu provides options you can apply to a specific entry on a list. To see the actions
available for a row, click on the down arrow next to Edit. The options vary, depending upon the
particular list. The default action on most lists is Edit, as it is the most commonly used action
for existing entries.
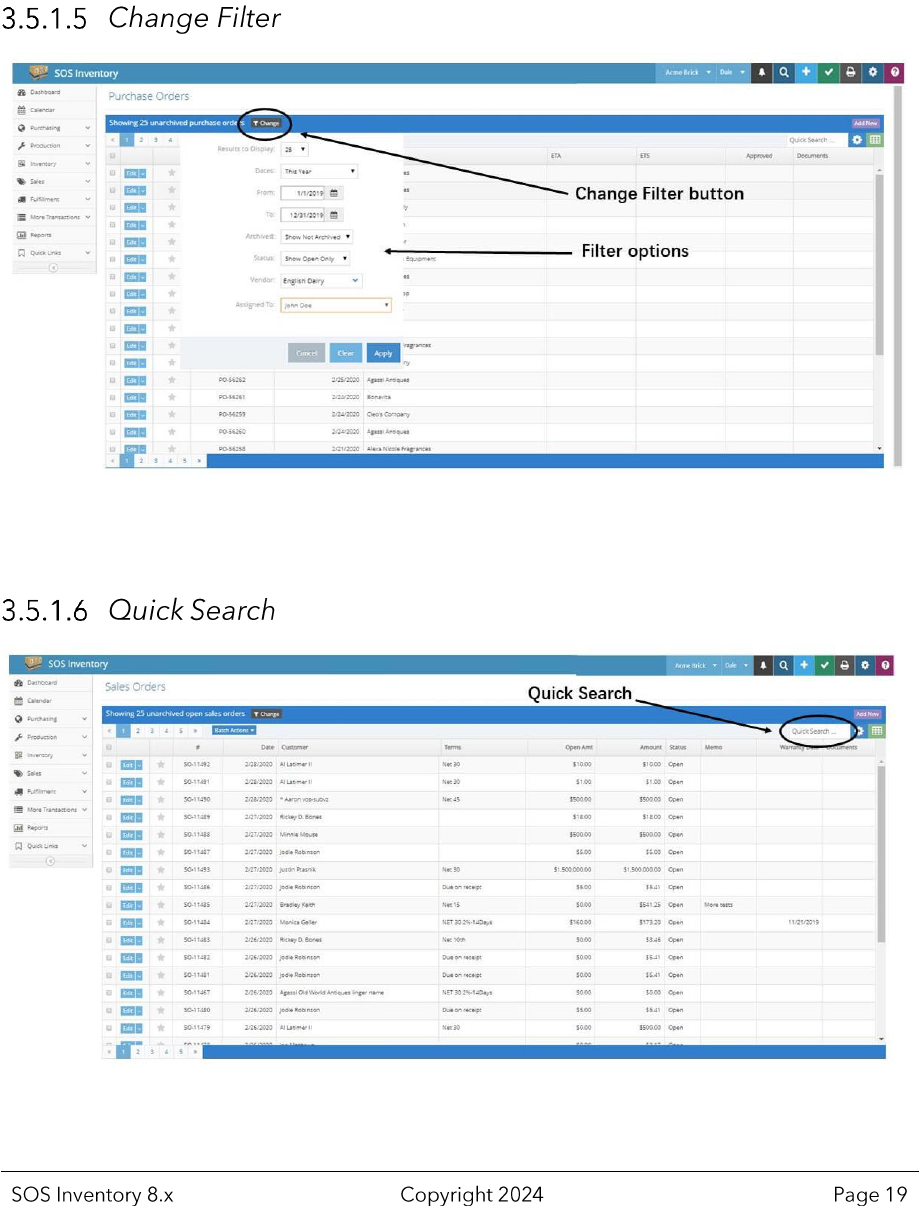
The Batch Actions dropdown list allows you to select a common action and apply it to multiple
rows of entries. Click on the box on the left of each row you want the batch actions to affect.
Clicking the box on the column title row selects every line on that displayed page.
The Change Filter button allows you to select the specific type of information you want from
the list.

Quick Search is an intelligent search limited to data within a list, enabling you find one or more
items which meet the search string. Not all columns are searched. Contact Support if you have
a question about this function.
The Add New button allows you to create a new entry of the same type as those displayed on
the list you are currently viewing.
This button is found on almost all lists in SOS Inventory. In this regard, the list page Add New
feature differs from the Task Bar’s Add (+) Menu. The Add Menu is a “quick add” feature that
allows you to bypass navigating through a list page to create a new page of data—but it is
limited to adding new items, customers, vendors, and transactions only.

The gear icon at top of the list, the Column Chooser, allows you to choose columns of
information to display that are appropriate to the type of list. When the Column Chooser icon
is selected, a pop-up window with all column options for that list appears on your screen.
Simply check or uncheck the box next to the column name to display or hide that column.
When you have finished making your column choices, go to the bottom of the pop-up window
and select Apply.

The Excel Export icon at the top of the list lets you save your currently viewed data as a
spreadsheet. This affects only the page of data you are displaying and not the entire list across
multiple pages.
Stars is a feature set in the Company Settings. You can use it as a reminder or in a stoplight
fashion to show importance of that row in the list.

For every type of object in SOS (item, transaction, etc.) there is an edit page. It is accessed via
the Edit action, the default action on most lists. In the top left corner of every edit page are the
navigation buttons for that page.
The gray Back Arrow button takes you to the list from which you entered the edit mode. If you
use the browser’s back button instead of the gray back arrow, the browser will take you to the
previous operations page before your current list. The Print button gives you a screen print of
the page you are on. The Save and Close button completes the edit and returns you to the list.
Some pages have a More button which provides additional options after the save is completed.
Each user has settings and a unique user profile which they should establish for themselves
after they login for the first time. These can be found under the User Menu (your display name)
on the Task Bar.
The User Profile contains a display name, email address (used as username for logging in),
password, security question and answer, as well as, listing your mobile carrier and mobile
number for text-based notifications which will be discussed in depth later in this guide. To edit
any of this information, go to the Task Bar and select User Menu > User Profile, make your
changes, and click Save in the lower right corner.
NOTE: If you are an administrator, be sure to use the User Profile function as described above to
change your email address, not the User Administration function under the Company Menu.
Users in SOS Inventory do not always have the same time zone or use the same date format for
transactions. User Settings allows you to change these to match your area. All users must set
their time zone setting for transactions to be recorded correctly. User Settings also allows you

to choose how you receive notifications. You can edit this information by going to User Menu >
User Settings, making your changes, and clicking Save in the lower right corner.
Users can set tasks for themselves or others in SOS with due dates so they can be tracked on the
calendar. To add tasks, go to User Menu > Tasks. You can click Add New on the right to add a
new task. Provide a title for the task (must be unique), a description to explain the task if
needed, assign it to yourself or another user in SOS, and set a complete by date. Once the task is
finished, you can either (1) click the Completed option on the task’s edit page, or (2) select
Mark as Complete from the Actions Menu on the Task list.
SOS and QuickBooks Online are separate online products, and thus separate websites. SOS does
not add extra menus to QuickBooks Online. You use both products and they simply exchange
data behind the scenes. One of the most common questions we get is how the user should
switch back and forth between the two products. These are the common approaches:
•
No switching.
Many users simply have no need to switch between SOS and QuickBooks
Online on a regular basis. For example, when running financial reports, you can open
QuickBooks Online and do what is needed. When working with inventory, you can open
SOS and do what is needed. The data will still synchronize per your settings.
You do not
need to have both programs open for them to exchange data, and you do not need to be
logged into them either.
•
Multiple tabs.
Virtually all web browsers today offer the ability to create multiple tabs,
where each tab can view a different website. Our favorite method of switching from SOS
to QuickBooks Online and vice versa (and the method we use here at SOS), is to open
one tab to SOS and one tab to QuickBooks Online. Then switching between the two
programs requires only one simple, fast click.

If you have multiple SOS Inventory company accounts and a user accesses those accounts with
the same email address, that person can switch between accounts by going to Company Menu
> Change Companies. The user may also designate the company that serves as the default
when logging in to SOS Inventory.
• cust (customer)
• adj (adjustment)
• build
• job
• lot
• sn (serial number)
• ship (shipment)
• proc (process
transaction)
• pick (pick ticket)
• xfer (inventory
transfer)
• est (estimate)
• inv (invoice)
• item
• wo (work order)
• po (purchase order)
• ir (item receipt)
• rent (rental)
• ret (return)
• rma
• rr (rental return)
• rtv (return to
vendor)
• so (sales order)
• sr (sales receipt)
• vend (vendor)
As an example, you could enter “5177” (without quotes) to find anything with 5177 in the name or
ID. But if you search for “po 5177” (without quotes) it would look for purchase order ID 5177 only.
In this case, it would take you directly to the appropriate list page.
If you are not using an SOS keyword, enclose a phrase in quotes to obtain precise search results. For
example, “Flight Jacket” finds anything with that phrase as part of the name or description
(depending on the inventory settings you have configured for searches). Without the quotes, SOS
looks for every possible match for that phrase.
SOS Inventory provides many options if you need assistance using the software:

•
Embedded Help.
The software contains help text embedded and can be recognized by the
icon. Also, you can read the instructions included with some pages.
•
Help Menu.
Click on the Help (question mark) icon in the Task Bar to bring up the
following menu:
o
User Guide.
The user guide is available online as a PDF and can be accessed via the
Help menu of the SOS Inventory app or on the Support page of the SOS Inventory
website (https://www.sosinventory.com/support). The guide provides a handy
reference for using SOS Inventory.
o
Frequently Asked Questions (FAQ).
Covers the most common issues encountered
with SOS and even some with QuickBooks Online.
o
Video Tutorials.
Informative videos that show you how to use the more common
features of SOS.
o
How-To Guides.
Step-by-step procedures that you can follow to complete tasks
within SOS.
o
What’s New.
Lists the features that are new to this version. They are also listed in
this user’s guide.

o
Feature Requests.
Uses an external resource called User Voice to allow all SOS users
from any company to view a list of user-requested features that you can review and
vote on. Features with the highest votes are taken into consideration for future
release. You can even provide a new requested feature of your own.
o
Contact Us.
Allows you to submit a support ticket to SOS Inventory technicians for a
fast response to your questions. Email support is available from 7 a.m. – 8 p.m.
Central, Monday through Friday, and from 12-4 p.m. on Saturday and Sunday. Our
average response time is less than one hour, although it can take up to 24 hours in
some cases.
o
About SOS Inventory.
This is where you can find the Terms of Service for SOS
Inventory account use.
•
Phone support.
Phone support is available Monday–Friday (excluding holidays), from 9
a.m. – 6 p.m. Central. Phone support is available for companies on the Plus and Pro plans.
For phone support, dial 1–888–545–4146 and choose option 2. If all Support team
representatives are busy, please email support@sosinventory.com for urgent issues or
leave a message with our call service. Someone will return your call within one business
day.
To print any screen in SOS Inventory, click the Print button on the Task Bar. That will print a
specially formatted version of the page that removes unneeded menus and other formatting to
make it print more cleanly. In addition, many pages have the option to print documents as PDF, as
described elsewhere in this manual.

When you first begin using SOS Inventory, there are some settings and defaults that you might
want to configure to optimize SOS Inventory for your company. Settings come in two general
forms: Company and System. Let’s look at what it takes to set up these areas.
These are the base settings for company wide information within the system. You find them under
Company Menu > Company Settings. Make changes and click Save and Close.
Fields are listed in the order they appear on the Company Settings page in SOS Inventory.
Company Name.
If you are set to be a stand-alone inventory system, enter the name of your
company. If you are connected to a QuickBooks company, this name will be retrieved
automatically.
Company Header.
This header will appear on purchase orders, sales orders, and packing slips.
Never Connect.
Check this box if you don't ever plan to connect to QuickBooks Online. This hides
several menu options to make the user experience a little better. You can change this setting at any
time. Best used for stand-alone companies.
Multi-Currency.
Check this box to enable the multi-currency capabilities of SOS Inventory. If you
are using multi-currency and want the transaction to sync to QuickBooks Online correctly, make
sure that multi-currency is also turned on in QuickBooks Online.
Home Currency.
All transactions are stored in the system in your home currency by default. You
can override this on individual transactions if the Multi-Currency setting is enabled.
Automated Time Zone.
This time zone will be used for transactions that are generated by SOS
Inventory automatically. If a user is logged in, the user time zone setting will override this setting.
The default is UTC time (London). Change to your company’s time zone.

Automated Date Format.
This date format will be used for transactions that are generated by SOS
Inventory automatically. If a user is logged in, the user date format setting will override this
setting.
Stars.
This setting controls the stars that users in your company can select on list pages. Yellow
allows you to flag items for later attention. The Red, Yellow, Green option provides a stoplight type
of flagging (for example, Red – immediate issue, Yellow – take note of, Green – ready for next
step).
Default Lines.
This is the number of line items that will show on a new form, or the number of
lines added when you click the More Lines option on a form. The smallest possible value is 3, and
the largest possible value is 20.
Child Forms Inherit Transaction Number.
By default, child forms (such as an invoice created from
a sales order) will continue the child form numbering. Enable this setting to have the child form
inherit its number from the parent, instead of the next child number.
Logo.
This logo will appear on your forms in quick view or PDF. The file should be less than 2MB in
size. The image will be scaled to the width and height settings which follow. JPEG (*.jpg), PNG
(*.png), and GIF (*.gif) files are accepted. You can change a logo by clicking the Clear Logo button
and browsing for the replacement logo graphic file.
Logo Width.
Enter the width for your logo. Enter the width as a pixel value. A common width is 144,
which is about two inches. Every computer and every printer are different, so you might have to try
different values here to size it exactly as you want. Leave this blank to use the original size if your
logo was edited before adding to be the desired size.
Logo Height.
Enter the height for your logo. Enter the height as a pixel value. A common height is
144, which is about two inches. Every computer and every printer are different, so you might have
to try different values here to size it exactly as you want. Leave this blank to use the original size if
your logo was edited before adding to be the desired size.
These are the base settings for functionality within the system. They are presented in the order
that you’ll find them listed under the Settings Menu in the Task Bar. Make changes and click on
Save and Close in each settings area.
Fields are listed in the order they appear on the Purchasing Settings page in SOS Inventory.
Next PO Number.
Change this value if you want to reset your purchase order numbering.
PO Number Prefix.
This field is optional. If a value is entered, it will be placed automatically before
system-generated PO numbers. For example, if the prefix is
2013-
, PO numbers would be
2013-1
,
2013-2
, and so forth.
Next Item Receipt Number.
Change this value if you want to reset your item receipt numbering.
This is only for item receipts being created directly and not as a child form from a PO. Child forms
inherit the transactions number from the parent.
Item Receipt Number Prefix.
This field is optional. If a value is entered, it will be placed
automatically before system-generated item receipt numbers. For example, if the prefix is
2013-
,
item receipt numbers would be
2013-1
,
2013-2
, and so forth.
Next RTV Number.
Change this value if you want to reset your RTV numbering.
RTV Number Prefix.
This field is optional. If a value is entered, it will be placed automatically
before system-generated RTV numbers. For example, if the prefix is
2013-
, RTV numbers would be
2013-1
,
2013-2
, and so forth.
Default CC for POs.
Set this value to automatically CC all your purchase orders to a certain address.
Hide Item Name.
Check this box to hide the item name on purchase orders, sales orders, and
packing slips. This is often useful in drop shipping. You can also change this setting for each
individual form.

Default Ship-To Location for POs.
This is the default ship-to location for purchase orders.
Location is pulled from locations list and the address in the definition is used as ship to.
Default QuickBooks Sync for Item Receipts.
This is the default option for syncing item receipts to
QuickBooks. You can override this on any given item receipt. Values are None, Bill, Cash, Check,
Credit Card.
Require Approval for POs.
If you check this box, a user with permission to approve POs must
approve each PO for the items to be received into inventory. This feature is available on Plus and
Pro plans only. You will also need to enable the Approved column in the PO list to take full
advantage of this feature.
Purchase Order From.
This is the email from which your purchase orders will be sent.
Purchase Order Message.
This is the body of the email message to be sent with your purchase
orders. Do not use HTML.
Purchase Order Footer.
This text will show at the bottom of every purchase order.
Auto Serial/Lot Numbers.
Check this box to generate serial and lot numbers automatically when
receiving serial- and lot-tracked items.
Auto Serial Prefix.
If you are auto-generating serial numbers, this prefix will come before the
actual number.
Auto Lot Prefix.
If you are auto-generating lot numbers, this prefix will come before the actual
number.
Auto Serial/Lot Random.
If this box is checked, auto-generated serial and lot numbers will be
generated randomly, according to the format you specified. Otherwise, they will be generated
sequentially.
Auto Serial/Lot Number Length.
Length of automatic serial and lot numbers. The minimum length
is 8 characters and the maximum length is 32.
Auto Serial Next Sequential.
If you are auto-generating serial numbers sequentially, this number
will be next.

Auto Lot Next Sequential.
If you are auto-generating lot numbers sequentially, this number will be
next.
Search Any Part of Vendor Name.
Check this option to search for vendors by any part of the name,
instead of only what the name starts with.
Default Expense Account.
This is the expense account used by the system if an item does not have
an expense account specified.
Update Default Cost.
Check this box to update the default cost of an item automatically when you
issue a PO or item receipt for that item. You can override this setting in the PO or Item Receipt if
needed. Do not enable this setting if you use the multicurrency feature. For multicurrency, default
costs should be included in the Vendor-Item Catalog instead of the item definition.
Suggest PO Quantities.
Check this box to have SOS automatically suggest a reorder quantity when
you enter an item on a purchase order.
Include WOs on Reorder Report.
Check this box to include work order calculations on the Reorder
Report. This considers all inputs for assemblies and items listed for a process transaction.
Enter Customer on Line Items.
Check this box to be able to specify the customer on each line item
of purchase forms.
Show Weight on Purchase Forms.
Check this box to display the weight of each item (and the total
weight) on purchase forms.
Show Volume on Purchase Forms.
Check this box to display the volume of each item (and the total
volume) on purchase forms.
Synchronize POs.
Check this box to synchronize POs with QuickBooks Online. For existing
accounts, enabling this option will retrieve any POs from QuickBooks Online on your next sync.
Please be sure that this is your intention. Also, any future purchase orders created, edited, or
deleted in SOS will synchronize with QuickBooks Online. If you are using QuickBooks Online
Essentials, this option
must
be off to allow for successful syncs.
Automate Drop Ship POs.
If this box is checked, SOS does two extra steps on a drop ship PO. It
closes the PO automatically, and it creates a journal entry in QuickBooks Online to record the
payable and cost of goods sold. Uncheck this box to disable this behavior.

Fields are listed in the order they appear on the Inventory Settings page in SOS Inventory.
Don’t Ask About Negative Inventory.
If this option is checked, SOS Inventory will not warn you
when shipping, using, or adjusting items that would cause your inventory to go negative. Don’t
check this box if you want to avoid negative inventory.
Default Income Account.
Income (sales) account used for new items if another one is not specified.
Default Asset Account.
Asset account used for new items if another one is not specified.
Default COGS Account.
Cost of goods sold account used for new items if another one is not
specified.
New Items Taxable.
Check this option to set new items as taxable by default.
Sync New Items.
Check this option to sync new items with QuickBooks Online by default.
Default Adjustment Account.
Default account to use for tracking inventory adjustments. Normally
this would be something like
Breakage
,
Spoilage
, or
Adjustments
.
Default Checking Account.
Default account to use when creating new checks (while receiving
items).
Default Credit Card Account.
Default account to use when creating new credit card charges (while
receiving items).
Default Cash Account.
Default account to use when creating new cash purchases (while receiving
items).
Next Adjustment Number.
Change this value if you want to reset your inventory adjustment
numbering.
Adjustment Number Prefix.
This field is optional. If a value is entered, it will be placed
automatically in front of system-generated inventory adjustment numbers. For example, if the
prefix is
2013-
, inventory adjustment numbers would be
2013-1
,
2013-2
, and so forth.
Next Transfer Number.
Change this value if you want to reset your inventory transfer numbering.

Transfer Number Prefix.
This field is optional. If a value is entered, it will be placed automatically
in front of system-generated inventory transfer numbers. For example, if the prefix is
2013-
,
inventory transfer numbers would be
2013-1
,
2013-2
, and so forth.
Work Order Title.
Change this value if you want to change the title when printing or emailing work
orders. For example, some people use
Job Order
instead. The title should be no more than 50
characters.
Work Order From.
This is the email from which your work orders will be sent.
Work Order Message.
This is the body of the email message to be sent with your work orders. Do
not use HTML.
Work Order Footer.
This text will show at the bottom of every work order.
Default CC for Work Orders. Set
this value to automatically CC all your work orders to a certain
email address.
Next Job Number.
Change this value if you want to reset your job numbering.
Job Number Prefix.
This field is optional. If a value is entered, it will be placed automatically in
front of system-generated job numbers. For example, if the prefix is
2013-
, job numbers would be
2013-1
,
2013-2
, and so forth.
Next WO Number.
Change this value if you want to reset your work order numbering.
WO Number Prefix.
This field is optional. If a value is entered, it will be placed automatically in
front of system-generated work order numbers. For example, if the prefix is
2013-
, work order
numbers would be
2013-1
,
2013-2
, and so forth.
Next Build Number.
Change this value if you want to reset your build numbering.
Build Number Prefix.
This field is optional. If a value is entered, it will be placed automatically in
front of system-generated build numbers. For example, if the prefix is
2013-
, build numbers would
be
2013-1
,
2013-2
, and so forth.
Next Proc Txn Number.
Change this value if you want to reset your process transaction numbering.

Proc Txn Number Prefix.
This field is optional. If a value is entered, it will be placed automatically
in front of system-generated process transaction numbers. For example, if the prefix is
2013-
,
process transaction numbers would be
2013-1
,
2013-2
, and so forth.
Calculate Reorder Points.
Check this option to have SOS Inventory calculate reorder points
automatically, on a weekly basis. The calculation makes an estimate based on historical data. (Pro
Plan only)
Find Items by Short Name.
Check this option to search for items on sales orders, purchase orders,
and so forth, using the short name of the item instead of the full name of the item. This can be
useful if you use many levels of sub-items. Be careful using this option, as you can accidentally
cause yourself to be unable to look up items if you have multiple items that have the same short
name.
Search Any Part of Item Name.
Check this option to search for items by any part of the name,
instead of only what the name starts with.
Search Item Description.
Check this option to search for items by the description, in addition to
the name. Please keep in mind that this can slow your results, especially if you have a large number
of items.
Auto-Build Assemblies.
Check this option to build assemblies automatically when creating a
shipment. This feature only builds top-level assemblies, not all levels of a multi-level assembly.
Valuation Method.
SOS Inventory supports three valuation methods: Weighted Average, FIFO
(default method), and LIFO. This method will be used to calculate the value of your inventory on
reports. If you don’t know (or don’t care), you can just leave the default option. Any changes to
inventory calculations will not affect historical transactions. The new option will apply only to
transactions completed after the change is made. If you are unsure about this change, contact a
qualified accountant.
Value Serials by Specific Id.
Check this box to value serialized items by specific unit cost,
regardless of the valuation method for other items.
Always Use Average Costs for Cost by Location.
Check this box to calculate the cost basis at a
specific location using average costs instead of FIFO or LIFO, even if you use FIFO or LIFO

otherwise. This can be helpful to produce reports that are more meaningful, even though not
strictly FIFO or LIFO.
Don’t Show Quantity on Builds and Shipments.
For customers creating long builds or shipments,
calculating the quantity of each item can be inconvenient. Enable this option to remove that
column.
Picture Width.
Enter the width for printed item pictures. These are typically used when making
sell sheets, for example. Enter the width as a pixel value. A common width is 144, which is about
two inches. Every computer and every printer are different, so you might have to try different
values here to size it exactly as you want.
Picture Height.
Enter the height for printed item pictures. These are typically used when making
sell sheets, for example. Enter the height as a pixel value. A common height is 144, which is about
two inches. Every computer and every printer are different, so you might have to try different
values here to size it exactly as you want.
Use Units of Measure.
Check this box to track multiple units of measure for your items. The Units
of Measure feature is available on all transactions.
Barcode Width.
Enter the width for printed barcode images. These are typically used when making
barcode labels. Enter the width as a pixel value. A common width is 144, which is about two inches.
Every computer and every printer are different, so you might have to try different values here to
size it exactly as you want.
Barcode Height.
Enter the height for printed barcode images. These are typically used when
making barcode labels. Enter the width as a pixel value. A common width would be 72, which is
about one inch. Every computer and every printer are different, so you might have to try different
values here to size it exactly as you want.
Job Tracking.
Check this box to track transactions by job.
Rental Inventory.
Check this box to enable rental inventory.
Track Workers.
Check this box if you want to track the individual workers when you enter labor
items on builds or process transactions.

Sales settings are the most extensive configuration of SOS Inventory because there are so many
different transactions involved in sales. This menu is broken out by tabs.
Fields are listed in the order they appear on the Sales Settings page in SOS Inventory.
Default Tax Code.
This is the default tax code if you use the Sales Tax Center in QuickBooks Online.
If you do not use the Sales Tax Center, then this setting has no effect.
Show Available for Sale on Forms.
Check this box to retrieve the available-for-sale quantity
automatically when entering a new item on a sales order. You can hover your mouse over the
quantity box to see the available quantity. Using this option can slow down the retrieval of item
information.
Default Tax Rate.
Default sales tax rate, specified as a percentage. You can also set a default rate
for each individual location.
Discount Taxable.
Check this box if discounts are taxable. You can override this setting on any
sales form.
Go to Invoice from SO.
Check this box to view the invoice automatically after generating an
invoice from a sales order.
Default Payment Method.
This is the default payment method for customer payments.
Default Terms.
Default terms specified in QuickBooks Online, or in SOS if not connected to
QuickBooks Online.
Hide Item Name.
Check this box to hide the item name on purchase orders, sales orders, and
packing slips. This is often useful in drop shipping. You can also change this setting for each
individual form.
Find Customers By Long Name.
Check this option to search for customers by their long name,
which includes any parent customers, instead of the regular customer name. This is helpful if you
use sub-customers.

Search Any Part of Customer Name.
Check this option to search for customers by any part of the
name, instead of only what the name starts with.
Auto-Ship Invoices.
Check this box to create a shipment automatically for new invoices created in
QuickBooks Online. Do not use if items are tracked by serial or lot number.
Auto-Ship Sales Receipts.
Check this box to create a shipment automatically for new sales
receipts created in QuickBooks Online. Do not use if items are tracked by serial or lot number.
Auto Backorder Sales Receipts.
Check this box to create a backorder automatically for new sales
receipts created in QuickBooks Online.
Auto Sales Order Invoices.
Check this box to create a sales order automatically for new invoices
created in QuickBooks Online. This setting will be ignored if a shipment is automatically created
for the invoice.
Show Weight on Sales Forms.
Check this box to display the weight of each item (and the total
weight) on sales forms.
Enable Line-Item Discounts on Sales Forms.
Displays a regular price, discount percentage, and
sales price on each item on a sales form.
Show Cost/Markup on Sales Forms.
Displays the markup on each item and the total costs for the
line as two additional columns on sales forms. Available only to administrators and users with the
View Costs
permission.
Markup On Actual Cost.
Uses actual cost instead of standard cost when showing cost/markup on
sales forms.
Show Volume on Sales Forms.
Check this box to display the volume of each item (and the total
volume) on sales forms.
Include Incoming in Available.
Check this box if you want to include inbounds goods (e.g., POs,
rentals due, etc.) in your available-for-sale calculations. Normally you would enable this only if
your incoming goods have very reliable delivery dates.

Show Only In-Stock.
Check this box if you want to show ONLY items in-stock when generating a
pick ticket or shipment from a sales order or sales receipt. You can override this option by entering
any other items manually.
Expand Kits on Sales Orders.
Check this box to expand kits automatically when saving a sales
order.
Sales Order Title.
Change this value if you want to change the title when printing or emailing sales
orders. For example, some people use Work Order instead. The title should be no more than 50
characters.
Next SO Number.
Change this value if you want to reset your sales order numbering.
SO Number Prefix.
This field is optional. If a value is entered, it will be placed automatically in
front of system-generated sales order numbers. For example, if the prefix is
2013-
, sales order
numbers would be
2013-1
,
2013-2
, etc.
Sales Order From.
This is the email from which your sales orders will be sent.
Sales Order Message.
This is the body of the email message to be sent with your sales orders. Do
not use HTML.
Sales Order Footer.
This text will show at the bottom of every sales order.
Default CC for Sales Orders.
Set this value to automatically CC all your sales orders to a certain
email address.
Lock Sales Orders When Editing.
Check this box to prevent users from editing a sales order that
someone else already has open. Eliminates chance of two users editing the same transaction where
the last one to save would overwrite the other user’s changes. If sales order is already open by
another user, the system will display a message letting the user know someone else is currently
editing the order.

Estimate Title.
Change this value if you want to change the title when printing or emailing
estimates. For example, some people use
Quote
instead. The title should be no more than 50
characters.
Next Estimate Number.
Change this value if you want to reset your estimate numbering.
Estimate Number Prefix.
This field is optional. If a value is entered, it will be placed automatically
in front of system-generated estimate numbers. For example, if the prefix is
2013-
, estimate
numbers would be
2013-1
,
2013-2
, and so forth.
Estimate From.
This is the email from which your estimates will be sent.
Estimate Message.
This is the body of the email message to be sent with your estimates. Do not
use HTML.
Estimate Footer.
This text will show at the bottom of every estimate.
Default CC for Estimates.
Set this value to automatically CC all your estimates to a certain email
address.
Use QuickBooks Invoice Numbers.
If this setting is on, SOS Inventory will leave the invoice
number blank when sending an invoice to QuickBooks, and QuickBooks will generate an invoice
number and syncs the transaction back to SOS. Refer to section 6.8, Invoices, for additional
information on using this feature with QuickBooks Online.
Next Invoice Number.
Change this value if you want to reset your invoice numbering. Leave this
field blank if Use QuickBooks Invoice Numbers has been enabled.
Invoice Number Prefix.
This field is optional. If a value is entered, it will be placed automatically in
front of system-generated invoice numbers. For example, if the prefix is
2013-
, invoice numbers
would be
2013-1
,
2013-2
, and so forth. Leave this field blank if Use QuickBooks Invoice
Numbers has been enabled.
Invoice From.
This is the email from which your invoices will be sent.

Invoice Message.
This is the body of the email message to be sent with your invoices. Do not use
HTML.
Invoice Footer.
This text will show at the bottom of every invoice.
Default CC for Invoices.
Set this value to automatically CC all your invoices to a certain email
address.
Use Shipping Cost from Shipment.
By default, SOS uses the shipping cost specified on the sales
order when invoicing. This setting overrides the default, using the shipping cost from the
associated shipment transaction instead of the sales order.
Next Sales Receipt Number.
Change this value if you want to reset your sales receipt numbering.
Sales Receipt Number Prefix.
This field is optional. If a value is entered, it will be placed
automatically in front of system-generated sales receipt numbers. For example, if the prefix is
2013-
, sales receipt numbers would be
2013-1
,
2013-2
, and so forth.
Sales Receipt From.
This is the email from which your sales receipts will be sent.
Sales Receipt Message.
This is the body of the email message to be sent with your sales receipts.
Do not use HTML.
Sales Receipt Footer.
This text will show at the bottom of every sales receipt.
Default CC for Sales Receipts.
Set this value to automatically CC all your sales Receipts to a certain
email address.
Include Sales Receipts in Available.
Check this box if you want to include sales receipts in your
available-for-sale calculations. If this option is turned off, only sales orders are included.
Next Shipment Number.
Change this value if you want to reset your shipment numbering. Note
that this applies only on shipments created from scratch. A shipment generated from another
transaction will take the number of that transaction.

Shipment Number Prefix.
This field is optional. If a value is entered, it will be placed automatically
in front of system-generated shipment numbers. For example, if the prefix is
2013-
, shipment
numbers would be
2013-1
,
2013-2
, and so forth.
Packing Slip Title.
Change this value if you want to change the title when printing or emailing
packing slips. For example, some people use
Packing List
instead. The title should be no more than
50 characters.
Packing Slip From.
This is the email from which your packing slips will be sent.
Packing Slip Message.
This is the body of the email message to be sent with your packing slips. Do
not use HTML.
Packing Slip Footer.
This text will show at the bottom of every packing slip.
Show On Packing Slips.
Select whether you want the customer’s email address and/or phone
number to show on packing slips.
Ship From Address of Location.
By default, SOS will display the company header information on a
packing slip when shipping. Enable this setting to use instead the address of the location from
which you are shipping.
Bill of Lading Footer.
This text will show at the bottom of every bill of lading.
Default CC for Shipments.
Set this value to automatically CC all your shipments to a certain email
address.
Next RMA Number.
Change this value if you want to reset your RMA numbering.
RMA Number Prefix.
This field is optional. If a value is entered, it will be placed automatically in
front of system-generated RMA numbers. For example, if the prefix is
2013-
, RMA numbers would
be
2013-1
,
2013-2
, and so forth.
RMA Footer.
This text will show at the bottom of every RMA.
RMA From.
This is the email from which your RMAs will be sent.

RMA Message.
This is the body of the email message to be sent with your RMAs. Do not use HTML.
Next Return Number.
Change this value if you want to reset your return numbering.
Return Number Prefix.
This field is optional. If a value is entered, it will be placed automatically in
front of system-generated return numbers. For example, if the prefix is
2013-
, return numbers
would be
2013-1
,
2013-2
, and so forth.
Pick Ticket Title.
Change this value if you want to change the title when printing or emailing pick
tickets. For example, some people use Pick Slip instead. The title should be no more than 50
characters.
Next Pick Ticket Number.
Change this value if you want to reset your pick ticket numbering.
Pick Ticket Number Prefix. This
field is optional. If a value is entered, it will be placed
automatically in front of system-generated pick ticket numbers. For example, if the prefix is
2013-
, pick ticket numbers would be
2013-1
,
2013-2
, and so forth.
Pick Ticket Footer.
This text will show at the bottom of every pick ticket.
Pick Ticket From.
This is the email from which your pick tickets will be sent.
Pick Ticket Message.
This is the body of the email message to be sent with your pick tickets. Do
not use HTML.
Serials/Lots on Pick Tickets.
Check this box if you want to specify serial numbers and lot numbers
on pick tickets.
Default CC for Pick Tickets.
Set this value to automatically CC all your pick tickets to a certain
email address.

Rental Title.
Change this value if you want to change the title when printing or emailing rentals.
For example, some people use Rental Ticket instead. The title should be no more than 50
characters.
Next Rental Number.
Change this value if you want to reset your rental numbering.
Rental Number Prefix.
This field is optional. If a value is entered, it will be placed automatically in
front of system-generated rental numbers. For example, if the prefix is
2013-
, rental numbers
would be
2013-1
,
2013-2
, and so forth.
Rental Footer.
This text will show at the bottom of every rental.
Rental From.
This is the email from which your rentals will be sent.
Rental Message.
This is the body of the email message to be sent with your rentals. Do not use
HTML.
Next Rental Return Number.
Change this value if you want to reset your rental return numbering.
Rental Return Number Prefix.
This field is optional. If a value is entered, it will be placed
automatically in front of system-generated rental return numbers. For example, if the prefix is
2013-
, rental return numbers would be
2013-1
,
2013-2
, and so forth.
These settings will allow you to set what format of barcode you want SOS to use when defining and
printing labels.
Barcode Format.
Supported barcode formats are Code 39, UPC, ISBN, or QR Code.
Printed Width (inches).
Specifies the print width.
Printed Height (inches).
Specifies the print height.
Sample Text.
Allows you to put in what you desire for the barcode and click Show Sample to see
what the barcode looks like for the settings above.
See the section on Barcoding later in this guide for where and how barcodes can be used.
These settings affect the way SOS Inventory and QuickBooks Online interact with each other and
more. If you are not currently connected to QuickBooks Online, you will see only two buttons: one
button to Connect to QuickBooks, and one that selects the stand-alone function Never Connect.
An entire section discusses the integration with QuickBooks Online later in this user’s guide.
Disconnect.
Select Remove Connection to QuickBooks Online to disconnect from QuickBooks
Online. If you disconnect, you will not be able to synchronize until you reconnect.
Automatic Sync.
You can choose hourly, daily, weekly, or never. When enabled, SOS Inventory will
automatically sync with QuickBooks Online according to the schedule you specify. Choose Never if
you want to do all synchronizations manually.
Directional Sync.
Change this setting to control the information flow when synchronizing. You
can let it default to bi-directional or for unique cases, limit it to only one direction, or not send at
all.
Post COGS to QuickBooks.
Uncheck this box if you do not want SOS to post cost of goods sold to
QuickBooks. This option is enabled by default, and we recommend that you leave it enabled.
However, in certain situations you might wish to have manual control over COGS postings—for
example, if you are getting duplicate postings due to QuickBooks Online inventory tracking. Check
with your accountant or SOS Support if you are unsure.
Class Tracking.
Check this box to turn on class tracking. Classes enable you to group transactions
for reporting purposes. If you select classes on transactions, the classes will sync with QuickBooks.
Department Tracking.
Check this box to turn on department tracking. Departments enable you to
group transactions for reporting purposes. If you select departments on transactions, the
departments will sync with QuickBooks. Departments can also make it easier for auto-ship
invoices and auto-ship sales receipts if the departments match the locations defined in SOS.

When SOS Inventory needs to post data to QuickBooks, it posts to the accounts associated with
each item, as described later in this manual. If the accounts are not specified, SOS Inventory uses
the default accounts specified on the settings pages. You should make sure that these accounts are
set to the ones that you want, or your data might post to incorrect accounts in QuickBooks.
Default Income Account.
Found on the Inventory Settings page (Settings Menu > Inventory
Settings). This account will be used as the default for all sales unless it is otherwise specified with
the item.
Default Asset Account.
Found on the Inventory Settings page (Settings Menu > Inventory
Settings). This account will be used as the default to record inventory assets. It can be overridden
at the item level.
Default COGS Account.
Found on the Inventory Settings page (Settings Menu > Inventory
Settings). This account will be used as the default to record cost of goods sold. It can be overridden
at the item level.
Default Expense Account.
Found on the Purchasing Settings page (Settings Menu > Purchasing
Settings). This account will be used as the default for expense items on purchase orders and item
receipts. It can be overridden at the item level.
Default Credit Card Account.
Found on the Inventory Settings page (Settings Menu > Inventory
Settings). This account will be used as the default for all credit card charges generated from item
receipts. This account must be of type Credit Card in QuickBooks or you will get an error message
when you sync.
Default Checking Account.
Found on the Inventory Settings page (Settings Menu > Inventory
Settings). This account will be used as the default for all checks generated from item receipts. This
must be a bank account in QuickBooks.
Default Cash Account.
Found on the Inventory Settings page (Settings Menu > Inventory
Settings). This account will be used as the default for all cash purchases generated from item
receipts.

Default Adjustment Account.
Found on the Inventory Settings page (Settings Menu > Inventory
Settings). This account will be used as the default account to record inventory adjustments, unless
otherwise changed on the adjustment page. In an adjustment, a debit or credit will be issued to the
inventory asset account and an offsetting entry will be issued to the adjustment account. This is
normally the Inventory Shrinkage account in QuickBooks Online.

The inventory management functions of SOS Inventory collectively form the core of SOS
Inventory—the underlying engine on which the software runs. The inventory features are used by
companies ranging in size from one-person to as many as several thousand employees. Most
importantly, the functionality matches that found in expensive inventory/manufacturing/ERP
systems that cost over 10 times as much as SOS Inventory.
Items are the most important pieces of data in SOS Inventory. They drive everything else in the
system. You can set up an item to represent almost anything. It does not have to be something
stored in inventory. An item is simply something that you want to track in SOS Inventory, which
could be a product you sell, a service you provide, raw materials for manufacturing, overhead
expenses, and so on.
SOS Inventory provides three ways to add an item. You can go on the Task Bar under Add Menu >
Inventory > Item. You may also add new items from the Items page under Operations Menu >
Inventory > Items and click on Add New in the upper right corner of the content area. Then enter
the proper information and save. Or when filling out a form (purchase order, sales order, etc.), if
you enter an item name that does not match an existing item, the system will prompt you to create
a new item automatically. If using the inline method, be sure that you have configured your default
settings for new items, as those are the settings that SOS Inventory will use for the new items
entered on forms.
Refer to Item Field Descriptions and Accounts Needed According to Item Type to help you as you
define an item.
Fields are listed in the order they appear on the Item edit page in SOS Inventory.

Name.
Name of the item. The name should be whatever you want to use to reference this item. The
name is the primary method you will use to retrieve the item on forms. This could be a part
number, SKU number, item code, descriptive name, or anything you want, as long as you
understand what it represents. Double quote (“) characters are not allowed in the item name.
Those will be converted to single quotes.
Description.
This is the default description for your item. You can change it on any individual form.
Type.
SOS Inventory supports the following item types:
•
Inventory.
Inventory items are the most common type of item you will have. These simply
represent any item for which you want to track stock on hand.
•
Non-inventory.
Non-inventory items are items that you want to use in transactions but for
which you do not maintain inventory. For example, this could be used for items that you
sell but do not stock (for example, drop-shipped items).
•
Category.
Category items are ways to group like items. This is very similar to the structure
of QuickBooks Online. For example, if you sell 10 different types of widgets, you could have
a category item called Widget with 10 items underneath. For a category item, its inventory
is always the sum of the inventory of its items.
•
Expense.
An expense item is not tracked for inventory purposes. When it is purchased, it is
booked to QuickBooks Online directly as an expense.
•
Assembly.
An assembly item is a special type of inventory item. An assembly is made up of
component items. Its cost is determined by its bill of materials (BOM). For more
information on assemblies, go to the section on Assemblies.
•
Kit (Item Group).
A collection of physical items that are bundled together at the time of
purchase or sale. The items in a kit are still separate items that may be sold individually if
desired. For more information, go to the section on Kits (Item Groups).
•
Service.
Service items are non-inventory items used to represent services or fees that you
provide (or that are provided to you). An example would be installation or delivery.
•
Labor.
For more information on labor items, go to the section on Labor. Labor items are
available only on the Pro plan.
•
Overhead.
For more information on overhead items, go to the section on Overhead.
Overhead items are available only on the Pro plan.
•
Other.
Use this designation for non-inventory items that do not fall in one of the other
categories.

Has Variants.
Indicates that the item is a product with multiple variations. For more information
about this feature, see Item Variants.
Category.
This allows you to select a category to assign the item to so that you may group common
items together and report on all items within the category. For more on categories, see the section
Creating and Using Categories.
Sales Price.
A fixed price that you charge your customers for this item. You can enter the fixed price
or select Switch to markup pricing to add a percentage of either the standard cost or the actual cost
basis in the Markup field to set the final selling price.
Markup.
The price of an item that is charged to a customer, calculated by adding a percentage to
either the standard cost or the actual cost basis. You can enter the markup percentage or select
Switch to fixed pricing and enter a fixed price in the Sales Price field. Fixed pricing is the default. If
you want the markup based on the actual cost of the item under your valuation method, enable
Markup on Actual Cost (Settings > Sales Settings > General).
Minimum Sales Price.
Specifies the lowest sales price that the system will accept. The system will
not allow any transaction to be saved if the sales price entered for an item is below its minimum
sales price.
Track Serial Numbers.
Selecting this option allows you to track serial numbers for specific items.
NOTE: You can track both serial numbers and lot numbers on the same item, if desired. For more
information on serial number tracking, go to the section on Serial Inventory.
Track Lot Numbers.
Selecting this option allows you to track lots for this item when it is
purchased, shipped, or manufactured. NOTE: You can track both serial numbers and lot numbers
on the same item, if desired. For more information on lot tracking, go to the section on Lots.
Income Account.
Account to record income from sales of this item.
Asset Account.
Account to record inventory on hand for this item. If the list is empty, that means
you have not set up any asset accounts for your inventory.
COGS Account.
Account to record costs of goods sold for this item. If the list is empty, that means
you have not set up any COGS accounts.

Expense Account.
Account that will be affected when you purchase, sell, or use this item. This
applies only to items in which the Type field is designated as Non-inventory, Kit (Item Group),
Service, Expense, Labor, or Overhead.
Always Shippable.
Specifies that the item can always be shipped. This option is available for any
item type except Inventory, Assembly, and Category.
Barcode.
SOS Inventory will recognize the item by this barcode in addition to the name of the item.
You can type the code or scan it in from an existing barcode. For more information on barcoding, go
to the section on Barcoding.
Warranty.
The type of warranty attached to the sale of a serial-tracked item. The warranty must be
defined before it will appear in the dropdown list.
SKU.
Scan or type the SKU that the system will use to recognize this item. This syncs to the SKU
field in QuickBooks Online.
Picture.
You can attach a picture of the item for reference within SOS. You can set the size of the
picture as mentioned previously in the Inventory Settings.
Web Address.
URL where this item can be located online.
Purchase Description.
This description will be shown on purchase orders and other purchasing
forms.
Purchase Cost.
Also known as the standard cost, which is the default price you pay when
purchasing this item. This value is mandatory for any items that will be used as the output on a
process transaction.
Preferred Vendor.
Vendor from which you normally purchase this item. This will assist you in
generating purchase orders from the Reorder Report mentioned later in this guide. If you need to
specify multiple vendors for an item, use the Vendor-Item Catalog.
Vendor Part Number.
Use this field if your vendor has a different part number for this item than
you do. This value will show on the line item of a purchase order. This field is optional.
Customer Part Number.
Use this field as an internal reference number. It can be included on
printed or emailed transactions.

Default Bin.
The bin in which this item is stored by default. It will appear on forms when adding
the item to the Items list. You can change this on any individual form. Changing this value will not
change any existing transactions.
Starting Inventory.
The beginning inventory level of this item, as of a certain date, at a total value
of, and stored at what location. Use for existing inventory that needs to be entered into the system.
IMPORTANT
: Adding the quantity and value during the creation of an item does not create
a journal entry to increase the inventory asset account for that item in QuickBooks Online.
It does create an inventory adjustment that you would need to Add to Sync to send to
QuickBooks Online.
Reorder Point.
The level at which you need to order more of this item. All items are assumed to be
on the Reorder Report unless you fill this block with a negative number (such as
-99
) to hide the
item from the report.
Max Stock Level.
The maximum desired quantity of this item. Another way to think of this is the
number of units you want to have after you complete restocking.
Lead Time.
The length of time that must be allowed for a vendor to produce, ship, and deliver the
item once it has been ordered. It is used on the Pro Plan to automatically calculate reorder points.
Weight.
The weight of the item, in pounds, ounces, kilograms, or grams. This is useful for shipping
purposes.
Volume.
The size of the item, typically in cubic meters (cbm). This is useful in shipping and
purchasing.
Sync with QuickBooks.
Check this box if you want changes to this item to show up in QuickBooks
Online. For example, if you have a large number of items, you might not want all of them to show
up in QuickBooks Online. However, if you plan to use the item on any transactions sent to
QuickBooks Online (invoices, etc.), you must check this box.
Update Inventory in Shopify.
Automatically adds a new item and updates the quantity of an item
in Shopify as sales are received, adjusting the available-for-sale numbers.
Update Inventory in BigCommerce.
Automatically adds a new item and updates the quantity of an
item in BigCommerce as sales are received, adjusting the available-for-sale numbers.

Taxable.
Default taxable status for this item. You can override this on each line item of a sales
form. Users based outside the US will see dropdown lists to define a default purchase tax and sales
tax for each item. On transactions, a tax is required for every line item.
Commission Exempt.
Specifies that sales of this item are not eligible for sales commissions.
Percent Commission.
Specifies the commission percentage that a sales representative will receive
for the sale of this item.
Per Unit Commission.
Specifies the monetary amount per unit sold that a sales representative will
receive as a commission.
Default Class.
The class to which the item is assigned by default when used on transactions, but
the class assignment can be changed on the transaction as needed. Class tracking is useful for
reporting purposes. Classes sync to QuickBooks Online if class tracking has been enabled in
QuickBooks.
Used On.
Allows you to choose the types of forms on which the item appears. Choices are Sales
Forms, Purchasing Forms, and/or Manufacturing Forms. The option is useful if, for example, the
item is a raw material component used in manufacturing. You may need the component to appear
on purchasing and manufacturing forms but do not want it to show on sales forms.
Tags.
These allow you to search for unlike items that are still related in some sense. An example
would be a coffee table, couch, and television. If you gave them all a tag of living room, you can
search for that tag to show only those items.
Notes.
Any additional information you wish to store about this item.
If you have defined any custom fields for items, they will appear below the standard SOS item fields
and will be of the input format and value that you define.

ITEM TYPE
HOW USED
INCOME
INV ASSET
COGS
EXPENSE *
NOTES
Inventory
Finished goods output of
process transaction.
X
X
X
X
The COGS/Expense is to be able to
list a cost so that process
transactions can compute output
value percentages and transfer
value of sale.
Inventory
Raw materials purchased for
manufacturing.
X
X
X
COGS/Expense needed for
purchasing raw materials and Asset
to hold the value until used in
manufacturing.
Non-Inventory
Physical items not tracked.
X
X
Expense for purchases, Income if
sold.
Service/Expense
Fees, shipping, advertising,
etc.
X
Only used in sales.
Service/Expense
Used in manufacturing Bill of
Materials.
X
Must have cost to add value to built
product.
Item Group
Cases of product.
X
Need Income because it is sold.
Item Group
Packaging materials.
X
Used in manufacturing, so it needs
these accounts to hold a cost.
Category
For grouping items only.
Categories do not have accounts.
Assembly
Finished goods output of
builds.
X
X
X
X
Income for sale, Asset to hold
overall value of build,
COGS/Expense to transfer value of
sale.
Assembly
Sub-assembly used for upper-
level assembly build.
X
X
X
Asset to hold value, COGS to show
cost in BOMs.
Labor
Labor unit for Employee
X
Used in manufacturing.
Overhead
Utilities and property
X
Used in manufacturing.
Other
Used for anything else
No accounts assigned.

*
The expense account is used on the QuickBooks Online side to connect with the COGS
account in the item definition to allow purchasing of the item.
The Items list (Operations Menu > Inventory > Items) is one of the most used pages in SOS
Inventory. It provides an overview of your items and their key properties. It is often useful to have
the Items list open in one tab in your browser while working in another tab. So, let’s look at the
capabilities available in the Items list. This is what it looks like:
This button allows you to add a new item to the Items list.
This allows you to search for items according to the inventory settings. If all options are set in the
inventory settings, this field is very powerful. By default, the search will search from the start of a
name. For example, “Wid” would find Widget but not Gasket. You can search by any part of the
item name, so that “et” would find both Widget and Gasket. In addition, you can configure SOS to
search by the item description. Be careful using the item description to find items, as it can
significantly slow down the search, depending on the number of items that you have.
For items that are assigned to a category, the item is listed with a colon separating the category and
item names. For example, the full name of an item might be Widget:XYZ123 and Widget:ABC123.
Those represent two different items of the category Widget.

This button allows you to change the defaults for the inventory items displayed. This includes how
many items to display, type of items to display, category, tags, archive status, location, vendor, and
variants. Set them to what you need and then click Apply. The filters chosen remain unchanged for
the user that set them until they are reset. To return to the default filter settings, simply click
Clear.
The Actions Menu options available for items will vary, depending upon the item type. The default
action for items is Edit, with additional actions available in the Actions Menu dropdown list.
Actions that are also available as batch actions are noted where applicable.
Options are listed in the order they appear on the Actions Menu of the Items list in SOS Inventory.
Edit.
Opens an existing item’s edit page for viewing and editing.
PDF.
Uses a form template to produce a PDF file of the item’s information. Also available on the
Batch Actions dropdown list.
Copy.
Allows you to copy an item and then just update the name to what you need it to be.
Delete.
Moves an item from the Items list to the Deleted Items list, where
(deleted)
is also added to
the end of the item name. Deleted items can be recovered if needed by going to the Deleted Items
list (Operations Menu > Reports > Miscellaneous > Deleted Items) and selecting the Restore
action. Also available on the Batch Actions dropdown list.
Archive/Unarchive.
Allows you to pull items from the Items list until you need them again. The
ability to display archived items is controlled through the Item list’s Change Filter feature. Also
available on the Batch Actions dropdown list.
Transaction History.
Probably the best tool for troubleshooting items, Transaction History shows
the entire history of an item. It shows when the item first entered SOS, as well as all transactions
affecting the item.
Rental History.
Provides a list of all rental transactions on which an item has ever appeared.

Bill of Materials.
A bill of materials (BOM) lists the components and quantities that are used to
build this assembly or kit (item group). Costs of components are shown from the cost field of their
item definitions. The total BOM cost is used as the expected cost of the assembly and should be
copied to the cost in the assembly or kit’s definition.
Location Settings.
Allows establishing different reorder points, maximum stock levels, and default
bins at each location where an item is stocked.
Units of Measure.
Differentiates between different sizes (such as base unit of pound and a
purchased unit of a 50-pound bag). For more on this feature, see the section on Units of Measure.
Variants.
Creates variations of an item. Examples include size and color variants of the same
product. For more information on this feature, see Item Variants.
Boxes.
A future capability of SOS for EDI shipping that will enable an Advance Ship Notice (ASN) to
be generated from the Shipments list.
Clear Cache.
SOS caches an item’s quantity data (including quantity on hand and quantity for sale)
on sales orders, sales receipts, purchasing orders, and work orders. Although caching increases the
speed and performance on the items list, in certain situations it may not update as expected. The
Clear Cache action allows the system to zero out the cached quantities of an item. It does not affect
the stored quantity-on-hand number. Cached quantities are reestablished when the item list is
refreshed.
Add to Sync.
Provides the functionality of adding an item to the sync queue to send it up to
QuickBooks Online again. Also available on the Batch Actions dropdown list.
The Items list Column Chooser allows you to select which attributes you want to see displayed for
items. Columns available are # (Item ID), Name, Category, Description, Type, Vendor, In Stock,
Available, On SO, On SR, On PO, On RMA, On WO, On Rental, Reorder Point, Max Stock, Sales Price,
Purchase Price, Cost Basis, Weight, Volume, Image, Barcode, SKU, Url, Tags, Notes, Bin, Purchase
Description, Vendor Part #, Warranty, Sync, and Documents. Between Sync and Documents, you
will see any custom fields defined for the item. Select the ones you want to see and click Apply. The
list will automatically reformat to provide the best viewing of the columns selected. The saved

column selection will appear each time that user views the Items list until the selections are
changed by the user.
Categories work like parent items, grouping like inventory items together. For example, you may
have many items that are different types of chairs and, alphabetically, are scattered throughout
the items list. You could have a category item called
Chair
assigned to all the different chair items
so they appear together in the list. Some reports can filter by category to provide you with a report
of just the items listed in that category. These items sync with QuickBooks Online in the manage
categories list.
To create a new category item, click on the Add Menu (blue plus sign) and select Item. Then, give
your category a name, in the Type field select Category, and then click on the Save button in the
upper left corner. No other options are used. You may also use the Add New button at the top right
of the Items list to create a new category item as well.
To assign a category, go to your items list and edit each item’s definition to select your newly
created category in the Category field’s dropdown list. If you have many items to edit, you may
want to use the Export Data/Import Data features to perform a bulk edit of items.
If you sell variations of the same product, SOS Inventory’s item variants feature allows you to
create a master item and establish variations that link to the master product. Many SOS reports
track master items with a breakdown that includes variant data.
Setting up item variants requires the creation of a master item to which the variants are linked.
SOS automatically applies the description, pricing, cost, and other information defined for the
master product to new product variants. But you can edit each variant’s item definition as needed.
If you need to change a variant to a stand-alone item, please see Converting a Variant to a Stand-
alone Item.

How to create item variants
NOTES:
SOS Inventory’s Export/Import Data feature, which enables items to be created and edited
in bulk, cannot be used for master items and variants. Master items do not sync to QuickBooks
Online. Only variants are selectable on transactions; master items cannot be used.
1.
Create a new item that will serve as the master product.
(NOTE: A master item cannot be
created by editing an existing item.) Set up the master item as you would any other
inventory item but enable Has Variants on the item definition. When you finish creating
the master item, Save and Close.
2.
Define each variant and link it to the master product.
First, locate the master product in the
Items list, then select Variants from the Actions dropdown list. A Variants edit page of your
master item will appear, displaying a table for each item variant that you wish to add.
• For variants that are new items, leave the Linked Item field blank. SOS will create a
link to the master upon saving.
• If the desired variant already exists as a stand-alone item in the system, locate that
item in the dropdown list of the Linked Item field. NOTE: When the table is saved,
the name of the linked item will be changed to the name specified in the Variant
Name field. If the Variant Name field is left blank, SOS will not save the existing
item as a variant.
After completing the table fields, Save and Close.
The screenshot below shows a table of variants for the master item, Aurora Natural Spinel Ring. In
this example, a three-carat peach spinel ring is being added to the list. The Variant Name field
consists of a prefix (the master item name, Aurora Natural Spinel Ring), followed by the variant-
specific designation (14K Rose Gold, 3ct Peach).
SOS automatically imported the SKU, sales price, and purchase cost information from the master
item definition, but the information has been manually changed to reflect the data needed for this
variant.

Master and variant items will appear on the Items list as shown in the following screenshot. They
can be revised as necessary using the Edit action on the Items list.
Converting a variant to a stand-alone item will result in a change to the name of the item, as the
master item prefix will be removed—leaving the variant designation as the new name of the
stand-alone item. Before converting the variant to a stand-alone item, check your existing items
to ensure that your variant designation does not duplicate an item that already exists in the
system.
If you wish to change the name for your stand-alone item:
1.
Change the name on the master item’s variant table to the desired name for the stand-
alone item.
Save and Close.
2.
Reopen the variant table and delete the item from the table.
Save and Close.
If further changes to the stand-alone item are needed, locate it in the Items list and use the
Edit action to access the item’s edit page. Enter and save your changes.

Most inventory and cost basis discrepancies are due to an item, date, or quantity that was
incorrectly entered on a transaction—or has not been entered at all.
The Show Transaction History action for items is an excellent tool for investigating inventory and
cost basis discrepancies. The transaction history reveals the point at which the error occurred so
that the appropriate correction can be taken.
To view the history of an item, go to the Items list (Operations Menu > Inventory > Items), then
select Show Transaction History under the Actions Menu dropdown. The system will display every
transaction that affects the inventory or cost basis for a given item. Click a reference number link
in the Transaction ID column to open the associated transaction.
The cost basis of an item is the value of an item that you have on hand. This is the aggregate cost
that you paid for the units you have on hand, as calculated using your chosen valuation method.
You can alter the cost basis of an item, if necessary, by creating an adjustment (Operations Menu >
Inventory > Adjustments).
Inventory adjustments allow you to modify the quantity and cost basis of inventory on hand via
direct entry. You should use inventory adjustments sparingly, as most often inventory will be
added or removed through item receipts and shipments. In some cases, however, you might run
into a situation in which your physical (actual) inventory count does not match what the system
shows.
In this case, your first step should be to determine WHY there is a discrepancy. Look at the history
of the item by going to the Items list and look at the Transaction History for that item. Review the
history and determine if any transactions were entered incorrectly or if any transactions were
simply missed.

If you are confident that the transaction history is correct and your count is still off, you might
need to enter an adjustment. Typical reasons for entering adjustments are breakage, spoilage,
theft, and so on. To enter an adjustment, go to Operations Menu > Inventory > Adjustments and
click on Add New. Alternately, you may go to Add (+) Menu > Inventory > Adjustment.
If you need to update the quantities of a large number of items at once, you might wish to use the
Export Data/Import Data features.
Adjustments to items can also denote departments and classes to assign the adjusted values to, as
well as allow you to assign the adjusted items to a job.
NOTE: You cannot make quantity
increases
to serial items by an adjustment. You must enter
additional inventory into the system with an item receipt so that a serial number can be assigned
to each unit added.
When entering an adjustment via the Operations Menu > Inventory > Adjustments page, first fill
out the top of the form as appropriate. Then on each line item, enter or select the item that you
wish to adjust. Once selected, the current quantity on hand for that item (at the selected location,
on the selected date) will show in the Old Quantity field. You can then enter the appropriate value
in either the New Quantity or the Adjust Qty By field, and the system will calculate the other one as
needed.
When entering an adjustment, you will see a field on each line item labeled Adjust Cost Basis By.
This allows you to adjust the cost on hand of each item. When you enter the quantity, SOS
Inventory will enter a suggested cost adjustment in the Adjust Cost Basis By field. The suggested
value is based on the quantity. If the quantity adjustment is positive (an increase), the suggested
cost is the quantity multiplied by the standard cost of the item. If the quantity adjustment is
negative (a decrease), the suggested cost is the cost basis of the missing items using the chosen
valuation method (FIFO, weighted average, LIFO). In both cases, the user can override the value.
This is often used when adjusting for damages, depreciation, etc.

To simplify the cycle counting process, SOS Inventory provides the ability to do partial physical
inventories using the adjustment feature as described above. Thus, each cycle count is really
nothing more than a physical inventory which might or might not include counts of all items. The
selection of items to count is left up to the user. It is not mandated by the system.
SOS Inventory provides a worksheet for you to print when working on physical inventories. To
access the worksheet, go to Operations Menu > Reports > Inventory > Physical Inventory
Worksheet. Choose the date, filters, options, and columns that you wish to use, then select how
you wish to receive the worksheet in the Actions block.
When entering an inventory adjustment, the system needs to know the account to which you want
the inventory adjustment to post. The exact transaction depends on the type of adjustment. If the
quantity increases, SOS Inventory will post a debit to the inventory asset account of each item and
a credit to the adjustment account. If the quantity decreases, SOS posts a credit to the inventory
asset account of each item and a debit to the adjustment account.
You can specify a default adjustment account on the Settings Menu > Inventory Settings page. The
default adjustment account is used for Export Data/Import Data adjustments and other situations
in which no adjustment account is specified. When entering an adjustment directly, you can
specify the adjustment account to override the default. The most common accounts used for
inventory adjustments are Breakage, Spoilage, and similar accounts to track the unexpected loss of
goods. When adding items to an account or opening a new account, you can use Opening Balance
Equity.
You can also adjust your inventory by stating the unit of measure you wish to adjust by. It will
calculate the change in quantity by that unit of measure ratio defined for the item and also change
the cost basis accordingly.

The Plus and Pro plans of SOS Inventory support an unlimited number of inventory locations. A
location is typically defined as a place with its own physical mailing or shipping address. For
example, if you have multiple stores or multiple warehouses, those would each be a unique
location. For tracking items at different places within a specific location (for example, bins within
a warehouse) or specifying different default bins for an item at multiple locations, see the Bin
Tracking capabilities of SOS Inventory.
To add a location, go to Company Menu > Locations, then select Add New. You can also use the
Locations list to edit the address or other attributes of a specific location. Once your locations are
set up, you can choose your desired location on each form that requires one. In addition, you will be
able to use the Inventory Stock Status and Inventory Valuation reports to view your quantity and
cost basis at each location.
When setting up a location, you can specify the location as non-nettable. Items in a non-nettable
location are not counted as available for sale. Non-nettable locations are typically used to
represent quality assurance items, items awaiting repair, and so on. Items in non-nettable
locations do count toward your quantity on hand, because you do indeed have the items. They are
simply not available for sale.
To transfer inventory from one location to another, go to Operations Menu > Inventory >
Transfers. Select the From location, the To location, and enter your items and quantities. You can
transfer any type of items here to include serial inventory, lot-tracked inventory, and item groups.
When transferred, the value of the item is calculated by the valuation method selected in your
settings.
SOS Inventory allows you to specify transfers in defined units of measure for items, assign classes
and departments for reporting in QuickBooks Online, and assign transfers to a job for costing.

The system also provides you with the ability to assign shipping information that could be applied
to the transfer of goods from one location to another. This information includes the ship method,
tracking number, and shipping cost. You can even create a bill based on the shipping vendor listed
in the ship method.
SOS Inventory allows you to generate inventory transfers through the Generate Transfer action of
the Reorder Report (Operations Menu > Reports > Purchasing > Reorder Report).
To use this feature, the Location field in the Filters block must be set to a single location. After
choosing your other filters, options, and columns, select Display Report in the Actions block. Once
you run the report, additional options will appear in the Actions block. Choose the location from
which you desire to make an inventory transfer in the From dropdown list, then select Generate
Transfer.
After generation, the transfer will appear in the Transfers list, where it can be edited as needed.
Serialized inventory allows you to track individual units of an item, rather than quantities only. A
serial number is assigned to each unit, and the number stays with the unit as it goes through the
system. You can track when each individual unit was received, shipped, built, and so on. The Plus
and Pro plans of SOS Inventory support serialized inventory.
To turn on serial tracking for an item, create or edit the item, turn on the Track Serial Numbers
setting, and save the changes. Once that is complete, whenever you use that item the system will
prompt you for the serial number(s).
You MUST create the item first and set it as serial tracked before you load quantities via an item
receipt or load one unit at a time via the Serial Inventory page (Operations Menu > Inventory >
Serial Inventory).
The Export Data/Import Data features cannot be used on serial items, and
adjustment transactions cannot be used for serial items if the intended change is to increase
quantity.
If you want to convert a current item to being serial tracked, you will need to zero out the

quantity and value of the item, ensure a purchase cost representing the correct value of each unit
of the serial item is set, and then turn serial tracking on. Now you must reload the stock levels back
in via an item receipt or using the serial inventory page.
As an example of serialized inventory, suppose you have an item called
Widget
with serial tracking
turned on. Now suppose that you create an item receipt to receive four units of that item into
inventory. When you add that item to the Items list with an item receipt, the system will provide
you the entry spaces for you to enter the serial numbers. In addition to this, on the item receipt
only you can upload the serial numbers via a button that lets you select a spreadsheet listing the
serial numbers. Shipments, builds, process transactions, etc., all work similarly, except they ask
for the serial numbers upon save without the spreadsheet option.
If you want to add historical records of serial items that are at a customer site, select the customer
name from the Customer dropdown list when entering a new serial item on the Serial Inventory
page. Either way, once you add a serial item to either a location or a customer, it cannot be changed
by editing the serial item, but only via transactions like shipments or returns.
If you look at the options in the Inventory Settings and Purchasing Settings, you will see many
things that make serial tracking more powerful. Under Inventory Settings, you can select Value
Serials by Specific Id, which means that each serial item brought into the system will keep the
exact value it was entered in at, regardless of the valuation method. Under Purchasing Settings,
you can use settings to automate the generation of serial numbers, add a prefix to the number, set
the number length, and either generate the numbers randomly or keep them in sequence by
providing a starting sequence number.
To view the history of a serial item, go to either: (1) the Serial Inventory list (Operations Menu >
Inventory > Serial Inventory) and use the item’s Actions Menu to select Transaction History; or (2)
the Serial Unit History report (Operations Menu > Reports > Inventory > Serial Unit History).
NOTE:
If you desire to assign a warranty to an existing item but previously did not track the item
with serial numbers, please contact SOS Support (s[email protected]) for assistance.
The Plus and Pro plans of SOS Inventory allow you to issue and maintain warranty information on
serialized items that you sell. To use this feature, a warranty must be defined in SOS as well as
assigned to an item.

Once your warranties are configured and assigned to items, warranty information for serial
inventory items will be included on packing lists of shipments to customers. The warranty goes
into effect on the date the item is shipped.
Warranty information will be added automatically to the serial unit’s edit page, which is stored
under the Serial Inventory list (Operations Menu > Inventory > Serial Inventory). The information
also can be viewed by enabling the warranty-related columns of that list with the Column Chooser.
To define a warranty in SOS Inventory, go to Company Menu > Warranties and select Add New.
Then complete the following fields:
•
Name.
A unique title for the warranty.
•
Description.
Additional information about the warranty.
•
Duration.
A number or text that corresponds with the Units field (for example, enter “5” in
the Duration field for a five-year warranty).
•
Units.
A dropdown list that includes options for Days, Weeks, Months, and Years.
Upon saving, the newly defined warranty will appear on the Warranties list and be included in the
dropdown list of Warranty field options on item edit pages. Warranties can be assigned to new and
previously existing serialized items.
Lot tracking is used to track batches, or groups, of a specific item. Lots work similarly to serialized
inventory, except a lot represents a group of items instead of an individual unit. A lot number is
assigned to each batch of items, and the number stays with the batch as it goes through the
system. You can track when each batch was received, shipped, built, and so on, as well as set an
expiration date for the lot. If a customer reports something wrong with the lot, you can mark it for
recall. The Plus and Pro plans of SOS Inventory support lot tracking.
To turn on lot tracking for an item, create or edit the item, turn on the Track Lot Numbers setting,
and save the changes. Once that is complete, whenever you use that item the system will prompt
you for the lot number.

You MUST create the item first and set as lot tracked before you load quantities via an item receipt
or inventory adjustment. In some cases, you may need to create the empty lot first so you can load
the quantities. This is done under the Lots list (Operations Menu > Inventory > Lots). Lot items
cannot be adjusted through the Export Data/Import Data features. If you want to convert a current
item to being lot tracked, you will need to zero out the quantity and value of the item, ensure a
purchase cost representing the correct value of each unit of the lot item is set, and then turn lot
tracking on. Then you must reload the stock levels back in via an item receipt or an inventory
adjustment.
For example, suppose you have an item called
Widget
with lot tracking turned on. Now suppose
that you create an item receipt to receive four units of that item into inventory. The system will
provide you the blanks next to that that item on the item receipt so you can enter the lot numbers
for each lot item. Shipments, builds, process transactions, etc., all work similarly, except the
transaction will provide you with the blanks upon saving. If you need to enter more than one lot of
an item on the same form, create a second line on the form to represent the second lot, and so on.
If you need to adjust your inventory of items tracked by lot, use the Operations Menu > Inventory >
Adjustments page. The system will prompt you for the lot number(s) as appropriate.
If you look at the options in the Purchasing Settings, you will see many things that make lot
tracking more powerful. You can use settings to automate the generation of lot numbers, add a
prefix to the number, set the number length, and either generate the numbers randomly or keep
them in sequence by providing a starting sequence number.
To view the history of a lot, go either to: (1) the Lots list (Operations Menu > Inventory >Lots) and
use the item’s Actions Menu to select Transaction History; or (2) the Lot History report
(Operations Menu > Reports > Inventory > Lot History).
NOTE: Lots are location sensitive and can be spread across multiple locations. Be sure to keep track
of how much of a lot is at each location.

In SOS Inventory, the handling of consignment inventory—goods transferred by the owner to
another party, typically an agent hired to sell the goods on the owner’s behalf—depends on
whether you are the owner (consignor) or the agent (consignee).
For the consignee, consignment inventory requires creating the correct accounts in QuickBooks
Online and linking consignment items to the correct accounts. Sales Inventory Assets should be in
a separate account from your consignment Inventory Assets. In addition to creating separate
Inventory Asset accounts in QuickBooks Online, it is very important to assign the correct asset
account to that item when it is defined in SOS.
Once the creation of the lines of accounting are complete and you have created items in SOS and
chosen the correct accounting settings, you can then receive your consignment items. As the
receipt of the material will create an open payment to the consignor, you will have many open
payments in QuickBooks Online until the time that the item actually sells.
If you do not want to have many open payments in
QuickBooks Online
, on your item receipt (in
SOS), select None in the payment field. However, you must amend the receipt and select the
applicable payment field when you sell the consignment item. If the price the consignor wished to
receive for the item is different from the actual selling price, you would have to amend the receipt
anyway.
If you are the consignor, create a separate, non-nettable location (or locations) for your
consignment inventory. This location will be on your books because the items are in your
inventory.
Consignment items are classified as inventory assets. Designating the location as non-nettable
will protect consignment items from being inadvertently added to your available-for-sale quantity
and sold from your location.
When items are sold from the consignment area, transfer them to a nettable location, create a
sales order and shipment to close the sale, and then bill the consignee.

If no possibility exists for the items to be oversold from your default location, the alternate
location does not need to be designated as non-nettable.
SOS Inventory supports barcoding of items (SKUs), serial numbers, lot numbers, or really anything
else that you want. The type of scanning is transactional. SOS does NOT support warehouse
scanning of this type via network scanners. A hand-held scanner and a laptop or tablet is required
for mobile scanning capability. To scan data, simply put your cursor in the proper field, scan the
barcode, and it will show up in that field. NOTE: Barcodes are supported only in the Plus and Pro
plans of SOS Inventory.
In addition to an item name, each item in SOS can be configured with a specific barcode. This
allows the system to recognize the name of the item or the barcode. To specify a barcode for an
item, go to the item’s edit page, and then scan or type the barcode into the Barcode field.
For other scannable data, such as serial numbers and lot numbers, you simply enter the data as
normal, and scan it when ready. The system will recognize it and match the appropriate data.
Barcodes can be used on any transaction simply by adding a field to the appropriate form template.
For more information on how to change barcode settings, see Barcode Settings.
SOS Inventory provides the capability to print barcode labels for items by using a form template. If
you have not created a form template for the type of barcode label you need, you will need to do so
before you can print labels. See the section on Form Templates to find out how to build one or to
use a predefined one from the Template Library.
In setting up the barcode label template, the Form Type field is most commonly set to Item. Use
the Lot form type for a lot-tracked item to produce labels using the lot ID, and Serial Item form
type for a serial-tracked item to produce labels using the serial number

Item barcode labels also can be configured to print directly from a transaction (for example, an
item receipt). In this case, select the form type that corresponds to the type of transaction from
which you want to create labels.
To print barcode labels for items:
1. Locate on the appropriate list the item or transaction for which you want to print barcode
labels.
a. Item form type. Use the Items list (Operations Menu > Inventory > Items).
b. Lot form type. Use the Lots list (Operations Menu > Inventory > Lots).
c. Serial Item form type. Use the Serial Inventory list (Operations Menu > Inventory
> Serial Inventory).
d. A transaction form type. Use the appropriate transaction list under the
Operations Menu.
2. From the Actions Menu, select PDF.
3. When the pop-up window appears, choose your desired barcode label template from the
Template field’s dropdown list, then select Generate.
A PDF of the barcode label will download, which you can then print. If you need additional
assistance with this feature, email support@sosinventory.com.
You do not need a specific type of scanner to scan barcodes into SOS Inventory. You simply need a
scanner that works with your computer and web browser. The scanner can be either USB connected
or Bluetooth, but it must use an SOS-supported barcode format.
When scanning barcodes, be sure that your scanner is configured properly. Many scanners are
configured to send a certain character after the scan (such as
Enter
,
Tab
, or something else). It
works just the same as if you pressed that key manually. If the page is resetting each time you scan
something, be sure that the scanner is not configured to enter a Return or Enter character each
time it scans. The Tab character is sometimes useful to help you move to the next field
automatically.

Bins provide a way of managing the place for each item within a given location. For example, you
might have a warehouse organized into aisles, rows, bins, floor stacks, or various other things. In
SOS Inventory, all those things would be a bin. Bins are simply sublocations within a main
location. Each location can have a different bin structure, and you can have some locations
organized into bins while others are not. Bin tracking must be enabled for a location at the time it
is created. Once bin tracking is turned on, it cannot be turned off for a location. If a location starts
out as non-bin tracked, then it cannot be turned on later.
To enable bin tracking for a location, add the location (Company Menu > Locations) and turn on
the Bin Tracking option. Once bin tracking is enabled for at least one location, the Bins option will
appear on the Company Menu (Company Menu > Bins).
If you want to convert a location to bin tracked or turn off bin tracking for a location, you must
create a new location with the appropriate options, then complete an inventory transfer to move
the goods from one location to the next. Lastly, delete the old location or change its name to
denote that it is old and should not be used.
To add bins, go to the Bins list (Company Menu > Bins) and select Add New. Provide a bin number,
description, and the location where the bin will reside. Because bins are unique to a location, you
should create bins with distinctive identification numbers if you have multiple locations that use
bin tracking. To avoid confusing the bins at one location with those at another, establish a naming
convention (such as a prefix on the bin number) to denote a bin’s location.
When a location has bin tracking enabled, you should receive, ship, and otherwise use items from
that location as normal. For example, when receiving items into a bin-tracked location, add the
item to the item receipt as you normally would. If you have defined a default bin for that item, the
bin will display below the item name automatically. For other types of transactions, the system will
prompt you to select the proper bin upon saving the transaction.
To see all the items in a selected bin, go to the Bins list. Under the Actions Menu, select Contents.
You can use an inventory transfer to move contents to or from a bin-tracked location, as well as to
make bin-to-bin transfers within the same location. In the latter case, the From Location and To
Location fields on the transfer form will be the same.

When you transfer inventory from one bin-tracked location to another bin-tracked location, the
system will prompt you to enter the From Bin and To Bin under the name of the item that is being
transferred. If you are transferring inventory from a bin-tracked location to one that is not
tracked, only the From Bin field will be displayed. If the transfer is from a non-tracked location to
a bin-tracked location, only the To Bin field will be displayed.
Enter other fields on the transfer form as usual, then save when finished.
On an item page, you can set the default bin to which the item is assigned. But what do you do if
your item is stored at multiple locations—each of which has a different default bin for the item?
Location Settings, an option on the Actions menu of the Items list, allows you to establish an
item’s default bin, as well as its reorder point and maximum stock level, at each of your company’s
locations.
Here is the layout of a Locations Settings table for a sample item called Blue Ink Cartridge:
Location Settings allows you to assign an item to bins at multiple locations, but bin tracking must
be enabled at each location where you intend to bin track the item. In addition, each location must
have an existing bin to which you can assign the item.
If bin tracking has not been enabled or bins
have not been created for a specific location, SOS will not allow you to use Location Settings to
enter a default bin for the item at that location.
Bin-tracked locations can be identified by the down arrow appearing in the Default Bin column. If a
down arrow is present but no bin options appear in the dropdown list, bin tracking has been
enabled at that location—but bins have not been created for it.
If the Default Bin field on the Location Settings table is left blank for a bin-tracked location, SOS
will use the Default Bin listed in the item definition. The Default Bin has no relevance for non-
tracked locations.
SOS Inventory supports multiple units of measure for each item. For example, you might purchase
an item in a pack or case and then sell it as an individual unit. To turn on the Units of Measure
feature, go to the Inventory Settings page (Settings Menu > Inventory Settings) and turn on the
Units of Measure option.
Once the Units of Measure option is enabled, you can go to Company Menu > Units of Measure to
define all the units of measure available in the system. You must define the available units of
measure before assigning them to each individual item.
When the Units of Measure option is enabled, each item on the Items list will have Edit Units of
Measure in the Actions Menu. Use this action to define the units of measure for a specific item. You
will need to specify the base unit of measure (the default unit that it will be stored in), any other
acceptable units of measure with their respective conversion ratios (relative to the base unit),
along with the alternate monetary values for the sales price and purchase cost. For example,
suppose you buy light bulbs in cases of 24 and then sell them as individual units. Set the Base Unit
field to
each,
and in the Conversions table, select
case
in the Unit column. Enter
24
in the Ratio
column, since 24 of the base unit are in each case. Because you buy light bulbs from your vendor by
the case, enter a value in the case’s Purchase Cost field.
Once your units of measure are configured, you can use them on forms. A dropdown list on each
line item allows you to choose the unit of measure for that line item. The Units of Measure feature

is available on all purchasing and sales transactions. It is not available within the manufacturing
functions.
Base units of measure should be used for input and output items on build and process
transactions, as well as bills of materials (BOMs) and process templates.
You can also accomplish the same effect as units of measure by creating a separate item to
represent a case, for example. This would allow you to know exactly how many cases are in stock
relative to individual units. You could set up each case as an assembly or kit, as appropriate, and
then build cases or break them down as needed.
A kit or item group is a collection of inventory items that are bundled together at the time of
purchase or sale. The individual items that make up a kit are still separate items and could be sold
individually if needed. In contrast, an assembly is an item that is manufactured (built) from
component items. When you record a build transaction into the system, the inventory of the
assembly item increases and the inventory of the component items decreases, as they are used to
build the assembly. A common example of a kit is a sampler pack, where you bundle individual
products together when you ship them, although they still remain individual items.
It is important to use SOS Inventory’s kit (aka item group) feature rather than QuickBooks Online’s
bundle feature, as sending bundled items from QuickBooks Online to SOS Inventory will result in
sync errors.
To create a kit, add or edit the item that will represent your kit. For the item type, select Kit (Item
Group). That will create a kit item.
To add components to the kit, be sure that you’ve created the kit item. Then, go to the Items list
and find that item. In the Actions Menu for the kit item, select Edit Bill of Materials. This will take
you to a page where you can enter the components. Be sure to include a quantity for each
component.
Once that is complete, you can use the kit as a regular item and the system will recognize the
components. Kits act differently on different transactions. On purchase orders, the kit has a button
to allow the user to expand the kit to list the components instead. On the item receipt, you have
the same option, but when you save the item receipt, all unexpanded kits will be expanded to affect

the inventory appropriately. On sales forms such as the sales order, invoice, estimate, and sales
receipt, you have the Expand button and the choice of expanding or saving as a kit item just like the
purchase order. On pick tickets or shipments, they will expand upon saving since the warehouse
needs to know which items to pull from the shelves for the kit.
SOS posts to the cost of goods sold account of an item when that item is shipped (included on a
shipment). Invoices and sales receipts do not generate COGS entries in SOS. Customers can also
turn off this posting from the QuickBooks Sync Settings page (under Settings Menu > QuickBooks
Setup) if needed in certain circumstances, but this is not recommended.
SOS values inventory at the price at which it was purchased. So if you buy $3,000 worth of raw
materials, you have $3,000 worth of material in inventory. When you buy inventory at different
prices over time and then sell that inventory, it is not always obvious how to value that inventory.
For example, if you buy 10 units today at $10 each and 5 units at $5 each, you have $75 worth of
inventory. Now let’s say that you sell one unit. Did you sell a $5 unit or a $10 unit? SOS Inventory
allows you to value your inventory using either FIFO (First-In, First-Out) or weighted average. If
you are unsure which method to use, please contact a qualified accountant.
By default, SOS allows negative inventory. If you do not want the system to allow negative
inventory, go to the Inventory Settings page (Settings Menu > Inventory Settings) and make sure
that the option Don’t Ask About Negative Inventory is disabled.

SOS Inventory offers a wide selection of reports about items that can provide much information
about your inventory. Some reports, such as Inventory Stock Status and Inventory Value, can take
some time to calculate because of the large amount of data they contain.
The reporting options can be found under Operations Menu > Reports > Inventory. See the
Inventory Reports section of Report Descriptions for details regarding the types of information
that each report provides.

SOS Inventory provides robust purchasing and receiving functionality. Normally you would do all
your purchasing and receiving in SOS Inventory and allow any relevant data to synchronize to
QuickBooks Online as appropriate. We’ll be looking at this section in the order of the Operations
Menu.
Vendors in SOS Inventory will synchronize with vendors from QuickBooks Online. Changes made
to your Vendors list in one system will synchronize to the other. To add/edit/delete vendors in SOS
Inventory, go to Operations Menu > Purchasing > Vendors or to Add (+) Menu > Purchasing >
Vendor on the Task Bar. You can also create vendors as you are entering purchase orders and item
receipts. A vendor definition will include its display name, contact information and address,
default terms, default tax rate, currency (if the Multi-Currency setting is enabled), account
number, and notes. The option Show On Forms allows you to choose whether to show them in the
vendor dropdown. One of the unique options on the Action Menu of the Vendors list is View Vendor
History.
When completing a vendor profile, if the Name and Contact field data are the same, leave the
Contact field blank. This will prevent duplicate name information from appearing on PDFs of your
vendor-facing transaction forms.
For the same reason, if the Name and Company Name data are the same, leave the Company Name
field blank.
If the data in the fields are different, then complete each field accordingly. If the vendor’s company
name has a designator (for example, “Inc.,” “Ltd.,” or “LLC”) as well as a trade name (“doing
business as” or “DBA”), enter the designator in the Name field and the trade name in the
Company Name field.

The Plus and Pro plans of SOS Inventory allow you to track multiple vendors per item. For each
vendor-item combination, you can track the cost, vendor part number, and estimated lead time. To
view, edit, or manage your Vendor-Item Catalog, go to Company Menu > Vendor-Item Catalog.
Once you have created your Vendor-Item Catalog, you can use the Where To Buy report to assist
you in making purchasing decisions. The Where To Buy report pulls data from the Vendor-Item
Catalog, allowing you to comparison shop.
When you create a purchase order with a vendor listed in the Vendor-Item Catalog and select a
catalog item associated with that vendor, SOS will automatically add the vendor’s part number and
cost to the purchase order.
1. Automatic updates and additions to the Vendor-Item Catalog will occur via the Update
Default Costs setting (Settings > Purchasing Settings) if enabled, or when the item record
is saved.
2. Entries in the Vendor-Item Catalog may be edited to change the cost, but the vendor
cannot be edited.
3. New vendors and their item costs may be added for an existing item listed in the Vendor-
Item Catalog.
4. If no preferred vendor is in the item record, nothing is sent to the Vendor-Item Catalog.
5. If a vendor other than the preferred vendor and its item cost are used, no entry is sent to
the Vendor-Item Catalog.
6. If a preferred vendor in the item record is used on a transaction, an entry is sent to the
Vendor-Item Catalog.
7. If the vendor is not the preferred vendor but the Update Default Cost box on the purchase
transaction is checked, an entry is sent to the Vendor-Item Catalog for that vendor.
8. If the cost is updated in the Vendor-Item Catalog, it will also update the cost in the item
record for the preferred vendor listed in the item record.
9. If no preferred vendor is listed in the item record, but a cost on the purchase transaction
other than the cost in the item record, an entry is sent to the Vendor-Item Catalog.

You can send vendor messages on purchase orders to describe exact details of a purchase, make
shipping arrangements, or include any additional information that you wish. Vendor messages can
be stored for later use. To manage your list of saved vendor messages, go to Company Menu >
Vendor Messages.
A purchase order, or PO, is a form used to request that a vendor provide a good or service to you in
exchange for payment. The purchase order will typically define payment terms, delivery, and so
on. Purchase orders in SOS Inventory will synchronize with purchase orders in QuickBooks Online
if the Synchronize POs setting is enabled on the Purchasing Settings page (Settings > Purchasing
Settings). This option is enabled by default. A purchase order is a non-posting transaction,
meaning that it does not affect your financial reports directly. A purchase order closes
automatically when all items have been received, but you can close it manually at any time.
To create a PO in SOS Inventory, go to the Purchase Orders list (Operations Menu > Purchasing >
Purchase Orders) and select the Add New button. You can also add a PO from the Task Bar by going
to Add (+) Menu > Purchasing > Purchase Order.
A third option is to generate a purchase order from another transaction (such as a sales order, sales
receipt, invoice, etc.). Locate the transaction on its appropriate list, then select Create Purchase
Order from the Actions Menu.
Fields are listed in the order they appear on the transaction form in SOS Inventory.
Date/Time
. Transaction date and timestamp (PO date).
Vendor
. Vendor from whom you are purchasing the items on the PO. Once you select a vendor it
fills in the address blocks, notes, and default terms.
Vendor Notes.
This is the internal notes from the vendor definition.

PO Number.
Reference number used to identify the PO. This field is searchable. The system will
attempt to number the PO automatically depending on your settings on the Purchasing Settings
page.
Drop-Ship.
Check this box if these items will be shipped directly from the vendor to the customer.
Vendor Address.
The vendors billing address for placing an order for goods.
Shipping Address.
Address to which the goods will be shipped. To set a default for this location, go
to the Purchasing Settings page. If drop ship is checked, this becomes the customer to whom the
items will be drop-shipped.
Currency.
Currency for this transaction. This field is only visible if the Multi-currency feature is
enabled.
Exchange Rate.
The exchange rate for this transaction. The system will automatically provide the
most recent exchange rate for the chosen currency, or you can override it manually. This field is
only visible if the Multi-currency feature is enabled.
Line Items:
•
Multi-tool.
The right arrow (top left corner) allows you to insert a blank line. The three bars
(center) allow you to click, hold, and drag the lines to reorder them. The down
arrow (bottom right corner) allows you to copy a line and paste it on the next
line.
•
Remove
( ). Click the trash can to remove a line from the PO.
•
Item.
Enter/select the item to be purchased. You can enter new items here.
•
Description.
Purchase description for the item.
•
Part #.
Vendor part number for the item. This is often useful if your vendor requires you to
enter their unique part number and it is different than your own internal part number.
•
Quantity.
How many of this item you are purchasing.
•
UOM.
Units of Measure, if enabled. Available on Plus and Pro plans.
•
WGT.
This is the weight, as defined in the item.
•
VOL.
This is the volume, as defined in the item.
•
Unit Price.
Price of each item.
•
Amount.
Extended (line) total.

•
Received.
Number of units received for a line item. Normally, you would not edit this field
manually. The system should keep it up to date. However, you can override it if necessary.
You should NOT edit this field when receiving items. Use an item receipt for that.
•
Class.
QuickBooks Online class for this line item. This field is enabled only if class tracking
is enabled in QuickBooks Online.
•
Customer.
This field allows you to select the customer for whom this item is being
purchased. You can have multiple customers listed on the PO. Ignored by drop ship.
•
Job.
Job to which this line item belongs. This box is only available if Job Tracking is enabled
in SOS Inventory on the Inventory Settings page.
Add Lines.
Click this link to add additional lines to the PO. On the Company Settings page, you can
specify the number of lines added by default.
Clear Lines.
Click this button to clear the items form completely.
Terms.
Payment terms.
Expected Date.
Date you expect the items to arrive.
Expected Ship.
Date you expect the items to ship.
Ship Method.
Shipping carrier.
Tracking #.
Carrier tracking number.
Deposit.
Deposit paid to vendor as a fixed expense or percentage of the PO. Does not sync to
QuickBooks Online.
Department.
Department for this transaction.
Blanket PO.
Check this box to make this a blanket (open-ended) PO. The quantity column is
ignored on a blanket PO.
Contract Manufacturing.
Check this box if this PO is requesting that a third-party manufacturer
build some assemblies for you. It is used internally to note that the PO is for contract
manufacturing.
Update Default Costs.
If checked, the costs listed will be used to update the items’ costs.
Vendor Message.
This message will be displayed on the purchase order. This field can be expanded
to become as large as you need it.
Comment.
Internal comment about this PO. The comment is not displayed on the purchase order
when printed or emailed.
Custom fields may appear on purchase order transactions, depending on how each field has been
defined. If present, custom fields will be placed after the standard SOS data fields.
Actions for purchase orders are accessible from the Purchase Orders list (Operations Menu >
Purchasing > Purchase Orders). Edit is the default action for purchase orders. Actions are listed
below in the order they appear in SOS Inventory.
Edit.
Opens an existing purchase order for viewing and editing.
Quick View.
A view of the PO to see quickly whether ordered items have been received.
PDF.
Creates a PDF version of the PO based on a selected form template.
Email.
Sends an email to the names specified in the box based on the selected form template.
Separate multiple addresses with a comma. Do not include any extraneous characters such as
brackets. You may select which attachments to include.
Receive.
Generates an item receipt for all open items on this PO.
Create Invoice.
Creates an invoice for drop ship orders.
Use as Template.
Generates a PO identical to the current one with a new date and reference
number.
Archive/Unarchive.
Use Archive for a PO that doesn’t need to be shown in the Purchase Order list.
Unarchive returns an archived PO to the Purchase Order list.
Open/Close.
Manually opens or closes the PO. You can use this action to override the current
status of the PO.
Mark as Confirmed/Mark as Unconfirmed.
Allows you to set a status for confirmation of order
with vendor.

Delete.
Deletes the current PO.
Show History.
List of all the times this PO has been acted upon.
Add to Sync.
Use this action to add the PO to the sync queue.
On the Plus and Pro plans, SOS Inventory can require approval for all purchase orders before they
can be emailed. This is a single level approval capability only. To enable this capability, go to
Settings Menu > Purchasing Settings and select Require Approval for POs.
When approvals are enabled, any purchase orders that are pending approval will be highlighted in
red on the Purchase Orders list. A PO that is pending approval also will have No showing in the
list’s Approved column. The Approved column MUST be displayed using the Column Chooser to
allow for this functionality.
Only administrators or users with the appropriate privileges can approve POs. To approve a PO,
locate it on the Purchase Orders list and select Approve from the Actions Menu. If you wish to
approve multiple purchase orders at one time, use the Approve option on the Batch Actions
dropdown list.
To add/edit/delete shipping methods that are available on purchase orders, go to Company Menu >
Shipping Methods. The shipping methods are the same as those available for your sales
transactions.
Blanket POs are open-ended purchase orders, meaning that they specify an agreement to purchase
a certain item at a certain price, without a specific quantity. To create a blanket PO, enter the
purchase order as normal and check the Blanket PO option on the form.
To add/edit/delete payment terms that are available on purchase orders, go to Company Menu >
Terms. The payment terms are the same as your sales terms, and they will also synchronize with
QuickBooks Online.
SOS Inventory supports drop shipping items directly from a vendor to a customer. To issue a drop-
ship PO, simply check Drop Ship on the purchase order and then enter the intended customer’s
information in the Shipping Address block. Drop-ship POs are not included in the “On PO”
calculation, as they are not incoming inventory. When you receive confirmation from the vendor
that the items have shipped, update the PO with tracking information (if so desired) and then close
the PO. As long as you have set up your items correctly (where the expense account in QuickBooks
Online is the COGS account), then you could do a copy to bill in QuickBooks Online as that bill will
affect Accounts Payable and COGS directly.
In Purchasing Settings, the option Automate Drop Ship Purchase Orders closes a drop ship PO
automatically and sends journal entries to QuickBooks Online that post against Accounts Payable
and COGS.
Typically, when someone uses the drop ship option, they go through the following steps:
1. Create an invoice for the customer
.
This affects the Income and Accounts Receivable (A/R)
in QuickBooks Online.
2. Ensure the Automate Drop Ship Purchase Orders option in Purchasing Settings is turned
on
.
3. Create the drop ship PO from the invoice. This generates an Accounts Payable to vendor
and COGS journal entry in QuickBooks Online. The PO also closes automatically.
4. Send the invoice to customer as needed (either immediately or when product ships).
Some SOS users do not like this method as the journal entry that affects Accounts Payable and
COGS does not have a due date on it like a bill would.
Another method of completing a drop ship PO is as follows:
1. Disable Automate Drop Ship Purchase Orders.
2. Create a Sales Order. Mark it as Drop Ship.
3. Create the PO from the sales order. As the sales order is marked as Drop Ship, the PO will
automatically be marked as Drop Ship. The PO will sync to QuickBooks Online. This PO will
be open.

4. Once you have received confirmation that the item has shipped, you must:
a. Receive the PO.
b. Create the shipment from the sales order.
c. Create the invoice from the sales order.
The receiving will create the bill in QuickBooks Online (affecting Accounts Payable and Asset
accounts). The shipment will create a journal entry in QuickBooks Online (affecting Asset and
COGS accounts). The invoice will sync to QuickBooks Online (affecting Accounts Receivable and
Income accounts).
If you have prepaid a vendor for a purchase order, SOS provides a couple of different way to process
the transaction.
Option 1
1. Add the purchase order in SOS Inventory or QuickBooks Online.
2. Sync to bring the PO to QuickBooks Online.
3. In QuickBooks Online, add a vendor credit for the deposit amount.
a. In the Ref no. field, enter the same reference number as listed on the PO.
b. Complete the information needed in the Category Details.
i. Enter the category (account) from which you are paying.
ii. Enter the amount of the payment.
c. Save.
4. When the items are received, convert the PO to an Item Receipt in SOS Inventory.
5. Sync SOS Inventory to QuickBooks Online for the bill to be created in QuickBooks Online.
6. Apply the vendor credit to the bill.
7. Make the payment for the bill in QuickBooks Online.
Option 2
1. In QuickBooks Online, create an “other current asset” account called Prepaid Inventory.

2. Sync SOS Inventory to QuickBooks Online to bring the account to SOS Inventory.
3. In SOS Inventory, create an expense item called Prepaid Inventory Deposit.
a. The expense account of this item will be the Prepaid Inventory asset account
created above.
4. Sync SOS Inventory to QuickBooks Online to sync the item to QuickBooks Online.
5. Create the purchase order in SOS Inventory or QuickBooks Online.
a. Add the items you are purchasing from the vendor.
b. Add the Prepaid Inventory Deposit item to the purchase order.
i. In the Qty column, enter
1
.
ii. In the Unit Price column, enter the amount of the deposit as a negative
number (example:
-245.95
).
c. Save the purchase order.
6. In QuickBooks Online, add a vendor check.
a. In the Bank Account, select the account from which you are paying.
b. Complete the Item Details area.
i. For the Item, enter the Prepaid Inventory Deposit item.
ii. For Qty, enter
1
.
c. Save the vendor check.
7. When the item(s) are received, convert the PO to an item receipt in SOS Inventory.
8. Sync SOS Inventory to QuickBooks Online for the bill to be created in QuickBooks
Online. The bill will be for the items, minus the deposit.
9. Make the payment to the bill in QuickBooks Online.
NOTE: If preferred, the Prepaid Inventory Deposit can be added to the item receipt when it is
created instead of the purchase order.
Items are received into inventory by creating an Item Receipt. To create an item receipt, you can
access the Operations Menu > Purchasing > Item Receipts page. Also, you can use the Add (+)
Menu on the Task Bar under Purchasing > Item Receipt. Or, if you have a PO that you wish to
receive, go to the Purchase Order list and click on the Actions Menu, then select Receive.

When adding/editing an item receipt, the form fields available are very similar to those on a
purchase order. The key difference is that an item receipt puts items into inventory. There are two
possible list areas on the item receipt. The first one, the standard item receipt line item area, is
common to all plans. The second one, Other Costs, is available only on the Pro Plan.
Some fields on an item receipt that differ from a purchase order are:
Receipt #.
Reference number for this item receipt. You can set autonumbering in the purchasing
settings for this.
Location.
Location at which the items will be received.
Auto Serial/Lot Numbers.
Check this box to generate serial/lot numbers automatically when
receiving serial/lot items set according to your settings.
Payment.
Method used to pay for the items. You can set the default payment in the purchasing
settings. NOTE: If you choose None, no transaction will be sent to QuickBooks. However, if an item
receipt has already been sent to QuickBooks as a Bill, then changing this field to None will revert
and delete the original bill sent to QuickBooks—even if that bill has already been paid. Similar
actions will happen if currently sent as a purchase type (Check, Cash, Credit card).
Add PO.
Item receipts can be used to receive goods from the same vendor from multiple POs. If
there are other open POs with this vendor, it will show them in this list. Selecting a PO will add the
unreceived items from that PO. This can only be done when creating the PO the first time. After
that you will need to start another item receipt to receive the goods in.
Overhead.
You can enter a percentage here to apply a fixed percentage of overhead to each item.
This is sometimes useful in GAAP compliance.
Line item area
Multi-tool.
The right arrow (top left corner) allows you to insert a blank line. The three bars
(center) allow you to click, hold, and drag the lines to reorder them. The down arrow
(bottom right corner) allows you to copy a line and paste it on the next line.

Remove.
Click the trash can to remove a line from the item receipt.
Item.
Enter/select the item to be received. You can enter new items here. If the location you are
receiving in from is bin tracked, then a bin list will be added below the name. It will display the
default bin in the items definition if one was entered. Upon saving the receipt, the bin is added to
the description block.
Description.
This block also becomes multifunctional. It can contain any of the following:
•
Purchase description for the item.
If no purchase description exists in the items definition
it will use the sales description.
•
Lot entry blank.
To allow you to enter a lot ID for a lot-tracked item. This number can be
autogenerated based on your purchasing settings.
•
Expiration.
This is a date field to allow you to set an expiration date for the lot entered in a
lot tracked item.
•
S/N blank.
This is a blank to allow entry of serial numbers for serial-tracked items. You will
get the number of blanks to correspond to the quantity entered on that line. These can be
autogenerated based on your purchasing settings. If you have a lot of serial numbers to
enter, you can use the Upload button to select a CSV file that just lists all the serial numbers
needed for that one item on the list.
Part #.
Vendor part number for the item.
Quantity.
How many of this item you are receiving. You can lower the number if you were only sent
partial quantities (partial receiving). At the bottom of this column is the total number of items
received.
UOM.
If Units of Measure are turned on in Plus plan and above you will see the list of possible
measures. If coming from a PO, that UOM will be selected by default.
WGT.
This is the weight as defined in the item. At the bottom of this column is the total weight for
the received goods.
VOL.
This is the volume as defined in the item. At the bottom of this column is the total volume of
the received goods.
Unit Price.
Price of each item.

Amount.
Extended (line) total. The total amount is displayed at the bottom of that column.
Applied To.
This field will list the PO reference number and the line on the PO that will be updated
for the quantity received. If there is only 1 item on the PO then it defaults to a 0. If more than one
item is on the listed PO, then it will be the line number of that item on that PO.
Class.
QuickBooks Online class for this line item. This field is enabled only if class tracking is
enabled in QuickBooks Online.
Customer.
This field allows you to select a customer that this item is being received for. You can
have multiple customers listed on the item receipt.
Job.
Job to which this line item belongs. This box is only available if Job Tracking is enabled in SOS
Inventory on the Inventory Settings page.
Add Lines.
Click this link to add additional lines to the item receipt.
Clear Lines.
Click this button to clear the items form completely.
Other Costs is a second item list area located at the bottom of an item receipt. It is available only on
the Pro Plan. Enter in the Other Costs block any additional costs that apply to the items received.
These costs will be totaled and distributed across all received items for the calculation of cost of
goods sold. This is helpful in determining your landed cost for the items received.
Amount.
Cost of item such as freight.
Vendor.
Vendor to be paid. Always enter the vendor, even if it is the same as the from whom you
are receiving goods.
Class.
Class to which the item is assigned for reporting in QuickBooks Online.
Bill.
Check this box if you desire a separate bill to go to the vendor listed in this line.
All the items on a purchase order do not have to be received at the same time. If you receive only
some of the items on a PO, create an item receipt for only those items. SOS Inventory is smart
enough to keep track of the number of items received relative to the number ordered by updating

the received column on the PO automatically. Once a PO is fully received it will automatically close
out. When generating a second item receipt for a PO, you will need to modify the reference number
to show that it is a follow-on receipt by adding a suffix, for example,
-2
.
The landed cost of an item is the complete amount that it costs you to get the item into inventory.
The landed cost feature of SOS Inventory allows you to include costs other than the raw cost of the
item. For example, you might wish to include shipping charges, customs charges, duties, and so
on. The landed cost feature of SOS Inventory is available only on the Pro Plan.
To enter landed costs, specify the exact costs in the Other Costs section of the Item Receipt. These
are expense type items pointing to the Inventory Asset account as their expense account. Any
costs entered in the Other Costs section will be distributed across the line items on the item
receipt. The Other Costs are allocated proportionally according to the cost of each line item on the
receipt. For true landed costs to work correctly, the inventory asset account must match the
inventory asset account of the items listed in the items section of the receipt. It could get
complicated if more than one asset account is used to define your items.
SOS Inventory helps you to avoid duplicate data entry. When you enter an item receipt, you have an
option for how you want that item to appear in QuickBooks Online. In the “Payment” option on the
item receipt, you have options to create a bill, credit card charge, check, or cash purchase in
QuickBooks Online. You also have the option to create no transaction in QuickBooks Online, if you
prefer to do everything manually. Bill is the default option.
You can generate bills in QuickBooks Online if you selected None for payment, but be careful doing
this. QuickBooks Online uses the expense account when generating bills—and for inventory items,
that is the COGS account. If you desire to generate bills in QuickBooks Online, ensure that the
items listed on the bill have an expense account pointing to the inventory asset account for that
item.
A variance in SOS Inventory is the difference between the actual cost of an item and the expected
(standard) cost of an item. For example, let’s say that your standard purchase cost for a Widget is

$100. Now, let’s say that this week you found them on sale and bought 5 widgets at $95 each. Your
variance is $95 - $100, which equals -$5 per unit, or -$25 total. That means that you paid $25 less
for those 5 widgets than would normally be expected. A positive variance would indicate that you
paid more than expected. You can find variances in SOS Inventory on the Purchase Variances report
and on an item’s Transaction History.
The purchasing and receiving process in SOS Inventory is shown in this workflow diagram:

When returning items to a vendor, enter a Return To Vendor (RTV) transaction. Use this
transaction to return goods that were sent erroneously or damaged in delivery and entered in SOS
on an item receipt.
An RTV can be generated from an item receipt or created as a stand-alone transaction. Regardless
of how the RTV is created, be sure to select Create Vendor Credit if you wish SOS to automatically
credit the account from which the goods were paid (Accounts Payable). If you do not select the
Create Vendor Credit checkbox, you will need to select from the Account dropdown list the account
to which you want the return posted.
To generate the RTV from an item receipt, locate the appropriate receipt on the Item Receipts list
(Operations Menu > Purchasing > Item Receipts), then select Create Return to Vendor from the
Actions Menu. Edit the generated RTV as needed.
To create a new stand-alone vendor return, select Return to Vendor under the Task Bar’s Add
Menu—or select the Add New button on the Returns to Vendors list (Operations Menu >
Purchasing > Returns to Vendors). All data fields will need to be manually entered. The value of the
items being returned may be different than the value the were received at so you may need to enter
an adjusted value in QuickBooks to account for the difference.
NOTE: RTVs are available only on the Plus and Pro plans.
SOS Inventory provides multiple tools and options to assist you in reordering products.
You can set an item’s reorder point and maximum stock level at one or multiple locations. The
Reorder List (Operations Menu > Purchasing > Reorder List) can be used alone or in tandem with
the Reorder Report to determine what you need to order—while the Where To Buy report assists
you in determining the vendor from whom you make your purchases.
Once you have determined your ordering needs, you may create POs manually or have the system
generate them for you.

SOS also allows you to set up email alerts to notify you when you are getting low on items. More
information on alerts is available later in this guide.
A reorder point is the stock level at which the system signals that you need to replenish an
inventory or assembly item. Established when you add or edit an item, the reorder point is used by
SOS to determine when an item needs to be placed on the Reorder Report (Operations Menu >
Reports > Purchasing > Reorder Report). If you have set up a low-inventory alert for the item, SOS
uses the reorder point to determine when the notification should be emailed to you.
SOS Inventory calculates the current stock level using multiple factors. Items will appear on the
reorder report when the available quantity of an item plus the quantity of the item on open
(unreceived) purchases orders hits or falls below the reorder point. The system calculates available
quantity using the following formula:
Available quantity = In-stock quantity - quantities at non-nettable locations – quantities
on unfulfilled sales – quantities on pick tickets not related to a sale
If an assembly is on an unfulfilled sale, the available quantity of the components of the assembly
are reduced. If Include WOs on Reorder Report is enabled (under Purchasing Settings at Settings >
Purchasing Settings), SOS will also include work orders in the calculation of available stock.
An option on the Reorder Report allows you to disable Include POs in Calculation in the
computation of items needed, but this setting should not be disabled in most circumstances.
For an item that you do not wish to order unless you have a sales demand for it, enter
-1
in the
Reorder Point field of the item definition.
If you have an item at multiple locations, you may establish different reorder points for each
location. Location Settings, an action available on the Items list, allows you to set different reorder
points—as well as different maximum stock levels and default bins—at each location.
The Pro plan of SOS Inventory supports the ability to calculate reorder points automatically based
on historical data. It considers historical lead times for purchases as well as historical sales
volumes. To turn on the Calculate Reorder Points option, go to Settings > Inventory Settings.

SOS Inventory allows you to establish a maximum stock level for an inventory or assembly item via
its edit page. The value in the Max Stock Level field indicates the quantity you wish to have on hand
after replenishing the item’s inventory and allows the system to direct the quantity that needs to
be ordered.
The quantity the system indicates you should order is found on the Reorder Report (Operations
Menu > Reports > Purchasing). The amount is based on the available quantity, the options to
include open work orders and open purchase orders, as well as the maximum stock level. The
system will suggest a reorder quantity that will increase your in-stock quantity of items to the
maximum stock level after all unfulfilled sales and open work orders are satisfied.
If the Max Stock Level value is set to zero or is lower than the Reorder Point, the item will not show
up on the Reorder Report. Leave the Max Stock Level field blank if you do not wish to reorder an
item unless you have a sales demand for it.
If you have an item at multiple locations, you may establish different maximum stock levels for
each location. Location Settings, an action available on the Items list, allows you to set different
maximum stock levels, reorder points, and default bins for each location.
SOS Inventory’s Reorder List (Operations Menu > Purchasing > Reorder List) serves as a type of
shopping list—a reminder of the items that you need to buy—but with the added capability of
generating purchase orders from that list.
Items can be added to the Reorder List using any of the following methods:
•
Directly, via the Reorder List.
Use the Add New button on the list page to create a
Reorder entry. This method requires populating the data fields manually.
•
The Actions Menu of the Items list
(Operations Menu > Inventory > Items). Choose the
Add to Reorder List action for the item you wish to add.
•
The Reorder Report
(Operations Menu > Reports > Purchasing > Reorder Report).
• If you want SOS to add to the Reorder List all items that have hit their reorder
point, select Auto-Add to Reorder List feature under the Options menu.

• If you prefer greater control over which items are added to the Reorder List, select
the Display Report option under the Actions block when you are ready to run the
report. Once the online version of the Reorder Report appears, place a check in
the box of any item you wish to include, then select Add to Reorder List in the
Actions block.
•
The Where To Buy report
(Operations Menu > Reports > Purchasing > Where To Buy).
Available on the Plus and Pro plans, this report compiles information from the Vendor-
Item Catalog and presents it in a chart that allows you to compare vendors’ prices for an
item and check your current inventory stock level. If you select the Display Report
option under the Actions block when you are ready to run the report, the Where To Buy
report will include an Add to Reorder List column. Select Add for any item that you want
to include in the Reorder List.
When you are ready to place an order for the items on the Reorder List, you can streamline your
work by having SOS generate purchase orders for you. On the list page, place a check in the box of
each item you wish to order—or check the box at the top of the column to select all items on that
page. Then select Generate POs on the Batch Actions dropdown list.
Purchase orders created from the Generate POs batch action are NOT sent to vendors
automatically. After generation, the POs will appear on the Purchase Orders list, where they can be
edited as needed and emailed to vendors.
If SOS successfully generates a purchase order for an item, it will be removed by the system from
the Reorder List. However, you may need to refresh the list page in your browser for the updated
version to appear.
To view your reorder report, go to Operations Menu > Reports > Purchasing > Reorder Report. This
report shows all items for which the Available for Sale quantity is at or below the reorder point. It
also calculates the quantity needed to bring the item to its maximum stock level.
If selected in the Reorder Report options, open (unbuilt) work orders of assemblies will further
increase the demand for the component items and will be included in the calculation of when the
item shows up on the Reorder Report, along with how many should be purchased.
For companies with multiple locations, the Reorder Report can be used to create system-generated
inventory transfers from one location to another.
If your company has multiple locations, you can run a Reorder Report for an individual location if
you have established maximum stock levels and reorder points for items specific to that location.
Location Settings, an action available on the Items list, allows you to set different maximum stock
levels, reorder points, and default bins at each of your company’s locations.
An alternative to using the Location Settings action is performing a location-specific data
export/import. This process can be used to add the maximum stock level, reorder point, and
default bin for each item stored at that location.
Once you have entered location-specific data with either Location Settings or a data export/import,
you can run a Reorder Report for a select location using the report’s Location filter. The same
formulas used to calculate reorder quantities for all locations will be used to calculate the reorder
quantities for a single location.
Both purchase orders and inventory transfers may be generated for a single location using the
Reorder Report. For more information about these features, see Generating POs from the Reorder
Report and Generating Inventory Transfers from the Reorder Report.
If no location-specific data has been entered for an item, SOS will use the Max Stock Level and
Reorder Point values in the item definition to create the Reorder Report.
After a Reorder Report has been run, SOS Inventory allows you to generate purchase orders directly
from the Reorder Report with the Generate POs action. This allows you to create POs for the items
you need quickly.
Only those items with an assigned preferred vendor will be included on generated purchase orders.
When multiple items on the Reorder Report have the same preferred vendor, those items will be
added to the same purchase order. The purchase cost of the items on the generated PO comes from
the item record.

Generating POs from the Reorder Report will not send the purchase orders to vendors. After
generation, the user may go to the PO list, edit the generated POs as needed, and email them to
vendors.

SOS Inventory can support almost any sales process. SOS is extremely flexible in that regard. If you
want to enter sales transactions primarily in SOS and sync them to QuickBooks Online, that will
work. If you want to enter them first in QuickBooks Online and sync them to SOS, that will work
too. If you want to use SOS only and not use QuickBooks Online at all, that will also work. Also, you
can use any combination of estimates, sales orders, invoices, sales receipts, and so on. You must
follow the few guidelines outlined in the following sections, but for the most part, you are limited
only by your imagination.
Customers in SOS Inventory will synchronize with customers from QuickBooks Online. Changes
made to your customer list in one program will synchronize to the other.
New customers can be added to SOS Inventory using any of the following methods:
•
The Add (+) Menu.
On the Task Bar, go to Add (+) Menu > Sales > Customer.
•
The Customers list
. Go to Operations Menu > Sales > Customers, then select Add New.
•
Certain transaction forms.
The inline method allows you to create a new customer while
entering an estimate, sales order, invoice, sales receipt, rental, or shipment. In the
Customer field, simply type the name of your customer and then select Add New
Customer.
o If you use the inline method, it is important to update the customer’s definition
after saving the transaction. Although SOS will copy relevant fields from the
transaction to the new customer’s record, you need to add to the customer
definition any information you wish to have on file that was not included on the
transaction form.
The fields on the Customer edit page include the company name, address, and contact
information, as well as quite a few details such as the price group they could be assigned to, default

terms, tax rate, currency (if Multi-currency is enabled), and payment method to appear on sales
forms they are listed on. A sales representative can also be assigned to their account. Some
business-specific fields—such as the resale number, contractor number, and business license—do
not sync with QuickBooks Online. If the customer is actually a sub-customer, you can specify the
associated parent customer and indicate whether the sub-customer is to be billed with the parent.
If you are on the Pro plan, the Portal Password contains the customer’s password to your Customer
Portal and allows you to generate a new password if needed.
Finally, the Notes field allows you to enter internal information about the customer. You will see
the note on the edit page of a sales order or invoice, but it will not show on forms sent to the
customer.
Actions and batch actions for customers are accessible from the Customers list (Operations Menu
> Sales> Customers). The default action for customers is Edit, with additional options available in
the Actions Menu dropdown list. Actions that are also available as batch actions are noted where
applicable.
Options are listed in the order they appear on the Actions Menu of the Customer list in SOS
Inventory.
Edit.
Opens an existing customer’s edit page for viewing and editing.
PDF.
Uses a form template to produce a PDF file of the customer’s information. Also available on
the Batch Actions dropdown list.
Create Sub-Customer.
Creates a new customer that is linked to this customer, who is the parent
customer. For more on this feature, see Sub-Customers vs Addresses for Customers with Multiple
Locations and Adding Sub-Customers.
Delete.
Deletes a customer from the Customers list. Also available on the Batch Actions dropdown
list.
Archive/Unarchive.
Allows you to pull customers from the Customers list until you need them
again. The ability to display archived customers is controlled through the Customer list’s Change
Filter feature. Also available on the Batch Actions dropdown list.

Addresses.
Enables adding and editing the addresses of a customer with multiple locations. For
more on this feature, see Sub-Customers vs Addresses for Customers with Multiple Locations and
Using Addresses for Customers with Multiple Locations.
View Customer History.
Provides a historical summary of every transaction pertaining to this
customer in a chart.
Add to Sync.
Provides the functionality of adding a customer to the sync queue to send it up to
QuickBooks Online. Also available on the Batch Actions dropdown list.
When completing your customer profiles, if the Name and Contact field data are the same for a
customer, leave the Contact field blank. This will prevent duplicate name information from
appearing on PDFs of your customer-facing transaction forms.
For the same reason, if the customer’s Name and Company Name data are the same, leave the
Company Name field blank.
If the data in the fields are different, then complete each field accordingly. If a company name has
a designator (for example, “Inc.,” “Ltd.,” or “LLC”) as well as a trade (“doing business as” or DBA)
name, enter the designator in the Name field and the trade name in the Company Name field.
If you have a customer with multiple locations, SOS Inventory offers you two different ways of
handling the locations: (1) they can be set up in SOS Inventory as sub-customers (individual
customers linked to the parent customer); or (2) they can be considered multiple addresses of a
single customer.
The feature you choose depends on how your company interacts with a specific customer. The sub-
customer option typically is used if you are working with Projects in QuickBooks Online or if you
are used to working with sub-customers. Sub-customers sync with QuickBooks Online.

A new sub-customer can be created using the same process outlined in Creating and Editing
Customers. An alternate approach is to go to the Customers list (Operations Menu > Sales >
Customers) and select Create Sub-Customer on the Actions Menu of the parent customer’s record.
If you add a new customer directly, use the Parent Customer field on the Customer edit page to link
the sub-customer to its parent. In addition, check the Bill With Parent box if the sub-customer’s
invoices are to be paid by the parent.
If you use the Actions Menu of the parent customer to create the sub-customer, SOS will
automatically import into the sub-customer definition some information from the parent
customer. In the sub-customer’s Name field, SOS will insert a name using the format [parent
name]-sub. Imported fields can be edited as needed.
You can view parents of sub-customers from the Customers list by enabling Parent on the Column
Chooser.
As an alternate method to handling multiple shipping locations (or billing addresses), you can set
up or edit addresses for customers with multiple locations. To do this, locate your customer on the
Customers list (Operations Menu > Sales > Customers) and select Addresses on the Actions Menu
of the customer’s record. Enter or edit the address information for the locations, then Save and
Close. Using this method, the customer syncs to QuickBooks with the default billing and shipping
addresses, but the additional addresses defined in SOS Inventory do not sync to QuickBooks. So if
you use them, the transactions need to originate in SOS Inventory.
SOS Inventory allows you to distinguish between your different customers—such as wholesale,
retail, online, etc.—through the Customer Type feature. To add a new customer type, go to
Company Menu > Customer Types. Then on the Customer Type list, select Add New. Specify the
name you want to use for the customer type, then Save and Close.
Once created, the customer type will be added to the dropdown menu of the Customer Type field on
the Customer edit page.
Sales by Customer Type - Summary
is available as a report, and customer
type can be selected on a variety of other sales reports as a column option.

NOTE: QuickBooks does not allow customer types created in third-party applications to sync to
QuickBooks. So if you want your customer types to be seen in both SOS Inventory and in
QuickBooks, create the customer types in QuickBooks and have them sync to SOS Inventory. Once
synchronized, if the shared customer type is added to a customer record in either application, it
will synchronize with the customer record.
In SOS Inventory, sales do not automatically relieve inventory. Or to put it another way, sales and
shipping are separate processes. This is one of the most popular features of SOS Inventory, yet it is
also probably the most misunderstood feature as well. This is different than the way QuickBooks
does it, so why does SOS do it differently?
While having a sales transaction relieve inventory automatically is easy and convenient, it is overly
simplistic and not realistic for many businesses. For example, many companies ship products to
customers every few days and then invoice them at the end of the month. In that model, removing
inventory only when invoicing would mean that their inventory would be correct only once per
month (when the invoice went out). Every other time that a shipment went out, it would be wrong.
Also, a furniture store might sell a couch and generate a sales receipt to a customer. However, the
store might not deliver the couch for two weeks or more. It is problematic to remove it from
inventory at the time it is sold, as it is in fact still in inventory (although not available for sale).
The answer to the problem above is to separate sales and shipping, which is what SOS Inventory
does. You have a sales transaction (for example, a sales receipt or invoice) to process the sale, and a
shipment to relieve inventory. SOS automates the process of creating shipments from sales
transactions, so it usually only takes one or two extra clicks, which is well worth the additional
flexibility that it provides.
All sales forms (sales orders, invoices, estimates, etc.) have both add and edit modes, as well as
many additional actions that can be taken on the transaction. The add and edit modes are used to
enter data on the form and to save changes. For example, to add a new sales order, you can go on

the Task Bar under Add (+) Menu > Sales > Sales Order. You may also add new sales orders from the
sales orders list page under Operations Menu > Sales > Sales Orders, then click Add New in the
upper right corner of the list. To edit an existing sales order, open the Sales Order (SO) list and find
the sales order you need. Then click Edit in the Actions Menu to open the sales order for editing. All
sales forms work similarly.
The Available for Sale quantity on the Items list and other places in the system represents the
number of units that can be sold and shipped immediately to customers. To be specific, SOS
Inventory uses the following formula to calculate the quantity available for sale:
*Available for Sale = Quantity On Hand – Quantity On Sales Order – Quantity Non-Nettable
So the system takes whatever stock is on hand, subtracts the quantity on open orders, and
subtracts the quantity in non-nettable locations. That is the quantity available for sale.
*NOTE: If the Include Sales Receipts in Available setting (Settings Menu > Sales Settings > Sales
Receipts) is enabled, the quantity on sales receipts also will be subtracted as part of the Available
for Sale formula.
Note that the “On PO” number and the “On RMA” number are not included in the available for sale
calculation. Note also that if the item is a component of an assembly, its available for sale number
might be affected by the available for sale status of the assembly item, as changes in the available
for sale quantity of an assembly item can generate demand for its components.
On sales orders and invoices, you can see the available for sale quantity if you float the mouse over
the Quantity cell for an item listed on the form.
The sales workflow varies from company to company, and even from one order to the next. An
example of what this process can look like is shown in the Sample Sales Workflow diagram. In this
illustration, the sales process begins with an estimate that converts into a sales order. The process
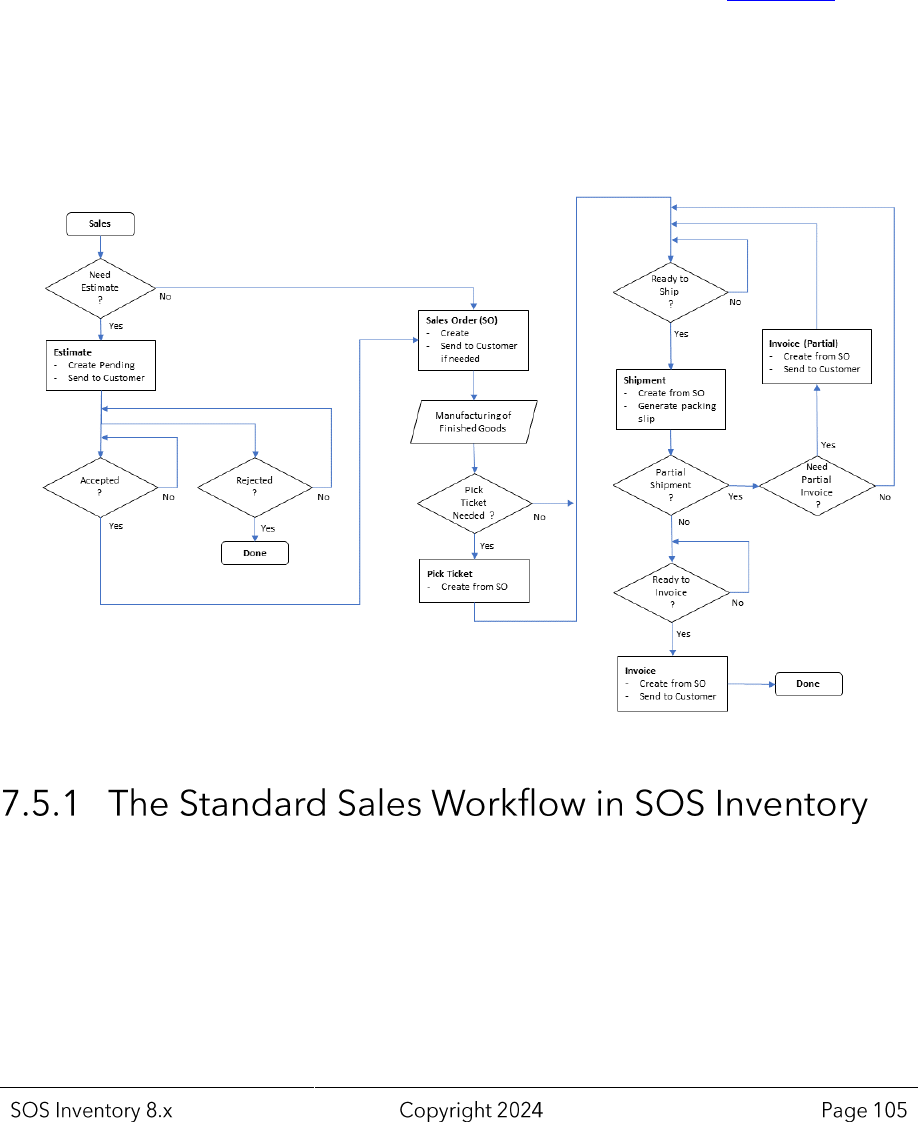
entails manufacturing the needed goods, picking and shipping the items on the customer’s order,
and lastly, invoicing the customer.
Although the workflow includes picking and shipping as part of the sales process, in this guide
these topics will be covered separately. For more information, see Chapter 6, Fulfillment.
Sample Sales Workflow
This chart summarizes how items on sales forms are processed in SOS Inventory and in
QuickBooks Online:

THREE-STAGE SALES WORKFLOW
IMPACT ON SOS INVENTORY
AND QUICKBOOKS ONLINE
Create sales order
Reduces the available quantity of an item but has no
effect on QuickBooks Online.
Generate shipment from a sales order
Removes the item from inventory, making the on-
hand quantity lower. Marks the items on the sales
order as shipped. Once synced with QuickBooks
Online, creates a journal entry in QuickBooks that
affects the Inventory Asset and Cost of Goods Sold
(COGS) accounts.
Generate invoice from a sales order
Marks the items on the sales order as invoiced. If all
items are shipped and invoiced, closes the sales order.
Invoice syncs to QuickBooks Online as an invoice and
affects Accounts Receivable and income accounts of
the invoiced items.
An estimate is a quotation to a customer, or an offer to provide products or services at a specified
price. The terms of an estimate (binding, non-binding, etc.) are set by your company policies.
Estimates in SOS Inventory are very similar to estimates in QuickBooks Online. You can enter an
estimate in SOS and it will synchronize to QuickBooks Online, and vice-versa. You can also send
the estimate to a customer (print, email, etc.) from either place. If you convert an estimate into a
sales order, SOS will automatically change the Status field on the estimate to Accepted.
A sales order is an order from a customer to buy products or services at a specified price. Sales
orders are non-posting transactions, meaning that they do not impact your financials until they
are converted into shipments and/or invoices. Also, note that sales orders do not synchronize with
QuickBooks Online because QuickBooks Online does not have a sales order transaction.
QuickBooks Online has estimates, invoices, and sales receipts, but not sales orders. Thus, there is

no process for synchronizing sales orders with QuickBooks Online, because they don’t exist in
QuickBooks Online.
Fields are listed in the order they appear on the transaction form in SOS Inventory.
Date/Time.
Transaction date and timestamp (sales order date).
Customer.
Customer from whom you are selling the items on the SO. Once you select a customer it
fills in the address blocks, notes, and default terms.
Cust Notes.
This is the internal notes from the customer definition.
Order Number.
Reference number used to identify the SO. This field is searchable. The system will
attempt to number the SO automatically depending on your settings on the Sales Settings page.
Billing Address.
The customer’s billing address for placing an order for goods.
Shipping Address.
Address to which the goods will be shipped.
Currency.
Currency for this transaction. This field is visible only if the Multi-currency setting is
enabled.
Exchange Rate.
The exchange rate for this transaction. The system will automatically provide the
most recent exchange rate for the chosen currency, or you can override it manually. This field is
only visible if the multi-currency feature is enabled.
Price Tier.
This dropdown list allows you to select a price tier that you will apply to the items that
have been added to the item list. Go to the section on price tiers for more information.
Line Items
•
Multi-tool.
The right arrow (top left corner) allows you to insert a blank line. The three
bars (center) allow you to click, hold, and drag the lines to reorder them. The
down arrow (bottom right corner) allows you to copy a line and paste it on the
next line.
•
Remove
( ) – Click the trash can to remove a line from the PO.
•
Item.
Enter/select the item to be purchased. You can enter new items here.

•
Description.
Purchase description for the item.
•
Quantity.
How many of this item you are purchasing.
•
UOM.
The unit of measure for the item, if Units of Measure feature is enabled (Plus and Pro
plans only).
•
WGT.
This is the weight as defined in the item.
•
VOL.
This is the volume as defined in the item.
•
Unit Price.
Price of each item.
•
Amount.
Extended (line) total.
•
Picked.
Number of units of this item picked. In normal use, you would not edit this field
manually. The system should keep it up to date. However, you can override it if necessary.
You should NOT edit this field when picking items. Use a pick ticket for that.
•
Shipped.
Number of units of this item shipped. In normal use, you would not edit this field
manually. The system should keep it up to date. However, you can override it if necessary.
You should NOT edit this field when shipping items. Use a shipment for that.
•
Invoiced.
Number of units of this item invoiced. In normal use, you would not edit this field
manually. The system should keep it up to date. However, you can override it if necessary.
You should NOT edit this field when invoicing items. Use an invoice for that.
•
Due Date.
Set the date that the item is due to be shipped out to or is desired by the
customer. This will be used for back ordering.
•
Class.
QuickBooks Online class for this line item. This field is enabled only if class tracking
is enabled in QuickBooks Online.
•
Tax.
Check this box if you want tax applied to the item.
•
Job.
Job to which this line item belongs. This box is only available if Job Tracking is enabled
in SOS Inventory on the Inventory Settings page.
Add Lines.
Click this link to add additional lines to the PO. On the Company Settings page, you can
specify the number of lines added by default.
Clear Lines.
Click this button to clear the items form completely.
Discount.
Allows you to apply a discount to the order as a flat rate or percentage of the subtotal.
You can also mark it to be taxable or not.
Tax.
Tax rate to be applied to the sale.
Terms.
Payment terms.

Sales Rep.
Sales representative assigned to this sales transaction.
Channel.
Sales channel from which this sale was initiated (such as Web Order).
Drop Ship.
Mark this block if the sales order is to be drop shipped. Available for sale is not
affected.
Customer PO.
The customer PO number. Syncs to QuickBooks Online if Customer PO is the field
name.
Deposit.
Deposit paid by customer as a fixed expense or percentage of the SO. Does not sync to
QuickBooks Online.
Department.
Department for this transaction.
Customer Message.
This message will be displayed on the sales order. This field can be expanded
to become as large as you need it.
Comment.
Internal comment about this SO. The comment is not displayed on the sales order when
printed or emailed.
Custom fields may appear on sales order transactions, depending on how each field has been
defined. If present, custom fields will be placed after the standard SOS data fields.
All sales forms share the following actions, which can be accessed by clicking the appropriate
menu option. Edit is the default action for sales orders and other sales forms. Actions are listed
below in the order they appear in SOS Inventory.
Edit
. Opens an existing sales form’s edit page for viewing and editing.
Quick View/PDF
. Allows you to create a PDF version of the form that you can view, print, or save.
Email
. Emails the form as a PDF attachment to the recipient(s) specified in the To box. Separate
multiple recipients with a comma.
Create Purchase Order.
Creates a purchase order to your vendors to replenish your inventory items
such as a good or service.

Create Job
. Creates a job to organize groups of transactions.
Create a Work Order
. Creates a work order to provide detailed instructions about how to make each
item.
Create Pick Ticket
. Creates a pick ticket that will provide instructions to pull certain items, serial
numbers, quantities, lot numbers, etc.
Create Shipment
. Creates a shipment and removes those items from the inventory.
View Profit/Loss
. Allow you to view the profit/loss for each item purchased and sold.
Create Invoice
. Creates a bill to your customer to be paid by a certain date.
Use as Template
. Generates a cloned version of the form that can then be edited and saved.
Create RMA.
Creates a Return Merchandise Authorization that authorizes a customer to return a
product.
Create Return
. Creates a record that you received an item back from a customer on a certain date.
Archive / Unarchive.
Allows you to set if an item is to appear on forms or not.
Open or Close
. Manually closes or opens the form.
Delete.
Deletes the transaction.
Show History
. Shows a history of each time the form was modified.
Each type of sales form will have a unique set of actions that accomplish specific tasks related to
that form. For example, most forms will have one or more actions that allow you to turn that form
into another form. An estimate can be converted to a sales order. A sales order can be used to
generate a PO or an invoice. All forms can be used to create shipments. And so on. The idea is that
there should never be any duplicate data entry. If you feel like you are entering data twice, check to
see if you can generate that form from the previous one in your workflow.

The due date for each line item on a sales order is the date that the item has been promised to the
customer. The due date is important because reports (such as the Ready to Ship report) can be
sorted by due date, enabling the warehouse to know which orders should be fulfilled first.
On the Items list, click on the number in the On SO column for a given item to see a list of all open
sales orders that contain the item. If an item is a component of an item that is on sales order, it will
show in the list as well, as demand has been generated for that component.
Backorder tracking in SOS Inventory is accomplished via sales orders. Each line item on a sales
order tracks the quantity ordered, as well as the quantity shipped. Any item ordered but not
shipped constitutes a backorder.
To track backorders, use the Backorder Report (Operations Menu > Reports > Fulfillment >
Backorder Report) or the Open Sales Order Detail report (Reports> Sales > Open Sales Order
Detail).
If you receive goods from a supplier, go to the Ready to Pick/Ship report (Operations Menu >
Reports > Fulfillment > Ready to Pick/Ship) to see which orders you now have enough stock on
hand to ship. These reports are also described in the Reports section later in this guide.
An invoice is a bill to a customer requesting that they pay you a certain amount of money by a
certain date. Invoices in SOS Inventory are very similar to invoices in QuickBooks Online. You can
enter an invoice in SOS, and it will synchronize to QuickBooks Online—and vice versa. You can also
send the invoice to a customer (print, email, etc.) from either place. Many customers prefer to
generate the invoice in SOS and then send it from QuickBooks Online. That works perfectly fine, if
that is your preference.
If you wish to create invoices in SOS Inventory and let QuickBooks Online number the transactions
for you, you must follow the steps listed below.
1. In QuickBooks Online:
a. Enable Custom Transaction Numbers (under Gear icon > Account and Settings >
Sales).
b. Create an invoice in QuickBooks with the starting number you wish to use.
c. After saving the invoice, disable Custom Transaction Numbers.
2. In SOS Inventory:
a. Go to Settings > Sales Settings > Invoices.
b. Enable the Use QuickBooks Invoice Numbers setting. Leave the Next Invoice Number
and Invoice Number Prefix fields blank. Refer to the descriptions for Invoice settings if
needed.
To create an invoice from a sales order, open the sales order list and find the sales order you want
to process. Under the Actions Menu for that invoice, click the Create Invoice action. Note that this
will create an invoice only for items on the sales order that have been shipped but not invoiced.
This means that you must ship the items on the sales order before you can invoice for them. Thus,
you normally use the Create Shipment action on the sales order before using the Create Invoice
action.
The Ready to Invoice report (Operations Menu > Reports > Sales > Ready to Invoice) shows all
orders that have been shipped and are waiting to be invoiced. This report helps ensure that your
accounting department has missed no orders and has invoiced all customers.
A sales receipt is a record of a completed sales transaction. An example is the receipt you receive
from a grocery store for the merchandise you purchase. Sales receipts in SOS Inventory work
almost identically to sales receipts in QuickBooks Online.
Note that a sales receipt by itself does not relieve inventory. The reason is that shipping and sales
are different processes. Consider a furniture store where you walk in and buy a couch for them to
deliver to you. You pay them, and they give you a sales receipt. However, the couch is still in their
warehouse. It is still in their inventory. Thus, their “on-hand” quantity has not changed, as they
would still have the same number of units if they walked out to their warehouse. Only when it is
entered on a shipment will it come out of inventory.
If you select More > Save and Ship on the Navigation Bar when you finish adding or editing a sales
receipt, the system will save the sales receipt—and then generate and automatically open a pre-
populated shipment transaction. This is a convenient option if you want your sale and delivery to
occur at exactly the same time, as it allows you to easily remove the merchandise from inventory
with only one click.
If the shipment takes place later, simply locate the saved sales receipt on the Sales Receipts list
and select the Create Shipment option on the Actions Menu. SOS will generate a shipment
transaction from the sales receipt.
SOS Inventory’s SOS Pay feature offers online credit card and ACH (electronic check) payment
processing. Fees are charged on a per transaction basis. SOS Pay also allows you to record payments
with other payment methods that your company accepts. Like other aspects of SOS Inventory, SOS
Pay is designed to work in tandem with QuickBooks Online or as a standalone feature.
To sign up for SOS Pay, select Payments (Operations Menu > Sales > Payments). If you do not see
this option or would like more information about SOS Pay, please contact our Support team.
SOS Inventory supports price tiers (price levels) that allow you to have different pricing structures
for each item, as well as quantity-based pricing. These price tiers can then be used on sales
transactions but can also be assigned directly to a customer. For example, you might wish to have
wholesale pricing and retail pricing. Price tiers in SOS are based on what we call
price groups
.

To set up a price group in SOS, go to Company Menu > Price Tiers, then select the Add New button.
You can specify an across-the-board percentage discount for the price group, or you can specify
the prices on an item-by-item basis. The calculation for the percentage discount is based upon the
item’s
list price
(its regular sales price, without discounts). The list price on sales forms matches
the value entered in the Sales Price field of the item definition.
When entering a price group, you can retrieve the prices for existing items in the group by selecting
the item and clicking the Retrieve Prices button. Then add or edit the prices as needed. Note that
you can enter different prices at different quantity levels. If you remove all entries from the prices
table for an existing item in the tier and save, it deletes the entry from the price tier.
If you do not wish to have quantity breaks, simply enter one price per item, with a quantity of
1
. To
enter the pricing for another item in the group, save the first item. Then change to another item
and enter pricing for it. Then save and repeat until you have entered all of them. Note that any
items not in the group will use the default pricing as specified with the item. If you remove all
entries from the prices table for an existing item in the tier and save, it deletes the entry from the
price tier.
You can use the Export Data/Import Data features to edit your price tiers.
Once you have set up your price groups, you can assign customers to them by editing the customer
definition and selecting the default price group that applies to the customer. You can override this
price tier on a sales transaction. Your price groups, as well as pricing by item and/or customer, can
be viewed on the Price Book (Operations Menu > Reports > Sales > Price Book). Select the item(s),
customer(s), and print or export as needed.
SOS Inventory can track sales representatives and their commissions. Commissions can be
calculated using any of the methods listed below. But regardless of the commission calculation
method chosen, the sales representative must be defined in the system.
The methods for calculating commissions are:

•
By the value established for the representative in the sales rep definition.
You can set the
commission to be based on a percentage of sales or a flat rate per transaction. Only one
commission rate may be applied to the sales representative per definition. If you wish to
provide varying rates to the same representative, enter an additional definition for each
rate that applies to that sales representative.
•
By the value established in the item definition.
The commission can be based on a
percentage of the item’s sale price or a designated per-unit rate. An item may also be
commission exempt if you do not want to pay commission on sales of that item.
•
By the combined total of the values established in the sales rep definition and the item
definition.
If commission values are specified for the item as well as the representative,
then SOS will calculate a commission that is based on both.
To add a sales representative, go to Company Menu > Sales Reps, then select the Add New button.
Enter the information needed in the fields, and then save. (If you do NOT wish to establish a
commission rate based on the sales representative, leave the Percent Commission and Per
Transaction Commission fields in the sales rep definition set to zero.) You may use the Actions
Menu to edit or delete a sales representative.
Once added to the system, the representative’s name will appear in the Sales Rep field of sales
forms.
Sales representative information will sync from SOS (the Sales Rep field) to a custom field in
QuickBooks Online if the QuickBooks custom field is also named
Sales Rep
.
To run the Commission Report, go to Operations Menu > Reports > Sales > Commission Report.
Choose your desired order date range, filters, options, and columns, then select in the Actions
block how you want the report delivered.
In calculating commissions earned, the report considers sales transactions as well as the returns
associated with a sales representative.

SOS Inventory supports discounts on sales transactions. To record a discount, simply enter it in the
discount box on the sales form. If syncing with QuickBooks Online, you must have discounts
enabled in QuickBooks Online, or the discount will not sync properly.
Sales orders and invoices in SOS Inventory can track customer deposits, or advance payments.
When included on an invoice, the deposit will flow to QuickBooks Online as a payment on the
invoice.
If you are not enrolled in SOS Inventory’s SOS Pay feature, you need to record the actual payment
(check, credit card, etc.) in QuickBooks Online. SOS merely records the deposit for tracking
purposes.
When you enter an internal comment (memo) on a sales transaction, SOS stores the comment
along with a record of who made the comment and when. The comment history is displayed on the
transaction when viewed internally. This allows your customer service staff and/or sales reps to
have a record of all notes on the order—for example, keeping a record of when the customer called.
The comment feature is very open-ended, and our customers use it in a variety of ways. The best
use will depend on the specific needs of your company.
To add/edit/delete sales terms that are available for sales transactions, go to Company Menu >
Terms. The sales terms will synchronize with QuickBooks Online.

All sales forms in SOS Inventory support sales tax. The way tax is handled depends on whether your
company is linked to QuickBooks Online.
If your company is linked to QuickBooks Online, SOS retrieves all your sales tax rates from the
Sales Tax Center in QuickBooks Online. Those rates cannot be edited directly in SOS. If you need to
change them, you must change them in QuickBooks Online and then synchronize them to SOS.
If your company is not linked to QuickBooks Online, you can set a default tax rate under the
General tab of the Sales Settings page (Settings > Sales Settings). In addition, you can set a
different default tax rate for each location by using the Location List to edit each location. Finally,
you can override the tax rate on any given sales form if you wish.
For our international customers, your QuickBooks Online Tax Center allows you to define separate
purchasing and sales taxes, as well as combined taxes and others like VAT tax codes. When adding
your items, you can define default purchase and sales tax codes. On transactions, you must provide
a tax code for each line item on the transaction. When you add items onto transactions, it will use
the appropriate tax code base on the transaction type.
If your SOS account was not connected to a QuickBooks Online account or was connected to one
that does not have a tax center defined, then you can leave the tax blocks blank.
You can send customer messages on sales transactions to describe exact details of a sale, make
shipping arrangements, or really to include any additional information that you wish. Previous
customer messages are stored for later use. To manage your list of saved customer messages, go to
Company Menu > Customer Messages.

SOS Inventory has a fulfillment system made up of pick tickets and shipments that make
warehouse processing easier.
Although these topics are covered in this chapter, picking and shipping are part of the sales
workflow. For a visual of a sales workflow that includes picking and shipping, see Sample Sales
Workflow.
Pick tickets in SOS Inventory are optional. You should use pick tickets ONLY if you need them in
addition to the packing slips that are generated with shipments. A pick ticket in SOS is used to give
instructions to your warehouse to pull certain items, quantities, serial numbers, lot numbers, etc.
Pick tickets do NOT remove items from inventory. They are simply a set of instructions that might
or might not be completed. Once the items are pulled and sent to the customer, they should be
recorded on a shipment so that they come out of inventory.
Shipping in SOS Inventory is defined as inventory going from your company to the customer. It
does not necessarily mean that you actually shipped it. For example, if a customer comes to your
location and picks up the items, you still need to create a shipment to indicate that the items were
removed from inventory.
Typically, the easiest method for creating a shipment is to locate an associated sales transaction
(sales order, invoice, etc.) on the appropriate list, then select Create Shipment from the Actions
Menu. This generates a shipment form populated with all the relevant information, which you can
then edit and save as appropriate.

If you need to create a shipment that does not have an accompanying sales transaction, go to Add
Menu > Fulfillment > Shipment. You may also add a new shipment from the Shipments list (under
Operations Menu > Fulfillment > Shipments) and click on Add New in the upper right corner of the
content area.
The Ready to Pick/Ship report (Operations Menu > Reports > Fulfillment > Ready to Pick/Ship)
shows all orders that can be picked or shipped based on the inventory on hand or the available for
sale depending on options that you choose when generating the report. As you receive new
inventory, use this report to fill your backorders. For many of our customers, the Ready to
Pick/Ship report becomes a to-do list for their warehouse workers each day.
When you create a shipment, the system automatically generates a packing slip. Use the Print
button to print it from your browser—or select PDF from the shipment’s Actions Menu to
download a PDF version. You can customize headers, footers, and other details of the packing slip
via the Sales Settings page.
SOS Inventory can create shipments (and thus relieve inventory) automatically from new invoices
and sales receipts entered in QuickBooks Online. This feature is not enabled by default. To enable
this capability, go to Settings Menu > Sales Settings. Under the General section, you will see
options called Auto-Ship Invoices and Auto-Ship Sales Receipts. Turn on the one that you need
and save the changes. Inventory will be relieved when you enter new invoices or sales receipts in
QuickBooks Online.

SOS Inventory supports both discrete manufacturing and process manufacturing. In both cases,
raw materials (inputs) are turned into finished goods (outputs). Where possible, SOS Inventory
tries to match the terminology used in the desktop editions of QuickBooks, to lessen the learning
curve for existing QuickBooks users and ProAdvisors.
An assembly in SOS Inventory is similar to an assembly in QuickBooks Desktop Pro, Premier, or
Enterprise. You can enter a bill of materials (BOM) that specifies the components of the assembly.
To remove inventory of raw materials and increase inventory of finished assemblies, you must use
a build transaction. This transaction tells the system that on a certain date you used raw materials
to make a finished good.
If you are using a contract manufacturer (third party) to produce a finished good, see Contract
Manufacturing.
9.1.1
In SOS Inventory, an assembly is the output of discrete manufacturing, where raw materials are
turned into one or more units of a finished good, based on a bill of materials (BOM). SOS also
supports process manufacturing, whereby outputs are produced using a recipe or formula. In SOS,
processes are used to describe a more general type of manufacturing that can produce an unlimited
number of outputs based on an unlimited number of inputs.
The item type produced by builds are assemblies, while that of processes are inventory items.
As a general rule, first see if your manufacturing workflow can fit the assembly/build model, as it is
the simplest approach. If production of an item involves going from one stage to another (e.g,
cutting, welding, etc.), a process is the most efficient way to go. It will support virtually any
manufacturing configuration.

A kit or item group is a collection of inventory items that are bundled together at the time of
purchase or sale. The individual items that make up a kit are still separate items and could be sold
individually if needed. In contrast, an assembly is an item that is manufactured (built) from
component items.
When you enter a build transaction into the system, the inventory of the assembly item increases
and the inventories of its component items decrease, as they are used to build the assembly. Item
groups, by contrast, never have any stock in SOS Inventory; only their components do. However,
the Available column on the Items list for item groups will display the possible number of kits
based on the available quantities of the components.
For more information on configuring and using kits, see the section Kits (Item Groups).
Build records are housed in the Builds list (Operations Menu > Production > Builds). This list will
show you when a build was initiated, and if you are on the Pro plan, whether the build is still in
progress.
A distinctive option on the Action menu options of the Builds list is Disassemble, which breaks an
assembly item down into its component items. The action generates a process transaction in which
the assembly item is the input and the component items are the outputs.
The steps required for building an assembly are:
1. Create an item to represent the finished assembly.
2. Ensure each component item needed for building that assembly exists in the system.
Create any additional components, if needed.
3. Create the bill of materials (BOM) for the assembly.
4. Add a build transaction for the assembly.
SOS Inventory also supports subassembly manufacturing, but a subassembly must be built using a
separate build transaction before it can be incorporated into a master assembly. The steps involved
in creating a subassembly are the same as those for any assembly. A subassembly is listed in the

BOM of an assembly as a component item. SOS supports multi-level BOMs and has no limit to the
number of levels.
A valuable tool in assembly production is the Expanded BOM Report. See Using the Expanded BOM
Report in Production Planning for more details.
Adding an assembly:
1. Open a new item page (Quick Add > Item).
2. Enter a unique name for the assembly in the Name field.
TIP: It may be helpful to include in the name whether the item is an assembly or
subassembly.
3. In the Type dropdown list, choose Assembly.
4. Choose the appropriate accounts to be associated with the assembly item.
5. If the assembly will be tracked with a serial and/or lot number, enable the appropriate
box(es).
6. The sales Description field is optional, but if used, the description should be unique.
7. If the assembly is a product that will be sold, enter a value in the Sales price field.
8. Do not enter a value in the Purchase cost field. (The combined purchase cost for all the
components in the BOM will make up the cost basis for the assembly.)
9. Complete other fields as desired, then save. The assembly item record will be added to the
Items list.
For each new assembly component item:
1. Open a new item page (Quick Add > Item).
2. Enter a unique name for the component in the Name field.
3. In the Type dropdown list, choose the appropriate type (Inventory, Expense, Assembly, Kit
(Item Group), Service, or Other). If Assembly is selected, it indicates the component is a
sub-assembly.
NOTE: If an input is an Assembly or Kit (Item Group) item type, it must have a bill of
materials (BOM).
4. Unless the component is also available for sale as a stand-alone item, do not enter a value
in the Sales price field.
5. In the Used on section, Manufacturing forms must be checked.
6. Enter the Starting Inventory data for the component item, if available.
7. Enter the Purchase cost of the component unless it is an assembly type.

8. Enter data for other fields as desired, then save. The component will be added to the Items
list.
A bill of materials (BOM) is the specification of the number and type of components that are used
in making an assembly. The BOM specifies the quantity required of each component to make one
unit of the finished good.
To create a BOM:
1. Go to Operations Menu > Inventory > Items and find the assembly item record.
2. On the Actions Menu, choose Bill of Materials from the dropdown.
3. On the Bill of Materials page for the assembly item, enter each component item and the
quantity needed to build the assembly. Include notes if needed. Labor items and fees
should be included in the BOM, as applicable.
IMPORTANT: Units of measure are not currently enabled for BOMs. All quantities
should be entered in the base unit only.
A build transaction specifies: (1) the assembly item to be produced, along with its quantity; and (2)
the component items required to build the assembly, as well as the quantities needed for each
component. The system uses the BOM definition for the quantities needed of the components.
If your company has multiple locations, make sure the stock is on hand at the location where the
assembly is to be built.
To create a build:
1. Open a new build transaction (either go to Quick Add > Build--or go to Operations Menu >
Production > Builds, then select Add New).
2. Choose the Location where the assembly will be built.
3. In the Output table, select the assembly item to be built and the quantity to build. It is
important that the output be specified before the inputs.
4. Enter assembly components manually in the Inputs table—or click the Update Inputs
button (located under the Output table) to retrieve the proper components based on the
BOM.

a. If retrieved via the Update Inputs button, you can adjust the input quantities and/or
items as needed—for example, if you are using a substitute product.
b. The units of measure specified for input and output items on a build transaction
should be each item’s base unit of measure (UOM).
5. If you need to change your output quantity after retrieving the inputs, you must select
Update Inputs again so that the Inputs table information is updated as well.
6. Plus and Pro plan option: check the Auto Serials/Lot Numbers box if the assembly will be
serial- or lot-tracked so that the system will generate a serial or lot number for the finished
assembly.
7. Pro plan customers using work centers: In the Work Center dropdown list, select Finished
Goods if the assembly output is complete. (All other options in the dropdown indicate the
item is a work in progress and is not available for sale.)
8. Finish completing other data fields as needed, then save the build.
A special use of the build transaction allows you to use an inventory item (i.e., typed as
an Inventory item instead of Assembly) as an output. For example, you may have an item that is
sold as a new product. If it is returned by a customer, you cannot sell it as new, even if the item is in
excellent condition. The solution: Sell it as a refurbished item, with the original item as the input
and the refurbished item as an output. No BOM is needed, as both the input and output items are
inventory items.
The Expanded BOM Report (Operations Menu > Reports > Production > Expanded BOM Report)
allows you to view the entire BOM for an assembly, including its subassemblies and their
components. This report is invaluable for the purposes of production planning, as it helps you
know whether you have enough stock on hand to build the quantities you need for the master
assembly and all subassemblies.

The report also shows the total cost structure of the complete finished product and the expected
expense of replenishing raw materials.
To set up the Expanded BOM Report, do the following:
1. Under the Input section:
a. Choose from the Location dropdown where the assembly will be built.
b. Select from the Item dropdown the assembly item to be manufactured.
c. Enter the number of assembly units to be manufactured in the Quantity field.
2. Under the Options section, check the boxes for Expand Subassemblies and Highlight
Reorders.
3. Under the Columns section, move additional Available columns to the Included columns, if
desired.
4. Under the Actions section, select Display Report. At the bottom of the Expanded BOM
Report page, all components (including those of any subassemblies) will be displayed. The
On Hand column will highlight in red any components that have insufficient quantities to
build the number of assemblies entered in Step 1c.
NOTE: Items representing labor and contract manufacturing fees always show
quantities of zero and are highlighted in red.
The two screenshots below show the settings for the Expanded BOM Report and the displayed
report for assembly item
387450 – Flight Jacket – BL - LG
:

SOS Inventory has the ability to create a build automatically when you ship an item. To use this
capability, enable the Auto-Build Assemblies option on the Inventory Settings page (Settings >
Inventory Settings).
The Auto-Build Assemblies option only builds the master assembly. This setting does not build
subassemblies if using a multilevel BOM.
IMPORTANT: If Auto-Build Assemblies has been enabled in the Inventory Settings, the Don’t Ask
About Negative Inventory will be overridden, and SOS Inventory will allow items to go into
negative inventory.
The Disassemble feature, available only on SOS Inventory's Pro plan, is an action available for
records on the Builds list. Disassemble breaks an assembly item down into its component items.
The action generates a process transaction in which the assembly item is the input and the
component items are the outputs. After disassembly, the system decreases the on-hand

quantities of the assembly and increases the on-hand quantities of the component items. For more
details on using this feature, see Creating a Process Transaction Using a Build’s Disassemble
Action.
9.2
Processes in SOS Inventory can have an unlimited number of inputs and outputs. This gives you the
flexibility to handle a variety of situations:
• Simple manufacturing (multiple inputs into one output).
• Disassembly (where one input turns into many outputs). Process transactions can be used
to break finished goods back into their original components.
• Complex processes with by-products (multiple inputs into multiple outputs).
Refer to Assemblies vs Processes for a brief explanation of how processes differ from assemblies.
If you are using a contract manufacturer (third party) to produce the goods, see Contract
Manufacturing.
Process transactions are housed on the Processes list (Operations Menu > Production > Processes).
This list will show you when a process was initiated, and whether the process is still in progress.
The steps required for creating a process are:
1. Create an output item for each end product that will be manufactured, including any
needed to designate waste products.
2. Create each input item needed to produce the outputs, including labor and fees.
3. Optional: Create a process template that includes all the items needed for the process, the
end products, and the quantities necessary for each. Defining a process template is
beneficial if you use the same manufacturing process on a recurring basis.
4. Create a process transaction to manufacture the output items. If a process template is used,
it would be selected for use in the transaction.

To add a process output item (including a waste item):
1. Open a new item page (go Quick Add > Item--or go to Operations Menu > Inventory >
Item, then select Add New).
2. Enter a unique name for the output item in the Name field.
TIP: For a waste item, we recommend including some designation in the item name
to indicate it is a waste product. For example, if you use an item called
Cod
as one of the
input items for a process, but some of it is wasted during the production process, create
a second item called
Cod - Waste
to represent the waste product. This keeps waste
product from getting returned to the Cod inventory and being included with
its quantities. A separate waste item also makes searching and accounting for the
waste via an inventory adjustment easy.
3. The Description field is optional, but if used, the description should be unique.
4. In the Type dropdown list, choose Inventory.
5. If the process output is a product that will be sold, enter a value in the Sales Price field.
6. If the output item will be serial and/or lot tracked, enable Track Serial Numbers and/or
Track Lot Numbers.
7. Choose the appropriate accounts to be associated with the process output item.
8. Enter a value in the Purchase Cost field. This field is required for the distribution of costs
among the output items.
9. Complete other fields as desired, then save. The process output item will be added to the
Items list.
For each new input item:
1. Open a new item page (Quick Add > Item).
2. Enter a unique name for the component in the Name field.
3. In the Type dropdown list, choose the appropriate type (Inventory, Expense, Assembly, Kit
(Item Group), Service, or Other).
NOTE: If an input is an Assembly or Kit (Item Group) item type, it must have a bill of
materials (BOM).
4. Unless the component is also available for sale as a stand-alone item, do not enter a value
in the Sales price field.
5. If the output item will be serial and/or lot tracked, enable Track Serial Numbers and/or
Track Lot Numbers.
6. In the Used on section, Manufacturing forms must be checked.
7. Enter the Purchase cost of the component unless it is an assembly type.

8. Enter data for other fields as desired, then save. The component will be added to the Items
list.
A process template in SOS Inventory is like a BOM that is designed for a process. A template is used
as a repeatable manufacturing run. It describes the inputs and outputs to be recalled for use later. A
template does not remove items from inventory. The inventory is removed/created when a process
transaction is created using the template.
To create a process template:
1. Go to the Process Templates list (Company Menu > Miscellaneous > Process Templates,
then select the Add New button).
2. Enter in the Name field what you want to name this template. Completing the Description
field is optional.
3. Enter each output item, as well as the quantity for each. Output items can represent a
finished good or materials that will be reused, as well as items to be discarded as waste. If
an item is waste, check the box in the Waste column. The Waste column is used only to
calculate the expected yield of the process.
4. Enter each input item, as well as the quantity for each.
5. When finished, the BOM Cost total of the output items should be close as possible (but not
necessarily exact) to that of the inputs.
6. Save and Close the template when done.
IMPORTANT: Units of measure are not currently enabled for process templates. All quantities
should be entered in the base unit only.
A process transaction in SOS Inventory is a record showing that a specific process took place on a
specific date. This transaction is what tells the system that something actually happened. A
process transaction can be added directly, generated from a build transaction (to disassemble an
assembly), or generated from a work order.
1. Go to the Task Bar under Quick Add > Production > Process--or go to Operations Menu >
Production > Processes, and then select the Add New button.

2. Choose from the Location dropdown where the manufacturing will be performed.
3. Manually enter the output and input line items--or select the process template to be used
for the transaction from the Template dropdown and select Apply. If you are not using a
process template, be sure to include any waste item(s) in the Outputs table and check
the Waste column box(es).
4. The units of measure specified for input and output items on a process transaction should
be in each item’s base unit of measure (UOM). (If a process template is used for the
transaction, the template should have been set up using the base UOM of each input and
output item.)
5. If the actual manufacturing is to start later than the date on the process transaction, set the
Start Date for when the manufacturing should begin.
6. If the desired output item quantities need to be changed (e.g., doubled or halved) and you
want all the input and output items to keep the same proportions, enter the correct number
in the Multiplier field (located below the Inputs table) and select Apply. If you are
decreasing the quantity produced, or increasing the quantity produced by a number that is
not whole, enter a decimal number in the Multiplier field (e.g., enter
.5
to decrease the
output by half, or
1.5
to increase the output by half).
7. Check the Auto Serials/Lot Numbers box if the process outputs will be serial- or lot-
tracked, and you want the numbers to be assigned by the system.
8. If you are using work centers, in the Work Center dropdown list, select the appropriate
work center for this process. Choose Finished Goods if the outputs are items ready for sale.
(All other options in the dropdown indicate the outputs are work in progress and are not
available for sale.)
9. Finish completing other data fields as needed, then save the transaction.
When you save a process transaction, inventory of the input items decrease and inventory of the
output items increase. The cost of the input items is distributed proportionally across the output
items, according to the purchase cost of the output items. Make sure that each of your output items
has a purchase cost entered, as an output item with a $0 purchase cost will receive none of the
value (unless it is the only output, which will result in it receiving 100 percent of the value).
The Disassemble action on a build record allows an assembly item to be broken down into its
component items. To disassemble an assembly, perform the following steps:
1. Locate the build transaction record containing the assembly item(s) you want to
disassemble.

a. If the assembly is serial tracked, you can find its associated build on the Serial
Inventory list by searching for the assembly's serial number. The build transaction
reference number is shown in the Serial Inventory list's Description column. The
reference number can also be found by going to the Actions Menu and
selecting Transaction History.
2. In the build's Actions Menu dropdown, select Disassemble. The system will generate a new
process transaction from the build. The assembly item will be in the Inputs table, while the
assembly components will appear in the Outputs table.
3. If needed, adjust the quantities (by using the Multiplier). Remove any labor and fees from
the Outputs table. Add any labor and fees required for executing the
disassembly
in the
Inputs table.
4. If you are disassembling a product with known broken parts, then mark these output items
as waste:
a. Check the Items list to see whether a waste item exists for each component that will
be waste product. If needed, create a new item for each waste product.
b. Enter each output item that will be waste into the Outputs table.
i. Enter the quantity of the waste, then check the box in the Waste column.
ii. For the corresponding (non-waste) output item: either lower the quantity to
offset that which will go to waste, or delete the item if all of it is waste.
5. Complete other fields as desired. When finished, save the process transaction. Upon
saving, SOS Inventory will automatically add in the Comment field of the process
transaction--as well as in the Memo column of the Process Transaction list--that the
process transaction is a disassembly and reference the associated build transaction
number.
6. If needed, create an adjustment to remove any waste products from the system.
a. After saving the adjustment, go to the Adjustments list (Operations Menu >
Inventory > Adjustments).
After disassembly, the system decreases the on-hand quantities of the assembly and increases the
on-hand quantities of the component items.
Work orders can be used to generate a process transaction, but the procedure is different from that
typically used in SOS Inventory to generate a child transaction from its associated parent. Refer to
Generating a Build or Process Transaction from a Work Order for details.
For any output of a process, you can specify the output item as waste.
Based on the percentage of waste items and non-waste items, the system will calculate a yield for
your process. This helps you to evaluate materials from different suppliers, for example, to
determine which gives you the best outputs in your manufacturing. Waste items go into inventory
like any other inventory item, so that they can be tracked and used later as needed.
On the Process Templates list, enable the Expected Yield column with the Column Chooser to
display the anticipated yield percentage of any process. The actual yield of a process can be viewed
in the Yield column of the Process Transactions list.
If you discard waste product, use an adjustment transaction to remove the waste item quantities
from SOS Inventory.
TIP: For a waste item, we recommend including some designation in the item name to indicate it is
a waste product. For example, if you use an item called
Cod
as one of the input items for a process,
but some of it is wasted during the production process, create a second item called
Cod - Waste
to
represent the waste product. This keeps waste product from getting returned to the Cod inventory
and being included with its quantities. A separate waste item also makes searching and accounting
for the waste via an inventory adjustment easy.
If you have defined any custom fields for build or process transactions, they will appear after the
standard SOS Inventory fields and before the Comment field. Custom fields will be of the input
format and value that you have defined.

Add lines. Click this link to add additional lines to the transaction form. On the Company Settings
page (Company Menu > Company Settings), you can specify the number of lines added by default.
Apply to WO. The work order and line item with which the output item on a build or process is
associated.
Auto Serial/Lot Numbers. Check this box to generate serial/lot numbers automatically for output
items according to your Purchasing Settings (Settings Menu > Purchasing Settings).
Build #. Reference number identifying this build transaction. The system will number the
transaction automatically if autonumbering is enabled in the Inventory Settings (Settings Menu >
Inventory Settings).
Class. QuickBooks Online class for this line item. This field is enabled only if class tracking is
enabled in QuickBooks Online.
Clear Lines. Click this button to clear the items from the form completely.
Comment. Internal comment about a transaction. The comment is not displayed on the
transaction when printed or emailed.
Date/Time. Transaction date and timestamp.
Department. Department for this transaction.
Description. This block is multifunctional and can contain any of the following:
• Sales description for the item. The default sales description, as entered in the item
definition.
• Lot entry blank. Allows you to enter a lot ID for a lot-tracked item. This number can be
autogenerated based on your Purchasing Settings.
• Expiration. A date field that allows you to set an expiration date for a lot-tracked item.
• S/N blank. A blank that allows entry of serial numbers for serial-tracked items. The
number of blanks corresponds to the quantity entered on that line. Numbers can be
autogenerated based on your Purchasing Settings. If you have many serial numbers to
enter, you can use the Upload button to select a CSV file listing all the serial numbers
needed for that one item on the list. The CSV file should contain the numbers only.

Inputs. The table of line items to be used in manufacturing goods.
Item. An item on the transaction. Enter/select the name of an existing item from the dropdown
list. New items can also be created.
From Job. Job from which an input item on a build or process is referenced from another job to
transfer the value into this transaction. This box is available only if Job Tracking is enabled on the
Inventory Settings page.
Line. A column that shows the order of line items on a table. The order of individual line items can
be changed using the Multitool.
Line #. The line-item number on a work order to which an output on a build or process transaction
is applied.
Location. On builds and process transactions, the location where the items are being
manufactured.
Multiplier. On a process transaction, the number by which input and output item quantities (i.e,
those imported from a process template) are to be multiplied to obtain the desired output
quantities.
Multitool. A multifunctional icon in the far-left column of a line item. Selecting the right arrow
(top left corner) inserts a blank line. The three bars (center) allow lines to be reordered
when clicking, holding, and dragging the white arrow that appears. Selecting the down arrow
(bottom right corner) copies a line and pastes the duplicate on the next line.
Notes. An internal note pertaining to an input item on a build.
On Hand. The quantity of an item that is available for use.
On SO. On a build transaction, the quantity of an output item needed to fulfill sales order(s).
Output(s). The table of line item(s) produced by the manufacturing process.
Process Transaction #. Reference number identifying a process transaction. The system will
number the transaction automatically if autonumbering is enabled in the Inventory Settings
(Settings Menu > Inventory Settings).

Qty to Build. The quantity of assemblies to be manufactured on a build transaction.
Qty Used. The quantity used for an input item on a process.
Quantity. The number to be produced for an output item on a process transaction.
Remove. Click the trash can icon to remove a line from the transaction.
Start Date. The beginning date of the process manufacturing.
Template. The process template to be used on a process transaction.
To Job. The job to which an output item on a build or process should be applied.
Total in Build. On a build, the total quantity required of an input item to manufacture the specified
quantity of an output item.
Qty to Build. The quantity to manufacture for an output item on a build transaction.
UOM. If Units of Measure are turned on in Plus or Pro plan, you will see the list of possible
measures. If imported from a BOM or process template, the UOM will be the base unit by default.
On processes and builds, the base unit of measure should always be used.
Update Inputs. When this button is selected on a build transaction, component items listed in an
assembly’s bill of materials will appear in the Inputs table. If any changes are made to the output
item after the input items have been imported, you must select Update Inputs again to refresh
the Inputs table information.
Used Per. On a build transaction, the quantity required of a specific input (component) item to
build one unit of the output (assembly) item, as specified in the bill of materials.
Waste. Check the box if the output item on a process is a waste product. NOTE: SOS Inventory
returns a waste item to inventory. An adjustment transaction must be used to remove waste
products from the system. See Waste Product and Yield Percentage for important information on
handling waste.
WO #. The work order transaction reference number with which an output on a build or process is
applied.

Work Center. Pro plan subscribers who have defined work centers will see the Work
Center dropdown list on build and process transactions. Select Finished Goods if the output(s) are
completed items. Other dropdown options indicate a stage for a build or process that is a work in
progress.
Jobs, available in the Pro plan of SOS Inventory, are a convenient way of organizing groups of
transactions. Each job, and even each stage of a job, can have its own profit-and-loss statement to
show you precisely how much money you made or lost on a given set of transactions. To enable job
tracking in SOS Inventory, go to Settings Menu > Inventory Settings and turn on Job Tracking.
Job forms are stored on the Jobs list (Operations Menu > Production > Jobs).
The Job dashboard, located on the Actions menu, allows you to quickly access each transaction
associated with the job. Another action, View profit/loss, allows you to see the gains and losses for
each job.
To add a job, use any of the following methods:
• Generate a job from a sales order or sales receipt. Locate the parent transaction record on
its appropriate list, then select Create job from its Actions Menu.
• Go to the Quick Add > Production > Job.
• Go to Operations Menu > Production > Jobs, then select the Add New button on the list
page.
Explanations for fields pertaining to jobs are listed in Job Field Descriptions.
An existing job can be opened for editing by selecting its Edit button on the Jobs list. Be sure to save
your changes.
When adding or editing a job, you can specify one or more work centers for the job and the order in
which they occur. You must have at least one work center (Finished Goods). For more information,
see Work Centers.

Once job tracking is enabled, transactions in SOS Inventory will include the option to specify the
job to which the transaction, or the line item on the transaction, will be attached. The list will
include all open jobs in the system and their associated work centers.
If you have defined any custom fields for jobs, they will appear after the standard SOS Inventory
fields. The custom fields will be of the input format and value that you have defined.
Customer. The name of the customer for whom the job is being performed. New customers can be
added if desired. This field is optional.
Description. The description that applies to this job. If generated from a sales order or sales
receipt, the system will insert in the Description field, “Job for [sales order or sales receipt]
[transaction reference number].”
Job address. A block of fields that, if a job is associated with a customer, contains the customer’s
shipping address. Fields include up to five lines for the street address, post office box, attention
line, etc., along with City, State/province, Postal code, and Country fields.
Job Number. The system-generated number assigned to this job upon saving.
Multitool. This icon in the far-left column of a line item is usually multifunctional, but for jobs,
only the move tool is available. The three bars of the move tool allow lines to be reordered
when clicking, holding, and dragging the white arrow that appears.
Name. The name used for this job. If generated from a sales order or sales receipt, that
transaction’s reference number will serve as the name of the job.
Remove. Click the trash can icon to remove a stage from a job.
Restore. Restores the stages and their sequence to their defaults.
Stage. A work center as defined in SOS Inventory. Stages can be deleted, and their sequencing in
the Stages table can be reordered using the Multitool’s Move feature.

To view the dashboard for a job, go to Operations Menu > Jobs and click the Job Dashboard option
on the Actions Menu of the job you wish to view. The dashboard will allow you to quickly access
each transaction associated with the job. In addition, you can close the job or view the profit and
loss for each job.
To view the profit/loss for a given job, go to Operations Menu > Jobs and select Profit/Loss on the
Actions Menu. Then you can view the profit and loss for the job as a whole or for each work center.
The line items on the statement include all transactions for which that job was selected.
A work order in SOS Inventory is a scheduling tool for manufacturing, an order to produce a given
number of items. On a work order, you can provide detailed instructions about how to make each
item. A work order is like a purchase order in that it is a non-posting transaction. Work orders do
not affect your inventory until the manufacturing is recorded using a build transaction or process
transaction. A work order is simply a set of instructions that you send to your foreman, plant,
factory, etc. It may or may not be fulfilled.
Work orders are housed on the Work Orders list (Operations Menu > Production > Work Orders).
Actions menu options for generating transactions on the Work orders list include Create purchase
order, Create pick ticket, and Create transfer. For the associated target transaction (purchase
order, pick ticket, or transfer), the assembly item's components from the bill of materials will be
listed. However, inventory items meant for process transactions will only add the output item to
the target transaction.
If the work order is fulfilled, you can use the work order to generate a build or process transaction
associated with work performed.

1. To add a work order, use any of the following methods:
o Most common method: generate a work order from a sales order or sales receipt.
Locate the parent transaction record on its appropriate list (Operations Menu >
Sales > Sales Orders
or
Sales Receipts), then select Create Work Order from
its Actions Menu.
o Go to Quick Add > Production > Work order.
o Go to Operations Menu > Production > Work order, then select the Add New button
on the list page.
2. If any items are assemblies, check the Expanded BOM Report to see whether that assembly
contains any subassemblies. If the report shows you do not have enough components to
build the subassemblies, you will need to order and receive the components before you can
build the subassemblies, which in turn must be built before the master assembly can be
produced.
3. Important fields for work orders include Location, Items to Make, Quantity, and Due Date.
The Produced field is a system-generated quantity to indicate the production that has
already been completed for that line item.
NOTE: Due dates cannot be sorted, so it is important to enter the lines in chronological
order, according to due date. Use the Multitool’s Move feature to change the line order
if needed.
An existing work order can be opened for viewing or editing by going to the Work Orders list and
selecting the Edit button for the work order record. Be sure to save your changes.
A build or process transaction can be generated from a work order. But the procedure used is
different from that typically used to create a child transaction (such as a shipment) from a parent
transaction (such as a sales order). On the Work Orders list (Operations Menu > Production > Work
Orders), the work order’s Quick View action brings up all the line items requiring manufacturing,
as shown in the screenshot below:

Selecting the Produce button for a line item generates the appropriate manufacturing transaction
type (a build or a process transaction), based on the item type. Use the Produce All button if you
have multiple
assembly
items that are ready for production. This feature will produce any
assemblies that are not lot or serial tracked on inputs or outputs. Produce All will
not
generate
process transactions.
The quantity of an item that has already been produced will be reflected in the Produced column of
the work order. The system does track partially completed manufacturing of an item. If you select
Produce again for any item that has been partially produced, SOS will adjust the quantity
accordingly on the new build or process transaction.
If you have defined any custom fields for work orders, they will appear after the standard SOS
Inventory fields. The fields will be of the input format and value that you have defined.
Add lines. Click this link to add additional lines to the work order. On the Company Settings page,
you can specify the number of lines added by default.
Add order. Adds the items on a sales order or sales receipt to the work order. If other open sales
orders or sales receipts for the same customer exist, they will be listed in the Add order field
dropdown. Select the desired sales order or sales receipt, then click the Add button to import yet-
to-be-manufactured items from that transaction. The ability to import items from multiple sales
order and sales receipts can be used only when creating the work order. Once it has been saved, a
different work order must be created.

Assigned to. The user to whom the work order is assigned.
Channel. The avenue through which a sale was placed.
Class. QuickBooks Online class for this line item. This field is enabled only if class tracking is
enabled in QuickBooks Online.
Clear lines. Click this button to clear the items from the form completely.
Comment. Internal comment about this work order. The comment is not displayed on the
transaction when printed or emailed.
Customer. The customer associated with the work order. Completing this field is optional, but the
system will include the customer if the work order is generated from a sales order or sales receipt.
Customer notes. Internal notes from the customer definition.
Date/time. Transaction date and timestamp.
Department. Department for this transaction.
Due Date. The deadline by which the line item must be manufactured.
Instructions. Instructions on a work order regarding the work to be performed for a line item. This
field defaults to the sales description of the item.
Item to make. The item on the work order that is to be made. Enter/select the name of an existing
item from the dropdown list. New items can also be created.
For. The sales order or sales receipt and the corresponding line item to which the work order item
is associated.
Job. The job to which the work order line item is associated.
Location. The location where the items on the work order are being manufactured.
Multitool. A multifunctional icon in the far-left column of a line item. Selecting the right arrow
(top left corner) inserts a blank line. The three bars (center) allow lines to be reordered
when clicking, holding, and dragging the white arrow that appears. Selecting the down arrow
(bottom right corner) copies a line and pastes the duplicate on the next line.

Priority. The urgency with which the items on this work order are to be produced. The Priority
field’s dropdown options display those which have been predefined by your company. Priorities
can be added or edited via the Priorities list (Company Menu > Priorities).
Produced. The quantity of an item on a work order that has already been produced on a build or
process transaction.
Quantity. The number to be manufactured for an item.
Remove. Click the trash can icon to remove a line from the transaction.
UOM. If Units of Measure are turned on in Plus or Pro plan, the unit of measure for a line item.
Units of measure must be in an item's base unit only.
Work Order #. Reference number identifying this work order. The system will number the
transaction automatically if autonumbering is enabled in the Inventory Settings.
For many companies, the process of turning raw materials into finished goods can take days,
weeks, months—and in some cases, years. As the length of time involved in manufacturing
increases, so does the importance of tracking work in progress (WIP). Tracking WIP allows you to
remove raw materials from inventory that are no longer available because they have been used in
manufacturing. However, the finished good might not yet be available.
Tracking work in progress is a feature exclusive to the Pro plan, but workarounds do exist for
Companion and Plus plan subscribers.
SOS Inventory offers two methods for tracking WIP: work centers and items created to represent
WIP. These two methods are not mutually exclusive. You can use one or both, depending on your
tracking needs.

• Method 1: Work centers. SOS Inventory allows you to organize your manufacturing into
stages and indicate where in the manufacturing process the product is with work centers.
You add work centers by going to the Work Centers list (Company Menu > Miscellaneous
> Work Centers). Work center tracking is most useful when used in conjunction with Jobs,
as you can specify work centers for a given job and even run a profit/loss statement on each
work center within a job. See Work centers for more information on this feature.
• Method 2: Items. It is often useful to set up special items to represent WIP items in SOS
Inventory. This allows you to track exactly how many units of each “sub-product” that you
have at any given time. For example, suppose that you start with a Widget which must first
be welded and then painted to make the finished good. You might want to know how many
items have been welded and are waiting to be painted. A simple approach is to create an
item called
Widget - Raw
to represent the original raw material. Then create an item
called
Widget - Welded
to represent the welded version, and then an item called
Widget -
Painted
or
Widget
to represent the finished good that will eventually be sold to customers.
SOS Inventory's work-in-progress and work center features are designed for Pro Plan subscribers.
However, if you are not on the Pro plan, here are some possible workarounds:
• Companion Plan option: create a WIP item. An interim assembly item can be produced for
items that are converted into a finished item, but the process takes time. Example: A
widget is made from 1 gadget and 1 cog. Create an assembly item called
Work in Progress -
Widget
that has a WIP asset account assigned to the item. Add the gadget and the cog to the
bill of materials (BOM). Then create the
Widget
assembly item and the bill of materials is
just the
Work in Progress - Widget
.
o When you get ready to build the
Widget
, you add a build of
Work in Progress -
Widget
. This will remove the gadget and cog from inventory and place the
Work in
Progress - Widget
into inventory.
o When the
Widget
is complete, you add a build of the
Widget
. This will remove the
Work in Progress - Widget
from inventory and place the
Widget
into inventory. This
will also send a journal entry to QuickBooks Online to remove the value of the
Work
in Progress - Widget from
the WIP asset account and place it in the
Widget’s
asset
account.
• Plus Plan option: create another location called
Work in Progress
. Create a second location
and make it non-nettable so that the inventory at that location will not show in your

available stock. Transfer the goods to the WIP location when the build is started. When the
build is complete, record the build at the WIP location and then transfer the finished good
back to the main location.
NOTE: Only company administrators may set up locations.
NOTE: Only company administrators may set up work centers.
Available to Pro Plan customers, work centers allow you to organize work-in-progress (WIP)
manufacturing into stages. Work centers can be used on both build and process transactions.
EXAMPLE: Suppose your build starts with sheets of metal and ends with a water tank. To get
to that finished product, you must cut the metal, weld it, paint it, and assemble any remaining
add-on parts. The manufacturing process might take several weeks.
The system comes predefined with a work center called
Finished Goods
. The manufacturing
outputs are not recorded until the work center is changed to Finished Goods.
Work center tracking is most useful when used in conjunction with Jobs, as you can specify work
centers for a given job and even run a profit/loss statement on each work center within a job.
Create work centers by going to the
Work Centers list (Company Menu >
Miscellaneous > Work Centers), then
select Add New. Enter the name in the
Name field, enter a number in the Sort
Order field to indicate the staging
sequence of the work center, and in the
Asset Account field, select the
appropriate account from the dropdown
list. Then Save and Close.

Once a work center has been created, a Work Center
field will appear on Build and Process transactions, as
shown in the sample screenshot at left. After the work
for an item has been completed at one work center,
select its next stage of production from the Work
Center dropdown.
Use the Work Center column on the Builds list
(Operations Menu > Builds) or Processes list
(Operations Menu > Processes) to keep track of an
item's current stage of production. When goods are
work in progress (WIP), only the raw material value is
reduced and stored for reference later.
When Finished Goods is selected from the dropdown, it
indicates that production is complete and the item is
ready for sale. When this work center is used, the value from the raw materials is transferred to the
value of the finished goods.
SOS Inventory can track labor on build and process transactions. The Workers list (Company Menu
> Miscellaneous > Workers), which is available to Pro plan subscribers, contains the list of
available workers, which are used in tandem with labor items when they are included on these
transactions.
The use of workers requires creating items defined as a
Labor
item type, as well as the enabling of
worker tracking and the creation of workers.

To track labor, create an item (Add Menu > Item), set its type to
Labor
, and ensure the appropriate
expense account is selected. Use the Purchase Cost field to specify the rate, then save.
If you have different types of labor with different rates, you can handle this using either of these
methods:
• Create a separate labor item for each labor type and assign its rate.
• Have only one labor item but assign it a rate of $1.00. Then use the transaction's Quantity
field to enter the expected labor costs for that manufacturing transaction.
If you want to track hours for specific workers (for example, John Smith and Jane Doe), enable the
Track Workers option on the Inventory Settings page (Settings Menu > Inventory Settings). Add
your workers according to the steps explained below.
Before or after the Track Workers setting has been enabled, you can manage or add workers:
1. Go to the Workers list (Company Menu > Miscellaneous > Workers), then select Add New.
2. Complete the worker's First Name and Last Name fields.
NOTE: If your payroll module has been activated in QuickBooks Online, an employee
list will populate SOS Inventory’s Employee field dropdown list. If the worker has been
defined in QuickBooks, select the worker’s name from the Employee dropdown as well
as enter the worker’s first and last names.
3. Save and Close.
Once the workers have been entered into SOS Inventory, the system will prompt you to select the
appropriate worker when you include a labor item on a build or process transaction.


Many companies outsource some or all their manufacturing to third parties, often called contract
manufacturers (CM). SOS Inventory supports this configuration.
If the production of an item you sell involves the use of a contract manufacturer, the workflow
required depends upon whether your business is responsible for supplying the necessary raw
materials or components to your CM. If your company is responsible, use the procedures outlined
in the subsection Contract Manufacturing Workflow.
On the other hand, if your contract manufacturer is responsible for providing all materials needed
for manufacturing the item as well as executing the entire manufacturing process, you can treat
the item produced by the contract manufacturer as you would any other item sold by a vendor. In
this situation, choose Inventory in the Type field of the finished good’s item definition. No BOM is
needed because the contract manufacturer is totally responsible for all aspects of producing the
item.
Many complex situations exist in complex manufacturing. For specific questions on your situation,
please email support@sosinventory.com.
If your company is responsible for providing raw materials or components to your contract
manufacturer, the contract manufacturing workflow is a multi-stepped process.
Contract manufacturing process
1. Create definitions. (See Contract Manufacturing Definition Workflow for a visual
illustration of this process.)
•
Create a non-nettable location that represents the contract manufacturer.
This
allows you to transfer inventory to/from the contract manufacturer, as well as to
keep track of that inventory. Be sure to include full address information when you
set up the contract manufacturer’s location.
•
Create all items needed for the BOM/process template.

o
If an assembly item, create an assembly (output) item as well as the
individual component items.
•
Create an item representing the service fee of the contract manufacturer.
Note the
following as you create the service fee’s item definition:
o
Name.
Distinguish the item as a contract manufacturing (CM) service (e.g.,
387450 Flight Jacket - CM).
o
Description.
Indicate that it is the contract manufacturing fee for
production.
o
Type.
Service.
o
Sales Price.
Leave at 0, since this is an expense.
o
Income Account.
Leave as is, since this is an expense and is therefore
irrelevant.
o
Expense Account.
Designate the account to which this fee should be
assigned.
o
Always Shippable.
Yes.
o
Purchase Cost.
Enter the fee per unit.
•
Create the BOM or process template.
o
The BOM action will show only for items that are listed as an assembly.
o
If sometimes you build the assembly in house, and sometimes use a
contract manufacturer, you can include both your in-house labor item as
well as the CM fee on the BOM. (When you create a build transaction and
pull the BOM up, you can edit/delete the items as needed.)
(Refer to Raw Material Components to CM Location and Build for a workflow diagram of the
remaining steps outlined below.)
2.
Create two purchase orders.
One PO is for the items that must be ordered from a vendor,
the other for the service to be performed by the contract manufacturer.
• The purchase order for the vendor should list the contract manufacturer’s location
as the shipping address. In the Vendor Message, specify that the invoice is to be
sent to your company and include the company address and contact information.

3.
Create two item receipts.
Do one when the items ordered from a vendor have been received
by the contract manufacturer, the other for the service when the CM delivers the finished
product. Adjust the unit pricing or quantity on the item receipts if needed.
4.
Create a build transaction to reflect what the contract manufacturer did.
•
Make sure the location is the contract manufacturer’s location.
•
In the input items, the BOM will include the contract manufacturer’s fee.
5.
Create an inventory transfer to move the finished product from the contract manufacturer
to your location.
The item is now ready to be sold.
Contract Manufacturing Definition Workflow

Raw Material Components to CM Location and Build
Many companies track overhead as part of their manufacturing and/or inventory management. In
doing so, the utilities and other overhead costs become part of costs of goods sold as opposed to
expense items on your profit and loss statement. SOS Inventory supports two approaches to
tracking overhead. Both methods are available only on the Pro plan.
•
Overhead items.
You can create an item to represent an overhead expense by selecting the
Type field option Overhead. Typically, you set up the overhead item with the expense
account set to a current liability account in QuickBooks Online. As you enter builds and
process transactions, you enter the overhead items as inputs to the transactions. The cost
allocated to overhead is posted to the liability account. When the actual bills come in and
are paid via QuickBooks Online, the bill is posted to the liability account, which will

ultimately relieve the balance in that account. The net result overall is that your overhead
costs become part of the cost of the output items in the manufacturing runs in SOS, which
then turns into cost of goods sold upon sale.
•
Item receipts.
When goods are received, you can enter a percentage cost for overhead. This
tells SOS Inventory to add that percentage to each item in the item receipt. The value of the
item, including the overhead, can be viewed in that item’s transaction history.
This section will discuss extended sales transactions: customer returns and rental inventory.
Let’s start by reviewing how SOS Inventory provides a robust process to handle customer returns.
You can issue Return Merchandise Authorizations (RMAs) to customers, process the goods on a
return when they come in, and issue credit memos to customers. SOS Inventory also provides a
capability to handle inventory items as rental items.
An RMA is a form you provide to a customer authorizing them to return an item or items. The RMA
includes information such as the names of the items they are returning, the address where they
should ship the items, and an expiration date (the date by which goods must be returned in order to
obtain a refund). You can also place additional conditions for the return in the comment block.
An RMA is very similar to a PO. It is a non-posting transaction, so it does not affect your inventory
directly. However, it does provide a record of inbound inventory, and you can track that number via
the “On RMA” column of the Items list. RMAs are optional. You do not need an RMA to process
returned merchandise from a customer.
A return transaction is to an RMA what an item receipt is to a PO. It is a record showing that goods
have been received back from a customer. You can enter a return without an RMA, or you can
generate one from the RMA if needed. You must enter the quantities for the items being restocked.
A return transaction can be created in several different ways. The different methods are:
1.
Generate a return from its original shipment transaction.
Typically, this is the preferred
method for creating a return because the
exact
Cost of Goods Sold value is populated in the

Restock Value field, as it factors shipment costs into the COGS figure. No other method for
creating a return can provide an exact Restock Value; but if you adjust the Quantity field of
a returned item, you will need to adjust the Restock Value as well. To generate a return
using a shipment transaction, locate the shipment in the Shipment list (Operations Menu
> Fulfillment > Shipments), then select Create Return from the Actions Menu.
2.
Generate a return from the associated sales order, invoice, sales receipt, or RMA.
The
Restock Value field of the generated return will show the item’s purchase cost as listed in
the item definition. To generate a return from one of these forms, select the Create Return
option from the Actions Menu of the appropriate list.
3.
Create a return from the Task Bar’s Add Menu—or by selecting the Add New button on the
Returns list (Operations Menu > More Transactions > Returns).
All data fields will need to
be manually entered.
If you generate a return from another transaction, you may edit the return as needed.
When adding a return, if you want to issue a credit memo to the customer in QuickBooks Online,
simply check the Credit Memo box on the return. SOS will generate one for you. The amount used
is the Credit Amount on each line item of the return.
If you do not create a return from an existing transaction, the credit memo will show the unit price
as the sales price listed in the item definition, and the credit amount will be $0. You must manually
enter the correct Unit Price, Credit Amount, and Restock Value fields to process the credit memo
properly.
When adding a return, the items go back into inventory. Accordingly, they should have a value or
cost basis. The system uses the Restock Value for each line item as the cost basis for all future
calculations and MUST be entered before saving the transaction. You can adjust the restock value
to account for damages, etc. This value is entered for you if the return is generated from the
shipment on which the item was sent to the customer.

To use the rental/consignment features of SOS Inventory (available on Plus and Pro plan only), go
to Settings Menu > Inventory Settings and turn on the Rental Inventory option. Once done, you
will see the Rentals menu (under Operations Menu > More Transactions). You will also have an
additional location called
Out for Rental
, which will contain all items that are currently rented. This
location is non-nettable.
When a customer rents an item from you, enter a Rental transaction via the Rentals list
(Operations Menu > More Transactions > Rentals). This tells the system that the item is rented
with a specific due date. When the customer returns the item, generate a Rental Return transaction
from the Rental. Note that you still need to bill the customer using an invoice or sales receipt.
Run the Open Rental Detail or Rental Calendar reports (under Operations Menu > Reports >
Rentals) to view all items that are out for rental or available for rental. Note that your rental items
must be serialized to view item-level detail on the Rental Calendar. You can also use the Calendar
from the Operations Menu to see when rentals are due as well.

SOS Inventory’s Custom Fields feature allows you to add new fields on item pages, transaction
forms, and almost any other kind of data record. Custom field values can be passed from parent
transactions to the child transactions generated from the parent. If the same field is defined in
QuickBooks Online, the data will sync between systems.
A custom field will appear on the edit page of the item, transaction, or other data record to which it
is assigned. It also is included as a column option on the appropriate list’s Column Chooser, as well
as on relevant data exports and reports.
Custom fields can be added to form templates as a merge field. The merge field name is the name
of the custom field. Item custom fields will go into the items list section of the form where
transaction custom fields will go into any other area of the template.
SOS Inventory’s alert feature can also be used to create a notification pertaining to a custom field
when the Alert Type is set to Custom Field.
To add a new custom field, go to Company Menu > Custom Fields and select Add New. You will see
an edit page that looks like this:

Provide a name (it cannot be a data type or existing field on a form) and a description. Select the
appropriate data type:
•
Text.
For short text such as a VIN number for cars. This data type must be selected if the
custom field will sync to QuickBooks Online.
•
Multi-Line Text.
For additional address blocks or other text with line returns. The field
expands with the input text.
•
Number.
For a numerical field. Allows up to 13 digits and 5 decimal places.
•
Money.
For an additional currency field.
•
Date.
For an additional date formatted field.
•
Check Box (yes/no).
Creates a clickable box that may be checked or unchecked to show the
state of the field. This can be used in Alerts using a test of “yes” (checked) or “no”
(unchecked).
•
List.
Creates a dropdown with a list of values.
1. Name cannot be the same as any other existing form field.
2. Maximum number of custom fields in SOS Inventory is based on your plan.
• Companion—One

• Plus—Three
• Pro—Unlimited
3. PDF form templates can have any number of custom fields added but are limited to the
number of custom fields allowed by your plan.
4. Regardless of your SOS and QuickBooks Online plans, the current integration between SOS
Inventory and QuickBooks Online allows only the first three matched custom field names
between the systems.

The capability for Automated Order Processing, or AOP, allows a user to set rules to establish new
workflows within SOS. A user can define and enable or disable rules as necessary to provide the
desired operational workflow. The rule takes effect as the transaction is saved.
To create or edit a new rule, go to the AOP Rules list under Company Menu > Automated Order
Processing (AOP) Rules. Click on Add New to create a new rule.
On the edit page are the following fields:
1.
Name
. The name for the rule, such as “Auto-Ship Sales Orders.” Rule names must be
unique.
2.
Description
. The description explaining what the rule will accomplish.
3.
Enabled
. This checkbox allows you to enable or disable the rule.
4.
When a/an
. This is the transaction type to which the rule will apply. The available types are
Estimate, Invoice, Pick Ticket, Purchase Order, Sales Order, Sales Receipt, and Shipment.
5.
Is
. This is the state of the transaction. Either Created or Edited.
6.
With Channel
. You can list a channel through which the transaction is marked as passing
through.
7.
With Priority
. You can select transactions with a certain priority.
8.
At Location.
You can select the location that the transaction is set to pull items from.
9.
For Customer
. You can set the rule to affect transactions for a particular customer only.
10.
Do This
. If a transaction meets the above conditions as defined, you can assign any number
of actions to take, the target of the action, and the order in which they are to be taken.

Available actions for ‘Do This’ table
ACTION
TARGET
Assign to a User
User
Create a New Transaction
Type (Invoice, Sales Order, Sales Receipt)
Move to Stage
Stage
Notify a User
User—based on the user’s notification preferences
Send an Email
Address (Enter an email address or leave blank to send to form
default)
Template (The template you wish to use, based on the
transaction listed in the When a/an field)
Set the Priority
Priority (1—High, 2—Medium, 3—Low)
This is example of an AOP rule for a sales order:

For transactions, you can stack transaction creates. For example, you can create an AOP rule that
creates a shipment and invoice from a sales order:
1. Set the When a/an field to Sales Order.
2. In the Do This table:
a. Step 1: Create a New Transaction in the Action column. In the Target column, select
the Type as Shipment.
b. Step 2: Create a New Transaction in the Action column. In the Target column, select
Type as Invoice.
NOTE: If you select Shipment for the When a/an field, the invoice cannot go back and edit the
original sales order.

You can define a customer portal so that your customers can access information on their orders
posted in SOS, as shown below. This feature is available only on Pro plans.
Clicking the transaction reference number opens the transaction, as shown below:

To setup the customer portal within SOS, go to Settings Menu > Customer Portal Setup. There are
very few options, but you are defining the website that they can access and see the status of the
orders.
Options to set up your portal:
1.
Enabled
. Checking this box enables the portal for your customers. You can disable access if
you decide it is being misused or want to reconfigure the settings.
2.
Web Address
. This is the web address that your customers use to get to your portal. It is
usually your company name followed by “.orderfacts.com” and is particular to your
customers only. You cannot use “SOS” anywhere in your web address. This web address will
be part of the link that shows on sales orders and sales receipts. It is defined in Tracking
Email Settings (Settings > Tracking Email Config). See Tracking Email Config for more
information.
3.
Company Name
. This is the company name displayed to your company on the order site. If
not filled in, it uses the company name on your SOS account as seen in the Company Menu.
4.
Footer
. This is the footer that will show at the bottom of all portal pages for your
customers. This is typically used for disclaimers, contact information, etc.
5.
Require Password
. If activated, a customer is required to provide a password to enter the
site. The password is a randomly generated eight-character password. You can see it in the
customer’s definition under the option Portal Password only when activated. You can set
this password to anything you like if you don’t want to use the generated ones. You can also
generate a new random password if needed or the user can use the “I forgot my password”
option to let SOS generate a new one in their record and send it to their email address on
file.
6.
Show Assigned User
. Checking this option shows your customers the person assigned to
the order.
The customer portal setup works in conjunction with the Tracking Email Config settings to
automate customer notification processing as part of their orders.

This functionality allows you to use special message bodies for sales orders, shipments, and sales
receipts when using the Email action to send a customer a PDF copy of the transaction. The email
message bodies contain information unique to the transaction, such as the login to the Customer
Portal or tracking information for the shipment.
Here is a sample Tracking Email Config settings page. You can customize what each message body
will be.

What you see on the settings page is dependent on your SOS account level. If you are on the Pro
Plan, you will see everything shown in the graphic. If you are on Companion or Plus, you will see
only the Shipments section for notification of tracking information.
The data for the fields on the Tracking Email Settings page will be sent over from ShipStation or
UPS if you have set up your SOS Inventory account with either of these shipping integrations.
Customers who do not use these integrations may enter the data manually, if desired.
The field codes on the Tracking Email Settings page can be used on form templates if you want to
create a custom transaction form that includes those fields.

Within SOS Inventory, all available reports in the application can be found under a single Reports
page under Operations Menu > Reports. Most reports are quite extensive in information and can be
customized to view by date ranges, filters, and other factors such as location.
This is what the Reports page looks like. See Report Descriptions to learn more about the
capabilities of each report.
The Old Reports link in the top right corner are for older report formats that you may be more
familiar with but are being phased out.

Reports can be customized to use certain filters, options, and column selections. Due to the extent
of reporting, please try the report you are needing and contact the support team with questions.
Once a report has been customized, you can schedule it to run automatically either daily, weekly or
monthly, as well as have the report emailed to multiple email address.
You can display the information to the screen if there is a small amount of data. If a larger amount
of data is to be produced, you can either Save As Excel/CSV to get a downloaded file or Send Via
Email have the file sent to multiple addresses. This feature will run in the background and allow
you to keep working. When the report has been generated, you will receive a notification that the
action is complete.

SOS Inventory's Data Utilities (Company Menu > Data Tools) feature includes three different tools:
one for updating historical costs, another to retrieve transactions and other data from QuickBooks,
and the third to clear the item cache. The Data Utilities page appears as shown in the screenshot
below:
If you find it necessary to make a lot of adjustment transactions for item values or have made
changes that did not cleanly affect the system, you can update the historical costs of items. Choose
a date in the Update Historical Costs Starting On field, then select Begin Update to recalculate
every item used on transactions. This utility ensures the costs of items are correct from the date
you selected, based on their current valuations.

To reconcile item valuation differences between SOS Inventory and QuickBooks after updating
historical costs:
1. Run the Reconcile Journal Entries report (Operations Menu > Reports > Accounting >
Reconcile Journal Entries).
2. Perform either Step 2a or Step 2b:
a. Review the flagged transactions that SOS Inventory highlights. For each transaction,
go to its record on the relevant list, then select Add to Sync from the Actions Menu.
Perform a manual sync to QuickBooks (Sync > Sync Now). On shipments, the
transaction must be edited and saved instead of using Add to Sync.
b. Run an Inventory Value report (Operations Menu > Reports > Inventory > Inventory
Value)—and if you use work in progress, also run the Work in Progress report
(Operations Menu > Reports > Production > Work in Progress). Add those two report
valuations together if applicable, then compare the total to the total valuation for your
account in QuickBooks. Make an entry in QuickBooks to bring QuickBooks into
alignment with SOS Inventory.
On new SOS Inventory accounts, the initial sync imports from QuickBooks Online only the most
recent 1000 of any transaction type. If you need to import more than 1000 of a transaction type
into SOS Inventory, the data utility Retrieve From QuickBooks field allows you to obtain the rest.
The types of data that can be retrieved are bills, credit memos, estimates, invoices, journal entries,
payments, purchases, purchase orders, sales receipts, and vendor credits. Select the type of data
you need from QuickBooks, then select Retrieve.
Whenever using this data utility to retrieve records from QuickBooks, SOS will prompt you to
disable any AOP rules that you have created, along with any enabled "auto" functions in the Sales
Settings (Settings > Sales Settings). Examples of the latter include Auto-ship Invoices, Auto-ship
Sales Receipts, and Auto Backorder Sales Receipts.

NOTE: If you need to sync additional transactions using the Data Utilities feature after an initial
sync, the synchronization should be completed before executing an item conversion. An item
conversion is needed if inventory tracking was enabled in QuickBooks Online before you connected
to SOS Inventory. Please contact Support if this condition exists. If sales orders, invoices, and
purchase orders are synced after an item conversion, transactions will include the extension
(deleted)
at the end of each item listed on the transaction. Reports in SOS Inventory will not report
historical data accurately for those items.
SOS Inventory caches information on item quantities to increase the speed and performance of
loading quantities on hand and quantities for sale on purchasing orders, sales orders, sales
receipts, and work orders. Sometimes, however, the cache may get stuck and cannot update the
quantities of one or more items as expected. SOS Inventory allows you to clear the cache of an
individual item via the Clear Cache action on the Items list. But if you want to clear the cache of
all
items in the Items list, the Clear Item Cache data utility is the tool you want to use.
Clearing the cache does not affect the stored quantity-on-hand numbers. Cached quantities are
re-established from scratch when the Items list is refreshed. Re-establishing the cache may take
quite a bit of time the first time the Items list is reloaded after the cache has been cleared, so please
be patient.

SOS Inventory provides tools for exporting data and importing data to allow for editing your data in
bulk instead of one piece of data at a time.
If you need to make a few additions or edits to your data, the most efficient approach is to do so
directly within SOS. However, if you need to many additions or edits to your data, the import and
export data tools of SOS Inventory are the way to go. These tools are very powerful. You must use
them carefully and understand how they work, so that you don’t accidentally overwrite your data.
The import and export features are found on the Task Bar under Company Menu > Data Tools. All
data functions are performed via Excel or CSV files.
The process for editing data in this manner involves three basic steps:
1. Exporting the data type you need to modify. The file can be exported in either an Excel or
CSV format. (If you have many items, the export will be fastest if you select the CSV
format.) For new SOS customers with no data in the system, the exported file will serve
merely as the template for you to add your data.
2. Editing the data as needed.
3. Importing the edited Excel or CSV file back into SOS Inventory.
The types of data that you can export depend upon your SOS plan.
Standard (Companion plan)
Available to all SOS customers
• Adjustments
• BOMS
• Builds
• Customers
• Estimates
• Invoices
• Item Receipts
• Items
• Purchase Orders
• Returns
• Sales Orders
• Sales Receipts
• Shipments
• Vendors
Plus
Includes Standard (Companion plan) data types and the following
• Lots
• Pick Tickets
• Price Tiers
• Rentals
• Rental Returns
• Returns to Vendors
• RMAs
• Serial Inventory
• Transfers
• Units of Measure
• Vendor-Item Catalog
Pro
Includes Plus data types and the following
• Jobs
• Process Transactions
• Work Orders
Exported data are informational only, but they can be edited if needed and imported back into SOS
Inventory.
To export data from SOS Inventory:
1.
Go to Company Menu > Export Data, then select the type of data you wish to export.
The
system will take you to the export page for that data type.
2.
Select your desired As Of Date (for items) or Date Range (for transactions), Filters (a
location for items is required), Options, and Columns to include on the export.
If you are
intending to make changes and import the data back into SOS Inventory, click the gray
button under the Columns section that states Add All Columns Required For Import.

NOTE: For items, the use of the As Of date and Location filter is very important if you
want to set the inventory counts for an exact date in your system’s history upon import.
3.
If you anticipate reusing the export, you can add the export type as a favorite, save how you
customized it, or schedule it through the Manage block.
Favorites, customized and
scheduled exports will be added to the Export Data page.
4.
In the Actions block, select how you wish to obtain the exported information.
•
Display Export.
Data appears on the export page in SOS Inventory. You may then
print an
uneditable
hard copy of the data.
•
Save as Excel/CSV.
Downloads the data to your computer in the file format you
specify (Excel or CSV).
•
Send via Email.
Send the data as an email attachment in the file format you specify
(Excel or CSV).
NOTE:
If you choose the Display Export or Save as Excel/CSV options and the system
detects that you have a large amount of data to process, you’ll get a message stating to use
the Send via Email option so it can generate in the background. The resulting file will be
sent to you after it is generated.
When performing mass edits, follow the guidelines listed below. They will help to ensure that your
updated data is successfully imported into SOS Inventory.
• DO make a backup copy of the exported data file before editing.
• DO leave the Id column (ItemId, CustomerId, or VendorId) blank when inserting a new
row. The system will assign a number when your edited file is imported back into SOS
Inventory.
• DO make sure that the Id column (ItemId, CustomerId, or VendorId) stays matched to the
proper row. For example, let’s say that you upload an item file containing both new and
existing items. The system will first attempt to match the ItemId to an existing ItemId. If it

cannot find a match, it attempts to match the Name. If it can’t find a match, then it creates
a new item. If you accidentally jumble the Id column across rows, SOS will find a match, but
it might match to the wrong row, which can cause a big jumble in your data, both in SOS
and in QuickBooks Online.
• DO delete a row from the spreadsheet if no changes are being made to it.
• DO break long files into multiple sheets. The upload will be faster if you limit the number of
rows to under 1,000 per sheet. The system will prompt you to indicate which workbook
sheet should be imported.
• DON’T change any of the column headings. The format of the template is fixed, and it is
very important. If you change or delete column headings, your import will likely fail.
• DON’T leave any special features in the file (filters, formulas, freeze panes, hide/unhide
columns or rows, etc.). You may use these while editing the file, but remove or turn them
off before saving.
This is the most common data type to be edited using the export/import tools. Use the Item Export
page (Company Menu > Export Data > Items) to obtain your data. Then you can add or edit items all
at once.
Refer to Item Field Definitions for Data Export/Import for assistance with completing the data
fields. As previously mentioned, it is extremely important that you do not mix up the ItemId
column in relation to the other columns. (By default, the file is protected to prevent that from
happening. If you override this protection, be extremely careful. To override the protection in
Excel, go to the Review ribbon and click on Unprotect Sheet) NOTE: The ItemID column must be
sorted in ascending order.
Once you have completed your edits, save your changes. Then upload the file back into the system
using the Import Data feature.
If you made changes to the QuantityOnHand and ValueOnHand fields, SOS will create an inventory
adjustment when the file is imported back into the system. This transaction needs to be resaved or
Added to Sync to send the adjusting journal entries to QuickBooks Online. In certain
circumstances, you may want to backdate this adjustment to show starting values at a certain date.

To do this, change the date and then click on the Compute button on the top of the Adjust Qty By
column to recalculate the value column based on the date selected.
Field descriptions are listed in column order. When entering data, follow the examples included in
the exported file. For more details on the contents of each field, see Item Field Descriptions.
ItemId.
DO NOT edit this value for existing items. It is a system-assigned number. The system first
attempts to use the ItemId to match the row with an existing item. This column must be sorted in
ascending order. Leave the ItemId field blank for new items.
Name.
Item name up to 100 characters (cannot use “ or < in name). If there is no match on the
ItemId, the system attempts to match the item based on this name.
SalesDescription.
Description of the item for sales forms up to 1000 characters (cannot use < in
description). Also used on purchasing forms if no purchase description provided.
QuantityOnHand.
In stock quantity (max value is 9,999,999,999,999.99999). Any changes made to
the quantity will be entered as an inventory adjustment. Must also change ValueOnHand as well,
not automatically calculated.
Note
: Do not change for serial tracked or lot tracked items. This
would need to be done within the specialized lists for each. Lots can be modified via an inventory
adjustment.
ValueOnHand.
Total cost basis for the item (max value is 9,999,999,999,999.99999). This field is
NOT calculated automatically when you change the quantity. You can enter it manually, or you can
set up a formula in Excel. Many people use this to update the cost basis to account for depreciation,
etc. Thus, the system will use whatever value you put there. If you change the quantity, be sure to
change this value also, unless you have a very good reason not to do so. Accidentally leaving this
value the same while changing the quantity is one of the most common reasons we see for people
having an unexpected cost basis.
Note
: Do not change for serial- or lot-tracked items. This needs
to be done within the specialized lists for each. Lots can be modified via an inventory adjustment.
Category.
The category to which an item is assigned. If subcategories are used, this would be
master category:subcategory to show as many category levels as needed.
PurchaseDescription.
Purchase description up to 1000 characters.

SKU
. SKU field that can be used as further search reference. Syncs with QuickBooks Online.
Barcode.
Barcode used to represent the item up to 100 characters depending on barcode type used.
PreferredVendor.
Default vendor for this item up to 36 characters.
VendorPartNumber.
Vendor-specific part number up to 50 characters.
SalesPrice.
Default sales price for the item (max value is 99,999,999.99999).
SalesPricePercent.
Percent markup, if markup is used.
Cost.
Default purchase cost of the item (max value is 99,999,999.99999). Also called standard cost.
Bin.
Default bin for this item. Note that changing the default bin does not change the location of
any existing stock.
IsTaxable.
TRUE if taxable, FALSE otherwise.
TypeOfItem.
Item type, as described in Item Field Descriptions. Use the existing items as a guide
for what goes in this field. Valid types are: Inventory Item, Non-inventory Item, Assembly, Item
Group, Category, Expense, Service, Other, Labor, or Overhead. (CASE SENSITIVE. Types that do
not match are stored as Inventory Item.)
ReorderLevel.
Reorder point for the item. Placed on reorder report if at or below. Use large
negative number to keep item off reorder report.
SyncWithQuickBooks.
This option will state whether you want the item to sync to QuickBooks
Online or not. TRUE for yes, FALSE for no.
Deleted.
Simply removing rows from the file and importing it will not delete items. You can delete
an item bychanging this value from FALSE to TRUE. Then save the changes and import the file.
Note that this will delete the item only from SOS, not from QuickBooks Online. If you need to
delete an item in both SOS and QuickBooks Online you should delete the items from the items list
and then sync.
SerialTracking.
TRUE for yes, FALSE for no. Make sure you bring existing quantity and value to
zero for this item before making this change.

LotTracking.
TRUE for yes, FALSE for no. Make sure you bring existing quantity and value to zero
for this item before making this change.
SalesItem.
Show on sales forms. TRUE for yes, FALSE for no.
PurchasingItem.
Show on purchasing forms. TRUE for yes, FALSE for no.
ManufacturingItem.
Show on manufacturing forms. TRUE for yes, FALSE for no.
MaxStockLevel.
Max restock level of item. Optional.
Notes.
Other info about the item.
UsePricePercent.
TRUE to use markup pricing, FALSE otherwise. Used in conjunction with
SalesPricePercent.
Weight.
Weight of the item, in units specified by WeightUnit.
WeightUnit.
Units used to represent weight of this item. Must be either lb (pounds), oz (ounces),
kg (kilograms), or g (grams).
Volume.
Volume of the item, as specified by VolumeUnit.
VolumeUnit.
Units used to represent volume of the item. At this time, only cbm (cubic meters) is
supported.
Starred.
If the item is to show a star. If using default star method then 0 is none, 1 is yellow. If
using stop light stars then 0 is none, 1 is red, 2 is yellow, 3 is green.
Archived.
TRUE to archive the item, FALSE otherwise.
WebUrl.
URL where the item can be found online up to 255 characters. Example:
https://www.sosinventory.com.
Tags.
Tags used to easily find this item in searches and custom reports. Also, used to groups items
together that are usually unrelated.
UpdateInventoryInShopify.
If using the Shopify integration, TRUE for yes, FALSE otherwise.
UpdateInventoryInBigCommerce.
If using the BigCommerce integration, TRUE for yes, FALSE
otherwise.

Shippable.
Specifies that the item can always be shipped. This option is available for items in
which the TypeOfItem is designated as Non-inventory, Expense, Item Group, Service, Labor,
Overhead, or Other.
CustomerPartNumber.
Your internal part number for reference in reports and exports.
LeadTime.
The length of time in days that must be allowed for a vendor to produce, ship and
deliver the item once it has been ordered. Used on the Pro Plan to automatically calculate reorder
points.
MinimumPrice.
The lowest sales price that the system will accept. Transactions attempting to sell
the item for less will be rejected.
IncomeAccountName.
Income account name up to 36 characters (see Accounts list under the Sync
Menu). All items have this if they are to be sold.
AssetAccountName
. Asset account name up to 36 characters (see Accounts list under the Sync
Menu). Inventory and assembly items have this.
COGSAccountName.
COGS account name up to 36 characters (see Accounts list under the Sync
Menu). Inventory and assembly items have this.
ExpenseAccountName.
Expense account name up to 36 characters (see Accounts list under the
Sync Menu). Usually same as COGS. All items that can be purchased will have this. For inventory
and assembly items it is the same as the COCSAccountName. If using landed costs feature on Pro
plan this is an asset account name.
SalesTaxCode.
For non-US based accounts. Enter the sales tax code name exactly.
PurchaseTaxCode.
For non-US based accounts. Enter the purchase tax code name exactly.
Class.
The class to which the item is assigned by default when used on transactions.
Warranty.
The type of warranty attached to the sale of a serial-tracked item. The warranty must be
defined in SOS before it will be included in the item definition.
CommissionAmount.
Specifies the monetary amount per unit sold that a sales representative will
receive as a commission. Overrides the commission rate in sales rep definition.

CommissionExempt.
TRUE for yes, FALSE for no. Overrides the commission rate in sales rep
definition.
CommissionRate.
Specifies the commission percentage that a sales representative will receive for
the sale of the item. Overrides the commission rate in sales rep definition.
Custom Fields.
Follow next in alphabetical order if defined in custom fields list for items.
SosAccount.
Your account Id. Do not change or remove.
Importing data to SOS Inventory requires that the uploaded data be submitted in a format that the
system can read.
Currently supported data for imports are:
• Items
• Customers
• Vendors
• BOMs
• Price Tiers
• Sales Orders
• Sales Receipts
To upload the data, go to Import Data (Company Menu > Import Data). Select the type of data you
want to import, along with the location affected if importing items with changes to Quantity on
Hand and Value on Hand. Make sure that the As Of date matches the date that you chose when you
performed the data export, if importing items with changes to Quantity on Hand and Value on
Hand.
NOTE: If uploading quantities as of the current date, DO NOT enter an As Of date.
Choose the Excel or CSV file containing your data, then select Preview. Up to ten rows of data will
appear for your review to ensure that you are importing the correct file. If everything looks correct,
Import. The system will begin to process the data.
NOTE: If your file is a multi-sheet spreadsheet, the system will let you know that it cannot
continue until you select which sheet to upload from a dropdown list of the sheets now displayed.
SOS will issue a message that lets you know whether the import was successful. If you receive an
error message while attempting to import or edit items, the cause is almost always a missing or
incorrectly titled column. You MUST keep the columns in the template and leave the headings the
same, or the upload will not complete properly. If you are unable to determine the problem, please
email support@sosinventory.com, and we will be happy to help.
Sales orders and sales receipts can be imported into SOS via this method. This process is a very fast
upload. If you are using AOP rules on either of these transaction types, please note that AOP rules
activate automatically when the transactions are uploaded into your system. If the AOP rules
include emailing a contact, this will slow down the process considerably, so patience is required.
These imports are commonly used for moving sales orders from QuickBooks Desktop or Enterprise
to SOS, or to upload orders coming through the EDI process.
If you have enabled the Multi-currency feature and leave the Exchange Rate field blank on sales
orders and sales receipts, SOS Inventory will automatically populate upon import the stored
exchange rate for the date of the transaction.
Please contact the Support desk at support@sosinventory.com if you need more information about
importing sales orders and sales receipts (such as required fields).
If you are using Assembly or Item Group item types, then you can use the Export Data and Import
Data functions to create and upload (or edit) the BOMs all at once.
Go to Company Menu > Export Data > BOMs to get a copy of the spreadsheet with the current data
and headers. Then edit the file to list the Assembly or Item Groups, the components that make
them up, the quantities of the components needed, and optional notes. Other columns are not
required and are supplied by the system. Once you have finished building the spreadsheet, go to
Company Menu > Import and follow the steps for importing data to import your BOMs. If the BOM
was uploaded previously, the new BOMs import will overwrite the existing BOMs in the system. If
you limit your import to include only those BOMs that have been changed or are new, the other
BOMs in the system will be unaffected.

The BOM spreadsheet looks like this:
If you are on the Plus or Pro plans and intend to use the Price Tiers feature, you can export and
import the price tiers using this method. First, go to Company Menu > Price Tiers and add new
tiers by just providing the name of the tier. This is a mandatory step before attempting the import,
as it will not work otherwise. Next, go to Company Menu > Export Data > Price Tiers to get an Excel
or CSV file with the existing price tiers in the account and the headers. Complete the sheet with the
price tier names, the items the tier affects, the quantity to which the price applies, and the price
for the item in that tier. Once you have finished building the spreadsheet, go to Company Menu >
Import and follow the steps for importing data to import your price tiers. If a line item was
uploaded previously, the new import will overwrite the existing data in the system. If you limit
your import to include only those price tiers that have been changed or are new, the other price
tiers in the system will be unaffected.
The Price Tiers spreadsheet looks like this:

This section covers data transfer between applications and other functionality to ensure no issues
are encountered that can’t be resolved.
SOS Inventory and QuickBooks Online synchronize via a two-way, server-to-server data sync. You
do not need to be logged into both programs (or even into either program) for them to sync
properly. Synchronizations normally take less than 30 seconds to complete. Synchronization does
not happen immediately when you enter a transaction. Synchronization happens when you initiate
a sync manually by clicking Sync Now (Sync Menu > Sync Now) or when SOS triggers an automatic
sync based on your specified schedule. Be sure that you enter data into only one program. Use the
sync function to send it to the other program. Entering data in both places will create duplicates.
In addition to syncing manually using the Sync button at any time, you can configure SOS to sync
with QuickBooks Online every hour, every day, or every week. To set up automatic
synchronizations in SOS, go to Settings Menu > QuickBooks Setup and set the desired sync
frequency. Setting the Automatic Sync setting to Never means that if you sync, you always sync
manually.
In general, all data relevant to inventory synchronizes from QuickBooks Online to SOS as a one-to-
one match with the appropriate transaction. However, since QuickBooks Online does not support
some transactions that SOS supports, SOS cannot always send a one-to-one match. The key to
understanding the sync is to understand which transactions trigger data to be sent from SOS to
QuickBooks Online. The following two tables show the core data that are exchanged. Other
ancillary data are exchanged as well, and a description of those follows later.

The following QuickBooks Online data are sent to SOS when added or edited in QuickBooks Online.
They can then be accessed fully and added, edited, and deleted in SOS.
QUICKBOOKS ONLINE DATA
SENT TO SOS AS
Purchase Order
Purchase Order
Vendor
Vendor
Payment Method
Payment Method
Terms
Sales/Payment Terms
Product/Service
Item
Customer
Customer
Estimate
Estimate
Invoice
Invoice
Sales Receipt
Sales Receipt
SOS DATA
SENT TO
QUICKBOOKS AS
NOTES
Purchase Order
Purchase Order OR
Journal Entry (drop
ship)
Drop ship POs can generate a credit to Accounts
Payable and a debit to Cost of Goods Sold. You
can turn this setting off.
Vendor
Vendor
Payment Method
Payment Method
Sales / Payment
Terms
Terms
Item
Product/Service
Inventory quantities do not update from SOS to
QuickBooks Online.
Customer
Customer
Estimate
Estimate
Invoice
Invoice
Sales Receipt
Sales Receipt

SOS DATA
SENT TO
QUICKBOOKS AS
NOTES
Item Receipt
Bill OR
Check OR
Credit Card Charge
OR Cash Purchase
OR None
User has the option on the item receipt page to
specify how the transaction will show in
QuickBooks Online.
Return to Vendor
n/a
QuickBooks Online does not support adding
Vendor Credits in an automated manner.
Shipping Methods
n/a
QuickBooks Online does not support shipping
methods.
Builds
Journal Entry
The journal entry credits the asset account of the
component items and debits the asset account of
the finished goods.
Process
Transactions
Journal Entry
The journal entry credits the asset account of the
inputs and debits the asset account of the
outputs.
Work Orders
n/a
QuickBooks Online does not support work
orders. Work orders are non-posting
transactions, so they do not affect financials.
Adjustments
Journal Entry
The journal entry credits the asset account of the
adjusted items and debits the selected
adjustment account.
Transfers
n/a
Sales Orders
n/a
QuickBooks Online does not support sales
orders. Sales orders are non-posting
transactions, so they do not affect financials.
Pick Tickets
n/a
Shipments
Journal Entry
The journal entry credits the asset account of the
items and debits the cost-of-goods-sold account
of the items.
RMAs
n/a
Returns
Journal Entry & optional
Credit Memo
The journal entry debits the asset account of the
items and credits the cost-of-goods-sold
account of the items. A Credit Memo is posted to
the customer’s account if the user selects that
option when entering the return.

SOS DATA
SENT TO
QUICKBOOKS AS
NOTES
Price Groups
n/a
QuickBooks Online does not support price
groups.
Sales Reps
n/a
QuickBooks Online does not support sales reps.
Users
n/a
The SOS user list and QuickBooks Online user list
are independent.
SOS and QuickBooks Online differ in their typing of items. This chart shows how an item type in
SOS is regarded in QuickBooks:
SOS ITEM TYPE
QUICKBOOKS ITEM TYPE
Inventory Item
Non-Inventory Item
Non-Inventory Item
Non-Inventory Item
Assembly
Non-Inventory Item
Item Group
Non-Inventory Item
Category
Category
Service
Service
Expense
Service
Labor
Non-Inventory Item
Overhead
Non-Inventory Item
Other
Non-Inventory Item
Do not use bundles in QuickBooks Online.
This section will provide insight as to the basics of trouble shooting sync errors.

To see what will be sent to QuickBooks Online the next time you sync, go to the Sync Menu >
Preview Sync. The transactions are listed in the order that they will be sent. If a transaction is in
the queue that you do not want to go to QuickBooks Online, you can remove that line from the list.
Sometimes the synchronization with QuickBooks Online will fail. This can be due to a data error or
something as simple as a temporary server outage. Whenever the sync fails, the Sync button will
display an X instead of the checkmark. Go to Sync Menu > Sync Errors to see the error message
associated with the sync failure. Usually it will tell you how to resolve the error. You can also use
the Preview Sync option as described above to see exactly which transaction is causing the
problem. The message pertains to the top row of the Preview Sync. Float your mouse over the link
in the fourth column to see exactly what is in error.
The SOS sync algorithm is very sophisticated. On a sync error, it waits a few minutes to give the
user a chance to resolve the error. If the error persists, the system will attempt to correct the error
automatically. Sometimes it takes longer than others, depending on system load and the nature of
the error. If you are unable to resolve a sync error and the problem persists, please contact
Sometimes the synchronization with QuickBooks Online will fail but you do not get an error in the
Sync Errors list. For example, you may have an invoice that does not sync over to QuickBooks
Online due to something that caused QuickBooks Online to reject it—but QuickBooks did not
provide a direct reason. In this instance, go to the Invoices list and use the Column Chooser to
select the Sync column and Apply the change to the list. Now you can sort by the Sync column.
Then you can see if there are errors on the invoices so you can correct why they did not sync over to
QuickBooks Online successfully.

If you use class tracking in QuickBooks Online, SOS Inventory will automatically retrieve your
classes and enable class tracking in SOS. If you select the class on a line item of a transaction, SOS
will send the transaction to QuickBooks Online with the class info, so that it shows properly in
QuickBooks Online. Class tracking in SOS is based on line items and does not have the capability to
have a class for the entire transaction, which is an option in QuickBooks Online.
Department tracking in QuickBooks Online can be used to track different divisions, properties, or
other sub-units of your business. SOS supports department tracking and will read your
departments from QuickBooks Online and enable department tracking as appropriate.
Departments can be used in conjunction with the auto-ship options in the Sales Settings to
automate shipping from specific locations. You just build your locations (departments) list in
QuickBooks Online to match the locations exactly in the SOS locations list. Go to Sales Settings
(Settings > Sales Settings > General) and enable Auto-Ship Invoices and Auto-Ship Sales
Receipts. Now it is just simply creating your invoices and sales receipts in QuickBooks Online,
ensuring they have the appropriate location (department) listed on the transaction, saving the
transaction, and letting it sync to SOS on the next cycle or manually. Once the transaction is
received, the auto-ship creates the shipment for the respective transaction. As long as the physical
location in SOS matches the department listed on the transaction, it will pull the stock from that
location automatically.
If you use serial, lot, or bin tracking, you cannot use the Auto-Ship options. This would not work
for your situation.
In addition to the QuickBooks Online data described in previous sections, SOS Inventory also
retrieves the following data for viewing in SOS. These lists can be found under the Sync Menu on

the Task Bar. The following data are retrieved and available for use as needed, but only classes and
departments can be edited in SOS. To view any of these areas, the user must have the appropriate
permission settings.
• Accounts
• Bills
• Classes
• Credit Memos
• Departments
• Employees
• Journal Entries
• Purchases
• Tax Codes

The third-party integration and connector options available through SOS Inventory enhance your
e-commerce business.
Cart and FTP.
For each subscription plan, SOS includes a specified number of carts (PayPal,
Shopify, or Big Commerce) and/or FTP connections as standard features:
•
Companion Plan.
One cart or one FTP connection.
•
Plus Plan.
Two connections (any combination, cart and/or FTP).
•
Pro Plan.
Three connections (any combination, cart and/or FTP).
A charge is assessed for any connections over the plan limit. Current plan information is always on
our website.
ShipStation and UPS.
We provide ShipStation and UPS setup to SOS customers at no additional
charge. You will be billed directly by ShipStation or the shipping provider for any charges you
incur.
EDI Integration.
SOS charges a one-time set-up fee for each EDI connection. The fee varies
depending on your specific needs—for example, whether you already have an EDI provider or
whether you use ours, whether your provider conforms to our standard document formats, etc.
Please contact support@sosinventory.com for additional information about pricing.
For data field definitions, see Cart and FTP Field Descriptions.

SOS Inventory helps you integrate PayPal with QuickBooks Online. Now when you receive
payments via PayPal (via an eBay auction, for example), you can automatically have a
corresponding accounting transaction sent to QuickBooks Online. No manual entering of
transactions is needed.
You must first configure SOS Inventory and your PayPal account. To do this, go on the Task Bar to
Settings Menu > Cart Connections, then select Add New. On the Cart Connections page, go to the
Cart field and choose PayPal from the dropdown list. Follow the instructions listed to complete the
setup.
NOTE: As part of the configuration, you must make sure that you use the same item names and/or
numbers in PayPal as in SOS.
Once configured, each time you receive a payment via PayPal, PayPal will send a notification (IPN
record) to SOS Inventory. Upon receiving notification, SOS will create a sales receipt and send it to
QuickBooks Online.
SOS matches customers by first name/last name or by email address. If no match exists, SOS
automatically adds a new customer. If the item name on a PayPal sales receipt is the same item
name in SOS Inventory, the system will match the item when the sales receipt syncs from PayPal
into SOS Inventory. The correct SOS Inventory item will appear on the SOS sales receipt.
This feature does not automatically generate shipment transactions. You must still create the
shipment. However, you can set up an AOP rule to do this for you based on a channel called PayPal.
If you use SOS Inventory for inventory management, you can also configure your PayPal
transactions to send the item numbers so that we can automatically update your inventory counts.
For more information on enabling that feature, please contact [email protected].
For data field definitions, see Cart and FTP Field Descriptions.
SOS allows you to import your sales orders and sales receipts from Shopify directly into SOS
Inventory. SOS Inventory will also update Shopify with your available inventory quantities. You

will need to complete your item definitions as stated below, ensuring the SKUs or names are
defined correctly for ALL items that are to match between SOS and Shopify.
The cart connection with Shopify should be made only after the item definition process is complete
in both applications.
NOTE: If changes or additions are made to items in either SOS Inventory or Shopify after the
connection has been made, we recommend that you open your Shopify Cart Connection in the Cart
Connections list (Settings > Cart Connections) and then resave the page to remap the items.
NOTE: Shopify reference numbers allow you to use a prefix and a suffix in addition to the order
number. Please note that the maximum length allowed for the reference number (prefix + order
number + suffix) is 21 characters.
SOS Inventory takes a very detailed approach to matching items in Shopify to your items in SOS
Inventory. The following logic is applied:
•
SKU to SKU Matching.
If your products and variants of products in Shopify have a SKU and
the Item in SOS has a matching SKU, the items will be linked by SKU. We recommend that
you assign a SKU for every item, both in Shopify and in SOS Inventory.
•
Title/Variant Matching.
If your products in Shopify do not have a SKU, or if the SKU in
Shopify does not match the item’s SKU in SOS Inventory, SOS Inventory will match on item
title/variant. Item names must match in both applications with regard to case (capital or
lowercase letters), spacing, and characters.
o
Items without variants in Shopify.
The item title in Shopify will be used to match
the item name in SOS Inventory. If a match is found, those items will be linked by
Shopify title to SOS Inventory item name.
o
Items with variants in Shopify.
A combination of the item title and variant in
Shopify will be used to match the item name in SOS Inventory. If a match is found,
those items will be linked by Shopify title/variant to SOS Inventory item name.
Example: Item in Shopify: Title = “Shirt”, Variant = “Small”, The title/variant
combination that will be used to match to an SOS Inventory item name is “Shirt –
Small”. Note that the combination is title name, space, dash, space, variant name.

•
No Match.
If no matches can be made, per the above logic, a new item will be created in SOS
Inventory.
SOS Inventory will not send inventory information to Shopify until the item has been matched to a
corresponding SOS Inventory item. For SOS Inventory to update inventory quantities in Shopify,
you must use SKU/SKU matching—setting the SKU in Shopify to be the same as the SKU in SOS in
each item’s definition.
You must also keep Track quantity enabled for each Shopify item. If you need to create many items
in Shopify, you can enable the Track quantity setting with a bulk edit using Shopify’s export and
import feature (which is similar to the Export Data and Import Data features in SOS Inventory). On
the exported spreadsheet, enter
Shopify
in the items’ Variant Inventory Tracker column. NOTE:
The export/import should be done only after your items in Shopify have been matched to your
items in SOS Inventory. If you are unsure, please contact support@sosinventory.com.
SOS Inventory will update Shopify with the
available
quantity from SOS Inventory if the above
settings are set in Shopify and the appropriate settings are set in SOS Inventory. In SOS Inventory,
Update Inventory must be enabled on the Cart Connection page and the Update Inventory in
Shopify setting must be enabled in the item record.
For Shopify users with multiple locations, SOS will use the following methodology:
• If your SOS Inventory location(s) and Shopify location(s) do not have matching names, SOS
Inventory will send the total available quantity (across all locations) in SOS Inventory to
each location in Shopify.
• If your locations in Shopify have the exact same name (in spacing, case, and characters) as
your locations in SOS Inventory, such locations will be mapped (linked), and SOS Inventory
will send location-specific quantities to the Shopify locations.
o NOTE: If some, but not all your locations are mapped between SOS Inventory and
Shopify, SOS Inventory will not send inventory quantities to any Shopify location
that is unmapped to an SOS Inventory location.

To view quantities of items by location in SOS Inventory, use the Item list’s Column Chooser to
enable the Available column. Then open the Change Filter and choose the desired location from
the Location dropdown.
1. Before connecting with Shopify, edit your items in either SOS Inventory or Shopify (or
both) to ensure that the SKU of an item (variant) in Shopify matches the SKU of the
matching item in SOS Inventory. NOTE: Each item in SOS Inventory must be given a unique
SKU so that Shopify is able to map to the correct SOS Inventory item. However, the same
SKU can be used for multiple products in Shopify (for example, if you sell products with the
same SKU at different prices for different types of customers).
2. Optional: In SOS, click on the company name tile and choose Channels. Create a channel
named
Shopify
.
3. Connect SOS Inventory to Shopify. On the Task Bar, go to Settings Menu > Cart
Connections, then select Add New.
4. On the Cart Connections page, choose Shopify from the Cart field’s dropdown list.
5. In the Shopify App Type dropdown, select Custom App. NOTE: To create a new cart
connection, Custom App must be selected. Although Shopify continues to support existing
private apps, the private app feature was deprecated in January 2022. SOS Inventory
includes the Private App option for our customers who need to maintain or connect to an
existing Shopify private app.
6. In the Instructions section, follow the directions for the app type selected to ensure
Shopify is connected successfully with SOS Inventory.
a. Enter your Shopify shop name in the Shop field. The name will be something like
shopname.myshopify.com.
b. Log in to Shopify and follow the steps below:
i. From your Shopify admin, click Apps.
ii. Click on Develop apps for your store or Developer apps.
iii. Click on Create an app.
iv. Enter
SOS Inventory
in the App Name field and click Create App.
v. Click on the Configuration tab.

vi. On Admin API integration, select Configure.
vii. Under the All tab of Admin API access scopes, enable the following
permissions:
1. Under Customers section, enable read_customers. This setting
allows your Shopify customer to be created within SOS Inventory
when the sale synchronizes to SOS.
2. Under Inventory section, enable write_inventory and
read_inventory. Write_inventory allows inventory quantities in
SOS to write back to Shopify; if you don’t want your inventory
quantities to write back to Shopify, you can leave write_inventory
unchecked. Read_inventory allows an item to synchronize to SOS if
the item doesn’t already exist in SOS.
3. Under Locations section, enable read_locations. This setting allows
SOS to send specific quantities for items at multiple locations back
to Shopify as long as location names are the same (in case, spacing,
and characters) in both software apps.
4. Under Orders, enable read_orders to allow orders placed in Shopify
to sync to QuickBooks.
5. Under Product Listings, enable write_product_listings,
read_product_listings. These settings allow Shopify products and
those in SOS Inventory to correctly map upon initial connection and
talk with each other.
6. Under Products, enable write_products, read_products. These
settings allow Shopify products and those in SOS Inventory to
correctly map upon initial connection and talk with each other.
viii. On the Webhook subscriptions, choose the latest version from the Event
version dropdown list.
ix. Go to the top of the page and select Save. After saving the configuration,
click the green Install App button at the top of the page. Installing gives the
app access to your data and provides an access token.
x. Under Admin API access token, copy the access token and save it in a secure
place, as it can be accessed only once in Shopify. (Ignore the API key and API
secret key that is listed.)

xi. In SOS Inventory, paste the access token in the Admin API access token
field on the Cart Connection page for your Shopify cart.
c. Configure other settings on the Cart Connection page as needed. The
Enabled
box
must be checked to activate the integration between Shopify and SOS Inventory.
In the Sales Channel dropdown, be sure to select Shopify. When finished with all
other desired changes, Save and Close.
d. Once you have saved the settings, the item mapping is completed between the two
systems and the connection is verified.
Once connected, your sales from Shopify will sync into SOS and your inventory levels will be
updated by SOS Inventory in Shopify.
NOTE: If you edit or add more items later, come back to the Cart Connections page and select Save
and Close again to update the data.
NOTE: Cancelling an order in Shopify does not update SOS Inventory. You must manually delete
the complimentary transaction in SOS.
NOTE: In January 2022, Shopify released a new version of its app. All apps created with the new
release are called
custom apps
. Shopify apps created prior to January 2022 are labeled
private apps
.
Since private apps are still supported by Shopify at this time, SOS Inventory’s cart connections
with Shopify’s private apps can be used to: (1) add or edit items in Shopify and SOS Inventory; and
(2) establish a connection between SOS Inventory and a private app in Shopify.
1. Edit or add items in either SOS Inventory or Shopify (or both) to ensure that the SKU of an
item (variant) in Shopify matches the SKU of the matching item in SOS Inventory. NOTE:
Each item in SOS Inventory must be given a unique SKU so that Shopify is able to map to
the correct SOS Inventory item. However, the same SKU can be used for multiple products
in Shopify (for example, if you sell products with the same SKU at different prices for
different types of customers).

2. Refresh the cart connection. On the Task Bar, go to Settings Menu > Cart Connections. On
the Actions Menu of the existing Shopify cart connection, select Edit. On the Cart
Connection edit page, simply Save and Close.
1. Edit or add items in either SOS Inventory or Shopify (or both) to ensure that the SKU of an
item (variant) in Shopify matches the SKU of the matching item in SOS Inventory. NOTE:
Each item in SOS Inventory must be given a unique SKU so that Shopify is able to map to
the correct SOS Inventory item. However, the same SKU can be used for multiple products
in Shopify (for example, if you sell products with the same SKU at different prices for
different types of customers).
2. In SOS, click on the company name tile and choose Channels. Create a channel named
Shopify.
3. Connect SOS Inventory to Shopify. On the Task Bar, go to Settings Menu > Cart
Connections. Then select Add New.
4. On the Cart Connections page, choose Shopify from the Cart field’s dropdown list.
5. In the Shopify App Type dropdown, select Private App.
6. Enter your Shopify shop name in the Shop field. The name will be something like
shopname.myshopify.com.
7. Open a new browser window, log in to Shopify, and select your store. Follow the steps
below:
a. On the Shopify left menu, click Apps.
b. Click on Develop apps for your store or Develop apps.
c. Click on your private app.
i. Copy the API key and paste it into the Shopify API Key field on the Cart
Connection page in SOS Inventory.
ii. In Shopify, copy the Password and paste it into the Shopify API Password on the
Cart Connection page in SOS Inventory.
iii. Review your Admin API permissions and the Webhook API version and update if
desired. (The setting Allow this app to access your storefront data using the
Storefront API should remain disabled.) If any changes were made, scroll to the
top of the page and select Save.

8. In SOS Inventory, configure any other settings as desired on the Cart Connection page and
then Save and Close. Once you have saved the settings, SOS will begin matching your SOS
Inventory items to those in Shopify. When this process is complete, the connection is
verified.
9. As you create items in Shopify, keep Track quantity as the default for each item.
Once connected, your sales from Shopify will sync into SOS and your inventory levels will be
updated by SOS Inventory in Shopify.
NOTE: If you edit or add more items later, come back to the Cart Connections page and select Save
and Close again to update the data.
NOTE: Cancelling an order in Shopify does not update SOS Inventory. You must manually delete
the complimentary transaction in SOS.
Shopify does not allow personally identifiable customer data to sync to SOS Inventory if the
Shopify subscriber is on its Basic plan. This means that the corresponding sales order or receipt in
SOS Inventory will not include your customer’s name or address, although the items in the line-
item table do sync over.
If you subscribe to Shopify for Small Teams (Shopify’s mid-tier plan) or the Advanced plan, the
customer data restrictions do not apply. Customer information will sync as usual to SOS Inventory.
For data field definitions, see Cart and FTP Field Descriptions.
SOS allows you to import your sales orders and sales receipts from BigCommerce directly into SOS
Inventory. SOS Inventory will also update BigCommerce with your available inventory quantities.
You will need to complete your item definitions as stated below, ensuring the SKUs or names are
defined correctly for ALL items that are to match between SOS and BigCommerce. Only after that is
complete should you continue with the setup.

To establish the integration with BigCommerce, go on the Task Bar to Settings Menu > Cart
Connections, then select Add New. On the Cart Connections page, go to the Cart field and choose
BigCommerce from the dropdown list. Follow the instructions to make sure BigCommerce is
connected successfully with SOS Inventory.
BigCommerce reference numbers allow you to set the next number for the BigCommerce order
number. Please note that the maximum length allowed for the reference number (prefix + order
number + suffix) is 21 characters. Please ensure that you set the next number to a series that does
not already exist in SOS Inventory. SOS will not create more than one order with the same number.
SOS Inventory takes a very detailed approach to matching items in BigCommerce to your items in
SOS Inventory. The following logic is applied:
•
SKU to SKU Matching.
If your products and variants of products in BigCommerce have a
SKU and the Item in SOS has a matching SKU, the items will be linked by SKU.
•
No Match.
If no matches can be made, per the above logic, a new item will be created in SOS
Inventory.
SOS Inventory will not send inventory information to BigCommerce until the item has been
matched to a corresponding SOS Inventory item. For SOS Inventory to update inventory in
BigCommerce, you must enable Track Inventory for the item in BigCommerce and enable Update
Inventory in BigCommerce for the item definition in SOS Inventory.
SOS Inventory will update BigCommerce with the Available Quantity from SOS Inventory. NOTE:
The available amount is the available amount across all locations (excluding locations set as non-
nettable), not just a single location.
1. Before connecting with BigCommerce, edit your items in either SOS Inventory or
BigCommerce (or both) to ensure that the SKU of an item (variant) in BigCommerce
matches the SKU of the matching item in SOS Inventory.
2. In SOS, click on the company name tile and choose Channels. Create a channel named
BigCommerce
.
3. Connect SOS Inventory to BigCommerce. On the top Task Bar, go to Settings Menu > Cart
Connections, then select Add New. On the Cart Connections page, go to the Cart field and
choose Big Commerce from the dropdown list. Follow the instructions and complete the
data fields to make sure BigCommerce is connected successfully with SOS Inventory. For
the Sales Channel field, choose BigCommerce from the dropdown list.
4. Once you have saved the settings, the item mapping is completed between the two systems
and the connection is verified.
Once connected, your sales from BigCommerce will sync into SOS and your inventory levels will be
updated by SOS Inventory in BigCommerce.
NOTE:
Cancelling an order does not update SOS. You must manually delete the complimentary
transaction in SOS.
For data field definitions, see Cart and FTP Field Descriptions.
FTP, or File Transfer Protocol, enables files to be exchanged between network computers. SOS
Inventory supports outbound file transfers for exports and reports.
To establish an FTP connection, go to Settings > FTP Connections, then select Add New. On the
FTP Connection page, you will need to create a name and description for the connection, as well as
supply the FTP address of the host server, the FTP login credentials, and the path to the remote
server. After completing the data fields, Save and Close.
This functionality currently connects to non-secure FTP servers, not secure FTP (SFTP) servers.
BigCommerce Client ID.
The identification number assigned to you by BigCommerce.
BigCommerce Access Token.
The security credential assigned to you by BigCommerce.

BigCommerce API Path.
The website address for the BigCommerce API.
Class.
The class to which orders coming from this cart should be assigned. If this field is left blank,
SOS will assign each item on a sales transaction to the class specified in its item definition.
Connection Type.
Used for FTP connections. Currently, SOS offers the Outbound option only.
Department.
The department to which orders coming from this cart should be assigned.
Description.
A description of the connection.
Enabled.
Check the box to enable the cart connection.
FTP Password.
Obtain the user password from whoever set up the FTP account.
FTP Username.
Obtain the user ID from whoever set up the FTP account.
Host.
The server address for an FTP connection.
Location.
The location to which incoming transactions to a cart will be assigned.
Name.
A unique name for this connection.
Override Description.
By default, SOS will use the item description coming from the cart. Check
this box to override it with the SOS description.
PayPal Fee Account.
Expense account for PayPal fees.
PayPal Income Account.
Income account for PayPal payments.
PayPal Payment Address.
Email address of PayPal account holder.
PayPal Payment Method.
Payment method for PayPal payments.
Remote Path.
Path to the FTP directory on the remote server. Normally a slash (/) for the root path.
Format is /directory/directory…
Sales Channel.
The sales channel to which orders coming from this cart should be assigned.
Sales Receipt Deposit Account.
The QuickBooks account to which funds from sales receipts are
posted.

Shopify API Key.
A unique code assigned to you by Shopify that identifies your application in an
API call.
Shopify API Password.
Your Shopify-assigned password for making API calls.
Shop.
Your company’s Shopify web address.
Transaction Type.
The type of SOS transaction that the cart transaction will become when
imported into SOS. Select from Auto-Detect, Sales Orders, Sales Receipts, Don’t Import. If using
Auto-Detect, unpaid or pending orders come in as Sales Orders and paid orders come in as Sales
Receipts.
Update Inventory.
Enables SOS to update inventory in this cart. This behavior can also be
controlled at the item level.
Use Common Customer.
By default, SOS will create a customer for each customer coming from the
cart. Check this box to link all cart orders to the same common customer.
Use SOS Order Number.
By default, SOS will use the order number coming from the cart. Check
this box to override it with the next SOS number.
SOS Inventory supports direct shipping via UPS. Currently, UPS shipping functionality is available
only within the United States. To enable UPS shipping functionality, go to Settings > UPS Setup.
Then follow the instructions on the page to agree to the UPS terms. You can add a UPS account if
you wish, so that you can pay for shipping via UPS account as well as via credit card.
Once you have configured your UPS account to work with SOS Inventory, you can create shipments
for UPS. Locate the desired transaction on the Shipments list (Operations Menu > Fulfillment >
Shipments), then select Ship via UPS from the Actions Menu. SOS will take you to the Create UPS
Shipment page. After providing the necessary package information and selecting shipping options
and payment method, select Next in the lower right corner of the screen. A Confirm UPS Shipment
page will appear with the Shipping Details and cost. Select the Ship Now button in the lower right
corner to complete the shipment.
All users that will need to create UPS shipments must be given local administrator privileges
temporarily so they can complete the UPS settings process to add the account for their use as well.
SOS Inventory connects to the ShipStation app to provide you an easy way to ship your products
using a number of vendors. To use this integration, go to Settings Menu > ShipStation Setup and
follow the directions to configure ShipStation for use with SOS Inventory.
Once set up, any shipments created in SOS can by synced to ShipStation for further processing with
a carrier of choice. In the ShipStation app, click the option Update Stores to start the retrieval of
shipments from SOS. Once a shipment is processed through a carrier and the label is created,
ShipStation will send the tracking information back to SOS Inventory according to the
"Notifications" settings of the store setup in ShipStation. If you wish for the tracking info to post
from ShipStation to SOS Inventory immediately after the shipping label is created, set the
Notifications Settings in ShipStation to "Send marketplace notification when ... Shipping label is
created."
Shipping methods must be created and mapped in their definitions to the carriers in ShipStation so
that tracking information can sync back from ShipStation for the shipments to update. This means
UPS method in SOS to UPS method in ShipStation for example.
NOTES:
1. Voiding a shipment in ShipSation does not remove the tracking information in SOS. You
must manually update the shipment transaction.
2. Only shipments with two-digit country codes will sync to ShipStation. If you don’t want a
transaction to go over during the update, then use a country name instead.
SOS Inventory offers connections to EDI (Enhanced Data Interchange) integration with companies
that provide you with the ability to send transactions in a secure common environment.

EDI connections are enabled on an individual basis to connect your account to an EDI trading
partner. We can exchange almost any SOS transaction via EDI. Setup time varies from a few days to
a few weeks, depending on the complexity of the data exchange.
For more information, contact [email protected].
Through integrations offered by the product Zapier, SOS Inventory allows you to automate tasks
without building—or hiring someone to build—custom API integrations. Zapier is an online
connector app that allows the easy creation of “zaps” (automated workflows) between SOS
Inventory and other web-based applications. No coding skills are necessary.
A zap is a one-way workflow that can be triggered by an action in SOS Inventory or by that of the
other application with which SOS is paired.
In SOS Inventory, a new transaction (invoice, purchase order, sales receipt, sales order, or
shipment), an update in an item quantity, or a new customer can be used to trigger a workflow.
When another application initiates the zap, SOS Inventory can be used to: create a sales receipt;
create or find a sales order; or create or find a customer.
Through Zapier, SOS Inventory can be integrated with Salesforce, HubSpot, WooCommerce,
Airtable, Google Sheets, and many other online applications. Zaps can be created from scratch, but
a number of ready-made SOS Inventory zap templates are also available for your use, if desired.
The zap templates have been designed specifically for use with applications that pair well with
SOS’ software. Templates are available at https://zapier.com/apps/sos-
inventory/integrations#zap-template-list. When you select a template, the zap is added to your
zap list on the Dashboard of your Zapier account.
Pricing and other information about Zapier is available on its website, https://zapier.com.
Assistance for using Zapier is available via the Help menu of your Zapier account or at
https://zapier.com/help.

Administrative functions of SOS Inventory can be found under the Company Menu for managing
your SOS Inventory account. This menu is accessible only to users who have been designated as
SOS administrators.
Users in SOS Inventory are different than users in QuickBooks Online. You can have two users in
QuickBooks Online and 10 users in SOS, or vice-versa. The user lists are independent. Thus, you
need to manage your users in SOS Inventory to control who has access to your SOS Inventory
account, and to which information they have access. To add/edit/delete users, you can access the
Users page by going to Company Menu > User Administration.
To add a user, go to Company Menu > User Administration and click on Add New. Complete the
form and select the privileges for the user. See the following section for more information on user
privileges. Please note that an additional fee applies if you go beyond the number of users included
with your pricing plan.
User privileges in SOS Inventory are much more granular than those in QuickBooks Online. You can
select from 49 different security settings to turn on/off for your users. To grant/deny privileges to a
user, specify those you want them to have. You would enter this information when adding or
editing the user. Note that anyone designated as an administrator will have access to all areas of
the system.
As with QuickBooks Online, one of the administrators on your account must be designated the as
the master administrator. The master administrator has ultimate control over the account. The
master administrator can be changed only by contacting the SOS Inventory support team at

On the Users page (Company Menu > User Administration), you can use the Status field in the
Change Filter feature to view a list of active and/or inactive users. To restore an inactive user, find
the user in the inactive list and select Activate under the Actions Menu.
By enabling the Locked column on the Column Chooser of the Users list (Company Menu > User
Administration), you can see when a user has been locked out of his account due to too many failed
login attempts. A Yes will appear in the Locked column for that user. To allow the user to log in
again, select Unlock under the Actions Menu. The user should clear his SOS cookies before
attempting to log in again.
For security reasons, changing the master administrator (account owner) on your account MUST be
accomplished by the SOS Inventory Technical Support Team.
To meet the security policies outlined in the Terms of Service, changing the master administrator
would fit into one of these conditions:
1.
Current master administrator is still working within the company and is handing over
the account to a new master administrator or the current master administrator is no
longer with the company but can be reached to complete the transfer of ownership.
a. Action: The current master administrator must send an email to SOS Inventory
([email protected]m) stating that they would like this position to be
moved to another user and provide the account number, the gaining user’s
name, and the gaining user’s email.
b.
SOS Inventory Technical Support will complete the transfer of the account to the
gaining user and send an email to both parties letting them know that the
change is complete and make them aware of any actions by the new master
administrator to close the action.
2.
Current master administrator is no longer with the company and either cannot be
reached or refuses to act in this matter.
a. If the current and gaining master administrator are from the same company.

i. Action: Individual or entity requesting the change in master
administrator must send us a notarized letter on company letterhead
signed by a company officer. Company officers may be the CEO,
President, LLC Manager, majority owner, etc. Letter must contain the
account number, existing master administrator’s email, and the gaining
master administrator’s name and email address. Letter can be scanned
and emailed to our Support email address (support@sosinventory.com).
b. If the current and gaining master administrator are from different companies.
i. Action: Individual or entity requesting the change in master
administrator must send proof that they made the most recent payment
on the SOS Inventory account. An example of this proof could be a credit
card statement showing the charge and the payer’s information. Request
must contain the account number, existing master administrator’s
email, and the gaining master administrator’s name and email address,
with the documents, as mentioned above, which can be scanned and
attached to the email. Send email to our Support address
c. Either action taken above, once verified authorization is established, SOS
Inventory Technical Support will complete the transfer of the account to the
gaining user and send an email letting them know that the change is complete
and make them aware of any steps needed to close the action.
NOTE:
If the gaining user is not currently listed on the account, the gaining user must be added to
the account for the Support team to complete the transfer of ownership.
Account management functions are found under Company Menu > Account Info. On the Your
Account page, you will find the key administrative information related to your account. On that
page, you may add or edit payment information, change your plan level, and cancel your
subscription. You will also see a record of all subscription billing receipts and the expiration date of
your current subscription, so you know when the next charge will be made on your card.

SOS Inventory provides an activity log that is very similar to the one provided by QuickBooks
Online. The activity log allows you to track the history of actions taken by users in SOS Inventory.
To view the activity log, go to Company Menu > Activity Log. You can filter the log to see exactly
what you want so you can track down suspicious activity or just find out who performed a certain
action. Once you found the entry you are looking for, you can even go directly to the transaction or
item from the log.
To change from one subscription plan to another, go to Company Menu > Account Info and click on
Change Plans. There you can select the plan that you want. You can change plans at any time. A
link also allows you to select an annual plan, saving you the cost of approximately two months of
service each year. There are restrictions on this so make sure you are familiar with the Terms of
Service listed on the About page (Help > About).

With SOS Inventory, the feature of customizable forms is included. If you don’t like the look of the
default system templates or just want to modify them to have a certain look, this feature allows
you to make additional versions of the forms. SOS uses the Microsoft Word .docx file format to take
advantage of Word’s form-building techniques and fields.
You can see the list of available form templates under Company Menu > Form Templates. The
Form Templates list displays default system templates, as well as any templates you have added.
Also located on the Form Templates list (in the upper right corner, just below the Task Bar) is a link
called
Template Library
. It will take you to the Template Library list, which contains all
predesigned form templates available for you to use in SOS Inventory. You can copy or modify any
of these templates and add them to your Forms Template list if you wish.
The Get option on the Template Library’s Actions Menu will copy the template “as is” to your Form
Templates list. If you wish to modify the template rather than use the SOS version, select
Download from the Actions Menu.
Refer to Editing a Form Template and Form Template Fields for information about how to modify a
template.
If the Form Templates list is blank when you open the list, you can get the list back by going to the
Batch Actions menu and choosing Restore Default Templates.
To edit a form template, locate the desired template in the Form Templates list (Company Menu >
Form Templates) or in the Template Library (Company Menu > Form Templates > Template
Library). On the template’s Actions Menu, choose the Download option.
When editing a form template, observe the following rules:

1. The form definition must stay between the «TableStart:Main» and «TableEnd:Main»
delimiting merge fields.
2. The repeating row in the Items list must have a «TableStart:Lines» at the start of the first
cell in the row and a «TableEnd:Lines» as the last field in the last cell of the row.
3. You may rearrange the tables that make up the form.
4. You may add background graphics.
5. You can let SOS pull in your company logo, or you can add it to the form.
6. You may modify the fonts used within the form on merge fields (type and size) if you edit
the merge field and uncheck the option to “preserve formatting during updates.”
7. The available form fields are dependent on the type of form you are editing, such as an
invoice.
8. Instead of inserting brackets manually around field names, use the MS Word built-in
capabilities to edit fields, and it will insert the chevrons («») which surround the field name
for you.
When finished making your edits, save the template. (NOTE: If you have more than one version of
a form, such as an invoice, the .docx file name must be unique.) Then go to the Form AtTemplates
list and select the Add New button. Choose a unique name for the form, provide a description for it,
and select the form type for which the template will be used. (If you use an existing template name
and matching type, SOS will overwrite the previous version.) Then choose the .docx file you want to
upload and select Save and Close.
For more information, please check out our “Customizing Form Templates” video tutorial
(available within the software under Help > Video Tutorials > Customizing Forms, as well as on the
public website at https://www.sosinventory.com/support). You may also register for our customer
training course on Form Templates at https://www.sosinventory.com/customertraining.
To see the form fields available on each template, download the sample template (system
template). If a template lacks fields that you need, you can find transaction form templates with all

possible fields in the Template Library. If you wish to use custom fields on your template, the
merge field is simply the name of the custom field.
For any object or transaction, go to the appropriate list and choose either PDF or Email on the
Actions Menu. You will be presented with a dropdown menu allowing you to choose the form
template you want to complete the process. If only one template exists for that transaction type,
SOS will not show you the menu but will generate the PDF.

SOS Inventory provides several ancillary features that make using other aspects of the system
easier. While these are not necessarily core features, they make the user experience better and add
significant value to the product.
A Quick Link is an easy way to navigate to a specific page in SOS Inventory. Quick Links show up in
the Quick Links bar at the bottom of the Operations Menu in SOS Inventory. To add a Quick Link to
any page, first navigate to that page and then click the Add This Page option in the Quick Links
sub-menu in the Operations Menu.
You can manage your Quick Links by going to Operations Menu > Quick Links. All links will have a
trash can icon in the Quick Links Menu that you can click on to delete the link.
SOS Inventory provides a document management and storage capability that allows you to upload
documents and attach them to objects and transactions in SOS Inventory. For example, you could
upload a picture of an item and attach it to that item. You could upload a customer contract and
attach it to the customer. You could upload a customer purchase order and attach it to a sales order.
You are limited only by your imagination.
Files uploaded by a user default to only be accessible by that user. You can use the sharing option to
allow all users to see that document.
To add a document, go to Company Menu > Files. You will see the list of all documents that you
have already uploaded. Click Add New to begin the process of adding a document. Select the file to
upload and give it a description if you wish. Then choose the object or transaction to which you
want to link the document by selecting the type of object and then the name from the list to the
right. Note that when adding a link, you must click the disk icon to the left of the row after entering
the link info, but before clicking the Upload button at the bottom of the page. Once a file/document
is attached to a transaction, you can go to the list page (Items list, Customers list, etc.) to retrieve
the document.
NOTE: Once a document is added, you cannot go back and attach a link later.
To set automated alerts, go to Company Menu > Alerts. Click on Add New at the top right corner of
the list to add an alert.
Alerts are not enabled by default. They must be configured before they will begin to work. When
adding/editing an alert, the type of alert you are setting changes the options to be entered.
Common fields:
•
Name.
Name that you will use to remember this alert.
•
Type of Alert
. SOS Inventory supports the follow types of alerts:
o
Bill Due.
Indicates that a bill to a vendor is coming due soon.
o
Custom Field.
Indicates that a custom field has met certain defined conditions.
o
Invoice Due.
Indicates that a customer invoice is past due.
o
Lot Expiration.
Shows all conditions of an expiring lot.
o
Low Inventory.
Indicates that one or more items are below the reorder point and
need to be restocked.
o
Sales Order Due.
Indicates that a sales order to a customer is coming due soon.
o
Sales Receipt Due.
Indicates that a sales receipt to a customer is coming due soon.
o
Task Due.
Indicates that a task is coming due soon.
•
Alert Method
. Allows you to select how the alert will be sent in the notifications system.
Currently, they are Notify a user, Send an email, or Send a text.
•
Enabled
. Check this box to begin receiving alerts.
•
Repeat Alert
. Specifies whether or not (and how often) you want to be notified if the alert
condition still persists. For example, if you select Never, you will get only one alert and
then it will stop running. Daily will send you one alert each day until the condition goes
away.

•
Interval
. Specifies how often you want the system to check to see if the alert has been
triggered.
Options for the Alert Types
Bill Due
•
Days Before Due Date.
Can be a number from -30 to 30.
Custom Field
•
Field.
The name of the custom field.
•
Alert On.
The object the custom field is on (transaction, customer, vendor, item, etc).
•
Comparison Value.
Any value to be compared against based on the type of custom field.
Invoice Due
•
Days Past Due.
Can be a number from 0 to 90.
Lot Expiration
•
Location.
The location the lot is to be tracked at.
•
Category.
Indicates lot items under a certain category.
•
Calculation.
What case to key on (In Stock or Available for Sale).
•
Item Name Contains.
Allows you to alert on lots of multiple similar item names.
•
Days Prior to Expiration.
Can be a number from -30 to 30.
Low Inventory
•
Location.
The location the item is to be tracked at.
•
Category.
Indicates items under a certain category.
•
Calculation.
What case to key on (In Stock or Available for Sale).
•
Item Name Contains.
Allows you to alert on items of multiple similar item names.
Sales Order Due
•
Days Before Due Date.
Can be a number from -30 to 30.
Sales Receipt Due
•
Days Before Due Date.
Can be a number from -30 to 30.
Task Due
•
Days Before Due Date.
Can be a number from -30 to 30.

If you would like to suggest additional alerts, please email [email protected].
SOS Inventory has a full in-app notification system similar to what you see in other web-based
products like FaceBook and even Google Mail. It allows you to see notifications generated from
different actions taken in the system from alerts, AOPs, or even transactions when you have been
assigned one. The notifications appear as a number on the notification icon.
Then you can click on the icon to see a short title for each notification and delete them from the list
by clicking on the trash can. You can also go to the Notifications page to manage then by clicking
on the See all notifications > link at the bottom of the list.
In the User Menu > User Settings page, you can set how you want to be notified when the system is
sending something to you. They are:
1. Don’t Email or Text me
2. Email me
3. Text me
4. Email and Text me
The notification system will use your login email address and the mobile phone provide in your
User Profile. Regardless, all notifications will appear in the notification icon at the least.

Order stages allow you to designate on a sales order or sales receipt the stage that the order is in.
They can be seen on the Customer Portal discussed later in this guide.
By default, there are no stages defined in your account, so you have control over what you name
them. This could be anything such as
Quoted
,
Created
,
Shipped
,
In Transit
, etc., to represent to
your customers on the customer portal where their order is within your system.
To define your order stages, go to the Company Menu > Order Stages and select Add New on the
list. When defining a stage, you can assign a sort order starting with
1
. This will allow the stages to
appear in that order on the dropdown list on a sales order or sales receipt. Stages must be set
manually, but you can use AOPs to automate this if desired. Once in your sales transactions, you
can select those columns in either the Sales Order List or Sales Receipt List and even sort by those
columns.
Priorities allow you to show how critical the sales order is so you can govern your work day by taken
care of orders with a higher precedence first.
Be default in your account you will have three priorities defined (High, Medium, and Low) but you
can define more if needed and set the sort order for the dropdown list. To define priorities, go to
the Company Menu > Priorities and select Add New on the list.
The priorities can now be added to transactions from a dropdown menu on the edit page. Priorities
must be set manually, but you can use AOPs to automate this if desired.
Users in SOS Inventory can set reminders or To-Dos by going to User Menu > Tasks.
To add to the list, click the Add New button on that page. You simply add a title, description, set a
complete by date so it will appear on the Calendar, and you can assign a task to a specific user. To

remove items, use the actions menu to select Delete. You can also mark tasks as Completed under
the Actions menu for a task.
Sometimes, but very rarely, there will be a system message from SOS Inventory in the Task List.
If you engage in international commerce, SOS Inventory’s multi-currency feature is a helpful tool
for transactions requiring the use of currency exchange rates.
To take advantage of this feature, the multi-currency setting must be enabled in both SOS
Inventory (Company Menu > Company Settings) and in QuickBooks Online.
If multi-currency is enabled, Currency and Exchange Rate fields appear on purchase orders, item
receipts, and sales forms.
NOTE:
SOS Inventory displays the exchange rate differently than QuickBooks Online. In
QuickBooks, the foreign currency unit (for example, the British Pound or GBP) is always expressed
as the fixed monetary unit (1 GBP), while the home currency (for example, the US Dollar or USD)
fluctuates accordingly to the exchange rate. In SOS, the home currency is always the fixed rate,
while the currency of your customer or vendor will vary. Thus, a rate of 1 GBP = 1.4 USD in
QuickBooks would be displayed as 0.714285714 GBP = 1 USD in SOS.
To change your home currency, go to Company Menu > Company Settings and choose the proper
home currency.
If you engage in transactions with vendors or customers that use currencies different from that of
your business, make sure that Currency field on the purchasing, item receipt, or sales form is
configured to reflect the currency used by that vendor or customer. If you have included a default
currency as part of the vendor or customer’s definition, SOS will retrieve the default currency
automatically when you create a transaction involving that customer or vendor. You may change
the currency on the transaction form, if you so desire.

For purchase orders, you can choose to use the Vendor-Item Catalog to establish your vendor’s
price for a given item
in the vendor’s currency
. When a product listed in the Vendor-Item Catalog
is entered as a line item on the purchase order, the values that populate the PO’s Unit Price and
Amount fields will reflect pricing in the vendor’s currency.
For sales transactions, the same result can be achieved using price tiers in which items prices are
listed in the foreign currency.
If you do not use the Vendor-Item Catalog or price tiers, SOS will draw upon the data specified in
the item definition to calculate the pricing or cost of items. Because items are defined in your home
currency, you must use the exchange rate to calculate and update the values on the transaction
manually so that they reflect the pricing in your vendor or customer’s currency.
When you use SOS to generate a PDF of the purchase order, the PO will include the symbol of your
vendor’s currency before monetary values to clearly designate the currency (example: £400.00 for
400.00 GBP).
The line items in QuickBooks will reflect item pricing in your vendor’s currency when the purchase
order or sales transaction is synced from SOS to QuickBooks Online. But in the amount total,
QuickBooks will list the amount in your home currency as well as that of your vendor’s.
SOS Inventory supports currency updates in the European Central Bank (ECB) currency feed. See
https://www.ecb.europa.eu/stats/policy_and_exchange_rates/euro_reference_exchange_rates/ht
ml/index.en.html.
The following currencies are supported by SOS Inventory:
• AUD (Australian Dollar)
• CAD (Canadian Dollar)
• BGN (Bulgarian Lev)
• BRL (Brazilian Real)
• CAD (Canadian Dollar)
• CHF (Swiss Franc)
• CNY (Chinese Yuan)
• CYP (Cyprus Pound)
• CZK (Czech Koruna)
• DKK (Danish Krone)
• EEK (Estonian Kroon)
• EUR (Euro)
• GBP (British Pound)
• HKD (Hong Kong Dollar)
• HRK (Croatian Kuna)
• HUF (Hungarian Forint)

• IDR (Indonesian Rupiah)
• ILS (Israeli New Shekel)
• INR (Indian Rupee)
• ISK (Icelandic Króna)
• JPY (Japanese Yen)
• KRW (Korean Won)
• LTL (Lithuanian Litas)
• LVL (Latvian Lats)
• MTL (Maltese Lira)
• MXN (Mexican Peso)
• MYR (Malaysian Ringgit)
• NOK (Norwegian Krone)
• NZD (New Zealand Dollar)
• PHP (Philippine Peso)
• PLN (Polish Zloty)
• ROL (Romanian Leu)
• RON (Romanian Leu)
• RUB (Russian Ruble)
• SEK (Swedish Krona)
• SGD (Singapore Dollar)
• SIT (Slovenian Tolar)
• SKK (Slovak Koruna)
• THB (Thai Baht)
• TRL (Turkish Lira)
• TRY (Turkish Lira)
• TWD (New Taiwan Dollar)
• USD (US Dollar)
• ZAR (South African Rand)
The Support team can add additional currencies to the list for your use. But you will need to enter
the desired exchange rate manually, as the data will not be updated by the system.
QuickBooks uses a different currency feed from that used by SOS. Depending on the currencies you
need, you may be able to obtain some exchange rates from QuickBooks’ feed that are unavailable
through ours. In this situation, you may prefer to use QuickBooks Online to enter transactions and
have them sync to SOS.
SOS Inventory provides the ability to use an existing form as a template to create a new form. To
use a form as a template, go to the desired form list and under the Action Menu select Use as
Template.
For example, to use an existing PO as a template for a new PO, perform the following steps. Go to
the PO List (Operations Menu > Purchasing > Purchase Orders). Then find the PO you want to use
for the template and on its Actions Menu choose Use as Template. A pre-filled PO will be
generated, and you can modify and save as needed.
Channels allow you to track sales which come in via different methods. For example, some sales
might come in via walk-in sales, and some might be online sales. You could set up a channel for
each type of sale so that you can track them differently. You can set up channels to represent
anything you want. It is simply a way to segment your sales. To define your channels, go to the
Company Menu > Channels and select Add New on the list.
If you find that your lists are slow to load, you can archive data records that you do not need to see.
Archiving allows you to remove items, transactions, customers, and vendors from active lists, but
the archived records remain in the system. Archived records can be unarchived (restored to the
appropriate active list) when desired. The ability to display archived and unarchived records is
controlled through the Change Filters feature on list pages. To archive or unarchive a specific data
record, select the desired option via its Actions Menu.
SOS Inventory is configured by default for accrual accounting—a method that records revenues and
expenses as they occur, regardless as to whether payment for a service or product has been made or
received. By contrast, cash accounting records revenues and expenses at the time they are actually
paid.
If you use cash accounting, you can use either of the following two methods for processing
transactions:
Method 1: One-way sync, tracking separately in SOS
• Sync QuickBooks Online to SOS only.
• Create purchase orders in QuickBooks Online and l sync to SOS.
• Create a bill in QuickBooks Online and let the goods post to your Cost of Goods Sold (COGS)
account directly.

• Track inventory assets in SOS only. Since no assets are tracked in QuickBooks Online, no
asset accounts exist in QuickBooks Online.
• Create an item receipt from the PO in SOS to enter the items into stock in SOS for lot
tracking and more.
• Sales originate in QuickBooks Online as invoices.
• Invoices sync from QuickBooks Online to SOS. Enable Auto Sales Order Invoices to create a
sales order in SOS automatically whenever a new invoice is created in QuickBooks Online.
In SOS, this feature is found under Sales Settings > General. The sales order can then be
processed for shipment on the SOS side.
• Lots are created in SOS, and lot information will appear on SOS shipment forms. However,
because invoices originate in QuickBooks, the lot and other lot-related information will not
appear on invoices.
Method 2: Bi-directional sync
• Purchase orders may be created in either SOS or QuickBooks Online.
• Create a bill in QuickBooks, and let the goods go to COGS.
• Create the item receipt in SOS with Payment set to None.
• Sales can originate in SOS as sales order.
• Create shipments to relieve goods. Make sure that the option Post COGS to QuickBooks
(Settings > QuickBooks Setup) is disabled.
• Create an invoice in either software with all information as needed.
At certain places in SOS Inventory, you will see a feature with the “Beta” label. When we release
new features into SOS Inventory, we always release the feature as a Beta feature first. That signifies
that the feature is new and has not been in operation as long as the other features. It means that
the feature has been tested internally and meets all our test criteria. However, as a new feature, it
has not run through millions of transactions like the rest of the software.
Beta features are safe and fully usable. However, you might run into some odd bugs and/or strange
results that you would not see with our more established features. We typically keep a feature in a
Beta state for at least 30 days and no more than six months. The amount of time depends entirely
on what issues arise during normal use of the feature.

SOS Inventory is available as an iOS app as well as a web application. Available in Apple’s App
Store, the iOS app can be used on iPhone, iPod Touch, and iPad devices. More information is
available in the iOS app’s Quick Start Guide.
If you do not have our iOS app, you can still use the web version on your mobile device. Simply open
the web browser (e.g., Safari, Chrome, etc.) on your mobile device and use the site as you normally
would. The menus and screens adapt automatically to simplify navigation and data entry on your
device.
While on any of the devices listed above, you can also get to the iOS app link from our web
application by going to the Help Menu (purple question mark icon) and selecting Mobile App.
Select the button to take you to the Apple App Store link for SOS Inventory.
We do have an Android app on our development roadmap for a future release.

This section will provide you a step-by-step process for successfully setting up a new SOS trial
account and integrating it to a new QuickBooks Online. There are some steps to take care of in
QuickBooks Online as well and they are detailed here as well.
This section provides a step-by-step process for successfully setting up a new SOS trial account
and integrating it into a new QuickBooks Online. Some steps must be executed in QuickBooks
Online. They are detailed here as well.
We recommend that you register for the
Setting Up SOS Inventory
class via SOS Inventory’s
Training page on our main website. The class covers much of the information given in this
checklist, but with greater detail.
To be completed by the user who will serve as the master administrator for the QuickBooks Online
and SOS Inventory accounts:
1. Start a new QuickBooks Online account.
2. If QuickBooks Online Plus or Advanced is used, in QuickBooks Online go to Settings >
Account and Settings, Sales tab to turn off Quantity on Hand Tracking to eliminate
possible duplicate entries in your journals.
3. Complete the Chart of accounts. Account numbers are optional, but names must be unique.
4. Complete the Sales tax center (if needed).
5. Specify the Sales Form Settings.

a. Under Settings > Account and Settings, Sales tab—Under Sales form content,
enable Shipping, Discount, and/or Deposit in QuickBooks if you will use these
features in SOS Inventory.
b. Under the Advanced tab
i. If you enabled Shipping and/or Discount, go under Chart of accounts and
choose the associated Shipping account and/or Discount account. (Deposits
automatically go to Undeposited Funds.)
ii. If you are going to use classes and/or locations (called departments in SOS
Inventory), go under Categories, then enable Track classes and/or Track
locations.
1. For Track classes: in the Assign classes dropdown, choose One to
each row in transaction.
2. For Track locations: Choose the desired option under the Location
label. (Note: Regardless of the label chosen, in SOS Inventory, it will
always be called Department.)
6. Start SOS account using one of these two methods:
a. From Apps tab in QuickBooks Online, find SOS Inventory and select Get App Now.
i. This will present you with the page stating to pick a plan. Select one by
clicking the button under the plan you desire.
ii. It will give you a message to please wait while creating your account.
iii. It also starts the initial sync to send a copy of needed information from
QuickBooks Online to SOS Inventory.
iv. Once the initial sync is complete, you will receive an email saying the sync is
complete, and you can starting using SOS Inventory.
b. From SOS website, https://www.sosinventory.com, click on Free Trial to create a
new SOS Inventory account selecting whatever level you would like to start at.
i. Once created, you can go in SOS to the Settings Menu > QuickBooks Setup
page and click on the button Connect to QuickBooks. Then follow the steps
to authorize the connection.
ii. This starts the initial sync and retrieves a copy of the chart of accounts,
sales tax center, and sales terms for use in SOS settings and functionality.
c. Whether you followed a or b above, wait for an email from SOS stating that the sync
is complete before proceeding.
7. Log out of SOS and then log back in to make sure your company name from your
QuickBooks Online account is shown in the Company Menu in SOS.

8. Go to the Users Menu (your login name) and go to User Settings. Set your time zone, and if
desired, the date format and notification method. then go to User Profile to update your
password and security question.
9. At this point in the setup process, you may want to delegate or share the completion of the
remainder of the setup process to one or more persons who will serve as company
administrators in SOS Inventory. You can define those users by going to Company menu >
User Administration. Be sure to check the Administrator box for each of these individuals
so that they have the appropriate permissions. Every user will receive an email from SOS
asking them to log in and complete their profile.
To be completed by any user with administrator privileges:
10. In SOS, go to the Settings menu and walk through the Inventory settings, Purchasing
settings, and Sales settings pages to ensure all appropriate defaults and other settings are
completed before loading any data.
11. Go to the Company menu (your company name) and complete the following as needed:
a. Company settings – At a minimum, add company header, set the automated time
zone, and upload the logo.
b. User administration – Define more users here. The users will get an email from SOS
asking them to log in and complete their profile.
c. Account info – Check to make sure the account is at the plan level you desire. This
is especially important if SOS Inventory was enabled via the App center in
QuickBooks Online.
d. Locations – Specify the default location so that you have the location address for
Purchase Orders and other transactions. If you are a Plus or Pro plan subscriber add
any additional locations you may need for your inventory management.
12. Now you can begin loading your data.
a. Go to the Company Menu > Bulk Edit and complete Step 1 to download the Items
Spreadsheet.
b. Complete this spreadsheet with all the information that you know for each item.
i. At minimum, you should enter:
1. Name
2. Sales Description
3. Sales Price
4. Purchase Description
5. Cost

6. Item Type (ex: Inventory Item, Service, Assembly, etc., see guide)
7. Quantity on Hand
8. Value on Hand (total value of stock)
9. Income, inventory asset, cost of goods sold (COGS), and expense
accounts as appropriate to item type
ii. See more information on the Export/Import Data spreadsheet in Item Field
Definitions for Data Export/Import, which follows the columns on the
spreadsheet. Also, make sure you are following Editing Guidelines as you
complete the process. You can also refer to the How-To entry, “Accomplish
a Bulk Edit.”
c. Go to the Import Data page (Company Menu > Import Data) and upload your items
into SOS.
i. This should have created an inventory adjustment if you added Quantity on
Hand and Value on Hand data for your items in the sheet.
ii. Go to the left side menu, Inventory > Inventory Adjustments to find the
adjustment created by the data export/import. Click on Edit to load the
transaction. Change the account at the bottom to Opening Balance Equity
and Save the adjustment. This will send journal entries to QuickBooks
Online to load the values in Inventory Asset and the offset in Opening
Balance Equity.
13. Go to the Sync Menu and click on Sync Now to send all new items and the journal entries
from the adjustment to QuickBooks Online to update your account.
14. Now you can load any other data you need, such as, vendors, customers, and BOMs if you
created Assembly type items in step 10b.
15. Go to the Company menu and review the options in the Miscellaneous section. Set up any
of these options that you want to use. (These options are explained in the user guide.)
If you have any questions as you are going through this, please contact SOS Inventory Support via
email at [email protected] (Mon-Fri, 7am-8pm Central, as well as 12-4pm on Sat-Sun)-
-or via phone (Mon-Fri, 9am-6pm Central) at 888-545-4146.
.

Most SOS Inventory customers already have an existing QuickBooks Online account that they have
been using for some time. This section will show the steps required to successfully connect an
existing QuickBooks account to SOS Inventory and outline unique support practices. We
recommend that you register for the
Setting Up SOS Inventory
class via SOS Inventory’s Training
page on our main website. The class covers much of the information given in this checklist, but
with greater detail.
To be completed by the user who will serve as the master administrator for the QuickBooks Online
and SOS Inventory accounts:
1. Make following changes in QuickBooks Online (if not setup yet in QuickBooks Online):
a. Under Settings > Account and settings > Sales
i. Under Sales form content, enable Shipping, Discount, and/or Deposit in
QuickBooks if you plan to use these features in SOS Inventory.
b. Under Settings > Account and settings > Advanced
i. If you enabled Shipping and/or Discount, go under Chart of accounts and
choose the associated Shipping account and/or Discount account. (Deposits
automatically go to Undeposited Funds.)
ii. If you are going to use classes and/or locations (called departments in SOS
Inventory), go under Categories, then enable Track classes and/or Track
locations.
1. For Track classes: in the Assign classes dropdown, choose One to
each row in transaction.
2. For Track locations: Choose the desired option under the Location
label. (Note: Regardless of the label chosen, in SOS Inventory, it will
always be called Department.)
c. Validate Sales Tax Center if taxes are being used.
d. Validate Chart of Accounts.
i. If using QuickBooks Essentials, create Inventory Asset and COGS accounts if
they don’t exist.
e. Go to Settings (gear icon) and select All lists.

i. If you are using locations and classes, create any that you need if they don’t
already exist.
2. Go to Apps at left side menu in QuickBooks Online.
3. Search for SOS Inventory and select it.
4. Click on Get App Now on the SOS Inventory information page.
a. This will present you with the page stating to pick a plan, select one by clicking the
button under the plan you desire.
b. It will give you a message to please wait while creating account.
c. You will be now placed into SOS at the dashboard and the accounts will be
performing the initial sync (SOS retrieves copy of chart of accounts, sales tax
center, and anything else you may have defined such as departments and classes, as
well as any historical transactions, vendors, customers, and items).
i. For historical transactions, the initial sync brings only the most recent 1000
transactions of each type: estimates, invoices, purchase orders, and sales
receipts. (If you need all transactions to be synced to SOS Inventory, you can
do so once you get to Step 11, by using SOS Inventory’s Data Utilities
feature.)
d. This will also add a new My Apps list in QuickBooks Online under the Apps tab for
entry into SOS Inventory from QuickBooks Online (this is only for the person
connecting the two accounts).
5. In SOS, go to the User Menu and select User Profile to change your password and add a
security question/answer in case of password recovery.
6. Go to the User Menu again and select User Settings and change the time zone to yours.
7. Once you have received the email from SOS stating that the initial sync is completed, you
are ready to go. If not, wait until you get it before proceeding with the rest of this checklist.
8. If you are using QuickBooks Online Plus or Advanced, have enabled Quantity on Hand
Tracking and/or have bundles have inventory items in your Product and Services list in
QuickBooks Online, please contact SOS Inventory at support@sosinventory.com before
proceeding.
9. Go to Settings > QuickBooks Setup to ensure automated sync is set to desired level (most
customers choose hourly).

10. At this point in the setup process, you may want to delegate or share the completion of the
remainder of the setup process to one or more persons who will serve as company
administrators in SOS Inventory. You can define those users by going to Company menu >
User Administration. Be sure to check the Administrator box so that they have the
appropriate permissions. (Other users who do not have administrator privileges can be
added as well, but they cannot complete items on this checklist.) Each user will receive an
email from SOS asking them to log in. Users should go to the User Menu to complete their
profile and settings (as described in Step 6 and Step 7).
The following steps can be completed by any user with administrator privileges:
11. If you want more than the 1000 most recent historical transactions than what were
retrieved during the initial sync from QuickBooks to SOS (reference: see Step 4.c.i), go to
Company > Data utilities, select the transaction type from the Retrieve from QuickBooks
dropdown, then select Retrieve. (Ignore entering a date for the Update historical costs
starting on field.) Repeat for each transaction type needed.
12. Complete company settings under the Company Menu.
a. Company settings – If needed, modify company header, set the home currency
(make sure it matches that set in QuickBooks), enable multi-currency (make sure
QuickBooks Online is set up for multi-currency as well), and add your company logo
(make sure the logo file meets requirements in the note).
b. User administration – If you haven’t done so already, add any other users you want
to have access to SOS.
c. Account info – Check the subscription plan setting to ensure it is the one you
selected when creating the account. (Usually managed by the master
administrator.)
d. If you are using SOS Plus or Pro, create locations if you have multiple locations
(warehouses, delivery vehicles, contract manufacturing, or other reasons for
additional locations).
13. Complete the operational settings under the Settings menu. Listed below are the
minimum requirements. (The “Setting Up SOS Inventory” class covers settings in greater
depth than what is presented here.)
a. Inventory settings
i. If you don’t want to let stock levels go negative, uncheck Don’t ask about
negative inventory.
ii. Select all default accounts needed for new items, inventory adjustments,
and item receiving.

iii. Enable advanced search options if desired.
iv. Select desired valuation method.
v. Review all other inventory options and enable/disable as desired.
b. Purchasing settings
i. Set your default location to receive goods into.
ii. Set your default payment method for paying vendors.
iii. Enable advanced search option.
iv. Set default expense account for items that do not have one in their
definition.
v. If using QuickBooks Online Essentials, uncheck Synchronize POs.
vi. Review all other purchasing options and set as desired.
c. Sales settings (General tab)
i. Set default tax code.
ii. Enable the Show Available for Sale on Forms if desired (shows available
stock while adding items to the sales forms).
iii. Set default payment method.
iv. Set default terms for sales.
v. Enable advanced search option.
vi. Review all other sales options and set as desired.
14. Validate vendors and customers that synced from QuickBooks Online. (You can use the
Export Data/Import Data tools under the Company menu to edit and make any necessary
changes to the Vendors and Customers lists.)
15. Finally, your items should have synced over from QuickBooks Online as an initial inventory
list. Use the Export Data/Import Data tools to make sure your data synced correctly and add
any missing essential information such as the account for asset and COGS. See the sections
Editing Guidelines and Item Field Definitions for Data Export/Import in this guide for more
information on the data columns and process.
a. Column data – minimum requirements needed for items:
i. Name
ii. Sales Description
iii. Sales Price
iv. Purchase Description
v. Cost
vi. Item Type (ex: Inventory Item, Service, Assembly, etc., see guide)(Very
important that every item be type correctly since they may not have been
initially received from QuickBooks Online correctly on the initial sync.)
vii. Quantity on Hand for an item

viii. Value on Hand (total value of stock for an item)
ix. Income, inventory asset, COGS, and expense accounts as appropriate to
item type (Very important that these are correct so that SOS Inventory can
generate the appropriate journal entries to affect the accounts in
QuickBooks Online.)
b. Do not change column A. If you are adding new items, leave column A blank so SOS
knows it is a new item.
c. If you have any specific questions on data before loading this spreadsheet, contact
SOS Support at 888-545-4146 or via email at suppo[email protected]. This
includes use of bins, multiple locations, serial inventory, or lot inventory.
16. Perform any other changes you may need that are discovered during this process—such as
setting up BOMs for assembly items, form templates, process templates, additional
locations, etc.
These setup instructions may change based on unique scenarios for your company. If you have any
questions as you are going through this, please contact SOS Inventory Support via email at
[email protected] (Mon-Fri, 7am-8pm Central, as well as 12-4pm on Sat-Sun)--or via
phone (Mon-Fri, 9am-6pm Central) at 888-545-4146.
.

SOS Inventory has a standard REST API structure available to customers, providing you with the
capability to access your accounts data through web requests. This is a pull functionality, not a
push, which means that you request data as needed. No method currently exists for automating
data that is sent to targets outside of SOS Inventory.
To start your API project, please go to the Developer Portal at https://developer.sosinventory.com/
to access the API registration process and the full documentation for working with the API. If you
prefer, you can have a developer (either internal or external) register on the Developer Portal to do
the programming for you, but you as the data owner still have the ability to authorize the developer
to access your data. You can limit them only to the data for which they have privileges, based on
the user login at time of authorization. Please see more on this in the site’s documentation.
Although API connections must be created through the Developer Portal, you may view and revoke
API connections in SOS Inventory by going to Settings > API Connections. Once revoked, requests
made for data against your account will result in access denied.
For assistance with the API or Developer Portal, please email support@sosinventory.com or call
our Support desk at 888-545-4146.
Two of the most common questions received by our Support team are, “Why doesn’t my inventory
value in SOS match my inventory value in QuickBooks?” and “Why do I need to reconcile inventory
value if SOS and QuickBooks synchronize data?” The answer to both questions is the same. SOS and
QuickBooks do synchronize data; however, if there are inconsistencies in the source data (due to
data entry errors, business changes, intended differences, etc.), then the synchronized data will be
incorrect, just as the source data was. Thus a reconciliation process helps to make sure that your
data are correct in both places and that you have accounted for any differences (either intentional
or unintentional). This is similar to balancing your check book – simply making sure that
everything matches as expected. This document describes in detail the interaction between SOS
Inventory and QuickBooks, the tools in SOS Inventory that can be used to reconcile, and some
special situations that can affect the reconciliation process.
Reconciliation inventory value between SOS Inventory and QuickBooks involves some or all of the
following steps, depending on which SOS features you are using. Once your values match, you
know that you’ve accounted for everything and that you’ve finished reconciling.
• Run an Inventory Valuation report in SOS Inventory and compare it to the total of the asset
accounts in QuickBooks. If the values are the same, you are finished, and everything is as
expected. If the values are different, continue with further steps.
• If using Work Centers, run the WIP report. These totals, combined with the inventory
valuation report, should be compared to the asset account.
• Use the Reconcile Item Receipts report to ensure all bills and/or purchase expenses have
synced to QuickBooks and that the line amounts on the item receipts in SOS Inventory
match the line amounts on the bills and/or purchase expenses in QuickBooks.

• Use the Reconcile Journal Entries report to ensure that all Journal Entry values in
QuickBooks match to the corresponding SOS Inventory transaction.
• Use the Reconcile Vendor Credits report to ensure the Vendor Credit values in QuickBooks
match the corresponding Return to Vendor transaction in SOS Inventory.
• Check the adjustment list in SOS Inventory to ensure that the correct inventory adjustment
account has been used.
• Check your “Other Cost” items to ensure their proper setup.
• Check QuickBooks for transactions that may have been added or edited after SOS Inventory
posted them.
The intent of reconciling SOS Inventory to QuickBooks is to ensure that the systems are in sync --
that the total value in the asset accounts in QuickBooks matches the value in SOS Inventory. In
order to understand how this is accomplished, it is important to understand how the systems
interact. This first section will provide that information.
• A purchase order created in SOS Inventory will create a purchase order in QuickBooks and
vice versa. When the purchase order is added/edited/deleted in one system, the sync will
add/edit/delete it in the companion system. Purchase orders do not affect any accounts.
• When a purchase order is converted to an item receipt in SOS Inventory, the item receipt
increases inventory quantity and value in SOS Inventory. The value of this inventory comes
from the cost listed on the item receipt. SOS Inventory will post a transaction to
QuickBooks matching the item receipt, depending on the user’s selected option.
o If Bill was chosen as the payment type, SOS Inventory will post a bill (vendor
invoice) in QuickBooks that increases the asset account(s) of the item(s) on the
item receipt and affects Accounts Payable.

o If Cash/Check/Credit was chosen as the payment type, SOS Inventory will post a
purchase expense in QuickBooks that increases the asset account(s) of the item(s)
on the item receipt and affects the default cash/check/credit account (set in the
Inventory Settings page of SOS Inventory).
o If None was chosen as the payment, SOS Inventory will not post anything in
QuickBooks to reflect the item receipt.
o NOTE: If the bill or purchase expense that is posted to QuickBooks by SOS
Inventory is subsequently edited or deleted in QuickBooks, this will not update the
item receipt in SOS Inventory.
o NOTE: If a bill or purchase is added in QuickBooks, this will not create an item
receipt in SOS Inventory.
o For Pro plan users that use the landed costs (Other Costs) feature in SOS, the items
used in the Other Costs area must be configured correctly. When you use this
feature, items that are listed as Other Costs should be expense items. However, the
expense account of these items should be your inventory asset account. In this
methodology, the expense incurred in this area of the item receipt both increases
the asset account in QuickBooks and the value of the received items in SOS
Inventory by the same amount.
• A Return to Vendor (RTV) created in SOS Inventory removes inventory quantity and value
from SOS Inventory. This transaction will produce (based on selected option on the RTV):
o A Journal Entry in QuickBooks that decreases the asset account(s) of the item(s) on
the RTV and also affects the account selected on the RTV.
o A Vendor Credit in QuickBooks that decreases the asset account(s) of the item(s) on
the RTV and also affects your Accounts Payable to the Vendor on the RTV.
o NOTE: If the Journal Entry or Vendor Credit that is posted to QuickBooks by SOS
Inventory is subsequently edited or deleted in QuickBooks, this will not update the
RTV in SOS Inventory.

o NOTE: Adding a Vendor Credit in QuickBooks will not create an RTV in SOS
Inventory.
o NOTE: On Returns to Vendors, the item that is removed from inventory will affect
the Asset and Accounts Payable accounts according to the valuation method you
have chosen in SOS Inventory. This value may or may not be the same as the
amount of credit the vendor (supplier) provides. If this is the case, it is
recommended that you add a second line to the Journal Entry or Vendor Credit
(depending which option was chosen) to account for the difference in the
valuation-method-derived value of the RTV and the amount of actual credit given
by the vendor (supplier).
• An estimate/sales receipt/invoice created in SOS Inventory will create a matching
transaction in QuickBooks and vice versa.
• When using SOS Inventory to track your inventory, all items should be set up as non-
inventory or service in QuickBooks. As such, sales receipts and invoices will affect the
income account(s) of the item(s) on the sale. The asset account(s) and COGS account(s) are
not affected by the sales transaction.
• A sales order created in SOS Inventory will not produce a transaction in QuickBooks. Sales
orders do not affect inventory quantities/values in SOS Inventory or any accounts in
QuickBooks.
• A shipment created in SOS Inventory takes items out of inventory in SOS Inventory. This
transaction will create a Journal Entry in QuickBooks to reduce the asset account(s) and
increase the COGS account(s) of the item(s) on the shipment.
o NOTE: If the Journal Entry reflecting the shipment is edited/deleted in QuickBooks,
this will not affect the shipment transaction in SOS Inventory.
• A return created in SOS Inventory brings items into inventory. The value of the returned
items is established by the restock value entered on the return. This transaction will create
a Journal Entry in QuickBooks that increases the asset account(s) and decreases the COGS
account(s) by the listed restock value of the item(s) on the return. If the Credit Memo

option is selected, SOS Inventory will also create a credit memo in QuickBooks for the
amount of credit specified on the return.
o NOTE: If the Journal Entry reflecting the return is edited/deleted in QuickBooks,
this will not affect the return transaction in SOS Inventory.
o NOTE: Adding a credit memo in QuickBooks will not create a return in SOS
Inventory.
An adjustment in SOS Inventory is used to increase or decrease your inventory quantities/values in
SOS Inventory. An adjustment created in SOS Inventory will create a journal entry in QuickBooks
that affects the asset account(s) of the item(s) on the adjustment and the account selected on the
adjustment.
An example of how an adjustment in SOS is handled in the system is shown below:
Adjustment #1198 increases the quantity of aluminum sheets in inventory by 100 units. SOS
Inventory calculates the value of the increase using the $.50/sheet purchase cost that is listed in
the item definition, thereby increasing the cost basis by $50.00.
SOS will post the increase as a debit to the Inventory Asset account. The user has specified that SOS
should post the offsetting credit to the Inventory Shrinkage account.

When the Adjustment #1198 is saved, SOS creates a corresponding journal entry and assigns to it
the reference number SOS-5865. The journal entry can be viewed in SOS after syncing with
QuickBooks Online.
To locate the entry in SOS, go to the Sync Menu > Journal Entries. Use the Date column and
transaction reference listed in the Memo column to help you locate the appropriate journal entry.
In QuickBooks Online, journal entry SOS-5865 is accessible through the Inventory Asset register
and Inventory Shrinkage report from the Chart of Accounts page.

The QuickBooks Online journal entry for SOS-5865 is shown below. The Description column
includes a reference to Adjustment #1198, the source document for the journal entry.

Additional information about adjustments:
• NOTE: When the inventory quantity is decreased by the adjustment, SOS Inventory will
calculate the value of the decrease based on the actual value of the items being removed
from inventory. Actual value is based on the valuation method selected and the
transactions that brought the stock into inventory.
• NOTE: When the inventory quantity is increased by the adjustment, SOS Inventory will
calculate the value of the increase based on the purchase cost listed in the item record.
• NOTE: If the Journal Entry reflecting the adjustment is edited/deleted in QuickBooks, this
will not affect the adjustment transaction in SOS Inventory.
• NOTE: A data export/import in SOS Inventory can create an adjustment in SOS Inventory
when the inventory quantities/values in the uploaded sheet are different from the numbers
in the system at the time of the data upload. This adjustment will not automatically post a
Journal Entry to QuickBooks. As the Export Data/Import Data tools are most commonly
used to edit items in bulk and enter starting inventories that are already accounted for in
QuickBooks accounts, not creating the Journal Entry in QuickBooks is the intended
behavior. If your intent was to use the Export Data/Import Data features to update
inventory quantities/values in SOS Inventory and have the accounts in QuickBooks reflect

the value change, you must edit and save the adjustment that results from uploading the
data.
• A build transaction in SOS Inventory will decrease the inventory quantity/value of the input
items and increase the quantity/value of the output items. The output item created in a
build transaction will inherit the value of the input items. A build created in SOS Inventory
will create a Journal Entry in QuickBooks that will decrease the asset account(s) of the input
items and increase the asset account of the output items by the value of the input items.
• NOTE: If an input item is a non-inventory/service/expense/labor/other item in SOS
Inventory, the expense account of the item is reduced by the build transaction. The value
used for non-inventory/service/expense/labor/other item in the build is the purchase cost
in the item record.
• NOTE: If the build transaction is placed in a work center other than “Finished Goods”, the
input items are removed from inventory, but the output items are not placed into inventory
because it is still Work-In-Progress (WIP). The Journal Entry reflecting the build will not
be sent to QuickBooks until the build work center is changed to “Finished Goods.”
• NOTE: If the Journal Entry reflecting the build is edited/deleted in QuickBooks, this will not
affect the build transaction in SOS Inventory.
• A process transaction in SOS Inventory will decrease the inventory quantity/value of the
input items and increase the quantity/value of the output items. The output items created
in a process transaction will inherit the value of the input items. The value of the inputs
items is distributed to the output items according to the ratio of the output quantities and
standard purchase cost (in the item record) of the output items. A process transaction
created in SOS Inventory will create a Journal Entry in QuickBooks that will decrease the
asset account(s) of the input items and increase the asset account(s) of the output item(s)
by the value of the input item(s).

• NOTE: An output item that has a 0.00 purchase cost in the item record will receive 0
percent of the input value—unless it is the only output, which will result in the output
receiving 100 percent of the value.
• NOTE: If an input item is a non-inventory/service/expense/labor/other item in SOS
Inventory, the expense account of the item is reduced by the process transaction. The
value used for each non-inventory/service/expense/labor/other item in the process
transaction is the purchase cost in the item record.
• NOTE: If the process transaction is placed in a work center (if using, Pro plan only) other
than Finished Goods, the input items are removed from inventory, but the output items are
not placed into inventory. The Journal Entry reflecting the process transaction will not be
sent to QuickBooks until the process work center is changed to Finished Goods.
• NOTE: If the journal entry reflecting the process is edited/deleted in QuickBooks, this will
not affect the process transaction in SOS Inventory.
• Purchase Order
• Estimates
• Sales Order
• Pick Ticket
• Return Merchandise Authorization
(RMA)
• Transfer
• Rental
• Rental Return
• Job
• Work Order
• SOS Inventory provides tools to help you compare your SOS Inventory valuation to your
QuickBooks asset accounts. Additionally, SOS provides tools to ensure that SOS Inventory
transactions affecting quantity/value have correctly posted to QuickBooks to update asset
(and other) accounts.

• The reconciliation process in SOS assumes that a matching starting point can be
established -- a point in which the inventory valuation in SOS Inventory matches the asset
account in QuickBooks. This will be the starting date of your reconciliation, as with
balancing a checkbook. You might need to adjust historical values as of a certain date to
establish an initial starting point.
The Inventory Value report shows the value of the items that are in stock as of the end of the day on
the selected date of the report. The report can be filtered by a single location, a particular category,
or text contained in the item name. For the purposes of reconciliation, the valuation report should
be run for all items (no text filter), all categories, and all locations.
The results of the Inventory Value report can then be compared to the combined total of all
inventory asset accounts used by SOS Inventory items in QuickBooks.
• If the valuation report in SOS Inventory matches the total of the asset accounts as stated
above, the reconciliation process is essentially complete.
• If the valuation report in SOS Inventory does not match the total of the asset accounts as
stated above, the report should be run for an earlier date and compared to the total of the
asset accounts on that date to establish a time period that the systems diverged.
NOTES:
• The Inventory Value report will not reflect values of archived items. Even if the report is
run for a date during which the archived item was not archived, the archived item and its
value will not be reflected.
• The Inventory Value report will not reflect values of deleted (inactive) items. Even if the
report is run for a date during which the deleted item was not deleted, the deleted item and
its value will not be reflected.
• It is best to not archive or delete items until a reconciliation of SOS Inventory and
QuickBooks Online is conducted and matching values are obtained for the current date.

• Once reconciliation is complete and the SOS Inventory Value report coincides with the asset
account(s) total in QuickBooks Online, we recommend that you close the books for that
period both in SOS Inventory and in QuickBooks Online.
If using the work center feature, any build or process transaction in a work center will not reflect in
the inventory valuation report. The WIP report accounts for those transactions. These item
values, when combined with the results of the Inventory Valuation report, should balance with the
total of all inventory asset accounts in QuickBooks Online that are used in the item definitions in
SOS Inventory.
Bills that SOS Inventory creates in QuickBooks are generated from item receipts. Thus it is
important to ensure that all bills successfully synced to QuickBooks and increased the asset
account by the amount on the corresponding item receipt. To check the sync status of the bills
created by SOS Inventory, click on the green check and choose Bills. View the “Sync” column to
see if any bills have a sync error. If you find any sync errors, you will want to resync that bill to
QuickBooks. To do that, you will:
• Go to the Item Receipts list in SOS Inventory.
• Find the item receipt that corresponds to the bill that did not sync.
• Click on the Actions Menu (next to the Edit button) and choose Add to Sync.
• Sync.
Once you have gone through the above process, check the bills list again and ensure that the sync
error is no longer present. Also check QuickBooks to ensure the bill has posted.
NOTES:
• If a bill was synced to QuickBooks and later deleted in QuickBooks, this will not be indicated
on the bills list with a sync error. This action could cause a mismatch between SOS
Inventory and QuickBooks.
• If a bill was synced to QuickBooks and then edited in QuickBooks to change the amounts on
the bill, this action could cause a mismatch between SOS Inventory and QuickBooks.

• The above two situations can sometimes be difficult to recognize. Using the “Reconcile
Item Receipts” report (described below) will help. Also, it might be useful to export item
receipts from SOS Inventory and/or the asset accounts in QuickBooks if it becomes really
difficult to track down an issue.
Purchase expenses that SOS Inventory creates in QuickBooks are generated from item receipts,
similar to bills. Thus, it is important to ensure that all purchase expenses successfully synced to
QuickBooks and increased the asset account by the amount on the item receipt. To check the sync
status of the purchase expenses created by SOS Inventory, click on the green check and choose
Purchase. View the Sync column to see if any purchase expenses have a sync error. If you find any
sync errors, you will want to resync that purchase expense to QuickBooks. To do that, you will:
• Go to the Item Receipts list in SOS Inventory.
• Find the item receipt that corresponds to the bill that did not sync.
• Click on the Actions Menu (next to the Edit button) and choose Add to Sync.
• Sync.
Once you have gone through the above process, check the purchase expense list again and ensure
that the sync error is no longer present. Also check QuickBooks to ensure the purchase expense
has posted.
NOTES:
• If a purchase expense was synced to QuickBooks and later deleted in QuickBooks, this will
not be indicated on the purchase expense list with a sync error. This action could cause a
mismatch between SOS Inventory and QuickBooks.
• If a purchase expense was synced to QuickBooks and then edited in QuickBooks to change
the amounts on the purchase expense, this action could cause a mismatch between SOS
Inventory and QuickBooks.
• The above two situations can sometimes be difficult to recognize. Using the “Reconcile
Item Receipts” report (described below) will help. Also, it might be useful to export item
receipts from SOS Inventory and/or the asset accounts in QuickBooks if it becomes really
difficult to track down an issue.

The reconcile item receipts report will provide the date and value of an item receipt in SOS
Inventory in comparison to the corresponding bill or purchase expense in QuickBooks. This report
can highlight:
• Situations where SOS Inventory created a bill or purchase expense in QuickBooks and a user
changed or deleted the bill or purchase expense in QuickBooks, creating a mismatch
between the valuation in SOS Inventory and the asset account in QuickBooks.
• Situations where SOS Inventory created a bill or purchase expense in QuickBooks and a user
changed the date of the bill or purchase expense in QuickBooks, creating a temporary
valuation mismatch between SOS Inventory and QuickBooks, between the date of the item
receipt and the date of the bill or purchase expense.
To run the Reconcile Item Receipts report, choose a date timeframe, choose the type of
transaction, and Run Report. The report should be run for all types of transactions that are used in
SOS Inventory.
• Blue Highlights: Blue highlights indicate that SOS Inventory did not post a transaction to
QuickBooks for the corresponding transaction. If this is the case, go to the item receipt list,
edit the item receipt to ensure the correct payment method is chosen, save, and sync.
• Green Highlights: Green highlights indicate that the line item on the transaction cannot be
found on the bill/purchase expense posted to QuickBooks. This can occur if the line item
removed from the bill/purchase expense in QuickBooks or if the item name has changed. If
the name has changed, this can be ignored. If not due to a name change, go to the item
receipt list, edit the item receipt to ensure the correct payment method is chosen, save, and
sync.
• Red Highlights: Red highlights indicate that the value of the line item on the transaction
was changed in QuickBooks after SOS Inventory posted the bill or purchase transaction to
QuickBooks. When a red highlight is observed, it is important to determine which is the
correct amount for the item – the amount in SOS Inventory or the amount in QuickBooks.
In either circumstance, the numbers should be corrected to match.

o If SOS Inventory reflects the correct costs for the items, edit/save (make no change)
the item receipt, and then sync so the bill will be updated.
o If QuickBooks reflects the correct costs of the items, edit/save the item receipt in
SOS Inventory to match the costs reflected in QuickBooks.
▪ NOTE: In this circumstance, you may not want the bill in QuickBooks to be
updated -- especially if you have added line items for other expenses, taxes,
etc. If this is the case, after saving the item receipt, click on the Green
Check and choose Preview Sync and remove the ‘Modify bill’ or ‘Modify
purchase expense’ associated with the resave of the item receipt.
• NOTE: As the algorithm to compare transactions looks for the item name within the line on
the QuickBooks bill/purchase expense, it can sometimes indicate a false mismatch. This
occurs when the item name of one item on the SOS Inventory transaction is contained
within more than one line of the purchase transaction in QuickBooks. If you have added
these to the queue, synced, and there still is a mismatch, this is most probably the case.
The reconcile vendor credits report will provide the date and value of a return to vendor transaction
in SOS Inventory in comparison to the corresponding vendor credit in QuickBooks. This report can
highlight:
• Situations in which SOS Inventory created a vendor credit in QuickBooks and a user
changed or deleted a vendor credit in QuickBooks, creating a mismatch between the
valuation in SOS Inventory and the asset account in QuickBooks.
o NOTE: On returns to vendors, the item that is removed from inventory will affect
the Asset and Accounts Payable accounts according to the valuation method you
have chosen in SOS Inventory. This value may or may not be the same as the
amount of credit the vendor (supplier) provides. If this is the case, it is
recommended that you add a second line to the Journal Entry or Vendor Credit
(depending which option was chosen) to account for the difference in the
valuation-method-derived value of the RTV and the amount of actual credit given
by the vendor (supplier).
The Reconcile Journal Entries report will provide the current calculated value of a transaction and
compare it to the Journal Entry that was sent to QuickBooks for the transaction. This report can
highlight:
• Journal Entries that were changed in QuickBooks.
• Journal Entries that were posted to QuickBooks, but the value of the transaction has
changed.
• Transactions that did not post a Journal Entry in QuickBooks.
To run the Reconcile Journal Entries report, choose a date time frame, choose the type of
transaction, and Run Report. The report should be run for all types of transactions that are used in
SOS Inventory.
• Transaction Numbers: The reconcile Journal Entries report matching algorithm relies on
matching a particular transaction to a particular Journal Entry in QuickBooks. As such, for
any transactions that do not have a transaction reference number, no match will be
possible. These lines will be highlighted in blue.
• Blue Highlights: Blue highlights indicate that SOS Inventory did not post a Journal Entry to
QuickBooks for the corresponding transaction, or such Journal Entry was deleted in
QuickBooks after it was posted by SOS Inventory. This may have occurred if the value of the
Journal Entry would have been $0. If the currently calculated value of the transaction is not
$0, click the “Add to Queue” link to add that transaction to the sync queue. If the current
calculated value of the transaction is $0, this line can be ignored.
• Green Highlights: Green highlights indicate that the line item on the transaction cannot be
found on the Journal Entry posted to QuickBooks. This can occur if the value of the line
item was $0 at the time the transaction was created or if the item name has been changed
since SOS Inventory posted the Journal Entry to QuickBooks. If the current value of the
transaction is not $0, click the “Add to Queue” link to add that transaction to the sync
queue. If the current calculated value of the transaction is $0, this line can be ignored.
• Red Highlights: Red highlights indicate that the value of the line item on the transaction
was changed after SOS Inventory posted the Journal Entry to QuickBooks. This can occur if
a transaction that increased the inventory of the item, dated before the transaction in

question, was added/edited/deleted. When a red highlight is observed, click the Add to
queue link to have SOS Inventory update the journal entry in QuickBooks with the newly
corrected values.
o NOTE: As the algorithm to compare transactions looks for the item name within the
line on the QuickBooks Journal Entry, it can sometimes indicate a false mismatch.
This occurs when the item name of one item on the SOS Inventory transaction is
contained within more than one line of the Journal Entry in QuickBooks. If you
have added these to the queue, synced, & there still seems to be a mismatch; this is
most probably the case.
o NOTE: On Returns to Vendors, the item that is removed from inventory will affect
the Asset and Accounts Payable accounts according to the valuation method you
have chosen in SOS Inventory. This value may or may not be the same as the
amount of credit the vendor (supplier) provides. If this is the case, it is
recommended that you add a second line to the Journal Entry or Vendor Credit
(depending which option was chosen) to account for the difference in the
valuation-method-derived value of the RTV and the amount of actual credit given
by the vendor (supplier).
As previously mentioned, archived and deleted items do not reflect on the Inventory Value report.
If you are reconciling for a previous date and items were used during the reconciliation period that
have now been archived or deleted (inactivated), these items will not be reflected on the valuation
report—even if they were active and not archived during the period of the report.

Unarchiving and undeleting of such items may be necessary to obtain an accurate valuation report
for the selected period. Use the Items list Change Filter or Batch Actions feature to unarchive
items. Deleted items can be reactivated by going to the Deleted Items list (Operations
Menu > Reports > Miscellaneous > Deleted Items) and selecting Restore from the Actions Menu or
Batch Actions dropdown list.
When SOS Inventory posts a transaction such as a bill, purchase expense, or vendor credit to
QuickBooks, the resulting transaction in QuickBooks reflects the values entered on the transaction
in SOS Inventory. If transactions are subsequently edited or deleted in QuickBooks, this can cause
a mismatch.
The Reconcile Item Receipts report will help identify these situations for item receipts. The
Reconcile Vendor Credits report will help identify these situations for Vendor Credits created from
an RTV.
Unintended journal entries can occur when a user enters inventory in SOS that has already been
accounted for in QuickBooks. If the value of this inventory (most commonly a journal entry
associated with an adjustment) posts to QuickBooks, there will be an unintended increase to the
asset account. This situation is typically only common when first setting up the SOS Inventory
account.
To identify unintended journal entry situations, determine the starting balance of the QuickBooks
account prior to beginning SOS Inventory, then check the transactions that posted to QuickBooks
from the initial adjustments added in SOS Inventory to determine which entries were unintended.
When an adjustment is created in SOS Inventory, the system allows you to choose an adjustment
account. The adjustment will create a journal entry in QuickBooks that affects the asset account(s)
of the items on the adjustment and the adjustment account selected on the adjustment. When a

user chooses the asset account as the adjustment account, both sides (credit and debit) of the
journal entry affect the same account—thereby adding value in SOS Inventory but not in
QuickBooks.
To identify incorrect adjustment account issues, go to the adjustment list in SOS Inventory. Click
on the gear to the right of the Quick Search bar and enable the Adj Acct column. For any asset
accounts (or other incorrect accounts) listed as the adjustment account, consider editing the
adjustment and choosing a different adjustment account.
Duplicate journal entry postings can occur when SOS Inventory queues the deletion of a journal
entry for a modified transaction (to be replaced by a new journal entry), but a user removes the
deletion from sync queue.
The following method can be used to check for duplicate journal entry postings:
• In QuickBooks, Export the Cost of Goods Sold account(s) to check for duplicate journal
entries for the same shipment, drop ship purchase order, and customer returns.
• In QuickBooks, Export the Asset account(s) to check for duplicate journal entries for the
same build, process transaction, inventory adjustment, and return to vendor.
• Steps:
o Run report in QuickBooks on account(s), as applicable.
o Export reports to Excel.
o In Excel:
▪ Use Conditional Formatting to highlight duplicate lines … run for the
Memo/Description column.
▪ Once duplicate lines are highlighted, check the journal entries associated
with the duplicates.
o NOTE: If the same item is on more than one line of a transaction, this can cause
duplicates to be shown, but you will be able to see that these are both on the same
journal entry.

Pro plan users have the option to use “Other Costs” items on the item receipt transaction in order
for SOS Inventory to calculate the landed cost value of the received items. When this feature is
used, items that are listed as “Other Costs” should normally be expense items. However, the
expense account of these items should be the inventory asset account. The expense incurred in
this area of the item receipt both increases the asset account in QuickBooks and the value of the
received items in SOS Inventory by the same amount. When the expense account of the “Other
Costs” items is listed as an expense account rather than an asset account, the bill or purchase
expense line in QuickBooks for the other costs increases an expense account rather than an asset
account. As such, the value increase in SOS Inventory does not have a matching asset account
value increase in QuickBooks and creates a mismatch.
To identify “Other Costs” items that have an incorrect expense account, begin by exporting your
items under the Export Data page in SOS Inventory. Annotate each item used as an Other Cost and
proceed to the Items list in SOS Inventory. Edit each of the annotated items and ensure the correct
account type is chosen as the expense account of the item. Once complete, it may be necessary to
resync the item receipts that these Other Costs were on in order to correct the Bills and Purchase
Expense transactions in QuickBooks so that the Other Cost lines increase the appropriate asset
account.
If a transaction is added directly in QuickBooks that increases or decreases the asset accounts in
QuickBooks, this can cause a mismatch between the SOS Inventory valuation report and the total
of the asset accounts in QuickBooks.
To help differentiate transactions created by SOS Inventory from those entered directly in
QuickBooks, SOS Inventory enters a reference to the SOS Inventory originating transaction in the
memo of the transaction posted to QuickBooks. Checking the transaction register of the asset
accounts can help identify transactions that were created directly in QuickBooks as the reference to
the SOS Inventory transaction will be absent.
My quantity (or cost basis) for item X is wrong in the system. What happened?
Pull up the Item History page for the item and review the transactions. That will allow you to
determine exactly where the quantity or cost became different than what you expected.
I sent an email for support and have not received a response. How long does it usually take?
We respond to most support emails within one hour; however, depending on the volume of emails
at the time and the complexity of the issue, it can take up to 24 hours. If you have not received a
response within 24 hours, please send your email again. It is possible that it was not delivered for
some reason.
Does SOS Inventory have a maximum amount of item, transaction, and other data that it can
process?
Theoretically, SOS Inventory has no limit to the amount of data that can be entered into the
system. However, our software does have practical limitations of which you should be aware. View
SOS Inventory Limitations
at https://www.sosinventory.com/wp-content/uploads/2021/02/SOS-
Limits_20210127_v1.pdf for more detailed information.
How do I set the default shipping address for purchase orders?
Go to the Settings Menu (gear icon in upper right) and select Purchasing Settings. Look for the
option to select the default location for POs. Then, go to the Location List under the Company
Menu (your company name), select Locations, and edit the location to specify the proper address.
How do I issue a packing slip for a partial shipment?
When you generate a packing slip for a sales order, it will automatically be generated for the
difference between the quantity shipped and the quantity invoiced. Thus you can issue a packing
slip for a partial shipment by making sure that the shipped and invoiced amounts are correct on
the sales order.
I'm getting a message that says SOS Inventory automatically detected a problem. What
happened?
This means that an unexpected situation occurred. There are a variety of causes, ranging from a
temporary QuickBooks Online outage to a bug in SOS Inventory. If the problem is on our side, we
usually have it fixed within 24 hours. You can always contact us and we will let you know the status
of the problem.
Do you support XYZ feature? If not, can you implement it?
Go to the Help Menu (? icon) and select the Feature Requests page and tell us about a new feature or
vote for an existing one. Also, you can email us at support@sosinventory.com if you have a
question about a specific feature that is not listed anywhere else. We log every feature request that
we get. The ones that are requested the most often are the ones that we prioritize. We are not a
custom development shop. We do not build specific features for specific customers. We try our best
to implement the features that will provide the most benefit to the most people.
Why do some of my vendors/items/customers have “(deleted)” in their name?
When you see a vendor, customer, employee, etc. with (deleted) in the name, which means that
you deleted the object but that it was linked to something else. For example, let's say you delete a
customer that has made purchases from you in the past. QuickBooks Online (and SOS Inventory)
need to keep your invoices and sales receipts for that customer. So the customer isn't really
deleted. It's just hidden most of the time. If you go to view an invoice with that deleted customer, it
will show the customer's name with (deleted) after it, to remind you that you deleted that
customer.
Why do some of my vendors/items/customers) have “(2)” or another number in their names?
When you add a new vendor, customer, or item in SOS Inventory, it attempts to send the item to
QuickBooks. If an item with that same name already exists in QuickBooks, it will add a (2) to
differentiate the second version of the item from the original. You can correct the duplicates by
seeing which one has the history you want to keep and then deleting the other version. If you keep
the (2) version, just rename it to get rid of the (2).
What does it mean when a menu option is listed as “beta”?
Beta features are new features that we have introduced recently. We introduce major new features
first in the beta stage, so that people who really want the feature can try it out. Beta features have
been tested internally and are believed to work correctly, but given that they are new it is possible
that you will experience more issues with those than with the core SOS Inventory software. After a
period of live field testing, we remove the beta label to signify that we believe the stability is on par
with other features.

I want to add Categories to my items but only have “None” as an option for Categories.
To add a category, click on the Blue Plus at the top of the page and choose Item. Add the category
name. The type should be Category. Save. Then, you can edit your other items and place them in
this category.
Why do Sales Tax and Shipping not show in my sales transactions?
For sales tax it is due to the sales tax center not being established in QuickBooks Online. For
shipping, you need to enable this option in you QuickBooks Online Company Settings to have it
appear on the transactions in SOS.
What type of barcode scanner works with SOS?
Any linear barcode scanner will work with SOS. You can use warehouse scanners like the Wasp as
long as you keep it in linear mode. Either USB connectable or Bluetooth formats will work as long
as they can be attached as an input device. Currently SOS does not have the capability to use
cellular phone barcode scanning apps.
How do you enable shipping in SOS Inventory?
To enable shipping in SOS Inventory, you have to enable it in QuickBooks Online. To do that:
1. Log in to QuickBooks Online.
2. Click on Gear > Account and Settings.
3. Click on Sales on the left.
4. Click on Sales Form Content.
5. Check the box next to Shipping.
6. Save.
7. Sync SOS Inventory to QuickBooks Online.
Once the above is done, you will have a shipping field in Sales Orders and Invoices in SOS
Inventory.
When processing a sales order to shipment to invoice, the customer purchase order number does
not come across from SOS to QuickBooks Online. I am currently having to enter it separately in
QuickBooks Online. What might be causing that?
To fix this situation, do the following:
1. Log in to QuickBooks Online.

2. Click on Gear > Custom Fields.
3. Add a transaction-based, text type custom field named Customer PO.
NOTE: The custom field must be labeled exactly as shown above. You must have a capital
C
, a space between
Customer
and
PO
, a capital
P
and capital
O
, and no characters after
the
O
. Do not use all caps.
4. Sync SOS Inventory to QuickBooks Online.
Now, any future invoices created or edited in SOS Inventory will sync to QuickBooks Online with
the Customer PO included.
I have entered a discount in my SOS invoice, but it won't sync to QuickBooks Online.
You need to enable discounts in QuickBooks Online to use them in SOS Inventory. To do that:
• Log in to QuickBooks Online.
• Click on Gear > Account and Settings.
• Click on Sales on the left.
• Click on Sales Form Content.
• Check the box next to Discounts.
• Save.
• Sync SOS Inventory to QuickBooks Online.
Once the above is done, you can use discounts in Sales Orders and Invoices in SOS Inventory.
I’m entering sales in QuickBooks and my inventory in SOS is not changing after synchronization.
Why not?
By default, SOS Inventory does not remove inventory for new transactions in QuickBooks. To
change this behavior, go to the Settings menu and choose Sales Settings. In the General section,
you’ll see options called Auto-Ship Invoices and Auto-Ship Sales Receipts. Turn those options on,
as appropriate, and then try your transactions again.
NOTE: If you have items with either serial tracking or lot tracking on in SOS or if you are blocking
negative inventory, then you should not enable the Auto-Ship Invoices or Auto-Ship Sales
Receipts, but can still use the Auto-Sales Order Invoices.
I enter shipping charges on an invoice, but they disappear when I sync with QuickBooks Online.
How do I fix this?

Be sure that the shipping feature is enabled in your QuickBooks Online preferences.
When I send an invoice to QuickBooks Online, why are the addresses sometimes formatted in a
strange way?
There are certain rules that we must follow when exchanging data with QuickBooks Online.
Sometimes those rules don’t support all of the features that SOS can support. So we sometimes
have to squeeze things down or otherwise make them fit into the format available to us, which
might or might not be the optimal way to view the data.
All my items downloaded from QuickBooks Online are showing as inventory items. Why?
The default item type for items downloaded from QuickBooks Online is Inventory Item. You can
edit this value individually for each item or do a data export/import to be able to correct them all at
once. As a reference the data export/import sheet contains a column that shows the type of item on
QuickBooks Online so you can correct the ones in SOS accordingly.
The inventory quantities in SOS aren’t syncing with the inventory quantities in QuickBooks
Online. Why not?
QuickBooks Online does not yet allow third-party tools to update inventory counts. With that said,
think of SOS Inventory as a replacement for the inventory functionality in QuickBooks Online. If
you are using SOS, you don’t need the inventory tracking in QuickBooks Online, because you are
using SOS to track inventory. Most of our customers do not have inventory tracking even turned on
in QuickBooks Online. In fact, if the inventory tracking in QuickBooks Online is sufficient for your
needs, then you probably don’t need SOS Inventory at all.
If you do have inventory tracking on in QuickBooks Online, please send an email to
[email protected] for more information or call 888-545-4146 to let us know.
I'm getting an error message when trying to synchronize with QuickBooks. What do I do?
Sometimes the synchronization with QuickBooks Online will fail. This can be due to a data error, or
it could be as simple as a temporary server outage. Whenever the sync fails, an X will appear
instead of the checkmark when the sync completes. Click on the Sync Menu (green icon at top) and
then Sync Errors to see the error message associated with the sync failure. Usually it will tell you
how to resolve the error. You can also use the Preview Sync option as described above to see exactly
which transaction is causing the problem.

The SOS sync algorithm is very sophisticated. On a sync error, it waits a few minutes to give the
user a chance to resolve the error. If the error persists, the system will attempt to correct the error
automatically. Sometimes it takes longer than others, depending on system load and the nature of
the error. If you are unable to resolve a sync error and the problem persists, please contact
I was testing SOS with fake data, and now I want to enter my real data. How do I clear all the test
data and start fresh?
The easiest way is to set up a new SOS account. Just make sure you disconnect your old SOS account
from your QuickBooks Online account before attempting to connect the new SOS account. You can
use your same email address for the new account.
How do I change my password?
From the User Menu (where it shows your name), select “User Profile.”
I am getting an error that states “Do not have authorization to complete action.” How do I fix
this?
The error message tells you what to do. In short, you need to have your master administrator on
the account disconnect and reconnect the account in SOS to authorize your connection again to
your QuickBooks Online account.
I am getting an “Unknown error from QuickBooks Online.” What does that mean?
This error usually happens due to communication issues during the sync such a timeout condition
if you are syncing a lot of data. If you have automatic sync on, SOS will resume when it is time to
sync again, otherwise, do a manual sync to resume.
I am getting an error that states “Invalid Number” with a long ID after it such as “df1210ab-
e227-492b-8b70-07ae74468b90”. What does this mean?
This means that something on the transaction doesn't exist in QuickBooks Online. Usually this is
an item that does not have the Sync option enabled. Editing the item and syncing it to QuickBooks
Online, then resaving and syncing the transaction will fix this error. Other things to check for
could be a non-existent vendor, customer, or sales term.
I changed my email address and can no longer sign on using the via Intuit option. Why?
To use the single sign on function, the email address must match in QuickBooks Online and SOS.

I am getting a “Stale Object” error. How do I fix it?
This means that an item was edited and saved on both systems between syncs. Note the
information on the SOS side for the item. Resave the item on QuickBooks Online and sync to SOS.
Edit the item on SOS to once again have the changes you intended for the object and sync back to
QuickBooks Online.

The following are definitions of many common terms used in this document and in the SOS
Inventory software. If there are other definitions that you’d like to see added, please email
AOP.
Automated Order Processing is a rule-based processing method to allow you to automate
different workflows to maximize your efficiency
Assembly.
A special type of inventory item that consists of other items (components).
Available for Sale.
Quantity on hand minus quantity on sales order minus quantity at non-nettable
locations.
Bill of Lading.
A document used in shipping/transporting goods. It is often required for certain
types of shipments, particularly freight.
Bill of Materials.
The list of components and quantities that makes up an assembly.
Blanket PO.
An open-ended PO, without specific quantities.
BOM.
Bill of materials.
Channels.
Methods of sales such as web, store, or any other sales path that may be used.
COGS.
Cost-Of-Goods-Sold.
Cost-Of-Goods-Sold.
The inventory costs (what you paid) for the goods sold during a given period.
The calculation may vary depending on your chosen inventory valuation method.
Credit Hold.
A conditional switch stopping a new sale to be accomplished for a customer due to
unpaid invoices for previous sales.
Credit Memo.
A document issued to a customer to show proof of a deposit or refund.
Customer.
Someone who buys things from you.

Drop-Shipping.
An arrangement in which your vendor (supplier) ships the items directly to the
end customer instead of to you.
EDI.
Electronic Data Interchange is the electronic interchange of business information using a
standardized format; a process which allows one company to send information to another
company electronically rather than with paper.
Estimate.
A quotation for goods or services.
Invoice.
A bill to your customer to be paid by a certain date.
Item.
Something that you want to track in SOS Inventory, which could be a product you sell, a
service you provide, raw materials for manufacturing, overhead expenses, and so on.
Item Receipt.
A record that you received goods from a vendor on a specified date.
Job.
A way to group transactions for reporting purposes.
Kit.
A collection of individual inventory items that are sold as a group.
Landed Cost.
The total amount that you paid to bring an item in house from a vendor. This could
include shipping charges, fuel charges, labor, customs, duty, etc., in addition to the price of the
item itself.
Lot.
A batch of an item that are tracked together as they are received, shipped, built, or otherwise
used in the system.
Max Stock Level.
The maximum amount an item that you want to have on hand. Also it is used as
the restock level for an item.
Non-posting transaction.
A transaction that does not post to your general ledger, meaning that it
does not affect your financial reports.
OE Companion.
An older version of SOS Inventory. Version 1 of the current software was called OE
Companion, as it was a companion tool for QuickBooks Online Edition.
On PO.
The quantity of an item on open purchase orders.
On SO.
The quantity of an item on open sales orders.

Overhead.
Additional costs of producing goods and services that a company wishes to include in
the costs of goods sold of the items.
Packing Slip.
A document typically enclosed in a shipment to a customer that shows the items
shipped and other shipping information. It usually does not include prices.
Pick Ticket.
A document providing instructions on which items to pull and from where (bins, etc.)
to pull them.
Priority.
Allows a user to know the importance of an object to determine the order tasks are
completed in.
Purchase Order (PO).
A purchase order is a form/document used to request a vendor to provide a
good or service to you in exchange for payment. The purchase order will typically define terms of
payment, delivery, and so on. Purchase orders are non-posting transactions.
QuickBooks Online.
A hosted, SaaS, cloud-based version of QuickBooks. QuickBooks Online is a
distinct product. It is not merely a hosted version of QuickBooks Pro, Premier, Enterprise, etc.
QuickBooks Online Edition.
This was the name used to refer to QuickBooks Online many years ago.
Reorder Point.
The point at which inventory of an item is considered “low.”
Return.
A record that you received merchandise back from your customer on a given date.
RMA.
Return Merchandise Authorization. A document authorizing a customer to return a product.
SaaS.
Software as a Service. This refers to a software that is hosted by the developer, and the user
pays a monthly fee to access the software / service. This is often referred to as cloud computing.
Sales Order.
A document showing quantities and prices of an order from your customer. This is a
non-posting transaction.
Sales Receipt
. A document describing a completed sale, similar to the receipt you would get from a
retail store.
Serial Inventory.
Items that are tracked individually by a unique number.
Stage.
Shows the state that goods are in during a sales process.

Variance.
In SOS Inventory, a variance is the difference between the actual cost of an item and the
expected (standard) cost of an item.
Vendor.
Someone from whom you buy products or services. Also called a supplier.
WIP.
Work-in-progress.
Work Center.
A stage or step in a manufacturing process.
Work-In-Progress
. Materials on which production has started but that have not yet been turned
into finished goods.

The reports available in SOS Inventory are found by going to Operations Menu > Reports. The
report sections, as well as the reports available within each of these areas, are listed here in
alphabetical order.
Reconcile Item Receipts.
Provides data on bills, cash purchases, checks, and credit card charges
pertaining to item receipts. Highlights financial information that is missing or has a discrepancy
with QuickBooks Online.
Reconcile Journal Entries.
Shows journal entry information pertaining to transactions. Highlights
financial information that is missing or has a discrepancy with QuickBooks Online.
Reconcile Vendor Credits.
Displays credit information on return-to-vendor transactions.
Highlights financial information that is missing or has a discrepancy with QuickBooks Online.
Backorder Report.
Lists data on backordered sales orders and sales receipts. Can be filtered
according to location, item name, customer, and order type.
Fulfillment Efficiency.
Provides information on the turnaround time in fulfilling customer orders
from the time a sales order or sales receipt is placed until it is received by the customer. The report
can be filtered by location, item name, customer, and order type. For each PO listed, the report
includes whether the order was delivered on time.
Ready to Pick/Ship.
Compiles a list of sales orders and sales receipts that are ready to be picked and
shipped.
Shipping Report.
Shows completed shipments by transaction, ship date, customer, item and
quantity shipped.

Bin Contents.
Lists bin contents by location and bin number, along with the quantity on hand for
each bin item.
Inventory Aging.
Provides a list of items on hand and how long they have been in inventory. This
report is useful for identifying slow-moving inventory, as well as the costs associated for storing
and maintaining it.
Inventory Stock Status.
Compiles data of items and their on-hand quantities. Filters include
location, category, item name, and vendor.
Inventory Summary.
A flexible report that offers much detail regarding items on hand, on
transactions, and available for sale. Many other options for column data exist as well. Information
can be filtered according to location, category, item name, and vendor.
Inventory Turnover.
Measures the number of times inventory is sold or consumed in a given time
period. Turnover rate is Cost of Goods Sold divided by Average Inventory. Average Inventory is the
beginning inventory number plus the ending inventory number, divided by two.
Inventory Value.
Provides the total quantity and value of an inventory item. Can be filtered by
location, category, item name, and vendor.
Item Analysis.
Shows the profitability of an item based on its standard cost. Filters include
location, category, item name, and vendor.
Item Movement.
Provides details about items’ movements on transactions: the quantity received,
returned to vendors, shipped, adjusted, etc., as well as the total quantity in and out.
Items in Bins.
Compiles data on bin-tracked items that includes item location, bin number, and
quantity on hand.
Lot History.
Shows the transaction history of lot-tracked items. Can be filtered by item or lot
number.
Lot Stock Status.
Gives data on the current status of a lot-tracked item. Filters include location,
category, item, lot number, and status (whether it is active, expired, or recalled).

Lot Traceability.
Tracks the history of a lot-tracked item using its lot number. The report shows
receiving and shipping information, as well as the item’s use in builds and processes. The report
has the option to include information on whether the item has expired or been recalled.
Lots in Bins.
Provides data on a lot-tracked item stored in bins. Filters include location, category,
item, lot number, bin number and status (whether it is active, expired, or recalled).
Overstock/Understock Report.
Gives a breakdown of inventory for a specified item. The report
includes the item’s reorder and maximum stock level, as well as the total quantity. Filters include
location, category, item name, and vendor.
Physical Inventory Worksheet.
Creates a worksheet that includes the system count of one or more
items and a column for you to enter the actual count of each item listed.
Serial Unit History.
Shows the transaction history of serial-tracked items. Can be filtered by
location, category, item name, serial number, customer, and status (in-stock, used, shipped,
adjusted out, or all).
Serials in Bins.
Compiles data on serial-tracked items that includes the serial number, item name,
location, and bin number.
Deleted Items.
Displays the Deleted Items list. Available actions include Restore and Transaction
History. The columns available on the Deleted Items list are identical to those on the Items list.
The Cost Basis column is helpful in identifying discrepancies between SOS Inventory and
QuickBooks Online, allowing you to determine whether any deleted items still have assigned value.
Transactions Assigned.
Generates a list of transactions with the name of the individuals to whom
they have been assigned. Can be filtered by user or transaction type.
Master Purchase Report.
Provides information regarding purchase orders, item receipts, and
returns to vendors. Filter options include data by order type, location, vendor, item, customer,
category, class, department, or drop shipment.

Open Purchase Order Detail.
Compiles data on purchase orders with items that have yet to be
received. The report can be filtered by location, item name, or vendor.
Purchase Variances.
Shows the difference between estimated and actual purchasing costs, also
known as purchase price variance or PPV. The report can be filtered by location, item name, or
vendor.
Purchases by Category—Summary.
Recaps the units received according to category, along with
their total cost.
Purchases by Class—Summary.
Recaps the units received according to class, along with their total
cost.
Purchases by Customer—Summary.
Recaps the units received according to customer, along with
their total cost.
Purchases by Department—Summary.
Recaps the units received according to customer, along
with their total cost.
Purchases by Item—Summary.
Recaps the units received according to customer, along with their
total cost. Items can be filtered by category, name, or vendor.
Purchases by Location—Summary.
Recaps the units received according to location, along with
their total cost.
Purchases by Vendor—Summary.
Recaps the units received according to vendor, along with their
total cost.
Reorder Report.
Generates a list of items which have hit their reorder point. The report also
includes for each item the quantity available, the maximum stock level, and the quantity needed to
restock inventory to the maximum stock level. If “Display Report” is chosen under the Actions,
three additional options will appear that are available for selected items on the Reorder Report: the
ability to generate purchase orders, generate transfers from a specific location, or add the items to
the Reorder List.

Vendor Efficiency.
Provides information on the turnaround time used by a vendor from the time a
purchase order is placed until it is received. The report can be filtered by location, item, or vendor.
For each PO listed, the report includes whether the order was delivered on time.
Where to Buy.
Compiles data from the Vendor-Item Catalog so that you can see which of your
vendors sell an item, each vendor’s price, and the quantity you need to order. If “Display Report” is
selected from the Actions menu, the report also allows you to add items to the Reorder List.
Available on Plus and Pro plans only.
Expanded BOM Report.
Provides details on an assembly item, including each component, its
vendor, the quantity on hand, the quantity used in a build, the cost of each component, and the
line total.
Open Work Order Detail.
Shows status of open work orders. Includes how many units have been
ordered, as well as how many remain to be finished.
Production Report.
Provides information on build and process transactions, the outputs, and the
output quantity.
Where Used.
Shows how an item is used and the quantity used. Can be filtered by category, item
name, and vendor.
Work In Progress.
Lists builds and processes that are in progress. Report includes the transaction
reference, output, input, input quantity and input value.
Open Rental Detail.
Shows rental transactions with outstanding items. Can be filtered by location,
item name, and customer.
Rental Calendar.
Shows the due dates for rental items. Filters include location, item, serial
number, and customer.

Commission Report.
Displays commission data filtered by the sales representative, item name,
customer, and order type. The report includes specific transaction information, as well as the
commissioned earned.
Master Sales Report.
Provides information regarding estimates, invoices, sales orders, and sales
receipts. Filter options include data by order type, location, customer, item, vendor, category,
channel, class, customer type, department, sales representative, or keyword.
Open Sales Order Detail.
Shows sales order transactions with backordered items. Can be filtered by
location, item name, and customer.
Open Sales Receipt Detail.
Shows sales receipt transactions with backordered items. Can be
filtered by location, item name, and customer.
Price Book.
Provides pricing information about items, the price tier and customer to whom an item
is sold, along with the quantity and sales price.
Profit/Loss by Customer.
Displays revenue, COGS, profit, and profit percentage data by customer.
Can be filtered by customer or job name.
Profit/Loss by Item.
Displays revenue, COGS, profit, and profit percentage data by customer. Can
be filtered by customer or job name.
Profit/Loss by Job.
Displays income, cost, profit, and profit percentage data by job. Can be filtered
by location as well.
Ready to Invoice.
Compiles a list of sales orders that are ready for billing. Can be filtered by
location, item name, and customer.
Sales by Category—Summary.
Recaps by category the units shipped, revenue, COGS, and profit, as
well as the percentages in each of these categories.
Sales by Channel—Summary.
Recaps by channel the units shipped, revenue, COGS, and profit, as
well as the percentages in each of these categories.

Sales by Class—Summary.
Recaps by class the units shipped, revenue, COGS, and profit, as well as
the percentages in each of these categories.
Sales by Customer—Summary.
Recaps by customer the units shipped, revenue, COGS, and profit,
as well as the percentages in each of these categories.
Sales by Customer Type—Summary.
Recaps by customer type the units shipped, revenue, COGS,
and profit, as well as the percentages in each of these categories.
Sales by Department—Summary.
Recaps by department the units shipped, revenue, COGS, and
profit, as well as the percentages in each of these categories.
Sales by Item—Summary.
Recaps by item the units shipped, revenue, COGS, and profit, as well as
the percentages in each of these categories.
Sales by Location—Summary.
Recaps by location the units shipped, revenue, COGS, and profit, as
well as the percentages in each of these categories.
Sales by Vendor—Summary.
Recaps by preferred vendor (as defined in the item record) the units
shipped, revenue, COGS, and profit, as well as the percentages in each of these categories. NOTE:
Because sales of an item from other vendors will show a zero dollar amount, the report option
“Hide Rows With No Sales” is enabled by default.
Sell Through.
Shows the percentage of a product that is sold to customers after being received from
vendors for a certain date range.
